Zerowatt ZFFS140X/E Manuale utente
- Categoria
- Cucina
- Tipo
- Manuale utente

KULLANIM KILAVUZU
FIRINLAR
TR
22
NOTICE D'EMPLOI ET D'INSTALLATION
DES FOURS ENCASTRABLES
FR
34
USER INSTRUCTIONS
OVENS
MANUALE D’ISTRUZIONI
FORNO
EN
02
IT
12
• ZFFS140X
• ZFFS140X/E
CANDY HOOVER GROUP S.R.L. • Via Comolli 16 • 20861 Brugherio (MB) - Italy

Safety Indications
EN 02
• During cooking, moisture may condense inside the oven cavity or on the
glass of the door. This is a normal condition. To reduce this effect, wait 10-15
minutes after turning on the power before putting food inside the oven. In
any case, the condensation disappears when the oven reaches the cooking
temperature.
• Cook the vegetables in a container with a lid instead of an open tray.
• Avoid leaving food inside the oven after cooking for more than 15/20
minutes.
• WARNING: the appliance and accessible parts become hot during use. Be
careful not to touch any hot parts.
•WARNING: the accessible parts can become hot when the oven is in use.
Childrenmustbekeptatasafedistance.
•WARNING: ensure that the appliance is switched off before replacing the
bulb, to avoid the possibility of electric shocks.
•WARNING: before initiating the automatic cleaning cycle:
- Clean the oven door;
- Remove large or coarse food residues from the inside of the oven using a
damp sponge. Do not use detergents;
- Remove all accessories and the sliding rack kit (where present);
- Do not place tea towels
• In ovens with meat probe it is necessary, before making the cleaning cycle,
close the hole with the nut provided. Always close the hole with the nut
when the meat probe is not used.
•Children under 8 must be kept at a safe distance from the appliance if not
continuously supervised.
•Children must not play with the appliance. The appliance can be used by
those aged 8 or over and by those with limited physical, sensorial or mental
capacities, without experience or knowledge of the product, only if
supervised or provided with instruction as to the operation of the appliance,
in a safe way with awareness of the possible risks.
•Cleaning and maintenance should not be carried out by unsupervised
children.
•Do not use rough or abrasive materials or sharp metal scrapers to clean the
oven door glasses, as they can scratch the surface and cause the glass to
shatter.
•The oven must be switched off before removing the removable parts and,
after cleaning, reassemble them according the instructions.

EN 03
•Only use the meat probe recommended for this oven.
•Do not use a steam cleaner for cleaning operations.
• Connect a plug to the supply cable that is able to bear the voltage, current
and load indicated on the tag and having the earth contact. The socket must
be suitable for the load indicated on the tag and must be having the earth
contact connected and in operation. The earth conductor is yellow-green in
colour. This operation should be carried out by a suitably qualified
professional. In case of incompatibility between the socket and the appliance
plug, ask a qualified electrician to substitute the socket with another suitable
type. The plug and the socket must be conformed to the current norms of
the installation country. Connection to the power source can also be made
by placing an omnipolar breaker between the appliance and the power
source that can bear the maximum connected load and that is in line with
current legislation. The yellow-green earth cable should not be interrupted
by the breaker. The socket or omnipolar breaker used for the connection
should be easily accessible when the appliance is installed.
• The disconnection may be achieved by having the plug accessible or by
incorporating a switch in the fixed wiring in accordance with the wiring rules.
• If the power cable is damaged, it must be substituted with a cable or
special bundle available from the manufacturer or by contacting the
customer service department.
• The type of power cable must be H05V2V2-F.
• Failure to comply with the above can compromise the safety of the
appliance and invalidate the guarantee.
• Any excess of spilled material should be removed before cleaning.
• During the pyrolytic cleaning process, surfaces can heat up more than
usual, children must therefore be kept at a safe distance.
• The appliance must not be installed behind a decorative door in order to
avoid overheating.
• When you place the shelf inside, make sure that the stop is directed
upwards and in the back of the cavity.
The shelf must be inserted completely into the cavity
• WARNING: Do not line the oven walls with aluminum foil or single-use
protection available from stores. Aluminum foil or any other protection, in
direct contact with the hot enamel, risk melting and deteriorating the
enamel of the insides.
• WARNING: Never remove the oven door seal.
• No additional operation/setting is required in order to operate the
appliance at the rated frequencies

Oven Cleaning and Maintenance
General Instructions
5
1.1 Safety indications
1.2 Electrical safety
1.3 Recommendations
1.4 Installation
1.5 Waste management
1.6 Conformity declaration
2.1 Overview
2.2 Accessories
2.3 First use
Product Description
7
3.1 Display description
3.2 Cooking modes
Use of the Oven
8
4.1 General notes on cleaning
4.2 Self-cleaning oven with catalytic
4.3 Maintenance
• Removal of the oven window
• Removal and cleaning of the glass
door
• Changing the bulb
9
5.1 F.A.Q.
Troubleshooting
11
Summary
EN 04

1. General Instructions
We thank you for choosing one of our products. For the
best results with your oven, you should read this
manual carefully and retain it for future reference.
Before installing the oven, take note of the serial
number so that you can give it to customer service staff
if any repairs are required. Having removed the oven
from its packaging, check that it has not been damaged
during transportation. If you have doubts, do not use
the oven and refer to a qualified technician for advice.
Keep all of the packaging material (plastic bags,
polystyrene, nails) out of the reach of children. When
the oven is switched on for the first time, strong
smelling smoke can develop, which is caused by the glue on the insulation panels surrounding the oven
heating for the first time. This is absolutely normal and, if it occurs, you should wait for the smoke to
dissipate before putting food in the oven. The manufacturer accepts no responsibility in cases where
the instructions contained inthis document are not observed.
NOTE: the oven functions, properties and accessories cited in this manual will vary, depending on the
model you havepurchased.
1.1 Safety Indications
Only use the oven for its intended purpose, that is only for the cooking of foods; any other use, for
example as a heat source, is considered improper and therefore dangerous. The manufacturer cannot
be held responsiblefor any damage resulting from improper, incorrector unreasonable usage.
The use of any electrical appliance implies the observance of some fundamental rules:
- do not pull on the power cable to disconnectthe plug fromthe socket;
- do not touch the appliance with wet or damp hands or feet;
- in general the use of adaptors, multiple socketsand extensioncables is not recommended;
- in caseof malfunction and/orpoor operation,switch off the appliance and do not tamper with it.
1.2 Electrical Safety
ENSURE THAT AN ELECTRICIAN OR QUALIFIED TECHNICIAN MAKES THE ELECTRICAL CONNECTIONS.
The power supply to which the oven is connected must conform with the laws in force in the country of
installation. The manufacturer accepts no responsibilityfor any damage caused by the failureto observe
these instructions. The oven must be connected to an electrical supply with an earthed wall outlet or a
disconnector with multiple poles, depending on the laws in force in the country of installation. The
electrical supply should be protected with suitable fuses and the cables used must have a transverse
section that can ensure correct supply to the oven.
CONNECTION
The oven is supplied with a power cable that should only be connected to an electrical supply with 220-
240 Vac 50 Hz power between the phases or between the phase and neutral. Before the oven is
connectedtothe electrical supply,it is important tocheck:
- power voltageindicated on the gauge;
- the settingof the disconnector.
The grounding wire connected to the oven's earth terminal must be connected to the earth terminal of
the power supply.
WARNING
Before connecting the oven to the power supply, ask a qualified electrician to check the continuityof the
power supply's earth terminal. The manufacturer accepts no responsibility for any accidents or other
problems caused by failure to connect the oven to the earth terminal or by an earth connection that has
defective continuity.
EN 05

1.3 Recommendations
Aftereach use of the oven,a minimum of cleaning will help keepthe oven perfectlyclean.
Do not line the oven walls with aluminium foilor single-use protectionavailablefromstores. Aluminium
foil or any other protection, in direct contact with the hot enamel, risks melting and deteriorating the
enamel of the insides. In order to prevent excessive dirtying of your oven and the resulting strong
smokey smells, we recommend not using the oven at very high temperature. It is better to extend the
cooking time and lower the temperature a little. In addition to the accessories supplied with the oven,
weadvise you only use dishes and baking moulds resistant to very high temperatures.
1.4 Installation
The manufacturers have no obligation to carry this out. If the assistance of the manufacturer is required
to rectify faults arising from incorrect installation, this assistance is not covered by the guarantee. The
installation instructions for professionally qualified personnel must be followed. Incorrect installation
may cause harm or injury to people, animals or belongings. The manufacturer cannot be held
responsibleforsuch harm or injury.
The oven can be located high in a column or under a worktop. Before fixing, you must ensure good
ventilation in the oven space to allow proper circulation of the fresh air required for cooling and
protecting the internalparts. Makethe openings specified on last page according tothe type of fitting.
NOTE: as the oven could require maintenance work, it is advisable to keep another wall socket available
so that the oven can be connected to this if it is removed from the space in which it is installed. The
power cable must only be substituted by technical service staff or by technicians with equivalent
qualifications.
1.5 Waste management and environmental protection
This appliance is labelled in accordance with European Directive 2012/19/EU regarding
electric and electronic appliances (WEEE). The WEEE contain both polluting substances
(that can have a negative effect on the environment) and base elements (that can be
reused). It is importantthat the WEEE undergospecific treatments to correctly remove and
dispose of the pollutants and recover all the materials. Individuals can play an important
role in ensuring that the WEEE do not become an environmental problem; it is essential to
follow a fewbasic rules:
- the WEEE should not be treatedas domestic waste;
- the WEEE should be taken to dedicated collection areas managed by the town council or a registered
company.
In many countries, domestic collections may be available for large WEEEs. When you buy a new
appliance, the old one can be returned to the vendor who must accept it free of charge as a one-off, as
long as the appliance is of an equivalenttype and has the same functions as the purchasedappliance.
SAVINGAND RESPECTING THE ENVIRONMENT
Where possible, avoid pre-heating the oven and always try to fill it. Open the oven door as infrequently
as possible, because heat from the cavity disperses every time it is opened. For a significant energy
saving, switch off the oven between 5 and 10 minutes before the planned end of the cooking time, and
use the residualheatthat the oven continues to generate.Keep the seals clean and in order, to avoidany
heat dispersal outside of the cavity. If you have an electric contract with an hourly tariff, the "delayed
cooking" programme makes energy saving more simple, moving the cooking process to start at the
reducedtariff time slot.
1.6 Declaration of compliance
The parts of this appliance that maycomeintocontact with foodstuffs comply with the provisions of EEC
Directive89/109.
By placing the mark on this product, we areconfirming compliance to all relevant Europeansafety,
health and environmental requirementswhich are applicable in legislationforthis product.
EN 06

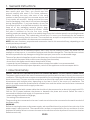
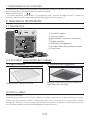
2. Product Description
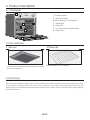
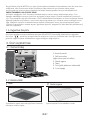
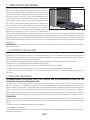
2.1 Overview
1. Control panel
2. Shelf positions
(lateral wire grid if included)
3. Metal grill
4. Drip pan
5. Fan (behind the steel plate)
6. Oven door
2.2 Accessories
Drip pan
1
Collects the residuesthat drip during the cooking
of foodson the grills.
Metal grill
2
Holds baking trays and plates.
2.3 First Use
PRELIMINARYCLEANING
Clean the oven before using for the first time. Wipe over external surfaces with a damp soft cloth. Wash
all accessories and wipe inside the oven with a solution of hot water and washing up liquid. Set the
empty oven to the maximum temperature and leave on for about 1 hour, this will remove any lingering
smells of newness.
EN 07
1
2
3
5
4
6

3. Use of the Oven
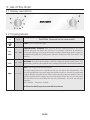
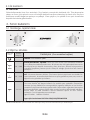
3.1 Display description
T °C
range
L1 ÷ L5
Function
Dial
Function (Depends on the oven model)
LAMP: Turns on the oven light.
GRILL: use the grill with the door closed.
The top heating element is used alone and you can adjust the temperature. Five
minutes preheating is required to get the elements red-hot. Success is guaranteed
forgrills, kebabsand gratindishes. White meats should be put at a distance fromthe
grill; the cooking time is longer, but the meat will be tastier. You can put red meats
and fish fillets on the shelf with the drip tray underneath. The oven has two grill
positions:
Grill: 2140 W Barbecue: 3340 W
Grill function MUST be performed at 200°C maximum
*Tested in accordance with the CENELEC EN 60350-1 used for definition of energy class.
3.2 Cooking Modes
50 ÷ 280
CONVENTIONAL COOKING: Both top and bottom heating elements are used.
Preheat the oven for about ten minutes. This method is ideal for all traditional
roasting and baking. For seizing red meats, roast beef, leg of lamb, game, bread, foil
wrapped food (papillotes), flaky pastry. Place the food and its dish on a shelf in mid
position.
BOTTOM: Using the lower element. Ideal for cooking all pastry based dishes. Use
this forflans, quiches, tarts,pate and any cooking that needs more heat frombelow.
50 ÷ 230
*
EN 08

4. Oven cleaning and maintenance
4.1 General notes on cleaning
The lifecycleof the appliance can be extended through regularcleaning. Waitforthe oven to cool before
carrying out manual cleaning operations. Never use abrasive detergents, steel wool or sharp objects for
cleaning, so as to not irreparably damage the enamelled parts. Use only water, soap or bleach-based
detergents (ammonia).
GLASS PARTS
It is advisable to clean the glass window with absorbent kitchen towel after every use of the oven. To
remove more obstinate stains, you can use a detergent-soaked sponge, well wrung out, and then rinse
with water.
OVENWINDOWSEAL
If dirty,the seal can be cleaned with a slightly damp sponge.
ACCESSORIES
Clean accessories with a wet, soapy sponge before rinsing and drying them: avoid using abrasive
detergents.
DRIP PAN
After using the grill, remove the pan fromthe oven. Pourthe hot fat into a container and wash the pan in
hot water,using a sponge and washing-up liquid.
If greasy residues remain, immerse the pan in water and detergent. Alternatively, you can wash the pan
in the dishwasheror use a commercialoven detergent.Never put a dirty pan back intothe oven.
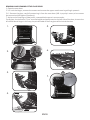
REMOVALOF THE OVEN WINDOW
1. Open the frontwindow.
2. Open the clamps of the hinge housing on the right and left side of the front window by pushing them
downwards.
3. Replace the window by carrying out the procedurein reverse.
4.3 Maintenance
EN 09
4.2 Self-cleaning oven with catalytic
Special self-cleaning panels covered in a micro-porous coating are available as optional extras for all
models. If theyare fitted,the oven no longer needs to be cleaned by hand.
The fat that is splattered onto the sides of the oven during roasting is eliminated by the microporous
coatingwhich breaksthe fatdownby catalysis and transforms it into gas.
Excessive splattering may nevertheless block the pores and therefore hinder self-cleaning. The self-
cleaning capacity may be restored by switching on the empty oven to maximum for about 10-20
minutes.
Do not use abrasive products, metal cleaning wads, sharp objects, rough cloths, or chemical products
and detergents that maypermanently damagethe catalyticlining.
It is a good idea to use deep roasting trays to roast fatty foods such as joints of meat etc. and to put a tray
underneath the grill to catch surplus fat.If the walls of the oven are so thickly coated in grease that the
catalytic lining is no longer effective remove surplus grease with a soft cloth or sponge soaked in hot
water.
The lining mustbe porousforself-cleaning to be effective.
N.B.: All catalytic linings currently on the market have a working life of about 300 hours. They should
thereforebe replaced after about 300 hours.

LOW-E
1
2
3
1.
2.
3.
4.
5.
6.
7.
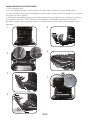
REMOVALAND CLEANING OF THE GLASS DOOR
1. Open the oven door.
2.3.4. Lock the hinges, removethe screws and remove the upper metalcoverby pulling it upwards.
5.6. Remove the glass, carefully extracting it from the oven door (NB: in pyrolytic ovens, also remove
the second and thirdglass (if present)).
7. At the end of cleaning or substitution, reassemblethe parts in reverse order.
On all glass, the indication "Pyro" must be legible and positioned on the left side of the door, close to the
left-handlateral hinge. In this way, the printed label of the firstglass will be inside the door.
EN 10

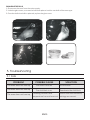
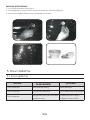
CHANGING THE BULB
1. Disconnect the ovenfromthe mains supply.
2. Undo the glass cover, unscrew the bulb and replaceit with a new bulb of the same type.
3. Once the defective bulb is replaced, replace the glass cover.
5. Troubleshooting
5.1 FAQ
PROBLEM POSSIBLE CAUSE SOLUTION
The oven does not heat up
The clock is not set Set the clock
The child lock is on
A cooking function and
temperature has not been set
Deactivate the child lock
Ensure that the necessary
settings are correct
The oven does not heat up
The oven does not heat up
EN 11

Indicazioni di Sicurezza
IT 12
• Durante la cottura l'umidità può condensarsi all'interno della cavità o sul
vetro della porta. È normale. Per ridurre questo effetto, attendere 10-15
minuti dopo l'accensione prima di mettere il cibo all'interno del forno. In
ogni caso, la condensa scompare quando il forno raggiunge la temperatura
di cottura.
• Cuocere le verdure in un contenitore con un coperchio invece di un
vassoioaperto.
• Evitare di lasciare il cibo all'interno del forno dopo la cottura per un
periodo superiore a 15/20 minuti.
• ATTENZIONE: l'apparecchio e le parti accessibili diventano calde durante
l'uso. Prestareattenzione a nontoccare le parti calde.
• ATTENZIONE: le parti accessibili possono diventare molto calde quando
si utilizza ilforno.I bambini devono essere tenutia distanzadi sicurezza.
• L'apparecchio può essere usato da bambini dagli 8 anni in su e persone
con ridotte capacità fisiche, sensoriali o mentali o senza esperienza e
conoscenza del prodotto se supervisionate o dando loro istruzioni
riguardo al funzionamento dell'apparecchio in maniera sicura e coscente
del rischiopossibile.
• Ibambini non dovrebbero giocare conl'apparecchio.
• La pulizia e la manutenzione non dovrebbero essere fatte da bambini
senza supervisione
• Durante l’uso l’apparecchio diventa molto caldo. Si dovrebbe fare
attenzione anon toccare gli elementi riscaldanti all’interno delforno.
• ATTENZIONE: Le parti accessibili possono diventare molto calde durante
l’uso. I bambinidovrebbero essere tenutia distanza.
• Non usare per la pulizia materiali ruvidi abrasivi o raschietti metallici
affilati per pulire le porte di vetro del forno dato che possono graffiare la
superficie ecausarela frantumazione delvetro.
• Spegnere il forno prima di rimuovere lo schermo di protezione e, dopo la
pulizia, rimontarlo secondo le istruzioni.
• Usare solo la sonda termica raccomandata per questo forno.
• Nonutilizzare un pulitore a vapore.
• Collegare al cavo di alimentazione una spina dimensionata per la
tensione, la corrente e la potenza indicate nella targhetta e dotata del
contatto diterra. La presa deve esseredimensionataper la potenza

IT 13
indicata sulla targhetta e deve avere il contatto di terra collegato e
funzionante. Il conduttore di terra è giallo-verde. Questa operazione deve
essere eseguita solo da un tecnico adeguatamente addestrato. In caso di
incompatibilità tra presa e spina dell'elettrodomestico, richiedere ad un
tecnico specializzato di sostituire la presa con un'altra di tipo compatibile. La
spina e la presa devono essere conformi alle normative attuali del paese di
installazione. Il collegamento alla rete di alimentazione può essere effettuato
anche collocando un interruttore automatico onnipolare tra
l'elettrodomestico e la rete di alimentazione, in grado di supportare il carico
massimo collegato, in linea con la legislazione corrente. Il cavo di terra giallo-
verde non deve essere interrotto dall'interruttore automatico. La presa o
l'interruttore automatico onnipolare utilizzati per il collegamento devono
essere facilmente accessibili al momento del montaggio
dell'elettrodomestico.
• La disconnessione può essere eseguita con la spina accessibile o
aggiungendo un interruttore sul cablaggio fisso, nel rispetto delle normative
relative ai cablaggi.
• Se il cavo di alimentazione si danneggia, deve essere sostituito con un cavo o
uno speciale fascio di cavi disponibile presso il produttore o contattando il
reparto assistenza al cliente.
• Il cavo di alimentazione deve essere di tipo H05V2V2-F.
• Il mancato rispetto di quanto indicato sopra può compromettere la
sicurezza dell'elettrodomestico e rendere nulla la garanzia.
• Qualsiasi materiale fuoriuscito in eccesso deve essere tolto prima della
pulizia.
• Durante il processo di pulizia pirolitico, le superfici possono surriscaldarsi più
del normale: mantenere sempre i bambini a distanza di sicurezza;
•L’elettrodomestico non deve essere installato dietro a una porta a scopo
ornamentale per evitarne il surriscaldamento.
• Quando si posiziona uno scaffale all’interno, accertarsi che il blocco sia
rivolto verso l’alto e nella parte posteriore della guida.
Lo scaffale deve essere inserito completamente nella guida
• AVVERTENZA: Non coprire le pareti del forno con fogli di alluminio o
protezioni monouso disponibili in commercio. I fogli di alluminio o le altre
protezioni, se a diretto contatto con lo smalto caldo, rischiano di fondersi e di
danneggiare lo smalto interno stesso.
• AVVERTENZA: Non togliere mai la guarnizione della porta del forno.
• Il funzionamento dell'elettrodomestico alle frequenze nominali non
richiede alcuna operazione o impostazione.

Avvertenze Generali
15
1.1 Suggerimenti sulla sicurezza
1.2 Sicurezza elettrica
1.3 Raccomandazioni
1.4 Installazione
1.5 Gestione dei rifiuti
1.6 Dichiarazione di conformità
2.1 Panoramica
2.2 Accessori
2.3 Primo utilizzo
Descrizione del Prodotto
17
3.1 Descrizione del display
3.2 Modalità di cottura
Utilizzo del Forno
18
4.1.Note generiche di pulizia
4.2 Forno autopulente catalitico
4.3 Manutenzione
• Rimozione dello sportello del forno
• Rimozione e pulizia della porta in
vetro
• Sostituzione della lampadina
Pulizia e Manutenzione del Forno
19
5.1 F.A.Q.
Risoluzione dei problemi
21
Riassunto
IT 14

1. liIndicazioni generali
Vi ringraziamo per aver scelto uno dei nostri prodotti.
Per utilizzare il forno in modo ottimale è consigliabile
leggere con attenzione questo manuale e conservarlo
con cura per ogni ulteriore consultazione. Prima di
installare il forno, prendere nota del numero di serie in
modo da poterlo comunicareal personale del serviziodi
assistenza in caso di richiesta di intervento. Dopo aver
rimosso il forno dall’imballaggio, verificare che non
abbia subito danni durante il trasporto. In caso di
dubbi, non utilizzare il forno e richiedere l’assistenza di
un tecnico qualificato. Tenere tutto il materiale da
imballaggio (sacchetti di plastica, polistirolo, chiodi)
fuori dalla portata dei bambini. Alla prima accensione del forno può svilupparsi fumo di odore acre,
causato dal primo riscaldamento del collante dei pannelli d’isolamento avvolgenti il forno: si tratta di un
fenomeno assolutamente normale e, in caso si verificasse, occorre attendere la cessazione del fumo
prima di introdurre le vivande. Il produttore declina ogni responsabilità in caso di mancata osservanza
delle istruzioni contenute in questo documento.
NOTA: le funzioni, le proprietà e gli accessori dei forni citati in questo manuale possono variare a
secondadei modelli.
1.1 SicurezzaAvvertenze di
Utilizzare il forno solo per lo scopo per cui è stato progettato, ossia solo per la cottura di alimenti;
qualsiasi altro utilizzo, ad esempio come fonte di riscaldamento, è considerato improprio e quindi
pericoloso. Il costruttore non può essere considerato responsabile per eventuali danni derivanti da usi
impropri,erronei ed irragionevoli.
L’uso di un qualsiasi apparecchio elettrico comportal’osservanza di alcune regole fondamentali:
- non tirare il cavo di alimentazioneper staccare la spina della presadi corrente;
- non toccare l’apparecchiocon mani o piedi bagnati o umidi;
- in generale è sconsigliabile l’usodi adattatori, prese multiple e prolunghe;
- in casodi guasto e/o cattivo funzionamento dell’apparecchio, spegnerlo e non manometterlo.
1.2 Sicurezza Elettrica
ACCERTARSI CHE I COLLEGAMENTI ELETTRICI SIANO EFFETTUATI DA UN ELETTRICISTA O DA UN
TECNICOQUALIFICATO.
La rete di alimentazione alla quale si collega il forno deve rispettare le leggi in vigore nello stato in cui
viene installato. Il produttore non si assume responsabilità per danni causati dal mancato rispetto di
queste istruzioni. Il forno deve essere collegato ad una rete di alimentazione elettrica, con un'uscita a
parete con messa a terra oppure un interruttore automatico multipolare, a seconda delle leggi in vigore
nello stato in cui viene installato. L'alimentazione elettrica deve essere protetta tramite appositi fusibili;
i cavi utilizzati devono avere una sezione trasversale in grado di garantire un'alimentazione corretta al
forno.
COLLEGAMENTO
Il forno è alimentato da un cavo che deve essere collegato unicamente ad una rete di alimentazione
elettrica da 220-240 Vac, 50 Hz tra le fasi o tra fase e neutro. Prima di collegare il forno alla rete di
alimentazioneelettrica, è importantecontrollare quantosegue:
- tensionedi alimentazione riportata sull'indicatore;
- impostazione dell'interruttore automatico. Il cavo di messa a terra collegato al morsetto di terra del
fornodeve essere a sua volta collegato al morsetto di terra della retedi alimentazione.
ATTENZIONE
Prima di collegare il forno alla rete di alimentazione, chiedere ad un tecnico qualificato di controllare la
continuità del morsetto di terra della rete di alimentazione. Il produttore non si assume responsabilità
per incidenti o altri problemi causati dal mancato collegamento del forno al morsetto di terra o da un
IT 15

Dopo ogni utilizzo del forno, si consiglia di effettuare una rapida pulizia per mantenerlo sempre in
condizioni ottimali. Non rivestire le pareti del forno con pellicola di alluminio o protezione monouso
disponibili nei supermercati. La pellicola di alluminio o le eventuali altre protezioni, trovandosi a diretto
contatto con lo smalto caldo, rischiano di fondersi e di danneggiare lo smalto che si trova all'interno del
forno. Per evitare di sporcare eccessivamente il forno e causare odore di fumo acre, si consiglia di non
utilizzare il forno a temperature molto elevate. È meglio prolungare il tempo di cottura e abbassare
leggermente la temperatura. Oltre agli accessori forniti con il forno, si consiglia di utilizzare solo piatti e
stampidi cottura resistenti alle temperature elevate.
collegamento di terra con continuitàdifettosa.
NOTA: considerando che il forno potrebbe richiedere attività di manutenzione, si consiglia di tenere a
disposizione un'altra presa a parete in modo da potere collegare a questa il forno se viene tolto dallo
spazio nel quale è montato. Il cavo di alimentazione deve essere sostituito unicamente da personale di
assistenza tecnico o da tecnici con qualifiche equivalenti.
1.3 Consigli
1.4 Installazione
Il produttore non è obbligato ad effettuarla. Se è necessaria l'assistenza del produttore per correggere
errori dovuti ad un'installazione non corretta, questo intervento in assistenza non è coperto da
garanzia. Le istruzioni di installazione destinate al personale professionalmente qualificato devono
essere rispettate. Un'installazione non corretta può causare lesioni o danni alle persone, agli animali o
alle cose. Il produttorenon si assume la responsabilità per tali lesioni o danni.
Il forno può essere posizionato in alto all'interno di una colonna o sotto un piano di lavoro. Prima del
fissaggio, è necessario garantire una corretta ventilazione nella zona del forno per permettere la
corretta circolazione dell'aria fresca necessaria per raffreddare e proteggere i componenti interni.
Praticarele aperture specificateall'ultima pagina a seconda del tipo di inserimento.
1.5 Gestione dei rifiuti e rispetto dell’ambiente
Questo elettrodomestico dispone di contrassegno ai sensi della direttiva europea
2012/19/CE in materia di apparecchi elettrici ed elettronici (RAEE). I RAEE contengono sia
sostanze inquinanti (che possono avere un effetto negativo sull'ambiente) sia elementi
base (che possono essere riutilizzati). È importante che i RAEE siano sottoposti a
trattamenti specifici in modo da togliere e smaltire in modo corretto gli inquinanti e
recuperare tutti i materiali. Spetta ai singoli individui garantire che i RAEE non diventi un
problemaa livello ambientale.Esistonoalcune regole specifiche da rispettare:
- i RAEE non devono essere trattati come rifiuti domestici;
- i RAEE devono essere portati nelle aree di smaltimento specifiche, gestite dai comuni o da società
autorizzate.
In molti stati, nel caso di RAEE di grandi dimensioni sono disponibili servizi di prelievo a domicilio.
Durante l'acquisto di un nuovo elettrodomestico, quello vecchio può essere restituito al venditore che
lo deve accettare gratuitamente in un'unica soluzione, a condizione che l'elettrodomestico sia di tipo
simile ed abbia le stesse funzioni di quello acquistato.
SALVATAGGIOE RISPETTO DELL'AMBIENTE
Cercare per quanto possibile di evitare il preriscaldamento e cercare di riempire sempre il forno. Aprire
la porta del forno il meno possibile, in quanto il calore del vano di cottura si disperde ogni volta che la
porta viene aperta. Per un buon risparmio di energia, spegnere il forno 5 e 10 minuti prima del tempo
previsto di cottura; utilizzare il calore residuo che il forno continua a generare. Mantenere pulite e in
buone condizioni le guarnizioni, per evitare di disperdere il calore all'esterno del vano di cottura. Se si
dispone di un contratto di fornitura di elettricità con tariffa oraria, il programma "cottura ritardata"
semplificail risparmio energetico,facendoiniziare il processodi cottura nel periodo a tariffa ridotta.
IT 16

1.6 Dichiarazione di conformità
I componenti di questo elettrodomestico che possono entrare in contatto con sostanze alimentari
devonorispettare le disposizioni della direttivaCEE 89/109.
Apponendo il marchio
su questo prodotto, confermiamo la conformità a tutti i requisiti di legge europei in materia di
sicurezza, salute e tutela ambientaleapplicabili per legge a questoprodotto.
2. Descrizione del Prodotto
2.1 Panoramica
1. Pannello comandi
2. Posizioni ripiani
(griglia laterale a rete se in dotazione)
3. Griglia metallica
4. Vaschetta raccogligocce
5. Ventola (dietro alla piastra in acciaio)
Porta forno6.
2.2 Accessori )(a seconda del modello
Griglia metallica
1
Supporta vassoi e piastre di cottura.
Vaschetta raccogligocce
2
Raccoglie i residui che gocciolano durante la
cottura del cibo sulle griglie.
IT 17
1
2
3
5
4
6
2.3 Primo utilizzo
PULIZIA PRELIMINARE
Prima del primo utilizzo, pulire il forno. Ripulire le superfici esterne con un panno morbido e umido.
Lavare tutti gli accessori e ripulire l'interno del forno con una soluzione di acqua calda e liquido
detergente. Impostare il forno (vuoto) alla temperatura massima e lasciarlo in questa posizione per
circa1 ora,per toglierequalsiasi odore pungentedi prodotto nuovo.

3. Utilizzo del Forno
3.1 Descrizione del display
3.2 Modalità di cottura
L1 ÷ L5
50 ÷ 280
ELEMENTO RISCALDANTE INFERIORE: Ideale per la cottura di tutti i piatti a base di
pasta. Utilizzare questa funzione per crostate, torte salate, torte, paté e qualsiasi
cottura che ha bisogno di più caloree radiazionidal basso.
50 ÷ 230
Manopola
commuta-
tore
Funzione (a seconda del modello)
LAMPADA: accende la luce interna.
GRILL: Grigliatura tradizionale a porta chiusa: con questa funzione viene inserita la
resistenza del grill. Ottima nella cottura di carni di medio e piccolo spessore
(salsicce, costine,bacon).
La funzione Grill deve essre eseguita massimo a 200°C
CONVEZIONE NATURALE: sono in funzione le resistenze superiore e inferiore. È la
cottura tradizionale, ottima per arrostire cosciotti, selvaggina, ideale per biscotti,
mele al fornoe per renderei cibi molto croccanti.
Intervallo
di T°
*
* Programma di prova secondo CENELEC EN 60350-1 utilizzato per la definizione della classe energetica.
IT 18

4. Pulizia e manutenzione del forno
4.1 Note generiche di pulizia
La vita di servizio dell’apparecchio si allunga se questo viene pulito ad intervalli regolari. Attendere che il
forno si raffreddi prima di effettuare le operazioni di pulizia manuali. Non utilizzare mai detergenti
abrasivi, pagliette di ferro o oggetti appuntiti per lapulizia, per non danneggiare in modo irreparabile le
parti smaltate.Utilizzaresolo acqua, sapone o detergenti a base di candeggina (ammoniaca).
PARTI IN VETRO
E’ consigliabile pulire lo sportello in vetro con carta assorbente da cucina dopo ogni utilizzo del forno.
Per rimuovere le macchie più ostinate, è possibile anche utilizzare una spugna imbevuta di detergente
ben strizzata e sciacquarecon acqua.
GUARNIZIONEDELLO SPORTELLO DEL FORNO
Se sporca,la guarnizione può essere pulita con una spugna leggermenteinumidita.
ACCESSORI
Pulire gli accessori con una spugna imbevuta con acqua e sapone, sciacquarli e asciugarli : evitare di
usaredetergenti abrasivi.
VASCHETTADI GOCCIOLAMENTO
Dopo l’uso del grill, rimuovere la vaschetta dal forno. Versare il grasso caldo in un contenitore e lavare la
vaschetta in acqua calda, utilizzandouna spugna e del detergente per piatti.
Se rimangono dei residui di grasso, immergere la vaschetta in acqua e detergente. In alternativa, è
possibile anche lavare la vaschetta nella lavastoviglie oppure utilizzare un detergente per forni di tipo
commerciale.Non reinseriremai una vaschetta sporca nel forno.
4.3 Manutenzione
RIMOZIONEDELLOSPORTELLO DEL FORNO
1. Aprire lo sportelloanteriore.
2. Aprire i morsetti dell’alloggiamento della cerniera sul lato destro e sinistro dello sportello anteriore,
premendoliverso il basso.
3. Installare nuovamente lo sportelloeseguendo la procedura all’inverso.
IT 19
4.2 Forno autopulente catalitico
Speciali pannelli autopulenti ricoperti da uno smalto a struttura microporosa, offerti come accessori
opzionaliper tutti i modelli, eliminano la pulizia manuale del forno.
I grassi proiettati sulle pareti durante la cottura, vengono decomposti dallo smalto, mediante un
processocataliticodi ossidazione e trasformatiin prodottigassosi.
Schizzi eccessivi di grasso possono ostruire i pori e quindi impedire l’autopulizia. Tale caratteristica può
essere ripristinata mediante un riscaldamento per circa 10-20 minuti del forno vuoto impostando la
manopola fornoin corrispondenzadella massima temperatura.
Non usare prodotti abrasivi, pagliette metalliche, oggetti appuntiti, panni ruvidi, prodotti chimici o
detersivi che possono danneggiare irrimediabilmente lo smalto.
Si consiglia inoltre di utilizzare pentole a bordi alti nel caso di cotture di vivande particolarmente grasse
(arrosti, ecc.) e di usare la leccarda quando si esegue la cottura al grill.
Qualora, per particolari condizioni di sporco, non fosse sufficiente l’azione precedente, si consiglia di
intervenire asportando i grassiconun panno morbido od una spugna inumiditi conacqua calda.
La porositàdello smalto è fondamentaleper garantirel’azione autopulente.
N.B.: Tutti i pannelli autopulenti in commercio hanno un’efficacia di rendimento di circa 300 ore di
funzionamentoforno. Dopo tale limite i pannelli dovrebberoesseresostituiti.

1
2
3
1.
2.
3.
4.
5.
6.
7.
RIMOZIONEE PULIZIA DELLA PORTA IN VETRO
1. Aprile la porta del forno.
2.3.4. Bloccare le cerniere, rimuovere le viti e rimuovere la copertura metallica superiore tirandola
verso l’alto.
5.6. Rimuovere il vetro, estraendolo con molta cura, dalla controporta del forno (NB: nei forni pirolitici,
rimuovere anche il secondo e terzovetro (se presente)).
7. Al terminedella pulizia o sostituzione riassemblarele parti nell’ordine opposto alla rimozione.
Su tutti i vetri, l’indicazione ”Low-E” deve essere correttamente leggibile e posizionata sul lato sinistro
della porta, vicino alla cerniera laterale sinistra. In questo modo, l’etichetta stampata del primo vetro
rimarràinterna alla porta.
LOW-E
IT 20
La pagina sta caricando ...
La pagina sta caricando ...
La pagina sta caricando ...
La pagina sta caricando ...
La pagina sta caricando ...
La pagina sta caricando ...
La pagina sta caricando ...
La pagina sta caricando ...
La pagina sta caricando ...
La pagina sta caricando ...
La pagina sta caricando ...
La pagina sta caricando ...
La pagina sta caricando ...
La pagina sta caricando ...
La pagina sta caricando ...
La pagina sta caricando ...
La pagina sta caricando ...
La pagina sta caricando ...
La pagina sta caricando ...
La pagina sta caricando ...
La pagina sta caricando ...
La pagina sta caricando ...
La pagina sta caricando ...
La pagina sta caricando ...
La pagina sta caricando ...
-
 1
1
-
 2
2
-
 3
3
-
 4
4
-
 5
5
-
 6
6
-
 7
7
-
 8
8
-
 9
9
-
 10
10
-
 11
11
-
 12
12
-
 13
13
-
 14
14
-
 15
15
-
 16
16
-
 17
17
-
 18
18
-
 19
19
-
 20
20
-
 21
21
-
 22
22
-
 23
23
-
 24
24
-
 25
25
-
 26
26
-
 27
27
-
 28
28
-
 29
29
-
 30
30
-
 31
31
-
 32
32
-
 33
33
-
 34
34
-
 35
35
-
 36
36
-
 37
37
-
 38
38
-
 39
39
-
 40
40
-
 41
41
-
 42
42
-
 43
43
-
 44
44
-
 45
45


Zerowatt ZFFS140X/E Manuale utente
- Categoria
- Cucina
- Tipo
- Manuale utente
in altre lingue
- English: Zerowatt ZFFS140X/E User manual
- français: Zerowatt ZFFS140X/E Manuel utilisateur
- Türkçe: Zerowatt ZFFS140X/E Kullanım kılavuzu
Documenti correlati
Altri documenti
-
Candy FC9D415NX Double Electric Oven Manuale utente
-
Candy FCS 201 N/E Manuale utente
-
Candy FCS 201 W SINGLE OVEN Manuale utente
-
-
Haier HWO60SM4TS5BH Manuale utente
-
-
Samsung BT62CDBSTL/XET Manuale utente
-
-
-