CS1842 / CS1844 2/4-Port USB 3.0 4K HDMI Dual Display KVMP
TM
Switch
www.aten.com
Commutateur KVMP
TM
deux affi chages HDMI 4K USB 3.0 à 2/4 ports CS1842 / CS1844
www.aten.com
CS1842 / CS1844 2/4-Port USB 3.0 4K HDMI Dual-Anzeige KVMP
TM
Switch
www.aten.com
CS1842 / CS1844 Conmutador KVMP
TM
USB 3.0 4K HDMI de dos pantallas con 2/4 puertos
www.aten.com
CS1842 / CS1844 - 2/4-портовый, USB 3.0 4K HDMI KVMP
TM
-переключатель с поддержкой Dual Display
www.aten.com
Switch KVMP
TM
a visualizzazione doppia 4K HDMI USB 3.0 a 2/4 porte CS1842 / CS1844
www.aten.com
A
Hardware Review
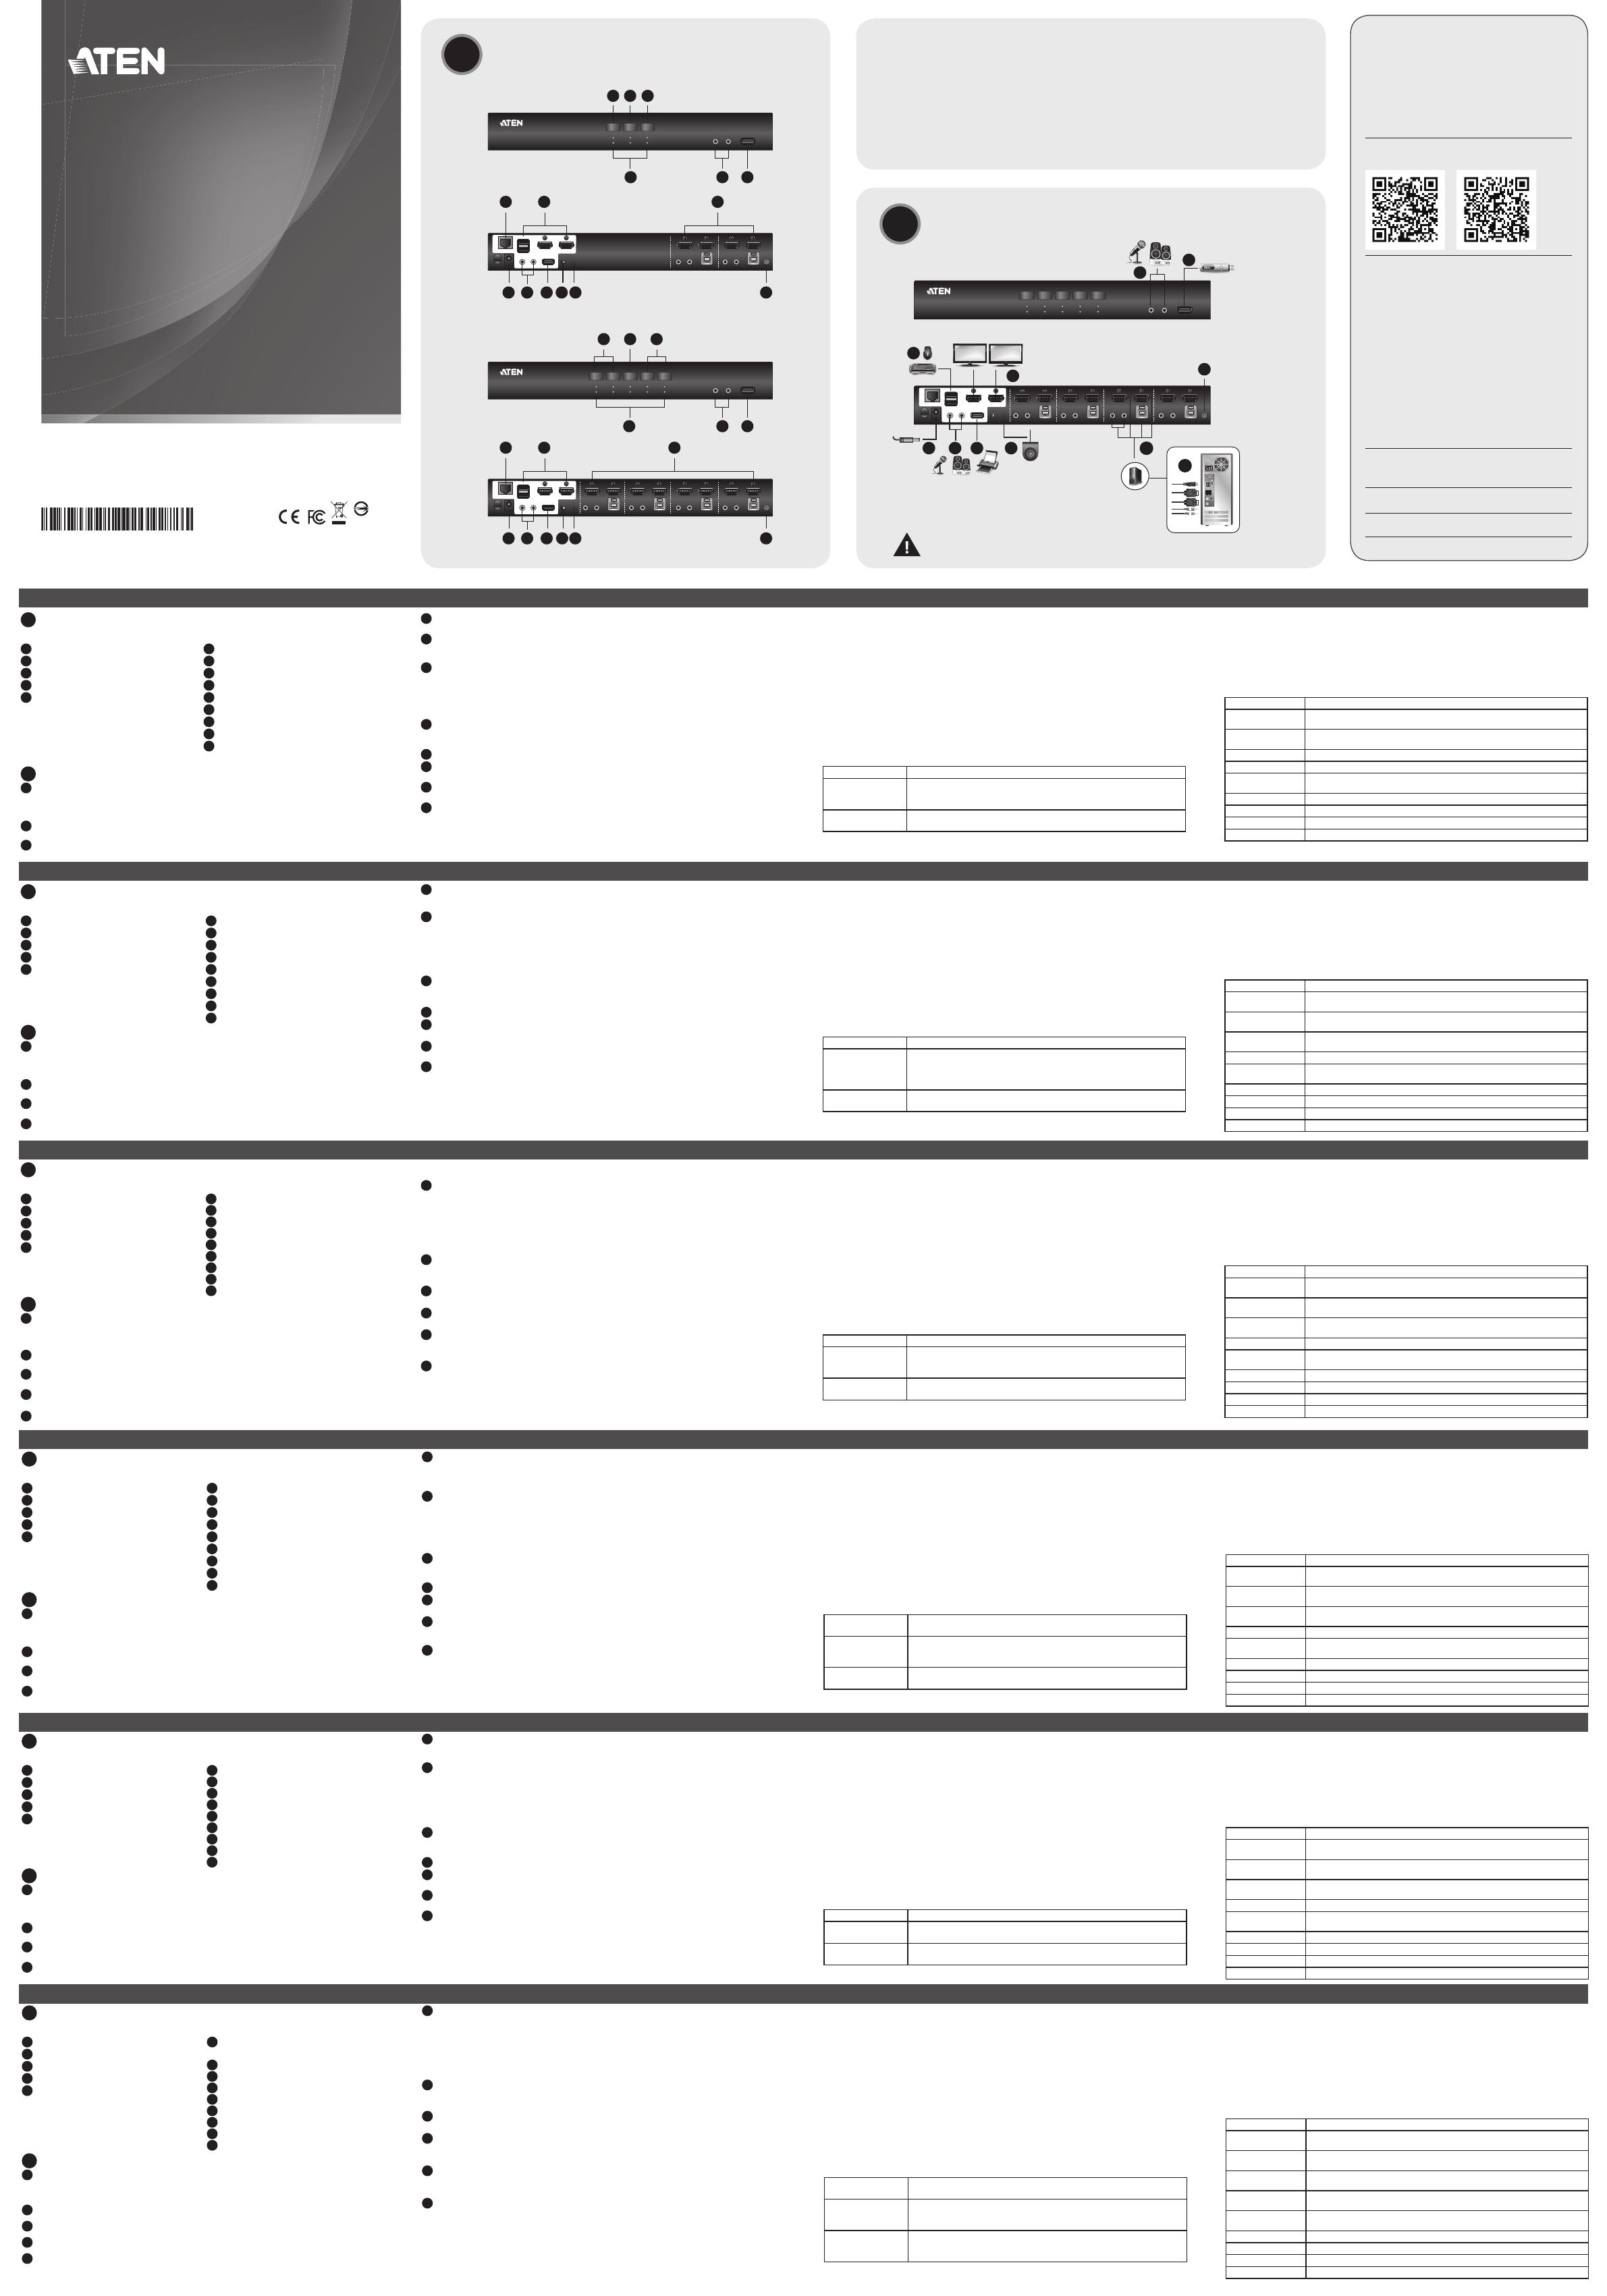
Front View
1
Mode Selection Pushbutton
2
Port Selection Pushbuttons
3
Port LEDs
4
Audio Jacks
5
USB 3.1 Gen1 Peripheral Port
Rear View
1
DCC Port (Daisy Chain Control)
2
Console Ports Section
3
KVM Ports Section
4
Power Jack
5
Audio Jacks
6
USB 3.1 Gen1 Peripheral Port
7
DCC Switch
8
Remote Port Selector Jack
9
Grounding Terminal
B
Hardware Installation
1
Ground the CS1842 / CS1844 by connecting one end of a grounding wire to the Grounding Terminal
and the other end to a suitable grounded object.
Note: Do not omit this step. Proper grounding helps to prevent damage to the unit from power
surges or static electricity.
2
Plug your USB keyboard and USB mouse into the USB console ports from the Console Ports Section
located on the unit’s rear panel.
3
Plug your HDMI monitors into the HDMI console ports from the Console Ports Section located on the
unit’s rear panel and power on the monitors.
4
Plug your microphone and speakers into the Audio Jacks located on the unit’s front panel. Audio
cables are required to be connected on the CPU side for this connection to work.
5
Plug your secondary microphone and speakers into the Audio Jacks located on the unit’s rear panel.
Note: The microphone and speakers plugged into the front panel have priority over those plugged
into these jacks.
6
Use the provided cable sets (HDMI cables, USB 3.0 cable, microphone cable, and speaker cable) with
this package. Plug the HDMI connector into any available HDMI “A” socket on the KVM Ports Section
of the switch (CPU1, CPU2, etc.), then plug the USB 3.0 cable, microphone cable, and speaker
cable into their corresponding sockets. Use another HDMI cable from the cable sets, plug the HDMI
connector into the HDMI “B” socket in the same KVM Ports Section of the switch.
Note: Verify that all the connectors are in the same KVM Ports Section (all in CPU1, all in CPU2, etc.).
7
At the other end of the cables from step 6, plug the HDMI cables, USB 3.0 cable, microphone cable,
and speaker cable into their respective ports on the computer. Repeat steps 6, and 7 for each dual-
screen PC system you are installing.
8
(Optional) Plug your USB peripherals into the front or rear USB 3.1 Gen1 Peripheral Ports.
9
(Optional) If you choose to use the remote port selector, plug its cable into the Remote Port Selector
Jack, located on the unit’s rear panel.
10
Plug the power adapter that came with your switch into an AC power source, then plug the power
adapter cable into the switch’s Power Jack. Now the CS1842 / CS1844 is turned on.
11
Power on the computers.
Operation
Manual Switching
To bring complete focus (audio, KVM, and USB) to a computer, either:
a) Press the Port Selection Pushbutton that corresponds to that computer; or
b) Press the Mode Selection Pushbutton once (the Mode icons light up) and then press the Port Selection
Pushbutton that corresponds to that computer, and all three port icons light up.
Mouse Switching
For mouse port selection: Double-click the scroll wheel of your USB mouse to cycle through the ports.
Note: 1. Mouse switching is only supported by USB 3-key scroll wheel mice.
2. Mouse switching is disabled by default.*
3. Mouse switching is only supported when Mouse Emulation is enabled.
* See Hotkey Setting Mode section to enable mouse switching.
Hotkey Switching
All hotkey port switches begin with tapping the [Scroll Lock] key twice. The table below describes the
actions that each combination performs.
Note: If using the [Scroll Lock] key confl icts with other programs running on the computer, the [Ctrl] key
can be used instead.
Hotkey Action
[Scroll Lock] [Scroll
Lock] [Enter]
Brings the KVM, USB hub, and audio focus from the port that currently has the
KVM focus to the next port on the switch.
(1 to 2, 2 to 1 for the CS1842; 1 to 2, 2 to 3, 3 to 4, 4 to 1 for the CS1844).
[Scroll Lock] [Scroll
Lock] [n] [Enter]
Brings the KVM, USB hub, and audio focus to the computer attached to the
port corresponding to the specifi ed Port ID.
Note: The n stands for the computer’s Port ID number (CS1842: 1 or 2; CS1844: 1, 2, 3, or 4).
Hotkey Setting Mode (HSM)
Hotkey Setting Mode is used to set functions on the switch. Invoke HSM and then press a key in the table
below. Follow the steps below to invoke HSM and perform a hotkey function.
1. Press and hold down the [Num Lock] key.
2. Press and release the [-] key.
3. Release the [Num Lock] key.
4. Press the hotkey to perform the desired function. Refer to the table below for the function.
HSM Summary Table
Key Function
[H]
Toggles between the default ([Num Lock] [-]) and alternate ([Ctrl] [F12]) HSM
invocation keys.
[T]
Toggles between the default ([Scroll Lock] [Scroll Lock]) and alternate ([Ctrl] [Ctrl])
Port Switching keys.
[F4] Prints the switch’s current settings via a text editor or word processor.
[R] [Enter] Resets the hotkey settings to their default status.
[u] [p] [g] [r] [a] [d] [e]
[Enter]
Invokes Firmware Upgrade Mode.
[E] Enables/disables Power on Detection.
[N] Enables/disables keyboard emulation.
[M] Enables/disables mouse emulation.
[W] Enables/disables Mouse Switching.
© Copyright 2020 ATEN
®
International Co., Ltd.
ATEN and the ATEN logo are trademarks of ATEN International Co., Ltd. All rights reserved. All
other trademarks are the property of their respective owners.
Part No. PAPE-1223-T70G Printing Date: 04/2020
2/4-Port USB 3.0 4K HDMI Dual Display
KVMP
™
Switch
Quick Start Guide
CS1842/CS1844
D33866
RoHS
Support and Documentation Notice
All information, documentation, fi rmware, software utilities,
and specifi cations contained in this package are subject to
change without prior notifi cation by the manufacturer.
To reduce the environmental impact of our products, ATEN
documentation and software can be found online at
http://www.aten.com/download/
Technical Support
www.aten.com/support
EMC Information
FEDERAL COMMUNICATIONS COMMISSION INTERFERENCE
STATEMENT:
This equipment has been tested and found to comply with the limits
for a Class A digital device, pursuant to Part 15 of the FCC Rules.
These limits are designed to provide reasonable protection against
harmful interference when the equipment is operated in a commercial
environment. This equipment generates, uses, and can radiate radio
frequency energy and, if not installed and used in accordance with
the instruction manual, may cause harmful interference to radio
communications. Operation of this equipment in a residential area
is likely to cause harmful interference in which case the user will be
required to correct the interference at his own expense.
FCC Caution: Any changes or modifi cations not expressly approved by
the party responsible for compliance could void the user's authority to
operate this equipment.
Warning: Operation of this equipment in a residential environment
could cause radio interference.
This device complies with Part 15 of the FCC Rules. Operation is subject
to the following two conditions:(1) this device mat not cause harmful
interference, and(2) this device must accept any interference received,
including interference that may cause undesired operation.
Important. Before proceeding, download the Installation and
Operation Manual by visiting the website, www.aten.com and
navigating to the product page. The manual includes important
warnings, loading specifi cations and grounding instructions.
Package Contents
1 CS1842 / CS1844 2/4-Port USB 3.0 4K HDMI Dual Display KVMP
TM
Switch
4/8 HDMI 2.0 Cables
2/4 USB 3.0 Cables
2/4 Speaker Cables
2/4 Microphone Cables
1 Power Adapter
1 Remote Port Selector
1 User Instructions
B
Hardware Installation
A
Hardware Review
To prevent damage to your installation from power
surges or static electricity, it is important that all
connected devices are properly grounded.
CS1842 Front View
CS1844 Front View
CS1842 Rear View
CS1844 Rear View
3
2 1 2
21 3
9
4 5
3
2 1 2
4 5
4 75 6 8
21 3
94 75 6 8
2
1
4
10
5 8 9
6
CS1844 (Front)
CS1844 (Rear)
7
3
8
Scan for more information
ATEN Website User Manual
Note: All console ports are located in the grey area.
Note: All console ports are located in the grey area.
이 기기는 업무용(A급) 전자파적합기기로서 판매자 또는 사용자는 이 점을
주의하시기 바라며, 가정외의 지역에서 사용하는 것을 목적으로 합니다.
Achtung: Der Gebrauch dieses Geräts in Wohnumgebung kann
Funkstörungen verursachen.
警告使用者:此為甲類資訊技術設備,於居住環境中使用時,可能會造
成射頻擾動,在此種情況下,使用者會被要求採取某些適當的對策。
A
Description de l’appareil
Vue de devant
1
Bouton de sélection de mode
2
Boutons poussoirs de sélection de port
3
LED des ports
4
Jacks audio
5
Port périphérique USB 3.1 Gen 1
Vue de derrière
1
Port DCC (Contrôle en chaînage)
2
Section ports de la console
3
Section ports KVM
4
Prise d’alimentation
5
Jacks audio
6
Port périphérique USB 3.1 Gen 1
7
Commutateur DCC
8
Prise du sélecteur de port distant
9
Borne de mise à la terre
B
Installation matérielle
1
Reliez le CS1842 / CS1844 à la terre en connectant une extrémité du fi l de terre à la borne de mise à
la terre et l’autre extrémité à un objet relié à la terre.
Remarque : Ne négligez pas cette étape. Une mise à la terre appropriée aide à prévenir les
dommages à l'appareil due aux surtensions ou à l'électricité statique.
2
Branchez votre clavier USB et votre souris USB sur les ports de console USB à partir de la Section
ports de la console située à l’arrière de l’appareil.
3
Branchez vos moniteurs HDMI aux ports HDMI de la console à partir de la Section ports de la console
située sur le panneau arrière de l’appareil puis allumez les moniteurs.
4
Branchez votre micro et les enceintes sur les Jacks audio situés sur le panneau avant de l’appareil. Il
est nécessaire de connecter des câbles audio sur le côté CPU pour que cette connexion fonctionne.
5
Branchez votre micro secondaire et les enceintes sur les Jacks audio situés sur le panneau arrière de l’appareil.
Remarque : Le micro et les enceintes branchés sur le panneau avant ont la priorité sur ceux branchés
sur ces jacks.
6
Utilisez les ensembles de câbles fournis (câbles HDMI, câble USB 3.0, câble du micro et câble des
enceintes) avec ce package. Branchez le connecteur HDMI sur une prise HDMI « A » sur la Section ports
KVM du commutateur (CPU 1, CPU 2, etc.), puis branchez le câble USB 3.0, le câble du micro et le câble
des enceintes sur leurs prises respectives. Utilisez un autre câble HDMI des ensembles de câbles, branchez
le connecteur HDMI dans la prise HDMI « B » dans la même Section ports KVM du commutateur.
Remarque : Vérifi ez que tous les connecteurs se trouvent dans la même Section ports KVM (tous
dans CPU 1, tous dans CPU 2, etc.).
7
À l’autre extrémité des câbles de l’étape 6, branchez les câbles HDMI, le câble USB 3.0, le câble du
micro et le câble des enceintes sur les ports respectifs de l’ordinateur. Répétez les étapes 6 et 7 pour
chaque système PC à double écran que vous installez.
8
(Facultatif) Branchez les périphériques USB sur les ports périphériques USB 3.1 Gen 1 avant ou arrière.
9
(Facultatif) Si vous choisissez d’utiliser le sélecteur de port distant, branchez son câble dans la prise du
Sélecteur de port Jack, située sur le panneau arrière de l’appareil.
10
Branchez l’adaptateur secteur fourni sur une prise de courant, puis le câble de l’adaptateur secteur
dans la prise d’alimentation du commutateur. Maintenant, le CS1842 / CS1844 est allumé.
11
Allumez les ordinateurs.
Fonctionnement
Commutation manuelle
Pour transférer les contrôles (audio, KVM, et USB) sur un même ordinateur :
a) appuyez sur le bouton de sélection de port qui correspond à cet ordinateur ; ou
b) appuyez une fois sur le Bouton de sélection de mode (les icônes de mode s’allument) puis appuyez sur
le Bouton de sélection de port qui correspond à cet ordinateur ; et les trois icônes de ports s’allument.
Commutation à la souris
Pour la sélection du port à la souris : Double-cliquez sur la molette de défi lement de votre souris USB
pour basculer de façon cyclique entre les ports.
Remarque : 1. La commutation à la souris est uniquement prise en charge par les souris à 3 boutons et
molette de défi lement USB.
2. La commutation à la souris est désactivée par défaut.*
3. La commutation à la souris est uniquement prise en charge lorsque l’émulation de souris est activée.
* Consultez la section Mode de réglage des touches raccourci pour activer la commutation
à la souris.
Commutation par touche de raccourci
Toutes les commutations de ports raccourcies démarrent en appuyant deux fois sur la touche [Arrêt défi l].
Le tableau ci-dessous décrit les actions que chaque combinaison effectue.
Remarque : Si l’utilisation de la touche [Arrêt défi l] l entre en confl it avec d’autres programmes exécutés
sur l’ordinateur, la touche [Ctrl] peut être utilisée, à la place.
Raccourci Action
[Arrêt défi l] [Arrêt défi l]
[Entrée]
Déplace la cible KVM, concentrateur USB et audio depuis le port actuel jusqu’au
port suivant sur le commutateur.
(de 1 a 2 et de 2 a 1 pour le CS1842) (de 1 a 2, de 2 a 3, de 3 a 4, et de 4 a 1
pour le CS1844).
[Arrêt défi l] [Arrêt défi l]
[n] [Entrée]
Amène la cible KVM, concentrateur USB et audio vers l’ordinateur connecté au
port correspondant à l’ID Port indiqué.
Remarque : Le [n] représente le numéro d’ID Port de l'ordinateur (CS1842 : 1 ou 2 ; CS1844 : 1, 2, 3, ou 4).
Mode de réglage des touches de raccourcis (HSM)
Le Mode de réglage des touches de raccourcis (Hotkey Setting Mode) est utilisé pour régler les fonctions
du commutateur. Appelez l’HSM, puis appuyez sur une touche du tableau ci-dessous. Suivez les étapes
ci-dessous pour invoquer HSM et exécuter une fonction de raccourci.
1. Enfoncez la touche [Verr num] et maintenez-la.
2. Appuyez et relâchez la touche [-].
3. Relâchez la touche [Verr num].
4. Appuyez le raccourci pour exécuter la fonction souhaitée. Consultez le tableau ci-dessous pour la fonction.
Tableau récapitulatif HSM
Touche Fonction
[H]
Bascule entre les touches d’invocation HSM ([Verr num] [-]) et alternatives ([Ctrl]
[F12]).
[T]
Bascule entre les touches de commutation de port par défaut [Arrêt défi l] [Arrêt
défi l]) et alternative ([Ctrl] [Ctrl]).
[F4]
Imprimer les paramètres actuels du commutateur via un éditeur de texte ou un
traitement de texte.
[R] [Entrée] Réinitialise les paramètres de raccourcis à leurs états par défaut.
[u] [p] [g] [r] [a] [d] [e]
[Entrée]
Appelle le mode de mise à niveau du fi rmware.
[E] Active/désactive la détection de mise sous tension.
[N] Active/désactive l’émulation du clavier.
[M] Active/désactive l’émulation de la souris.
[W] Active/désactive la commutation à la souris.
A
Hardwareübersicht
Ansicht von vorne
1
Modusauswahldrucktaste
2
Anschlussauswahltasten
3
Anschluss LEDs
4
Audiobuchsen
5
USB-3.1-Gen-1-Peripherieanschluss
Ansicht von hinten
1
DCC-Anschluss (Daisy-Chain-Steuerung)
2
Konsolenanschlussbereich
3
KVM-Anschlussauswahl
4
Netzbuchse
5
Audiobuchsen
6
USB-3.1-Gen-1-Peripherieanschluss
7
DCC-Switch
8
Buchse für den Fernbedienungsanschluss
9
Erdungsanschluss
B
Installation der Hardware
1
Erden Sie den CS1842 / CS1844, indem Sie ein Ende eines Erdungskabels mit dem Erdungsanschluss
und das andere Ende mit einem geeigneten geerdeten Objekt verbinden.
Hinweis: Lassen Sie diesen Schritt nicht aus. Eine ordnungsgemäße Erdung hilft bei der Vermeidung
von Schäden am Gerät durch Stromspitzen oder statischer Elektrizität.
2
Schließen Sie USB-Tastatur und USB-Maus an den USB-Konsolenanschlüssen des
Konsolenanschlussbereichs an der Rückblende des Gerätes an.
3
Schließen Sie Ihre HDMI-Monitore über den Konsolenanschlussbereich, der sich auf der Rückseite des
Geräts befi ndet, an die HDMI-Konsolenanschlüsse an und schalten Sie die Monitore ein.
4
Schließen Sie Ihr Mikrofon und Ihre Lautsprecher an die Audiobuchsen an der Vorderseite des Geräts
an. Audio kabel werden an der CPU-Seite benötigt, damit diese Verbindung funktioniert.
5
Schließen Sie Ihr zweites Mikrofon und Ihre Lautsprecher an die Audiobuchsen an der Rückseite des Geräts an.
Hinweis: Mikrofon und Lautsprecher, die an der Frontblende angeschlossen wurden, haben Priorität
vor jenen, die diese Buchsen angeschlossen sind.
6
Verwenden Sie die mit diesem Paket mitgelieferten Kabelsätze (HDMI-Kabel, USB 3.0-Kabel,
Mikrofonkabel und Lautsprecherkabel). Stecken Sie den HDMI-Anschluss in eine beliebige verfügbare
HDMI "A" Buchse am KVM Anschlussabschnitt des Switch (CPU1, CPU2 usw.) und stecken Sie dann
das USB 3.0-Kabel, das Mikrofonkabel und das Lautsprecherkabel in die entsprechenden Buchsen.
Verwenden Sie ein anderes HDMI-Kabel aus den Kabelsätzen. Stecken Sie den HDMI-Stecker in die
HDMI "B" Buchse im gleichen KVM Anschlussabschnitt des Switch.
Hinweis: Vergewissern Sie sich, dass alle Stecker im gleichen Abschnitt der KVM-Anschlüsse sind
(alle in CPU1, alle in CPU2 usw.).
7
Schließen Sie am anderen Ende der Kabel von Schritt 6 die HDMI-Kabel, USB 3.0-Kabel,
Mikrofonkabel und Lautsprecherkabel an ihren entsprechenden Anschlüssen am Computer an.
Wiederholen Sie die Schritte 6 und 7 bei jedem PC-System mit zwei Bildschirmen, das Sie installieren.
8
(Optional) Verbinden Sie Ihre USB-Peripherie mit den vorderen oder hinteren USB-3.1-Gen-1-
Peripherieanschlüssen.
9
(Optional) Wenn Sie den Fernbedienungsanschluss Auswahlschalter verwenden möchten, schließen Sie dessen
Kabel an die Buchse für den Fernbedienungsanschluss an, die sich an der Rückseite des Geräts befi ndet.
10
Schließen Sie das mit Ihrem Switch gelieferte Netzteil an eine Wechselspannungsversorgung an,
verbinden Sie dann das Netzteilkabel mit dem Netzanschluss des Switch. Der CS1842 / CS1844 ist
jetzt eingeschaltet.
11
Schalten Sie die Computer ein.
Bedienung
Manuelle Umschaltung
So ermöglichen Sie den vollständigen Fokus (Audio, KVM und USB) an einem Computer:
a) Drücken Sie die Anschlussauswahldrucktaste, die diesem Computer entspricht; oder
b) Drücken Sie einmal auf die Drucktaste für die Modusauswahl (die Modus Symbole leuchten auf) und
dann auf die diesem Computer entsprechende Drucktaste für die Anschlussauswahl, woraufhin alle drei
Anschlusssymbole aufl euchten.
Per Maus wechseln
Anschlussauswahl per Maus: Doppelklicken Sie das Scrollrad Ihrer USB-Maus zum Umschalten zwischen
den Anschlüssen.
Hinweis: 1. Der Mauswechsel wird nur von einer 3-Tasten-USB-Maus mit Scrollrad unterstützt.
2. Der Mauswechsel ist standardmäßig deaktiviert.*
3. Mauswechsel wird nur unterstützt, wenn Mausemulation aktiviert ist.
* Beachten Sie den Abschnitt Tastenkombinationseinstellungsmodus zur Aktivierung des
Mauswechsels.
Per Tastenkombination wechseln
Alle mittels Tastenkombinationen ausführbaren Anschlusswechsel beginnen mit zweimaliger Betätigung
der [Rollen-Taste]. Die nachstehende Tabelle beschreibt die Maßnahmen, die jede Kombination ausführt.
Hinweis: Wenn die Nutzung der [Rollen-Taste] mit anderen aktuell auf dem Computer laufenden
Programmen in Konfl ikt steht, können Sie stattdessen die [Strg]-Taste drücken.
Schnelltaste Aktion
[Rollen-Taste] [Rollen-
Taste] [Eingabe]
Verschiebt KVM, USB-Hub und Audio vom aktuellen zum nachsten Anschluss
am Switch. (1 zu 2 und 2 zu 1 beim CS1842) (1 zu 2, 2 zu 3, 3 zu 4 und 4 zu 1
beim CS1844).
[Rollen-Taste] [Rollen-
Taste] [n] [Eingabe]
Bringt KVM, USB-Hub und Audio von dem am entsprechenden Anschluss ange-
schlossenen Computer zu der angegebenen Anschlusskennung.
Hinweis: Das n steht für die Anschluss-ID-Nummer des Computers (CS1842: 1 oder 2; CS1844: 1, 2, 3
oder 4).
Tastenkombinationseinstellungsmodus (HSM)
Der Tastenkombinationseinstellungsmodus dient der Konfi guration der Funktionen am Switch. Aktivieren
Sie HSM, drücken Sie dann eine Taste in der nachstehenden Tabelle. Führen Sie die folgenden Schritte
aus, um HSM aufzurufen und eine Hotkey-Funktion auszuführen.
1. Halten Sie die [Num-Taste] gedrückt.
2. Drücken Sie die Taste [-] und lassen Sie sie los.
3. Lassen Sie die [Num-Taste] los.
4. Drücken Sie den Hotkey, um die gewünschte Funktion auszuführen. Die Funktion ist in der folgenden
Tabelle aufgeführt.
HSM-Übersichtstabelle
Taste Funktion
[H]
Wechselt zwischen der standardmäßigen ([Num-Taste] [-]) und alternativen ([Strg]
[F12]) Tastenkombination zur HSM-Aktivierung.
[T]
Wechselt zwischen der standardmäßigen ([Rollen-Taste] [Rollen- Taste]) und alter-
nativen ([Strg] [Strg]) Tastenkombination zum Anschlusswechsel.
[F4]
Drucken Sie die aktuellen Einstellungen des Switch über einen Texteditor oder
ein Textverarbeitungsprogramm.
[R] [Eingabe] Setzt die Tastenkombinationseinstellungen auf ihren Standardzustand zurück.
[u] [p] [g] [r] [a] [d] [e]
[Eingabe]
Ruft den Modus zur Firmware-Aktualisierung auf.
[E] Aktiviert/Deaktiviert die Einschalterkennung.
[N] Aktiviert/Deaktiviert die Tastaturemulation.
[M] Aktiviert/Deaktiviert die Mausemulation.
[W] Aktiviert/Deaktiviert die Umschaltung des Mausanschlusses.
A
Presentación del hardware
Vista frontal
1
Pulsador de selección de modo
2
Pulsadores de selección de puerto
3
LED de puertos
4
Tomas de audio
5
Puerto Periférico USB 3.1 Gen 1
Vista posterior
1
Puerto DCC (Control de conexión en cadena)
2
Sección de puertos de consola
3
Sección de puertos KVM
4
Entrada de alimentación
5
Tomas de audio
6
Puerto Periférico USB 3.1 Gen 1
7
Conmutador DCC
8
Toma del selector de puerto remoto
9
Toma de tierra
B
Instalación del hardware
1
Conecte a tierra el CS1842 / CS1844 conectando un extremo de un cable de conexión a tierra con el
terminal de conexión a tierra y el otro extremo con un objeto conectado a tierra adecuado.
Nota: No omita este paso. Una conexión correcta a tierra protege a la unidad de la electricidad
estática y de las subidas de tensión.
2
Conecte su teclado USB y su ratón USB a los puertos de la consola USB de la sección de puertos de
consola ubicada en el panel posterior de la unidad.
3
Conecte sus monitores HDMI a los puertos de la consola HDMI de la sección de puertos de consola
ubicada en el panel posterior de la unidad y encienda los monitores.
4
Conecte su micrófono y altavoces a las tomas de audio ubicadas en el panel frontal de la unidad. Es
necesario conectar los cables de audio en el lado de la CPU para que esta conexión funcione.
5
Conecte su micrófono y altavoces secundarios a las tomas de audio ubicados en el panel posterior de
la unidad.
Nota: El micrófono y los altavoces conectados al panel frontal tienen prioridad sobre los conectados
a estas tomas.
6
Utilice los conjuntos de cables suministrados en esta caja (cables HDMI, cable USB 3.0, cable de micrófono
y cable de altavoz). Conecte el conector HDMI a cualquier toma HDMI "A" disponible en la sección de
puertos KVM del conmutador (CPU1, CPU2, etc.), luego conecte el cable USB 3.0, el cable de micrófono
y el cable del altavoz a sus correspondientes tomas. Utilice otro cable HDMI de los conjuntos de cables,
conecte el conector HDMI a la toma HDMI “B” de la misma sección de puertos KVM del conmutador.
Nota: Compruebe que todos los conectores estén en la misma sección de puertos KVM (todos en
CPU1, todos en CPU2, etc.).
7
En el otro extremo de los cables del paso 6, conecte los cables HDMI, el cable USB 3.0, el cable del
micrófono y el cable del altavoz a sus respectivos puertos en el PC. Repita los pasos 6 y 7 para cada
sistema de PC de doble pantalla que esté instalando.
8
(Opcional) Conecte sus periféricos USB a los puertos de periféricos USB 3.1 Gen 1 frontales o posteriores.
9
(Opcional) Si opta por usar el selector de puerto remoto, conecte su cable a la toma del selector de
puerto remoto, situada en el panel posterior de la unidad.
10
Enchufe el adaptador de alimentación que viene con el conmutador en una fuente de alimentación
de CA, luego conecte el cable del adaptador de alimentación a la toma de alimentación del
conmutador. Ahora se encenderá el CS1842 / CS1844.
11
Encienda las computadoras.
Funcionamiento
Conmutación manual
Para llevar el enfoque completo (audio, KVM, y USB) a una PC, ya sea:
a) presione el pulsador de selección de puerto que corresponda a ese PC; o bien:
b) presione el pulsador de selección de modo una vez (se encenderán los íconos de modo) y luego
presione el pulsador de selección de puerto que corresponda a ese PC, y los tres iconos de puerto se
encenderán.
Conmutación de ratón
Para la selección de puerto de ratón: Haga doble clic en la rueda de desplazamiento del ratón USB para
recorrer los puertos.
Nota:
1. La conmutación de ratón sólo se admite para los ratones rueda de desplazamiento USB de 3-teclas.
2. La conmutación del ratón está desactivada por defecto.*
3. La conmutación ratón solamente se admite cuando la emulación del ratón está activada.
* Consulte la sección Modo de ajuste de teclas de acceso rápido para habilitar la conmutación de ratón.
Conmutación de teclas de acceso rápido
Todos los conmutadores de puerto de acceso directo comienzan tocando la tecla [Bloq Despl.] dos veces.
La siguiente tabla describe las acciones que realiza cada combinación.
Nota: Si el uso de la tecla [Bloq Despl] resulta confl ictivo con otros programas que se ejecutan en el PC,
se puede usar la tecla [Ctrl].
Tecla de acceso
rápido
Acción
[Bloq Despl] [Bloq
Despl] [Entrar]
Desplaza el foco del KVM, concentrador USB y audio desde el puerto que
actualmente tiene el foco KVM al siguiente puerto en el conmutador.
(1 a 2 y 2 a 1 para el CS1842) (1 a 2, 2 a 3, 3 a 4, y 4 a 1 para el CS1844).
[Bloq Despl] [Bloq
Despl] [n] [Entrar]
Lleva el KVM, el concentrador USB y el enfoque de audio al PC conectado al
puerto correspondiente para la ID de puerto especifi cada.
Nota: La n representa el número de ID de puerto del PC (CS1842: 1 o 2; CS1844: 1, 2, 3, o 4).
Ajuste del modo de teclas de acceso rápido (HSM)
El Ajuste del modo de teclas de acceso rápido se usa para confi gurar funciones en el conmutador.
Invoque HSM y luego pulse una tecla de la siguiente tabla. Siga los pasos que se indican a continuación
para invocar HSM y ejecute una función de tecla de acceso directo.
1. Pulse y mantenga pulsada la tecla [Bloq Num].
2. Pulse y suelte la tecla [-].
3. Suelte la tecla [Bloq Num].
4. Pulse la tecla de acceso directo para ejecutar la función que desee. Consulte la siguiente tabla para ver
la función.
Tabla resumen HSM
Tecla Función
[H]
Alterna entre las teclas de invocación del HSM predeterminadas ([Bloq Num] [-])
y alternativas ([Ctrl] [F12]).
[T]
Alterna entre las teclas predeterminadas ([Bloq Despl] [Bloq Despl]) y las teclas de
conmutación de puerto alternativas ([Ctrl] [Ctrl]).
[F4]
Imprima la confi guración actual del conmutador a través de un editor de texto o
procesador de textos.
[R] [Entrar] Restablece la confi guración de teclas de acceso rápido a su estado predeterminado.
[u] [p] [g] [r] [a] [d] [e]
[Entrar]
Invoca el modo de actualización de fi rmware.
[E] Habilita/deshabilita la detección de encendido.
[N] Habilita/deshabilita la emulación de teclado.
[M] Habilita/deshabilita la emulación de ratón.
[W] Habilita/deshabilita la conmutación de ratón.
A
Panoramica hardware
Vista anteriore
1
Pulsante push di selezione modalità
2
Pulsanti push di selezione porta
3
LED porte
4
Jack audio
5
Porta periferica USB 3.1 Gen 1
Vista posteriore
1
Porta DCC (Controllo di interconnessione)
2
Sezione porte console
3
Sezione porte KVM
4
Jack di alimentazione
5
Jack audio
6
Porta periferica USB 3.1 Gen 1
7
Switch DCC
8
Jack selezione porta remota
9
Terminale di messa a terra
B
Installazione dell'hardware
1
Mettere a terra il CS1842 / CS1844 collegando una estremità del cavo di messa a terra al terminare
di messa a terra dell'unità, e l'altra estremità a un oggetto con messa a terra adeguato.
Nota: Non ignorare questo passaggio. Una messa a terra corretta aiuta a evitare danni all'unità
derivanti da sbalzi elettrici o elettricità statica.
2
Collegare la tastiera USB e il mouse USB alle porte della console USB dalla Sezione porte console sul
pannello posteriore dell'unità.
3
Collegare i monitor HDMI alle porte della console HDMI dalla sezione porte console sul pannello
posteriore dell'unità e accendere i monitor.
4
Collegare il microfono e gli altoparlanti ai jack audio sul pannello anteriore dell'unità. Per utilizzare
questa connessione + necessario collegare i cavi audio a lato della CPU.
5
Collegare il microfono secondario e gli altoparlanti ai jack audio sul pannello posteriore dell'unità.
Nota: Il microfono e gli altoparlanti collegati nel pannello anteriore hanno priorità rispetto a quelli
collegati ai jack.
6
Usare il set di cavi in dotazione (cavi HDMI, cavo USB 3.0, cavo microfono e cavo altoparlante).
Collegare il connettore HDMI a una presa HDMI "A" disponibile sulla sezione porte KVM dello
switch (CPU1, CPU2, ecc) quindi collegare il cavo USB 3.0, il cavo microfono e il cavo altoparlante
alle rispettive prese. Usare un altro cavo HDMI del set di cavi, collegare il connettore HDMI alla presa
HDMI "B" nella stessa sezione porte KVM dello switch.
Nota: Verifi care che tutti i connettori siano nella stessa sezione porte KVM (tutte in CPU1, tutte in
CPU2, ecc.).
7
All'altra estremità dei cavi del passaggio 6, collegare i cavi HDMI, il cavo USB 3.0, il cavo microfono,
e il cavo altoparlante nelle rispettive porte sul computer. Ripetere i passi 6 e 7 per ogni sistema PC a
schermo doppio che si sta installando.
8
(Opzionale) Collegare le periferiche USB nelle porte periferiche USB 3.1 Gen 1 frontali o posteriori.
9
(Opzionale) Se si sceglie di usare il selettore della porta remota, collegare il cavo al Jack selettore porta
remota sul pannello posteriore dell'unità.
10
Collegare l’alimentatore in dotazione a una presa di corrente CA, quindi inserire il cavo dell’alimentatore
nella presa d’alimentazione dello switch. A questo punto il CS1842 / CS1844 si accende.
11
Accendere i computer.
Funzionamento
Commutazione manuale
Per concentrare l'attivazione (audio, KVM e USB) su un computer:
a) premere il pulsante push di selezione porta corrispondente a quel computer o:
b) premere una volta il pulsante push di selezione della modalità (le icone Modalità si illuminano), quindi
premere il pulsante push di selezione porta corrispondente al computer, le tre icone porta si illuminano.
Commutazione con mouse
Per la selezione delle porte con il mouse: Fare doppio clic sulla rotella del mouse USB per passare tra le
varie porte.
Nota: 1. La commutazione con mouse è supportata solo con mouse USB dotati di rotellina di scorrimento
a 3 tasti.
2. La commutazione con mouse è disabilitata per impostazione predefi nita.*
3. La commutazione con mouse è supportata solamente quando la modalità Emulazione mouse è
abilitata.
* Fare riferimento alla sezione Modalità d'impostazione tasti di scelta rapida per abilitare la
commutazione con mouse.
Commutazione con tasto di scelta rapida
Tutte le operazioni di commutazione con tasto di scelta rapida iniziano toccando due volte il tasto [Bloc
Scorr]. Nella tabella di seguito sono descritte le azioni di ogni combinazione.
Nota: Se l'uso del tasto [Bloc Scorr] è in confl itto con altri programmi in esecuzione sul computer,
utilizzare il tasto [Ctrl].
Tasto di scelta rapida Azione
[Bloc Scorr] [Bloc Scorr]
[Invio]
Seleziona KVM, hub USB e audio dalla porta corrente a quella successiva dello
switch. (1 a 2 e 2 a 1 per CS1842; 1 a 2, 2 a 3, 3 a 4, 4 a 1 per CS1844).
[Bloc Scorr] [Bloc Scorr]
[n] [Invio]
Seleziona KVM, hub USB e audio del computer collegato alla porta corrispon-
dente all’ID della porta specifi cato.
Nota: n indica il numero ID porta del computer (CS1842: 1, 2; CS1844: 1, 2, 3 o 4).
Modalità d'impostazione tasti di scelta rapida (HSM)
La modalità d'impostazione tasti di scelta rapida è utilizzata per impostare le funzioni sullo switch.
Richiamare la modalità HSM e premere un tasto nella tabella di seguito. Seguire i passaggi per richiamare
HSM ed eseguire una funzione tasto rapido.
1. Tenere premuto il tasto [Bloc Num].
2. Premere e rilasciare il tasto [-].
3. Lasciare il tasto [Bloc Num].
4. Premere il tasto rapido per eseguire la funzione desiderata. Consultare la tabella di seguito per la funzione.
Tabella di riepilogo HSM
Tasto Funzione
[H]
Passa tra i tasti di attivazione HSM predefi niti ([Bloc Num] [-]) e alternati ([Ctrl]
[F12]).
[T]
Passa tra i tasti di commutazione porta predefi niti ([Bloc Scorr] [Bloc Scorr]) e
alternati ([Ctrl] [Ctrl]).
[F4]
Stampa le impostazioni attuali dello switch tramite editor di testo o elaboratore
di testo.
[R] [Invio] Ripristina le impostazioni predefi nite del tasto di scelta rapida.
[u] [p] [g] [r] [a] [d] [e]
[Invio]
Richiama la modalità Aggiornamento fi rmware.
[E] Abilita/disabilita il Rilevamento accensione.
[N] Abilita/disabilita l'emulazione tastiera.
[M] Abilita/disabilita l'emulazione mouse.
[W] Abilita/disabilita la commutazione mouse.
A
Обзор аппаратного обеспечения
Вид спереди
1
Кнопка выбора режима
2
Кнопки выбора порта
3
Индикаторы портов
4
Гнезда аудио
5
Порт USB 3.1 Gen 1 (периферийный)
Вид сзади
1
Порт DCC (Управление подключением
шлейфом (в стек))
2
Область портов консоли
3
Область KVM-портов
4
Гнездо питания
5
Гнезда аудио
6
Порт USB 3.1 Gen 1 (периферийный)
7
Переключатель DCC
8
Гнездо пульта удаленного переключения портов
9
Клемма заземления
B
Установка аппаратного обеспечения
1
Заземлите CS1842 / CS1844, подключив один конец провода заземления к клемме заземления,
а другой конец - к надежно заземленному объекту.
Примечание: Не пропускайте этот шаг. Надлежащее заземление защищает устройство от
повреждений, вызываемых скачками напряжения и статическим электричеством.
2
Подключите USB-клавиатуру и USB-мышь к USB-портам консоли в Области портов консоли на
задней панели устройства.
3
Подключите мониторы с интерфейсом HDMI к разъемам HDMI, расположенным в Области
портов консоли на задней панели устройства и включите питание мониторов.
4
Подключите микрофон и динамики к гнездам аудио на передней панели консоли. Также
необходимо подключить аудиокабели к подсоединяемым компьютерам.
5
Подключите второй микрофон и динамики к гнездам аудио на задней панели консоли.
Примечание: Подключенные к передней панели микрофон и динамики имеют приоритет над
теми, которые подключены к этим гнездам.
6
Используйте входящие в комплект поставки наборы кабелей (кабели HDMI, USB 3.0,
микрофона и динамиков). Подключите HDMI-вилку в любое свободное гнездо HDMI “A”
в Области KVM-портов переключателя (CPU1, CPU2 и так далее), а кабели USB 3.0,
микрофона и динамиков подключите к соответствующим гнездам. С помощью другого
HDMI-кабеля из набора подключите HDMI-вилку в гнездо HDMI “B” в той же самой Области
KVM-портов переключателя.
Примечание: Проверьте, что все соединители подключены в той же самой Области KVM-
портов (все в CPU1, все в CPU2 и так далее).
7
Обратную сторону кабелей, подсоединенных на этапе 6 (HDMI, USB 3.0, микрофона и
динамиков), подключите к соответствующим портам компьютера. Повторите действия 6 и 7
для каждого подключаемого ПК с двумя экранами.
8
(Необязательно) Подключите периферийные USB-устройства к портам USB 3.1 Gen1
периферийных устройств на передней или задней панели.
9
(Необязательно) Для использования пульта удаленного переключения портов подсоедините
его кабель к гнезду пульта удаленного переключения портов, расположенному на задней
панели переключателя.
10
Подключите адаптер питания из комплекта поставки переключателя к источнику питания
переменного тока, а затем кабель адаптера питания подключите к гнезду питания
переключателя. Произойдет включение устройств CS1842 / CS1844.
11
Затем включите питание компьютеров.
Работа
Ручное переключение
Для переключения фокуса (функций звука, KVM и USB) на определенный компьютер выполните
одно из следующих действий:
а) нажмите кнопку выбора портов, соответствующую этому компьютеру; или
b) однократно нажмите кнопку выбора режима (загорятся значки Режим) и затем нажмите кнопку
выбора портов, соответствующую этому компьютеру, в результате загорятся значки всех трех портов.
Переключение мышью
Для выбора порта мышью выполните следующие действия: дважды щелкните колесо прокрутки
USB-мыши для последовательного переключения портов.
Примечание: 1. Переключение мышью выполняется только при использовании 3-кнопочной
USB-мыши с колесом прокрутки.
2. По умолчанию переключение мышью отключено.*
3. Переключение мышью поддерживается только в режиме эмуляции мыши.
* Для включения переключения мышью см. раздел "Режим установки клавиш
быстрого вызова".
Переключение клавишей быстрого вызова
Все переключения портов клавишей быстрого вызова начинаются с двойного нажатия на
клавишу [Scroll Lock]. Следующая таблица описывает комбинации клавиш и выполняемые ими
действия.
Примечание: Если использование клавиши [Scroll Lock] создает конфликт с другими
программами, выполняемыми на компьютере, то вместо нее можно использовать
клавишу [Ctrl].
Клавиша быстрого
вызова
Действие
[Scroll Lock] [Scroll
Lock] [Enter]
Передача функций KVM, USB-концентратора и звука с текущего KVM-
порта на следующий порт переключателя.
(от 1 к 2, от 2 к 1 для CS1842) (от 1 к 2, 2 к 3, 3 к 4 и 4 к 1 для CS1844).
[Scroll Lock] [Scroll
Lock] [n] [Enter]
Передача функций KVM, USB-концентратора и звука на компьютер,
подключенный к порту, соответствующему указанному идентификатору
порта.
Примечание: Буквой n обозначается идентификатор порта компьютера(CS1842: 1, 2; CS1844:
1, 2, 3 или 4).
Режим установки клавиш быстрого вызова (HSM)
Режим установки клавиш быстрого вызова используется для установки функций на
коммутаторе. Вызовите HSM и нажмите на клавишу, указанную в следующей таблице.
Выполните описанные ниже шаги для вызова режима HSM и выполнения функции «горячей»
клавиши.
1. Нажмите и удерживайте клавишу [Num Lock].
2. Нажмите и отпустите клавишу [-].
3. Отпустите клавишу [Num Lock].
4. Нажмите «горячую» клавишу для выполнения нужной функции. Описание функции см. в
следующей таблице.
Сводная таблица функций HSM
Клавиша Функция
[H]
Переключение между исходными ([Num Lock] [-]) и альтернативными ([Ctrl]
[F12]) клавишами вызова HSM.
[T]
Переключение между исходными ([Scroll Lock] [Scroll Lock]) и альтерна-
тивными ([Ctrl] [Ctrl]) клавишами переключения портов.
[F4]
Печать текущих параметров коммутатора через текстовый процессор
или редактор.
[R] [Enter]
Сброс параметров клавиши быстрого вызова и восстановление значений
по умолчанию.
[u][p][g][r][a][d][e]
[Enter]
Вызов режима обновления микропрограммы.
[E] Включение/выключение функции "Power on Detection".
[N] Включение/отключение эмуляции клавиатуры.
[M] Включение/отключение эмуляции мыши.
[W] Включение/отключение переключения мышью.
