
de Montageanleitung 2
en Installation instructions 9
es Instrucciones de montaje 16
fr Notice d'installation 24
it Istruzioni d'installazione 32
nl Installatie-instructies 40
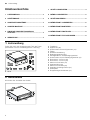
DV061100
Vakuumierschublade
Vacuum-sealing drawer
Cajón de envasado al vacío
Tiroir de mise sous-vide
Cassetto per sottovuoto
Vacumeerlade
Gaggenau

de Lieferumfang
2
Inhaltsverzeichnis
1 LIEFERUMFANG ...................................................2
2 GERÄTEMASSE ....................................................2
3 SICHERHEITSABSTÄNDE ....................................3
4 SICHERE MONTAGE.............................................3
5 HINWEISE ZUM ELEKTRISCHEN AN-
SCHLUSS...............................................................3
6 WERKZEUGE.........................................................3
7 GERÄT VORBEREITEN.........................................4
8 MÖBEL VORBEREITEN ........................................5
9 GERÄT MONTIEREN.............................................5
10 MÖBELFRONT VORBEREITEN ............................6
11 MÖBELFRONT MONTIEREN ................................6
12 MÖBELFRONT EINSTELLEN................................8
13 MÖBELFRONT FESTSCHRAUBEN ......................8
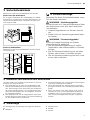
1 Lieferumfang
Prüfen Sie nach dem Auspacken alle Teile auf Trans-
portschäden und die Vollständigkeit der Lieferung.
¡Gerät
¡Frontblech
¡Kippschutz (2x)
¡Holzschraube für den Kippschutz (4x)
¡Ölfilter
¡Netzanschlussleitung
¡Befestigungswinkel (2x)
¡Montagehilfe für die Befestigungswinkel
¡Holzschraube für die Befestigungswinkel (4x)
¡Dekorblech 10,5mm (2x)
¡Dekorblech 12,5mm (2x)
¡Metrische Schraube (4x)
¡Gewindehülse (6x)
¡Metrische Schraube (6x)
¡Gewölbte Unterlegscheibe (2x)
¡Klebepuffer
¡Doppelseitiges Klebeband (3x)
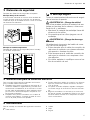
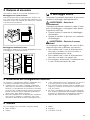
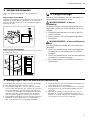
2 Gerätemaße
Hier finden Sie die Maße des Geräts.

Sicherheitsabstände de
3
3 Sicherheitsabstände
Beachten Sie die Sicherheitsabstände des Geräts.
Einbau unter der Arbeitsplatte
Ein zu großer Überstand der Arbeitsplatte zum Möbel-
korpus kann zu Kollisionen mit dem Glasdeckel in der
Vakuumierschublade führen. Beachten Sie das maxi-
mal mögliche Maß.
Einbau im Einbaumöbel
Beachten Sie die Sicherheitsabstände für den Einbau
im Einbaumöbel.
4 Sichere Montage
Beachten Sie diese Sicherheitshinweise, wenn
Sie das Gerät montieren.
WARNUNG‒Erstickungsgefahr!
Kinder können sich Verpackungsmaterial über
den Kopf ziehen oder sich darin einwickeln
und ersticken.
▶Verpackungsmaterial von Kindern fernhal-
ten.
▶Kinder nicht mit Verpackungsmaterial spie-
len lassen.
WARNUNG‒Stromschlaggefahr!
Eine beschädigte Isolierung der Netzan-
schlussleitung ist gefährlich.
▶Nie die Netzanschlussleitung mit heißen
Geräteteilen oder Wärmequellen in Kontakt
bringen.
▶Nie die Netzanschlussleitung mit scharfen
Spitzen oder Kanten in Kontakt bringen.
▶Nie die Netzanschlussleitung knicken, quet-
schen oder verändern.
5 Hinweise zum elektrischen Anschluss
Um das Gerät sicher elektrisch anschließen zu können,
beachten Sie diese Hinweise.
¡Das Gerät darf nur an eine vorschriftsmäßig instal-
lierte Schutzkontakt-Steckdose angeschlossen wer-
den. Das Verlegen einer Steckdose oder Austausch
der Anschlussleitung darf nur vom Elektrofachmann
unter Berücksichtigung der einschlägigen Vorschrif-
ten ausgeführt werden.
¡Das Gerät darf nur mit der mitgelieferten Anschluss-
leitung angeschlossen werden. Die Anschlussleitung
an der Geräterückseite einstecken.
¡Anschlussleitungen mit verschiedenen Steckertypen
sind beim Kundendienst erhältlich.
¡Keine Mehrfachstecker, Steckerleisten und Verlän-
gerungen benutzen. Bei Überlastung besteht Brand-
gefahr.
¡Wenn der Stecker nach dem Einbau nicht mehr er-
reichbar ist, muss in der festverlegten elektrischen
Installation eine Trennvorrichtung in den Phasen
nach den Einrichtungsbestimmungen vorgesehen
werden.
6 Werkzeuge
Sie benötigen für die Montage die folgenden Werkzeu-
ge.
¡Maßband
¡Messschieber
¡Bleistift
¡Winkel

de Gerät vorbereiten
4
¡Schraubendreher Torx 20
¡Großer Schlitzschraubendreher
¡Mittlerer Schlitzschraubendreher
¡Kombizange
¡Akkubohrschrauber
¡Bohrer Ø4/Ø5/Ø6,5/Ø10
¡Ansenker
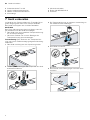
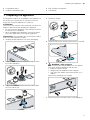
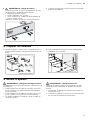
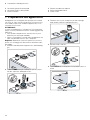
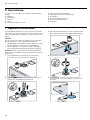
7 Gerät vorbereiten
Im Gerät ist eine Pumpe verbaut, die Öl enthält. Bei zu
großer Neigung kann das Öl der Pumpe auslaufen.
Das Gerät nicht kippen oder hochkant aufstellen.
ACHTUNG!
Das Öl der Vakuumpumpe kann bei Kippen oder Nei-
gen auslaufen und das Gerät beschädigen.
▶Das Gerät nicht ohne installierte Transportsicherung
für die Pumpe bewegen.
▶Nach dem Ausbau und vor dem Bewegen die
Transportsicherung erneut befestigen.
Voraussetzung:Beim Entfernen der Transportsiche-
rung und bei der Ölfiltermontage geeignetes Werkzeug
verwenden.
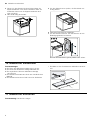
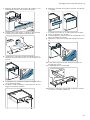
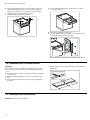
1. Das Gerät vorsichtig aus der Verpackung heben.
2. Die Transportsicherung für die Pumpe auf der Gerä-
teoberseite entfernen.
3. Die Transportsicherung zur weiteren Verwendung an
der Geräterückseite befestigen.
4. Den Ölfilter montieren.
5. Den Deckel in die Öffnung legen und nach links
schieben.

Möbel vorbereiten de
5
6. WARNUNG‒Kippgefahr!
Nach Entfernen der Transportsicherung kann sich
die Schublade öffnen und das Gerät kippen.
▶Die Schublade geschlossen halten.
▶Das Gerät mit einem Gewicht beschweren.
▶Die Schublade erst öffnen, wenn der Kippschutz
montiert ist.
Die Transportsicherungsschrauben entfernen.
7. Die Netzanschlussleitung an der Geräterückseite
einstecken.
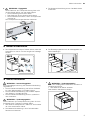
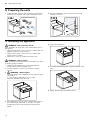
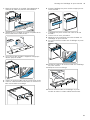
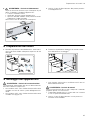
8 Möbel vorbereiten
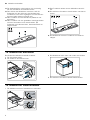
1. Den Kippschutz montieren. Darauf achten, dass die
Schrauben im oberen Teil der Langlöcher befestigt
werden.
2. Die Befestigungswinkel mit der Montagehilfe am
Möbel befestigen.
9 Gerät montieren
WARNUNG‒Stromschlaggefahr!
Eine beschädigte Isolierung der Netzanschlussleitung
ist gefährlich.
▶Nie die Netzanschlussleitung mit heißen Gerätetei-
len oder Wärmequellen in Kontakt bringen.
▶Nie die Netzanschlussleitung mit scharfen Spitzen
oder Kanten in Kontakt bringen.
▶Nie die Netzanschlussleitung knicken, quetschen
oder verändern.
WARNUNG‒Verletzungsgefahr!
Nach Entfernen der Transportsicherung kann sich die
Schublade beim Transport ruckartig öffnen.
▶Das Gerät so transportieren, dass sich die Schubla-
de nicht versehentlich öffnet.
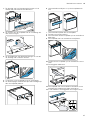
1. Die Netzanschlussleitung in eine Schutzkontakt-
Steckdose einstecken.
2. WARNUNG‒Verletzungsgefahr!
Das hohe Gerätegewicht kann beim Anheben zu
Verletzungen führen.
▶Das Gerät nicht alleine anheben.
Das Gerät in das Möbel schieben.

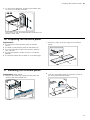
de Möbelfront vorbereiten
6
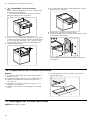
3. Wenn sich das Gerät nicht einschieben lässt, die
Kippschutzwinkel in der Höhe verstellen. Dazu die
Schrauben lösen und die Kippschutzwinkel nach
oben schieben.
4. Das Gerät mittig ausrichten.
5. Um den Kippschutz zu prüfen, die Schublade vor-
sichtig öffnen.
6. Passende Dekorbleche auswählen.
7. Um das Gerät zu fixieren, die Dekorbleche an die
Befestigungswinkel schrauben.
Die Nut am Dekorblech gehört jeweils nach außen.
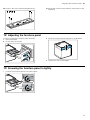
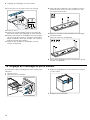
10 Möbelfront vorbereiten
Voraussetzungen
¡Die Dicke der Möbelfront beträgt mind. 19mm.
¡Die Breite der Möbelfront beträgt 590-596mm.
¡Die empfohlene Höhe der Möbelfront beträgt
142-156mm.
¡Die Möbelfront besteht aus Holz oder holzähnlichem
Material.
¡Die Möbelfront hat einen Griff oder eine Griffmulde.
▶Die Mitte an der Oberkante der Möbelfront anzeich-
nen.
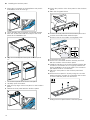
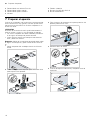
11 Möbelfront montieren
Voraussetzung:Handschuhe tragen.

Möbelfront montieren de
7
1. Die Breite des Einbaumöbels messen und die Mitte
am Zwischenboden anzeichnen.
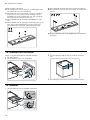
2. Die Laschen des Frontblechs mit der Kombizange
um 90° nach oben biegen.
3. Das Frontblech am Gerät einhängen und bis zum
Anschlag nach unten drücken.
4. Prüfen, ob das Frontblech gerade eingehängt ist.
5. Das doppelseitige Klebeband als Montagehilfe an
das Frontblech kleben.
6. Die Möbelfront ausrichten und auf das Frontblech
drücken.
aDie Möbelfront klebt am Frontblech.
7. Die Schublade vorsichtig öffnen.
8. Die Oberkante des Frontblechs auf der Möbelfront
anzeichnen.
9. Das Frontblech mit der Möbelfront aushängen.
10. Lage des Frontblechs auf der Möbelfront prüfen.
11. Die Langlöcher anzeichnen.
12. Das Frontblech von der Möbelfront lösen und das
doppelseitige Klebeband entfernen.
13. Mittig in den Langlöchern die Bohrungen bohren.
14. Die Bohrungen ansenken.

de Möbelfront einstellen
8
15. Die Gewindehülsen einschrauben, bis sie bündig
mit der Oberfläche der Möbelfront sind.
16. Den Griff an der Möbelfront montieren, weil die
Schrauben für den Griff nach der Montage des
Frontblechs nicht mehr zugänglich sind. Die Schrau-
ben des Griffs müssen versenkt sein.
17. Das Frontblech auf der Möbelfront platzieren und
ausrichten.
18. Das Frontblech mit den gewölbten Unterlegscheiben
und den Schrauben locker anschrauben. Die
Schrauben nicht fest anziehen, damit das Blech be-
weglich bleibt.
19. Das Frontblech wieder an der Möbelfront ausrich-
ten.
20. Die seitlichen Schrauben einschrauben und fest an-
ziehen.
21. Die Möbelfront mit dem Frontblech am Gerät ein-
hängen.
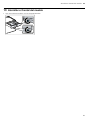
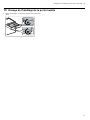
12 Möbelfront einstellen
Bei Bedarf die Möbelfront vertikal einstellen.
1. Die Schublade öffnen.
2. Die seitlichen Schrauben lösen.
3. Die Möbelfront nach oben oder unten verschieben.
4. Die seitlichen Schrauben wieder festschrauben.
13 Möbelfront festschrauben
▶Die Möbelfront mit den Seitenblechen verbinden.

Scope of delivery en
9
Table of contents
1 SCOPE OF DELIVERY...........................................9
2 UNIT DIMENSIONS................................................9
3 SAFETY CLEARANCES ......................................10
4 SAFE INSTALLATION .........................................10
5 INSTRUCTIONS FOR THE ELECTRICAL
CONNECTION......................................................10
6 TOOLS .................................................................10
7 PREPARING THE APPLIANCE ...........................11
8 PREPARING THE UNITS.....................................12
9 INSTALLING THE APPLIANCE...........................12
10 PREPARING THE FURNITURE PANEL ..............13
11 INSTALLING THE FURNITURE PANEL ..............13
12 ADJUSTING THE FURNITURE PANEL...............15
13 SCREWING THE FURNITURE PANEL IN
TIGHTLY ..............................................................15
1 Scope of delivery
After unpacking all parts, check for any damage in
transit and completeness of the delivery.
¡Appliance
¡Front panel
¡Tilt protection (2 pcs)
¡Wood screw for the tilt protection (4 pcs)
¡Oil filter
¡Power cord
¡Mounting bracket (2 pcs)
¡Installation aid for the mounting bracket
¡Wood screws for the angle bracket (4 pcs)
¡Decorative panel 10.5mm (2 pcs)
¡Decorative panel 12.5mm (2 pcs)
¡Metric screw (4 pcs)
¡Threaded sleeve (6 pcs)
¡Metric screw (6 pcs)
¡Concave washer (2 pcs)
¡Adhesive buffers
¡Double-sided adhesive tape (3 pcs)
2 Unit dimensions
You will find the dimensions of the appliance here

en Safety clearances
10
3 Safety clearances
Comply with the safety clearances for the appliance.
Installing the appliance under the worktop
If the worktop overlaps with the furniture cavity by too
much, this may lead to collisions with the glass cover
in the vacuum-sealing drawer. Note the maximum pos-
sible dimension.
Installation in the fitted unit
Note the safety clearances for installing in the fitted
unit.
4 Safe installation
Follow these safety instructions when in-
stalling the appliance.
WARNING‒Risk of suffocation!
Children may put packaging material over
their heads or wrap themselves up in it and
suffocate.
▶Keep packaging material away from chil-
dren.
▶Do not let children play with packaging ma-
terial.
WARNING‒Risk of electric shock!
If the insulation of the power cord is dam-
aged, this is dangerous.
▶Never let the power cord come into contact
with hot appliance parts or heat sources.
▶Never let the power cord come into contact
with sharp points or edges.
▶Never kink, crush or modify the power
cord.
5 Instructions for the electrical connection
In order to safely connect the appliance to the elec-
trical system, follow these instructions.
¡The appliance must only be connected to a protect-
ive contact socket that has been correctly installed.
Only a qualified electrician may install a socket or
replace the connecting cable, taking the appropriate
regulations into account.
¡The appliance must only be connected with the
power cable provided. Connect the power cable to
the back of the appliance.
¡Connecting cables with various plug types are avail-
able from after-sales service.
¡No multi-plugs, multiple connectors or extension
leads must be used. Overloading causes a risk of
fire.
¡If the plug can no longer be reached after the in-
stallation, a partition must be provided in the phases
in the permanent electrical installation in accord-
ance with the installation regulations.
6 Tools
You require the following tools for the installation.
¡Measuring tape
¡Calliper
¡Pencil
¡Angle bracket
¡Torx 20 screwdriver
¡Large flat-tipped screwdriver
¡Medium-sized flat-tipped screwdriver

Preparing the appliance en
11
¡Combination pliers
¡Cordless combination drill
¡Drill, 4/5/6.5/10 diameter
¡Countersink
7 Preparing the appliance
A pump that contains oil is installed in the appliance. If
the incline is too great, this oil may flow out of the
pump. Do not tip the appliance or upend it.
ATTENTION!
The oil from the vacuum pump may leak out when it is
tipped or tilted, and may damage the appliance.
▶Do not move the appliance if the transport locks for
the pump are not installed.
▶When uninstalling the appliance, secure the trans-
port locks again before moving the appliance.
Requirement:Use a suitable tool to remove the trans-
port locks and install the oil filter.
1. Carefully lift the appliance out of the packaging.
2. Remove the transport lock for the pump from the
top of the appliance.
3. Secure the transport lock to the rear of the appli-
ance for further use.
4. Install the oil filter.
5. Place the lid into the opening and move it to the left.
6. WARNING‒Risk of tipping!
After removing the transportation lock, the drawer
may open and the appliance may tip over.
▶Keep the drawer closed.
▶Weigh down the appliance with a weight.
▶Only open the drawer if the tilt protection is in-
stalled.
Remove the transport lock screws.
7. Insert the power cord at the rear of the appliance.

en Preparing the units
12
8 Preparing the units
1. Install the tilt protection. Ensure that the screws are
mounted in the upper part of the elongated holes.
2. Use the installation aid to secure the mounting
bracket to the unit.
9 Installing the appliance
WARNING‒Risk of electric shock!
If the insulation of the power cord is damaged, this is
dangerous.
▶Never let the power cord come into contact with hot
appliance parts or heat sources.
▶Never let the power cord come into contact with
sharp points or edges.
▶Never kink, crush or modify the power cord.
WARNING‒Risk of injury!
After removing the transport lock, the drawer may open
suddenly during transport.
▶Transport the appliance in such a way that the
drawer does not accidentally open.
1. Insert the power cord into a protective contact
socket.
2. WARNING‒Risk of injury!
The high weight of the appliance may result in injury
when lifted.
▶Do not lift the appliance on your own.
Slide the appliance into the unit.
3. If the appliance cannot slide in, adjust the height of
the tilt protection brackets. To do this, undo the
screws and push the tilt protection brackets up-
wards.
4. Centre the appliance.
5. To check the tilt protection, open the drawer care-
fully.
6. Select appropriate decorative panels.

Preparing the furniture panel en
13
7. To secure the appliance, screw the decorative pan-
els onto the mounting brackets.
The groove on the decorative panel should face out-
wards in each case.
10 Preparing the furniture panel
Requirements
¡The thickness of the furniture panel is at least.
19mm.
¡The width of the furniture panel is 596–590mm.
¡The recommended height of the furniture panel is
142–156mm.
¡The furniture panel is made of wood or wood-like
material.
¡The furniture panel has a handle or a recessed grip.
▶Mark the centre of the top edge of the furniture
panel.
11 Installing the furniture panel
Requirement:Wear gloves.
1. Measure the width of the fitted unit and mark the
centre of the intermediate floor.
2. Use the combination pliers to bend the hooks on
the front panel upwards by 90°.

en Installing the furniture panel
14
3. Mount the front panel on the appliance and push it
downwards as far as it will go.
4. Check whether the front panel is mounted straight.
5. Stick the double-sided adhesive tape to the front
panel as an installation aid.
6. Align the furniture panel and push the front panel
on.
aThe furniture panel sticks to the front panel.
7. Carefully open the drawer.
8. Mark the top edge of the front panel on the furniture
panel.
9. Detach the front panel with the furniture panel.
10. Check the position of the front panel on the furniture
panel.
11. Mark the elongated holes.
12. Loosen the front panel from the furniture panel and
remove the double-sided adhesive tape.
13. Drill the holes in the middle of elongated holes.
14. Countersink the holes.
15. Screw in the threaded sleeves until they are flush
with the surface of the furniture panel.
16. Install the handle on the furniture panel because the
screws for the handle are no longer accessible fol-
lowing installation of the front panel. The screws for
the handle must be countersunk.
17. Place the front panel on the furniture panel and
align it.
18. Screw the front panel in loosely using the concave
washers and the screws. Do not tighten the screws
to ensure that the panel can still move.
19. Realign the front panel with the furniture panel.

Adjusting the furniture panel en
15
20. Screw in the side screws and tighten them. 21. Mount the furniture panel with the front panel on the
appliance.
12 Adjusting the furniture panel
If required, adjust the furniture panel vertically.
1. Open the drawer.
2. Loosen the side screws.
3. Move the furniture panel upwards or downwards.
4. Tighten the side screws again.
13 Screwing the furniture panel in tightly
▶Connect the furniture panel to the side panels.

es Volumen de suministro
16
Tabla de contenidos
1 VOLUMEN DE SUMINISTRO...............................16
2 MEDIDAS DEL APARATO...................................16
3 DISTANCIAS DE SEGURIDAD............................17
4 MONTAJE SEGURO............................................17
5 ADVERTENCIAS PARA LA CONEXIÓN
ELÉCTRICA .........................................................17
6 HERRAMIENTAS .................................................17
7 PREPARAR EL APARATO..................................18
8 PREPARAR LOS MUEBLES ...............................19
9 MONTAR EL APARATO ......................................19
10 PREPARAR EL FRONTAL DEL MUEBLE ..........20
11 MONTAR EL FRONTAL DEL MUEBLE...............20
12 AJUSTAR EL FRONTAL DEL MUEBLE..............22
13 ATORNILLAR EL FRONTAL DEL MUEBLE .......23
1 Volumen de suministro
Al desembalar el aparato, comprobar que estén todas
las piezas y que no presenten daños ocasionados du-
rante el transporte.
¡Aparato
¡Chapa frontal
¡2 seguros contra vuelco
¡4 tornillos para madera para los seguros contra
vuelco
¡Filtro de aceite
¡Cable de conexión a la red
¡2 ángulos de fijación
¡Ayuda para la instalación de los ángulos de fijación
¡4 tornillos para madera para los ángulos de fijación
¡2 chapas decorativas de 10,5mm
¡2 chapas decorativas de 12,5mm
¡4 tornillos métricos
¡6 casquillos roscados
¡6 tornillos métricos
¡2 arandelas curvadas
¡Tope adhesivo
¡3 cintas adhesivas de doble cara
2 Medidas del aparato
Aquí se pueden consultar las dimensiones del aparato.

Distancias de seguridad es
17
3 Distancias de seguridad
Respetar las distancias de seguridad del aparato.
Montaje debajo de la encimera
Si la encimera sobresale en exceso de la cavidad del
mueble pueden producirse colisiones con la tapa de
cristal del cajón de envasado al vacío. Tener en cuenta
las dimensiones máximas.
Montaje en muebles empotrados
Respetar las distancias de seguridad para el montaje
en muebles empotrados.
4 Montaje seguro
Tener en cuenta estas indicaciones de seguri-
dad al montar el aparato.
ADVERTENCIA‒¡Riesgo de asfixia!
Los niños pueden ponerse el material de em-
balaje por encima de la cabeza, o bien enro-
llarse en él, y asfixiarse.
▶Mantener el material de embalaje fuera del
alcance de los niños.
▶No permita que los niños jueguen con el
embalaje.
ADVERTENCIA‒¡Riesgo de descarga
eléctrica!
Un aislamiento incorrecto del cable de cone-
xión de red es peligroso.
▶Evitar siempre que el cable de conexión de
red entre en contacto con piezas calientes
del aparato o fuentes de calor.
▶Evite siempre que el cable de conexión de
red entre en contacto con esquinas o bor-
des afilados.
▶No doble, aplaste ni modifique nunca el ca-
ble de conexión de red.
5 Advertencias para la conexión eléctrica
Para conectar eléctricamente el aparato de forma se-
gura, consultar estas indicaciones.
¡El aparato solo podrá conectarse a una toma de co-
rriente de instalación reglamentaria y provista de to-
ma de tierra. La instalación de un enchufe o el cam-
bio del cable de alimentación debe realizarlos siem-
pre un técnico electricista experto cumpliendo con
las normas pertinentes.
¡El aparato solo puede conectarse con el cable de
conexión suministrado. Conectar el cable de cone-
xión en la parte posterior del aparato.
¡Pueden adquirirse cables de conexión con diversos
tipos de conectores a través del servicio de Aten-
ción al Cliente.
¡No utilizar enchufes múltiples, regletas ni alargado-
res. Existe riesgo de incendio en caso de sobrecar-
ga.
¡Según la normativa, si el enchufe ya no es accesi-
ble tras el montaje, la instalación eléctrica con toma
de tierra deberá constar de un dispositivo de sepa-
ración en las fases.
6 Herramientas
Para el montaje se necesitan las siguientes herramien-
tas.
¡Cinta métrica
¡Calibre
¡Lápiz
¡Ángulo

es Preparar el aparato
18
¡Destornillador de cabeza Torx 20
¡Destornillador plano grande
¡Destornillador plano mediano
¡Alicates
¡Taladro a batería
¡Brocas Ø4/Ø5/Ø6,5/Ø10
¡Broca avellanadora
7 Preparar el aparato
Colocar en el aparato una bomba que contenga aceite.
Si la inclinación es muy grande, el aceite puede derra-
marse fuera de la bomba. No inclinar el aparato ni co-
locarlo de canto.
¡ATENCIÓN!
El aceite de la bomba de vacío podría derramarse si
esta se inclina o vuelca, y con ello dañar el aparato.
▶No mover el aparato sin haber instalado previamen-
te el seguro de transporte para la bomba.
▶Volver a fijar el seguro de transporte tras desmon-
tarlo y antes de moverlo.
Requisito:Utilizar la herramienta apropiada para retirar
el seguro de transporte y para montar el filtro de acei-
te.
1. Sacar el aparato del embalaje tirando de él hacia
arriba.
2. Retirar el seguro de transporte para la bomba de la
parte superior del aparato.
3. Fijar el seguro de transporte a la parte posterior del
aparato para futuros usos.
4. Montar el filtro de aceite.
5. Colocar la tapa en la abertura y desplazar hacia la
izquierda.

Preparar los muebles es
19
6. ADVERTENCIA‒Riesgo de vuelco!
Después de retirar el seguro de transporte, el cajón
puede abrirse y el aparato puede volcar.
▶Mantener cerrado el cajón.
▶Pesar el aparato con un peso.
▶Abrir el cajón solo cuando se haya instalado el
seguro contra vuelco.
Retirar los tornillos de fijación para el transporte.
7. Conectar el cable de conexión a la red en la parte
posterior del aparato.
8 Preparar los muebles
1. Montar el seguro contra vuelco. Comprobar que los
tornillos estén fijados en la parte superior de los ori-
ficios.
2. Fijar los ángulos de fijación con la ayuda para la
instalación en el mueble.
9 Montar el aparato
ADVERTENCIA‒¡Riesgo de descarga eléctrica!
Un aislamiento incorrecto del cable de conexión de red
es peligroso.
▶Evitar siempre que el cable de conexión de red en-
tre en contacto con piezas calientes del aparato o
fuentes de calor.
▶Evitar siempre que el cable de conexión de red en-
tre en contacto con esquinas o bordes afilados.
▶No doblar, aplastar ni modificar nunca el cable de
conexión de red.
ADVERTENCIA‒¡Riesgo de lesiones!
Después de retirar el seguro de transporte, el cajón
puede abrirse al transportar el aparato de manera
brusca.
▶Transportar el aparato de manera que el cajón no
se abra por error.
1. Conectar el cable de conexión a la red a una toma
de corriente provista de toma de tierra.

es Preparar el frontal del mueble
20
2. ADVERTENCIA‒Riesgo de lesiones!
El elevado peso del aparato puede causar lesiones
al levantarlo.
▶Una sola persona no puede levantar el aparato.
Introducir el aparato en el mueble.
3. Si no es posible introducir el aparato, ajustar el án-
gulo del seguro contra vuelco en altura. Para ello,
aflojar los tornillos y colocar el ángulo del seguro
contra vuelco hacia arriba.
4. Centrar el aparato.
5. Abrir el cajón con cuidado para comprobar el ángu-
lo del seguro contra vuelco.
6. Seleccionar una chapa decorativa adecuada.
7. Para fijar el aparato, atornillar las chapas decorati-
vas a los ángulos de fijación.
La ranura de la chapa decorativa se encuentra ha-
cia afuera.
10 Preparar el frontal del mueble
Requisitos
¡El frontal del mueble debe tener un grosor mín. de
19mm.
¡El frontal del mueble debe tener un ancho de
590-596mm.
¡El frontal del mueble debe tener una altura recomen-
dada de 142-156mm.
¡El frontal del mueble debe ser de madera o de al-
gún material similar.
¡El frontal del mueble debe tener un asa o un tirador
embutido.
▶Marcar el centro del borde superior del frontal del
mueble.
11 Montar el frontal del mueble
Requisito:Usar guantes.
La pagina si sta caricando...
La pagina si sta caricando...
La pagina si sta caricando...
La pagina si sta caricando...
La pagina si sta caricando...
La pagina si sta caricando...
La pagina si sta caricando...
La pagina si sta caricando...
La pagina si sta caricando...
La pagina si sta caricando...
La pagina si sta caricando...
La pagina si sta caricando...
La pagina si sta caricando...
La pagina si sta caricando...
La pagina si sta caricando...
La pagina si sta caricando...
La pagina si sta caricando...
La pagina si sta caricando...
La pagina si sta caricando...
La pagina si sta caricando...
La pagina si sta caricando...
La pagina si sta caricando...
La pagina si sta caricando...
La pagina si sta caricando...
La pagina si sta caricando...
La pagina si sta caricando...
La pagina si sta caricando...
La pagina si sta caricando...
-
 1
1
-
 2
2
-
 3
3
-
 4
4
-
 5
5
-
 6
6
-
 7
7
-
 8
8
-
 9
9
-
 10
10
-
 11
11
-
 12
12
-
 13
13
-
 14
14
-
 15
15
-
 16
16
-
 17
17
-
 18
18
-
 19
19
-
 20
20
-
 21
21
-
 22
22
-
 23
23
-
 24
24
-
 25
25
-
 26
26
-
 27
27
-
 28
28
-
 29
29
-
 30
30
-
 31
31
-
 32
32
-
 33
33
-
 34
34
-
 35
35
-
 36
36
-
 37
37
-
 38
38
-
 39
39
-
 40
40
-
 41
41
-
 42
42
-
 43
43
-
 44
44
-
 45
45
-
 46
46
-
 47
47
-
 48
48


in altre lingue
- English: Gaggenau DV061100 User manual
- français: Gaggenau DV061100 Manuel utilisateur
- español: Gaggenau DV061100 Manual de usuario
- Deutsch: Gaggenau DV061100 Benutzerhandbuch
- Nederlands: Gaggenau DV061100 Handleiding
Altri documenti
-
 Balmani 26427 Guida d'installazione
-
 Balmani 26430 Guida d'installazione
-
Bosch HBA21B360J/35 Manuale utente
-
Bosch EQ391EK00(00) Manuale utente
-
Bosch HBC36D750B/03 Manuale del proprietario
-
Siemens HB53CR550/48 Manuale utente
-
Bosch WIW24341EU/01 Repair Hints
-
Siemens HB86P585/45 Manuale utente
-
Bosch HBC34D554B Manuale del proprietario
-
ROSIERES RBLP3683/3 Manuale utente

