Yamaha YDP-S52 Manuale utente
- Categoria
- Apparecchiature musicali supplementari
- Tipo
- Manuale utente
Questo manuale è adatto anche per

ES
Owner’s Manual
Mode d’emploi
Manual de instrucciones
Before using the instrument, be sure to read “PRECAUTIONS” on pages 5-7.
For information on assembling the instrument, refer to the instructions at the end of this
manual.
Avant d’utiliser l’instrument, lisez attentivement la section « PRÉCAUTIONS D’USAGE »
aux pages 5 et 7.
Pour plus d’informations sur l’assemblage de l’instrument, reportez-vous aux instructions
figurant à la fin de ce manuel.
Antes de utilizar el instrumento, lea las “PRECAUCIONES”, en las páginas 5-7.
Para obtener más información sobre el montaje del instrumento, consulte las
instrucciones que encontrará al final de este manual.
EnglishFrançaisEspañol
FR
EN
YDP
-
S52
Digital Piano / Piano Numérique / Piano Digital

2
YDP-S52 Owner’s Manual
SPECIAL MESSAGE SECTION
This product utilizes batteries or an external power supply
(adapter). DO NOT connect this product to any power supply
or adapter other than one described in the manual, on the
name plate, or specifically recommended by Yamaha.
WARNING:
Do not place this product in a position where
anyone could walk on, trip over, or roll anything over power or
connecting cords of any kind. The use of an extension cord is
not recommended! If you must use an extension cord, the
minimum wire size for a 25' cord (or less) is 18 AWG. NOTE:
The smaller the AWG number, the larger the current handling
capacity. For longer extension cords, consult a local
electrician.
This product should be used only with the components
supplied or; a cart, rack, or stand that is recommended by
Yamaha. If a cart, etc., is used, please observe all safety
markings and instructions that accompany the accessory
product.
SPECIFICATIONS SUBJECT TO CHANGE:
The information contained in this manual is believed to be
correct at the time of printing. However, Yamaha reserves the
right to change or modify any of the specifications without
notice or obligation to update existing units.
This product, either alone or in combination with an amplifier
and headphones or speaker/s, may be capable of producing
sound levels that could cause permanent hearing loss. DO
NOT operate for long periods of time at a high volume level or
at a level that is uncomfortable. If you experience any hearing
loss or ringing in the ears, you should consult an audiologist.
IMPORTANT: The louder the sound, the shorter the time period
before damage occurs.
Some Yamaha products may have benches and/or accessory
mounting fixtures that are either supplied with the product or
as optional accessories. Some of these items are designed to
be dealer assembled or installed. Please make sure that
benches are stable and any optional fixtures (where
applicable) are well secured BEFORE using.
Benches supplied by Yamaha are designed for seating only.
No other uses are recommended.
NOTICE:
Service charges incurred due to a lack of knowledge relating
to how a function or effect works (when the unit is operating as
designed) are not covered by the manufacturer’s warranty,
and are therefore the owners responsibility. Please study this
manual carefully and consult your dealer before requesting
service.
ENVIRONMENTAL ISSUES:
Yamaha strives to produce products that are both user safe
and environmentally friendly. We sincerely believe that our
products and the production methods used to produce them,
meet these goals. In keeping with both the letter and the spirit
of the law, we want you to be aware of the following:
Battery Notice:
This product MAY contain a small non-rechargeable battery
which (if applicable) is soldered in place. The average life
span of this type of battery is approximately five years. When
replacement becomes necessary, contact a qualified service
representative to perform the replacement.
This product may also use “household” type batteries. Some
of these may be rechargeable. Make sure that the battery
being charged is a rechargeable type and that the charger is
intended for the battery being charged.
When installing batteries, never mix old batteries with new ones,
and never mix different types of batteries. Batteries MUST be
installed correctly. Mismatches or incorrect installation may
result in overheating and battery case rupture.
Warning:
Do not attempt to disassemble, or incinerate any battery. Keep
all batteries away from children. Dispose of used batteries
promptly and as regulated by the laws in your area. Note:
Check with any retailer of household type batteries in your
area for battery disposal information.
Disposal Notice:
Should this product become damaged beyond repair, or for
some reason its useful life is considered to be at an end,
please observe all local, state, and federal regulations that
relate to the disposal of products that contain lead, batteries,
plastics, etc. If your dealer is unable to assist you, please
contact Yamaha directly.
NAME PLATE LOCATION:
The name plate is located on the bottom of the product. The
model number, serial number, power requirements, etc., are
located on this plate. You should record the model number,
serial number, and the date of purchase in the spaces
provided below and retain this manual as a permanent record
of your purchase.
Model
Serial No.
Purchase Date
PLEASE KEEP THIS MANUAL
92-BP (bottom)
For YDP-S52

3
YDP-S52 Owner’s Manual
1. IMPORTANT NOTICE: DO NOT MODIFY THIS
UNIT!
This product, when installed as indicated in the instruc-
tions contained in this manual, meets FCC requirements.
Modifications not expressly approved by Yamaha may
void your authority, granted by the FCC, to use the prod-
uct.
2. IMPORTANT: When connecting this product to accesso-
ries and/or another product use only high quality shielded
cables. Cable/s supplied with this product MUST be used.
Follow all installation instructions. Failure to follow instruc-
tions could void your FCC authorization to use this prod-
uct in the USA.
3. NOTE: This product has been tested and found to com-
ply with the requirements listed in FCC Regulations, Part
15 for Class “B” digital devices. Compliance with these
requirements provides a reasonable level of assurance
that your use of this product in a residential environment
will not result in harmful interference with other electronic
devices. This equipment generates/uses radio frequen-
cies and, if not installed and used according to the instruc-
tions found in the users manual, may cause interference
harmful to the operation of other electronic devices. Com-
pliance with FCC regulations does not guarantee that
interference will not occur in all installations. If this product
is found to be the source of interference, which can be
determined by turning the unit “OFF” and “ON”, please try
to eliminate the problem by using one of the following
measures:
Relocate either this product or the device that is being
affected by the interference.
Utilize power outlets that are on different branch (circuit
breaker or fuse) circuits or install AC line filter/s.
In the case of radio or TV interference, relocate/reorient
the antenna. If the antenna lead-in is 300 ohm ribbon
lead, change the lead-in to co-axial type cable.
If these corrective measures do not produce satisfactory
results, please contact the local retailer authorized to dis-
tribute this type of product. If you can not locate the
appropriate retailer, please contact Yamaha Corporation
of America, Electronic Service Division, 6600 Orangetho-
rpe Ave, Buena Park, CA90620
The above statements apply ONLY to those products dis-
tributed by Yamaha Corporation of America or its subsid-
iaries.
* This applies only to products distributed by YAMAHA CORPORATION OF AMERICA. (class B)
FCC INFORMATION (U.S.A.)
* This applies only to products distributed by
YAMAHA CORPORATION OF AMERICA.
COMPLIANCE INFORMATION STATEMENT
(DECLARATION OF CONFORMITY
PROCEDURE)
Responsible Party : Yamaha Corporation of America
Address : 6600 Orangethorpe Ave.,
Buena Park, Calif. 90620
Telephone : 714-522-9011
Type of Equipment : Digital Piano
Model Name : YDP-S52
This device complies with Part 15 of the FCC Rules.
Operation is subject to the following two conditions:
1) this device may not cause harmful interference, and
2) this device must accept any interference received
including interference that may cause undesired opera-
tion.
See user manual instructions if interference to radio recep-
tion is suspected.
(FCC DoC)
For YDP-S52
For AC adaptor and YDP-S52

4
YDP-S52 Owner’s Manual
The above warning is located on the bottom of the unit.
Explanation of Graphical Symbols
The lightning flash with arrowhead symbol
within an equilateral triangle is intended to
alert the user to the presence of uninsulated
“dangerous voltage” within the product’s
enclosure that may be of sufficient
magnitude to constitute a risk of electric
shock to persons.
The exclamation point within an
equilateral triangle is intended to alert the
user to the presence of important operating
and maintenance (servicing) instructions in
the literature accompanying the product.
IMPORTANT SAFETY INSTRUCTIONS
1 Read these instructions.
2 Keep these instructions.
3 Heed all warnings.
4 Follow all instructions.
5 Do not use this apparatus near water.
6 Clean only with dry cloth.
7 Do not block any ventilation openings. Install in
accordance with the manufacturer’s instructions.
8 Do not install near any heat sources such as
radiators, heat registers, stoves, or other
apparatus (including amplifiers) that produce
heat.
9 Do not defeat the safety purpose of the polarized
or grounding-type plug. A polarized plug has two
blades with one wider than the other. A grounding
type plug has two blades and a third grounding
prong. The wide blade or the third prong are
provided for your safety. If the provided plug does
not fit into your outlet, consult an electrician for
replacement of the obsolete outlet.
10 Protect the power cord from being walked on or
pinched particularly at plugs, convenience
receptacles, and the point where they exit from the
apparatus.
11 Only use attachments/accessories specified by
the manufacturer.
12 Use only with the cart,
stand, tripod, bracket, or
table specified by the
manufacturer, or sold with
the apparatus. When a cart
is used, use caution when
moving the cart/apparatus
combination to avoid injury
from tip-over.
13 Unplug this apparatus during lightning storms or
when unused for long periods of time.
14 Refer all servicing to qualified service personnel.
Servicing is required when the apparatus has
been damaged in any way, such as power-supply
cord or plug is damaged, liquid has been spilled or
objects have fallen into the apparatus, the
apparatus has been exposed to rain or moisture,
does not operate normally, or has been dropped.
(UL60065_03)
CAUTION: TO REDUCE THE RISK OF
ELECTRIC SHOCK, DO NOT REMOVE
COVER (OR BACK). NO USER-SERVICEABLE
PARTS INSIDE. REFER SERVICING TO
QUALIFIED SERVICE PERSONNEL.
CAUTION
RISK OF ELECTRIC SHOCK
DO NOT OPEN
WARNING
TO REDUCE THE RISK OF FIRE OR ELECTRIC SHOCK, DO NOT EXPOSE THIS APPARATUS TO RAIN OR
MOISTURE.
This device complies with Part 15 of the FCC Rules. Oper-
ation is subject to the following two conditions:
(1) this device may not cause harmful interference, and (2)
this device must accept any interference received, includ-
ing interference that may cause undesired operation.
(fcc_sengen-C)
CAN ICES-3 (B)/NMB-3(B)
• This applies only to products distributed by Yamaha Canada
Music Ltd.
• Ceci ne s’applique qu’aux produits distribués par Yamaha
Canada Musique Ltée.
(can_b_01)
For AC adaptor

5
YDP-S52 Owner’s Manual
PRECAUTIONS
PLEASE READ CAREFULLY BEFORE PROCEEDING
Please keep this manual in a safe and handy place for future reference.
WARNING
• This AC adaptor is designed for use with only Yamaha electronic instruments. Do
not use for any other purpose.
• Indoor use only. Do not use in any wet environments.
CAUTION
• When setting up, make sure that the AC outlet is easily accessible. If some
trouble or malfunction occurs, immediately turn off the power switch of the
instrument and disconnect the AC adaptor from the outlet. When the AC adaptor
is connected to the AC outlet, keep in mind that electricity is flowing at the
minimum level, even if the power switch is turned off. When you are not using
the instrument for a long time, make sure to unplug the power cord from the wall
AC outlet.
WARNING
Always follow the basic precautions listed below to avoid the possibility of serious injury or even death from electrical
shock, short-circuiting, damages, fire or other hazards. These precautions include, but are not limited to, the
following:
• Do not place the power cord near heat sources such as heaters or radiators. Also,
do not excessively bend or otherwise damage the cord, or place heavy objects on
it.
• Only use the voltage specified as correct for the instrument. The required voltage
is printed on the name plate of the instrument.
• Use the specified adaptor (page 33) only. Using the wrong adaptor can result in
damage to the instrument or overheating.
• Check the electric plug periodically and remove any dirt or dust which may have
accumulated on it.
• This instrument contains no user-serviceable parts. Do not open the instrument
or attempt to disassemble or modify the internal components in any way. If it
should appear to be malfunctioning, discontinue use immediately and have it
inspected by qualified Yamaha service personnel.
• Do not expose the instrument to rain, use it near water or in damp or wet
conditions, or place on it any containers (such as vases, bottles or glasses)
containing liquids which might spill into any openings. If any liquid such as
water seeps into the instrument, turn off the power immediately and unplug the
power cord from the AC outlet. Then have the instrument inspected by qualified
Yamaha service personnel.
• Never insert or remove an electric plug with wet hands.
• Do not put burning items, such as candles, on the unit. A burning item may fall
over and cause a fire.
• When one of the following problems occur, immediately turn off the power switch
and disconnect the electric plug from the outlet. Then have the device inspected
by Yamaha service personnel.
- The power cord or plug becomes frayed or damaged.
- It emits unusual smells or smoke.
- Some object has been dropped into the instrument.
- There is a sudden loss of sound during use of the instrument.
For AC adaptor
For YDP-S52
Power supply/AC adaptor
Do not open
Water warning
Fire warning
If you notice any abnormality
DMI-5 1/2

6
YDP-S52 Owner’s Manual
CAUTION
Always follow the basic precautions listed below to avoid the possibility of physical injury to you or others, or damage
to the instrument or other property. These precautions include, but are not limited to, the following:
• Do not connect the instrument to an electrical outlet using a multiple-connector.
Doing so can result in lower sound quality, or possibly cause overheating in the
outlet.
• When removing the electric plug from the instrument or an outlet, always hold
the plug itself and not the cord. Pulling by the cord can damage it.
• Remove the electric plug from the outlet when the instrument is not to be used for
extended periods of time, or during electrical storms.
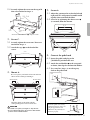
• Read carefully the attached documentation explaining the assembly process.
Failure to assemble the instrument in the proper sequence might result in
damage to the instrument or even injury.
• Be sure to attach the anti-fall brackets to the instrument, to ensure stability.
Failure to do so might result in damage to the instrument or even injury.
• Do not place the instrument in an unstable position where it might accidentally
fall over.
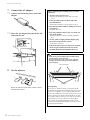
• When transporting or moving the instrument, always use two or more people.
Attempting to lift the instrument by yourself may damage your back, result in
other injury, or cause damage to the instrument itself.
• Before moving the instrument, remove all connected cables, to prevent damage
to the cables or injury to anyone who might trip over them.
• When setting up the product, make sure that the AC outlet you are using is easily
accessible. If some trouble or malfunction occurs, immediately turn off the power
switch and disconnect the plug from the outlet. Even when the power switch is
turned off, electricity is still flowing to the product at the minimum level. When
you are not using the product for a long time, make sure to unplug the power
cord from the wall AC outlet.
• Use only the stand specified for the instrument. When attaching it, use the
provided screws only. Failure to do so could cause damage to the internal
components or result in the instrument falling over.
• Before connecting the instrument to other electronic components, turn off the
power for all components. Before turning the power on or off for all components,
set all volume levels to minimum.
• Be sure to set the volumes of all components at their minimum levels and
gradually raise the volume controls while playing the instrument to set the
desired listening level.
• Do not insert a finger or hand in any gaps on the key cover or instrument. Also
take care that the key cover does not pinch your finger.
• Never insert or drop paper, metallic, or other objects into the gaps on the key
cover, panel or keyboard. This could cause physical injury to you or others,
damage to the instrument or other property, or operational failure.
• Do not rest your weight on, or place heavy objects on the instrument, and do not
use excessive force on the buttons, switches or connectors.
• Do not use the instrument/device or headphones for a long period of time at a
high or uncomfortable volume level, since this can cause permanent hearing
loss. If you experience any hearing loss or ringing in the ears, consult a
physician.
Always turn the power off when the instrument is not in use.
Even when the [ ] (Standby/On) switch is in standby status (power lamp is off), electricity is still flowing to the instrument at the minimum level.
When you are not using the instrument for a long time, make sure you unplug the power cord from the wall AC outlet.
Power supply/AC adaptor
Assembly
Location
Connections
Handling caution
Yamaha cannot be held responsible for damage caused by improper use or modifications to the instrument, or data that is lost or destroyed.
DMI-5 2/2

7
YDP-S52 Owner’s Manual
NOTICE
To avoid the possibility of malfunction/ damage to the product,
damage to data, or damage to other property, follow the notices
below.
Handling
• Do not use the instrument in the vicinity of a TV, radio,
stereo equipment, mobile phone, or other electric devices.
Otherwise, the instrument, TV, or radio may generate noise.
When you use the instrument along with an application on
your iPad, iPhone or iPod touch, we recommend that you set
“Airplane Mode” to “ON” on that device in order to avoid
noise caused by communication.
• Do not expose the instrument to excessive dust or
vibrations, or extreme cold or heat (such as in direct
sunlight, near a heater, or in a car during the day) to prevent
the possibility of panel disfiguration, damage to the internal
components or unstable operation. (Verified operating
temperature range: 5° – 40°C, or 41° – 104°F.)
• Do not place vinyl, plastic or rubber objects on the
instrument, since this might discolor the panel or keyboard.
Maintenance
• When cleaning the instrument, use a soft and dry/slightly
damp cloth. Do not use paint thinners, solvents, alcohol,
cleaning fluids, or chemical-impregnated wiping cloths.
• During extreme changes in temperature or humidity,
condensation may occur and water may collect on the
surface of the instrument. If water is left, the wooden parts
may absorb the water and be damaged. Make sure to wipe
any water off immediately with a soft cloth.
• As with an acoustic piano, pedals may become tarnished
across the ages. When this occurs, polish the pedal with a
compound designed for piano pedals. Before using the
compound, make sure to read the instructions for proper
usage.
Saving data
• Some of the data of this instrument (page 28) are retained
when the power is turned off. However, the saved data may
be lost due to some failure, an operation mistake, etc. Save
your important data onto an external device such as a
computer (page 28).
Information
About copyrights
• Copying of the commercially available musical data
including but not limited to MIDI data and/or audio data is
strictly prohibited except for your personal use.
• This product incorporates and bundles contents in which
Yamaha owns copyrights or with respect to which Yamaha
has license to use others' copyrights. Due to copyright laws
and other relevant laws, you are NOT allowed to distribute
media in which these contents are saved or recorded and
remain virtually the same or very similar to those in the
product.
* The contents described above include a computer
program, Accompaniment Style data, MIDI data, WAVE
data, voice recording data, a score, score data, etc.
* You are allowed to distribute medium in which your
performance or music production using these contents is
recorded, and the permission of Yamaha Corporation is
not required in such cases.
About functions/data bundled with the
instrument
• Some of the preset songs have been edited for length or
arrangement, and may not be exactly the same as the
original.
About this manual
• The illustrations as shown in this manual are for
instructional purposes only, and may appear somewhat
different from those on your instrument.
• iPhone, iPad and iPod touch are trademarks of Apple Inc.,
registered in the U.S. and other countries.
• The company names and product names in this manual are
the trademarks or registered trademarks of their respective
companies.
Tuning
• Unlike an acoustic piano, this instrument does not need to
be tuned by an expert (although the pitch can be user-
adjusted to match other instruments). This is because the
pitch of digital instruments is always maintained perfectly.
The model number, serial number, power requirements, etc., may be
found on or near the name plate, which is at the bottom of the unit.
You should note this serial number in the space provided below and
retain this manual as a permanent record of your purchase to aid iden-
tification in the event of theft.
Model No.
Serial No.
(bottom_en_01)
The name plate is located on the bottom of the unit.

8
YDP-S52 Owner’s Manual
Table of Contents
PRECAUTIONS .................................... 5
About the Manuals ................................ 9
Included Accessories ............................. 9
Panel Controls and Terminals.............10
Basic Operations
Setting Up.............................................11
Key Cover and Music Rest ......................................11
Turning the Power On.............................................12
Auto Power Off Function........................................13
Using Headphones ...................................................13
Playing the Piano..................................14
Setting the Volume...................................................14
Intelligent Acoustic Control (IAC)........................14
Using the Pedals........................................................15
Using the Damper Resonance ................................15
Setting the Operation Confirmation Sounds........16
Changing the Touch Sensitivity .............................16
Using the Metronome..............................................17
Advanced Operations
Playing Various Musical Instrument
Sounds (Voices)....................................18
Selecting a Voice.......................................................18
Listening to the Demo Songs ..................................19
Adding Variations to the Sound (Reverb) ............20
Transposing the Pitch in Semitones ......................21
Fine-tuning the Pitch ...............................................21
Layering Two Voices (Dual mode) ........................22
Playing Duo...............................................................23
Song Playback and Practice .................24
Listening to 50 Preset Songs....................................24
Practicing a One-Hand Part....................................25
Playing from the Top of the Bar Including a Rest or
Blank...........................................................................25
Recording Your Performance .............26
Recording Your Performance ................................ 26
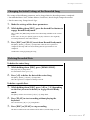
Changing the Initial Settings of the Recorded Song
....................................................................................27
Deleting Recorded Data ..........................................27
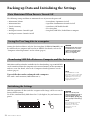
Backing up Data and Initializing the
Settings................................................. 28
Data Maintained When Power is Turned Off...... 28
Saving the User Song data to a computer.............28
Transferring SMF Files Between a Computer and
this Instrument.........................................................28
Initializing the Settings............................................ 28
Appendix
Troubleshooting ..................................29
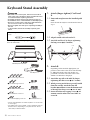
Keyboard Stand Assembly...................30
Specifications .......................................33
Index.....................................................34

9
YDP-S52 Owner’s Manual
Thank you for choosing the Yamaha digital piano.
In order to make the most of the performance potential and features of the instrument,
please read the manuals thoroughly, and keep them in a handy place for later reference.
About the Manuals
This instrument has the following manuals.
Included Manuals
Owner’s Manual (this book)
Explains how to use the instrument.
Quick Operation Guide (separate
sheet)
Shows in chart form the functions assigned to the
buttons and the keyboard for quick
understanding.
Online Manuals (PDF)
iPhone/iPad Connection Manual
Explains how to connect the instrument to a smart
device, such as iPhone, iPad.
Computer-related Operations
Includes instructions on connecting this
instrument to a computer, and operations related
to transferring song data.
MIDI Reference
Contains the MIDI Data Format and MIDI
Implementation chart, as well as descriptions on
MIDI functions such as MIDI channel and Local
Control settings.
MIDI Basics (only in English, French
and German)
Contains basic explanations about MIDI.
To obtain these manuals, access the Yamaha
Downloads website, select your country, enter
“YDP-S52” in the Model Name box, then click
[SEARCH].
Included Accessories
•Owner’s Manual (this book)
• Quick Operation Guide (separate sheet)
• “50 Greats for the Piano” (music book)
• Online Member Product Registration
*1
•Warranty
*2
•AC adaptor
*2
•Power cord
*2
*1 You will need the PRODUCT ID on the sheet in order
to fill out the User Registration form.
*2 May not be included depending on your particular
area. Please check with your Yamaha dealer.
Yamaha Downloads
http://download.yamaha.com/
Smart device application
– Digital Piano Controller
With the specially developed Digital Piano
Controller app running on your iPhone, iPad,
or iPod touch, you can remotely control your
digital piano for even more convenience and
flexibility. By presenting various parameters
on-screen, this app allows you to make
settings in a visual, more intuitive manner. For
more details on Digital Piano Controller, refer
to the following Yamaha web site.
http://yamaha.com/kbdapps/
For instructions on connecting the
instrument to a smart-device, refer to the
“iPhone/iPad Connection Manual.”

10
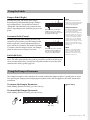
YDP-S52 Owner’s Manual
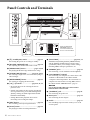
Panel Controls and Terminals
[ ] (Standby/On) switch......................... page 12
For turning the power on or setting to standby.
[MASTER VOLUME] knob ..................... page 14
For adjusting the volume of the entire sound.
[DEMO/SONG] button..................... pages 19, 24
For playing the Demo Songs and the Preset Songs.
[PIANO/VOICE] button............. pages 18, 20, 22
For selecting a single Voice, two Voices for layering or
a Reverb Type.
[METRONOME] button .......................... page 17
For starting or stopping the metronome.
[+R], [–L] buttons ....................... pages 18, 21, 25
• In general, these are for selecting the next or
previous Voice.
• During Song playback, these are for selecting the
next or previous Song, and (while holding down
[PLAY]) turning on/off the right-hand and left-
hand Parts individually.
• During Metronome playback, these are for
increasing or decreasing the Tempo.
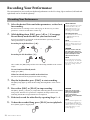
[REC] button............................................ page 26
For recording your keyboard performance.
[PLAY] button.......................................... page 26
For playing back the recorded performance.
[FUNCTION] ................................... pages 16, 21
Simultaneously holding both the [DEMO/SONG]
and the [PIANO/VOICE] buttons and pressing a
specified key allows you to change various settings,
including MIDI, Transpose parameters, etc.
[PHONES] jacks....................................... page 13
For connecting a set of standard stereo headphones.
[USB TO HOST] terminal
For connecting to a computer or a smart device such
as iPhone or iPad. Refer to the online manual
“Computer-related Operations” for connection to a
computer. For instructions on using MIDI, refer to
the online manual “MIDI Reference” (page 9).
NOTICE
Use an AB type USB cable of less than 3 meters.
USB 3.0 cables cannot be used.
[TO PEDAL] jack ..................................... page 31
For connecting the pedal cord.
DC IN jack................................................ page 12
For connecting the AC adaptor.
Pedals ....................................................... page 15
For controlling expression and sustain, just as on an
acoustic piano.
TO PEDAL
16V
PHONES
Rear
(Keyboard side)
Bottom
(Keyboard side)
Bottom
Shows the DC IN and
[TO PEDAL] jacks as
seen when viewed from
the rear of the instrument.

11
YDP-S52 Owner’s Manual
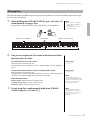
Basic Operations
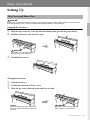
Setting Up
CAUTION
Hold the key cover with both hands when opening or closing it. Do not release it until it is fully opened or closed. Be careful to
avoid catching fingers (yours or others, especially children’s) between the key cover and main unit.
Opening the key cover
1. Hold the edge of the key cover top with both hands, then open the key cover slowly.
2. Fold down the front part of the key cover.
3. Unfold the music rest.
Closing the key cover
1. Fold the music rest.
2. Unfold the front part of the key cover.
3. Hold the key cover with both hands and close it slowly.
Key Cover and Music Rest
CAUTION
Be careful to avoid catching your fingers
when opening or closing the cover.
CAUTION
Be careful to avoid catching your fingers
when opening or closing the cover.
NOTICE
Before closing the key cover, be sure to fold
the music rest and unfold the front part of the
key cover.

Setting Up
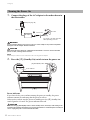
12
YDP-S52 Owner’s Manual
1. Connect the plugs of the AC adaptor in the order shown in
the illustration.
WARNING
Use the specified adaptor (page 33) only. The use of other adaptors may result in irreparable
damage to both the adaptor and the instrument.
CAUTION
Remove the AC plug from the AC outlet when the instrument is not to be used for extended
periods of time, or during electrical storms.
NOTE
Follow this procedure in reverse order when disconnecting the AC adaptor.
2. Press the [ ] (Standby/On) switch to turn the power on.
Power indicator
If you close the key cover without turning the power to standby, the power
indicator remains lit, indicating that the power is still on.
When you’re ready to turn the power to standby, press the [ ](Standby/On)
switch again for a second. The power indicator turns off.
CAUTION
Even when the [ ] (Standby/On) switch is in the standby status, electricity is still flowing to the
instrument at a minimum level. When not using the instrument for an extended period of time, be
sure to unplug the power cord from the wall AC outlet.
Turning the Power On
Power cord
AC outlet
AC adaptor
DC IN jack (page 10)
The shape of the plug and outlet
differ depending on locale.
AC plug
DC plug
Power indicator
[ ] (Standby/On) switch

Setting Up
13
YDP-S52 Owner’s Manual
To prevent unnecessary power consumption, this instrument features an Auto
Power Off function that automatically turns the power off if the instrument is
not operated for approximately 30 minutes. If you do not want to use the Auto
Power Off function, disable the function as described below. The setting
(disabled or enabled) is retained even if the power is turned off.
Disabling the Auto Power Off function
When the instrument is turned off
While holding down the A-1 key (the lowest key), press the
[ ] (Standby/On) to turn the instrument on. The [REC]
indicator flashes three times, indicating the Auto Power
Off function has been disabled.
When the instrument is turned on
While holding down the [DEMO/SONG] and the
[PIANO/VOICE] simultaneously, press the A♯5 key.
Enabling the Auto Power Off function
While holding down the [DEMO/SONG] and the
[PIANO/VOICE] simultaneously, press the A5 key.
Since this instrument is equipped with two [PHONES] jacks, you can connect
two sets of standard stereo headphones. If you are using only one set of
headphones, insert a plug into either jack, which automatically shuts off the
speakers.
CAUTION
Do not use headphones at a high volume for an extended period of time; doing so may cause
hearing loss.
Reproducing a natural sense of distance (Stereophonic Optimizer)
The Stereophonic Optimizer gives you the feeling of playing an actual acoustic
piano — even though you’re listening through headphones. Normally, the
sound comes out from headphones sounds very close to your ears. However,
this Stereophonic Optimizer effect recreates a natural distance or the sense of
physical space between your ears and the instrument, just as when playing an
acoustic piano.
While holding down the [PIANO/VOICE],
press the A♯0 key to turn the function on.
Press the A0 key while holding down the
[PIANO/VOICE] to turn the function off.
Auto Power Off Function
Default setting:
Enable
Lowest key
Highest keyA♯5
Highest keyA5
Using Headphones
PHONES
Standard stereo phone plug
Bottom surface
A0: Off
Lowest key
A♯0: On
Default setting:
On

14
YDP-S52 Owner’s Manual
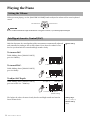
Playing the Piano
When you start playing, use the [MASTER VOLUME] knob to adjust the volume of the entire keyboard
sound.
CAUTION
Do not use this instrument at a high volume level for a long period of time, or your hearing may be damaged.
With this function, the sound quality of this instrument is automatically adjusted
and controlled according to the overall volume. Even when the volume is low,
this lets you hear both low sounds and high sounds clearly.
To tu rn on IAC:
While holding down [PIANO/VOICE],
press the F♯0 key.
To turn off IAC:
While holding down [PIANO/VOICE],
press the F0 key.
To adjust IAC Depth:
While holding down [PIANO/VOICE],
press one of the A-1 – D♯0 keys.
The higher the value, the more clearly that low and high sounds are heard at
lower volume levels.
Setting the Volume
Intelligent Acoustic Control (IAC)
Level decreases. Level increases.
Default setting:
On
F♯0Lowest key
F0Lowest key
C0: depth 0
(Default setting)
Lowest key
A-1: depth -3 D♯0: depth +3
Setting range:
A-1 (-3) – D♯0 (+3)
Default setting:
C0 (0)

Playing the Piano
15
YDP-S52 Owner’s Manual
Damper Pedal (Right)
Pressing this pedal will sustain notes longer.
Releasing this pedal immediately stops (damps)
any sustained notes. This pedal also features a
“half-pedal” function that creates partial sustain
effects, depending on how far down you press the
pedal.
Sostenuto Pedal (Center)
Pressing this pedal while holding the notes will
sustain the pressed notes (as if the Damper Pedal
had been pressed), but all subsequently played
notes will not be sustained. This makes it possible
to sustain a chord or single low note, for example,
while the other notes are played “staccato.”
Soft Pedal (Left)
Pressing this pedal will reduce the volume and slightly change the timbre of the
notes. The notes played before this pedal is pressed are not affected. When you
select the Jazz Organ Voice, pressing the left pedal switches between fast/slow
rotation of the rotary speaker (page 18).
The Damper Resonance effect simulates the sustain sound of the damper pedal on a grand piano, as if you
were pressing the damper pedal and playing the keyboard. This effect is applied to the entire sound of the
instrument.
To turn on the Damper Resonance:
While holding [PIANO/VOICE], press the G♯ 2 key.
To turn off the Damper Resonance:
While holding [PIANO/VOICE], press the G2 key.
Using the Pedals
When you press the damper
pedal here, this note and the
notes you play before you release
the pedal sustain longer.
When you press the sostenuto
pedal here while holding the
note, the note will sustain as
long as you hold the pedal.
NOTE
If the damper pedal doesn’t
work, make sure that the pedal
cord is properly plugged into
the main unit (page 31).
Half-pedal function
This function allows you to vary
the sustain length depending
on how far the pedal is
pressed. The farther down you
press the pedal, the more the
sound sustains. For example, if
you press the damper pedal
and all notes you are playing
sound a bit murky and loud
with too much sustain, you can
release the pedal half way or
higher to decrease the sustain
(murkiness).
NOTE
While the sostenuto pedal is
held, the organ and strings
Voices sound continuously
without decay after the notes
have been released.
Using the Damper Resonance
Default setting:
On
Lowest key G2
(Off)
G♯2
(On)

Playing the Piano
16
YDP-S52 Owner’s Manual
Because of the simple, piano-like design of this instrument, there are a minimum of panel controls, and most
settings are made using the keys of the keyboard. When you turn a function on or off, or change a setting, the
instrument produces a sound to confirm the change. There are three types of sounds used: an ascending
sound for on, a descending sound for off, and clicks for other settings. In the Metronome setting (page 17), a
numeric value is read out when a tempo is specified by a three-digit value using the keyboard.
For the list of functions assigned to the buttons and keys, see “Quick Operation Guide” (separate sheet).
Turning the Operation Confirmation Sounds on
Press the A♯-1 key while holding down the [DEMO/SONG] and the [PIANO/
VOICE] simultaneously.
Turning the Operation Confirmation Sounds off
Press the A-1 key while holding down the [DEMO/SONG] and the [PIANO/
VOICE] simultaneously.
You can specify the Touch Sensitivity (how the sound responds to the way you
play the keys).
While holding down [PIANO/VOICE], press one of the A6 – C7 keys.
Setting the Operation Confirmation Sounds
Default setting:
On
Lowest key A-1
(Off)
(On)
A♯-1
Changing the Touch Sensitivity
NOTE
This setting is disabled with
some Voices, such as an
organ sound.
Default setting:
B6 (Medium)
Key
Touch
Sensitivity
Description
A6 Fixed
The volume level does not change at all regardless of whether you
play the keyboard soft or hard.
A♯6Soft
The volume level does not change much when you play the
keyboard soft or hard.
B6 Medium This is the standard piano touch response.
C7 Hard
The volume level changes very widely from pianissimo to fortissimo
to facilitate dynamic and dramatic expression. You have to hit the
keys hard to produce a loud sound.
A6 Highest key (C7)
B6
A♯6

Playing the Piano
17
YDP-S52 Owner’s Manual
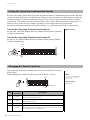
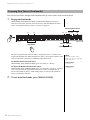
The metronome feature is convenient for practicing with an accurate tempo.
1. Press [METRONOME] to start the Metronome.
2. Press [METRONOME] to stop the Metronome.
Selecting a Beat
While holding down [METRONOME], press one of the C3 – F3 keys.
Adjusting the Tempo
The Metronome tempo can be set from 5 to 280 beats per minute.
•To increase or decrease the value by 1:
While the metronome is playing, press [+R] to increase or [–L] to decrease.
Alternatively, press and hold down [METRONOME], and press the C♯5 key to
increase or B4 key to decrease.
•To increase or decrease the value by 10:
While holding down [METRONOME], press the D5 key to increase or the A♯4 key
to decrease.
•To specify a three-digit value:
While holding down [METRONOME], press the relevant C4 – A4 keys one by one
in order. For example to specify “95,” press the C4 (0), A4 (9) and F4 (5) keys in
order.
•Resetting the value to the default (120)
While holding down [METRONOME], press the [+R] and [–L] simultaneously, or
press the C5 key.
Adjusting the Volume
While holding down [METRONOME], press one of the keys between C1 and G2
to set the volume of the metronome. Pressing a higher key results in higher
volume, while pressing a lower key results in lower volume.
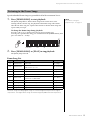
Using the Metronome
22447
13 3056 56
9
11
8
10
12
14 16 19
15 17 18 2013
024579
8631
C♯3
Highest key
D♯3
D3 E3 F3
A♯4
C4
C♯5
A4 D5B4Lowest key C1 G2
Adjusting
the Volume
Selecting
a Beat
Adjusting
the Tempo
D2
(Default
setting)
C5
(Default
setting)
C3
(Default
setting)
Default setting:
0 (C3)
Key Beat
C3 0
C♯32
D3 3
D♯34
E3 5
F3 6
Setting range:
C1 (1) – G2 (20)
Default setting:
D2 (15)
NOTE
A numeric value is read out
when a relevant key is
pressed.

18
YDP-S52 Owner’s Manual
Advanced Operations
Playing Various Musical Instrument Sounds (Voices)
To select “Grand Piano 1”:
Simply press [PIANO/VOICE].
To select another Voice:
After pressing [PIANO/VOICE], press [+R] or [–L] to select the next or previous
Voice.
To select a specific Voice:
While holding down [PIANO/VOICE], press one of the C1 – A1 keys. For details
on which Voice is assigned to each key, see the list below.
Voice List
Selecting a Voice
NOTE
To hear the characteristics of
the Voices, play back the
Demo Songs (page 19).
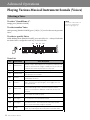
Key Voice Name Voice description
C1 Grand Piano 1
This sound was sampled from a full concert grand piano. It uses
different samples depending on the strength of your playing and
produces smoother tonal changes. Suitable not only for classical
compositions but also for piano pieces of any style.
C♯1 Grand Piano 2 Warm and soft piano sound. Good for playing ballads.
D1 Grand Piano 3
Bright piano sound. Clear tone helps the sound to “cut through”
when playing in an ensemble.
D♯1 E.Piano 1
An electronic piano sound created by FM synthesis. Good for
standard popular music.
E1 E.Piano 2
The sound of an electric piano using hammer-struck metallic
“tines.” Soft tone when played lightly, and an aggressive tone
when played hard.
F1 Harpsichord
The definitive instrument for baroque music. Since harpsichord
uses plucked strings, there is no touch response. There is,
however, a characteristic additional sound when the keys are
released.
F♯1 Vibraphone
Vibraphone played with relatively soft mallets. The tone becomes
more metallic the harder you play.
G1 Pipe Organ
This is a typical pipe organ sound (8 feet + 4 feet + 2 feet). Good
for sacred music from the Baroque period.
G♯1 Jazz Organ
The sound of a “tonewheel” type electric organ. Often heard in
jazz and rock music. The rotary speed of the rotary speaker
effect can be switched by using the left pedal.
A1 Strings
Stereo-sampled, large-scale strings ensemble with realistic
reverb. Try combining this Voice with piano in the Dual mode.
C♯1D♯1F♯1G♯1
C1 D1 E1 F1 G1 A1Lowest key

Playing Various Musical Instrument Sounds (Voices)
19
YDP-S52 Owner’s Manual
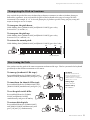
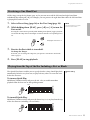
Special individual Demo Songs are provided for all of the instrument Voices.
1. Press [DEMO/SONG] to start playback.
The [PLAY] lamp flashes, and the Demo Song for the current Voice starts.
Starting with the selected song, the playback of the Demo Songs will continue.
After the last demo song, the sequence then returns to the first Demo Song and
repeats until you stop it.
To change the Demo Song during playback:
Press the [+R] or [–L] to change to the next or previous Demo Song.
To change to a specific Demo Song, press and hold down the [DEMO/SONG], then
press one of the C1 – A1 keys.
2. Press [DEMO/SONG] or [PLAY] to stop playback.
The [PLAY] lamp turns off.
Demo Song List
The Demo Songs excluding original Songs are short rearranged excerpts from the original
compositions. The original Demo Songs are Yamaha originals (©2015 Yamaha Corporation).
Listening to the Demo Songs
NOTE
If you want to change the
playback tempo, see page 17.
Key Voice Name Title Composer
C1 Grand Piano 1 Blumenlied G. Lange
C♯1 Grand Piano 2
Von fremden Landern und Menchen,
Kinderszenen op. 15-1
R. Schumann
D1 Grand Piano 3 Original Original
D♯1 E.Piano 1 Original Original
E1 E.Piano 2 Original Original
F1 Harpsichord
Concerto a cembalo obbligato, 2 violini, viola e
continuo No. 7, BWV. 1058
J. S. Bach
F♯1 Vibraphone Original Original
G1 Pipe Organ Herr Christ, der ein’ge Gottes-Sohn, BWV. 601 J. S. Bach
G♯1 Jazz Organ Original Original
A1 Strings Original Original
Lowest key C1 A1

Playing Various Musical Instrument Sounds (Voices)
20
YDP-S52 Owner’s Manual
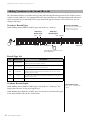
This instrument features several Reverb Types that add extra depth and expression to the sound to create a
realistic acoustic ambience. The appropriate Reverb Type and Depth are called up automatically when you
select each of the Voices and Songs. This is why the Reverb Type need not be selected; however, you can
change it if desired.
To select a Reverb Type:
While holding down [PIANO/VOICE], press one of the C2 – E2 keys.
Reverb Type List
To adjust Reverb Depth:
While holding down [PIANO/VOICE], press one of the C3 – G♯4 keys. The
Depth value increases as you press higher keys.
While holding down [PIANO/VOICE], press the A4 key to set the Reverb Depth
to the most suitable value for the current Voice.
Adding Variations to the Sound (Reverb)
Reverb in Dual Mode
An optimum reverb type for the
combination of Voices is
assigned automatically.
Lowest key
C3: depth 0
G♯4: depth 20
A4
The depth value increases as you
press higher keys.
C♯ 2D♯2
C2 D2 E2
Selecting a
Reverb Type
Adjusting
Reverb Depth
Highest key
Key Reverb Type Description
C2 Recital Hall
Simulates the clear reverb sound you would hear in a medium-
sized concert hall for piano recitals.
C♯2 Concert Hall
Simulates the gorgeous reverb sound you would hear in a large
concert hall for orchestral performances.
D2 Chamber
Suitable for playing chamber music; simulates the intimate
reverb sound you would hear in a spacious room, such as for
classical music recitals.
D♯2Club
Simulates the vivid reverb sound you would hear in a live music
venue or a jazz club.
E2 Off No effect is applied.
Reverb Depth range:
0 (no effect) – 20 (maximum
depth)
La pagina si sta caricando...
La pagina si sta caricando...
La pagina si sta caricando...
La pagina si sta caricando...
La pagina si sta caricando...
La pagina si sta caricando...
La pagina si sta caricando...
La pagina si sta caricando...
La pagina si sta caricando...
La pagina si sta caricando...
La pagina si sta caricando...
La pagina si sta caricando...
La pagina si sta caricando...
La pagina si sta caricando...
La pagina si sta caricando...
La pagina si sta caricando...
La pagina si sta caricando...
La pagina si sta caricando...
La pagina si sta caricando...
La pagina si sta caricando...
-
 1
1
-
 2
2
-
 3
3
-
 4
4
-
 5
5
-
 6
6
-
 7
7
-
 8
8
-
 9
9
-
 10
10
-
 11
11
-
 12
12
-
 13
13
-
 14
14
-
 15
15
-
 16
16
-
 17
17
-
 18
18
-
 19
19
-
 20
20
-
 21
21
-
 22
22
-
 23
23
-
 24
24
-
 25
25
-
 26
26
-
 27
27
-
 28
28
-
 29
29
-
 30
30
-
 31
31
-
 32
32
-
 33
33
-
 34
34
-
 35
35
-
 36
36
-
 37
37
-
 38
38
-
 39
39
-
 40
40


Yamaha YDP-S52 Manuale utente
- Categoria
- Apparecchiature musicali supplementari
- Tipo
- Manuale utente
- Questo manuale è adatto anche per
in altre lingue
- English: Yamaha YDP-S52 User manual
- français: Yamaha YDP-S52 Manuel utilisateur
- español: Yamaha YDP-S52 Manual de usuario
- Deutsch: Yamaha YDP-S52 Benutzerhandbuch
- русский: Yamaha YDP-S52 Руководство пользователя
- Nederlands: Yamaha YDP-S52 Handleiding
- português: Yamaha YDP-S52 Manual do usuário
- dansk: Yamaha YDP-S52 Brugermanual
- čeština: Yamaha YDP-S52 Uživatelský manuál
- polski: Yamaha YDP-S52 Instrukcja obsługi
- svenska: Yamaha YDP-S52 Användarmanual
- Türkçe: Yamaha YDP-S52 Kullanım kılavuzu
- suomi: Yamaha YDP-S52 Ohjekirja
- română: Yamaha YDP-S52 Manual de utilizare
Documenti correlati
-
Yamaha YDP-S52 Manuale del proprietario
-
Yamaha YDP-103 Manuale del proprietario
-
-
Yamaha NP-12 Manuale del proprietario
-
Yamaha P-95S Manuale del proprietario
-
-
-
-
Yamaha YDP-162/142 Manuale del proprietario
-