
Das Telefonbuch ist geöffnet.
Mehrfacher Anruf von derselben Telefonnummer.
Anzeige bei 12 Stunden-Zeitformat.
Mobilteil
Akku schwach, bitte aufladen.
Akku voll aufgeladen.
Freisprechen ist eingeschaltet.
Tonruf ausgeschaltet.
Tastatur gesperrt.
Wecker eingeschaltet.
Navigation im Menü
Hauptmenü öffnen (Tischgerät)
1. Drücken Sie .
2. Wählen Sie mit L und M den gewünschten Menüpunkt aus und drücken Sie
.
3. Drücken Sie , um die Aktion abzubrechen, zurück zum vorherigen
Menüpunkt zu gelangen oder das Menü zu verlassen.
4. Halten Sie gedrückt, um in den Ruhezustand zurückzukehren.
Hauptmenü öffnen (Mobilteil)
1. Drücken Sie .
2. Wählen Sie mit und den gewünschten Menüpunkt aus und drücken Sie
.
3. Drücken Sie , um die Aktion abzubrechen, zurück zum vorherigen Me-
nüpunkt zu gelangen oder das Menü zu verlassen.
4. Drücken Sie , um in den Ruhezustand zurückzukehren.
Hinweis: Wenn innerhalb von 30 s keine Taste gedrückt wird, kehrt das Gerät
automatisch in den Ruhezustand zurück.
Erste Inbetriebnahme
Im Auslieferungszustand ist die Menüsprache auf Englisch eingestellt.
1. Pls set date/time erscheint im Display des Mobilteils.
2. Drücken Sie .
3. Wählen Sie mit oder Enter time aus und drücken Sie .
4. Geben Sie die Uhrzeit ein und drücken Sie .
5. Wählen Sie mit oder Enter date aus und drücken Sie .
6. Geben Siedas Datum ein und drücken Sie .
Einstellen der Sprache am Mobilteil
1. Drücken Sie .
2. Wählen Sie mit oder Settings aus und drücken Sie .
3. Wählen Sie mit oder Handset Settings aus und drücken Sie .
4. Wählen Sie mit oder Language aus und drücken Sie .
5. Wählen Sie die gewünschte Sprache aus und drücken Sie .
7. Drücken Sie .
Einstellen der Sprache am Tischgerät
1. Drücken Sie .
2. Wählen Sie mit L oder M LANGUAGE aus und drücken Sie .
5. Wählen Sie die gewünschte Sprache aus und drücken Sie .
D200
Tischgerät
1 Anrufanzeige
- Blinkt bei eintreffendem Anruf.
2 Telefonbuch
- Öffnet das Telefonbuch.
3 Anrufliste (verpasst)
- Öffnet die Liste der verpassten Anrufe.
4 Menü/OK
- Im Ruhezustand: Menü öffnen.
5 Aufwärts
- Im Menü/in Listen: Aufwärts blättern.
- Bei Eingabe von Namen/Zahlen: Cursor nach links verschieben.
- Während eines Gesprächs/Abhören des Anrufbeantworters: Erhöhung
der Lautstärke.
6 Abwärts
- Im Ruhezustand: Wahlwiederholung öffnen
- Im Menü/in Listen: Abwärts blättern.
- Bei Eingabe von Namen/Zahlen: Cursor nach rechts verschieben.
- Während eines Gesprächs/Abhören des Anrufbeantworters: Verringe-
rung der Lautstärke.
7 Lautsprecher
8 Direktwahltasten M1, M2, M3
- Bei Rufnummerneingabe: Nach Eingabe der Rufnummer lange drücken,
um die Rufnummer zu speichern.
- Im Ruhezustand: Drücken, um die Rufnummer, die auf die jeweilige
Taste gespeichert ist, zu wählen.
9 Wähltastatur
- Eingabe von Ziffern oder Buchstaben.
- Taste 0 bei Rufnummerneingabe: Langer Tastendruck zum Einfügen
einer Wahlpause.
- Raute-Taste im Ruhezustand: Langer Tastendruck zum Ein-/ Ausschal-
ten des Tonrufs.
10 Lautsprecher-Taste
- Im Freisprechmodus anrufen, Anruf annehmen oder Gespräch beenden.
- Während eines Gesprächs: Lautsprecher ein-/ausschalten.
11 Verstärker-Taste
- Während eines Gesprächs: Erhöhung der Lautstärke im Hörer.
12 R-Taste (Flash)
- Während eines Gesprächs: Flash-Funktion zur Nutzung von Netz-Leis-
tungsmerkmalen.
- Bei Wahlvorbereitung: Fügt ein 'F' ein. Die Flash-Funktion wird aus-
geführt, wenn Sie den Hörer abheben.
13 Anrufbeantworter ein/aus
- Drücken, um den Anrufbeantworter ein- oder auszuschalten.
- Anrufanzeige (1) leuchtet, wenn der Anrufbeantworter eingeschaltet ist.
- Anrufanzeige (1) blinkt langsam bei neuen Nachrichten.
14 Start-/Stopp-Taste
- Abhören des Anrufbeantworters starten/stoppen.
15 Vorwärts-Taste
- Weiterspringen zur nächsten Nachricht während des Abhörens des An-
rufbeantworters.
- Im Ruhezustand: Lange drücken, um ein Memo aufzunehmen.
16 Zurück-Taste
- Aktuelle Nachricht während des Abhörens des Anrufbeantworters wie-
derholen.
- Zweimal drücken, um vorherige Nachricht abzuspielen.
- Im Ruhezustand: Kurz drücken, um den aktuellen Begrüßungstext anzu-
hören.
- Im Ruhezustand: Lange drücken, um einen Begrüßungstext aufzuneh-
men.
17 Lösch-Taste
- Löschen der aktuell abgespielten Anrufbeantworter-Mitteilung oder An-
sage.
18 Zurück/Stumm/Löschen/Intern
- Im Menü: Auswahl abbrechen/ zurück zum vorherigen Menü / Lange drü-
cken um zum Ruhezustand zurückzukehren.
- Bei Anruf: Tonruf ausschalten (Gespräch kann weiterhin angenommen
werden, solange der Anrufer nicht aufgelegt hat).
- Bei Eingabe von Namen/Rufnummern: Löschen von Zeichen, z. B. beim
Erstellen eines Telefonbucheintrags.
- Im Ruhezustand: Mobilteil rufen (internes Gespräch).
19
Anzeige „Im Gebrauch“
- Leuchtet bei Anruf, Gespräch oder bei Annahme eines Gesprächs durch
den Anrufbeantworter.
- Leuchtet, wenn ein anderes Gerät (Mobilteil) bereits die Leitung belegt.
Mobilteil
1 Anrufanzeige
- Blinkt bei eintreffendem
Anruf.
2 Hörer
3 Verstärkertaste
- Zur Erhöhung der Lautstärke
im Hörer. Kurzes Drücken
während eines Gesprächs
schaltet die Verstärkung ein -
nochmaliges Drücken schaltet
die Verstärkung wieder aus.
Bei aktivierter Verstärker-
Funktion erscheint „Boost ein“
im Display und die Anruf-
anzeige (1) leuchtet.
4 Direktwahltasten M1/M2/M3
- Im Ruhezustand: Wählen der
gespeicherten Rufnummer.
5 Menü/OK
- Im Ruhezustand: Menü öff-
nen.
- Im Menü: Menüpunkt aus-
wählen oder Speichern.
- Während eines Gesprächs: Zu-
griff auf Telefonbuch/ Anruf-
liste/Wahlwiederholung
6 Telefonbuch/Aufwärts
- Im Ruhezustand: Telefonbuch öffnen.
- Im Menü/in Listen: Aufwärts blättern.
- Während eines Gesprächs: Lautstärke erhöhen.
- Während Anrufsignalisierung: Klingellautstärke erhöhen.
7 Anrufen-Taste/Lautsprecher-Taste
- Im Ruhezustand: Anrufen oder Anruf annehmen.
- In Telefonbuch/Anrufliste/Wahlwiederholung: Ausgewählten Eintrag an-
rufen.
- Während eines Gesprächs: Lautsprecher ein-/ausschalten.
8 Wahlwiederholung/Abwärts
- Im Ruhezustand: Wahlwiederholung öffnen.
- Im Menü/in Listen: Abwärts blättern.
- Während eines Gesprächs: Lautstärke verringern.
- Während Anrufsignalisierung: Klingellautstärke verringern.
9 Wähltastatur
- Eingabe von Ziffern oder Buchstaben.
- Taste 0 bei Rufnummerneingabe: Langer Tastendruck zum Einfügen
einer Wahlpause (P).
- Stern-Taste im Ruhezustand: Langer Tastendruck zum Ein-/ Ausschal-
ten der Tastensperre. Bei Eingabe von Namen: Umschaltung zwischen
Groß- und Kleinbuchstaben.
- Raute-Taste im Ruhezustand: Langer Tastendruck zum Ein-/ Ausschal-
ten des Tonrufs. Während eines Gesprächs: Langer Tastendruck für
Flash-Funktion zur Nutzung von Netz-Leistungsmerkmalen. In Anruf-
liste: Anzeige der Anrufernummer (falls verfügbar).
10 Mikrofon
11 Lautstärketasten
- Während eines Gesprächs: Lautstärke einstellen.
12 Stumm-Taste/INT
- Im Menü: Zurück zum vorherigen Menüpunkt. Langer Tastendruck: Zu-
rück zum Ruhezustand.
- Während Rufnummern-/Nameneingabe: Letztes Zeichen löschen. Lang
drücken, um alle Zeichen zu löschen.
- Während eines Gesprächs: Mikrofon ausschalten.
- Im Ruhezustand: Interne Verbindung (nur wenn mehrere Mobilteile an
derselben Basis angemeldet sind).
13 Auflegen-Taste/Abbruch
- Während eines Gesprächs: Auflegen.
- Im Menü: Auswahl abbrechen / zum Ruhezustand zurückkehren.
- Im Ruhezustand: Langer Tastendruck schaltet Mobilteil aus/ein.
Aufstellort
Stellen Sie das Tischgerät in der Nähe einer Netzsteckdose und der Telefon-
anschlussdose auf, so dass die Länge der Anschlusskabel ausreicht. Halten Sie
einen Abstand von ca. 1 m zu anderen elektronischen Geräten ein, um eine ge-
genseitige Beeinflussung auszuschließen. Die Verbindung zwischen dem Tisch-
gerät und dem Mobilteil geschieht mittels Funksignalen. Die Signalstärke ist
abhängig vom Standort. Die maximale Reichweite beträgt bei freier Sichtverbin-
dug bis zu 300 m, in Gebäuden ist sie aufgrund von Mauern und anderen Hinder-
nissen geringer.
Tischgerät anschließen
1. Stecken Sie den am Ende des
Kabels befindlichen Stecker in
die entspechend gekennzeich-
nete Buchse an der Unterseite
des Tischgerätes und das Netz-
teil in die Steckdose.
2. Stecken Sie das Ende des Tele-
fonanschlusskabels mit dem
kleinen Stecker in die entspe-
chend gekennzeichnete Buchse
des Tischgerätes und das an-
dere Ende in die Telefonsteck-
dose.
3. Verbinden Sie den Hörer mit der
gewendelten Hörerschnur mit
dem Telefon.
Hinweis: Führen Sie die Anschlusskabel durch die Kabel führungen, damit das
Tischgerät flach auf der Unterlage steht.
Wichtig: Verwenden Sie nur die Netzteile, das Telefonanschlusskabel und
die Akkus, die zum Lieferumfang Ihres D200 gehören. Andernfalls ist die
einwandfreie Funktion Ihres Telefons nicht gewährleistet. Versperren Sie
den Zugang zum Steckernetzteil nicht durch Möbel oder andere Gegen-
stände.
Mobilteil in Betrieb nehmen
1. Öffnen Sie das Akkufach und legen Sie die
Akkus ein. Achten Sie auf die richtige Polari-
tät.
2. Schieben Sie den Akkufachdeckel wieder auf,
bis er spürbar einrastet.
Damit das Mobilteil vollständig geladen wird,
muss es mindestens 16 Stunden in die Ladesta-
tion gesetzt werden (Stromversorgung der La-
destation prüfen!).
Wichtig: Verwenden Sie unbedingt nur die
mitgelieferten Akkus. Auch bei einem späte-
ren Austausch darf nur dieser Akkutyp ver-
wendet werden.
Symbole im Display
Tischgerät
Neuer Eintrag in der Anrufliste.
Laufende Nummer des Eintrags in der Anrufliste.
Sie führen ein Telefongespräch.
Freisprechen ist eingeschaltet.
Tonruf ausgeschaltet.
7
2
3
1
4
5
6
8
9
10
11
12
13
18
19
17
14
15
16
2
1
3
4
5
12
13
11
6
8
7
9
10

Menüaufbau
Tischgerät
TELEFONBUCH ANSEHEN
EINTRAG NEU
ÄNDERN
LÖSCHEN
ALLE LÖSCHEN
TB-STATUS
ANRUFLISTE VERPASST
EMPFANGEN
GEWÄHLT
DATUM & ZEIT ZEITFORMAT
UHR EINST.
SPRACHE
EINSTELL. RUFTON EINST EXTERN MELODIE
LAUTSTÄRKE
INTERN MELODIE
LAUTSTÄRKE
MT ABMELDEN
WAHLVERF. TONWAHL/IMPULSWAHL
FLASH-ZEIT KURZ/MITTEL/LANG
TASTENTON
PIN ÄNDERN
BS RÜCKSETZ.
PAGING (ALLE)
ANMELDUNG
ANRUFBEANTW. NACHR. ABSP.
ALLE LÖSCHEN
MEMO
AB EIN/AUS
AB-EINSTELL. ANTWORTMODUS MIT AUFZ.
OHNE AUFZ.
ANSAGEN MIT AUFZ.
OHNE AUFZ.
ANTW.VERZ. 2/4/6/8 KL.ZEICH.
AB-SPRACHE DEUTSCH
FRANÇAIS
ENGLISH
MITHÖREN
FERNABFRAGE
KOMPRESSION NIEDRIG/MITTEL/
HOCH
PIN ÄNDERN
AB RÜCKSETZ.
Mobilteil
Anrufliste Details anzeigen
Löschen
Alles löschen
Anrufen
Nummer speichern
Art der Anrufliste
Töne Klingeln Externe Anrufe Melodie ...
Interne Anrufe Melodie ...
Lautstärke Stufe ...
Stumm Piepton/Aus
Warntöne Tastenton
Bestätige
Akku schwach
Nicht verfügbar
Einstell. Mobilteil einstellen Basiswahl
Display Kontrast
Mobilteil Name
Sprache
Auto Antwort
Mobilteil anmelden
Mobilteil abmelden
Mobilteil zurücksetz
Basis einstellen Klingeln Rufton
Lautstärke
Wählmodus MFV/IWV
Flashzeiten 100/300/600 ms
System-PIN
Basis zurücksetz
Datum/Zeit/
Wecker Zeit/Datum Zeitformat
Datumsformat
Eingabe Uhrzeit
Eingabe Datum
Wecker Wecker Ein/Aus
Eingabe Uhrzeit
Rufton
Tastenspeicher M1/M2/M3/M4
Anrufbeantworter Nachricht abhören
Nachricht löschen
AB Ein/Aus
Memo aufnehmen
Ansage Aufnehmen Ansage/Aufnahme
Nur Ansage
Nachricht abhören Ansage/Aufnahme
Nur Ansage
Ansage Einstell. Ansage Modus Ansage/Aufnahme
Nur Ansage
AB Sprache Deutsch/English/
Française
Klingelzahl 2/4/6/8 Rufe
Aufnahmezeit 30/60/120 s / Beliebig
Aufzeich. mithören
Zugangscode Aktiviert/Ausschalt
Telefonieren
Anrufen, Gespräch annehmen und beenden
Am Tischgerät anrufen
Geben Sie die Rufnummer ein und heben Sie den Hörer ab oder drücken Sie
.
- oder -
Heben Sie den Hörer ab oder drücken Sie . Wenn Sie den Wählton
hören, geben Sie die Telefonnummer ein.
Am Tischgerät Gespräch annehmen
Heben Sie den Hörer ab oder drücken Sie .
Am Tischgerät Gespräch beenden
Wenn Sie mit dem Hörer telefonieren, legen Sie den Hörer auf.
Wenn Sie über den Lautsprecher telefonieren, drücken Sie .
Am Mobilteil anrufen
Geben Sie die Rufnummer ein und drücken Sie .
- oder -
Drücken Sie . Wenn Sie den Wählton hören, geben Sie die Telefonnum-
mer ein.
Am Mobilteil Gespräch annehmen
Drücken Sie .
Am Mobilteil Gespräch beenden
Drücken Sie oder stellen Sie das Mobilteil in die Ladestation.
Freisprechen
Drücken Sie während eines Gesprächs die Taste am Tischgerät bzw.
am Mobilteil noch einmal. Zum Ausschalten der Freisprechfunktion
drücken Sie die Taste erneut.
Lautstärke einstellen
Am Tischgerät
Drücken Sie während eines Gesprächs die Lautstärketasten L und M.
Am Mobilteil
Drücken Sie während eines Gesprächs die seitlich angebrachten Lautstärke-
tasten.
Mikrofon ausschalten
Am Tischgerät
Drücken Sie während eines Gesprächs . Zum Einschalten des Mi-
krofons drücken Sie noch einmal.
Am Mobilteil
Drücken Sie während eines Gesprächs . Zum Einschalten des Mikro-
fons drücken Sie noch einmal.
Wahlwiederholung
Am Tischgerät
1. Drücken Sie im Ruhezustand M.
- oder -
Drücken Sie die Menütaste , wählen Sie ANRUFLISTE -> GEWÄHLT
und drücken Sie .
2. Wählen Sie mit L und Mgewünschten Eintrag.
3. Heben Sie den Hörer ab oder drücken Sie , um die Nummer zu wählen.
Am Mobilteil
1. Drücken Sie im Ruhezustand .
2. Wählen Sie mit und den gewünschten Eintrag.
3. Drücken Sie , um die Nummer zu wählen.
Hinweis zu den Einstellungen
Einige Einstellungen sind mit einer PIN gesichert. Diese ist im Auslieferungs-
zustand bei Tischgerät und Mobilteil „0000“.
Hinweis zum Anrufbeantworter
Ihr D200 verfügt über einen eingebauten digitalen Anrufbeantworter. Die Ge-
samtkapazität beträgt ca. 15 Minuten. Sie können den Anrufbeantworter am
Tischgerät oder von jedem angemeldeten Mobilteil bedienen. Mit einem MFV-fä-
higen Telefon haben Sie außerdem einen PIN-geschützten Fernzugriff auf den
Anrufbeantworter.
Es stehen zwei Betriebsarten zur Auswahl:
- Ansage mit Nachrichtenaufzeichnung
- Nur Ansage.
Im Auslieferungszustand ist bereits für jede Betriebsart eine Standardansage
gespeichert (Deutsch, Englisch und Französisch). Damit ist der Anrufbeantwor-
ter sofort betriebsbereit. Bei „Ansage mit Nachrichtenaufzeichnung“ und Errei-
chen der maximalen Aufnahmekapazität schaltet das Gerät automatisch in die
Betriebsart „Nur Ansage“ um.
Die Fernabfrage ist nur möglich, wenn diese Funktion eingeschaltet ist. Beach-
ten Sie bitte, dass das benutzte externe Telefon in der Lage sein muss, während
der Verbindung Ton-Wahlimpulse (DTMF / MFV) zu senden.
Um auf Ihren Anrufbeantworter von einem entfernten MFV-fähigen Telefon zu-
greifen zu können, müssen Sie die Fernabfrage-PIN eingeben.
Fernabfrage nutzen
1. Wählen Sie die Telefonnummer Ihres Anschlusses.
2. Bei ausgeschaltetem Anrufbeantworter meldet sich dieser nach ca. 16
Rufsignalen mit der Ansage „Nur Ansage“.
Drücken Sie während der Ansage die Stern-Taste und geben Sie die vier-
stellige Fernabfrage-PIN Ihres Telefons ein. Nach erfolgreicher PIN-Ein-
gabe stehen Ihnen die folgenden Optionen zur Verfügung.
- oder -
Bei eingeschaltetem Anrufbeantworter meldet sich dieser nach der ein-
gestellten Anzahl der Rufsignale mit der Ansage.
Mit der Stern-Taste leiten Sie während der Ansage die Fernabfrage ein.
Geben Sie jetzt die vierstellige Fernabfrage-PIN Ihres Telefons ein. Nach
erfolgreicher PIN-Eingabe stehen Ihnen die folgenden Optionen zur Ver-
fügung.
- Taste 5 - Wiedergabe starten
- Taste 7 - Anrufbeantworter einschalten
- Taste 9 - Anrufbeantworter ausschalten
Während der Wiedergabe einer Nachricht:
- Taste 2 - Aktuelle Nachricht löschen
- Taste 4 - Aktuelle Nachricht wiederholen. Taste 4 zweimal drücken,
um zur vorherigen Nachricht zu springen.
- Taste 6 - Nächste Nachricht abspielen
- Taste 8 - Wiedergabe stoppen.
Hinweis: Die Verbindung wird nach dreimaliger falscher PIN-Eingabe ge-
trennt.
Falls Probleme auftauchen
Manche Probleme lassen sich lösen, indem man das Telefon ausschaltet. Trennen
Sie das Netzteil der Basisstation für etwa 20 Minuten vom Netz und nehmen Sie
die Akkus aus dem Mobilteil. Wenn Sie dann die Basisstation wieder anschließen
und die Akkus einlegen, ist das Problem möglicherweise wieder behoben.
Sicherheitsinformationen
Bei der Verwendung von Telefonen sollten grundsätzliche Sicherheits -
vorkehrungen getroffen werden, um das Risiko von Feuer, Stromschlag und Ver-
letzungen zu verringern, einschließlich der folgenden Punkte:
• Lesen und verstehen Sie alle Anweisungen.
• Beachten Sie alle auf dem Produkt angebrachten Warnungen und Anweisungen.
• Ziehen Sie das Netzkabel aus der Steckdose, bevor Sie das Gerät reinigen.
Verwenden Sie keine Flüssigreiniger oder Aerosolreiniger. Verwenden Sie
zum Reinigen ein feuchtes Tuch.
• Verwenden Sie dieses Gerät nicht in der Nähe von Wasser (z. B. in der Nähe
von Badewannen, Spüle, Schwimmbad).
• Überlasten Sie keine Steckdosen und Verlängerungskabel, da dies zu Bränden
oder elektrischen Schlägen führen kann.
• Ziehen Sie das Netzkabel aus der Steckdose und wenden Sie sich bei den fol-
genden Bedingungen an Ihren Lieferanten:
• Wenn das Netzkabel oder der Netzstecker beschädigt oder ausgefranst ist.
• Wenn das Gerät nicht wie in der Bedienungsanleitung beschrieben arbeitet.
• Wenn das Gerät fallengelassen und das Gehäuse beschädigt wurde.
• Wenn das Gerät eine deutliche Leistungsänderung aufweist.
• Vermeiden Sie die Benutzung eines Telefons (außer schnurlos) während eines
Gewitters. Es besteht möglicherweise die Gefahr eines Stromschlags durch
Blitzschlag.
• Verwenden Sie das Telefon nicht, um ein Gasleck in der Nähe des Lecks zu
melden.
• Bei steckbaren Geräten muss die Steckdose (Netzteil) in der Nähe des Gerä-
tes installiert und leicht zugänglich sein.
Akkus
• Verwenden Sie nur die mitgelieferten NiMH-Akkus (Nickel-Metallhydrid)! Die
Betriebszeiten für die Mobilteile sind nur mit den vorgegebenen Akkukapazi-
täten möglich.
• Die Verwendung anderer Batterietypen oder nicht wieder aufladbarer Batte-
rien / Primärzellen kann gefährlich sein. Dies kann zu Störungen und / oder
Unfallschäden führen. Der Hersteller haftet nicht für Schäden, die durch
diese Nichtbeachtung entstehen.
• Verwenden Sie keine Ladeschalen von Drittanbietern. Die Akkus können be-
schädigt werden.
• Achten Sie beim Einlegen der Akkus auf die richtige Polarität.
• Batterien nicht ins Wasser tauchen und nicht ins Feuer werfen.
• Es besteht Explosionsgefahr, wenn die Akkus durch einen falschen Typ er-
setzt werden.
•
Entsorgen Sie gebrauchte Akkus/Batterien gemäß den behördlichen Anweisungen.
Achtung, Explosionsgefahr beim Ersetzen der Akkus durch einen fal-
schen Typ.
Bestimmungsgemäße Verwendung
Dieses analoge Telefon ist für den Anschluss an ein öffentliches Fern sprechnetz
oder eine zugelassene private Telefonanlage bestimmt. Jegliche andere Ver-
wendung gilt als nicht bestimmungsgemäßer Gebrauch. Eigenmächtige Ände-
rungen oder Umbauten sind nicht erlaubt. Auf keinen Fall dürfen Sie selbst
Reparaturen durchführen.
Entsorgung
Wollen Sie Ihr Gerät entsorgen, bringen Sie es zur Sammelstelle Ihres
kommunalen Entsorgungsträgers (z. B. Wertstoffhof). Nach dem Elektro-
und Elektro nik gerätegesetz sind Besitzer von Altgeräten gesetzlich ver-
pflichtet, alte Elektro- und Elektronikgeräte einer getrennten Abfallerfas-
sung zuzuführen. Das nebenstehende Symbol bedeutet, dass Sie das
Gerät auf keinen Fall in den Hausmüll werfen dürfen!
Gefährdung von Gesundheit und Umwelt durch Akkus und Batte-
rien!
Akkus und Batterien nie öffnen, beschädigen, verschlucken oder in die
Umwelt gelangen lassen. Sie können giftige und umweltschädliche
Schwermetalle enthalten. Sie sind gesetzlich verpflichtet, Akkus und
Batterien beim batterievertreibenden Handel sowie bei zuständigen Sam-
melstellen, die entsprechende Behälter bereitstellen, sicher zu entsorgen
und keinesfalls in den Hausmüll zu geben. Die Entsorgung ist unentgelt-
lich. Lithium-Akkus und Akkupacks jedweder Art sollten nur im entlade-
nen Zustand abgegeben werden. Treffen Sie unbedingt Vorsorge gegen
Kurzschlüsse, z. B. durch das Isolieren der Pole mit Klebestreifen, da an-
sonsten das Risiko eines Brandes besteht. Verpackungsmaterialien ent-
sorgen Sie entsprechend den lokalen Vorschriften.
Garantie
SWITEL-Geräte werden nach neuesten Produktionsverfahren hergestellt und ge-
prüft. Die Verwendung sorgfältig ausgewählter Materialien und hochentwickelter
Technologien gewährleistet einen störungsfreien Betrieb und eine lange Lebens-
dauer. Die Garantiebedingungen gelten nicht, wenn die Ursache für eine Störung
im Gerät beim Fernsprechnetzbetreiber oder in einer eventuell zwischengeschal-
teten Nebenstellenanlage liegt. Die Garantie gilt nicht für die in den Produkten
verwendeten wiederaufladbaren Batterien, Akkus oder Akkupacks. Die Garantie-
zeit beträgt 24 Monate ab dem Datum des Kaufs.
Innerhalb der Garantiezeit werden alle Mängel, die auf Material- oder Herstel -
lungs fehler zurückzuführen sind, kostenlos behoben. Der Garantieanspruch er-
lischt nach Eingriffen des Käufers oder durch Dritte. Schäden, die durch
unsach gemäße Behandlung oder Bedienung, falsche Platzierung oder Lagerung,
unsachgemäße Anschlüsse oder Installation, höhere Gewalt oder sonstige äu-
ßere Einflüsse entstehen, fallen nicht unter die Garantieleistung.
Wir behalten uns das Recht vor, bei Reklamationen defekte Teile zu reparieren
oder auszutauschen bzw. ein Ersatzgerät bereit zustellen. Ausgetauschte Teile
oder Geräte gehen in unser Eigentum über.
Schadenersatzansprüche sind ausgeschlossen, es sei denn, dem Hersteller
kann Vorsatz oder grobe Fahrlässigkeit nachgewiesen werden.
Sollte Ihr Gerät während der Garantiezeit einen Defekt aufweisen, wenden Sie
sich bitte unter Vorlage Ihres Kaufbelegs an das Geschäft, in dem Sie Ihr
SWITEL-Gerät erworben haben. Alle Gewährleistungsansprüche nach diesen
Bestimmungen sind ausschließlich gegenüber dem Fachhändler geltend zu ma-
chen. Zwei Jahre nach dem Kauf der Produkte können keine Garantieansprüche
mehr geltend gemacht werden.
Konformitätserklärung
Dieses Gerät erfüllt die Anforderungen der
EU-Richtlinie: 2014/53/EU.
Die Konformität mit der vorgenannten Richtlinie wird durch das CE-Zeichen auf
dem Gerät bestätigt. Die komplette Konformitätserklärung können Sie kostenlos
von unserer Website unter www.switel.com/support herunterladen.
Telgo AG, Route D’Agy 16, 1763 Granges-Paccot, Switzerland
Technische Daten
Standard DECT
HF-Frequenz 1,89 GHz
HF-Leistung durchschnittlich <10,4 dBm
Stromversorgung (Tischgerät) Eingang: 100-240VAC 50/60Hz
Ausgang: 6 VDC 450 mA
Stromversorgung (Ladestation) Eingang: 100-240VAC 50/60Hz
Ausgang: 6 VDC 450 mA
Reichweite Im Freien: ca. 300 m, Innen: ca. 50 m
Standby Bis zu 100 Std.
Max. Gesprächsdauer Bis zu 10 Std.
Maximale Hörerlautstärke +30dB
Akkus AAA, 1,2 V, 400 mAh, NiMH
Wählmodus Tonwahl (DTMF), Impulswahl
Flashzeit Kurz (100 ms), Mittel (300 ms),
Lang (600 ms)
Optimale Umgebungstemp. 0 ˚C bis 45 ˚C
Optimale relative Luftfeuchte 20 % bis 80 %
Netzteil-Informationen
Tischgerät und Ladestation
VTech (Qingyuan) Plastic & Electronics Co. Ltd.
Model : VT04EEU06045, Input 100-240V AC 50/60Hz 150mA, Output 6VDC
450mA (EU plug)
Shen Zhen Ruijing Industrial Co. Ltd.
Model : RJ-AS060450E002, Input 100-240V AC 50/60Hz 150mA, Output 6VDC
450mA (EU plug)
V1.1 / 12.2018

Display icons
Corded phone
New entry in the call log.
Indicate the sequence number of the calls list record.
You are in a call.
The speakerphone is in use.
Ringer off.
The phonebook is open.
Multiple call from the same phone number.
Indicate the time format (when set to 12h).
Handset
Battery is low; place handset in charger to recharge.
Full battery power level.
The handset speakerphone is in use.
Ringer off.
Keyboard locked.
Alarm activated.
Navigating the menu
Open main menu (corded phone)
1. Press .
2. Use L and M to select the desired menu item and press .
3. Press to cancel an operation, back to the previous menu, or exit
that menu.
4. Press and hold down to return to idle state.
Open main menu (handset)
1. Press .
2. Use and to select the desired menu item and press .
3. Press to cancel an operation, back up to the previous menu, or exit that
menu.
4. Press to return to idle state.
Note: If a key is not pressed within 30 seconds, the telephone
automatically returns to idle mode.
Initial setup
1. Pls set date/time appears in the handset’s display.
2. Press .
3. Use or
to select Enter time and press .
4. Enter the time and press .
5. Use or
to select Enter date and press .
6. Enter the date and press .
7. Press .
Corded phone
1 Incoming call light
- Flashes when there is an incoming call.
2 Phonebook
- Opens the phonebook.
3 Call log (missed calls)
- Opens the missed calls list.
4 MENU/OK
- Press to enter the menu.
5 Up
- Press to scroll up while in menus or lists.
- Press to move the cursor to the left while entering or modifying
names/numbers.
- Press to increase the listening volume during a call or message play-
back.
6 Down
- In idle mode, press to open the redial list.
- Press to scroll down while in menus or lists.
- Press to move the cursor to the right while entering or modifying names
or numbers.
- Press to decrease the listening volume during a call or message play-
back.
7 Loudspeaker
8 Direct call keys M1, M2, M3
- In predial mode, input a number, long press to store the number.
- In idle mode, press to dial the stored number.
9 Alphanumeric keypad
- Press to enter numbers or characters/*/#.
- Press and hold key “0“ to enter a dialling pause.
- Press and hold hash key to switch the ringer on/off.
10 Speaker
- Press to make, answer or end a call.
- Press to switch between the corded handset and the base speakerphone
during a call.
11 Boost key
- Press to increase the corded handset earpiece volume during a call.
12 Flash key
- Press to do a Flash function during a call.
- In predial, insert a 'F', it will do a flash function when press Call key.
13 Answering machine on/off
- Press to turn the built-in answering machine on/off.
- The incoming call light (1) will be on when answering machine is on.
- The incoming call light (1) will flash slowly when a new message is re-
ceived.
14 Play/Stop
- Press to start or stop message playback.
15 Skip
- Press to skip to the next message during message playback.
- In idle mode, long press to record a memo.
16 Repeat
- Press once to repeat the current message.
- Press twice to play the previous message.
- In idle mode: press briefly to playback current OGM.
- In idle mode: press and hold to record OGM.
17 Delete
- Press to delete the current message or announcement.
18 Back/Mute/Delete/Int
- Press to cancel an operation, or go back to the previous menu while in a
menu. Press and hold to return to idle mode while in a menu.
- Press to silence the base ringer temporarily while the phone is ringing
(the call can still be accepted if the caller hasn't hung up).
- Press to delete characters or numbers e. g. when creating a phone book
entry.
- In idle mode: press to intercom another system handset.
19 “In use“ light
- On when there is an incoming call or the phone is in use or the answering
system is answering an incoming call.
- On when another telephone (cordless handset) on the same line is in
use.
Handset
1 Incoming call light
- Flashes when there is an in-
coming call.
2 Earpiece
3 Boost key
- To increase the volume in the
handset. Press briefly during a
call to switch the amplifica-
tion on - pressing again
switches the amplification off
again.
If the amplifier function is ac-
tivated, "Boost on" appears on
the display and the incoming
call light (1) lights up.
4 Direct call keys M1/M2/M3
- In idle mode, press to dial the
stored number.
5 MENU/OK
- In idle mode: Press to access
the main menu
- In sub-menu mode: Press to
confirm the selection
- During a call: Press to access
Phonebook/ Redial List/ Call
List
6 Phonebook/Up
- In idle mode: Press to access the phonebook.
- In Menu/in lists: Press to scroll up.
- During a call: Press to increase the volume.
- In ringing: Press to increase the ringer volume.
7 Call/Hands-free
- In idle mode: Press to make or answer a call.
- In Redial list / Call List / Phonebook entry: Press to make a call to the
selected entry in the list.
- Whilst in a call: switch hands-free on/off.
8 Redial/Down
- In idle mode: press to open redial list.
- In Menu/in lists: Press to scroll down.
- During a call: Press to decrease the volume.
- In ringing: Press to decrease the ringer volume.
9 Alphanumeric keypad
- Press to enter numbers or characters/*/#.
- Key 0 during entering numbers: Long press to enter a dialling pause (P).
- Star key in idle mode: Long press to activate/deactivate key lock.
To switch between upper case and lower case while entering characters.
- Hash key in idle mode: Long press to switch handset ringer on/off.
Whilst in a call: Long press to enter flash function to use network fea-
tures. In calls list: Press to review caller’s number (if applicable).
10 Microphone
11 Volume keys
- Press to adjust the listening volume during a call.
12 CLEAR/BACK/MUTE/INT
- In Menu: Press to go back to previous level. Press and hold to go back to
idle screen.
- In editing / predialing mode: Press to clear a character / digit. Press and
hold to delete all the characters / digits.
- Press to mute the microphone during a call.
- In idle mode: Press to intercom another handset (only if more than one
handset is registered at the base station).
13 End call/Cancel
- Press to hang up during a call.
- Press to cancel an operation/return to idle mode while in a menu.
- Press and hold to switch off the handset when idle.
Location
Place the base unit (corded phone) near a mains socket and a telephone wall
jack to ensure that the connection cables are long enough. Keep the unit approx.
1 m away from other electronic devices to prevent interference. The corded
phone uses radio signals to connect with the cordless handset. Signal strength
depends on the base unit's location. The maximum range is 300 m based on an
unobstructed line of sight; the range is shorter inside buildings because of walls
and other obstacles.
Connect the corded phone
1. Plug the connector on the cable
end into the corresponding jack
on the underside of the base
and plug the power adaptor into
the wall socket.
2. Plug the small connector on
the end of the telephone line
cord into the corresponding jack
on the base and plug the other
end into the telephone jack.
3. Connect the receiver with the
telephone using the coiled re-
ceiver cord.
Note: Guide the connection cables through the strain-relief tabs on the base so
the unit sits flush with the desk.
Important: Use only the power adaptors, telephone line cord and bat-
teries supplied with your D200, otherwise your phone may not work.
Do not block access to the wall power supply with furniture or other
items.
Connect the cordless handset
1. Open the battery compartment and insert the
rechargeable batteries. Observe the correct
polarity.
2. Slide the battery compartment cover towards
the centre of the handset until it clicks into
place.
For a full charge, the handset must be left in the
charger for at least 16 hours (check the
charger’s power supply!).
Important: Use only the batteries supplied
with this product.
If the batteries need to be replaced later on
the same battery type must be used.
7
2
3
1
4
5
6
8
9
10
11
12
13
18
19
17
14
15
16
2
1
3
4
5
12
13
11
6
8
7
9
10
D200

Menu layout
Corded phone
PHONEBOOK VIEW
ADD
EDIT
DELETE
DELETE ALL
PB STATUS
CALL LOG MISSED
RECEIVED
DIALED
DATE & TIME TIME FORMAT
SET CLOCK
LANGUAGE
SETTINGS RING SETUP EXT. RING MELODY
VOLUME
INT. RING MELODY
VOLUME
DELETE HS
DIAL MODE TONE/PULSE
FLASH TIME SHORT/MEDIUM/LONG
KEY TONE
CHANGE PIN
BS DEFAULT
PAGE ALL HS
REGISTRATION
ANS. MACHINE MSG PLAYBACK
DELETE ALL
MEMO
TAM ON/OFF
TAM SETTINGS ANSWER MODE ANS & REC.
ANSWER ONLY
OGM SETTINGS ANS & REC.
ANSWER ONLY
ANSWER DELAY 2/4/6/8 RINGS
TAM LANGUAGE DEUTSCH
FRANÇAIS
ENGLISH
BS SCREENING
REMOTE ACC.
COMPRESSION LOW/MEDIUM/
HIGH
CHANGE PIN
TAM DEFAULT
Handset
Call log Details
Delete
Delete all
Call
Store number
Call log type
Sound Ringer External Melody ...
Internal Melody ...
Ringer volume Level ...
Silent Beep/Off
Tones Key beep
Confirmation
Battery low
No coverage
Settings Handset settings Select base
Display Contrast
Handset name
Language
Auto answer
Register handset
Deregister
Handset reset
Base settings Ringer Ringtone
Ringer volume
Dial mode Tone/Pulse
Flash time 100/300/600 ms
System PIN
Base reset
Date/Time/Alarm Date/Time Time format
Date format
Enter time
Enter date
Alarm Alarm On/Off
Enter time
Ringtone
Memory keys M1/M2/M3/M4
Answer machine Play messages
Delete messages
Answer On/Off
Record MEMO
Outgoing message Record message Answer/Record
Answer only
Play message Answer/Record
Answer only
Answer settings Answer mode Answer/Record
Answer only
TAM language Deutsch/English/Française
Answer delay 2/4/6/8 rings
Recording time 30/60/120 s / Unlimited
Call screening
Remote access Enable/Disable
Making and receiving calls
Making a call, answering a call, ending a call
To make a call on the corded phone
Enter the telephone number and lift the receiver or press .
- or -
Lift the receiver or press . When you hear a dial tone, enter the tele-
phone number.
To answer a call on the corded phone
Lift the receiver, or press .
To end a call on the corded phone
hen you are using the receiver, place it on the telephone base.
When you are using the speakerphone, press .
To make a call on a cordless handset
Enter the telephone number and press .
- or -
Press . When you hear a dial tone, enter the telephone number.
To answer a call on a cordless handset
Press .
To end a call on a cordless handset
Press or place the handset in the charger.
Handsfree
Whilst in a call press on the corded phone or once again on the
cordless handset. To deactivate, press the same key again.
Volume control
On the corded phone
Whilst in a call press the volume keys L and M.
On a cordless handset
Whilst in a call press the volume buttons on the side.
Mute
On the corded phone
Whilst in a call press . Press again to resume the conver-
sation.
On a cordless handset
Whilst in a call press . Press again to resume the conversation.
Redial
On the corded phone
1. Press M in idle state.
- or -
press the menu key , select CALL LOG -> DIALED and press .
2. Select the desired entry with L and M.
3. Lift the receiver or press to dial the telephone number.
On a cordless handset
1. Press in idle state.
2. Select the desired entry with and .
3. Press to dial the telephone number.
Notes on settings
Some settings are secured with a PIN. In delivery state this PIN is “0000“ for
both corded phone and handset.
Notes on the answering machine
Your D200 has a built-in digital answering machine. The total capacity is about
15 minutes. You can operate the answering machine at the corded phone or
from each registered handset. With a touch-tone telephone, you also have a
PIN-protected remote access to the answering machine.
Two operating modes are available:
- announcement with message record
- announcement only.
In delivery state, a standard announcement is already stored for each operating
mode (German, English and French). This makes the answering machine im-
mediately ready for operation. When reaching the maximum recording capacity
in "announcement with message recording" mode, the unit automatically
switches to the "announcement only" mode.
Remote access is only possible if this function is activated.
To get access to your answering machine remotely from any touch-tone tele-
phone you have to enter the four-digit remote access code.
To access your answering machine from a remote touch-tone phone, you must
enter the remote access PIN.
Using remote access
1. Dial your telephone number.
2. When switched off, the answering machine takes the call after approx. 16
ring signals in "Answer only" mode.
Press the star key during the announcement to initiate the remote access
and enter the four-digit remote access PIN of your telephone. You then have
the following options.
- or -
When switched on, the answering machine takes the call after the set
numbers of rings.
Press the star key during the announcement to initiate the remote access
and enter the four-digit remote access PIN of your telephone. You then have
the following options:
- key 5 - start playback
- key 7 - turn on the answering machine
- key 9 - turn off the answering machine
While a message is playing:
- key 2 - delete current message
- key 4 - repeat current message. Press key 4 twice to skip back to the
previous message.
- key 6 - skip to the next message
- key 8 - stop the current message playback.
Note: The connection will be cut off after three incorrect PIN entries.
Help and support
Some issues may be resolved by simply disconnecting the power to the unit.
Switch off the power to the base station and remove the batteries in the handset
for about 20 minutes.
Reconnect everything to determine if the issue has been resolved.
Safety information
When using your telephone equipment, basic safety precautions should always
be followed to reduce the risk of fire, electric shock and injury, including the fol-
lowing:
• Read and understand all the instructions.
• Follow all warnings and instructions marked on the product.
• Unplug this product from the wall outlet before cleaning. Do not use liquid
cleaners or aerosol cleaners. Use a damp cloth for cleaning.
• Do not use this product near water (for example, near a bath tub, kitchen sink,
swimming pool).
• Do not overload wall outlets and extension cords as this can result in the risk
of fire or electric shock.
• Unplug this product from the wall outlet and refer servicing to your supplier
under the following conditions:
• When the power supply cord or plug is damaged or frayed.
• If the product does not operate normally by following the operating in-
structions.
• If the product has been dropped and the cabinet has been damaged.
• If the product exhibits a distinct change in performance.
• Avoid using a telephone (other than a cordless type) during an electrical
storm. There may be a remote risk of electric shock from lightning.
• Do not use the telephone to report a gas leak in the vicinity of the leak.
• For pluggable equipment, the socket-outlet (power adaptor) shall be installed
near the equipment and shall be easily accessible.
Rechargable batteries
• Use only the supplied NiMH (Nickel Metal Hydride) batteries!
The operation periods for the handsets are only applicable with the default
battery capacities
• The use of other battery types or non-rechargeable batteries/primary cells
can be dangerous. These may cause interference and/or unit damages. The
manufacturer will not be held liable for damage arising from such non-com-
pliance.
• Do not use third party charging bays. The batteries may be damaged.
• Please note the correct polarity while inserting the batteries.
• Do not immerse batteries in water, do not place in fire.
• Risk of explosion if battery is replaced by an incorrect type.
• Dispose of used batteries according to the instruction. Must be disposed of at
the point of sale or at the appropriate collection points provided by the public
waste authorities.
Caution, risk of explosion if battery is replaced by an incorrect type.
Dispose of used batteries according to the instructions.
Intended use
This phone is suitable for use on either a public telephone network or on an ap-
proved Private exchange (PABX). Any other use is considered unintended use.
Unauthorised modifications are prohibited. Do not attempt to carry out repairs
yourself.
Disposal
In order to dispose of your device, take it to a collection point pro-
vided by your local public waste authorities (e.g. recycling centre).
According to laws on the disposal of electronic and electrical de-
vices, owners are obliged to dispose of old electronic and electrical
devices in a separate waste container. The symbol indicates that the
device must not be disposed of in normal domestic waste!
Batteries represent a hazard to health and the environment!
Never open, damage or swallow batteries or allow them to pollute
the environment. They may contain toxic, ecologically hazardous
heavy metals. You are legally required to dispose of batteries and
rechargeable batteries safely, either at a retailer that sells bat-
teries or at an appropriate collection point that provides a suitable
container. Never put batteries in the household waste. Disposal is
free of charge. Lithium batteries and battery packs of all kinds
should be fully discharged before you drop them off. Be sure to
take precautions against short-circuits, e.g. by covering poles with
adhesive tape, to prevent the risk of a fire.
Packaging materials must be disposed of according to local regu-
lations.
Guarantee
SWITEL equipment is produced and tested according to the latest production
methods. The use of carefully chosen materials and highly developed tech-
nologies ensures trouble free functioning and a long service life. The terms of the
warranty do not apply where the cause of the equipment malfunction is the fault
of the telephone network operator or any interposed private branch extension
system. The terms of the warranty do not apply to the rechargeable batteries or
power adaptors used in the products. The warranty period is 24 months from the
date of purchase.
All deficiencies resulting from material or production faults which occur during
the warranty period will be eliminated free of charge. Rights to claims under the
warranty terms are voided following intervention by the purchaser or third
parties. Damage caused as a result of improper handling or operation, incorrect
positioning or storing, improper connection or installation, Acts of God or other
external influences are not covered by the warranty.
In the case of complaints, we reserve the right to repair or replace defective
parts or provide a replacement device. Replaced parts or devices become our
property. Rights to compensation in the case of damage are excluded where there
is no evidence of intent or gross negligence by the manufacturer.
If your equipment shows signs of a defect during the warranty period, please re-
turn it to the sales outlet where you purchased the SWITEL equipment together
with the purchase receipt. All claims under the warranty terms in accordance
with this agreement must be asserted exclusively with regard to your sales out-
let.
The right to assert a warranty claim expires two years after the purchase of our
products.
Declaration of conformity
This device fulfils the requirements stipulated
in the EU directive: 2014/53/EU.
Conformity with the above mentioned directive is confirmed by the CE symbol
on the device. To view the complete Declaration of Conformity, please refer to
the free download available on our website www.switel.com/support.
Telgo AG, Route D’Agy 16, 1763 Granges-Paccot, Switzerland
Technical Detail
Standard DECT
RF frequency 1.89 GHz
RF power average <10.4 dBm
Power supply (corded phone) Input: 100-240VAC 50/60Hz
Output: 6VDC 450mA
Power supply (charger base) Input: 100-240VAC 50/60Hz
Output: 6VDC 450mA
Range Outdoors approx. 300m,
Indoors approx. 50m
Standby Up to 100hrs
Maximum Talk Time Up to 10hrs
Maximum earpiece volume +24 dB
Rechargeable batteries AAA, 1.2V 400 mAh NiMH
Dialling mode Tone (DTMF) / Pulse
Recall time (Flash) Short (100 ms), Medium (300 ms),
Long (600 ms)
Optimum ambient temperature 0˚C to 45˚C
Optimum relative humidity 20% to 80%
Power adaptor information
Corded phone and Charger
VTech (Qingyuan) Plastic & Electronics Co. Ltd.
Model : VT04EEU06045, Input 100-240V AC 50/60Hz 150mA, Output 6VDC
450mA (EU plug)
Shen Zhen Ruijing Industrial Co. Ltd.
Model : RJ-AS060450E002, Input 100-240V AC 50/60Hz 150mA, Output 6VDC
450mA (EU plug)
V1.1 / 12.2018

Affichage du format sur 12 heures.
Mobile
Batterie faible, recharger.
Batterie complètement chargée..
Fonction mains-libres activée.
Signal sonore éteint.
Clavier verrouillé.
Réveil activé.
Navigation dans le menu
Ouvrir le menu principal (appareil fixe)
1. Appuyez .
2. Sélectionnez avec L et M l’élément de menu désirer et appuyez sur .
3. Appuyez sur pour suspendre l’action, retourner vers l’élément pré-
cédent ou sortir du menu.lassen.
4. Maintenir pressé pour retourner vers l’état de veille.
Ouvrir le menu principal (mobile)
1. Appuyez sur .
2. Sélectionner avec et l’élément de menu désiré et appuyez sur .
3. Appuyez sur pour suspendre l’action, retourner vers l’élément précé-
dent ou sortir du menu.
4. Appuyez sur pour retourner vers l’état de veille.
Avis: Manque de tout appui sur une touche pendant 30 sec, l’appareil reprend
automatiquement le mode veille.
Première mise en service
Dans l’état initial (comme expédié), la langue de menu est « anglais »
1. Sur l’écran de mobile apparaît Pls set date/time.
2. Appuyez sur .
3. Sélectionner avec et Enter time et appuyez sur .
4. Entrez l’heure actuelle (heures/minutes) et appuyez sur .
5. Sélectionner avec et Enter date et appuyez sur .
6. Entrez la date (jour/mois/année) et appuyez sur .
7. Appuyez sur .
Réglage de la langue au mobile
1. Appuyez sur .
2. Sélectionner avec et Settings et appuyez sur .
3. Sélectionner avec et Handset Settings et appuyez sur .
4. Sélectionner avec et Language et appuyez sur .
5. Sélectionnez une langue et appuyez sur .
Réglage de la langue à l’appareil fixe
1. Appuyez sur .
2. Sélectionnez LANGUAGE et appuyez sur .
3. Sélectionnez une langue et appuyez sur .
Appareil fixe
1 Affichage d’appel
- Clignote lors d’un appel externe.
2 Répertoire
- Ouvre le répertoire.
3 Liste des appels (manqués)
- Ouvre la liste des appels manqués.
4 Touche menu/OK
- en mode veille : ouvrir menu.
5 Vers le haut
- dans le menu/des listes : vers le haut.
- Pour la saisie de noms/chiffres : déplacer le curseur vers la gauche.
- en cours de conversation/consultation du répondeur : augmentation du
volume.
6 Vers le bas
- Au repos : ouvrir la répétition du dernier numéro composé.
- dans le menu/des listes : vers le bas.
- Pour la saisie de noms/chiffres : déplacer le curseur vers la droite.
- en cours de conversation/consultation du répondeur : baisse du volume.
7 Haut-parleur
8 Touches de numérotation directe M1, M2, M3
- Lors de la saisie du numéro de téléphone : après avoir saisi le numéro de
téléphone, appuyer longuement pour sauvegarder ce dernier.
- Au repos : appuyer pour sélectionner le numéro de téléphone sauve-
gardé sur la touche respective.
9 Clavier
- Saisie de chiffres ou lettres.
- Touche 0 lors de la saisie du numéro de téléphone :
Appuyer longuement sur la touche pour insérer une pause dans la numé-
rotation.
- Touche dièse en mode veille : appuyer longuement sur la touche pour
activer / désactiver la sonnerie.
10 Touche haut-parleur
- en mode mains-libres, appeler, prendre un appel ou terminer une conver-
sation.
- en cours de conversation : haut-parleur ON/OFF.
11 Touche d’amplification
- Pendant une conversation : augmentation du volume du combiné.
12 Touche R (Flash)
- Pendant une conversation : fonction flash pour utiliser des caractéris-
tiques du réseau.
- Lors de la préparation de la numérotation : insère un « F ». La fonction
flash est exécutée quand vous décrochez le combiné.
13 Répondeur ON/OFF
- Appuyez pour allumer ou éteindre le répondeur.
- Affichage d’appel (1) brille quand le répondeur est activé.
- Affichage d’appel (1) clignote lentement en cas de nouveaux messages.
14 Touche Start/Stop
- Commencer/Terminer la consultation du répondeur.
15 Touche avant
- Aller vers le prochain message pendant la consultation du répondeur.
- Au repos : appuyer longuement pour enregistrer un mémo.
16 Touche retour
- Répéter le message actuel pendant la consultation du répondeur.
- Appuyez deux fois pour écouter le message précédent.
- Au repos : appuyer brièvement pour écouter le message d’accueil actuel.
- Au repos : appuyer longuement pour enregistrer un message d'accueil.
17 Touche supprimer
- Supprimer le message ou l’annonce en cours.
18 Suspension
- mans le menu : suspendre la sélection / retour au menu précédent /
appui long pour retourner vers le mode veille.
- lors d’un appel : éteindre le signal sonore (l’appel peut toujours être pris
tant que le correspondant ne raccroche pas).
- pour saisir des noms/chiffres : supprimer les caractères, par ex., lors de
la création d'une entrée de répertoire.
- en état de veille : appeler le combiné (conversation interne).
19 Affichage « En fonction »
- S’allume lors d’un appel, une conversation ou lorsque le répondeur
prend un appel.
- S’allume lorsqu’un autre appareil (mobile) est déjà connecté.
Mobile
1 Affichage d’appel
- Clignote lors d’un appel ex-
terne.
2 Combiné
3 Touche d‘amplification
- Pour augmenter le volume du
combiné. Une pression brève
pendant la conversation active
l’amplification. Appuyez en-
core une fois pour désactiver
l‘amplification.
Quand la fonction de l’amplifi-
cation est activée „Boost on“
s’affiche sur l’écran et le
voyant (1) est allumé.
4 Touche de numérotation
directe M1/M2/M3
- Au repos : sélection des nu-
méros de téléphone sauvegar-
dés.
5 Menu/OK
- en mode veille : ouvrir le
menu.
- dans le menu : sélectionner un
élément de menu ou sauve-
garder.
- Pendant une conversation :
accès à répertoire/liste des
appels/répétition du dernier numéro composé
6 Répertoire/vers le haut
- en mode veille : ouvrir le répertoire.
- dans le menu/des listes : vers le haut.
- Pendant une conversation : augmenter le volume.
- Pendant la notification d’un appel : augmenter le volume de la sonnerie.
7 Touche Appeler/Touche haut-parleur
- en mode veille : appeler ou accepter un appel.
- Dans répertoire/liste des appels/répétition du dernier numéro composé :
appeler la saisie sélectionnée.
- Pendant une conversation : activer/désactiver le hautparleur.
8 Recomposition/vers le bas
- en mode veille : ouvrir recomposition.
- dans le menu/des listes : vers le bas.
- Pendant une conversation : baisser le volume.
- Pendant la notification d’un appel : baisser le volume de la sonnerie.
9 Clavier
- Saisie de chiffres ou lettres.
- Touche 0 lors de la saisie d’un numéro de téléphone : pression de
touche longue pour saisir une pause (P).
- Touche étoile au repos : pression de touche longue pour activer/dés-
activer le verrouillage des touches. Lors de la saisie du nom : commuter
entre majuscules et minuscules.
- Touche dièse en état de veille : pression de touche longue pour acti-
ver/désactiver la sonnerie. Pendant une conversation : pression de
touche longue de la fonction Flash pour utiliser les caractéristiques ré-
seau. Dans liste des appels : affichage des numéros d’appelants (si dis-
ponible).
10 Microphone
11 Touches volume
- en cours de conversation : régler le volume
12 Touche muet/INT
- Dans le menu : retour au point de menu précédent. Pression de touche
longue : retour au mode repos.
- Pendant la saisie du numéro/nom : supprimer le dernier caractère. Ap-
puyer longuement pour supprimer tous les caractères.
- en cours de conversation : éteindre le microphone
- Au repos : liaison interne (seulement si plusieurs combinés sont enregis-
trés sur la même base).
13 Touche accrocher/terminer
- en cours de conversation : accrocher.
- dans le menu : terminer la sélection / retourner vers le mode veille.
- en mode veille : appui long désactive/active le combiné.
Emplacement du téléphone
Placez l’appareil fixe près d’une fiche-réseau et du boîtier de raccordement de
sorte que la longueur du câble suffit. Garder un écart d’env. 1m aux autres ap-
pareils électroniques pour prévenir des interférences mutuelles.
La connexion entre l’appareil fixe et le mobile est assurée par des signaux
radio. La puissance du signal dépend du site. La portée maximale est, en vue
libre, 300 m ; à l’intérieur, elle est plus courte en raison de murs ou obstacles
pareils.
Raccorder l’appareil fixe
1. Insérer la fiche au bout du
câble dans la douille marquée
au dessous de l’appareil l’fixe
et le bloc d’alimentation dans la
prise.
2. Insérer le bout du câble de rac-
cordement avec la petite fiche
dans la douille marquée de l’ap-
pareil fixe et l’autre bout dans
la prise du téléphone.
3. Raccorder le récepteur, avec le
câble spiralé, au téléphone.
Avis : Faire passer les câbles de
raccordement par les guidages
afin de bien positionner l’appareil
sur le support.
Avis important : N’utiliser que le bloc, le câble et les batteries fournis
avec votre D100. Sinon, le bon fonctionnement de votre téléphone n’est
pas assuré. Ne pas barrer l’accès au bloc d’alimentation par des meubles
ou d’autres objets.
Mise en service du mobile
1. Ouvrir le compartiment batterie et insérez les
accumulateurs. Attention à la bonne polarité.
2. Remettre le couvercle du compartiment
jusqu’à ce qu’il s’enclenche.
Pour recharger le mobile complètement, il faut
le laisser au moins 16 heures dans le bloc de
chargement (vérifier l’alimentation du bloc de
chargement !).
Avis important : n‘utilisez absolument que
les accumulateurs livrés. Aussi en cas de
remplacement ultérieur, seul ce type de
batterie doit être utilisé.
Symboles sur l’écrany
Appareil fixe
Nouvelle entrée dans la liste des appels.
Numéro d’ordre de l’entrée dans la liste des appels.
Vous êtes en conversation.
Fonction mains-libres activée.
Signal sonore éteint.
Le répertoire est ouvert.
Appel répété du même numéro de téléphone.
D200
7
2
3
1
4
5
6
8
9
10
11
12
13
18
19
17
14
15
16
2
1
3
4
5
12
13
11
6
8
7
9
10

Structure menu
Appareil fixe
RÉPERTOIRE VOIR
AJOUTER
MODIFIER
SUPPRIMER
SUPPRIM.TOUT
ÉTAT RÉPERT.
JOURNAL MANQUÉ
REÇU
COMPOSÉ
DATE / HEURE FORMAT HEURE
RÉGL.HORLOGE
CHOIX LANGUE
RÉGLAGES RÉGL.SONN. SONNERIE EXT MÉLODIE
VOLUME
SONNERIE INT MÉLODIE
VOLUME
ANNULER COMB
NUMÉROTATION FREQ.VOCALE/DECIMALE
DÉLAI FLASH COURT/MEDIUM/LONG
BIPS TOUCHES
MODIFIER PIN
PARAM.ORIGIN
RECH.COMB.
ASSOCIATION
RÉPONDEUR LECT. MESS.
SUPPRIM.TOUT
MÉMO
RÉP ON/OFF
RÉGL. RÉP MODE RÉP. RÉP. & ENREG.
RÉP. SEULE
ANNONCES RÉP. & ENREG.
RÉP. SEULE
NBR.SONN. 2/4/6/8 SONNERIES
LANGUE RÉP DEUTSCH
FRANÇAIS
ENGLISH
FILTRAGE
ACCÉS DIST.
COMPRESSION BASSE/MEDIUM/
HAUTE
MODIFIER PIN
RÉINIT. RÉP.
Mobile
Liste des appels Voir les détails
Effacer
Effacer tout
Appeler
Enreg numéro
Liste d'appels
Sons Sonneries Appels externes Mélodie ...
Appels internes Mélodie...
Volume Niveau ...
Silence Bips/Off
Tons Bip clavier
Confirmer
Batterie faible
Hors portée
Réglages Réglages combiné Choix base
Ecran Contraste
Nom combiné
Langue
Décroché auto
Déclar. combiné
Supprimer Combiné
Réinit combiné
Réglages base Sonneries Mélodie
Volume
Numérotation FV/DC
Touche R 100/300/600 ms
Code Base
Réinit base
Date/Heur/Alarme Date et Heure Format de l'heure
Format de date
Entrer heure
Entrer date
Alarme Alarme on/off
Entrer heure
Mélodie
Touches Mémoire M1/M2/M3/M4
Répondeur Ecouter messages
Effacer messages
Répondeur on/off
Enreg. un mémo
Annonce Enregist.
Répondre/Enregistr.
Répondeur simple
Ecouter message
Répondre/Enregistr.
Répondeur simple
Régler le répondeur
Mode du répondeur
Répondre/Enregistr.
Répondeur simple
Langue répondeur Deutsch/English/
Française
Nombre sonneries 2, 4, 6, 8 Sonn.
Durée enr. 30/60/120 s /
Illimité
Filtrage d'appel
Code d'accès Activer/Désactiv.
Téléphoner
Appeler, prendre un appel et raccrocher
Appeler depuis l’appareil fixe
Composer le numéro et décrochez le récepteur ou appuyez sur .
- ou bien -
Décrochez le récepteur ou appuyez sur . Lorsque vous entendez la to-
nalité, composez le numéro.
Prendre un appel depuis l’appareil fixe
Décrochez le récepteur ou appuyez sur .
Terminer la conversation depuis l’appareil fixe
Si vous téléphonez avec le récepteur, raccrochez le récepteur.
Si vous téléphonez via le haut-parleur, appuyez sur .
Appeler depuis le mobile
Composer le numéro un et appuyez sur .
- ou bien -
Appuyez sur . Lorsque vous entendez la tonalité, composez le numéro.
Prendre des appels depuis le mobile
Appuyez sur .
Terminer la conversation depuis le mobile
Appuyez sur ou insérer le mobile dans la station de base.
Fonction mains-libres
Appuyez encore une fois sur la touche de l’appareil fixe ou bien du
mobile en cours de conversation. Pour désactiver cette fonction, appuyez de
nouveau sur la touche.
Régler le volume
Sur l’appareil fixe
Appuyez en cours de conversation sur les touches volume L et M.
Sur le mobile
Appuyez en cours de conversation sur les touches volume latérales.
Eteindre le microphone
Sur l’appareil fixe
Appuyez en cours de conversation sur . Pour allumer le micro-
phone, appuyez sur encore une fois.
Sur le mobile
Appuyez en cours de conversation sur . Pour allumer le microphone,
appuyez sur à nouveau.
Recomposition
Sur l’appareil fixe
1. Appuyez en mode veille sur M.
- ou -
Appuyez sur la touche menu , sélectionnez JOURNAL -> COMPOSÉ et
appuyez sur .
2. Sélectionnez avec L et M l`élément voulu.
3. Décrochez le récepteur ou appuyez sur pour composer le numéro.
Sur le mobile
1. Appuyez en mode veille sur .
2. Sélectionnez avec et l’élément voulu.
3. Appuyez sur pour composer le numéro.
Indication relative aux réglages
Certains réglages sont sécurisés par un PIN. À la livraison, le PIN de l'appareil
de bureau et du combiné est « 0000 ».
Indication relative au répondeur
Votre D200 possède un répondeur numérique incorporé. Sa capacité totale est
de 15 minutes. Vous pouvez utiliser le répondeur sur appareil fixe ou sur tout
combiné enregistré. En outre, vous pouvez interroger le répondeur à distance
avec la protection d'un PIN avec un téléphone à fréquences vocales.
Deux modes de fonctionnement sont disponibles :
- Annonce avec enregistrement de message
- Annonce seulement.
Une annonce standard enregistrée (allemand, anglais et français) est déjà four-
nie pour tout mode de fonctionnement à la livraison. Le répondeur est ainsi opé-
rationnel immédiatement. L'appareil passe automatiquement au mode «
Annonce seulement » en cas d’ « Annonce avec enregistrement de message »
et atteinte de la capacité d’enregistrement maximale.
L’interrogation à distance n’est possible que si cette fonction est activée. Veillez
à ce que le téléphone externe utilisé soit en mesure d’envoyer des impulsions
(DTMF/MFV) pendant la liaison.
Pour pouvoir accéder au répondeur depuis un téléphone supportant les MFV,
vous devez saisir le PIN de l'interrogation à distance.
Utiliser l’interrogation à distance
1. Sélectionnez le numéro de téléphone de votre raccordement.
2. Si le répondeur est désactivé, celui-ci répond avec le message « Annonce
uniquement » après env. 16 signaux d'appel. Appuyez sur la touche étoile
pendant l’annonce et saisissez le PIN à quatre chiffres d’interrogation à dis-
tance de votre téléphone. Après la saisie réussie du PIN, vous disposez des
options suivantes.
- ou -
Si le répondeur est activé, celui-ci répond avec l’annonce après le nombre de
signaux d'appel réglé. Avec la touche étoile, commencez l’interrogation à
distance pendant l'annonce. Saisissez maintenant le PIN à quatre chiffres de
l'interrogation à distance de votre téléphone. Après la saisie réussie du PIN,
vous disposez des options suivantes.
- Touche 5 - démarrer la lecture
- Touche 7 - allumer le répondeur
- Touche 9 - éteindre le répondeur
Pendant la lecture d'un message :
- Touche 2 - supprimer le message actuel
- Touche 4 - répéter le message actuel. Appuyer deux fois sur la Touche 4
pour passer au message précédent.
- Touche 6 - lire le message suivant.
- Touche 8 - arrêter la lecture
Remarque : La liaison est interrompue après trois erreurs lors de la saisie du
PIN.
En cas de problèmes
Certains problèmes se règlent lorsque l’on éteint le téléphone. Débranchez le bloc
d’alimentation de la station de base pour environ 20 minutes et enlevez les accus
du mobile. Lorsque vous aurez raccordé la station de base et inséré les accus, le
problème aura éventuellement déjà disparu.
Consignes de sécurité
Prendre des précautions de sécurité fondamentales lors de l’utilisation du télé-
phone pour réduire les risques d’incendie, de choc électrique et de blessures, y
compris les points suivants :
• Lisez et comprenez toutes les instructions.
• Respectez tous les avertissements et toutes les instructions figurant sur le
produit.
• Débranchez le cordon d'alimentation de la prise avant de nettoyer l'appareil.
N’utilisez aucun nettoyant liquide ou nettoyant aérosol. Utilisez un chiffon hu-
mide pour le nettoyage.
• N’utilisez pas cet appareil à proximité d'eau (par ex. à proximité de la bai-
gnoire, du lavabo, de la piscine).
• Ne surchargez pas de prises et de câbles de prolongation sous peine d’entraî-
ner des incendies ou des électrocutions
• Retirez le cordon d'alimentation de la prise et adressez-vous à votre fournis-
seur dans les cas suivants :
• le cordon d'alimentation ou le bloc d’alimentation est endommagé ou effi-
loché.
• l'appareil ne fonctionne pas comme décrit dans le mode d'emploi.
• l'appareil est tombé et le boîtier a été endommagé.
• la performance de l'appareil a changé de manière évidente.
• Evitez d’utiliser un téléphone (excepté sans fil) pendan un orage. Il peut exis-
ter un risque de choc électrique par la foudre.
• N’utilisez pas le téléphone pour signaler une fuite de gaz à proximité de la
fuite.
• Pour les appareils enfichables, la prise (bloc d'alimentation) doit être instal-
lée à proximité de l'appareil et facilement accessible.
Accumulateurs
• Utilisez uniquement les accumulateurs NiMH (nickel-métalhydrure) livrés
avec l'appareil ! Les temps de fonctionnement des combinés ne sont pos-
sibles qu'avec les capacités d’accumulateurs indiquées.
• L’utilisation d’autres types de piles ou de piles non rechargeables/cellules pri-
maires peut être dangereuse. Elle peut entraîner des dysfonctionnements
et/ou des dommages résultant d'accidents. Le fabricant décline toute respon-
sabilité pour les dommages résultant de ce non-respect. N’utilisez pas de
chargeurs de bureau de fournisseurs tiers. Les accumulateurs peuvent s’en-
dommager.
• Veillez à la bonne polarité lors de l'insertion des accumulateurs.
• Ne pas plonger les piles dans l’eau et ne pas les jeter au feu.
• Il existe un risque d’explosion si les accumulateurs sont remplacés par un
mauvais type de piles.
• Eliminez les accumulateurs/piles conformément aux instructions des autori-
tés.
Attention, risque d’explosion en cas de remplacement des accumula-
teurs par un mauvais type de piles.
Utilisation conforme aux prescriptions
Ce téléphone est conçu pour être utilisé à l’intérieur d’un réseau téléphonique.
Toute autre utilisation n’est pas conforme à l’usage. Les modifications effec-
tuées par l’utilisateur ne sont pas autorisées. En aucun cas vous ne devez ouvrir
l’appareil ou tenter de le réparer vous-même.
Recyclage
Si vous ne voulez plus vous servir de votre appareil, veuillez l’ap-
porter au centre de collecte de l’organisme d’élimination des dé-
chets de votre commune (par ex. centre de recyclage). D’après la
loi relative aux appareils électriques et électroniques, les proprié-
taires d’appareils usagés sont tenus d’apporter tous les appareils
électriques et électroniques dans un collecteur séparé.
L’icône ci-contre signifie que vous ne devez en aucun cas jeter votre
appareil dans les ordures ménagères !
Mise en danger de l’homme et l’environnement causée par les
piles et les batteries !
Ne jamais ouvrir, endommager, avaler les batteries et les piles ou
ne jamais faire pénétrer leur contenu dans l’environnement. Elles
peuvent contenir des métaux lourds toxiques et nuisibles pour
celui-ci. Selon la loi, vous êtes tenus d’éliminer les accumulateurs
et les piles en toute sécurité dans le commerce distributeur de piles
et auprès de centres de collecte compétents, qui mettent des bacs
correspondants à votre disposition et de ne les jeter en aucun cas
dans les ordures ménagères. Le recyclage des piles et batteries est
gratuit. Il est recommandé de ne rendre que les accumulateurs et
batteries d’accumulateurs de toute sorte vidés de leur contenu.
Prenez absolument des précautions contre les court-circuits, par
ex. en isolant les pôles avec des bandes adhésives sous peine d'un
risque d'incendie. Éliminez les matériaux d’emballage conformé-
ment au règlement local.
Garantie
Les appareils SWITEL sont fabriqués et testés selon les procédés de production
les plus modernes. Les matériaux choisis et la haute technologie assurent un
fonctionnement parfait et une longue durée de vie. La garantie n’est pas valable si
l’exploitant du réseau téléphonique ou éventuellement une installation à postes
supplémentaires intercalée est responsable du dysfonctionnement de l’appareil.
La garantie ne s’applique pas à la pile rechargeable standard ou aux packs de
piles rechargeables utilisés dans le produit. La durée de garantie est de 24 mois à
partir de la date d’achat. Pendant la période de garantie, tous les défauts dus à
des erreurs de matériel et de fabrication sont réparés gratuitement. La garantie
expire en cas d’interventions de l’acheteur ou d’un tiers. Les dommages engen-
drés par une manipulation ou une utilisation inadéquate, par un mauvais emplace-
ment ou rangement, par un raccordement ou une installation inadéquate ainsi
qu’en cas de force majeure ou d’autres influences extérieures ne sont pas inclus
dans la prestation de garantie. En cas de réclamations, nous nous réservons le
droit de réparer ou de remplacer les pièces défectueuses ou d’échanger l’appa-
reil. Les pièces ou appareils échangés deviennent notre propriété. Tout droit de
prétention à des dédommagements est exclu, sauf si ce dommage est basé sur
une préméditation ou une négligence grave du fabricant. Si votre appareil
comporte cependant un défaut pendant la période de garantie, veuillez vous
adresser exclusivement au magasin dans lequel vous avez acheté votre appareil
SWITEL en présentant votre bon d’achat. Tous les droits de garantie basés sur
ces dispositions ne peuvent être revendiqués qu’auprès de votre revendeur. A
l’échéance des deux ans après l’achat et le transfert de nos produits, les législa-
tions en matière de garantie ne sont plus applicables.
Déclaration de conformité
Cet appareil remplit les exigences de la directive européenne :
2014/53/EU.
confirmée sur l’appareil par le symbole CE. Pour obtenir la déclaration intégrale
de conformité, veuillez la télécharger gratuitement sur notre site Internet
www.switel.com/support.
Telgo AG, Route D’Agy 16, 1763 Granges-Paccot, Switzerland
Données techniques
Standard DECT
Fréquence RF 1,89 GHz
RF moyenne puissance <10,4 dBm
Alimentation (station de base) Entrée : 100-240VAC 50/60Hz
Sortie : 6 VDC 450 mA
Portée A l’extérieur : env. 300m
A l’intérieur : env. 50 m
Standby Jusqu’à 100h
Durée conservation maxi Jusqu’à 10h
Volume récepteur maxi +30dB
Accumulateurs AAA, 1,2 V, 400 mAh NiMH
Mode de composition DTMF, par impulsion
Flash Court (100 ms), moyen (300 ms),
long (600 ms),
Température ambiante optimale 0˚C à 45˚C
Hygrométrie relative optimale 20% à 80%
Informations d'alimentation
Appareil fixe en bloc de chargement
VTech (Qingyuan) Plastic & Electronics Co. Ltd.
Model: VT04EEU06045, Input 100-240V AC 50/60Hz 150mA, Output 6VDC
450mA (fiche EU)
Shen Zhen Ruijing Industrial Co. Ltd.
Model: RJ-AS060450E002, Input 100-240V AC 50/60Hz 150mA, Output 6VDC
450mA (fiche EU)
V1.1 / 12.2018

Suoneria disattivata.
La rubrica è aperta.
Più chiamate dello stesso numero.
Indicatore nel formato ore 12.
Unità mobile
Batteria scarica, ricaricare.
Batteria carica.
Vivavoce attivo.
Suoneria disattivata.
Tastiera bloccata.
Sveglia attivata.
Navigazione all’interno del menu
Apertura del menu principale (apparecchio da tavolo)
1. Premere .
2. Selezionare con L e M la voce di menu desiderata e premere .
3. Premere per interrompere l’azione, per tornare alla voce di menu
precedente o per abbandonare il menu.
4. Tenere premuto per tornare alla modalità di standby.
Apertura del menu principale (unità mobile)
1. Premere .
2. Selezionare con e la voce di menu desiderata e premere .
3. Premere per interrompere l’azione, per tornare alla voce di menu pre-
cedente o per abbandonare il menu.
4. Premere per tornare alla modalità di standby.
Avvertenza: Se non viene premuto alcun tasto nell’arco di 30 s,
l’apparecchio torna automaticamente alla modalità di standby.
Prima messa in funzione
Nelle impostazioni di fabbrica, la lingua del menu è impostata su “In-
glese“.
1. Sul display dell’unità mobile compare la scritta Pls set date/time.
2. Premere .
3. Selezionare con e Enter time e premere .
4. Inserire l’ora (ore/minuti) e premere .
5. Selezionare con e Enter date e premere .
6. Inserire la data (giorno/mese/anno) e premere .
7. Premere .
Impostazione della lingua sull’unità mobile
1. Premere .
2. Selezionare con e Settings e premere .
3. Selezionare con e Handset Settings e premere .
4. Selezionare con e Language e premere .
5. Selezionare una lingua e premere .
Impostazione della lingua sull’apparecchio da tavolo
1. Premere .
2. Selezionare con L e M LANGUAGE ae premere .
5. Selezionare una lingua e premere .
Apparecchio da tavolo
1 Visualizzazione chiamate
- Lampeggia in caso di chiamata in arrivo.
2 Rubrica telefonica
- Apre la rubrica telefonica.
3 Registro chiamate (perse)
- Apre la lista delle chiamate perse.
4 Tasto menu/OK
- In standby: apertura menu
5 Freccia in su
- Nel menu/in liste: scorrimento verso l’alto.
- In caso di inserimento di nomi/cifre: spostamento del cursore a sinistra.
- Durante una conversazione/ascolto della segreteria telefonica: aumento
del volume.
6 Freccia in giù
- In standby: aprire la ricomposizione
- Nel menu/in liste: scorrimento verso il basso.
- In caso di inserimento di nomi/cifre: spostamento del cursore verso de-
stra.
- Durante una conversazione/ascolto della segreteria telefonica: riduzione
del volume.
7 Altoparlante
8 Tasti selezione diretta M1, M2, M3
- Nell’inserimento dei numeri telefonici: dopo aver inserito il numero pre-
mere a lungo per salvarlo.
- In standby: premere per selezionare il numero di telefono che è salvato
sul rispettivo tasto.
9 Tastiera di selezione
- Inserimento di numeri o lettere.
- Tasto 0 con inserimento del numero di telefono: pressione lunga del
tasto per inserire una pausa di selezione.
- Tasto cancelletto in standby: pressione lunga del tasto per
accendere/spegnere il tono di chiamata.
10 Tasto altoparlante
- In modalità vivavoce chiamata, accettazione di chiamata o chiusura
della conversazione.
- Durante una conversazione: attivazione/disattivazione altoparlante.
11 Tasto amplificatore
- Durante una conversazione; aumento del volume sul ricevitore.
12 Tasto R (Flash)
- Durante una conversazione: funzione flash per usare le risorse di rete.
- Nel preparare la selezione: inserire una ‚F‘. Viene eseguita la funzione
flash, quando si solleva il ricevitore.
13 Segreteria on/off
- Premere per attivare o disattivare la segreteria telefonica.
- Visualizzazione chiamate (1) si illumina quando la segreteria telefonica è
attivata.
- Visualizzazione chiamate (1) lampeggia lentamente in caso di nuovi mes-
saggi.
14 Tasto start/stop
- Avvio/arresto dell'ascolto della segreteria telefonica.
15 Tasto avanti
- Passaggio al messaggio successivo durante l’ascolto della segreteria te-
lefonica.
- In standby: pemere a lungo per registrare un memo.
16 Tasto indietro
- Ripetizione del messaggio attuale durante l'ascolto della segreteria tele-
fonica.
- Premere due volte per riprodurre il messaggio precedente.
- In standby: premere brevemente per ascoltare il testo attuale di benve-
nuto.
- In standby: premere alungo per registrare un testo di benvenuto.
17 Tasto cancella
- Cancellazione del messaggio di segreteria o annuncio in fase di riprodu-
zione.
18 Interruzione
- Nel menu: interruzione della selezione/ritorno al menu precedente / pres-
sione lunga per tornare alla modalità di standby.
- In caso di chiamata: disattivazione della suoneria (la conversazione può
essere accettata a meno che il chiamante non abbia appeso).
- In caso di inserimento di nomi/cifre: cancellazione di caratteri, ad esem-
pio quando si crea una voce della rubrica telefonica.
- In standby: chiamare unità mobile (conversazione interna).
19 ASpia “In uso”
- Si illumina in caso di chiamate, conversazione o all’accettazione di una
chiamata tramite la segreteria telefonica.
- Si illumina quando un altro ap-
parecchio (unità mobile) sta già
occupando la linea.
Unità mobile
1 Visualizzazione chiamate
- Lampeggia in caso di chiamata
in arrivo.
2 Ricevitore
3 Pulsante amplificatore
- Per aumentare il volume del ri-
cevitore. Durante una conversa-
zione, una breve pressione
accende l’amplificazione, un’ul-
teriore pressione la spegne nuo-
vamente. Con funzione
amplificatore attiva, sul display
compare “Ampl. att.” e si ac-
cende l’indicatore di chiamata
(1).
4 Tasti selezione diretta
M1/M2/M3
- In standby:
Selezionare il numero
di telefono memorizzato.
5 Menu/OK
- In standby: Apertura menu.
- Nel menu: Selezione o memoriz-
zazione di una voce di menu.
- Durante una conversazione: Accesso alla rubrica telefonica/registro
chiamate/ricomposizione
6 Rubrica/freccia in su
- In standby: Apertura rubrica telefonica.
- Nel menu/in liste: Scorrimento verso l’alto.
- Durante una conversazione: Aumentare il volume
- Durante la segnalazione di chiamata: Aumentare il volume della suoneria.
7 Tasto chiamata/tasto altoparlante
- In standby: Telefonare o ricevere telefonate.
- Nella rubrica telefonica/registro chiamate/ricomposizione: Chiama la
voce selezionata.
- Durante una conversazione: Accendere/spegnere l’altoparlante.
8 Ripetizione di selezione/verso il basso
- In standby: Apertura della ripetizione di selezione
- Nel menu/in liste: Scorrimento verso il basso.
- Durante una conversazione: Ridurre il volume.
- Durante la segnalazione di chiamata: Ridurre il volume della suoneria.
9 Tastiera di selezione
- Inserimento di numeri o lettere.
- Tasto 0 con inserimento del numero di telefono: Pressione lunga del
tasto per inserire una pausa di selezione (P).
- Accettazione chiamate in arrivo tramite un tasto qualsiasi.
- Tasto asterisco in standby: Premere il tasto a lungo per accendere/spe-
gnere la suoneria. Quando si inseriscono i nomi: Commutazione tra let-
tere maiuscole e minuscole.
- Tasto cancelletto in standby: Pressione lunga del tasto per
accendere/spegnere la suoneria. Durante una conversazione: Premere a
lungo il tasto per la funzione flash per l’uso delle caratteristiche di pre-
stazione della rete. Nel registro chiamate: Visualizzazione del numero
del chiamante (se disponibile).
10 Microfono
11 Tasti volume
- Durante una conversazione: Impostazione del volume.
12 Tasto mute/INT
- Nel menù: Tornare alla voce menù precedente. Pressione tasto a lungo:
Tornare alla modalità di sospensione.
- Durante l’inserimento del numero di telefono/del nome: Cancella l’ultimo
carattere. Pressione a lungo, per cancellare tutti i caratteri.
- Durante una conversazione: Disattivazione microfono
- In standby: Collegamento interno (solo se più portatili sono registrati
sulla stessa base).
13 Tasto di riaggancio/interruzione
- Durante una conversazione: Riaggancio.
- Nel menu: Interruzione della selezione/tornare alla modalità di standby.
- In standby: Una pressione lunga del tasto spegne/accende l’unità mo-
bile.
Luogo di installazione
Installare l’apparecchio da tavolo nelle vicinanze di una presa di corrente e
della presa telefonica, affinché la lunghezza del cavo di allacciamento sia suffi-
ciente. Mantenere una distanza di circa 1 m da altre apparecchiature elettroni-
che per evitare un influsso reciproco. Il collegamento fra l'apparecchio da
tavolo e l'unità mobile avviene tramite segnali radio. La potenza del segnale di-
pende dall’ubicazione. La portata massima, in caso di collegamento in linea ot-
tica libero, è pari a 300 m, ma all’interno di edifici diminuisce per via delle pareti
e di ostacoli similari.
Collegamento dell’apparecchio da tavolo
1. Inserire la spina che si trova al-
l’estremità del cavo nella presa
all’uopo contrassegnata sul lato
inferiore dell’apparecchio da ta-
volo e l’alimentatore nella presa
elettrica.
2. Inserire l’estremità del cavo di
allacciamento telefonico con la
piccola spina nella presa al-
l’uopo contrassegnata dell’ap-
parecchio da tavolo e l’altra
estremità nella presa telefo-
nica.
3. Collegare il ricevitore con il
cavo a spirale al telefono.
Avvertenza: far passare il cavo di allacciamento nelle guide, affinché l’apparec-
chio da tavolo possa essere posizionato in piano sulla base d'appoggio.
Importante: Utilizzare solo l’alimentatore, il cavo di allacciamento telefo-
nico e le batterie forniti con il D200. In caso contrario, non si garantisce il
perfetto funzionamento del telefono. Non bloccare l’accesso all’alimenta-
tore con mobili o altri oggetti.
Messa in funzione dell’unità mobile
1. Aprire lo scomparto batterie e inserire le bat-
terie. Fare attenzione alla corretta polarità
2. Spingere nuovamente il coperchio dello scom-
parto batterie, finché non scatta percettibil-
mente in posizione.
Affinché l’unità mobile si carichi completamente,
deve essere lasciata per almeno 16 ore sulla sta-
zione di carica (controllare l’alimentazione della
stazione di carica).
Importante: Utilizzare tassativamente solo
per batterie ricaricabili in dotazione. Anche
in caso di una futura sostituzione, è possibile
utilizzare solo questo tipo di batterie.
Simboli sul display
Apparecchio da tavolo
Nuova voce nel registro chiamate.
Numero attuale della voce del registro chiamate.
State effettuando una conversazione telefonica.
Vivavoce attivo.
D200
7
2
3
1
4
5
6
8
9
10
11
12
13
18
19
17
14
15
16
2
1
3
4
5
12
13
11
6
8
7
9
10

Struttura del menu
Apparecchio da tavolo
RUBRICA VISUALIZZA
AGGIUNGI
MODIFICA
ELIMINA
ELIM.TUTTO
STATO RUBR
REGISTRO CH. CH.PERSE
RICEVUTO
CHIAMATO
DATA E ORA FORMATO ORA
IMP. OROL.
LINGUA
IMPOSTAZIONI IMP. SQUILLI CHIAMATE EST MELODIA
VOLUME
CHIAMATE INT MELODIA
VOLUME
ELIMINA RIC.
MOD.COMPOSIZ TONI/IMPULSI
MOD.FLASH BREVE/MEDIO/LUNGO
TONO TASTI
CAMBIA PIN
BASE PREDEF
CERCA T.RIC
REGISTRAZ.
SEGRETERIA ASCOLTO MESS
ELIM.TUTTO
MEMO
SEGR.ATT/DIS
IMPOST.SEGR. MOD.RISPOSTA RISP.& REG.
SOLO RISP.
IMPOST OGM RISP.& REG.
SOLO RISP.
RITARDO RISP 2/4/6/8 SQUILLI
LINGUA SEGR DEUTSCH
FRANÇAIS
ENGLISH
FILTRO CHIAM
ACC. REMOTO
COMPRESSIONE BASSA/MEDIO/
ALTA
CAMBIA PIN
SEGR.PREDEF
Unità mobile
Reg. ch. Dettagli
Elimina
Elimina tutti
Chiama
Salva numero
Tipo reg. ch.
Suono Suoneria Esterna Melodia ...
Interna Melodia ...
Volume suoneria Livello ...
Silenz. Bip/Disattiva
Toni Bip tasto
Conferma
Batteria scarica
Nessuna copertura
Impost. Impostaz. portatile Seleziona base
Display Contrasto
Nome portatile
Lingua
Risposta autom.
Registra portatile
Annula registraz.
Riprist. portatile
Impostaz. base Suoneria Suoneria
Volume suoneria
Selezione Tono/Impulso
PIN del sistema
Riprist. base
Data/Ora/Allar. Data/Ora Formato ora
Formato data
Inserisci ora
Inserisci data
Allarme Allarme att./dis.
Inserisci ora
Suoneria
Tasti memoria
M1/M2/M3/M4
Seg. telefonica Riproduci messaggi
Elimina messaggi
Att./Dis. segr.
Registra MEMO
Messaggio in uscita Registra messaggio Risp./Registra
Rispondi solamente
Riproduci messaggio
Risp./Registra
Rispondi solamente
Impost. segr. Modalità segr. Risp./Registra
Rispondi solamente
Lingua segreteria Deutsch/English/
Française
Ritardo segr. 2/4/6/8 toni
Tempo di registraz. 30/60/120 s /
Nes. Lim.
Filtro chiamate
Accesso remoto Abilita/Disabil.
Esecuzione di chiamate
Accettazione e conclusione di chiamate e conversazioni
Chiamate dall’apparecchio da tavolo
Inserire il numero telefonico e sollevare il ricevitore o premere .
- oppure -
Sollevare il ricevitore oppure premere . Quando si sente il tono di sele-
zione, inserire il numero telefonico.
Accettare chiamate sull’apparecchio da tavolo
Sollevare il ricevitore o premere .
Concludere una conversazione sull’apparecchio da tavolo
Se si sta chiamando con il ricevitore, agganciare il ricevitore.
Se si sta telefonando in vivavoce, premere .
Chiamate con l’unità mobile
Inserire il numero telefonico e premere .
- oppure -
Premere . Quando si sente il tono di selezione, inserire il numero telefo-
nico.
Accettare chiamate sull’unità mobile
Premere .
Concludere una conversazione sull’unità mobile
Premere oppure appoggiare l’unità mobile sulla stazione base/di carica
Vivavoce
Premere durante una conversazione i l tasto sull’apparecchio da tavolo
oppure sull'unità mobile nuovamente. Per disattivare la modalità viva-
voce, premere nuovamente il tasto.
Impostazione del volume
Sull’apparecchio da tavolo
Premere durante una conversazione i tasti volume L e M.
Sull’unità mobile
Premere durante una conversazione i tasti volume laterali.
Disattivazione microfono
Sull’apparecchio da tavolo
Durante una conversazione premere . Per attivare il microfono, pre-
mere nuovamente.
Sull’unità mobile
Premere durante una conversazione . Per attivare il microfono premere
di nuovo .
Ripetizione della selezione
Sull’apparecchio da tavolo
1. Premere in standby M.
- oppure -
Premere in standby , selezionare REGISTRO CH. -> CHIAMATO e pre-
mere .
2. Selezionare con L e M il contatto desiderato.
3. Sollevare il ricevitore oppure premere per selezionare il numero.
Sull’unità mobile
1. Premere in standby .
2. Selezionare con e il contatto desiderato.
3. Premere per selezionare il numero.
Avvertenza per le impostazioni
Alcune impostazioni sono protette da PIN. All’atto della consegna questo PIN è
“0000” per l’apparecchio da tavolo e l’unità mobile.
Avvertenza per la segreteria telefonica
Il vostro D200 dispone di una segreteria telefonica digitale integrata. La capa-
cità complessiva è pari a ca. 15 minuti. È possibile utilizzare la segreteria telefo-
nica dell’apparecchio da tavolo o di ciascuna unità mobile registrata. Con un
telefono DTMF si dispone inoltre di un accesso remoto alla segreteria telefonica
protetto da PIN.
Sono disponibili due modalità operative:
- Annuncio con registrazione messaggio
- Solo annuncio.
All’atto della consegna per ciascuna modalità operativa è già salvato un annun-
cio standard (tedesco, inglese e francese). La segreteria telefonica è quindi su-
bito pronta all’uso. Per “Annuncio con registrazione messaggio” e al
raggiungimento della capacità massima di registrazione, l’apparecchio com-
muta automaticamente sulla modalità “Solo annuncio”.
L’interrogazione remota è possibile solo se questa funione è accesa. Tenere pre-
sente che il telefono esterno utilizzato deve essere in grado, durante il collega-
mento, di inviare impulsi di composizione a toni (DTMF / MFV).
Per poter accedere alla vostra segreteria da un telefono DTMF, si deve inserire il
PIN dell’interrogazione remota.
Utilizzare l’interrogazione remota
1. Scegliere il numero di telefono della vostra connessione.
2. Quando la segreteria è spenta, risponde dopo ca. 16 segnali di chiamata con
l’annuncio “Solo annuncio”. Durante l’annuncio premere il tasto asterisco e
inserire il PIN a quattro caratteri di interrogazione remota del vostro tele-
fono. Dopo aver inserito con successo il PIN, avete a disposizione le seguenti
opzioni.
- oppure -
Quando la segreteria telefonica è accesa, risponde con l’annuncio dopo il nu-
mero di segnali di chiamata impostato. Con il tasto asterisco si avvia l’inter-
rogazione remota durante l’annuncio. Ora inserire il PIN a quattro caratteri
del vostro telefono. Dopo aver inserito con successo il PIN avete a disposi-
zione le seguenti opzioni.
- Tasto 5 - Avvia riproduzione
- Tasto 7 - Accendi segreteria
- Tasto 9 - Spegni segreteria
Durante la riproduzione di un messaggio:
- Tasto 2 - Elimina messaggio attuale
- Tasto 4 - Ripeti messaggio attuale. Premere due volte il Tasto 4
per passare al messaggio precedente.
- Tasto 6- Riproduci prossimo messaggio
- Tasto 8 - Interrompi riproduzione.
Avvertenza: La connessione viene interrotta dopo inserimento del PIN errato
a tre cifre.
In caso di problemi
Alcuni problemi si risolvono semplicemente spegnendo il telefono. Staccare l’ali-
mentatore della stazione base per circa 20 minuti dalla rete ed estrarre il battery
pack dall’unità mobile. Quando poi si ricollegherà la stazione base e si reinserirà il
battery pack, il problema si sarà probabilmente risolto.
Indicazioni di sicurezza
Quando si utilizzano i telefoni, occorre adottare delle precauzioni di base per ri-
durre il rischio di incendio, scossa elettrica e lesioni, compresi i seguenti punti:
• Leggere e comprendere tutte le istruzioni.
• Osservare tutte le avvertenze e istruzioni riportate sul prodotto.
• Scollegare il cavo di rete dalla presa di corrente prima di pulire l’apparecchio.
Non usare detergenti liquidi o detergenti in aerosol. Per pulire utilizzare un
panno umido.
• Non utilizzare questo apparecchio in presenza di umidità (ad es. vicino a va-
sche da bagno, lavandini, piscine). Non sovraccaricare le prese di corrente e i
cavi di prolunga poiché ciò può causare incendi o scosse elettriche.
• Scollegare il cavo di rete dalla presa di corrente e contattare il proprio forni-
tore se si presentano le condizioni seguenti:
• Se il cavo di rete o la spina di rete sono danneggiati o sfilacciati.
• Se l’apparecchio non lavora come descritto nelle istruzioni per l’uso.
• Se l’apparecchio è caduto e l’alloggiamento si è danneggiato.
• Se l’apparecchio mostra un cambiamento nelle prestazioni.
• Evitare di usare il telefono durante un temporale (eccetto wireless). Sussiste
potenziale pericolo di scossa elettrica.
• Non usare il telefono per segnalare una fuga di gas in prossimità della fuga
stessa.
• Per gli apparecchi collegabili si deve installare la presa di corrente (alimenta-
tore) in prossimità dell’apparecchio e in modo che sia facilmente raggiungi-
bile.
Batterie
• Utilizzare solo le batterie ricaricabili NiMH (nichel-metallo idruro)! I tempi di
funzionamento delle unità mobili sono fattibili sono con le capacità delle bat-
terie indicate.
• L’uso di altri tipi di batterie o di batterie non ricaricabili/pile primarie può es-
sere pericoloso. Ciò può causare guasti e/o incidenti. Il produttore non ri-
sponde di danni derivanti da questa inosservanza.
• Non utilizzare basi di ricarica di terzi. Le batterie ricaricabili si possono dan-
neggiare.
• Quando si inseriscono le batterie fare attenzione alla corretta polarità.
• Non immergere le batterie in acqua e non gettarle nel fuoco.
• Pericolo di esplosione se si sostituiscono le batterie con un tipo errato.
• Smaltire le batterie ricaricabili/batterie come da istruzioni ufficiali.
Attenzione, pericolo di esplosione quando si sostituiscono le batterie
con un tipo errato.
Utilizzo secondo le disposizioni
Il presente telefono è adatto per telefonare nell’ambito di una rete telefonica
analogica. Qualsiasi altro utilizzo non è conforme alle disposizioni. Non sono
consentite modifiche o trasformazioni arbitrarie. Non aprire in alcun caso l’ap-
parecchio da sé e non eseguire personalmente alcun tentativo di riparazione.
Smaltimento
Procedere allo smaltimento dell’apparecchio esausto consegnandolo
presso uno dei punti di raccolta istituiti dalla propria società di smalti-
mento rifiuti comunale (ad es. centro di riciclo materiali). Secondo quanto
previsto dalla legge sugli apparecchi elettrici ed elettronici, i proprietari
di apparecchi esausti sono per legge tenuti alla consegna di tutti gli appa-
recchi elettrici ed elettronici presso un centro di raccolta rifiuti differen-
ziata. Il simbolo indica che non è assolutamente consentito smaltire
l’apparecchio assieme ai normali rifiuti domestici!
Accumulatori e batterie possono provocare danni alla salute e al-
l’ambiente!
Non aprire, danneggiare, ingerire o disperdere nell’ambiente accumula-
tori e batterie. Questi possono contenere metalli pesanti nocivi e dannosi
per l’ambiente. Vige l’obbligo legale di smaltire in modo sicuro accumula-
tori e batterie presso il punto vendita o in punti di raccolta a ciò preposti
che mettono a disposizione i relativi contenitori e di non gettarli in alcun
caso nei rifiuti domestici. Lo smaltimento è gratuito. Accumulatori al litio
e battery pack di qualsiasi tipo devono essere depositati solo una volta
scarichi. Adottare in ogni caso delle precauzioni contro i cortocircuiti,
p.es. isolando i poli con del nastro adesivo, poiché vi è altrimenti il rischio
di incendio.
Smaltire confezioni ed imballaggi in base a quanto indicato dalle norme in
vigore a livello locale.
Garanzia
Gli apparecchi SWITEL vengono prodotti e testati secondo i processi produttivi
più moderni. I materiali ricercati e le tecnologie altamente sviluppate garanti-
scono un funzionamento perfetto e una lunga durata del prodotto.
Non sussiste un caso di garanzia qualora la causa di un malfunzionamento del-
l’apparecchio risieda nell’operatore della rete telefonica o in un centralino telefo-
nico automatico eventualmente intermedio. Sono esclusi dalla garanzia batterie,
accumulatori o battery pack contenuti nei prodotti. Il periodo di garanzia è pari a
24 mesi, a far data dal giorno dell'acquisto.
Entro il periodo di garanzia tutti i vizi riconducibili a difetti del materiale o della
fabbricazione vengono rimossi gratuitamente. Il diritto alla garanzia decade in
caso di interventi dell’acquirente o di terzi. I danni derivanti da un trattamento o
utilizzo non idoneo, dall’usura naturale, da un'errata installazione o conserva-
zione, da un collegamento o installazione non idonei, nonché da forza maggiore o
altri influssi esterni sono esclusi dalla prestazione di garanzia.
In caso di reclami, ci riserviamo di riparare o sostituire i pezzi difettosi o di sosti-
tuire l’apparecchio. I pezzi o gli apparecchi sostituiti diventano di nostra proprietà.
Si escludono i diritti al risarcimento dei danni non riconducibili a dolo o colpa
grave del produttore.
Dichiarazione di conformità
Il presente apparecchio soddisfa i requisiti della direttiva UE:
2014/53/EU.
La conformità con la succitata direttiva è garantita dal simbolo CE presente
sull’apparecchio.
È possibile scaricare gratuitamente la dichiarazione completa di conformità dal
nostro sito Web www.switel.com/support.
Telgo AG, Route D’Agy 16, 1763 Granges-Paccot, Switzerland
Dati tecnici
Standard DECT
Frequenza RF 1,89 GHz
Potenza media RF <10,4 dBm
Alimentazione (stazione base) Entrata: 100-240VAC 50/60Hz
Uscita: 6 VDC 450 mA
Portata All’aperto: circa 300 m
All’interno: circa 50 m
Standby Fino a 100 ore
Durata massima conversazione Fino a 10 ore
Volume massimo ricevitore +30dB
Batterie AAA, 1,2 V, 400 mAh NiMH
Modalità di selezione A toni (DTMF), a impulsi
Tempo di flash Breve (100 ms), medio (270 ms),
lungo (600 ms)
Temper. ambiente ottimale da 0 °C a 45 °C
Umidità relativa dell’aria ottimale dal 20 % all’80 %
Informazioni sull'alimentazione
VTech (Qingyuan) Plastic & Electronics Co. Ltd.
Model: VT04EEU06045, Input 100-240V AC 50/60Hz 150mA, Output 6VDC
450mA (spina EU)
Shen Zhen Ruijing Industrial Co. Ltd.
Model: RJ-AS060450E002, Input 100-240V AC 50/60Hz 150mA, Output 6VDC
450mA (spina EU)
V1.1 / 12.2018

Meerdere oproepen vanuit hetzelfde telefoonnummer.
Weergave bij 12-uurformaat.
Mobilteil
Batterij bijna leeg: batterij moet worden geladen.
Batterij vol.
De handsfree-modus is ingeschakeld.
Beltoon uitgeschakeld.
Toetsen vergrendeld.
Wekker ingeschakeld.
Door het menu navigeren
Hoofdmenu openen (tafeltoestel)
1. Druk op .
2. Selecteer met L en M het gewenste menupunt en druk op .
3. Druk op om de actie te annuleren, terug naar het vorige menupunt
te gaan of het menu te verlaten.
4. Houd ingedrukt om terug in de ruststand te schakelen.
Hoofdmenu openen (handset)
1. Druk op .
2. Selecteer met en het gewenste menupunt en druk op .
3. Druk op om de actie te annuleren, terug naar het vorige menupunt te
gaan of het menu te verlaten.
4. Druk op om terug in de ruststand te schakelen.
Opmerking: Wanneer u 30 seconden lang op geen enkele toets drukt, schakelt
het toestel automatisch terug in ruststand.
Eerste inbedrijfname
Fabrieksmatig is de menutaal ingesteld op Englisch.
1. In de display van de handset verschijnt Pls set date/time.
2. Druk op .
3. Selecteer met en Enter time en druk op .
4. Voer de tijd in (uren/minuten) en druk op .
5. Selecteer met en Enter date en druk op .
6. Voer de datum in (dag/maand/jaar) en druk op .
7. Druk op .
De taal instellen op de handset
1. Druk op .
2. Selecteer met en Settings en druk op .
3. Selecteer met en Handset Settings en druk op .
4. Selecteer met en Language en druk op .
5. Selecteer een taal en druk op .
De taal instellen op het tafeltoestel
1. Druk op .
2. Selecteer LANGUAGE en druk op .
3. Selecteer een taal en druk op .
Tafeltoestel
1 Oproep
- Knippert bij binnenkomende oproep.
2 Telefoonboek
- Opent het telefoonboek.
3 Oproeplijst (gemist)
- Opent de lijst van gemiste oproepen.
4 Menutoets/OK
- In ruststand: menu openen.
5 Omhoog
- In menu/lijsten: omhoog bladeren.
- Bij invoeren van namen/nummers: cursor naar links verschuiven.
- Tijdens een gesprek/afspelen van antwoordapparaat: verhoging van vo-
lume.
6 Omlaag
- In ruststand: Nummerherhalingslijst openen
- In menu/lijsten: omlaag bladeren.
- Bij invoeren van namen/nummers: cursor naar rechts bewegen.
- Tijdens een gesprek/afspelen van antwoordapparaat: Reductie van het
geluidsvolume.
7 Luidspreker
8 Snelkiestoetsen M1/M2/ M3
- Bij het invoeren van telefoonnummers: Na het invoeren van het telefoon-
nummer lang ingedrukt houden om het nummer op te slaan.
- In ruststand: Drukken om dat telefoonnummer dat onder die toets opge-
slagen is, te bellen.
9 Toetsenblok
- Invoeren van cijfers of letters
- Toets 0 bij het invoeren van telefoonnummers: ingedrukt houden voor
het toevoegen van een kiespauze.
- Hekjes-toets in ruststand: Ingedrukt houden om de beltoon in/uit te
schakelen.
10 Luidspreker-toets
- Handsfree bellen, een oproep aannemen of een gesprek beëindigen.
- Tijdens een gesprek: luidspreker aan/uit-schakelen.
11 Versterker-knop
- Tijdens een gesprek: verhoging van volume in de hoorn.
12 R-toets
- Tijdens een gesprek: flashfunctie voor gebruik van functies van telefoon-
net.
- Tijdens het kiesproces: Voegt een 'F' toe. U kunt de flash-functie gebrui-
ken door de hoorn op te heffen.
13 Antwoordapparaat aan/uit
- Indrukken om het antwoordapparaat aan/uit te schakelen.
- Weergave “Oproep“ (1) brandt wanneer het antwoordapparaat ingescha-
keld is.
- Weergave “Oproep“ (1) knippert langzaam bij nieuwe berichten.
14 Starten/stoppen-toets
- Het afspelen van het antwoordapparaat starten/stoppen.
15 Verder-toets
- Verdergaan naar volgende bericht bij het afspelen van het antwoord-
apparaat.
- In ruststand: lang ingedrukt houden om een memo op te nemen.
16 Terug-toets
- Momenteel afgespeeld bericht van antwoordapparaat herhalen.
- Tweemaal indrukken om het vorige bericht af te spelen.
- In ruststand: kort indrukken om de huidige begroeting te horen.
- In ruststand: lang ingedrukt houden om een begroeting op te nemen.
17 Wissen-toets
- Wissen van het afgespeelde antwoordapparaatbericht of het welkomst-
bericht.
18 Annuleren
- In het menu: selectie annuleren/terug naar vorige menu/ingedrukt hou-
den om terug naar ruststand te gaan.
- Bij een oproep: beltoon uitschakelen (u kunt ongewijzigd het gesprek opne-
men, zolang de beller niet heeft opgelegd).
- Bij invoeren van namen/nummers: wissen van tekens, bv. bij het aan-
maken van een contact in het telefoonboek.
- In ruststand: handset bellen (intern gesprek).
19 Weergave "Bezet"
- Brandt bij oproep, gesprek of aannemen van gesprek door antwoord-
apparaat.
- Brandt wanneer de lijn bezet is door een ander toestel (handset).
Handset
1 Oproep
- Knippert bij binnenkomende
oproep.
2 Hoorn
3 Versterkertoets
- Voor het verhogen van het vo-
lume in de hoorn. Druk tijdens
een gesprek eenmaal op de
toets om de volumeverster-
king in te schakelen, en druk
opnieuw op de knop om hem
uit te schakelen. Wanneer de
versterking ingeschakeld is,
verschijnt "Boost AAN" in het
display en begint het oproep-
lampje (1) te branden.
4 Snelkiestoetsen M1/M2/M3
- In ruststand: Een opgeslagen
telefoonnummer kiezen.
5 Menu/OK
- In ruststand: menu openen.
- In het menu: menupunt selec-
teren of opslaan.
- Tijden seen gesprek: toegang
tot telefoonboek/oproepenlist
/nummerherhaling
6 Telefoonboek/Omhoog
- In ruststand: telefoonboek openen.
- In menu/lijsten: omhoog bladeren.
- Tijdens een gesprek: volume verhogen.
- Tijdens rinkelen: rinkelvolume verhogen.
7 Bel-toets/Luidspreker-toets
- In ruststand: Bellen of oproep beantwoorden.
- In telefoonboek/oproepenlijst/nummerherhaling: geselecteerde nummer
bellen.
- Tijdens een gesprek: luidspreker aan/uit-schakelen.
8 Nummerherhaling/Omlaag
- In ruststand: nummerherhaling openen
- In menu/lijsten: omlaag bladeren.
- Tijdens een gesprek: volume verlagen.
- Tijdens rinkelen: rinkelvolume verlagen.
9 Toetsenblok
- Invoeren van cijfers of letters
- Toets 0 bij het invoeren van telefoonnummers: ingedrukt houden voor
het toevoegen van een kiespauze.
- Ster-toets in ruststand: ingedrukt houden voor in-/uitschakelen van
toetsenvergrendeling. Bij invoeren van namen: omschakelen tussen
grote en kleine letters.
- Hekjes-toets in ruststand: ingedrukt houden om de beltoon in/uit te
schakelen. Tijdens een gesprek: ingedrukt houden voor Flash-functie
voor gebruik van netwerkfuncties. In oproepenlijst: weergave van num-
mer van beller (indien beschikbaar).
10 Microfoon
11 Volumetoetsen
- Tijdens een gesprek: volume instellen.
12 Geluidsdemping/INT
- In het menu: terug naar het vorige menupunt.. Ingedrukt houden: terug
naar ruststand.
- Tijden shet invoeren van nummers/namen: laatste teken wissen. Inge-
druk houden om alle tekens te wissen.
- Tijdens een gesprek: microfoon uitschakelen.
- In ruststand: interne verbinding (alleen als meerdere handsets op de-
zelfde basis zijn aangemeld).
13 Opleggen/annuleren
- Tijdens een gesprek: opleggen.
- In het menu: selectie annuleren/terugkeren naar ruststand.
- In ruststand: ingedrukt houden om handset uit/aan te schakelen.
Installatieplek
Plaats het tafeltoestel in de buurt van een stopcontact en van de telefooncon-
tactdoos, zodat de lengte van de telefoonkabel voldoende is. Bewaar een af-
stand van ongeveer 1 meter tot andere elektronische apparaten, om een
wederzijdse interferentie te voorkomen. De verbinding tussen het tafeltoestel
en de handset gebeurt via radiosignalen. De signaalsterkte is afhankelijk van de
installatieplek. De maximale reikwijdte bij een ongehinderde zichtlijn is 300
meter; wanneer muren en andere hindernissen aanwezig zijn, is de maximale
reikwijdte kleiner.
Tafeltoestel aansluiten
1. Steek de kabelstekker in de
overeenkomstige ingang op de
onderkant van het tafeltoestel
en sluit de adapter aan op het
stopcontact.
2. Steek de kleine stekker van de
telefoonkabel in de overeen-
komstige ingang van het tafel-
toestel en het andere uiteinde in
de telefooncontactdoos op de
wand.
3. Sluit de hoorn met behulp van
het gekrulde hoornsnoer aan op
het tafeltoestel.
Opmerking: Steek de telefoonkabel door de kabelklemmen zodat het tafeltoe-
stel vlak op de ondergrond staat.
Belangrijk: Gebruik uitsluitend de adapter, telefoonkabel en batterijen die
met uw D200 meegeleverd zijn. Zo niet, dan is een correcte werking van
de telefoon niet gegarandeerd. De toegang tot de adapter mag niet wor-
den belemmerd door meubels of andere voorwerpen.
De handset in bedrijf stellen
1. Open het batterijvak en leg er de batterijen in.
Let op de polariteit.
2. Schuif het deksel terug op het batterijvak en
zorg ervoor dat het vastklikt.
Om de handset volledig op te laden, moet hij
minstens 16 uur in het laadstation blijven staan
(controleer of de spanning naar het laadstation
ingeschakeld is!).
Belangrijk: Gebruik uitsluitend de mee-
geleverde batterijen. Ook wanneer u later
de batterijen vervangt, mag u alleen dit type
accu gebruiken.
Symbolen in de display
Tafeltoestel
Nieuw nummer in oproeplijst.
Lopend nummer van een item van de oproeplijst.
U voert een gesprek.
De handsfree-modus is ingeschakeld.
Beltoon uitgeschakeld.
Het telefoonboek is geopend.
D200
7
2
3
1
4
5
6
8
9
10
11
12
13
18
19
17
14
15
16
2
1
3
4
5
12
13
11
6
8
7
9
10

Menuoverzicht
Tafeltoestel
TELEF.BOEK BEKIJKEN
TOEVOEGEN
BEWERKEN
WISSEN
ALLES WISSEN
TB STATUS
BELLERLIJST GEMIST
ONTVANGEN
GEBELD
DATUM & TIJD TIJDFORMAAT
KLOK INSTEL
TAAL
INSTELLINGEN BELINSTEL EXTERN. BEL MELODIE
VOLUME
INTERN. BEL MELODIE
VOLUME
VERWIJDER HS
BELMODUS TOON/PULS
FLASHTIJD KORT/NORMAAL/LANG
TOETSTOON
PIN WIJZIG.
STD.INSTELL.
PAGE ALLE HS
REGISTRATIE
ANT.APPAR WEERG.BDSCHP
ALLES WISSEN
MEMO
ANTW AAN/UIT
ANTAPP.INST ANTW. MODUS ANTW & OPN
ALLN ANTW.
UITG BS INST ANTW & OPN
ALLN ANTW.
ANTW VERTR 2/4/6/8 BELTONEN
ANTW. TAAL DEUTSCH
FRANÇAIS
ENGLISH
BS FILTER
EXT TOEGANG
COMPRESSIE LAAG/NORMAAL/
HOOG
PIN WIJZIG.
STD.INS.ANTW
Handset
Bellijst Toon info
Wissen
Alles wissen
Bellen
Nummer opslaan
Bellijst type
Geluid Beltonen Externe oproepen Melodie ...
Interne oproepen Melodie ...
Beltoon volume Niveau ...
Stil Pieptoon/Uit
Signalen Toets tonen
Bevest.
Bat. bijna leeg
Buiten bereik
Instell. Handset instelling Kies basis
Display Contrast
Handset naam
Taal
Autom. opnemen
Registr.handset
Afmelden handset
Handset reset
Basis instell. Beltonen Beltoon
Beltoon volume
Kiesmodus Toon/Puls
Systeem PIN
Syteem reset
Datum/Tijd/Alarm Datum/Tijd Tijd notatie
Datum notatie
Voer tijd in
Voer datum in
Alarm Alarm Aan/Uit
Voer tijd in
Beltoon
Pratende Geheugen
M1/M2/M3/M4
Antwoordapparat Bericht beluis
Bericht wissen
Beantwort aan/uit
Memo opnemen
Uitgaaende bericht Bericht opnemen Antw./opnemen
Alleen antworten
Bericht beluis Antw./opnemen
Alleen antworten
Beantwort Instell. Antwoordmodus Antw./opnemen
Alleen antworten
Beantwort taal Deutsch/English/
Française
Belvertraging 2/4/6/8 Belt.
Opnametijd 30/60/120 s /
Onbeperkt
Call screening
Toeg op afstnd Aan/Uit
Telefoneren
Bellen, gesprek aannemen en gesprek beëindigen
Via tafeltoestel bellen
Voer het telefoonnummer in en hef de hoorn op, of druk op .
- ofwel -
Hef de hoorn op of druk op . Wacht op de kiestoon en voer het telefoon-
nummer in.
Gesprek aannemen via tafeltoestel
Hef de hoorn op of druk op .
Gesprek beëindigen via tafeltoestel
Wanneer u via de hoorn hebt getelefoneerd, leg dan de hoorn op.
Wanneer u via de luidspreker hebt getelefoneerd, druk dan op .
Bellen via de handset
Voer het telefoonnummer in en druk op .
- ofwel -
Druk op . Wacht op de kiestoon en voer het telefoonnummer in.
Gesprek aannemen via handset
Druk op of druk op om het even welke cijfertoets.
Gesprek beëindigen via handset
Druk op of zet de handset in het laadstation.
Handsfree bellen
Druk tijdens een gesprek op de toets op het tafeltoestel of op de
handset. Om de handsfree-modus uit te schakelen, drukt u opnieuw op de
toets.
Volume instellen
Via het tafeltoestel
Druk tijdens een gesprek op de volumetoetsen L en M.
Via de handset
Druk tijdens een gesprek op de volumetoetsen op de zijkant van het toestel.
Microfoon uitschakelen
Via het tafeltoestel
Druk tijdens een gesprek op . Om de microfoon opnieuw in te scha-
kelen, drukt u nogmaals op .
Via de handset
Druk tijdens een gesprek op . Om de microfoon opnieuw in te schake-
len, druk u nogmaals op .
Nummerherhaling
Via het tafeltoestel
1. Druk in ruststand op M.
- ofwel -
Druk op de menutoets , selecteer BELLERLIJST -> GEBELD en druk
op .
2. Selecteer met L en M het gewenste telefoonnummer.
3. Hef de hoorn op of druk op om het nummer te bellen.
Via de handset
1. Druk in ruststand op .
2. Selecteer met en het gewenste telefoonnummer.
3. Druk op om het nummer te bellen.
Opmerking bij de instellingen
Enkele instellingen zijn met een PIN beveiligd. Deze PIN is standaard op het ba-
sistoestel en op de handset "0000".
Opmerking bij het antwoordapparaat
Uw D200 beschikt over een ingebouwd digitaal antwoordapparaat. De totale op-
namecapaciteit bedraagt ongeveer 15 minuten. U kunt het antwoordapparaat
bediening via het tafeltoestel of via elke geregistreerde handset. In geval van
een MFV-compatibele telefoon hebt u bovendien van op afstand toegang tot het
antwoordapparaat, en dit met pincodebeveiliging.
U kunt kiezen tussen twee antwoordopties:
- begroeting met opname van berichten;
- alleen begroeting.
Fabrieksmatig is voor elke antwoordoptie reeds een standaard begroeting opge-
slagen (Duits, Engels en Frans). Daarmee is het antwoordapparaat onmiddellijk
klaar voor gebruik. Wanneer de optie "Begroeting en opname van berichten" ge-
selecteerd is en de maximale opnametijd bereikt is, schakelt het antwoordappa-
raat automatisch in de antwoordoptie "Alleen begroeting".
Het beluisteren van de berichten op het antwoordapparaat op afstand is alleen
mogelijk, wanneer deze functie ingeschakeld is. Houd er rekening mee dat de
gebruikte externe telefoon een toonkiesimplus (DTMF/MFV) moet kunnen ver-
zenden.
Om via een MFV-compatibele telefoon de berichten op uw antwoordapparaat te
kunnen beluisteren, moet u de pincode invoeren.
Berichten beluisteren op afstand
1. Vorm uw eigen telefoonnummer.
2. Wanneer het antwoordapparaat uitgeschakeld is, dan schakelt na onge-
veer 16 rinkeltonen de begroeting van de modus "Alleen begroeting" in.
Druk tijdens de begroeting op de sterretjestoes en voer de viercijferige pin-
code van uw telefoon in. Nadat u de pincode correct hebt ingevoerd, staan
de volgende opties ter beschikking.
- ofwel -
Wanneer het antwoordapparaat ingeschakeld is, dan schakelt het na het
ingestelde aantal rinkeltonen de begroeting in. Met de sterretjestoets start
u tijdens de begroeting het beluisteren op afstand op. Voer nu de viercijfe-
rige pincode van uw telefoon in. Nadat u de pincode hebt ingevoerd, staan de
volgende opties ter beschikking.
- Toets 5 - het beluisteren starten
- Toets 7 - antwoordapparaat inschakelen
- Toets 9 - antwoordapparaat uitschakelen
Tijdens het afspelen van een bericht:
- Toets 2 - huidig bericht wissen
- Toets 4 - huidige bericht herhalen. Druk tweemaal op Toets 4 om
naar het vorige bericht te springen.
- Toets 6 - het volgende bericht beluisteren
- Toets 8 - het beluisteren stoppen
Opmerking: Na drie mislukte pogingen om de pincode in te voeren, wordt de
verbinding verbroken.
In geval van een storing
Talrijke storingen zijn op te lossen door de telefoon uit te schakelen. Haal de adap-
ter van het basisstation uit het wandstopcontact, neem de batterijen uit de handset
en wacht ongeveer 20 minuten. Als u daarna het basisstation opnieuw aansluit en
de batterijen opnieuw inlegt, is het probleem mogelijk verholpen.
Veiligheidsinstructies
Om het risico op brand, stroomstoot en verwondingen te reduceren, dient u bij
het gebruiken van een telefoon enkele elementaire voorzorgsmaatregelen te
nemen, waaronder de volgende:
• Lees en begrijp alle instructies.
• Volg alle op het product aangebrachte waarschuwingen en instructies.
• Haal de adapter uit het stopcontact voordat u het apparaat schoonmaakt. Ge-
bruik geen vloeibare reinigingsmiddelen of sprays. Gebruik voor het reinigen
een vochtige doek.
• Gebruik dit apparaat niet in de buurt van water (bv. in de buurt van badkuipen,
gootstelen, zwembaden).
• Overbelast nooit het stopcontact of het verlengsnoer, want dit kan brand of
stroomstoot veroorzaken.
• Haal het netsnoer uit het stopcontact en neemt contact op met uw leveran-
ciers als een van de volgende situaties optreedt:
• wanneer het netsnoer of de netstekker beschadigd of gerafeld is;
• wanneer het apparaat niet werkt zoals in de handleiding beschreven;
• wanneer het apparaat gevallen is en de behuizing beschadigd is;
• wanneer het vermogen van het apparaat duidelijk schommelt.
• Gebruik tijdens een onweer nooit een telefoon (behalve draadloze telefoons).
Er bestaat namelijk gevaar op een stroomstoot door bliksemslag.
• Gebruik de telefoon niet om een gaslek in de buurt te melden.
• Bij apparaten met stekker moet het wandstopcontact (de adapter) zich in de
buurt van het apparaat bevinden en gemakkelijk toegankelijk zijn.
Batterijen
• Gebruik alleen de meegeleverde NiMH-batterij (nikkelmetaallhydride)! De
werkingstijden voor handsets zijn alleen mogelijk met batterijen van het ge-
specificeerde vermogen.
• Het gebruik van andere soorten batterijen of van nietheroplaadbare batte-
rijen/primaire cellen kan gevaarlijk zijn. Deze kunnen namelijk leiden tot sto-
ringen en/of ongevallen. De fabrikant neemt geen aansprakelijkheid op voor
schade die voortvloeit uit het niet-naleven van dit punt.
• Gebruik geen laadstations van andere fabrikanten. De batterijen kunnen dan
beschadigd raken.
• Let bij het inleggen van de batterijen op de juiste polariteit.
• Dompel batterijen nooit onder in water en werp ze niet in vuur.
• Er bestaat gevaar op explosie wanneer een verkeerd type batterij wordt ge-
bruikt.
• Voer verbruikte accu's/batterijen af volgens de plaatselijke voorschriften.
Opgelet: er bestaat gevaar op explosie wanneer een verkeerd type bat-
terij wordt gebruikt.
Rechtmatig gebruik
Deze telefoon is bedoeld om te telefoneren via een analoog telefoonnetwerk. Elk
ander gebruik geldt als onrechtmatig gebruik. Zelf uitgevoerde wijzigingen aan
het toestel zijn verboden. Open nooit zelf het toestel en probeer het nooit zelf te
repareren.
Gescheiden inzameling
Als u het apparaat wilt afdanken, brengt u het naar een inzamelingspunt
(bijvoorbeeld KCA−depot). Volgens de wet op elektrische en elektro-
nische apparaten zijn eigenaars van oude apparaten verplicht om oude
elektrische en elektronische apparaten naar een gescheiden afvalinza-
meling te brengen. Het pictogram betekent dat u het apparaat in geen
geval bij het huisvuil mag plaatsen!
Gevaar voor de gezondheid en het milieu door accu’s en batterijen!
Maak accu’s en batterijen nooit open. Voorkom beschadiging en inslikken
en laat ze niet in het milieu terechtkomen. Ze kunnen giftige zware meta-
len bevatten die schadelijk zijn voor het milieu. Om accu's en batterijen
veilig af te voeren en te voorkomen dat u ze bij het huisvuil deponeert,
bent u wettelijk verplicht om accu's en batterijen in te leveren bij winkels
die batterijen verkopen of bij verzamelpunten die daartoe speciale contai-
ners beschikbaar stellen. De afvoer is kosteloos.
Lithiumbatterijen en accupacks van welke aard ook moeten in lege toe-
stand ingeleverd worden. Neem altijd voorzorgsmaatregelen tegen kort-
sluiting, bv. door de polen te isoleren met tape, omdat anders risico op
brand bestaat.
Verpakkingsmaterialen voert u volgens de plaatselijke voorschriften af.
Garantie
SWITEL-apparaten worden met hulp van de meest moderne productieprocessen
vervaardigd en getest. Specifiek geselecteerde materialen en geavanceerde tech-
nologieën zorgen voor een storingsvrije werking en lange levensduur. De garantie
geldt niet wanneer de oorzaak van een defect van het apparaat bij de telecomaan-
bieder of bij een tussengeschakeld apparaat ligt. De garantie geldt niet voor de in
de toestellen gebruikte batterijen, accu's en accupacks. De garantietijd bedraagt
24 maanden, gerekend vanaf de dag van aankoop.
Binnen de garantieperiode worden alle defecten die terug te leiden zijn tot een
fout in het materiaal of in de productie, gratis gerepareerd. De garantie vervalt bij
ingrepen door de koper of door derde partijen. De garantie geldt niet voor schade
als gevolg van onrechtmatige hantering of bediening, natuurlijke slijtage, verkeerd
opstellen of bewaren, onrechtmatige aansluiting of installatie, overmacht of an-
dere externe invloeden.
We behouden ons het recht voor om in geval van claims de defecte onderdelen te
repareren, te vervangen of het toestel te vervangen. Ter vervanging geretour-
neerde toestellen of onderdelen worden onze eigendom. Alle claims voor schade-
vergoedingen zijn uitgesloten, in zover de schade niet met voorbedachte rade of
uit nalatigheid veroorzaakt is. Als er tijdens de garantieperiode toch nog een de-
fect optreedt in uw toestel, neem dan contact op met de vakhandel waar u uw
SWITEL-toestel gekocht heb en toon hen uw ontvangstbewijs. Alle garantie-
claims moeten bij uw vakhandel worden ingediend. Twee jaar na de aankoop en
overhandiging van onze producten kunnen geen garantieclaims meer worden in-
gediend.
Conformiteitsverklaring
Dit toestel voldoet aan de voorschriften van de Europese
Richtlijn: 2014/53/EU.
De conformiteit met de bovenvermelde richtlijn wordt op het toestel aange-
geven met het CE-teken. De volledige conformiteitsverklaring is gratis te
downloaden op onze website www.switel.com/support .
Telgo AG, Route D’Agy 16, 1763 Granges-Paccot, Switzerland
Technische gegevens
Standaard DECT
RF frequentie 1,89 GHz
RF-vermogen gemiddeld <10,4 dBm
Stroomvoorziening Opgen. vermogen: 100-240VAC 50/60Hz
(Basisstation) Uitg. vermogen: 6 VDC 450 mA
Reikwijdte In de open lucht: ca. 300 m,
Binnen: ca. 50 m
Stand-by Max. tot 100 uur.
Gespreksduur Tot 10 uur
Maxmaal hoornvolume +30dB
Akku AAA, 1,2 V, 400 mAh NiMH
Kiesmodus Toonkiezen (DTMF), impulskiezen
Flashtijd Kort (100 ms), middellang (300 ms),
lang (600 ms),
Optimale omgevingstemperatuur 0˚C tot 45˚C
Optimale relatieve luchtvochtigheid 20% tot 80%
Informatie over de voeding
VTech (Qingyuan) Plastic & Electronics Co. Ltd.
Model: VT04EEU06045, Input 100-240V AC 50/60Hz 150mA, Output 6VDC
450mA (EU stekker)
Shen Zhen Ruijing Industrial Co. Ltd.
Model: RJ-AS060450E002, Input 100-240V AC 50/60Hz 150mA, Output 6VDC
450mA (EU stekker)
V1.1 / 12.2018

Timbre desconectado.
Agenda telefónica está abierta.
Múltiples llamadas desde el mismo número de teléfono.
Indicación horaria en el formato de 12 horas.
Terminal inalámbrico
Batería baja, cargar.
Batería totalmente cargada.
Manos libres conectado.
Timbre desconectado.
Teclado bloqueado.
Despertador activado.
Navegación por los menús
Abrir menú principal (unidad de sobremesa)
1. Pulse .
2. Seleccione la opción de menú deseada con L y M y pulse .
3. Pulse para interrumpir la acción, volver a la opción de menú ante-
rior o salir del menú.
4. Mantenga pulsado para restablecer el modo de reposo.
Abrir menú principal (terminal inalámbrico)
1. Pulse .
2. Seleccione la opción de menú deseada con y y pulse .
3. Pulse para interrumpir la acción, volver a la opción de menú anterior o
salir del menú.
4. Pulse para restablecer el modo de reposo.
Indicación: Si no se pulsa ninguna tecla en un intervalo de 30 s, el aparato re-
cupera automáticamente el modo de reposo.
Primera puesta en funcionamiento
El idioma ajustado de fábrica para los menús es Inglés.
1. En la pantalla del terminal inalámbrico aparece Pls set date/time.
2. Pulse .
3. Seleccione con y Enter time y pulse .
4. Introduzca la hora (horas/minutos) y pulse .
5. Seleccione con y Enter date y pulse .
6. Introduzca la fecha (día/mes/año) y pulse .
7. Pulse .
Configuración del idioma en el terminal inalámbrico
1. Pulse .
2. Seleccione con y Settings y pulse .
3. Seleccione con y Handset Settings y pulse .
4. Seleccione con y Language y pulse .
5. Elija un idioma y pulse .
Configuración del idioma en la unidad de sobremesa
1. Pulse .
2. Seleccione LANGUAGE y pulse .
3. Elija un idioma y pulse .
Unidad de sobremesa
1 Indicador de llamada
- Parpadea al llamar.
2 Agenda telefónica
- Abre la agenda telefónica.
3 Lista de llamadas (perdidas)
- Abre la lista de las llamadas perdidas.
4 Tecla de menú/OK
- En reposo: abrir menú.
5 Subir
- En el menú / en las listas: desplazarse hacia arriba.
- Al introducir nombres o números: desplazar cursor a la izquierda.
-
Durante una conversación / escuchar el buzón de voz: Aumentar el volumen.
6 Bajar
- En modo reposo: Abrir rellamada
- En el menú / en las listas: desplazarse hacia abajo.
- Al introducir nombres o números: desplazar cursor a la derecha.
-
Durante una conversación / escuchar el buzón de voz: Disminuir el volumen.
7 Altavoz
8 Teclas de marcación directa M1, M2, M3
- En modo de marcación: Después de introducir el número mantener pre-
sionado para guardar el número de teléfono.
- En modo reposo: Pulse para seleccionar el número de teléfono almace-
nado en la tecla correspondiente.
9 Teclado de marcación
- Introducir cifras o letras.
- Tecla 0 al introducir número de llamada: Presionar la tecla de forma pro-
longada para insertar una pausa de marcación.
- Tecla de almohadilla en modo de reposo: Presionar la tecla de forma
prolongada para para encender/apagar el tono de llamada.
10 Tecla de altavoz
- Llamar, responder una llamada o terminar una conversación en el modo
de manos libres.
- Durante una conversación: conectar / desconectar el altavoz.
11 Tecla de amplificación
- Durante una llamada: Aumentar el volumen del auricular.
12 Tecla R (Flash)
- Durante una conversación: función de flash para utilizar los servicios de
la red.
- En caso de preparación de marcación: Se añade una «F». La función de
flash se ejecuta cuando levanta el auricular.
13 Conectar / desconectar el contestador automáticos
- Pulsar para conectar o desconectar el contestador automático.
- Indicador de llamada (1) se enciende si el contestador automático está
encendido.
- Indicador de llamada (1) parpadea lentamente al recibir mensajes nue-
vos.
14 Tecla de inicio/parada
- Iniciar o detener la reproducción del contestador automático.
15 Tecla de avanzar
- Pasar al siguiente mensaje mientras escucha el contestador automático.
- En modo reposo: Presionar de forma prolongada para grabar una nota.
16 Tecla de retroceder
- Repetir el mensaje del contestador automático que se está escuchando
en ese momento.
- Pulsar dos veces para reproducir el siguiente mensaje.
- En modo reposo: Presione brevemente para reproducir el texto de bien-
venida actual.
- En modo reposo: Presionar de forma prolongada para grabar un texto de
bienvenida.
17 Tecla de borrado
- Eliminar el aviso o mensaje que se está reproduciendo en el contestador
automático.
18 Cancelar
- En el menú: cancelar selección / volver al menú anterior / pulsar prolon-
gadamente para volver al modo de reposo.
- Durante una llamada: desactivar el timbre (se puede responder la lla-
mada siempre que la persona que llama no haya colgado).
- Al introducir nombres o números: Borrar símbolos, por ejemplo, al crear
una entrada en la agenda telefónica.
- En reposo: Llamar al terminal inalámbrico (intercomunicador).
19 Indicador «en uso»
- Se ilumina al recibir una llamada, durante una conversación o al escu-
char el contestador automático.
- Se ilumina cuando otro dispositivo (terminal inalámbrico) está ocupando
la línea.
Terminal inalámbrico
1 Indicador de llamada
- Parpadea al llamar.
2 Auricular
3 Tecla de amplificación
- Para aumentar el volumen del
auricular. Al presionar breve-
mente durante una llamada se
activa la amplificación, si se
vuelve a pulsar se desactiva.
Cuando se activa la función de
amplificación aparece
„Ampl.act.“ en la pantalla y el
indicador de llamada (1) se
enciende.
4 Teclas de marcación directa
M1/M2/M3
- En reposo: Marcar el número
de llamada guardado.
5 Menú/OK
- En reposo: abrir menú.
- En el menú: seleccionar una
opción de menú o guardar.
- Durante una llamada: Acceder
a la agenda telefónica/lista de
llamadas/rellamada
6 Listín telefónico / Subir
- En reposo: abrir listín telefónico
- En el menú / en las listas: desplazarse hacia arriba.
- Durante una llamada: Aumentar el volumen.
- Durante la señalización de llamada: Aumentar el volumen del timbre.
7 Tecla de llamada / Tecla de altavoz
- En reposo: llamar o responder una llamada.
- En la agenda telefónica/lista de llamadas/rellamada: Llamar a la entrada
seleccionada.
- Durante una conversación: conectar / desconectar el altavoz.
8 Remarcar / Hacia abajo
- En reposo: abrir lista de rellamadas.
- En el menú / en las listas: desplazarse hacia abajo.
- Durante una llamada: Disminuir el volumen.
- Durante la señalización de llamada: Disminuir el volumen del timbre.
9 Teclado de marcación
- Introducir cifras o letras.
- Tecla 0 al introducir número de llamada: presionar la tecla de forma pro-
longada para insertar una pausa de marcación.
- Tecla de asterisco en modo reposo: Mantener la tecla presionada de
manera prolongada para activar/desactivar el bloqueo de teclas. Al in-
gresar nombres: Cambiar entre mayúsculas y minúsculas.
- Tecla de almohadilla en modo de reposo: presionar la tecla de forma
prolongada para para encender/apagar el tono de llamada. Durante una
llamada: Mantener la tecla presionada de manera prolongada para que
la función de Flash utilice las funciones de red. En lista de llamadas: Vi-
sualización del número de llamada (si la función está disponible).
10 Micrófono
11 Botones de volumen
- Durante una conversación: ajustar el volumen.
12 Tecla de silencio/INT
- En el menú: Volver al punto de menú anterior. Presionar de forma prolon-
gada la tecla: Vuelve al modo reposo.
- Mientras se introduce el número de teléfono/nombre: Eliminar el último
carácter. Mantenga pulsada la tecla de forma prolongada para borrar
todos los caracteres.
- Durante una conversación: desconectar el micrófono.
- En modo reposo: Conexión interna (solo si hay varios terminales inalám-
bricos registrados a la misma base).
13 Tecla de colgar / Cancelar
- Durante una conversación: colgar.
- En el menú: cancelar selección / volver al modo de reposo.
- En reposo: pulsando prolongadamente se apaga/encender el teléfono
inalámbrico.
Lugar de colocación
Coloque la unidad de sobremesa cerca de una toma de corriente y de teléfono,
de modo que alcance la longitud del cable de conexión. Mantenga una distancia
de aprox. 1 m respecto a los demás equipos electrónicos para evitar interferen-
cias. La conexión entre la unidad de sobremesa y el terminal inalámbrico se es-
tablece mediante señales de radio. La intensidad de la señal depende de la
ubicación. El alcance máximo es de 300 m si la línea de visión no presenta obs-
táculos; sin embargo, será menor en los edificios debido a las paredes y otros
obstáculos similares.
Conexión de la unidad de sobremesa
1. Conecte el conector del ex-
tremo del cable en la toma de-
bidamente señalizada que se
encuentra en la parte inferior de
la unidad de sobremesa y el
adaptador de corriente en la
toma de corriente.
2. Conecte el conector pequeño
del extremo del cable de cone-
xión del teléfono en la toma de-
bidamente señalizada de la
unidad de sobremesa y el otro
extremo en la toma de teléfono.
3. Conecte el cable en espiral del
auricular al teléfono.
Indicación: Haga pasar los cables de conexión por las guías de cable para que
la unidad de sobremesa se pueda apoyar correctamente sobre la superficie.
Importante: Utilice únicamente la fuente de alimentación, los cables de
conexión de teléfono y las baterías que se suministran con su D100. En
caso contrario, no se podrá garantizar el funcionamiento correcto del te-
léfono. No obstaculice el acceso al enchufe de conexión eléctrica con
muebles u otros objetos.
Puesta en funcionamiento del terminal inalámbrico
1. Abra la tapa del compartimento de batería y
coloque las baterías. Preste atención a la po-
laridad correcta.
2. Vuelva a cerrar la tapa del compartimento de
la batería hasta que encastre de forma audi-
ble.
El terminal inalámbrico deberá permanecer al
menos 16 horas en la estación de carga para su
carga completa (comprobar la alimentación de
corriente de la estación de carga).
Importante: Se permite utilizar únicamente
las baterías que se incluyen en la entrega.
También en caso de sustitución, asegúrese
de usar el mismo tipo de batería.
Símbolos de la pantalla
Unidad de sobremesa
Nueva entrada en la lista de llamadas.
Número actual de la entrada en la lista de llamadas.
Lleva a cabo una llamada telefónica.
Manos libres conectado.
D200
7
2
3
1
4
5
6
8
9
10
11
12
13
18
19
17
14
15
16
2
1
3
4
5
12
13
11
6
8
7
9
10

Estructura del menú
Unidad de sobremesa
DIRECTORIO VER
AGREGAR
EDITAR
ELIMINAR
BORRAR TODOS
ESTADO DIR
REG. LLAM. PERDIDAS
RECIBIDAS
REALIZADAS
FECHA Y HORA FORMATO HORA
AJUST. RELOJ
IDIOMA
AJUSTES CONF TIMBRE TIMBRE EXT MELODÍA
VOLUMEN
TIMBRE INT MELODÍA
VOLUMEN
ELIMINAR TLF
MODO MARC. TONOS/PULSOS
TIEMPO FLASH CORTO/MEDIA/LARGO
TONO TECLA
MODIFIC PIN
BASE PREDET
LOC TODOS TE
REGISTRO
CONTES AUTOM REP MENSAJE
BORRAR TODOS
RECORDATORIO
CONT ACT/DES
AJUSTES CON. MODO CONT CONT / GRAB
SÓLO CONT
CONF MEN SAL CONT / GRAB
SÓLO CONT
DEMORA RESP 2/4/6/8 TIMBRES
IDIOMA CONT DEUTSCH
FRANÇAIS
ENGLISH
REVISAR BASE
ACC. REMOTO
COMPRESIÓN BAJA/MEDIA/ALTA
MODIFIC PIN
CONTEST PRED
Terminal inalámbrico
Registro llamadas Detalles
Borrar
Borrar todo
Llamar
Guardar número
Tipo reg.llams.
Sonidos Timbre Externo Melodía ...
Interno Melodía...
Volumen timbre Nivel ...
Silencio Tono/Desactiv.
Tonos Tono teclas
Confirm.
Batería baja
Sin cobertura
Config. Config. teléfono Selecc. base
Pantalla Contraste
Nombre teléfono
Idioma
Respuesta automática
Registrar teléfono
Eliminar
Restablec teléfono
Config. base Timbre Tono llamada
Volumen timbre
Modo marcación Tone/Pulso
PIN sistema
Restablec base
Fecha/hora/alarm Fecha/hora Formato hora
Formato Fecha
Introduc. hora
Introduc. fecha
Alarma Alarma act./des.
Introduc. hora
Tono llamada
Teclas memoria M1/M2/M3/M4
Contest automático Reproduc. mensajes
Borrar mensajes
Act./des. contest.
Grabar mens. pers.
Mensaje saliente Grabar mensaje Responder/grabar
Solo respuesta
Reproduc. mensaje Responder/grabar
Solo respuesta
Config. contest. Modo respuesta Responder/grabar
Solo respuesta
Idioma contest. Deutsch/English/
Française
Retardo respuesta 2/4/6/8 señales
Tiempo grabac. 30/60/120 s /
Ilimitado
Emisión llamada
Acceso remoto Activar/Desactiv.
Telefonear
Realizar, responder y terminar una llamada
Llamar desde la unidad de sobremesa
Marque el número de teléfono y descuelgue el auricular o pulse .
O bien,
descuelgue el auricular o pulse . Espere a oír el tono de línea para mar-
car el número de teléfono.
Responder una llamada desde la unidad de sobremesa
Descuelgue el auricular, o bien pulse .
Finalizar una llamada desde la unidad de sobremesa
Cuelgue el teléfono si está utilizando el auricular.
Si está hablando con el manos libres, pulse .
Llamar desde el terminal inalámbrico
Marque el número de teléfono y pulse .
O bien,
pulse . Espere a oír el tono de línea para marcar el número de teléfono.
Responder una llamada desde el terminal inalámbrico
Pulse o cualquier tecla numérica.
Finalizar una llamada desde el terminal inalámbrico
Pulse o coloque el terminal inalámbrico en la estación de carga.
Función de manos libres
Durante la llamada, pulse la tecla en la unidad de sobremesa o en
el terminal inalámbrico. Vuelva a pulsar la tecla para desactivar la función de
manos libres.
Ajustar el volumen
En la unidad de sobremesa
Durante la llamada, pulse las teclas de volumen L y M.
En el terminal inalámbrico
Durante la llamada, pulse los botones de volumen situados a un lado del aparato.
Desconexión del micrófono
En la unidad de sobremesa
Durante la llamada, pulse . Pulse una vez más para co-
nectar el micrófono.
En el terminal inalámbrico
Durante la llamada, pulse . Vuelva a pulsar para conectar el mi-
crófono.
Remarcar
En la unidad de sobremesa
1. En el modo de reposo pulse M.
O bien,
En el modo de reposo, pulse la tecla de menú , seleccione REG. LLAM.
-> REALIZADAS y pulse .
2. Seleccione el registro deseado con L y M.
3. Descuelgue el auricular o pulse para marcar el número.
En el terminal inalámbrico
1. En el modo de reposo pulse .
2. Seleccione el registro deseado con y .
3. Pulsa para marcar el número.
Nota sobre los ajustes
Algunos ajustes están protegidos con un número PIN. Dicho número viene con-
figurado de fábrica tanto para la unidad de sobremesa como para el terminal
inalámbrico en "0000".
Nota sobre el contestador automático
Su D200 tiene incorporado un contestador automático digital. La capacidad
total es de unos 15 minutos. Puede utilizar el contestador automático desde la
unidad de sobremesa o desde cualquier teléfono inalámbrico registrado. Con un
teléfono de marcación por tonos habilitado también tienen un PIN de acceso re-
moto al contestador automático protegido. Existen 2 modos de funcionamiento
disponibles:
- Aviso de voz con grabación de mensajes
- Solo aviso de voz.
En el estado de fábrica ya viene para cada modo de funcionamiento un aviso de
voz estándar guardado (Alemán, Inglés e Francés). De esta manera el contesta-
dor automático puede ser utilizado directamente. En "Aviso de voz con graba-
ción de mensajes" y al alcanzar la capacidad máxima de grabación el dispositivo
pasa automáticamente al modo de funcionamiento "Sólo aviso de voz".
La comprobación remota sólo es posible si dicha función está activa. Tenga en
cuenta que el teléfono externo utilizado debe ser capaz de emitir durante la co-
nexión impulsos de marcación por tonos (DTMF / MFV).
Para acceder a su contestador automático desde un teléfono lejano que opere a
través de marcación por tonos debe introducir el PIN de comprobación remota.
Utilizar comprobación remota
1. Seleccione el número de teléfono de su conexión.
2. En caso de tener el contestador automático apagado éste se comunicará
después de unos 16 tonos de llamada con el mensaje "Sólo aviso de voz". Du-
rante el aviso de voz presione la tecla asterisco e introduzca el PIN de cua-
tro dígitos de comprobación remota de su teléfono.
Después de introducir el PIN correctamente le aparecerán las siguientes op-
ciones.
- o -
Si el contestador automático está encendido éste se comunicará con el aviso
de voz después de la cantidad de tonos de llamada introducidos. Con la tecla
asterisco inicia durante el aviso de voz la comprobación remota. A continua-
ción, introduzca el PIN de comprobación remota de cuatro dígitos de su telé-
fono. Tras haber introducido el PIN correctamente le aparecerán las
siguientes opciones.
- Tecla 5 - Iniciar reproducción
- Tecla 7 - Activar contestador automático
- Tecla 9 - Desactivar contestador automático
Durante la reproducción de un mensaje:
- Tecla 2 - Borrar mensaje actual
- Tecla 4 - Repetir mensaje actual. Presionar Tecla 4 2 veces para
saltar al mensaje anterior.
- Tecla 6 - Reproducir siguiente mensaje
- Tecla 8 - Detener reproducción
Nota: La conexión se suspende después de haber introducido tres veces el
PIN de forma incorrecta.
Si surgen problemas
Algunos problemas se pueden resolver apagando el teléfono. Desconecte de la red
eléctrica la fuente de alimentación de la estación base durante unos 20 minutos y
saque la batería del terminal inalámbrico. Si conecta la estación base de nuevo e
inserta la batería es posible que se resuelva el problema.
Instrucciones de seguridad
Al utilizar teléfonos se deberían tomar las precauciones de seguridad básicas
para reducir el riesgo de incendio, disminuir la descarga eléctrica y lesiones, in-
cluyendo los siguientes puntos:
• Lea y comprenda todas las instrucciones.
• Tenga en consideración las advertencias e indicaciones de seguridad que
están pegadas al producto.
• Desconecte el cable de alimentación de la toma de corriente antes de limpiar
el dispositivo. No utilice detergentes o disolventes. Al limpiar utilice un paño
húmedo.
• No utilice este dispositivo cerca del agua (por ejemplo, cerca de bañeras, fre-
gadero, piscinas).
• No sobrecargue tomar de corriente y cables de extensión ya que podría pro-
vocar un incendio o una descarga eléctrica.
• Desconecte el cable de alimentación de la toma de corriente y diríjase a su
proveedor en caso de que se den las siguientes condiciones:
• El cable de alimentación o el enchufe están dañados o desgastados.
• El dispositivo no funciona como se describe en el manual de instrucciones.
• El dispositivo se cae y se daña la carcasa.
• El dispositivo muestra un cambio notable en su rendimiento.
• Evite usar el teléfono (a no ser que sea inalámbrico) durante una tormenta
eléctrica. Existe riesgo de descarga eléctrica debido a un rayo.
• No utilice el teléfono para avisar sobre una fuga de gas junto a las proximida-
des de la fuga.
•
Para los equipos que han de ir enchufados la toma de corriente (fuente de ali-
mentación) debe estar instalada cerca del dispositivo y su acceso debe ser fácil.
Baterías
• ¡Utilice sólo las baterías de NiMH suministradas (hidruro metálico de níquel)!
Los tiempos de funcionamiento indicados sólo son posibles con las capacida-
des de batería establecidas.
• El uso de otros tipos de baterías o baterías no recargables / células primarias
pueden ser peligroso. Esto puede conducir a alteraciones y / o daños acciden-
tales. El fabricante no se hace responsable de los daños causados por el in-
cumplimiento de dichas indicaciones.
• No utilice estaciones de carga de terceros. Las baterías pueden dañarse.
• Al insertar las baterías tenga en cuenta la polaridad correcta.
• No sumergir en agua las baterías o tirarlas al fuego.
• Existe peligro de explosión si las baterías se sustituyen por un tipo de bate-
rías incorrecto.
• Elimine las baterías/pilas usadas de acuerdo con las indicaciones locales.
Atención, peligro de explosión si se sustituye la batería por un tipo de
baterías incorrecto.
Uso previsto
Este teléfono está diseñado para telefonear dentro de una red telefónica analó-
gica. Cualquier otro uso se considera inapropiado. Los cambios o modificaciones
en el aparato no están permitidos. No abra ni trate de reparar el dispositivo por
sí mismo bajo ningún concepto.
Eliminación
Para desechar su aparato, llévelo al punto de recogida de un organismo
de eliminación local (por ejemplo, un centro de reciclaje). Según la ley
sobre aparatos eléctricos y electrónicos, los propietarios de aparatos
usados están obligados por ley a realizar una clasificación de residuos
separada para los aparatos eléctricos y electrónicos usados. ¡El símbolo
significa que en ningún caso debe tirar el aparato a la basura doméstica!
¡Peligro para la salud y el medio ambiente provocado por baterías
recargables y pilas!
Jamás se deben abrir, dañar, ingerir o dejar que las baterías recargables
y pilas penetren en el medio ambiente. Pueden contener metales pesados
tóxicos y dañinos para el medio ambiente. Está legalmente obligado a
deshacerse de las baterías y/o pilas en la empresa que las comercialice y
en los puntos de recogida destinados para ello en sus correspondientes
contenedores para que sean eliminadas de forma segura y en ningún
caso deshaciéndose de ellas junto con la basura doméstica. La elimina-
ción es gratuita. Las baterías de litio y los packs de baterías de cualquier
tipo sólo deben eliminarse en estado de descarga. Tenga especial precau-
ción con los cortocircuitos, por ejemplo, al aislar los polos con cinta, ya
que puede existir riesgo de incendio. Los materiales de embalaje se
deben eliminar según las prescripciones locales.
Garantía
Los dispositivos SWITEL se fabrican utilizando los últimos procesos de produc-
ción y prueba. El uso de materiales cuidadosamente seleccionados y la aplicación
de avanzadas tecnologías aseguran un funcionamiento sin problemas y una larga
vida. La garantía no será aplicable si la causa de una avería en el dispositivo se
debe al operador de red o a la posible instalación de una centralita privada. La ga-
rantía no se aplica a los productos utilizados para cargar la batería tales como
pilas, baterías recargables y pilas recargables. El período de garantía es de 24
meses a partir de la fecha de adquisición.
Dentro del periodo de garantía todos los desperfectos materiales o de fabricación
serán atendidos de forma gratuita. Los derechos de garantía quedarán excluidos
si ha existido manipulación por parte del comprador o de terceros. Los daños cau-
sados por el manejo y operación indebida, colocación o almacenamiento inade-
cuado, conexión o instalación defectuosa, actos de fuerza mayor o acciones de
influencia externa no están cubiertos por la garantía.
En caso de reclamación nos reservamos el derecho a reparar las piezas defectuo-
sas, sustituirlas o reemplazar el dispositivo. Las piezas o el dispositivo reempla-
zado deberán ser de nuestra propiedad. Las reclamaciones por daños y perjuicios
quedan excluidas, a menos que se demuestre intencionalidad o negligencia grave
por parte del fabricante. Si dentro del periodo de garantía el dispositivo sigue
mostrando defectos, póngase en contacto con su recibo de compra únicamente
en la tienda donde compró su dispositivo SWITEL. Todas las reclamaciones de
garantía conforme a estas disposiciones sólo tendrán validez frente al distribuidor
del producto. Los derechos de garantía dejarán de tener validez una vez finalizado
el plazo de garantía de 2 años.
Declaración de conformidad
Este dispositivo cumple con los requisitos de la Directiva de la UE:
2014/53/EU.
La conformidad con la directiva mencionada anteriormente se confirma me-
diante el símbolo CE que aparece en el dispositivo. Para acceder a la declara-
ción de conformidad completa, utilice la descarga gratuita de nuestro sitio web
www.switel.com/support.
Telgo AG, Route D’Agy 16, 1763 Granges-Paccot, Switzerland
Datos técnicos
Estándar DECT
Frecuencia de RF 1,89 GHz
Potencia de RF media <10,4 dBm
Fuente de alimentación Entrada: 100-240 VAC 50/60 Hz
(Estación base) Salida: 6 VDC 450 mA
Alcance En el exterior: aprox. 300 m,
En el interior: aprox. 50 m
En modo de espera Hasta 100 horas
Tiempo máx. de conversación Hasta 10 horas
Volumen máx. del auricular +30dB
Baterías AAA, 1,2 V, 400 mAh NiMH
Modo de marcación Marcación por tonos (DTMF),
marcación por pulsos
Tiempo de flash Corto (100 ms), medio (300 ms),
largo (600 ms)
Temperatura ambiente óptima De 0 °C hasta 45 °C
Humedad relativa del aire óptima De 20 % a 80 %
Información sobre la fuente de alimentación
VTech (Qingyuan) Plastic & Electronics Co. Ltd.
Model: VT04EEU06045, Input 100-240V AC 50/60Hz 150mA, Output 6VDC
450mA (enchufe EU)
Shen Zhen Ruijing Industrial Co. Ltd.
Model: RJ-AS060450E002, Input 100-240V AC 50/60Hz 150mA, Output 6VDC
450mA (enchufe EU)
V1.1 / 12.2018
-
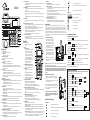 1
1
-
 2
2
-
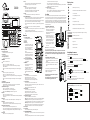 3
3
-
 4
4
-
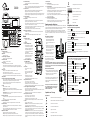 5
5
-
 6
6
-
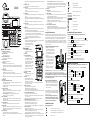 7
7
-
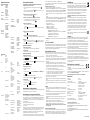 8
8
-
 9
9
-
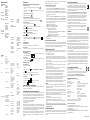 10
10
-
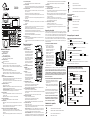 11
11
-
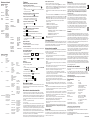 12
12


in altre lingue
- français: SWITEL D200 Manuel utilisateur
- español: SWITEL D200 Manual de usuario
- Deutsch: SWITEL D200 Benutzerhandbuch
- Nederlands: SWITEL D200 Handleiding
Documenti correlati
Altri documenti
-
Amplicomms BigTel 1480 Guida utente
-
AEG SOLO COMBO 10 Manuale del proprietario
-
Amplicomms PowerTel 2880 Guida utente
-
Amplicomms PowerTel 2780 Guida utente
-
Gigaset SL910A Guida utente
-
-
SwissVoice Aeris 126T Manuale utente
-
-
Amplicomms BigTel 12xx Istruzioni per l'uso
-
VTech t2101 Manuale utente