Electrolux Z5561 SCARABE GREEN Manuale utente
- Categoria
- Aspirapolvere
- Tipo
- Manuale utente


English: Thank you for choosing an Electrolux vacuum cleaner.
To ensure total satisfaction, read this Instruction book carefully.
Retain for reference.
Deutsch: Danke, daß Sie sich für einen Electrolux-Staubsauger
entschieden haben. Um maximale Zufriedenheit mit Ihrem
Staubsauger zu gewährleisten, sollten Sie diese
Gebrauchsanleitung sorgfältig durchlesen und als
Nachschlagehilfe aufbewahren.
Français: Nous vous remercions d’avoir choisi un aspirateur
Electrolux. Pour garantir une satisfaction totale, lire attentivement
ce mode d’emploi. A conserver pour s’y référer.
Español: Le agradecemos que haya elegido un aspirador
Electrolux. Para su absoluta satisfacción, lea detenidamente este
folleto de instrucciones y consérvelo como referencia.
Italiano: Vi ringraziamo di aver scelto un aspirapolvere della
Electrolux. Per garantire la massima soddisfazione, leggere
attentamente questo libretto di istruzioni. Conservarlo per farvi
riferimento.
Português: Obrigado por escolher o aspirador de pó Electrolux.
Para garantir satisfação total, leia este livro de instruções com
cuidado. Guarde para referência futura.
Nederlands: Hartelijk dank voor het kiezen van een Electrolux
stofzuiger. Om geheel aan uw behoeften te voldoen is het
raadzaam het instructieboekje grondig door te lezen. Bewaar dit
ter referentie.
Dansk: Tak fordi De valgte en Electrolux støvsuger. Følg venligst
brugsanvisningens råd og anvisninger, for at opnå fuld tilfredshed.
Gem brugsanvisningen, den skal følge med støvsugeren, hvis den
overdrages til en ny ejer, ligeledes er den rar at have i tvivlstilfælde.
Svenska: Tack för att du valde en dammsugare från Electrolux. För
att uppnå bästa städresultat, läs denna instruktionsbok noggrant.
Behåll den för framtida bruk.
Norsk: Takk for at du har valgt en Electrolux støvsuger. For å sikre
full tilfredshet, les denne Instruksjonsboken grundig. Spar på
boken for referanse og la den følge maskinen dersom den skifter
eier.
Suomi: Kiitämme Electrolux-pölynimurin valinnastasi. Jotta
pölynimurisi vastaisi odotuksiasi, lue tämä ohjekirja huolellisesti.
Säilytä se tulevan varalle.
Ελληνικά: Σας ευαριστύµε πυ επιλέατε την ηλεκτρική σκύπα
Electrolux. Για να εασαλίσετε πλήρη απδτικτητα, διαάστε
αυτ τ ιλιάρι δηγιών πρσεκτικά. Φυλάτε τ για µελλντική
αναρά.
Türkçe: Electrolux elektrikli süpürgeyi seçti¤iniz için teflekkür
ederiz. Tam olarak memnun kalman›z için, bu aç›klama kitap盤›n›
dikkatlice okuyunuz. ‹lerde yararlanmak için saklay›n›z.
Русский: Благодарим Вас за сделанный Вами выбор и
приобретение пылесоса Electrolux. Для достижения наивысшей
эффективности работы, внимательно прочитайте данные
инструкции. Сохраните эту брошюру для дальнейших справок.
Magyar: Köszönjük, hogy Electrolux porszívót választott. Annak
érdekében, hogy a készülék az Ön teljes megelégedettségét
szolgálja, szíveskedjen figyelmesen elolvasni ezt a használati
utasítást. Kérjük, tartsa az utasítást mindig biztos helyen, hogy az a
jövőben is kéznél legyen.

Limba român¤: V¤ mul∑umim pentru c¤ a∑i ales un aspirator
Electrolux. Pentru a v¤ asigura de o satisfac∑ie total¤ privind
func∑ionarea lui, citi∑i cu aten∑ie acest Manual de Instruc∑iuni.
P¤stra∑i-l pentru a-l consulta ulterior
Polski: Dziękujemy za wybranie Electrolux. Dla zapewnienia
całkowitej satysfakcji, należy dokładnie przeczytać ten podręcznik z
instrukcjami. Należy go zachować dla informacji.
Български: Благодарим Ви, че избрахте прахосмукачка
Електролукс Екселио. За да се гарантира максимална
удовлетвореност от работа на уреда, прочетете внимателно тази
книжка с инструкции и я запазете за справки в бъдеще.
Česky: Děkujeme vám, že jste si zakoupili Electrolux. Abyste mohli
být s přístrojem naprosto spokojeni, pozorně si prostudujte tuto
příručku. Uschovejte si ji pro budoucí potřebu.
Hrvatski: Hvala vam ‰to ste odabrali jedan od Electroluxovish
strojeva za usisavanje pra‰ine. Da biste njime u potpunosti bili
zadovoljni paÏljivo proãitajte ovu knjiÏicu i saãuvajte je.
Srpski: Hvala ‰to ste izabrali Electrolux. Da biste njime bili u pot-
punosti zadovoljni, paÏljivo proãitajte ovu knjiÏicu sa uputstvima i
zadrÏite je za sluãaj potrebe.
Eestikeelne väljaanne: Täname teid selle eest, et valisite i
Electrolux. Selleks, et tagada täielikku efektiivsust, tutvuda põhja-
likult selle juhendiga. Hoida alles kui teatmikku.
Latviski: Pateicamies, ka izvēlējaties Electrolux. Maksimāla efekta
sasniegšanai izlasiet rūpīgi šo instrukciju un uzglabājiet to
uzziņām.
Lietuvių k: Dėkojame, kad pasirinkote Electrolux. Atidžiai per-
skaitykite Instrukcijų knygelę ir išsaugokite ją galimam pasinaudo-
jimui ateityje.
Slovensky: Ďakujeme vám za to, že ste sa rozhodli pre Electrolux.
Jeho možnosti využijete na maximum, ak si prečítate priložený
návod na obsluhu. Uschovajte si ho pre prípad, že budete potre-
bovať ďalšie informácie.
Slovenščina: Hvala, da ste izbrali Electroluxov sesalnik. Pred
uporabo preberite priložena navodila ter seznanite s pravilno in
torej najbolj učinkovito uporabo aparata. Navodila shranite, da
vam bodo vedno pri roki.
:
Bahasa Malaysia: Terima kasih kerana memilih mesin Electrolux.
Untuk menjamin kepuasan sepenuhnya, sila baca buku panduan
ini dengan teliti. Simpan untuk rujukan.
:
Tiãng Vi
åt:
C·m ÷n c·c bÂn «„ løa chÜn m·y h˙t b¯i c˚a Electrolux.
Òã ho‡n to‡n th’a m„n, xin quÏ vŒ xem kœ s·ch h‹ßng d≈n v‡ giª lÂi
«ã tham kh‰o.

English 2
Deutsch 4
Français 6
Español 8
Italiano 10
Português 12
Nederlands 14
Dansk 16
Svenska 18
Norsk 20
Suomi 22
Ελληνικά 24
Türkçe 26
Русский 28
Magyar 30
Limba român¤ 32
Polski 34
Български 36
Česky 38
Hrvatski 40
Srpski 42
Eestikeelne väljaanne 44
Latviski 46
Lietuvių k 48
Slovensky 50
Sloven
ščina
52
54
56
Bahasa Malaysia 58
60
Tiâng Viåt 62
5551
•
5552
•
5558
•
5561

Before you start, please refer to the electrical safety instructions on
page 63 (U.K. and Ireland only).
Electrolux supply a range of cleaners with different
specifications and accessories. Please refer to your model
number whilst reading this booklet.
Keep both cover flaps open and cross reference pictures with
text where necessary.
Tools for your Vacuum Cleaner
B
Dust bags
B
Back Saver
®
tubes
w
Hose handle with remote control
E
Carpet/hard floor nozzle
X
Power nozzle 5561
G
Crevice nozzle
s
Combination nozzle/brush
Ensuring your safety
The cleaner is for domestic use only and has been designed to
ensure maximum safety and performance. Please follow these
simple precautions:
L
The cleaner is double-insulated so it must not be earthed
M
The cleaner is only to be used by adults. Young or infirm
persons should be supervised to ensure they do not play with
the appliance
N
Always store in a dry place
O
Do not use to pick up liquids
P
Avoid sharp objects
Q
Do not pick up hot cinders or lighted cigarette ends
R
Do not use near flammable gases
S
Avoid tugging on the mains cable and check cable regularly
for damage
T
Note: Do not use cleaner with a damaged cable. If damaged
the cable should be replaced at an Electrolux Service Centre
U
The plug must be removed from the socket-outlet before
cleaning or maintaining the appliance
W
All service and repairs must be carried out by authorised
Electrolux service staff
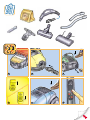
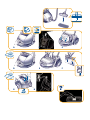
Getting started
1
Check the dust bag is in place.
2
Insert hose until catch clicks to engage (press catch to
release).
3
Extend cable and connect to mains.
4
Move foot pedal forward to reel cable in/out as required. Move
foot pedal back to lock extended cable in place. Press foot
pedal to rewind (please hold the plug to prevent it striking you).
5
Press on/off foot pedal to activate cleaner.
6
Press +/- buttons to adjust suction control (insert batteries
first). Note: Do not leave the cleaner connected to the mains.
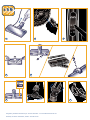
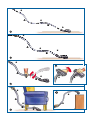
Using the Back Saver
®
tubes
The Back Saver
®
tubes have been designed for use in different
positions: General Cleaning & Cleaning Under Low Furniture.
7
Before you start please note the position of the tubes and
catches as indicated
*
in the diagrams.
Attach the larger tube
A to the hose handle and the smaller
tube
B to the floor nozzle until the catches click to engage.
Attach tubes
A+B together until the catch clicks to engage.
8
Use the tubes in this position for general cleaning.
9
To change position, push the catch on the smaller tube B and
turn smaller tube B through a half circle until the catch clicks
to engage.
9a
Now simply turn the rotary head of the nozzle through a half
circle.
10
Use the tubes in this position for cleaning under low furniture.
10a
This position can also be used for cleaning hard to reach
places such as on top of wardrobes and bookshelves.
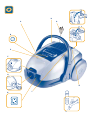
Your Vacuum Cleaner features
A
X
Mains cable
B
Y
Cable foot pedal
C
1
HEPA filter indicator
D
2
Standby/Overheat Indicator: Indicator will ‘illuminate’ when
cleaner is on standby, and ‘flash’ if cleaner overheats
E
3
Dust bag full indicator
F
l
Cover release for dust bag/filter compartment
G
m
Hose connection
H
4
Power outlet (for the use of power driven tools)
I
g
Back Saver
®
carrying handle
J
w
Remote control handle
K
i
On/off switch
L
5
Temporary parking position for floor nozzle and tubes when
in use
M
k
Storage slot for floor nozzle and tubes when not in use
Getting the best results
Using Carpet/Hard floor nozzle
v
Carpets: Use floor nozzle with lever in this position.
Reduce suction power for loose rugs.
u
Hard floors: Use floor nozzle with lever in this position.
Using Power nozzle 5561
Precautions: Only use nozzle on carpets with a pile depth
under 15 mm. Do not use on animal skins or rugs with long
fringes. To avoid damaging your carpet, do not keep nozzle
stationary whilst brush is rotating. Do not pass nozzle over
mains cable and switch off nozzle immediately after use.
11
Attach power nozzle 5561 to tubes.
12
Connect power nozzle plug to power outlet on cleaner and use
clips to secure cable to tube and hose 5561.
13
Power nozzle is activated by starting the cleaner 5561.
4
5
6
5551 • 5552 • 5558 • 5561
English

Cleaning Power nozzle 5561
14
Disconnect from mains and remove entangled threads from
nozzle by snipping threads with scissors.
15
Insert screwdriver to remove nozzle cover. Remove brush
cylinder and supports. Clean as necessary and replace.
To clean wheels, gently lever them from their mountings.
16
Replace cover ensuring it is properly fastened.
Using combination nozzle/brush
17
Use in position shown for cleaning upholstery.
18
Use in position shown for dusting.
19
Attach to hose handle for storage.
Dust bag indicator and changing the dust bag
The dust bag should be changed when full. The dust bag
indicator window will light up when full. If the dust bag should
accidentally get broken in the cleaner, take cleaner to
Electrolux Service Centre for cleaning.
To check the dust bag, the cleaner must be switched on,
with all attachments connected and off the floor.
The dust bag full indicator may signify that the bag is blocked
(occasionally caused by very fine dust) which will cause loss of
suction and may result in overheating. If this occurs change
the dust bag even if it is not full.
To change the dust bag:
A) Open the cleaner cover.
B) Pull the sliding tab to remove the dust bag.
C) Insert new dust bag by sliding the bag slots into the holder.
Close cover.
We recommend the dust bag is changed:
*
after using a carpet cleaning powder
*
if there is a bad smell from the cleaner, then you should also
change/clean the filter
Note: Use only Electrolux original dust bags (ref.E54A)
and filters:
Washable, reusable HEPA filter (ref. EF25a)
Dust bag safety device
To avoid damaging the cleaner, do not use it without a dust
bag. A safety device is fitted which prevents the cover closing
without a dust bag. Do not attempt to force cover shut.
Changing/Cleaning the filters
Never use the cleaner without the filters in place. The Motor
Protection filter should be changed twice a year for normal usage.
To change Motor Protection filter:
D) Open the cleaner cover.
E) Remove filter and covering strip.
F) Important: Insert new filter with original covering strip
securely in place. Close cover.
The HEPA filter should be cleaned when indicator light is on.
To clean the HEPA filter:
G) Open the filter cover and remove filter unit.
H) Rinse the inside (dirty side) of the filter unit under warm tap
water only. Do not use cleaning agents and avoid
touching the delicate filter surface. Tap the filter frame
to remove excess water. Repeat cleaning procedure four
times and allow the filter to air dry. The original filtering
performance is now restored. Replace the unit back into the
cleaner and close cover ensuring it is properly fastened.
Troubleshooting
1. Power: If the electric power does not come on, disconnect
from mains and check plugs, cable and fuses where appropriate.
2. Blockage/dirty filters: The cleaner may switch itself off in
event of severe blockage or excessively dirty filters (overheat
indicator will flash). In such cases, disconnect from mains and
allow to cool for 30 minutes. Clear blockage and/or replace
filter(s) and restart.
The clearing of blocked hoses is not covered by the guarantee.
To avoid blockages and maintain suction efficiency, the floor
nozzles should be cleaned regularly using the hose handle.
Please see additional Electrolux information towards the back
of this booklet.
3. Water: If water is sucked into the cleaner the motor must be
changed at an Electrolux Service Centre.
4. Batteries: Change the batteries in the Remote control
handle when flat. We recommend alkaline batteries. NB Do not
throw the batteries among other rubbish. Put them in a special
recycling container.
If you have any comments on the cleaner or the Instruction for
Use Booklet please e-mail us on: floorcar[email protected]
2
For healthier homes
ANY PROBLEMS?
08706 055 055
CUSTOMER HELPLINE
for the UK
DON’T TAKE
Something missing?
Don’t understand the instructions?
We are only a telephone call away.
Need more help?
IT BACK TO THE SHOP
Local call cost Australia wide: 1300 369 333

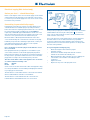
Electrical supply (Uk & Ireland only)
Before you start … check the voltage
Before connecting the cleaner to an electrical supply ensure that the
voltage marked on the data plate (on the underside of the cleaner)
is correct for your electrical supply. If it is not, do not use the cleaner
but refer back to your dealer.
Connecting to your electricity supply
Permanently connected to the cleaner is a mains supply (2-core)
cable fitted with a non-rewirable plug incorporating a 13A fuse.
In the event of the fuse requiring replacement the fuse cover should
be removed using a small screwdriver. The old fuse
MUST be
replaced by a 13A ASTA approved BS1362 fuse and the fuse cover
must be replaced before the plug is used again. In the event of loss
of the fuse cover, replacements can be obtained from your
Electrolux dealer or Electricity Board and must be of the same
colour as indicated by the coloured insert on the base of the plug.
If difficulty is experienced in obtaining a replacement, contact your
nearest Electrolux Service Centre. (Please see the separate
Electrolux Service Organisation leaflet).
In no circumstances must the plug be used without a correct
fuse cover fitted.
If the plug that is fitted to your appliance is not suitable for your
socket outlet, it must be cut off and the appropriate plug fitted.
Remove the fuse from the cut off plug. The cut off plug should then
be disposed of to prevent the hazard of shocks in case it should be
plugged into a 13 amp socket in another part of your home.
The wires in the mains cable of this appliance are coloured in
accordance with the following code:
Blue: Neutral.
Brown: Live.
As the colours of the wires in the mains cable of this appliance may
not correspond with the coloured markings identifying the terminals
in your plug, proceed as follows:
The wire which is coloured blue must be connected to the terminal
which is marked with the letter N or coloured black.
The wire which is coloured brown must be connected to the
terminal which is marked with the letter L or coloured red.
If using a three-pin plug, do not make any connection to the terminal
marked with the letter E or by the earth symbol or coloured
green or green-and-yellow. This cleaner is double insulated and no
earth connection is necessary.
It is in your interest to ensure that the plug is correctly attached to
the mains cable. In case of doubt, have it done by a qualified
electrician, as Electrolux cannot regard the repair of faults on the
plug connection as a service that can be given free of charge under
the terms of the guarantee.
As a general guide to fitting any plug
•
Ensure the lengths of wire inside the plug are
prepared correctly.
•
Connections should be firmly made after all conductor
strands are entered into the terminal posts.
•
When preparing the cable ends take care not to damage the
outer sheath, or the insulation surrounding the inner
conductors.
•
Tighten all screws.
•
Replace the top cover of the plug and secure.
Page 63

English: Electrolux decline all responsibility for all damages arising
from any improper use of the appliance or in cases of tampering
with the appliance.
Electrolux reserve the right to alter product appearance and/or
specifications without notice. Not all models featured are available
in all countries.
Electrolux vacuum cleaner features and accessories are protected
worldwide by Patents or Registered Designs.
Deutsch: Electrolux übernimmt keine Verantwortung für Schäden,
die durch den unsachgemäßen Einsatz des Geräts oder unbefugten
Eingriff in den Staubsauger entstehen.
Electrolux behält sich das Recht vor, Form bzw. Eigenschaften des
Geräts ohne Vorankündigung zu ändern. Alle abgebildeten Modelle
sind nicht in allen Ländern erhältlich.
Electrolux Staubsaugereigenschaften und Zubehörteile sind
weltweit durch Patente oder eingetragene Designs geschützt.
Français: Electrolux décline toute responsabilité concernant tous les
dommages découlant d’une mauvaise utilisation de l’appareil ou
en cas de modification de l’appareil.
Electrolux se réserve le droit de modifier l’aspect du produit et/ou
les caractéristiques sans préavis. Tous les modèles présentés ne
sont pas disponibles dans tous les pays.
L’aspirateur Electrolux et ses accessoires sont protégés dans le
monde entier par des Brevets ou des Modèles Déposés.
Español: Electrolux declina toda responsabilidad de cualquier daño
ocasionado por el uso incorrecto de este aparato o en casos en que
se haya reformado indebidamente.
Electrolux se reserva el derecho de alterar la apariencia del
producto y/o las especificaciones sin previo aviso. No todos los
modelos presentados se hayan a disposición en todos los países.
Las funciones del aspirador y los accesorios Electrolux están
protegidos en todo el mundo por Patentes o Diseños Registrados.
Italiano: L’Electrolux declina ogni responsabilità per i danni
derivati dall’uso improprio dell’apparecchio o se stesso è stato
manomesso.
L’Electrolux si riserva il diritto di modificare l’aspetto del prodotto
e/o le sue caratteristiche tecniche senza preavviso. Non tutti i
modelli descritti sono disponibili in tutti i Paesi.
Le caratteristiche e gli accessori degli aspirapolvere Electrolux sono
protetti in tutto il mondo da brevetti o come modelli depositati.
Português: A Electrolux não aceita qualquer responsabilidade por
danos resultantes do uso impróprio do aparelho ou em casos de
interferência indevida com o mesmo.
A Electrolux reserva-se o direito de alterar o aspecto do produto
e/ou as especificações sem qualquer aviso. Nem todos os modelos
apresentados estão disponíveis em todos os países.
As características e acessórios dos aspiradores Electrolux estão
protegidos mundialmente por Patentes ou Designs Registados.
Nederlands: Electrolux wijst alle verantwoordelijkheid af voor
eventuele schade die voortkomt uit het niet-geëigend gebruik van
het apparaat of in gevallen waarbij op het apparaat krachtig wordt
gedrukt.
Electrolux behoudt zich het recht voor om het uiterlijk van het
product of specificaties zonder wederbericht te veranderen. Alle
modellen die besproken worden zijn niet verkrijgbaar in alle landen.
De functies van de Electrolux stofzuiger zijn beschermd door
patenten of gedeponeerde ontwerpen.
Dansk: Electrolux fralægger sig ethvert ansvar for skader forårsaget
af forkert brug af støvsugeren samt ændringer udført på apparatet.
Electrolux forbeholder sig ret til at udføre ændringer på produktets
udformning og/eller specifikationer uden varsel. De beskrevne
modeller er ikke alle til rådighed i alle lande.
Electrolux støvsugerens udstyr og tilbehør er beskyttet globalt
under patenter eller registrerede varemærker.

English: This product is designed with the environment in
mind. All plastic parts are marked for recycling purposes.
For details see our website: www.electrolux.com
Deutsch: Das Design dieses Produkts ist
umweltfreundlich. Alle Kunststoffteile sind zur
Wiederverwertung gekennzeichnet. Einzelheiten finden Sie
auf unserer Webseite: www.electrolux.com
Français: Ce produit a été conçu dans le respect de
l’environnement. Toutes les pièces plastiques sont
marquées dans le but de les recycler. Pour plus
d’informations, veuillez consulter notre site
internet: www.electrolux.com
Español: Este producto ha sido diseñado teniendo en
cuenta el medio ambiente. Todas las piezas de plástico
llevan el distintivo de reciclaje. Para obtener más detalles
le invitamos a que visite nuestra página web:
www.electrolux.com
Italiano: Questo prodotto è stato ideato tenendo presente
considerazioni ambientali. Tutte le parti in plastica sono
contrassegnate a scopo di riciclaggio. Per maggiori
dettagli vedere il nostro sito web: www.electrolux.com
Português: Este produto foi projectado pensando-se no
meio ambiente. Todos as partes de plástico estão marcadas
para serem recicladas. Para obter pormenores consulte o
nosso website: www.electrolux.com
Nederlands: Dit product werd ontworpen met zorg voor
het milieu. Alle plastic onderdelen kunnen hergebruikt
worden. Meer informatie vind u op onze website:
www.electrolux.com
Dansk: Dette produkt er miljøvenligt fremstillet. Alle
plastikdele er afmærket til genbrugsformål. For yderligere
oplysninger henvises til vores webside:
www.electrolux.com
Svenska: Denna produkt är utformad med tanke på miljön.
Alla plastdelar är markerade för återvinning. För
ytterligare upplysningar, se vår website:
www.electrolux.com
Norsk: Dette produktet er fremstilt med henblikk på
omgivelsene. Alle plastdelene er merket for
gjenvinningsformål. For detaljer, se vår website:
www.electrolux.com
Suomi: Tämän laitteen sunnitelussa on otettu ympäristö
huomioon. Kaikki muoviosat on merkitty kierrätystä
varten. Tarkempia tietoja löytyy web-sivuiltamme:
www.electrolux.com
Ελληνικά: Αυτ τ πρϊν έει σεδιασθεί λαµάνντας
υπψη τ περιάλλν. λα τα µέρη απ πλαστικ έυν
τ σήµα για σκπύς ανακύκλωσης. Για λεπτµέρειες
δείτε µας στ Internet στην διεύθυνση:
www.electrolux.com
Türkçe: Bu ürün, çevre düflünülerek tasarlanm›flt›r. Tüm
plastik parçalar, geri dönüflüm amac›yla iflaretlenmifltir.
Detaylar için web sitemize bak›n›z: www.electrolux.com
Русский: Конструкция данного пылeсоса разработана с
учeтом экологичeских трeбований. Всe пластмассовыe
дeтали имeют соотвeтствующую маркировку с цeлью их
дальнeйшeй пeрeработки. Подробную информацию
можно получить, связавшись с нами в Интернете:
www.electrolux.com
Magyar: E termék tervezésekor különös figyelmet
fordítottunk a környezetvédelmi szempontokra.
Megjelöltük azokat a műanyag és gumi elemeket, amelyek
újrahasznosíthatók. További információt kaphatnak, ha
megkeresnek minket az Interneten a www.electrolux.com
címen.
Limba rom¤n¤: Acest produs, proiectat cu grij¤ fa›¤ de
mediului înconjur¤tor. Toate p¤r›ile din material plastic sunt
marcate, cu scopul de a fi reciclate. Pentru mai multe detalii
consulta∑i-ne la adresa noastr¤ de pe Internet:
www.electrolux.com

A
C
D
E
F
J
L
M
I
K
B
G
H

1
2
3
1
2
3
1 2 3
4 5 6
5561

Designed by Freedman International plc +44 020 7463 4800 www.freedmaninternational.com
Printed by AB Primo Oskarshamn, Sweden +46 491 89 400
4
5
6
11
14
16 17 18
19
15
12 13

?
ABC
DE
GH
F

*
*
*
*
*
*
*
*
A
B
A
A
A
B
B
B
*
*
*
*
*
*
*
*
*
7
8
9
10
10a
9a

-
 1
1
-
 2
2
-
 3
3
-
 4
4
-
 5
5
-
 6
6
-
 7
7
-
 8
8
-
 9
9
-
 10
10
-
 11
11
-
 12
12
-
 13
13
-
 14
14
-
 15
15


Electrolux Z5561 SCARABE GREEN Manuale utente
- Categoria
- Aspirapolvere
- Tipo
- Manuale utente