Datalogic Heron D140 LASEROUT Manuale utente
- Categoria
- Lettori di codici a barre
- Tipo
- Manuale utente
La pagina si sta caricando...

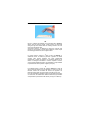
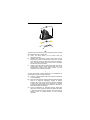
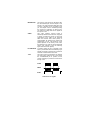
USING HERON™ SERIES READERS
UK
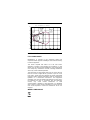
Heron™ readers automatically scan barcodes at a distance.
Simply aim and pull the trigger. Code scanning is performed
along the light bar emitted from the reading window. This bar
must cross the entire code.
Successful scanning is obtained by tilting the scanner with
respect to the barcode to avoid direct reflections, which impair
the reading performance, see the figure above.
I
Le pistole Heron™ leggono i codici a barre a distanza: è
sufficiente mirare sul codice e premere il grilletto. La lettura
avviene sulla banda luminosa che deve attraversare
interamente il codice da leggere. Le condizioni ottimali per la
lettura si ottengono inclinando lo scanner rispetto al codice,
così da evitare riflessioni dirette, che potrebbero compromettere
le prestazioni di lettura (vedere la figura qui sopra).
F
Les pistolets Heron™ lisent les codes à distance. Il suffit de
viser le code et d’appuyer sur la gâchette. Le code est lu par le
faisceau sortant de la fenêtre de lecture de l'appareil. Ce
faisceau doit traverser le code à barres à lire de part en part.
Pour des prestations optimales inclinez la douchette par rapport
au code à lire, afin d'éviter des réflexions directes qui pourraient
compromettre la performance de lecture (voir figure ci-dessus).
La pagina si sta caricando...
La pagina si sta caricando...

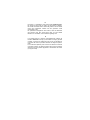
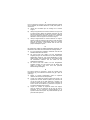
STAND INSTALLATION
A
B
C
UK
The stand can be mounted by using self-tapping screws, double
sided adhesive strips or rubber feet:
A) mount the stand directly to the surface using the
self-tapping screws;
B) carefully clean the bottom surface of the stand and the
table surface. Remove the protective plastic from one side
of the adhesive strips and stick them on the stand bottom.
Then, remove the plastic from the other side of the strips
and affix the stand to the table;
C) carefully clean the bottom surface of the stand, remove the
protective film from the rubber feet and stick them in the
corresponding housing on the bottom surface. It is also
possible to fix an optional metal plate.
I
Lo stand può essere montato utilizzando le viti autofilettanti, le
strisce adesive oppure i piedini di gomma:
A) montare lo stand direttamente sulla superficie utilizzando
le viti autofilettanti;
B) pulire accuratamente la superficie inferiore della base dello
stand e la superficie d’appoggio. Togliere la plastica
protettiva da un lato di ogni striscia e attaccare entrambe
le strisce alla base dello stand. Rimuovere la plastica
protettiva dall’altro lato delle strisce adesive e attaccare lo
stand alla superficie d’appoggio;
C) Pulire accuratamente la superficie inferiore della base
dello stand, quindi togliere la pellicola protettiva dai piedini
e attaccarli all’interno delle apposite sedi nella base di
plastica. Inoltre, è possibile fissare un base metallica
opzionale.
La pagina si sta caricando...

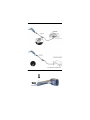
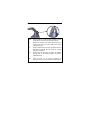
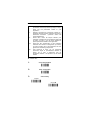
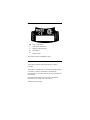
INSERTION INTO STAND
UK
Pair the reader to the stand paying attention to insert
the handle into the stand clip (see figure above).
I
Posizionare la pistola nello stand assicurandosi che
il manico sia inserito nel fermo dello stand stesso
(vedi figura sopra).
F
Placer le pistolet dans le support en faisant attention
d’introduire la poignée dans le crochet du support
(voir figure ci-dessus).
D
Positionieren Sie die Pistole im Halter und stecken
Sie den Griff in die Öffnung Haken des Halters
(siehe Bild oben).
E
Poner el lector en su soporte insertando la
empuñadura en el clip del soporte (ver figura arriba).
La pagina si sta caricando...
La pagina si sta caricando...
La pagina si sta caricando...

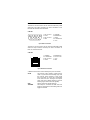
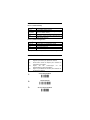
OPTIONAL CONFIGURATION PARAMETERS
UK
To configure the reader with the optional
parameters, follow the procedure (5 steps). In step 3
select only the parameters relative to your
application.
I Seguire la procedura per configurare il lettore con i
parametri opzionali (5 passi). All’interno del passo 3
selezionare solamente i parametri relativi alla
propria applicazione.
F Suivez dans l’ordre les étapes décrites pour
configurer le pistolet avec les paramètres optionnels
(5 points). Au point 3 vous ne devez sélectionner
que les paramètres relatifs à votre application.
D Folgen Sie den Anweisungen um die optionalen
Parameter der Pistole zu konfigurieren (5 Punkte).
Im Punkt 3 wählen Sie nur die Parameter, die Ihrer
gewünschte Anwendung entsprechen.
E Para configurar el lector con los parámetros
opcionales, seguir el procedimiento indicado (5
pasos). En el paso 3 seleccionar sólo los
parámetros relativos a la aplicación que se desee
realizar.
= default value
1.
Set to Interpret Mode
Ì$]8Î
2.
Enter Configuration
Ì$+;Î
3.
Video Polarity
Inverted
ÌDJ0bÎ
Normal
ÌDJ1eÎ
La pagina si sta caricando...

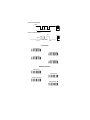
BEEPER TONE
Tone 1
ÌBH0\Î
Tone 2
Tone 3
ÌBH1_Î
ÌBH2bÎ
Tone 4
ÌBH3eÎ
BEEPER LENGTH
Long
ÌBI0^Î
Short
ÌBI1aÎ
BEEPER TYPE
Monotone
ÌBJ0`Î
Bitonal
ÌBJ1cÎ
4.
Exit Configuration
Ì$-?Î
5.
Set to Transparent Mode
Ì$[4Î
La pagina si sta caricando...
La pagina si sta caricando...
La pagina si sta caricando...

WARRANTY
UK
Datalogic warranties this product against defects in
workmanship and materials, for a period of 5 years
from the date of shipment, provided that the product is
operated under normal and proper conditions.
Datalogic has the faculty to repair or replace the
product; these provisions do not prolong the original
warranty term.
The warranty does not apply to any product that has
been subject to misuse, accidental damage,
unauthorized repair or tampering.
I
Datalogic garantisce questo prodotto contro difetti di
fabbricazione e di materiali per 5 anni dalla data di
consegna, a condizione che il prodotto sia utilizzato
come previsto.
Datalogic si riserva la facoltà di riparare o sostituire il
prodotto. Quanto sopra non prolunga la garanzia
originale.
La garanzia non si applica a prodotti utilizzati in modo
non corretto, danneggiati accidentalmente, sottoposti a
riparazioni non autorizzate o manomessi.
F
Datalogic garantit ce produit de tout défaut de
fabrication ou des matériaux pendant 5 ans à compter
de la date de livraison, à condition que le produit soit
utilisé correctement.
Datalogic a la faculté de réparer ou de remplacer ce
produit. Ces mesures ne prolongeront pas l’échéance
de la garantie.
La garantie ne s’applique pas aux produits qui ont été
utilisés de façon incorrecte, accidentellement
endommagés, soumis à des réparations non
autorisées ou bien altérés.
D
Datalogic gibt für dieses Produkt eine Garantie von 5
Jahren auf Herstellungs- und Materialfehler ab
Versandsdatum, falls das Produkt unter normalen und
angemessenen Bedingungen verwendet wurde.
Datalogic behält sich vor, das Produkt entweder zu
reparieren oder zu ersetzen, was aber den originalen
Garantietermin nicht verlängert.
Die Garantie erlischt bei unsachgemäßer Verwendung
und unberechtigter Veränderungen am Produkt.
E
Datalogic garantiza este producto contra todos los
defectos de fabricación y materiales por un periodo de
5 años desde la fecha de envío, a condición de que el
producto sea utilizado en condiciones normales y
correctas.
Datalogic tiene el derecho de reparar o reemplazar el
producto sin que esto suponga una prolongación de la
garantía original.
La garantía no será valida si el producto ha sufrido
abusos, daños accidentales, reparaciones no
autorizadas o ha sido falsificado.
La pagina si sta caricando...
La pagina si sta caricando...
La pagina si sta caricando...
-
 1
1
-
 2
2
-
 3
3
-
 4
4
-
 5
5
-
 6
6
-
 7
7
-
 8
8
-
 9
9
-
 10
10
-
 11
11
-
 12
12
-
 13
13
-
 14
14
-
 15
15
-
 16
16
-
 17
17
-
 18
18
-
 19
19
-
 20
20


Datalogic Heron D140 LASEROUT Manuale utente
- Categoria
- Lettori di codici a barre
- Tipo
- Manuale utente
in altre lingue
Documenti correlati
-
Datalogic Heron D140 Guida di riferimento
-
Datalogic Heron D110 Guida di riferimento
-
-
-
Datalogic PowerScan M8500 Quick Reference Manual
-
Datalogic Heron D150-EAS Manuale utente
-
Datalogic SR Manuale utente
-
-
-