Hoover ST 200 F Manuale del proprietario
- Categoria
- Aspirapolvere
- Tipo
- Manuale del proprietario

1
2
ATHYSS
0565 5191 ©2005 PRINTED IN P.R.C.
UUSSEERR IINNSSTTRRUUCCTTIIOONNSS
ENGLISH GGB
ITALIANO IT
FRANÇAIS FR
DEUTSCH DE
HRVATSKI HR
EËËHNIKA GR
NEDERLANDS NL
ESPAÑOL ES
1
2
3
4
5
6
7
8
9
10
11
1
1
2
3
4
5
6
7
8
2*
4*
5
a)
b)
a) b)
c) d)
e)
b) b)a)
3
®
Athyss_cover_Multilang.qxp 23/12/2005 11:45 Page 1

GB
1
USER INSTRUCTIONS
This product must be assembled and operated in accordance with these instructions and used only for domestic
cleaning to remove dry dirt and dust from household carpets and flooring. Accessories can be used to remove dirt
and dust from furniture and fabrics.
Contents
Important safety reminders . . . . . . . . . . . . . . . . . . . . . . . . . . . . . . . . . . . . . . . . . . . . . . . . . . . . . . . . . . . . . . . . . . . . 1
Suggested use . . . . . . . . . . . . . . . . . . . . . . . . . . . . . . . . . . . . . . . . . . . . . . . . . . . . . . . . . . . . . . . . . . . . . . . . . . . . . . 1
Product components . . . . . . . . . . . . . . . . . . . . . . . . . . . . . . . . . . . . . . . . . . . . . . . . . . . . . . . . . . . . . . . . . . . . . . . . . 2
Getting started . . . . . . . . . . . . . . . . . . . . . . . . . . . . . . . . . . . . . . . . . . . . . . . . . . . . . . . . . . . . . . . . . . . . . . . . . . . . . 2
Product use . . . . . . . . . . . . . . . . . . . . . . . . . . . . . . . . . . . . . . . . . . . . . . . . . . . . . . . . . . . . . . . . . . . . . . . . . . . . . . . . 2
Bag and Filters . . . . . . . . . . . . . . . . . . . . . . . . . . . . . . . . . . . . . . . . . . . . . . . . . . . . . . . . . . . . . . . . . . . . . . . . . . . . . . 2
Specialities . . . . . . . . . . . . . . . . . . . . . . . . . . . . . . . . . . . . . . . . . . . . . . . . . . . . . . . . . . . . . . . . . . . . . . . . . . . . . . . . 3
Calling for service . . . . . . . . . . . . . . . . . . . . . . . . . . . . . . . . . . . . . . . . . . . . . . . . . . . . . . . . . . . . . . . . . . . . . . . . . . . 3
Spare parts . . . . . . . . . . . . . . . . . . . . . . . . . . . . . . . . . . . . . . . . . . . . . . . . . . . . . . . . . . . . . . . . . . . . . . . . . . . . . . . . . 4
Your guarantee . . . . . . . . . . . . . . . . . . . . . . . . . . . . . . . . . . . . . . . . . . . . . . . . . . . . . . . . . . . . . . . . . . . . . . . . . . . . . 4
IMPORTANT SAFETY REMINDERS
This cleaner should only be used for its intended purpose as described in these instructions. Ensure that these are
fully understood before operating this appliance.
WARNING! ELECTRICITY CAN BE EXTREMELY DANGEROUS.
This appliance is double insulated and must not be earthed.
IMPORTANT
The wires in the mains lead are coloured in accordance with the following code:
BLUE - Neutral
BROWN - Live
STATIC ELECTRICITY
Some carpets can cause a small build up of static electricity. Any static discharge is not hazardous to health.
SUGGESTED USE
Replace the paper bag frequently when picking up material such as powder or fine dust or when cleaning new car-
pets.
See 'Changing the paper bag'.
Only use attachments recommended or supplied by Hoover.
DO NOT
• Use your cleaner outdoors, on wet surfaces or for wet pickup.
• Pick up hard or sharp objects, matches, hot ashes, cigarette ends or other similar items.
• Spray with, or pick up flammable liquids such as cleaning fluids, petrol, etc, or their vapours, as they may cause
an explosion or fire.
• Remove the plug by pulling on the supply cord.
• Stand on, or wrap the power cord around arms or legs when using your cleaner.
• Continue to use this product if it appears to be faulty. If the power cord/plug is damaged, stop using the vacu-
um cleaner IMMEDIATELY. The power cord must be replaced by an authorised HOOVER Service Engineer to
avoid a safety hazard.
After use switch the vacuum cleaner off and remove the plug from the electricity supply. Always switch off and
remove the plug before cleaning the appliance or attempting any maintenance work.
HOOVER SERVICE
To ensure the continued safe and efficient operation of this appliance, we recommend that only an authorised
HOOVER Service Engineer carries out any servicing or repairs.
6*
7*
8
9*
10
11*
12*
a) b)
a) b) b) a)
b) c)
a) b)
Athyss_cover_Multilang.qxp 23/12/2005 11:46 Page 6

GB
2
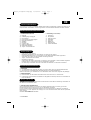
PRODUCT COMPONENTS
GETTING STARTED
• Remove product from box.
• Unclip foldaway handle from base of main body and fold upward into place.
• Open the bag door and check if the dust paper bag is correctly fitted.
• Ensure the pre-motor and exhaust filters are correctly fitted.
• Fit the Carpet & Hard Floor nozzle.
• Fully unwind cord.
• On fixed power version depress button to switch power On/Off. On variable power version rotate the knob to
switch on and control the power.
• For use on hard floors, press nozzle pedal to bring brushes in contact with the hard floor.
PRODUCT USE
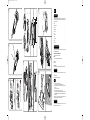
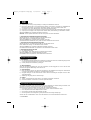
3 - POWER CORD STORAGE
a) Before use undo integrated clip, turn top hook and release power cord.
b) During use as a stick cleaner clip power cord into back of main handle.
After use, unclip power cord from handle and wind it around storage hooks before securing with integrated clip.
4 - CONTROLS*
a) On/Off switch. Push to switch On. Push again to switch Off.
b) Variable power control. Switch On and set the desired power by rotating the selector. Rotate back to switch Off.
BAG & FILTERS
IMPORTANT: Switch cleaner Off and remove plug from electricity supply before changing paper bag or removing
any filters.
5 - CHANGING THE PAPER BAG
When the bag check indicator shows red, check to see if the bag is full and requires replacement.
The bag check indicator may show red even if there is a blockage elsewhere in the product.
For accurate bag check indication, the power control* must be set to maximum.
Replace the paper bag frequently when picking up material such as powder or fine dust or when cleaning new
carpets.
DO NOT overfill the paper bag.
To change the paper bag:
a) Lay the cleaner on a flat surface, pull back catch and remove bag door.
b) Remove bag by pulling bag collar from hose inlet. Remove sticky backing from the dust flap and fold it over the
inlet to avoid dust escaping from the bag.
c) Before fitting a new bag, fold the corners of the bag behind the collar.
d) Slide the collar along the guides and lift over the inlet tube. Collar should 'click' into place.
e) Locate tabs on bag door as shown and close bag door.
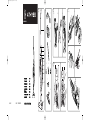
1 - STANDARD EQUIPMENT
1) Foldaway handle
2) Foldaway handle release button
3) Mini Pop-Up handle
4) On / Off button or variable power control
5) Quick release cord storage hook
6) Exhaust filter
7) Power cord
8) Integrated clip
9) Bag door
10) Bag check indicator
11) Carpet & Hard Floor nozzle
2 - ACCESSORIES (dependant on model)*
1) Shoulder strap
2) Flexible hose
3) Extension tube
4) Furniture nozzle
5) Crevice tool
6) Dusting brush
7) Accessory holder
8) Parquet Caresse nozzle
* Features vary according to model
Athyss_main_Multilang.qxp 11/01/2006 12:29 Page 1

DO NOT use the vacuum cleaner without a paper bag in place.
IMPORTANT: Hoover recommends that filters are replaced after five full bags have been used.
6 - REPLACING THE STANDARD PRE-MOTOR FILTER*
With paper bag removed lift the pre-motor filter from the bag housing.
Fit the new filter and replace the paper bag.
DO NOT use the vacuum cleaner without the pre-motor filter in place.
Replace the standard pre-motor filter after five full bags have been used.
7 - REPLACING THE HEPA PRE-MOTOR FILTER*
With paper bag removed, lift the HEPA pre-motor filter from the bag housing.
Fit the new HEPA pre-motor filter and replace the paper bag.
DO NOT use the vacuum cleaner without the HEPA pre-motor filter in place.
Replace the HEPA pre-motor filter after five full bags have been used.
8 - REPLACING THE EXHAUST FILTER
a) Lift off filter cover.
b) Peel off filter, fit new filter and replace cover.
DO NOT use cleaner without the exhaust filter in place.
Replace the exhaust filter after five full bags have been used.
SPECIALITIES
9 - FOLDAWAY HANDLE*
a) To use the product as portable vacuum cleaner together with the accessories and Portable Kit, press the handle
release button and fold the handle backwards until it clips into place at the base of the main body.
b) Fold handle for easy storage.
10 - MINI POP-UP HANDLE
As main handle is folded backward the Mini Pop-Up handle automatically rises to allow the product to be easily
carried or used as a portable vacuum cleaner.
11 - SHOULDER STRAP*
a) With nozzle and accessories removed, slide one end of the shoulder strap past the locking tab on the inlet tube
and rotate as shown. Refit accessories depending on use.
b) With main handle folded and locked at the base, clip other end of the shoulder strap over the peg behind the
Pop-Up handle.
c) Carry the cleaner over the shoulder as shown.
12 - NOZZLES*
a) Carpet & Hard Floor nozzle: press pedal to bring brushes in contact with hard floor.
b) Parquet Caresse nozzle: for wooden and delicate floors.
CALLING FOR SERVICE
A charge will be made if the cleaner is found to be in working order, has not been assembled in accordance with
these instructions or has been used incorrectly.
Before calling Hoover Service run through the following checklist:
1. Is there a working electricity supply to the cleaner? Check with another appliance.
2. Is the paper bag full? See 'Bag & Filters' section.
3. Are the filters blocked? See 'Bag & Filters' section.
4. Is the hose or inlet blocked? Remove any obstruction.
If there is any doubt call your local Hoover Service Office for advice, they may be able to assist you over the
telephone.
GB
3
* Features vary according to model
Athyss_main_Multilang.qxp 11/01/2006 12:29 Page 2

GB
Spare Parts*
Use only original Hoover spare parts.
WEEE DIRECTIVE
This appliance is marked according to the European directive 2002/96/EC on Waste Electrical
and Electronic Equipment (WEEE). By ensuring this product is disposed of correctly, you will
help prevent potential negative consequences for the environment and human health, which
could otherwise be caused by inappropriate waste handling of this product. The symbol on the
product indicates that this product may not be treated as household waste. Instead it shall be
handed over to the applicable collection point for the recycling of electrical and electronic
equipment. Disposal must be carried out in accordance with local environmental regulations for
waste disposal. For more detailed information about treatment, recovery and recycling of this
product, please contact your local city office, your household waste disposal service or the shop
where you purchased the product.
GUARANTEE STATEMENT
The guarantee conditions for this appliance are as defined by our representative in the country in which it is sold.
Details regarding these conditions can be obtained from the dealer from whom the appliance was purchased. The
bill of sale or receipt must be produced when making any claim under the terms of this guarantee. Subject to change
without notice.
® Registered Trade Mark
SPARE PART CODE
Paper bag (5 paper bags + 1 pre-motor filter + 1 exhaust filter) H59 - 35600279
1 pre-motor filter + 1 exhaust filter U37 - 35600280
Portable Kit (1 shoulder strap + 1 hose + 1 dusting brush) C48 - 35600191
Carpet & Hard Floor nozzle G79 - 35600281
Parquet Caresse nozzle G80 - 35600282
Hoover Limited Pentrebach, Merthyr Tydfil,
Mid Glamorgan CF48 4TU
GIAS Customer Sevice 08705 400600
Hoover Spares 01204 556111
4
* Features vary according to model
Athyss_main_Multilang.qxp 11/01/2006 12:29 Page 3

IT
5
ISTRUZIONI PER L'USO
Questo prodotto deve essere montato e fatto funzionare secondo le presenti istruzioni e va utilizzato
esclusivamente in ambito domestico per rimuovere lo sporco e la polvere da tappeti e pavimenti. Accessori
possono essere utilizzati per rimuovere lo sporco e la polvere da mobili e tessuti.
Indice
Avvertenze importanti per la sicurezza . . . . . . . . . . . . . . . . . . . . . . . . . . . . . . . . . . . . . . . . . . . . . . . . . . . . . . . . . . . 5
Uso consigliato . . . . . . . . . . . . . . . . . . . . . . . . . . . . . . . . . . . . . . . . . . . . . . . . . . . . . . . . . . . . . . . . . . . . . . . . . . . . . . 5
Componenti del prodotto . . . . . . . . . . . . . . . . . . . . . . . . . . . . . . . . . . . . . . . . . . . . . . . . . . . . . . . . . . . . . . . . . . . . . 6
Guida introduttiva . . . . . . . . . . . . . . . . . . . . . . . . . . . . . . . . . . . . . . . . . . . . . . . . . . . . . . . . . . . . . . . . . . . . . . . . . . . . 6
Uso del prodotto . . . . . . . . . . . . . . . . . . . . . . . . . . . . . . . . . . . . . . . . . . . . . . . . . . . . . . . . . . . . . . . . . . . . . . . . . . . . 6
Sacco di carta e filtri . . . . . . . . . . . . . . . . . . . . . . . . . . . . . . . . . . . . . . . . . . . . . . . . . . . . . . . . . . . . . . . . . . . . . . . . . 6
Peculiarità del prodotto . . . . . . . . . . . . . . . . . . . . . . . . . . . . . . . . . . . . . . . . . . . . . . . . . . . . . . . . . . . . . . . . . . . . . . . 7
Servizio assistenza . . . . . . . . . . . . . . . . . . . . . . . . . . . . . . . . . . . . . . . . . . . . . . . . . . . . . . . . . . . . . . . . . . . . . . . . . . 7
Ricambi . . . . . . . . . . . . . . . . . . . . . . . . . . . . . . . . . . . . . . . . . . . . . . . . . . . . . . . . . . . . . . . . . . . . . . . . . . . . . . . . . . . 8
Regolamento per la garanzia . . . . . . . . . . . . . . . . . . . . . . . . . . . . . . . . . . . . . . . . . . . . . . . . . . . . . . . . . . . . . . . . . . 8
AVVERTENZE IMPORTANTI PER LA SICUREZZA
Questo aspirapolvere deve essere usato esclusivamente per gli scopi previsti, secondo le istruzioni contenute nel
presente documento. Accertarsi di aver ben compreso le istruzioni prima di mettere in funzione l'apparecchio.
AVVERTENZA! L'ELETTRICITÀ PUÒ ESSERE ESTREMAMENTE PERICOLOSA.
Questo apparecchio è dotato di doppio isolamento e non richiede la messa a terra.
IMPORTANTE
I fili contenuti nel cavo di alimentazione sono colorati secondo il seguente codice:
BLU - Neutro
MARRONE - Fase
ELETTRICITÀ STATICA
Su alcune superfici tessili si può determinare un lieve accumulo di elettricità statica. Le scariche di elettricità statica
non sono pericolose per la salute.
USO CONSIGLIATO
Sostituire frequentemente il sacco di carta quando si aspira polvere molto fine oppure quando si puliscono tappeti
nuovi.
Vedere la sezione 'Sostituzione del sacco di carta'.
Utilizzare unicamente gli accessori consigliati o forniti da Hoover.
OPERAZIONI DA EVITARE
• Utilizzare l'apparecchio all'aperto, su superfici bagnate o per aspirare liquidi.
• Aspirare oggetti duri o taglienti, fiammiferi, cenere calda, mozziconi di sigaretta o articoli simili.
• Spruzzare o asprirare liquidi infiammabili quali fluidi detergenti, benzina, ecc. o i loro vapori, poiché possono
provocare esplosioni o incendi.
• Staccare la spina tirando il cavo in dotazione.
• Sostare sopra il cavo di alimentazione o avvolgerlo intorno alle braccia o alle gambe mentre si usa l'apparecchio.
• Continuare a utilizzare il prodotto se appare difettoso. Se il cavo di alimentazione/la spina sembra danneggiato,
smettere IMMEDIATAMENTE di utilizzare l'apparecchio. Per evitare pericoli, il cavo di alimentazione deve
essere sostituito esclusivamente da un tecnico autorizzato HOOVER.
Dopo l'uso, spegnere l'apparecchio e staccare la spina dalla presa di corrente. Prima di pulire l'apparecchio o
effettuare qualsiasi intervento di manutenzione su di esso, spegnere sempre l'apparecchio e staccare la spina.
Athyss_main_Multilang.qxp 11/01/2006 12:29 Page 4

IT
6
ASSISTENZA HOOVER
Per assicurare il funzionamento continuo dell'apparecchio in modo sicuro ed efficace si consiglia di far effettuare tutti
gli interventi di manutenzione o riparazione esclusivamente da un tecnico autorizzato HOOVER.
COMPONENTI DEL PRODOTTO
GUIDA INTRODUTTIVA
• Estrarre il prodotto dalla scatola.
• Sganciare l'impugnatura ripiegabile dalla base del corpo dell'apparecchio e sollevarla in posizione.
• Aprire lo sportellino del sacco e controllare che il sacco di carta sia inserito correttamente.
• Accertarsi che il filtro pre-motore e il filtro aria in uscita siano montati correttamente.
• Montare la spazzola per tappeti e pavimenti.
• Svolgere completamente il cavo.
• Nel modello a potenza fissa accendere l'apparecchio premendo il pulsante acceso/spento. Nel modello a
potenza variabile ruotare la manopola per accendere l'apparecchio e aggiustare la potenza.
• Per la pulizia dei pavimenti duri, premere il pedale sulla spazzola per abbassare le setole e porle a contatto con
la superficie.
USO DEL PRODOTTO
3 - COME RIPORRE IL CAVO DI ALIMENTAZIONE
a) Prima dell'uso sganciare il cavo dal clip integrato, ruotare il gancio superiore e rilasciare il cavo.
b) Durante l'uso dell'aspirapolvere in posizione verticale agganciare il cavo sul retro dell'impugnatura principale.
Dopo l'uso sganciare il cavo dall'impugnatura e avvolgerlo attorno ai ganci avvolgicavo prima di fissarlo con il clip
integrato.
4 - ACCENSIONE*
a) Interruttore acceso/spento. Premere per accendere. Premere nuovamente per spegnere.
b) Variatore di potenza. Accendere l'apparecchio e impostare la potenza desiderata ruotando il selettore. Per
spegnere ruotare la manopola in senso opposto.
SACCO DI CARTA E FILTRI
IMPORTANTE: Prima di sostituire il sacco di carta o estrarre i filtri spegnere l'apparecchio e staccare la spina dalla
presa di corrente.
5 - SOSTITUZIONE DEL SACCO DI CARTA
Quando l'indicatore di controllo del sacco diventa di colore rosso, controllare che il sacco non sia pieno e debba
essere sostituito.
L'indicatore di controllo del sacco può essere di colore rosso anche qualora l'apparecchio sia ostruito in altri punti.
Per un'indicazione accurata del controllo del sacco il variatore di potenza* deve essere impostato al massimo.
Sostituire frequentemente il sacco quando si aspira polvere molto fine oppure quando si puliscono tappeti nuovi.
NON riempire eccessivamente il sacco raccoglipolvere.
1 - PRODOTTO STANDARD
1) Impugnatura ripiegabile
2) Pulsante per il rilascio dell'impugnatura ripiegabile
3) Mini impugnatura a scomparsa
4) Pulsante acceso/spento o variatore di potenza
5) Gancio avvolgicavo a rilascio rapido
6) Filtro dell’aria in uscita
7) Cavo di alimentazione
8) Clip integrato
9) Sportellino del sacco di carta
10) Indicatore di controllo del sacco
11) Spazzola per tappeti e pavimenti
2 - ACCESSORI (a seconda del modello)*
1) Tracolla
2) Tubo flessibile
3) Tubo di prolunga
4) Bocchetta tutti gli usi
5) Bocchetta per fessure
6) Spazzola a pennello
7) Porta accessori
8) Spazzola Parquet Caresse
* Le caratteristiche variano a seconda del modello
Athyss_main_Multilang.qxp 11/01/2006 12:29 Page 1

Per sostituire il sacco di carta:
a) Adagiare l'aspirapolvere su una superficie piana, tirare il fermo all'indietro ed estrarre lo sportellino del sacco.
b) Rimuovere il sacco estraendo il collare del sacco dal tubo. Staccare il rivestimento adesivo dalla linguetta e
ripiegarla sopra l'apertura, per evitare la fuoriuscita della polvere dal sacco.
c) Prima di inserire un nuovo sacco di carta, ripiegarne gli angoli dietro il collare del sacco stesso.
d) Inserire il collare lungo le guide e sollevarlo sopra il tubo. Il collare deve scattare in posizione.
e) Collocare le linguette poste sullo sportellino del sacco come indicato e chiudere lo sportellino.
NON utilizzare l'aspirapolvere senza sacco raccoglipolvere.
IMPORTANTE: Hoover consiglia di sostituire i filtri dopo aver utilizzato cinque sacchi pieni.
6 - SOSTITUZIONE DEL FILTRO PRE-MOTORE STANDARD*
Dopo aver rimosso il sacco di carta, estrarre il filtro pre-motore standard dal porta filtro.
Inserire un nuovo filtro e sostituire il sacco di carta.
NON utilizzare l'aspirapolvere senza il filtro pre-motore.
Sostituire il filtro pre-motore standard dopo aver utilizzato cinque sacchi pieni.
7 - SOSTITUZIONE DEL FILTRO PRE-MOTORE HEPA*
Dopo aver rimosso il sacco di carta, estrarre il filtro pre-motore HEPA dal porta filtro.
Inserire un nuovo filtro pre-motore HEPA e sostituire il sacco di carta.
NON utilizzare l'aspirapolvere senza il filtro pre-motore HEPA.
Sostituire il filtro pre-motore HEPA dopo aver utilizzato cinque sacchi pieni.
8 - SOSTITUZIONE DEL FILTRO DELL’ARIA IN USCITA
a) Sollevare il coprifiltro.
b) Rimuovere il filtro, inserirne uno nuovo e richiudere il coperchio.
NON utilizzare l'aspirapolvere senza il filtro dell’aria in uscita.
Sostituire il filtro d’aria in uscita dopo aver utilizzato cinque sacchi pieni.
PECULIARITÀ DEL PRODOTTO
9 - IMPUGNATURA RIPIEGABILE*
a) Per utilizzare l'apparecchio come aspirapolvere portatile assieme agli accessori e al kit portatile, premere il
pulsante di rilascio dell'impugnatura e ripiegarla all'indietro agganciandola alla base del corpo dell'apparecchio.
b) Per riporre l'apparecchio con minimo ingombro ripiegare l'impugnatura.
10 - MINI IMPUGNATURA A SCOMPARSA
Quando l'impugnatura principale è ripiegata, la mini impugnatura si solleva automaticamente e consente di
trasportare con facilità l'apparecchio o di utilizzarlo come aspirapolvere portatile.
11 - TRACOLLA*
a) Una volta estratti spazzola ed accessori, inserire un'estremità della tracolla oltre la linguetta di bloccaggio sul
tubo di ingresso e ruotarla come indicato. Rimontare gli accessori a seconda del tipo di utilizzo.
b) Con l'impugnatura principale ripiegata e bloccata sul corpo dell'apparecchio, agganciare l'altra estremità della
tracolla al perno posto dietro l'impugnatura a scomparsa.
c) Trasportare l'apparecchio a tracolla come indicato.
12 - SPAZZOLE*
a) Spazzola per tappeti e pavimenti: premere il pedale per abbassare le setole e porle a contatto con la superficie.
b) Spazzola Parquet Caresse: per pavimenti in legno e superfici delicate.
SERVIZIO DI ASSISTENZA
Verrà addebitato un intervento di assistenza se si esamina l'apparecchio e si riscontra che non si trova nelle corrette
condizioni operative, non è stato montato secondo quanto riportato nel presente libretto d'istruzioni o è stato oggetto
di uso improprio.
Prima di rivolgersi all'assistenza Hoover esaminare la seguente lista di controllo:
1. La presa elettrica a cui è collegato l'apparecchio è funzionante? Verificare collegando un altro apparecchio alla
presa di corrente.
2. Il sacco è pieno? Vedere la sezione 'Sacchi di carta e filtri'.
3. I filtri sono ostruiti? Vedere la sezione 'Sacchi di carta e filtri'.
4. Il tubo o l'ingresso del tubo è ostruito? Rimuovere eventuali ostruzioni.
In caso di dubbi rivolgersi all'assistenza Hoover locale, che potrebbe essere in grado di aiutarvi telefonicamente.
IT
7
* Le caratteristiche variano a seconda del modello
Athyss_main_Multilang.qxp 11/01/2006 12:29 Page 2

IT
Ricambi*
Utilizzare esclusivamente ricambi originali Hoover.
DIRETTIVA WEEE
L'apparecchio è contrassegnato in conformità alla direttiva europea WEEE 2002/96/EC sulla
gestione dei rifiuti da apparecchiature elettrotecniche ed elettroniche. Garantendo il corretto
smaltimento del prodotto, il cliente contribuisce alla salvaguardia della salute delle persone e alla
protezione dell'ambiente che potrebbero altrimenti essere compromesse da uno smaltimento
eseguito in maniera non idonea. Il simbolo apposto su di esso indica che questo prodotto non
può essere smaltito come i normali rifiuti domestici, bensì deve essere portato al punto di
raccolta o al centro di riciclaggio delle apparecchiature elettriche ed elettroniche più vicino. Lo
smaltimento deve essere eseguito in conformità alle normative locali vigenti per la salvaguardia
dell'ambiente e lo smaltimento dei rifiuti.Per ulteriori informazioni sul trattamento, il recupero e il
riciclaggio di questo prodotto, contattare l'unità territoriale competente per il servizio di
smaltimento o il negozio in cui è stato effettuato l'acquisto.
REGOLAMENTO PER LA GARANZIA
Le condizioni di garanzia per questo prodotto sono definite in base alle norme previste per il Paese nel quale è stato
venduto. I dettagli delle suddette condizioni possono essere richiesti al distributore presso il quale il prodotto è stato
acquistato. Per ogni contestazione nei termini della garanzia è necessaria l'esibizione della fattura o di documento
equipollente. Soggetta a modifiche senza preavviso.
® Marchio registrato
RICAMBI CODICE
Sacco raccoglipolvere (5 sacchi carta + 1 filtro pre-motore + 1 filtro dell’aria in uscita) H59 - 35600279
1 filtro pre-motore + 1 filtro dell’aria in uscita U37 - 35600280
Kit portatile (1 tracolla + 1 tubo + 1 spazzola a pennello) C48 - 35600191
Spazzola per tappeti e pavimenti G79 - 35600281
Spazzola Parquet Caresse G80 - 35600282
Zerowatt. Hoover S.p.A.
Sede commerciale:via Privata E.Fumagalli,
20047 Brugherio (Mi)
Tel +39 039 208655
servizioclienti@hoover.it
Gias Customer Service (Italia) 039 2086811
8
* Le caratteristiche variano a seconda del modello
Athyss_main_Multilang.qxp 11/01/2006 12:29 Page 3

FR
9
GUIDE DE L’UTILISATEUR
Cet appareil doit être assemblé et utilisé conformément à ces instructions et utilisé seulement pour des tâches
ménagères. Des accessoires peuvent être utilisés pour aspirer la salissure et la poussière des meubles et tissus.
Sommaire
Remarques importantes concernant la sécurité ........................................................................................ 9
Conseils pour l’utilisation............................................................................................................................. 9
Composants ............................................................................................................................................... 10
Première utilisation ..................................................................................................................................... 10
Utilisation du produit.................................................................................................................................... 10
Sac et filtres ................................................................................................................................................ 10
Spécialités .................................................................................................................................................. 11
Recours au service technique..................................................................................................................... 12
Pièces détachées........................................................................................................................................ 12
Votre garantie.............................................................................................................................................. 12
REMARQUES IMPORTANTES CONCERNANT LA SECURITE
Cet aspirateur doit être utilisé uniquement pour des tâches ménagères comme cela est décrit dans ces instructions.
Veuillez vous assurer que vous avez lu et compris entièrement ces instructions avant d’utiliser l’appareil.
ATTENTION : L’ELECTRICITE PEUT ETRE EXTREMEMENT DANGEREUSE
Cet appareil est doublement isolé et il ne doit pas être mis à la terre.
IMPORTANT :
Les fils du cordon d’alimentation électrique sont colorés selon le code suivant :
BLEU – Neutre
MARRON - Phase
ELECTRICITE STATIQUE
Certaines moquettes peuvent produire une petite accumulation d’électricité statique. Les décharges d’électricité
statique ne sont pas dangereuses pour la santé.
CONSEILS POUR L’UTILISATION
Remplacez le sac en papier fréquemment lors de l’aspiration de poudres ou poussières fines ou du nettoyage de
moquettes neuves.
Voir « Pour changer le sac papier ».
Utilisez uniquement les accessoires recommandés ou fournis par Hoover.
VOUS NE DEVEZ PAS
• Utiliser l’aspirateur à l’extérieur, sur des surfaces mouillées ou pour aspirer des substances mouillées.
• Aspirer des d’objets durs ou tranchants, allumettes, cendres chaudes, mégots de cigarettes, farine, plâtre,
ciment, enduit, sciure de bois ou autres objets similaires.
• Vaporiser ou aspirer des liquides inflammables, fluides netttoyants, aérosols ou vapeurs pouvant présenter un
risque d’explosion ou d’incendie.
• Retirer la prise en tirant sur le cordon d’alimentation électrique.
• Marcher sur le cordon d’alimentation, ou le laisser s’emmêler autour de vos bras ou de vos jambes pendant la
marche de l’aspirateur.
• Continuer d’utiliser l’aspirateur s’il semble défectueux. Si le cordon d’alimentation électrique est endommagé,
arrêtez d’utiliser l’aspirateur IMMEDIATEMENT. Le cordon d’alimentation électrique doit être réparé par un
réparateur agréé du réseau de service Hoover pour éviter les risques.
Après l’utilisation, arrêtez l’aspirateur et débranchez la prise de courant. Vous devez toujours arrêter l’appareil et
débrancher la prise de courant avant de le nettoyer ou d’effectuer toute opération d’entretien.
Athyss_main_Multilang.qxp 11/01/2006 12:29 Page 4

FR
10
SERVICE HOOVER
Pour garantir une utilisation sans danger et efficace de cet appareil, nous recommandons de confier toutes les
réparations et les révisions à un technicien agréé du réseau de service Hoover.
COMPOSANTS
PREMIERE UTILISATION
• Sortez l’appareil de l’emballage.
• Dégagez la poignée pliable de la base du corps principal et dépliez-la pour la mettre en place.
• Ouvrez la porte du sac à poussière et confirmez que le sac est monté correctement.
• Confirmez que les filtres avant moteur et de sortie moteur sont montés correctement.
• Montez le suceur pour sols durs et moquettes.
• Déroulez entièrement le cordon.
• Sur les versions à puissance fixe, appuyez sur le bouton de Marche/Arrêt. Sur les versions à puissance
variable, tournez le bouton pour allumer et régler la puissance de l’aspirateur.
• Pour l’utilisation sur les sols durs, appuyez sur la pédale du suceur pour abaisser les brosses.
UTILISATION
3 - RANGEMENT DU CORDON D’ALIMENTATION
a) Avant l’utilisation, défaites le clip intégré, tournez le crochet supérieur et libérez le cordon d’alimentation
électrique.
b) Lors de l’utilisation en mode portable, fixez le cordon d’alimentation au dos de la poignée principale avec le clip.
Après l’utilisation, séparez le cordon de la poignée et enroulez-le autour des crochets de rangement avant de le fixer
avec le clip intégré.
4 - COMMANDES*
a) Commutateur Marche/Arrêt Poussez pour mettre en marche. Poussez de nouveau pour arrêter.
b) Commande de puissance variable. Mettez en marche et réglez la puissance selon les besoins en tournant le
bouton sélecteur. Tournez en arrière pour arrêter.
SAC & FILTRES
IMPORTANT : Arrêtez l’aspirateur et débranchez la prise de courant avant de changer le sac en papier ou de retirer
un des filtres.
5 - REMPLACEMENT DU SAC EN PAPIER
Quand l’indicateur rouge de contrôle du sac est allumé, vérifiez si le sac est plein et s’il faut le remplacer.
L’indicateur rouge de contrôle du sac peut s’allumer en cas de blocage ailleurs dans l’appareil.
1 - EQUIPEMENT STANDARD
1) Poignée pliable
2) Bouton de déverrouillage de poignée pliable
3) Mini poignée amovible
4) Bouton de Marche/Arrêt ou bouton de réglage de
puissance variable
5) Crochet de rangement de cordon à libération rapide
6) Filtre de sortie moteur
7) Cordon d’alimentation
8) Clip intégré
9) Porte de sac
10) Indicateur de sac plein.
11) Suceur pour sols durs & moquettes
2 - ACCESSOIRES (selon le modèle)*
1) Bandoulière
2) Tuyau flexible
3) Rallonge de tube
4) Petit suceur
5) Suceur plat
6) Brosse à meubles
7) Porte-accessoires
8) Brosse parquet Caresse (spéciale sols durs)
* Les caractéristiques varient selon le modèle
Athyss_main_Multilang.qxp 11/01/2006 12:29 Page 1

Pour une indication précise du contrôle de sac, la commande de puissance* doit être réglée au maximum.
Remplacez le sac en papier fréquemment lors de l’aspiration de poudres ou poussières fines ou du nettoyage de
moquettes neuves.
EVITEZ de laisser le sac en papier se remplir excessivement.
Pour remplacer le sac en papier :
a) Couchez l’aspirateur sur une surface plane, tirez le taquet en arrière et retirez la porte du sac.
b) Retirez le sac en tirant le collier du sac pour le séparer de l’embouchure du tuyau. Tirez la partie collante du
rabat et appliquez-la sur l’embouchure pour éviter que la poussière ne s’échappe du sac.
c) Avant de monter le sac neuf, repliez les coins du sac derrière le collier.
d) Faites glisser le collier le long des guides et soulevez-le au-dessus du tube d’entrée. Le collier devrait se mettre
en place avec un “déclic”.
e) Positionnez les taquets sur la porte du sac comme illustré et fermez la porte.
N’UTILISEZ PAS l’aspirateur sans le sac papier en place.
IMPORTANT : Hoover recommande de remplacer les filtres après que cinq sacs pleins ont été utilisés.
6 - REMPLACEMENT DU FILTRE D’AVANT MOTEUR STANDARD*
Après avoir retiré le sac en papier soulevez le filtre d’avant moteur du logement de sac.
Montez le filtre neuf et replacez le sac en papier.
N’UTILISEZ PAS l’aspirateur sans le filtre d’avant moteur en place.
Remplacez le filtre d’avant moteur standard après que cinq sacs pleins ont été utilisés.
7 - REMPLACEMENT DU FILTRE D’AVANT MOTEUR HEPA*
Après avoir retiré le sac papier soulevez le filtre d’avant moteur HEPA du logement de sac.
Montez le filtre HEPA neuf et replacez le sac en papier.
N’UTILISEZ PAS l’aspirateur sans le filtre d’avant moteur HEPA en place.
Remplacez le filtre d’avant moteur HEPA après que cinq sacs pleins ont été utilisés.
8 - REMPLACEMENT DU FILTRE DE SORTIE MOTEUR
a) Soulevez le couvercle de filtre.
b) Retirez le filtre usagé, montez le filtre neuf et remontez le couvercle.
N’UTILISEZ PAS l’aspirateur sans le filtre de sortie moteur en place.
Remplacez le filtre de sortie moteur après que cinq sacs pleins ont été utilisés.
SPECIFICITES
9 - POIGNEE PLIABLE*
a) Pour utiliser l’appareil comme un aspirateur portable avec les accessoires et le kit portable, appuyez sur le
bouton de libération de la poignée et rabattez la poignée en arrière jusqu’à ce qu’elle s’adapte dans la base du
corps principal.
b) Repliez la poignée pour faciliter le rangement.
10 - MINI POIGNEE AMOVIBLE
Quand la poignée principale est repliée en arrière une mini poignée amovible sort automatiquement pour permettre
de porter facilement l’aspirateur ou de l’utiliser comme un aspirateur portable.
11 - BANDOULIERE*
a) Après avoir retiré le suceur et les accessoires, glissez une extrémité de la bandoulière au-delà du taquet de
verrouillage sur le tube d’entrée et tournez de la façon illustrée. Remontez les accessoires selon les besoins.
b) La poignée principale repliée et verrouillée sur la base, fixez avec le clip l’autre extrémité de la bandoulière sur
l'accroche derrière la mini poignée
c) Portez l’aspirateur à l’épaule de la façon illustrée.
12 - SUCEURS*
a) Suceur de moquettes et sols durs : appuyez sur la pédale pour mettre les brosses en contact avec les sols durs.
b) Brosse parquet Caresse (spéciale sols durs).
FR
11
* Les caractéristiques varient selon le modèle
Athyss_main_Multilang.qxp 11/01/2006 12:29 Page 2

FR
RECOURS AU SERVICE TECHNIQUE
Veuillez noter que vous serez facturé(e) si l’examen par nos soins révèle que l’aspirateur est en bon état de marche,
qu’il n’a pas été assemblé conformément aux instructions ou qu’il a été utilisé incorrectement.
Avant d’appeler le Service technique Hoover, effectuez les contrôles de la liste suivante :
1. Est-ce que l’aspirateur est alimenté avec une tension électrique correcte? Branchez un autre appareil à la
même prise pour vérifier.
2. Est-ce que le sac à poussière est plein? Voir la section “Sac & Filtres”.
3. Est-ce que les filtres sont colmatés? Voir la section “Sac & Filtres”.
4. Y a-t-il un blocage dans le tuyau flexible ou le suceur? Eliminer tout blocage éventuel.
En cas de doute, appelez le Centre de service Hoover le plus proche qui pourra peut être vous assister au téléphone.
Pièces détachées*
N’utilisez que des pièces de rechange Hoover d’origine.
DIRECTIVE DEEE
Cet appareil porte des marques conformes à la directive européenne 2002/96/CE relative aux
déchets d’équipements électriques et électroniques (DEEE). En éliminant ce produit de
manière correcte, vous contribuerez à éviter des conséquences néfastes potentielles pour l’en-
vironnement et pour la santé. Le symbole apposé sur l’appareil indique qu’il ne peut pas être
mis à la poubelle avec les ordures ménagères. Il doit être apporté à un centre de recyclage des
déchets électriques et électroniques. L’élimination doit être conforme aux règlements locaux
relatifs à l’élimination des déchets. Pour des informations plus détaillées sur le traitement, la
récupération et le recyclage de ce produit, veuillez contacter votre municipalité, le service de
collecte des ordures ménagères ou le point de vente où le produit a été acheté.
DECLARATION DE GARANTIE
Les conditions de garantie de cet appareil sont définies par notre représentant dans le pays où il est vendu Les
détails concernant ces conditions de garanties peuvent être obtenus en s’adressant au revendeur auquel il a été
acheté. La facture d’achat ou le reçu doit être présenté pour toutes réclamations relevant des conditions de cette
garantie. Ces conditions peuvent être modifiées sans préavis.
® Marque déposée
PIECES DETACHEES CODE
Sac en papier (5 sacs en papier + 1 filtre avant moteur + 1 filtre de sortie moteur) H59 - 35600279
1 filtre avant moteur + 1 filtre de sortie moteur U37 - 35600280
Kit portable (1 bandoulière + 1 tuyau flexible + une brosse à épousseter) C48 - 35600191
Suceur pour sols durs & moquettes G79 - 35600281
Brosse parquet Caresse (spéciale sols durs) G80 - 35600282
Groupe Candy.Hoover SAS
13, rue Auger 93697 Pantin Cedex
Tel: 01.49.15.92.00
Ligne Service Consommateurs (France)
0892 35 00 89
Candy Hoover Belgium NV
Haachtsesteenweg 162B
1820 Melsbroek
Tel : 02-752 94 11
Gias Customer Service (België)
0903/99109 (1.12 € / min.)
12
* Les caractéristiques varient selon le modèle
Athyss_main_Multilang.qxp 11/01/2006 12:29 Page 3

DE
13
BEDIENUNGSANLEITUNG
Dieses Gerät muss gemäß der Gebrauchsanleitung zusammengesetzt und verwendet werden. Es ist nur für die
Trockenreinigung von Teppichen und Glattböden im Haushalt geeignet. Die Zubehörteile können zum Entfernen
von trockenem Schmutz und Staub auf Möbeln und Stoffen verwendet werden.
Inhalt
Wichtige Sicherheitshinweise . . . . . . . . . . . . . . . . . . . . . . . . . . . . . . . . . . . . . . . . . . . . . . . . . . . . . . . . . . . . . . . 13
Empfohlene Verwendung . . . . . . . . . . . . . . . . . . . . . . . . . . . . . . . . . . . . . . . . . . . . . . . . . . . . . . . . . . . . . . . . . . 13
Bezeichnung der Komponenten . . . . . . . . . . . . . . . . . . . . . . . . . . . . . . . . . . . . . . . . . . . . . . . . . . . . . . . . . . . . 14
Erste Schritte . . . . . . . . . . . . . . . . . . . . . . . . . . . . . . . . . . . . . . . . . . . . . . . . . . . . . . . . . . . . . . . . . . . . . . . . . . 14
Verwendung des Geräts . . . . . . . . . . . . . . . . . . . . . . . . . . . . . . . . . . . . . . . . . . . . . . . . . . . . . . . . . . . . . . . . . . 14
Beutel und Filter . . . . . . . . . . . . . . . . . . . . . . . . . . . . . . . . . . . . . . . . . . . . . . . . . . . . . . . . . . . . . . . . . . . . . . . . . 14
Spezielle Merkmale . . . . . . . . . . . . . . . . . . . . . . . . . . . . . . . . . . . . . . . . . . . . . . . . . . . . . . . . . . . . . . . . . . . . . . 15
Kundendienst . . . . . . . . . . . . . . . . . . . . . . . . . . . . . . . . . . . . . . . . . . . . . . . . . . . . . . . . . . . . . . . . . . . . . . . . . . . 15
Ersatzteile . . . . . . . . . . . . . . . . . . . . . . . . . . . . . . . . . . . . . . . . . . . . . . . . . . . . . . . . . . . . . . . . . . . . . . . . . . . . . 16
Ihre Garantie . . . . . . . . . . . . . . . . . . . . . . . . . . . . . . . . . . . . . . . . . . . . . . . . . . . . . . . . . . . . . . . . . . . . . . . . . . . 16
WICHTIGE SICHERHEITSHINWEISE
Dieses Gerät nur für die vorgesehenen Zwecke gemäß der Anleitung verwenden. Vor der Benutzung des Geräts
muss die vorliegende Gebrauchsanleitung gelesen und verstanden worden sein.
ACHTUNG! STROM KANN SEHR GEFÄHRLICH SEIN.
Dieses Gerät ist doppelt isoliert und muss nicht geerdet werden.
WICHTIG
Die einzelnen Drähte des Netzkabels sind wie folgt farbig gekennzeichnet:
BLAU - Neutral
BRAUN - Spannungsführend
STATISCHE ELEKTRIZITÄT
Bestimmte Teppiche neigen zu elektrostatischer Aufladung, die jedoch sehr gering und bei Entladung nicht gesund-
heitsschädlich ist.
EMPFOHLENE VERWENDUNG
Beim Reinigen von neuen Teppichen oder Aufsaugen von Pulver oder feinem Staub sollten Sie den Papierbeutel
häufig wechseln.
Siehe Kapitel “Wechseln des Papierbeutels“.
Verwenden Sie nur von Hoover empfohlene oder gelieferte Ersatz- und Zubehörteile.
SICHERHEITSHINWEISE
• Verwenden Sie den Staubsauger nicht im Freien, auf nassen Flächen oder zum Aufsaugen von Flüssigkeiten.
• Vermeiden Sie es, harte oder scharfe Gegenstände, Streichhölzer, heiße Asche, Zigarettenkippen oder
Ähnliches aufzusaugen.
• Sprühen Sie keine entzündlichen Flüssigkeiten wie Reinigungsmittel, Benzin usw. und saugen Sie diese nicht
auf – es besteht Brand- oder Explosionsgefahr.
• Ziehen Sie beim Entfernen des Steckers aus der Steckdose nicht am Kabel.
• Vermeiden Sie es, während der Benutzung des Geräts auf das Netzkabel zu treten oder es um Arme bzw. Beine
zu wickeln.
• Stellen Sie die Verwendung ein, wenn das Gerät nicht ordnungsgemäß funktioniert. Wenn der Stecker/das
Kabel beschädigt ist, muss die Verwendung des Staubsauger UMGEHEND eingestellt werden. Zur Vermeidung
von Sicherheitsrisiken darf das Netzkabel nur von einem von zugelassenen Hoover-Kundendiensttechniker
ersetzt werden.
Schalten Sie den Staubsauger nach Verwendung aus und ziehen Sie den Stecker aus der Steckdose. Auch vor der
Reinigung oder Wartung des Geräts den Staubsauger stets ausschalten und den Stecker herausziehen.
Athyss_main_Multilang.qxp 11/01/2006 12:29 Page 4

DE
14
HOOVER-KUNDENDIENST
Um auf Dauer den sicheren und effizienten Betrieb dieses Geräts zu gewährleisten, empfehlen wir, Wartungs- und
Reparaturarbeiten ausschließlich von einem zugelassenen Hoover-Kundendiensttechniker durchführen zu lassen.
BEZEICHNUNG DER KOMPONENTEN
ERSTE SCHRITTE
• Gerät aus dem Karton nehmen.
• Befestigung des Klappgriffs unten am Gerät lösen und Griff nach oben klappen.
• Klappe des Beutelfachs öffnen und sicherstellen, dass der Staubsaugerbeutel korrekt eingesetzt ist.
• Sicherstellen, dass Abluft- und Motorschutzfilter korrekt eingesetzt sind.
• Teppich- und Hartbodendüse aufsetzen.
• Netzkabel ganz abwickeln.
• Gerät mit fester Saugstärke: Taste drücken, um Gerät ein- und auszuschalten. Gerät mit variabler Saugstärke:
Drehknopf drehen, um Gerät einzuschalten und Saugstärke zu regulieren.
• Zur Verwendung auf Hartböden das Pedal an der Düse herunterdrücken, um die Bürsten auszufahren.
VERWENDUNG DES GERÄTS
3 - NETZKABEL
a) Vor Inbetriebnahme den integrierten Clip öffnen, den oberen Haken drehen und das Netzkabel abwickeln.
b) Bei Verwendung als Handstaubsauber das Netzkabel hinten am Hauptgriff festklemmen.
Kabel nach Verwendung vom Griff abziehen, um die Kabelhaken wickeln und mit dem integrierten Clip befestigen.
4 - BEDIENELEMENTE*
a) Ein/Aus-Schalter. Zum Einschalten des Geräts drücken. Nochmals drücken, um auszuschalten.
b) Leistungsregler. Zum Einschalten und Einstellen der Saugstärke den Drehknopf drehen. Zum Ausschalten den
Knopf zurückdrehen.
BEUTEL UND FILTER
WICHTIG: Vor dem Wechseln des Staubbeutels oder dem Entfernen eines Filters den Staubsauger ausschalten und
den Stecker aus der Steckdose ziehen.
5 - WECHSELN DES PAPIERBEUTELS
Wenn die Staubbeutel-Füllanzeige rot leuchtet, den Füllstand des Beutels prüfen und diesen ggf. wechseln.
Die Füllanzeige leuchtet manchmal auch rot, wenn der Staubsauger verstopft ist.
Für eine korrekte Anzeige des Staubbeutel-Füllstands muss der Leistungsregler* auf Maximum eingestellt sein.
Beim Reinigen von neuen Teppichen oder Aufsaugen von Pulver oder feinem Staub sollten Sie den Papierbeutel
häufig wechseln.
Den Beutel AUF KEINEN FALL überfüllen.
1 - STANDARDAUSSTATTUNG
1) Klappgriff
2) Griffverriegelung für Klappgriff
3) Mini-Tragegriff
4) Ein/Aus-Taste oder Leistungsregler
5) Beweglicher Kabelhaken
6) Abluftfilter
7) Netzkabel
8) Integrierter Clip
9) Klappe des Beutelfachs
10) Staubbeutel-Füllanzeige
11) Teppich- und Hartbodendüse
2 - ZUBEHÖR (je nach Modell)*
1) Schultergurt
2) Saugschlauch
3) Verlängerungsrohr
4) Polsterdüse
5) Fugendüse
6) Möbelpinsel
7) Zubehöraufsatz
8) Caresse-Parkettdüse
* Je nach Modell
Athyss_main_Multilang.qxp 11/01/2006 12:29 Page 1

Wechseln des Papierbeutels:
a) Staubsauger flach hinlegen, Riegel betätigen und Klappe des Beutelfachs abnehmen.
b) Beutel an der Manschette von der Schlauchöffnung abziehen und entnehmen. Schutzfilm vom selbstklebenden
Beutelverschluss abziehen und Verschluss über Öffnung klappen, so dass kein Staub austreten kann.
c) Vor Einsetzen eines neuen Beutels dessen Ecken hinter die Manschette falten.
d) Manschette in die Führungen einschieben und über das Ansaugrohr ziehen. Manschette sollte hörbar einrasten.
e) Vorsprünge an der Klappe in die entsprechenden Schlitze setzen (siehe Abbildung) und Beutelfach schließen.
Staubsauger NICHT ohne eingesetzten Staubbeutel verwenden.
WICHTIG : Hoover empfiehlt das Ersetzen der Filter nach jeweils fünf vollen Staubbeuteln.
6 - ERSETZEN DES STANDARD-MOTORSCHUTZFILTERS*
Staubbeutel entfernen und Motorschutzfilter aus dem Beutelfach ziehen.
Neuen Filter anbringen und Staubbeutel wieder einsetzen.
Staubsauger NICHT ohne eingesetzten Motorschutzfilter verwenden.
Der Standard-Motorschutzfilter sollte nach jeweils fünf vollen Staubbeuteln ersetzt werden.
7 - ERSETZEN DES HEPA-MOTORSCHUTZFILTERS*
Staubbeutel entfernen und HEPA-Motorschutzfilter aus dem Beutelfach ziehen.
Neuen HEPA-Filter anbringen und Staubbeutel wieder einsetzen.
Staubsauger NICHT ohne eingesetzten HEPA-Motorschutzfilter verwenden.
Der HEPA-Motorschutzfilter sollte nach jeweils fünf vollen Staubbeuteln ersetzt werden.
8 - ERSETZEN DES ABLUFTFILTERS
a) Den Filterdeckel abheben.
b) Filter abziehen, neuen Filter anbringen und Deckel wieder aufsetzen.
Staubsauger NICHT ohne eingesetzten Abluftfilter verwenden.
Der Abluftfilter sollte nach jeweils fünf vollen Staubbeuteln ersetzt werden.
SPEZIELLE MERKMALE
9 - KLAPPGRIFF*
a) Um das Gerät als tragbaren Staubsauger mit Zubehör und Tragekit zu verwenden, die Griffverriegelung drücken
und den Griff nach hinten klappen, bis er unten am Gerät einrastet.
b) Griff für platzsparende Aufbewahrung umklappen.
10 - MINI-TRAGEGRIFF
Wenn der Hauptgriff weggeklappt wird, richtet sich automatisch der Mini-Tragegriff auf, mit dem Sie das Gerät
problemlos als tragbaren Staubsauger verwenden können.
11 - SCHULTERGURT*
a) Düse und Zubehör entfernen. Ein Ende des Schultergurts an der Halteklinke der Ansaugrohrs vorbeischieben
und drehen (siehe Abbildung). Zubehör je nach Bedarf wieder anbringen.
b) Hauptgriff umklappen und am Gerät einrasten. Anderes Ende des Schultergurts am Zapfen hinter dem Mini-
Tragegriff befestigen.
c) Staubsauger wie gezeigt über der Schulter tragen.
12 - DÜSEN*
a) Teppich- und Hartbodendüse: Pedal drücken, um Bürsten für Hartböden auszufahren.
b) Caresse-Parkettdüse: für Holzböden und andere empfindliche Böden.
ANFORDERN DES KUNDENDIENSTES
Eine Gebühr wird erhoben, wenn sich das Gerät nach einer Reklamation als funktionstüchtig herausstellt, nicht
gemäß dieser Anleitung zusammengesetzt wurde oder falsch benutzt wurde.
Bevor Sie Ihren Hoover-Kundendienst anrufen, prüfen Sie zunächst bitte Folgendes:
1. Ist die Stromversorgung in Ordnung? Prüfen Sie dies mit einem anderem elektrischen Gerät.
2. Ist der Papierbeutel voll? Siehe Kapitel “Beutel und Filter”.
3. Sind die Filter verstopft? Siehe Kapitel “Beutel und Filter”.
4. Sind Saugschlauch oder Ansaugöffnung verstopft? Entfernen Sie etwaige Verstopfungen.
Wenden Sie sich im Zweifelsfalle an Ihren Hoover-Kundendienst, der Sie eventuell telefonisch beraten kann.
DE
15
* Je nach Modell
Athyss_main_Multilang.qxp 11/01/2006 12:29 Page 2

DE
Ersatzteile*
Benutzen Sie nur Originalersatzteile von Hoover.
WEEE-RICHTLINIE
Dieses Gerät ist entsprechend der europäischen Richtlinie 2002/96/EG des europäischen
Parlaments und Rates über Elektro- und Elektronik-Altgeräte (WEEE-Richtlinie) gekennzeichnet.
Durch die sichere und umweltgerechte Entsorgung dieses Produkts tragen Sie dazu bei,
mögliche negative Auswirkungen auf die Umwelt und die Gesundheit des Menschen zu
verhindern. Das am Produkt angebrachte Symbol gibt an, dass dieses Produkt nicht als
Hausmüll behandelt werden darf, sondern bei einem entsprechenden Recyclingzentrum für
elektrische und elektronische Geräte zu entsorgen ist. Die Entsorgung ist in Übereinstimmung
mit allen geltenden Vorschriften für die umweltgerechte Abfallentsorgung vorzunehmen. Für
ausführlichere Informationen über die Müllbehandlung und das Recycling dieses Produkts
wenden Sie sich bitte an Ihre zuständige Umweltbehörde, die Müllentsorgung oder an die
Verkaufsstelle, von der Sie das Produkt erworben haben.
GARANTIEERKLÄRUNG
Die Garantiebestimmungen für dieses Gerät entsprechen den Bestimmungen unserer Handelsniederlassung des
Landes, in dem Sie das Gerät erworben haben. Weitere Einzelheiten dazu erhalten Sie von dem Händler, bei dem
Sie das Gerät erworben haben. Der Kaufbeleg ist im Falle von Garantieansprüchen vorzulegen und sollte deshalb
sorgfältig aufbewahrt werden. Änderungen vorbehalten.
® Eingetragene Marke
ERSATZTEIL CODE
Papierbeutel (5 Papierbeutel + 1 Motorschutzfilter + 1 Abluftfilter) H59 - 35600279
1 Motorschutzfilter + 1 Abluftfilter U37 - 35600280
Tragekit (1 Schultergurt + 1 Schlauch + 1 Möbelpinsel) C48 - 35600191
Teppich- und Hartbodendüse G79 - 35600281
Caresse-Parkettdüse G80 - 35600282
Deutschland
Candy Hoover GmbH
Kaiserswerther Str. 83
D-40878 Ratingen
www.candy-hoover.de
Kundendienst Deutschland
(GIAS Customer Service)
01805 / 62 55 62
(0,12 € / Min.)
Österreich
Candy Hoover Austria
GmbH
Dominikanerbastei 4
A-1011 Wien
www.candy-hoover.at
Kundendienst Österreich
(GIAS Customer Service)
0820 / 220 224 (0,15 € / Min.)
Schweiz
Candy Hoover AG
Bösch 21
CH-6331 Huenenberg
www.candy-hoover.ch
Kundendienst Schweiz
(GIAS Customer Service)
0848 / 780 780 (0,12 CHF /
Min.)
16
* Je nach Modell
Athyss_main_Multilang.qxp 11/01/2006 12:29 Page 3

HR
17
UPUTE ZA KORISNIKE
Ovaj proizvod treba sklopiti i koristiti u skladu s ovim uputama, a rabiti samo za čišćenje u domaćinstvu za
uklanjanje suhe prljavštine i prašine iz tepiha i raznih podnih obloga. Dodatke možete koristiti za uklanjanje
prljavštine i prašine s namještaja i tkanina.
Sadržaj
Važne upute o sigurnosti . . . . . . . . . . . . . . . . . . . . . . . . . . . . . . . . . . . . . . . . . . . . . . . . . . . . . . . . . . . . . . . . . 17
Preporučena uporaba . . . . . . . . . . . . . . . . . . . . . . . . . . . . . . . . . . . . . . . . . . . . . . . . . . . . . . . . . . . . . . . . . . . . 17
Dijelovi proizvoda . . . . . . . . . . . . . . . . . . . . . . . . . . . . . . . . . . . . . . . . . . . . . . . . . . . . . . . . . . . . . . . . . . . . . . 18
Početak rada . . . . . . . . . . . . . . . . . . . . . . . . . . . . . . . . . . . . . . . . . . . . . . . . . . . . . . . . . . . . . . . . . . . . . . . . . . 18
Uporaba proizvoda . . . . . . . . . . . . . . . . . . . . . . . . . . . . . . . . . . . . . . . . . . . . . . . . . . . . . . . . . . . . . . . . . . . . . . 18
Vrećica i filteri . . . . . . . . . . . . . . . . . . . . . . . . . . . . . . . . . . . . . . . . . . . . . . . . . . . . . . . . . . . . . . . . . . . . . . . . . . 18
Osobitosti . . . . . . . . . . . . . . . . . . . . . . . . . . . . . . . . . . . . . . . . . . . . . . . . . . . . . . . . . . . . . . . . . . . . . . . . . . . . . 19
Zvanje servisa . . . . . . . . . . . . . . . . . . . . . . . . . . . . . . . . . . . . . . . . . . . . . . . . . . . . . . . . . . . . . . . . . . . . . . . . . . 19
Rezervni dijelovi . . . . . . . . . . . . . . . . . . . . . . . . . . . . . . . . . . . . . . . . . . . . . . . . . . . . . . . . . . . . . . . . . . . . . . . . 20
Vaše jamstvo . . . . . . . . . . . . . . . . . . . . . . . . . . . . . . . . . . . . . . . . . . . . . . . . . . . . . . . . . . . . . . . . . . . . . . . . . . . 20
VAŽNE UPUTE O SIGURNOSTI
Usisavač treba koristiti samo za svrhe za koje je namijenjen kako je opisano ovim uputama. Molimo vas
pažljivo i s razumijevanjem pročitajte upute prije uporabe uređaja.
UPOZORENJE! ELEKTRIČNA STRUJA MOŽE BITI IZUZETNO OPASNA.
Proizvod je dvostruko izoliran i ne treba biti uzemljen.
VAŽNO
Žice u kabelu za napajanje označene su bojama na sljedeći način:
PLAVA - nula
SMEĐA - faza
STATIČKI ELEKTRICITET
Neki tepisi mogu uzrokovati manje stvaranje statičkog elektriciteta. Statičko pražnjenje elektriciteta nije
opasno za zdravlje.
PREPORUČENA UPORABA
Često mijenjajte papirnatu vrećicu ukoliko čistite nečistoću u obliku praha ili fine prašine ili kad čistite nove
tepihe.
Pogledajte poglavlje “Zamjena papirnate vrećice”.
Koristite priključke koje je Hoover preporučio ili isporučio.
NEMOJTE
• Koristiti usisavač izvan domaćinstva, na vlažnim površinama ili za usisavanje tekućina ili mokre prljavštine.
• Usisavati teške ili oštre predmete, šibice, vrući pepeo, još tinjajuće opuške ili slično.
• Prskati usisavač ili usisavati zapaljive tekućine poput onih za čišćenje, benzina i sličnih, ili njihove pare jer
mogu uzrokovati požar ili eksploziju.
• Izvlačiti utikač iz utičnice povlačeći za kabel.
• Stajati na kabel za napajanje uređaja ili ga omotavati oko ruku ili nogu prilikom uporabe usisavača.
• Nastaviti koristiti uređaj ukoliko je u kvaru. Ako je kabel za napajanje/utikač oštećen, ODMAH prestanite
koristiti usisavač. Kabel za napajanje treba zamijeniti ovlašteni HOOVER serviser kako bi se izbjegla
opasnost za život i zdravlje.
Nakon uporabe usisavača, isključite ga i izvucite utikač iz električne utičnice. Uvijek isključite uređaj i izvucite
utikač iz utičnice za napajanje prije čišćenja uređaja ili bilo kakvog pokušaja popravka.
HOOVER SERVIS
Kako bi osigurali siguran i učinkoviti rad ovog uređaja, preporučujemo vam da popravke ili prepravke uređaja
vrši isključivo HOOVER ovlašteni serviser.
Athyss_main_Multilang.qxp 11/01/2006 12:29 Page 4

HR
18
DIJELOVI PROIZVODA
POČETAK RADA
• Izvadite proizvod iz kutije.
• Otključajte pregibnu ručku na dnu tijela uređaja i savinite je prema gore na njezino mjesto.
• Otvorite poklopac spremnika za vrećicu i provjerite da li je papirnata vrećica ispravno smještena.
• Uvjerite se da su izlazni filter i filter ispred motora ispravno postavljeni.
• Priključite nastavak za tepihe i čvrste podove.
• Potpuno odmotajte kabel za napajanje.
• Na modelu uređaja stalne snage pritisnite tipku za uključivanje/isključivanje uređaja. Na modelu
promjenjive snage, okrećite dugme za uključivanje i podešavanje snage.
• Za uporabu na tvrdim podovima, pritisnite pedalu na nastavku kako bi četkice došle u kontakt s podnom
oblogom.
UPORABA PROIZVODA
3 - POHRANA KABELA ZA NAPAJANJE
a) Prije uporabe otkopčajte ugrađenu kopču, okrenite kukicu na vrhu i oslobodite kabel za napajanje.
b) Tijekom uporabe poput štapnog usisavača, pričvrstite kabel za napajanje na pozadinu glavne ručke.
Nakon uporabe, oslobodite kabel za napajanje s ručke, namotajte ga oko kukica za pohranu i učvrstite ga za
to predviđenom kopčom.
4 - UPRAVLJANJE*
a) Tipka za uključivanje/isključivanje. Pritisnite za uključivanje. Pritisnite ponovno za isključivanje.
b) Upravljanje promjenjivom snagom. Uključite i podesite željenu snagu okretanjem dugmeta. Ponovno
okrenite za isključivanje.
VREĆICE I FILTERI
VAŽNO: Isključite usisavač i izvucite utikač iz električne utičnice prije zamjene papirnate vrećice ili skidanja
bilo kojeg od filtera.
5 - ZAMJENA PAPIRNATE VREĆICE
Kad indikator napunjenosti vrećice pokazuje crveno, provjerite da li je vrećica puna i da li je potrebna zamjena.
Indikator napunjenosti vrećice može biti crven ukoliko je nastala blokada nekog drugog dijela proizvoda.
Za ispravni prikaz napunjenosti vrećice, dugme za upravljanje snagom* mora biti postavljeno na najveću snagu.
Često mijenjajte papirnatu vrećicu ukoliko čistite nečistoću u obliku praha ili fine prašine ili kad čistite nove
tepihe.
NEMOJTE previše napuniti papirnatu vrećicu.
Za zamjenu papirnate vrećice.
a) Postavite usisavač na ravnu površinu, povucite zadnju ručicu i skinite poklopac spremnika papirnate vrećice.
b) Izvadite vrećicu povlačenjem okvira vrećice s ulaza cijevi. Skinite čvrstu pozadinu poklopca za prašinu i
preklopite ga preko ulaza kako prašina ne bi izlazila iz vrećice.
1 - STANDARDNA OPREMA
1) Pregibna ručka
2) Tipka za otpuštanje pregibne ručke
3) Malena ručka na podizanje
4) Tipka za uključivanje/isključivanje ili dugme za
upravljanje snagom
5) Brzo otpuštanje kukice za pohranu kabela
6) Izlazni filter
7) Kabel za napajanje
8) Ugrađena kopča
9) Poklopac papirnate vrećice
10) Indikator napunjenosti vrećice
11) Nastavak za tepihe i čvrste podove
2 - DODACI (ovisno o modelu)*
1) Naramenica
2) Gibljivo crijevo
3) Produžna cijev
4) Nastavak za namještaj
5) Alat za pukotine i uske prostore
6) Četka za uklanjanje prašine
7) Držač dodataka
8) Nastavak za održavanje parketa
* Promjenjiva osobina ovisno o modelu
Athyss_main_Multilang.qxp 11/01/2006 12:29 Page 1

c) Prije postavljanja nove vrećice, savinite kutove vrećice iza okvira.
d) Kližite okvir duž vodilica i podignite preko ulaza cijevi. Okvir treba “kliknuti” kad se dobro postavi na mjesto.
e) Uočite zupce na poklopcu vrećice kako je prikazano i zatvorite ga.
NE koristite usisavač bez ispravno postavljene papirnate vrećice.
VAŽNO: Hoover preporučuje zamjenu filtera nakon svake pete zamjene punih papirnatih vrećica.
6 - ZAMJENA STANDARDNOG FILTERA ISPRED MOTORA*
Dok je papirnata vrećica skinuta, podignite filter ispred motora iz kućišta vrećice.
Postavite novi filter i zamijenite papirnatu vrećicu.
NE koristite usisavač bez ispravno postavljenog filtera ispred motora.
Zamijenite standardni filter ispred motora nakon svake pete zamjene punih papirnatih vrećica.
7 - ZAMJENA STANDARDNOG HEPA FILTERA ISPRED MOTORA*
Dok je papirna vrećica skinuta, izvadite HEPA filter ispred motora iz kućišta vrećice.
Postavite novi HEPA filter ispred motora i zamijenite papirnatu vrećicu.
NE koristite usisavač bez ispravno postavljenog HEPA filtera ispred motora.
Zamijenite HEPA filter ispred motora nakon svake pete zamjene punih papirnatih vrećica.
8 - ZAMJENA IZLAZNOG FILTERA
a) Podignite poklopac filtera.
b) Uklonite filter, postavite novi i ponovno stavite poklopac.
NE koristite usisavač bez ispravno postavljenog izlaznog filtera.
Zamijenite izlazni filter nakon svake pete zamjene punih papirnatih vrećica.
OSOBITOSTI
9 - PREGIBNA RUČKA*
a) Za uporabu proizvoda kao prenosivog usisavača s dodacima i priborom, pritisnite tipku za otpuštanje
ručke i savinite je prema nazad dok se ne smjesti na za to predviđeno mjesto na dnu glavnog dijela.
b) Savinite ručku za jednostavniju pohranu.
10 - MALENA RUČKA NA PODIZANJE
Kad je glavna ručka presavijena unazad, malena ručka se automatski podiže za jednostavnije prenošenje
uređaja ili njegovu uporabu kao prijenosnog usisavača.
11 - NARAMENICA*
a) Dok je nastavak i dodaci uređaja skinuti, kližite jedan kraj naramenice dok ne prijeđe zubac za
zaključavanje na ulaznoj cijevi i zakrenite kako je prikazano slikom. Ponovno postavite dodatke ovisno o
namjeravanoj uporabi.
b) Dok je glavna ručka savinuta i zaključana na dnu uređaja, učvrstite drugi kraj naramenice preko kuke iza
malene ručke.
c) Usisavač nosite preko ramena kako je prikazano slikom.
12 - NASTAVCI*
a) Nastavak za tepihe i čvrste podove: pritisnite pedalu kako bi četkice došle u kontakt sa čvrstom podnom
oblogom.
b) Nastavak za održavanje parketa: za drvene i osjetljive podne obloge.
ZVANJE SERVISA
Ukoliko se pri pregledu usisavača ustanovi da je ustvari u radnom stanju, a nije sastavljen u skladu s ovim
uputama ili je rabljen na neispravan način, popravak će se naplatiti korisniku.
Prije poziva Hoover servisu, provjerite prema sljedećem spisku provjere:
1. Da li je usisavač uključen u ispravnu utičnicu? Provjerite pomoću drugog uređaja.
2. Da li je papirnata vrećica puna? Pogledajte poglavlje “Vrećice i fiteri”.
3. Da li su filteri začepljeni? Pogledajte poglavlje “Vrećice i fiteri”.
4. Da li su cijev ili usis začepljeni? Uklonite smetnju.
U slučaju nedoumice, nazovite ured Hoover servisa koji će vam dati savjet, a možda će biti moguće problem
riješiti i telefonom.
HR
19
* Promjenjiva osobina ovisno o modelu
Athyss_main_Multilang.qxp 11/01/2006 12:29 Page 2
La pagina sta caricando ...
La pagina sta caricando ...
La pagina sta caricando ...
La pagina sta caricando ...
La pagina sta caricando ...
La pagina sta caricando ...
La pagina sta caricando ...
La pagina sta caricando ...
La pagina sta caricando ...
La pagina sta caricando ...
La pagina sta caricando ...
La pagina sta caricando ...
La pagina sta caricando ...
-
 1
1
-
 2
2
-
 3
3
-
 4
4
-
 5
5
-
 6
6
-
 7
7
-
 8
8
-
 9
9
-
 10
10
-
 11
11
-
 12
12
-
 13
13
-
 14
14
-
 15
15
-
 16
16
-
 17
17
-
 18
18
-
 19
19
-
 20
20
-
 21
21
-
 22
22
-
 23
23
-
 24
24
-
 25
25
-
 26
26
-
 27
27
-
 28
28
-
 29
29
-
 30
30
-
 31
31
-
 32
32
-
 33
33


Hoover ST 200 F Manuale del proprietario
- Categoria
- Aspirapolvere
- Tipo
- Manuale del proprietario
in altre lingue
- français: Hoover ST 200 F Le manuel du propriétaire
- español: Hoover ST 200 F El manual del propietario
- Deutsch: Hoover ST 200 F Bedienungsanleitung
- Nederlands: Hoover ST 200 F de handleiding
- slovenčina: Hoover ST 200 F Návod na obsluhu
Documenti correlati
-
Hoover STG 750 Manuale del proprietario
-
Hoover AS70 AS15011 Manuale utente
-
Hoover AS71 AS21011 Manuale utente
-
-
-
-
-
-
-