

ENG-1
Safety information
Please read the safety instructions carefully before using the product for the first
time and keep the instructions for future reference.
1. Warning: This product includes lithium polymer batteries.
2. WARNING: CHOKING HAZARD – Children under 3 yrs. can choke or suffocate on camera
because of its small size. Adult supervision required. Keep camera away from toddlers and pets
to avoid chewing and swallowing. Discard broken buttons or parts at once.
3. Product operating and storage temperature is from 0 degree Celsius to 40 degree Celsius.
Under and over this temperature might affect the function.
4. Never open the product. Touching the inside electrics can cause electric shock. Repairs or
service should only be performed by qualified personnel.
5. Do not expose to heat, water, moisture, direct sunlight!
6. The unit is not waterproof. If water or foreign objects enter the unit, it may result in fire or
electric shock. If water or a foreign object enters the unit, stop use immediately.
7. Only charge with supplied USB cable.
8. Do not use non original accessories together with the product as this can make the product
functionality abnormal.

ENG-2
TABLE OF CONTENTS
1. INTRODUCTION .................................................................. 3
1.1. PRODUCT OVERVIEW.................................................. 3
1.2. POWERING THE DEVICE ON/OFF.................................3
1.3. SD CARD.......................................................................3
1.4. HOME PAGE ICONS ...................................................... 4
1.5. BATTERY CHARGING.................................................... 4
2. CAMERA............................................................................. 5
2.1. Photo........................................................................... 5
2.2. Photo frames............................................................... 5
3. ZOOM................................................................................. 5
4. VIDEO................................................................................. 5
5. PLAYBACK........................................................................... 5
6. GAMES................................................................................6
7. MUSIC.................................................................................6
8. SETTINGS............................................................................ 6
9. RESETTING THE DEVICE ...................................................... 6
10. SPECIFICATIONS................................................................7

ENG-3
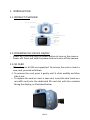
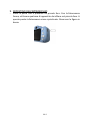
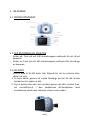
1. INTRODUCTION
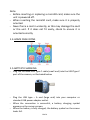
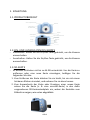
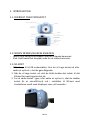
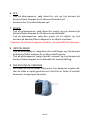
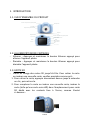
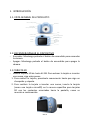
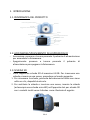
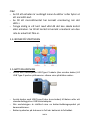
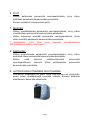
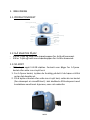
1.1.PRODUCT OVERVIEW
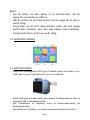
take it out
1. To remove the card, press it gently until it clicks audibly and the
new card, proceed as follows
1.2.POWERING THE DEVICE ON/OFF
-Power on: Press and hold the power button to turn on the camera.
-Power off: Press and hold the power button to turn off the camera.
1.3.SD CARD
-SD cards up to 64 GB are supported. To remove the card or insert a
:
n
.
2. To replace the card or insert a new card, insert the card (such as a
microSD card) into the dedicated SD card slot with the contacts
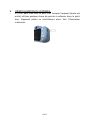
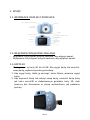
facing the display, as illustrated below:
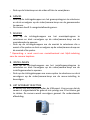
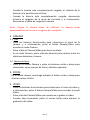
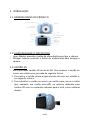
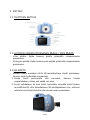
Video button/camera button
USB Port
SD card slot
Selfie lens
Display
Microphone
Lens
Video button/Camera button
Power Button
Up
Mode button
Menu button
Down

ENG-4
Note:
-Before inserting or replacing a microSD card, make sure the
unit is powered off.
-When inserting the microSD card, make sure it is properly
oriented.
-Never force a card in violently, as this may damage the card
or the unit. If it does not fit easily, check to ensure it is
oriented correctly.
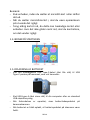
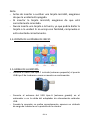
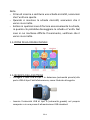
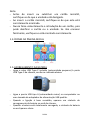
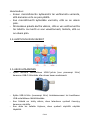
1.4.HOME PAGE ICONS
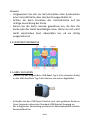
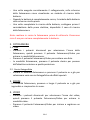
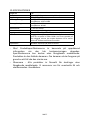
1.5.BATTERY CHARGING
-Plug the included USB Type-C cable (small end) into the USB Type-C
port of the camera, as illustrated below:
-Plug the USB type – A end (large end) into your computer or
standard USB power adapter outlet.
-When the connection is successful, a battery charging symbol
appears on the camera screen.
-When the battery is fully charged, the battery symbol on the screen
looks full.

ENG-5
-When the battery is fully charged, disconnect the charger from the
power outlet first, then disconnect the charging cable from the
camera.
Note: Please charge your camera before you use it. It takes
approximately 2 hours to fully charge the battery.
2. CAMERA
2.1. Photo
-Press the direction buttons to select the camera icon, then press
the Camera/Video button to enter Camera mode.
-Press the Camera/Video button to take a photo.
-In Camera mode, press the right button to switch between front
and rear lenses.
2.2. Photo frames
-Enter Camera mode and press the up and down buttons to select
various photo frames and special effects.
3. ZOOM
- In camera mode, long press the up or down button to zoom the
photo in or out.
4. VIDEO
-Press the direction buttons to select the video icon, then press the
Camera/Video button to enter Video mode.
-Press the Camera/Video button to begin recording the video.
-When you are done, press the same button to stop recording the
video.
5. PLAYBACK
-Press the direction buttons to select the playback icon, then press
the Camera/Video button to enter Playback mode.
-Press the up or down button to select the video or photo.
-Press the Camera/Video button to playback the video.
-Press the left button to delete the video or photo.

ENG-6
6. GAMES
-Press the direction buttons to select the games icon, then press the
Camera/Video button to enter Games mode.
-The camera has 5 pre-installed games.
7. MUSIC
-Press the direction buttons to select the music icon, then press the
Camera/Video button to enter Music mode.
-Press the direction buttons to select the music you want to play,
then press the Camera/Video button to play the music.
* Note: You should copy a music file in the MP3 format to the camera
first.
8. SETTINGS
-Press the direction buttons to select the settings icon, then press
the Camera/Video button to enter Settings mode.
-Press the direction buttons to select any menu options, then press
the Camera/Video button to confirm the menu setting.
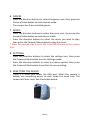
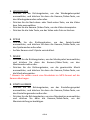
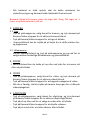
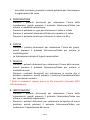
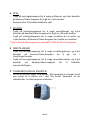
9. RESETTING THE DEVICE
-There is a small hole under the USB port. When the camera is
halted, use something pointy to stick inside the small hole. The
camera will then reset. See illustration below:

ENG-7
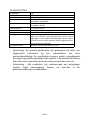
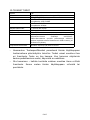
10.SPECIFICATIONS
Speaker
Battery
Resolution
Video Resolution
Photo Resolution
Screen Size
Material
Storage Media
Memory
System Requirements
1W
600 mAh (full capacity with protective board)
1080p/720p/VGA
Real: 640*480(VGA)
Interpolation: 1920*1080
Real: 640*480
Interpolation: 40 MP
2-inch IPS screen
ABS with rubber coating
Max. 64 GB supported
Built-in memory (for up to 50 photos). A memory card is
required to record video. Pictures stored in the built-in
memory can only be copied to another device via USB if
an SD card has been inserted.
Windows XP/Vista/7/8, Mac OS X 10.8
-Note: The product specifications are based on updated information
when compiling this product manual. The specifications are subject
to change without further notice. The product is the actual camera.
When the camera crashes from a drop, please restart it.
-Please notice - All products are subject to change without any
notice. We take reservations for errors and omissions in the
manual.

ENG-8
ALL RIGHTS RESERVED, COPYRIGHT DENVER A/S
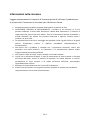
Electric and electronic equipment and included batteries contains materials,
components and substances that can be hazardous to your health and the
environment, if the waste material (discarded electric and electronic
equipment and batteries) is not handled correctly. Electric and electronic
equipment and batteries is marked with the crossed out trash can symbol,
seen above. This symbol signifies that electric and electronic equipment
and batteries should not be disposed of with other household waste, but
should be disposed of separately. As the end user it is important that you
submit your used batteries to the appropriate and designated facility. In this
manner you make sure that the batteries are recycled in accordance with
legislature and will not harm the environment. All cities have established
collection points, where electric and electronic equipment and batteries
can either be submitted free of charge at recycling stations and other
collection sites, or be collected from the households. Additional
information is available at the technical department of your city.
DENVER A/S
Omega 5A, Soeften
DK-8382 Hinnerup
Denmark
www.facebook.com/denver.eu
Warning: lithium battery inside

ENG-9
Contact
Nordics
Headquarter Denver
A/S
Omega 5A, Soeften
DK-8382 Hinnerup
Denmark
Phone: +45 86 22 61 00
(Push “1” for support)
E-Mail
For technical questions, please send to:
support.hq@denver.eu
For all other questions please write to:
contact.hq@denver.eu
Benelux
DENVER BENELUX B.V.
Barwoutswaarder 13C+D
3449 HE Woerden
The Netherlands
Phone: 0900-3437623
E-Mail: support.nl@denver.eu
Spain/PortugaI
DENVER SPAIN S.A
Ronda Augustes y Louis Lumiere, nº 23 – nave 16
Parque Tecnológico
46980 PATERNA
Valencia (Spain)
Spain
Phone: +34 960 046 883
Mail: support.es@denver.eu
Portugal:
Phone: +35 1255 240 294
E-Mail: denver.service@satfiel.com
Germany
Denver Germany GmbH Service
Max-Emanuel-Str. 4
94036 Passau
Phone: +49 851 379 369 40
E-Mail
support.de@denver.eu
Fairfixx GmbH
Repair and service
Rudolf-Diesel-Str. 3 TOR 2
53859 Niederkassel
(for TV, E-Mobility/Hoverboards/Balanceboards,
Smartphones & Tablets)
Tel.: +49 851 379 369 69
E-Mail: denver@fairfixx.de
Austria
Lurf Premium Service GmbH
Deutschstrasse 1
1230 Wien
Phone: +43 1 904 3085
E-Mail: denver@lurfservice.at
If your country is not listed above, please
write an email to support@denver.eu
DENVER A/S
Omega 5A, Soeften
DK-8382 Hinnerup
Denmark
denver.eu
facebook.com/denver eu


GER-1
Sicherheitshinweise
Bitte lesen Sie die Sicherheitshinweise vor der ersten Verwendung des Produkts
aufmerksam durch und bewahren Sie die Anleitung zum späteren Nachschlagen
auf.
1. Warnung: Dieses Produkt enthält Lithium-Polymer-Akkus.
2. WARNUNG: ERSTICKUNGSGEFAHR – Kinder unter 3 Jahren könnten die Kamera aufgrund ihrer
geringen Größe verschlucken und daran ersticken. Aufsicht durch einen Erwachsenen
erforderlich. Halten Sie die Kamera von Kleinkindern und Haustieren fern, damit diese nicht
darauf herumkauen und/oder sie verschlucken. Entsorgen Sie defekte Tasten und
Komponenten sofort.
3. Die Betriebs- und Lagertemperatur des Produkts liegt zwischen 0 und +40 °C. Eine Unter- oder
Überschreitung dieser Temperatur kann die Funktion beeinträchtigen.
4. Öffnen Sie das Produkt nicht. Das Berühren der Elektronik kann zu einem Stromschlag führen.
Reparatur- und Wartungsarbeiten dürfen nur von qualifiziertem Personal durchgeführt
werden.
5. Vor Hitze, Wasser, Feuchtigkeit und direkter Sonneneinstrahlung schützen!
6. Das Gerät ist nicht wasserdicht. Wenn Wasser oder Fremdkörper in das Gerät eindringen, kann
es zu Feuer oder Stromschlag kommen. Wenn Wasser oder Fremdkörper in das Gerät
eindringen, beenden Sie sofort den Gebrauch.
7. Laden Sie nur mit dem mitgelieferten USB-Kabel.
8. Verwenden Sie nur Original-Zubehörteile zusammen mit dem Produkt; Nichtbeachtung kann
die Funktionalität des Produkts beeinträchtigen.

GER-2
INHALTSVERZEICHNIS
1. EINLEITUNG ........................................................................ 3
1.1. PRODUKTÜBERSICHT ...................................................3
1.2. EIN- UND AUSSCHALTEN DES GERÄTS......................... 3
1.3. SD-KARTE.....................................................................3
1.4. STARTSEITENSYMBOLE................................................ 4
1.5. AKKU AUFLADEN......................................................... 4
2. KAMERA..............................................................................5
2.1. Foto............................................................................. 5
2.2. Fotorahmen ................................................................. 5
3. ZOOM................................................................................. 5
4. VIDEO................................................................................. 5
5. WIEDERGABE......................................................................6
6. SPIELE ................................................................................. 6
7. MUSIK.................................................................................6
8. EINSTELLUNGEN ................................................................. 6
9. RÜCKSETZEN DES GERÄTS...................................................7
10. TECHNISCHE DATEN......................................................... 8

GER-3
1. EINLEITUNG
1.1.PRODUKTÜBERSICHT
1.2.EIN- UND AUSSCHALTEN DES GERÄTS
-Einschalten: Halten Sie die Ein/Aus-Taste gedrückt, um die Kamera
einzuschalten.
-Ausschalten: Halten Sie die Ein/Aus-Taste gedrückt, um die Kamera
entfernen oder eine neue Karte einzulegen, befolgen Sie die
folgenden Schritte
auszuschalten.
1.3.SD-KARTE
-Es werden SD-Karten mit bis zu 64 GB unterstützt. Um die Karte zu
:
1. Zum Entfernen der Karte drücken Sie sie leicht, bis sie mit einem
hörbaren Klicken einrastet, und nehmen Sie sie dann heraus.
2. Zum Auswechseln der Karte oder Einsetzen einer neuen Karte
setzen Sie die Karte (z. B. eine microSD-Karte) in den dafür
vorgesehenen SD-Kartensteckplatz ein, wobei die Kontakte zum
Bildschirm zeigen, wie unten abgebildet:
Video-Taste/Kamera-Taste
USB-Anschluss
SD-Kartenschacht
Selfie-Objektiv
Anzeige
Mikrofon
Objektiv
Video-Taste/Kamera-Taste
Ein/Aus-Taste
Nach oben
Modus
Menü
Abwärts

GER-4
Hinweis:
-Vergewissern Sie sich vor dem Einsetzen oder Austauschen
einer microSD-Karte, dass das Gerät ausgeschaltet ist.
-Achten Sie beim Einsetzen der microSD-Karte auf die
richtige Ausrichtung der Karte.
-Setzen Sie die Karte niemals gewaltsam ein, da dies die
Karte oder das Gerät beschädigen kann. Wenn sie sich nicht
leicht einschieben lässt, überprüfen Sie, ob sie richtig
ausgerichtet ist.
1.4.STARTSEITENSYMBOLE
1.5.AKKU AUFLADEN
-Stecken Sie das mitgelieferte USB-Kabel Typ-C (mit schmalem Ende)
in den USB-Anschluss Typ-C der Kamera, wie unten abgebildet:
-Schließen Sie den USB-Type-A-Stecker (mit dem größeren Ende) an
Ihren Computer oder einen Standard-USB-Netzteil-Ausgang an.
-Bei erfolgreicher Verbindung erscheint ein Akkuladesymbol auf dem
Kamerabildschirm.

GER-5
-Wenn der Akku vollständig geladen ist, zeigt das Akkusymbol auf
dem Bildschirm eine volle Ladung an.
-Ziehen Sie nach dem vollständigen Aufladen des Akkus zuerst das
Ladegerät aus der Steckdose und dann das Ladekabel von der
Kamera ab.
Hinweis: Bitte laden Sie Ihre Kamera vor dem Gebrauch auf. Es dauert
etwa 2 Stunden, um den Akku vollständig aufzuladen.
2. KAMERA
2.1. Foto
-Durch Drücken der Richtungstasten wählen Sie das Kamerasymbol
und drücken dann die Kamera-/Video-Taste, um den Kameramodus
aufzurufen.
-Drücken Sie die Kamera-/Video-Taste, um ein Foto aufzunehmen.
-Drücken Sie im Kameramodus die rechte Taste, um zwischen
vorderem und hinterem Objektiv zu wechseln.
2.2. Fotorahmen
-Rufen Sie den Kameramodus auf und drücken Sie die Nach-oben-
und Nach-unten-Tasten, um verschiedene Fotorahmen und
Spezialeffekte auszuwählen.
3. ZOOM
- Drücken Sie im Kameramodus lange auf die Nach-oben- oder
Nach-unten-Taste, um das Foto zu vergrößern oder zu verkleinern.
4. VIDEO
-Drücken Sie die Richtungstasten, um das Videosymbol auszuwählen,
und drücken Sie dann die Kamera-/Video-Taste, um den
Videomodus aufzurufen.
-Drücken Sie die Kamera-/Video-Taste, um mit der Aufnahme des
Videos zu beginnen.
-Wenn Sie fertig sind, drücken Sie die gleiche Taste, um die
Videoaufnahme zu beenden.

GER-6
5. WIEDERGABE
-Drücken Sie die Richtungstasten, um das Wiedergabesymbol
auszuwählen, und drücken Sie dann die Kamera-/Video-Taste, um
den Wiedergabemodus aufzurufen.
-Drücken Sie die Nach-oben- oder Nach-unten-Taste, um das Video
bzw. Foto auszuwählen.
-Drücken Sie die Kamera-/Video-Taste, um das Video abzuspielen.
-Drücken Sie die linke Taste, um das Video oder Foto zu löschen.
6. SPIELE
-Drücken Sie die Richtungstasten, um das Spiele-Symbol
auszuwählen, und drücken Sie dann die Kamera-/Video-Taste, um
den Spielemodus aufzurufen.
-Auf der Kamera sind 5 Spiele vorinstalliert.
7. MUSIK
-Drücken Sie die Richtungstasten, um das Musiksymbol auszuwählen,
und drücken Sie dann die Kamera-/Video-Taste, um den
Musikmodus aufzurufen.
-Drücken Sie die Richtungstasten, um die gewünschte Musik
auszuwählen, und drücken Sie dann die Kamera-/Video-Taste, um
die Musik abzuspielen.
* Hinweis: Sie sollten zuerst eine Musikdatei im MP3-Format auf die
Kamera übertragen.
8. EINSTELLUNGEN
-Drücken Sie die Richtungstasten, um das Einstellungssymbol
auszuwählen, und drücken Sie dann die Kamera-/Video-Taste, um
den Einstellungsmodus aufzurufen.
-Drücken Sie die Richtungstasten, um eine Menüoption auszuwählen,
und drücken Sie dann die Kamera-/Video-Taste, um die
Menüeinstellung zu bestätigen.

GER-7
9. RÜCKSETZEN DES GERÄTS
-Unter dem USB-Anschluss befindet sich eine kleine Öffnung.
Bleibt die Kamera hängen, dann stecken Sie einen spitzen
Gegenstand in die kleine Öffnung. Die Kamera wird daraufhin
zurückgesetzt. Siehe Abbildung unten:

GER-8
10.TECHNISCHE DATEN
Lautsprecher
Akku
Auflösung
Videoauflösung
Fotoauflösung
Displaygröße
Material
Speichermedien
Speicher
Systemanforderungen
1 W
600 mAh (volle Kapazität mit Schutzplatte)
1080p/720p/VGA
Echt: 640 x 480 (VGA)
Interpolation: 1920 x 1080
Echt: 640 x 480
Interpolation: 40 MP
2 - Zoll IPS-Display
ABS mit Gummibeschichtung
Max. 64 GB unterstützt
Eingebauter Speicher (für bis zu 50 Fotos). Für
Videoaufnahmen wird eine Speicherkarte benötigt. Die
im integrierten Speicher gespeicherten Bilder können nur
mit einer eingelegten SD-Karte über USB auf ein anderes
Gerät kopiert werden.
Windows XP/Vista/7/8, Mac OS X 10.8
-Hinweis: Die Produktspezifikationen basieren auf aktuellen
Informationen, die bei der Erstellung dieses Produkthandbuchs zur
Verfügung standen. Die Spezifikationen können ohne weitere
Ankündigung geändert werden. Das Produkt ist die reale Kamera.
Im Falle eines Absturzes der Kamera durch Herunterfallen starten
Sie sie bitte neu.
-Bitte beachten Sie – Alle Produkte können stillschweigend geändert
werden. Irrtümer und Auslassungen in der Bedienungsanleitung
vorbehalten.

GER-9
ALLE RECHTE VORBEHALTEN, URHEBERRECHTE DENVER A/S
Elektrische und elektronische Geräte einschließlich Batterien enthalten
Materialien, Komponenten und Substanzen, welche für Sie und Ihre Umwelt
schädlich sein können, wenn die Abfallmaterialien (entsorgte elektrische
und elektronische Altgeräte und Batterien) nicht korrekt gehandhabt
werden. Elektrische und elektronische Geräte sowie Batterien sind mit der
vorstehend abgebildeten durchgestrichenen Mülltonne gekennzeichnet.
Dieses Symbol zeigt Ihnen, dass elektrische und elektronische Altgeräte
sowie Batterien nicht mit dem Hausmüll entsorgt werden dürfen, sondern
getrennt zu entsorgen sind. Als Endverbraucher ist es wichtig, dass Sie Ihre
verbrauchten Batterien bei den entsprechenden Sammelstellen abgeben.
Auf diese Weise stellen Sie sicher, dass die Batterien entsprechend der
Gesetzgebung recycelt werden und keine Umweltschäden verursachen. Alle
Städte und Gemeinden haben Sammelstellen eingerichtet, an denen
elektrische und elektronische Altgeräte sowie Batterien kostenfrei zum
Recycling abgegeben werden können oder die sie von den Haushalten
einsammeln. Weitere Informationen erhalten Sie bei der Umweltbehörde
Ihrer Stadt/Gemeinde.
DENVER A/S
Omega 5A, Soeften
DK-8382 Hinnerup
Dänemark
www.facebook.com/denver.eu
Warnung: Lithium-Batterie innen
La pagina si sta caricando...
La pagina si sta caricando...
La pagina si sta caricando...
La pagina si sta caricando...
La pagina si sta caricando...
La pagina si sta caricando...
La pagina si sta caricando...
La pagina si sta caricando...
La pagina si sta caricando...
La pagina si sta caricando...
La pagina si sta caricando...
La pagina si sta caricando...
La pagina si sta caricando...
La pagina si sta caricando...
La pagina si sta caricando...
La pagina si sta caricando...
La pagina si sta caricando...
La pagina si sta caricando...
La pagina si sta caricando...
La pagina si sta caricando...
La pagina si sta caricando...
La pagina si sta caricando...
La pagina si sta caricando...
La pagina si sta caricando...
La pagina si sta caricando...
La pagina si sta caricando...
La pagina si sta caricando...
La pagina si sta caricando...
La pagina si sta caricando...
La pagina si sta caricando...
La pagina si sta caricando...
La pagina si sta caricando...
La pagina si sta caricando...
La pagina si sta caricando...
La pagina si sta caricando...
La pagina si sta caricando...
La pagina si sta caricando...
La pagina si sta caricando...
La pagina si sta caricando...
La pagina si sta caricando...
La pagina si sta caricando...
La pagina si sta caricando...
La pagina si sta caricando...
La pagina si sta caricando...
La pagina si sta caricando...
La pagina si sta caricando...
La pagina si sta caricando...
La pagina si sta caricando...
La pagina si sta caricando...
La pagina si sta caricando...
La pagina si sta caricando...
La pagina si sta caricando...
La pagina si sta caricando...
La pagina si sta caricando...
La pagina si sta caricando...
La pagina si sta caricando...
La pagina si sta caricando...
La pagina si sta caricando...
La pagina si sta caricando...
La pagina si sta caricando...
La pagina si sta caricando...
La pagina si sta caricando...
La pagina si sta caricando...
La pagina si sta caricando...
La pagina si sta caricando...
La pagina si sta caricando...
La pagina si sta caricando...
La pagina si sta caricando...
La pagina si sta caricando...
La pagina si sta caricando...
La pagina si sta caricando...
La pagina si sta caricando...
La pagina si sta caricando...
La pagina si sta caricando...
La pagina si sta caricando...
La pagina si sta caricando...
La pagina si sta caricando...
La pagina si sta caricando...
La pagina si sta caricando...
La pagina si sta caricando...
La pagina si sta caricando...
La pagina si sta caricando...
La pagina si sta caricando...
La pagina si sta caricando...
La pagina si sta caricando...
La pagina si sta caricando...
La pagina si sta caricando...
La pagina si sta caricando...
La pagina si sta caricando...
La pagina si sta caricando...
La pagina si sta caricando...
La pagina si sta caricando...
La pagina si sta caricando...
La pagina si sta caricando...
La pagina si sta caricando...
La pagina si sta caricando...
La pagina si sta caricando...
La pagina si sta caricando...
La pagina si sta caricando...
La pagina si sta caricando...
La pagina si sta caricando...
La pagina si sta caricando...
La pagina si sta caricando...
La pagina si sta caricando...
La pagina si sta caricando...
La pagina si sta caricando...
-
 1
1
-
 2
2
-
 3
3
-
 4
4
-
 5
5
-
 6
6
-
 7
7
-
 8
8
-
 9
9
-
 10
10
-
 11
11
-
 12
12
-
 13
13
-
 14
14
-
 15
15
-
 16
16
-
 17
17
-
 18
18
-
 19
19
-
 20
20
-
 21
21
-
 22
22
-
 23
23
-
 24
24
-
 25
25
-
 26
26
-
 27
27
-
 28
28
-
 29
29
-
 30
30
-
 31
31
-
 32
32
-
 33
33
-
 34
34
-
 35
35
-
 36
36
-
 37
37
-
 38
38
-
 39
39
-
 40
40
-
 41
41
-
 42
42
-
 43
43
-
 44
44
-
 45
45
-
 46
46
-
 47
47
-
 48
48
-
 49
49
-
 50
50
-
 51
51
-
 52
52
-
 53
53
-
 54
54
-
 55
55
-
 56
56
-
 57
57
-
 58
58
-
 59
59
-
 60
60
-
 61
61
-
 62
62
-
 63
63
-
 64
64
-
 65
65
-
 66
66
-
 67
67
-
 68
68
-
 69
69
-
 70
70
-
 71
71
-
 72
72
-
 73
73
-
 74
74
-
 75
75
-
 76
76
-
 77
77
-
 78
78
-
 79
79
-
 80
80
-
 81
81
-
 82
82
-
 83
83
-
 84
84
-
 85
85
-
 86
86
-
 87
87
-
 88
88
-
 89
89
-
 90
90
-
 91
91
-
 92
92
-
 93
93
-
 94
94
-
 95
95
-
 96
96
-
 97
97
-
 98
98
-
 99
99
-
 100
100
-
 101
101
-
 102
102
-
 103
103
-
 104
104
-
 105
105
-
 106
106
-
 107
107
-
 108
108
-
 109
109
-
 110
110
-
 111
111
-
 112
112
-
 113
113
-
 114
114
-
 115
115
-
 116
116
-
 117
117
-
 118
118
-
 119
119
-
 120
120
-
 121
121
-
 122
122
-
 123
123
-
 124
124
-
 125
125
-
 126
126


Denver KCA-1340RO Manuale utente
- Tipo
- Manuale utente
- Questo manuale è adatto anche per
in altre lingue
- français: Denver KCA-1340RO Manuel utilisateur
- Deutsch: Denver KCA-1340RO Benutzerhandbuch
- português: Denver KCA-1340RO Manual do usuário
- dansk: Denver KCA-1340RO Brugermanual
Documenti correlati
-
Denver TC-29 Manuale utente
-
Denver Dm-24 Mk2 Portable CD Player Manuale utente
-
-
-
-
-
-
-
Denver DAB-30 Manuale utente
-