
04/17-01 PC
U1619D
BTicino SpA – Viale Borri, 231 – 21100 Varese – Italy – www.bticino.com
L4618
N4618
NT4618
HC4618
HD4618
HS4618
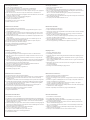
Memorizzazione dei trasmettitori
1. Portare l’impianto in manutenzione.
2. Premere per 5 secondi il pulsante di programmazione fino all’accensione del LED rosso.
3. Se il trasmettitore da memorizzare è dotato di contatto tamper premerlo 2 volte.
Se il trasmettitore non è dotato di contatto tamper premere l’apposito pulsante per 5 secondi.
4. Se il dispositivo è stato correttamente memorizzato il LED rosso del ricevitore si spegnerà.
Se non si spegne riprovare dal punto 3. Se il LED lampeggia significa che la memoria
del dispositivo è piena.
5. Per memorizzare altri dispositivi ripetere dal punto 2.
6. Chiudere i sensori per disattivare il tamper.
7. Apprendere l’impianto dalla centrale.
8. Programmare i telecomandi sulla centrale.
9. Uscire dalla manutenzione.
Cancellazione dei trasmettitori
1. Portare l’impianto in manutenzione.
2. Togliere l’alimentazione al ricevitore
3. Premere e tenere premuto il pulsante di programmazione ridando alimentazione al
ricevitore
4. Dopo 5 secondi il LED lampeggia arancio; rilasciando a questo punto il pulsante
vengono cancellati i soli telecomandi
Dopo 10 secondi il LED lampeggia più velocemente; rilasciando a questo punto il
pulsante vengono cancellati i soli sensori
5. Dopo aver rilasciato il pulsante il LED rimane acceso arancio fisso; allo spegnimento
la cancellazione è stata completata.
6. Apprendere l’impianto ed uscire dalla manutenzione.
• Non installare vicino a trasmettitori radio e lettori trasponder.
Non installare due ricevitori HC/HD/HS/L/N/NT 4618
affiancati.
Non installare in scatole metalliche.
• Do not install near radio transmitters and transponder readers.
Do not install two receivers item HC/HD/HS/L/N/NT 4618
side by side.
Do not install in metal boxes.
• Ne pas installer à proximité d’émetteurs radio ni de
lecteurs transpondeurs.
Ne pas installer deux récepteurs réf. HC/HD/HS/L/N/NT
4618 l’un à côté de l’autre.
Ne pas installer sous boîtiers métalliques.
• Nicht in der Nähe von Funksendegeräten und
Transponder-Lesegeräten installieren.
Zwei Empfänger Art. HC/HD/HS/L/N/NT 4618 nicht
angereiht installieren. Nicht in Metalldosen installieren.
• No instalar cerca de transmisores radio y lectores
transpondedores.
No instalar en mosaico dos receptores Art. HC/HD/
HS/L/N/NT 4618. No instalar en cajas metálicas.
• Niet installeren in de nabijheid van radiotransmitters en
trasponder-lezers.
Geen twee ontvangers art. HC/HD/HS/L/N/NT 4618 naast
elkaar installeren.
Niet installeren in metalen dozen.
• Não instalar perto de transmissores rádio e leitores
trasponder.
Não instalar dois receptores art. HC/HD/HS/L/N/NT
4618 lado a lado.
Não instalar em caixas metálicas.
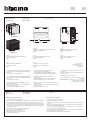
HC/HD/HS/L/N/NT
4618
• Ricevitore radio
• Alarm radio receiver
• Récepteur radio
• Funkempfänger
• Receptor radio
• Radio-ontvanger
• Receptor rádio
A
PL
M
4
3
Z
N°
AUX
1 2
1. Voyant
2. Bouton de programmation et réinitialisation (reset)
3. Logement configurateurs
4. BUS
1. Led
2. Taste für Programmierung und Reset
3. Sitz der Konfiguratoren
4. BUS
1. Led
2. Pulsador de programación, reset
3. Alojamiento de los configuradores
4. BUS
1. Led
2. Pulsante di programmazione/azzeramento
3. Sede configuratori
4. BUS
1. Led
2. Programming/reset pushbutton
3. Configurator socket
4. BUS
1. Led
2. Botão de programação, rearmo
3. Sede dos configuradores
4. BUS
1. Led
2. Drukknop van programmering, reset
3. Behuizing configurators
4. BUS
1
2
3
"BUS" .4
L/N/NT4618
Sede configuratori
BUS
Tamper
HC/HD/HS4618
Sede configuratori
BUS
• Messa in funzione
• Start-up
• Mise en service
• Inbetriebnahme
• Puesta en función
• In bedrijfstelling
• Pôr a funcionar

2
Empfänger speichern
1. Die Anlage auf Wartung schalten.
2. Die Programmierungstaste 3 Sekunden lang drücken bis die rote LED aufleuchtet.
3. Falls das zu speichernde Sendegerät mit einem Tamper-Kontakt versehen ist, diesen 2
Mal drücken.
Falls das Sendegerät nicht mit einem Tamper-Kontakt versehen ist, die entsprechende
Taste 5 Sekunden lang drücken.
4. Wenn die Vorrichtung richtig gespeichert worden ist, erlischt die rote LED des Empfängers.
Sollte sie nicht erlöschen, den Vorgang ab Punkt 3 wiederholen. Wenn die LED blinkt,
bedeutet das dass der Speicher der Vorrichtung voll ist.
5. Um weitere Vorrichtungen zu speichern, den Vorgang ab Punkt 2 wiederholen.
6. Die Sensoren schließen um den Tamper zu deaktivieren.
7. Die Anlage von der Zentrale lernen.
8. Fernbedienungen an der Zentrale programmieren.
9. Den Wartungsvorgang beenden.
Empfänger löschen
1. Die Anlage auf Wartung schalten.
2. Den Empfänger stromlos machen
3. Programmierungstaste drücken und gedrückt halten und dabei dem Empfänger wieder
Strom geben
4. Nach 5 Sekunden blinkt die orangefarbene LED; wird nun die Taste losgelassen werden
nur die Fernbedienungen gelöscht.
Nach 10 Sekunden blinkt die LED schneller; wird nun die Taste losgelassen werden nur die
Sensoren gelöscht.
5. Nachdem die Taste losgelassen worden ist, leuchtet die orangefarbene LED fest; durch
Ausschalten wird das
Löschen vervollständigt.
6. Die Anlage lernen und den Wartungsvorgang beenden.
Memorizing the transmitters
1. Set the system to maintenance mode.
2. Press the programming button for 5 seconds until the red LED lights up.
3. If the transmitter to be memorized has a tamper contact, press it twice.
If the transmitter to be memorized does not have a tamper contact, press the appropriate
button for 5 seconds.
4. If the device has been memorized correctly, the red LED of the receiver will turn off.
If it does not turn off, start again from paragraph 3. When the LED flashes, it means that
the memory of the device is full.
5. To memorize other devices, start again from paragraph 2.
6. Close the sensors to disconnect the tamper.
7. Set up the system from the unit.
8. Programme the remote controls on the unit.
9. Exit the maintenance mode.
Removing the transmitters
1. Set the system to maintenance mode.
2. Switch off the receiver
3. Press and hold down the programming button, hence switching the receiver back on
4. After 5 seconds, the LED will turn orange and will start flashing; then, when the button is
released, only the remote controls will be removed
After 10 seconds, the LED will start flashing more quickly; then, when the button is
released, only the sensors will be removed
5. After releasing the button, the LED will remain orange and steadily lit; the removal will be
completed after switching off.
6. Set up the system and exit the maintenance mode.
Mémorisation des émetteurs
1. Placer l’installation en mode maintenance.
2. Appuyer pendant 5 secondes sur le bouton de programmation jusqu’à ce que le
VOYANT s’allume sur le rouge.
3. Si l’émetteur à mémoriser est doté de contact tamper, appuyer 2 fois sur le contact;
Si l‘émetteur à mémoriser n’est pas doté de contact tamper, appuyer sur le bouton
prévu pendant 5 secondes.
4. Si le dispositif a été correctement mémorisé ; le VOYANT du récepteur, allumé sur le
rouge, s’éteint.
S’il ne s’éteint pas, recommencer à partir du point 3. Si le VOYANT clignote, cela
indique que la mémoire du dispositif est pleine.
5. Pour mémoriser d’autres dispositifs, répéter les opérations à partir du point 2.
6. Fermer les capteurs pour désactiver le tamper.
7. Procéder à l’apprentissage de l’installation par la centrale.
8. Programmer les télécommandes sur la centrale.
9. Quitter la maintenance.
Effacement des émetteurs
1. Placer l’installation en maintenance.
2. Couper l’alimentation du récepteur.
3. Appuyer sur le bouton de programmation et le maintenir enfoncé en tout remettant
le récepteur sous tension.
4. Au bout de 5 secondes, le VOYANT clignote sur l’orange; ensuite, en relâchant le
bouton, sont effacées seules les télécommandes.
Au bout de 10 secondes, le VOYANT clignote plus rapidement; ensuite, en relâchant
le bouton, sont effacés seuls les capteurs.
5. Après avoir relâché le bouton, le VOYANT reste allumé fixe sur l’orange ; après
extinction l’effacement est terminé.
6. Procéder à l’apprentissage de l’installation et quitter la maintenance.
Memorización de los transmisores
1. Ponga la instalación en estado de mantenimiento.
2. Presione 5 segundos el pulsador de programación hasta que se encienda el LED rojo.
3. Si el transmisor que desea memorizar está dotado de un contacto antisabotaje,
apriételo 2 veces.
Si el transmisor no está dotado de contacto antisabotaje presione el pulsador unos 5 segundos.
4. Si el dispositivo ha sido memorizado correctamente, el LED rojo del receptor se apagará.
Si no se apaga, intente nuevamente desde el punto 3. Si el LED parpadea significa
que la memoria del dispositivo está llena.
5. Para memorizar otros dispositivos, repita las instrucciones a partir del punto 2.
6. Cierre los sensores para desactivar el sistema de antisabotaje.
7. Efectúe el aprendizaje de la instalación desde la centralita.
8. Programe los telemandos en la centralita.
9. Salga del mantenimiento.
Eliminación de los transmisores
1. Ponga la instalación en estado de mantenimiento.
2. Desconecte la alimentación en el receptor.
3. Presione y mantenga apretado el pulsador de programación volviendo a alimentar el
receptor.
4. Al cabo de 5 segundos el LED parpadea de color naranja; a este punto soltando el
pulsador se eliminan sólo los telemandos.
Al cabo de 10 segundos el LED parpadea de manera más rápida; a este punto
soltando el pulsador se eliminan sólo los sensores.
5. Después de haber soltado el pulsador, el LED permanece encendido anaranjado fijo;
la eliminación se efectúa al apagado.
6. Efectúe el aprendizaje de la instalación y salga del mantenimiento.
Memorisatie van de transmitters
1. De installatie in onderhoud zetten.
2. Gedurende 5 seconden op de drukknop van programmering drukken tot de rode LED aangaat.
3. Indien de te memoriseren transmitter uitgerust is met een tamper-contact dit 2 keer indrukken.
Indien de transmitter niet is uitgerust met tamper-contact de desbetreffende drukknop
indrukken gedurende 5 seconden.
4. Indien de inrichting correct gememoriseerd werd, zal de rode LED van de ontvanger uitgaan.
Indien deze niet uitgaat terug proberen vanaf punt 3. Indien de LED knippert betekent dit
dat het geheugen van de inrichting vol is.
5. Om andere inrichtingen te memoriseren herhalen vanaf punt 2.
6. De sensoren sluiten om de tamper te deactiveren.
7. Het leerproces van de installatie vanop de centrale activeren.
8. De afstandsbedieningen op de centrale programmeren.
9 Het onderhoud verlaten.
Wissen van de transmitters
1. De installatie in onderhoud zetten.
2. De voeding wegnemen van de ontvanger.
3. De drukknop van programmering indrukken en ingedrukt houden en hierbij terug
voeding geven aan de ontvanger.
4. Na 5 seconden knippert de LED oranje; wanneer men nu de drukknop loslaat worden
alleen de afstandbedieningen gewist.
Na 10 seconden knippert de LED sneller; wanneer men nu de drukknop loslaat worden
alleen de sensoren gewist.
5. Nadat men de drukknop heeft losgelaten blijft de LED permanent oranje aan; bij het
uitgaan is het wissen beëindigd.
6. Het leerproces van de installatie activeren en het onderhoud verlaten.

3
1
52
3
5
4
3
.2
6
7
8
9
1
2
3
54
10
5
6
Memorização dos transmissores
1. Levar a instalação para a manutenção.
2. Carregar durante 5 segundos o botão de programação até que o INDICADOR
LUMINOSO vermelho acenda.
3. Se o transmissor a ser memorizado tiver contacto tamper pressioná-lo duas vezes;
se o transmissor não tiver contacto tamper pressionar o botão apropriado durante 5
segundos.
4. Se o dispositivo tiver sido memorizado correctamente o INDICADOR LUMINOSO
vermelho do receptor apagará.
Se não apagar tentar novamente a partir do item 3. Se o INDICADOR LUMINOSO
piscar isto está a significar que a memória do dispositivo está cheia.
5. Para memorizar outros dispositivos repetir a partir do item 2.
6. Fechar os sensores para desactivar o tamper.
7. Ajustar a instalação da central.
8. Programar os telecomandos na central.
9. Sair da manutenção.
Eliminação dos transmissores
1. Levar a instalação para a manutenção.
2. Retirar a tensão eléctrica do receptor.
3. Pressionar e manter pressionado o botão de programação dando novamente a
corrente ao receptor.
4. Depois de 5 segundos o INDICADOR LUMINOSO pisca na cor de laranja; se neste
momento o botão for soltado somente os telecomandos serão eliminados
Depois de 10 segundos o INDICADOR LUMINOSO pisca mais rápido, se neste
momento o botão for soltado somente os sensores serão eliminados
5. Depois de ter soltado o botão o INDICADOR LUMINOSO fica aceso n a cor de laranja
de maneira fixa; ao ser desligado a eliminação ficou terminada.
6. Ajustar a instalação e sair da manutenção.
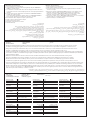
• Funzionamento
• Operation
• Fonctionnement
• Betrieb
• Funcionamiento
• Werking
• Funcionamento
• Durante il normale funzionamento il LED rosso indica la presenza di un allarme tecnico. Premendo il tasto di reset il LED si spegne e gli allarmi vengono cancellati.
Se il LED è rosso lampeggiante significa che uno dei sensori ha la batteria scarica. Premere il pulsante di reset per annullare la segnalazione e verificare i sensori.
• During normal operation, the red LED indicates the presence of a technical alarm. When the reset button is pressed, the LED will turn off and all the alarms will be removed.
If the LED is red and flashing, it means that one of the sensors has a dead battery. Press the reset button to cancel the signal and check the sensors.
• Pendant le fonctionnement, le VOYANT allumé sur le rouge indique la présence d’une alarme technique. En appuyant sur la touche de réinitialisation (reset), le VOYANT s’éteint
et les alarmes sont effacées. Si le VOYANT est rouge et clignote, cela indique que la batterie d’un des capteurs est déchargée. Appuyer sur le bouton de réinitialisation pour désactiver le
signal et contrôler les capteurs.
• Während des normalen Betriebs meldet die rote LED einen technischen Alarm. Durch Drücken der Reset-Taste erlischt die LED und die Alarme werden gelöscht.
Wenn die rote LED blinkt, bedeutet dies dass die Batterie eines der Sensoren erschöpft ist. Taste Reset drücken um die Meldung zu löschen und die Sensoren prüfen.
• Durante el funcionamiento normal el LED rojo indica la presencia de una alarma técnica. Al pulsar la tecla de reset el LED se apaga y las alarmas se eliminan.
Si el LED está rojo parpadeante significa que uno de los sensores tiene la batería agotada. Presione el pulsador de reset para cancelar la señal y verificar los sensores.
• Tijdens de normale werking wijst de rode LED op de aanwezigheid van een technisch alarm. Wanneer men op de drukknop van reset drukt, gaat de LED uit en de alarmen worden gewist.
Indien de LED rood knipperend is, betekent dit dat een van de sensoren een ontladen batterij heeft. Op de drukknop van reset drukken om de melding te annuleren en de sensoren verifiëren.
• Durante o funcionamento normal o INDICADOR LUMINOSO vermelho indica a presença de um alarme técnico. Se a tecla de rearmo for pressionada o INDICADOR LUMINOSO
apaga e os alarmes serão eliminados. Se o INDICADOR LUMINOSO for vermelho e piscar isto está a significar que um dos sensores está com a bateria descarregada. Pressionar o
botão de reset para anular a sinalização e verificar os sensores.
• Dati tecnici
• Technical data
• Caractéristiques techniques
• Technische Daten
• Datos técnicos
• Technische gegevens
• Dados técnicos
Alimentazione da Bus 27 Vdc
Assorbimento massimo 15 mA
Frequenza di trasmissione 868 MHz
Numero di dispositivi
memorizzabili
20 sensori, 10 telecomandi
Temperatura di funzionamento 5 – 40 °C
Grado di protezione IP30
Power from the BUS 27 Vdc
Maximum absorption 15 mA
Transmission frequency 868 MHz
Number of devices that can be
memorized
20 sensors, 10 remote controls
Operating temperature 5 – 40 °C
Degree of protection IP30
Alimentation sur Bus 27 Vdc
Courant maximum absorbé 15 mA
Fréquence de fonctionnement 868 MHz
Nombre de dispositifs
mémorisables
20 capteurs et 10 télécommandes
Température de fonctionnement 5 – 40 °C
Schutzklasse IP30
Alimentación desde BUS 27 Vdc
Máxima corriente absorbida 15 mA
Frecuencia de funcionamiento 868 MHz
Número de dispositivos
memorizables
20 sensores, 10 telemandos
Temperatura de funcionamiento 5 – 40 °C
Índice de protección IP30
Speisung über Bus 27 Vdc
Max. Stromaufnahme 15 mA
Betriebsfrequenz 868 MHz
Anzahl der speicherbaren
Vorrichtungen
20 Sensoren, 10 Fernbedienungen
Betriebstemperatur 5 – 40 °C
Schutzklasse IP30
Voeding door Bus
Maximum geabsorbeerde stroom 15 mA
Frequentie van werking 868 MHz
Aantal inrichtingen die
gememoriseerd kunnen worden
20 sensoren, 10 afstandbedieningen
Bedrijfstemperatuur 5 – 40 °C
Graad van bescherming IP30
Alimentação de Bus 27 Vdc
Corrente máxima absorvida 15 mA
Frequência de funcionamento 868 MHz
Número de dispositivos
memorizáveis
20 sensores, 10 telecomandos.
Temperatura de funcionamento 5 – 40 °C
Grau de protecção IP30
27 "Bus
15
868
10
20
40 - 5
IP30

4
-
 1
1
-
 2
2
-
 3
3
-
 4
4


Bticino HC4618 Istruzioni per l'uso
- Tipo
- Istruzioni per l'uso
in altre lingue
- français: Bticino HC4618 Mode d'emploi
- español: Bticino HC4618 Instrucciones de operación
- Deutsch: Bticino HC4618 Bedienungsanleitung
- português: Bticino HC4618 Instruções de operação
Documenti correlati
-
Bticino 365711 Istruzioni per l'uso
-
-
-
-
-
-
-
-
-