
Split Shaft Petrol Grass Strimmer
Assembly / Owner’s
Manual
©Trueshopping LTD Issue 01 mc-rt
Original instructions

CONTENTS
Model guide 3
Safety instructions
a,b,4
Protect
ing yourself 4
Fuelling 4
Vibrations 4
Protecting others 4
Protectin
g the machine 4
Minimum ag
e 4
Recommen
ded use 4
Emergency action
4
Safe operating instructions 5
What’s i
n the box? 6
Box cont
ents 6
Assemb
ling the handle 7
Attach
ing the guard / line cutter 7
Attaching the brush blade 10
Attach
ing the bump head 12
Fuelli
ng the machine 13
Starting
the machine 13
Operatio
n advice 14
Storage instructions 15
Inspec
tion and maintenance 15
Fuel pipe / tank grommet exchange 15
Fuel filte
r exchange 17
Changin
g / checking the spark plug 19
Air filter cle
aning / exchange 21
Carburett
or exchange / inspection 22
Maintaining
the bevel gear 23
Online help 25
Troubl
eshooting 26
Specificat
ions 26
Contac
t us 28
2

THIS GUIDE COVERS THE FOLLOWING
MODEL NUMBERS –
BC2602D
BC3302D
BC4302D
BC4902D
BC5202D
BC5502D
BC5802D
BC6202D
BC6502D
BC6802D
*While every effort is made to ensure the
accuracy of the information in this manual,
occasionally minor design changes can
occur, if in doubt please visit the
manufacturers
website for the most up to
date version of this guide.
3

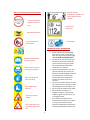
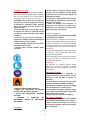
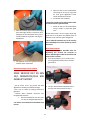
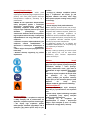
Labels on the Machine and their Meanings
IMPORTANT SAFETY INFORMATION
• Please note that the cutting blade
continues to run for a short period
after you let go of the throttle trigger
–This is called the flywheel effect.
• Do not lend or rent your power tool
without the instruction manual. Be
sure that anyone using your power
tool understands the information
contained in this manual.
• Persons with pacemakers only: The
ignition system of your power tool
produces an electromagnetic field of a
very low intensity. This field may
interfere with some pacemakers.
Consult your doctor if you have
concerns.
• Do not use a pressure washer to clean
your power tool. The solid jet of water
may damage parts of the power tool.
• Do not spray the machine with water.
• Work calmly and carefully – in
daylight conditions and only when
visibility is good. Stay alert so as not
to endanger others.
• Your power tool produces toxic
exhaust fumes as soon as the engine
is running. These fumes may be
colourless and odourless and contain
unburned hydrocarbons and benzoyl.
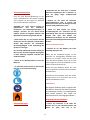
Product information
(model number will
vary)
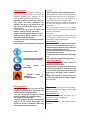
Hot Exhaust Warning
Do not operate near
naked flames
Read the manual before
using the product
Wear suitable head, eye
and hearing protection
Wear suitable gloves
when operating
Use suitable safety
footwear
Beware of thrown
objects
Keep all children,
bystanders and helpers 15
meters away from this
machine
Product noise
information
T.U.V ID Label
Do not place feet near
the cutting edge of the
unit
a.

Never run the engine indoors or in
poorly ventilated locations.
• The dusts, vapour and smoke
produced during operation may be
dangerous to health. If the work area
is very dusty or smoky, wear
appropriate safety equipment.
• If your power tool is subjected to
unusually high loads for which it was
not designed (e.g. heavy impact or a
fall), always check that it is in good
condition before continuing work
b.

Safety Instructions
Read this manual in full before operating the
machine for the first time. If you have any
questions regarding the operation of the
machine, please contact the manufacturer.
CAUTION! In order to ensure your safety you
must follow the safety, installation and
operation instructions. Any person who uses
this machine should be fully aware of the
potential risks.
! You must be 18 or over to operate this
machine. Children must not operate this
machine. ! The manufacturer shall not be held
liable if the unit is altered outside of the
information printed in this guide.
! Always turn the engine off before performing
any maintenance
! Some components will become hot during use.
! WEAR EAR PROTECTION!
! SAFETY BOOTS MUST BE WORN
WHILE OPERATING THE MACHINE!
! WEAR SUITABLE EYE
PROTECTION!
! WARNING, PETROL IS
FLAMMABLE, TAKE
APPROPRIATE CARE!
Protecting yourself
! Do not use this machine in areas with poor
ventilation or indoors, when switched on, the
machine produces carbon monoxide!
! Do not operate this machine in adverse
weather conditions or in situations where
sure footing is not guaranteed.
! Exercise common sense when operating this
machine, do not operate when under the
influence of alcohol or medication which may
impair judgement and concentration.
FUE
LLING
! Always switch the engine off before fuelling.
Open the tank cap slowly to avoid spillage due to
internal pressure. If the unit has recently been in
use
, allow to cool down first. Not allowing the
unit to cool could cause the fuel to ignite.
When replacing the fuel, be careful not to over fill
the tank. Any spillages should be cleaned up
immediately.
After filling ensure that the cap is secured
properly and that it will not work loose while the
machine is switched on.
VIBRATIONS
Vibrations from the machine make it difficult to
hold for long periods of time, this time can be
prolonged by wearing suitable gloves.
Protecting others
! Do not allow anyone to approach the machine
while in use, ensure the working area is clear.
! Avoid jamming the blade as this can make the
machine suddenly difficult to control.
! Do not use the machine for any purposes other
than outlined in this manual.
! It is good practise to clearly mark your working
area.
! Turn the machine off when moving location.
Protecting the Machine
! Only use recommended parts, consult the
manufacturer to obtain these.
! Always use the correct tool for the correct job.
! Ensure that the machine is stored in a dry area
in a secure place. Parts of the tool are sharp and
should not be left within reach of children /
pets.
! Inspect the machine for damage before use,
and ensure all components are properly aligned.
Minimum Age
Only persons over 18 years of age are legally
allowed to operate this machine unless under
training supervision.
Recommended use
The unit is recommended for general use in
agriculture, forestry and gardening.
Emergency Action
In the event of injury, seek qualified medical
assistance.
4

! The user is responsible for any material /
personal damage resulting from improper use.
! Please note that if not properly used, the
following injuries can be caused –
Hearing problems if proper ear protection not
used
Carbon monoxide poisoning if used in an
enclosed area.
Safe Operating Instructions
! Do not operate the machine if you suspect the
machine has a problem.
• Always visually inspect to see that the
chain and cutter assembly are not worn
or damaged. Ensure the engine vents
are free from any dirt or remnants.
• Operate the machine at the lowest
possible engine speed to do the job.
• Keep your hands and feet clear of the
attached tool when the machine is
running.
• Keep both hands firmly on the machine
at all times.
• Always use the machine with the
supplied carry strap.
• Always wear appropriate hand, feet and
hearing / eye protection when operating
the machine.
• Pay attention, the machine will continue
to run for five seconds after the engine
has stopped.
5

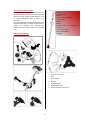
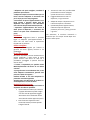
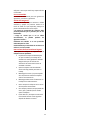
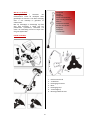
Handle
Cutting blade
Handle
Handle with throttle
Strimmer spool
Nuts
Main engine unit
Petrol mixing bottle
Carrying strap
Safety guard
Tool kit
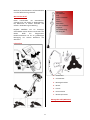
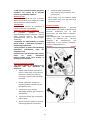
1. Protective shield
2. Blade
3. Fixing screws
4. Nut
5. Bracket diameter flange
6. Spacer disc
7. Blade locking nut
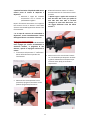
What’s in the box?
This 2 stroke grass strimmer / brush cutter makes
light work of even the toughest jobs. The
strimmer is not only versatile but is also easy to
operate and maintain.
With its twin line and 3 toothed cutting blade, the
Trueshopping brush cutter is ideal for
professional clean up jobs including clearing out
tough weeds and bushes over a large surface
area.
Box contents
6

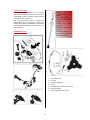
Assembling the handle
• Loosen the four bolts on the handle
bracket (1)
• Insert the right handle (2) with the
throttle lever attached and the left
handle (4) into the bracket (1)
•
Partially tighten the bolts (3)
• Adj
ust both handles to a suitable
working position.
• Fully tighten the bolts (3)
• The holder itself can be adjusted to
allow for user height by loosening the
fixings on the underside and then
adjusting the holder.
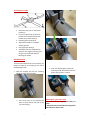
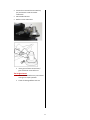
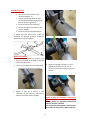
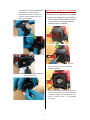
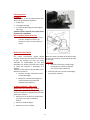
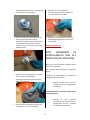
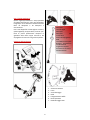
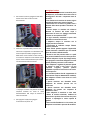
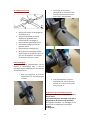
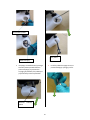
Pole Attachment
To connect the attachments to the machine, you
need to fit them to the coupling on the end of
the fixed engine pole.
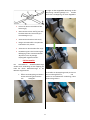
1. Open the
coupling and turn the retaining
handle to loosen the connection.
2. Line up the hole on the required tool
pole as shown below and push firmly
into the coupling.
3. Close the c
oupling again, tighten the
retaining handle, and pull and twist the
pole to ensure that it is secure.
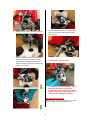
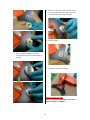
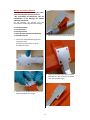
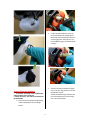
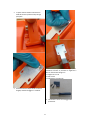
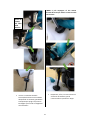
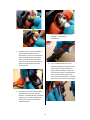
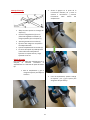
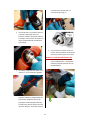
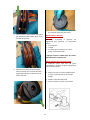
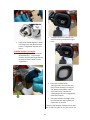
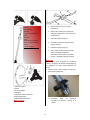
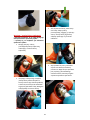
Attaching the guard / line cutter
! Be careful when handling the line cutter, it is
sharp.
! The guard must be attached when using either
the strimmer or brush cutter
7

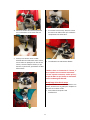
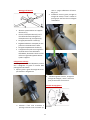
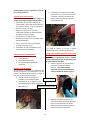
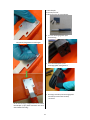
The following parts are required to fit the guard
and line cutter
4 x locking bolts
4 x locking nuts
4 x washers
1 x 4mm Allen key
1 x spanner
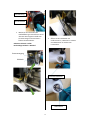
• Loosen the metal mounting bracket using
the 4mm Allen key and spanner
• Once loosened, pull the metal bracket away
from the plastic mounting on the pole.
• Place the blade guard up to the mounting
bracket.
• Make sure that the holes on the mounting
bracket and blade guard line-up.
• Insert the locking bolts through the plastic
retaining bracket on the main pole.
8

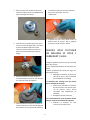
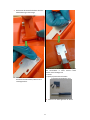
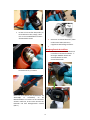
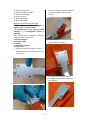
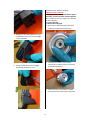
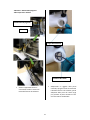
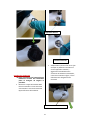
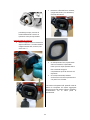
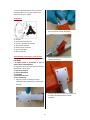
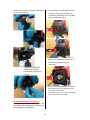
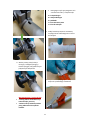
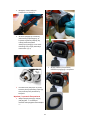
2 x Phillips screws
1 x small Philips screwdriver
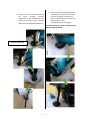
• Locate the mounting block on the guard.
• Place the line cutting blade up to the
mounting block as shown.
• Fix the blade to the mounting block using
the two Philips screws.
• Fasten them both together using the Allen
key, locking nuts and washers.
Now that the guard is attached, we will now fix
the
line cutter in place. To do this you will need –
1 x Line cutter
9

The line cutter is now attached.
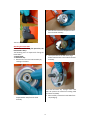
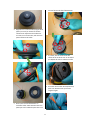
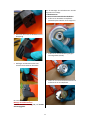
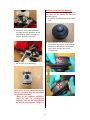
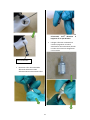
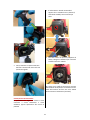
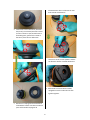
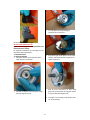
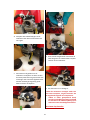
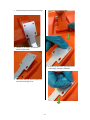
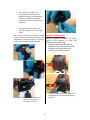
Attaching the brush blade
! Please be careful during this procedure, the
brush blade is sharp.
The following parts are required for fitting the
brush blade –
1 x Brush blade
1 x 4mm Allen key
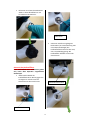
• Remove the nut on the head assembly by
rotating it clockwise.
• Once the nut is removed, pull the bell
shaped washer away from the head
assembly.
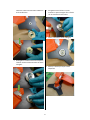
• Now lift and remove the flat spacer washer
from the head assembly.
• Line up the hole on the side of the large
washer with the hole in the side of the head
assembly.
Insert the 4mm Allen key through both holes
(This will prevent the head from rotating while
you attach the blade).
• Now carefully remove the brush blade from
the packaging.
10

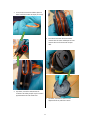
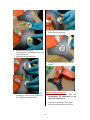
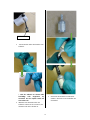
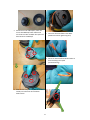
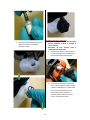
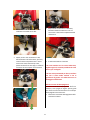
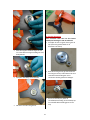
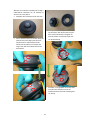
• The blade must be mounted with the
directional arrow on the blade and the
directional arrow on the guard pointing in
the same direction.
• Next we mount the blade onto the large
washer on the head assembly as shown.
! The blade must sit correctly onto the head
assembly, an improperly mounted blade can
cause damage / injury.
• Now re-fix the small spacer washer onto the
central spindle, ensuring the recessed side
of the washer faces the blade.
• Re-attach the bell shaped washer and
locknut while holding onto the Allen key.
11

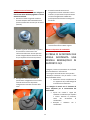
• Finger tighten the locknut anti clockwise and
then tighten fully with the socket tool.
• Finally, remove the Allen key.
• The blade in now ready for use.
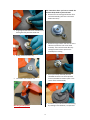
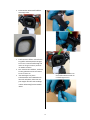
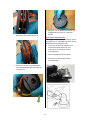
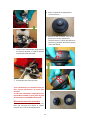
Attaching the Bump head
This instruction shows you how to attach the
strimmer bump head to your multi tool.
• Remove the nut and large bell washer from
the head assembly (as shown in the brush
blade instruction)
• Rotate the large washer until the hole in the
side lines up with the hole on the head
assembly. Then insert the 4mm Allen key
through the two holes to prevent the
assembly from moving.
• Pick up the bump head and place the
threaded connection on the bump head
onto the threaded connection point in the
centre of the head assembly.
• Screw the bump head onto the central fixing
by rotating it anti-clockwise, it is important
12

that you hold the Allen key while doing this
otherwise the head will turn indefinitely.
• The unit is ready for use once the bump
head stops turning.
Fuelling the machine
! Switch the engine off and ensure that it is cool
before fuelling.
! Unleaded petrol is recommended
! Only use two stroke engine oil for air-cooled
machines
• Mix the fu
el/oil together at a ratio of
25/1 in the provided mixing bottle.
! The mixing bottle is not designed
to be used for fuel storage
• Open the fuel tank cap carefully to
ensure any overpressure may be
released without spilling fuel.
• Fill the tank with fuel
! Any spillages should be removed
before attempting to use the
machine
• Replace the fuel cap ensuring a tight
seal is maintained.
After fuelling ensure that the cap is tight and will
not be worked loose by machine vibrations
during operation.
! If you n
otice any leaking fuel, discontinue use
immediately and contact the supplier
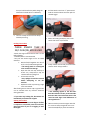
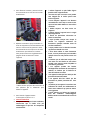
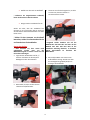
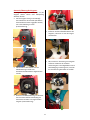
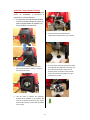
Starting the machine
! Please be aware that a certain degree of effort
is required to successfully start the multi-tool,
please persevere if you are struggling to start
the engine.
• Pull the switch into the on “I” position and
hold the throttle lockout and then pull the
throttle trigger.
• While still holding the above, press in the
switch next to the on/off switch.
• Slowly release all three and you should note
that the switch stays pressed in.
**The following applies to the 26cc 33cc
43cc 49cc and 52cc version, for the 55cc 58cc
62cc 65cc 68cc the worded instruction is the
same but with slight visual differences of
the engine block **
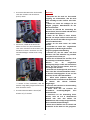
• Now w
e need to prime the engine with fuel
for use. Press the priming bulb on the unit
several times (8-10) to prime the machine.
PLEASE ENSURE THAT
A
25/1 FUEL/OIL MIX IS USED
13

**Please note that it can take several
attempts at pulling the starter cord to start
the machine.
• To tur
n the machine off push the on/off
switch to “O”.
• To start the engine, push the choke lever
upwards and pull the starter cord.
• Do this until you hear a splutter or cough
from the engine. Once this has happened,
push the choke lever down and pull the
starter cord and the engine will start. You
can then pull the throttle trigger to start the
tool working.
Operation advice
! Fully inspect the machine before use, ensure
the chain is not damaged and that all
components are secure.
! Operate the machine at the lowest possible
engine speed to do the job.
! Ensure your hands and legs are clear of the
chain when the machine is in operation
! Always hold the machine at an appropriate
safe distance from your body and ensure that
you have steady footing on a solid surface
! Keep both hands on the machine at all times
! Always use the machine with the supplied
strap/harness
! Ensure that you wear appropriate safety
protection
! Be careful when shutting down the machine as
it will continue to run for several seconds before
coming to a stop.
! Beware of falling branches that may spring
back on you
! You must use the provided extension pole, do
not lean or stretch as this may cause you to fall
! Do not use the pruning saw when standing on
a ladder or uneven surface, you may lose
balance and cause severe injury to yourself or
others
! The machine produces exhaust fumes
including Carbon Monoxide, do not use the unit
indoors or in non-ventilated areas
! This machine should not be operated by
anyone under the age of 18
14

! This machine should not be operated be
persons of limited capacity
! Do not operate the machine if under the
influence of alcohol, prescription medicine or
any substances which may impair your
judgement
! Be wary of your environment, do not operate
the machine in adverse weather conditions.
Clear any obstacles from the working area
Storage instructions
If the unit is to be stored for long periods of time
please read the following –
• Drain the oil and fuel tank, fuel vapours can
build up and pose a fire hazard
• Remove and clean the blade
•
Wipe the machine down with a cloth soaked
in a mild soapy solution and dry fully
• Store in a dry place
• Keep in a locked area and keep out of the
reach of children
• Allow the engine to cool before storing
• Ensure all fixings are tight on the unit
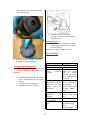
Inspection and maintenance
Regularly check:
• The air filter
• The spark plug
• The bump head / brush cutter blade
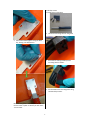
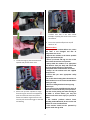
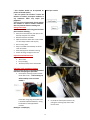
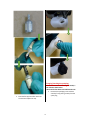
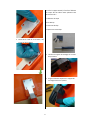
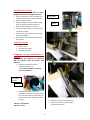
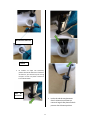
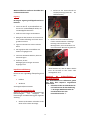
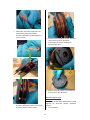
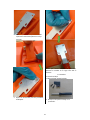
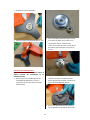
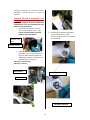
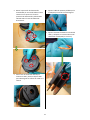
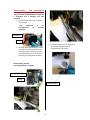
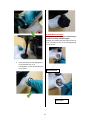
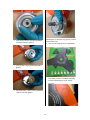
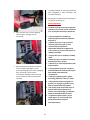
Fuel pipe / tank grommet exchange
! Please ensure the unit is completely drained of
fuel before attempting this procedure.
• Unscrew the retaining cap and remove
the air filter cover. **The retaining cap
will be a Philips screw on certain
models**
• Remove the fuel pipes from the
carburettor using long nosed pliers and
a small flat headed screwdriver, noting
the location of each pipe before
removal.
Black pipe = Feed/Supply
Clear Pipe = Return
• Unscrew the fuel cap and remove it by
pulling the retaining strap from inside
the fuel tank.
15

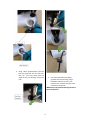
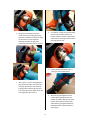
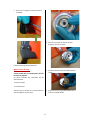
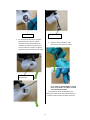
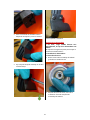
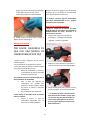
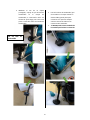
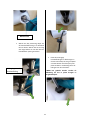
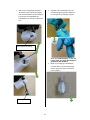
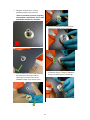
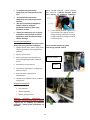
• Using a blunt pointed object, push the
fuel pipe grommet into the fuel tank,
then use your long nosed pliers to
withdraw the part through the fuel fill
hole.
• Insert the replacement fuel pipes /
grommet into the tank using a large
flathead screwdriver to push it into
position. Then reattach the pipes to the
carburettor connections
*WD40 may be sprayed around the grommet to
ease it into position.
16

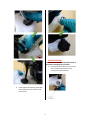
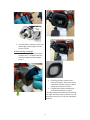
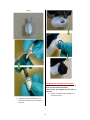
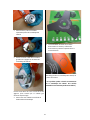
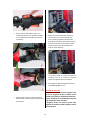
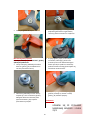
• Finally replace the retaining strap back
into the fuel tank then screw the cap
back in place.
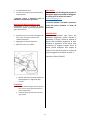
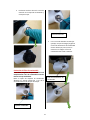
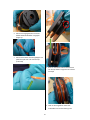
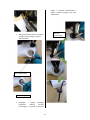
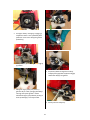
Fuel filter Exchange
! Please ensure the unit is completely drained of
fuel before attempting this procedure.
• Remove the fuel tank cap by unscrewing
anti-clockwise and pull out the cap
retaining strap from the tank.
17

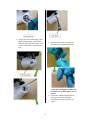
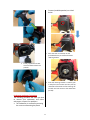
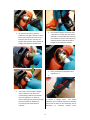
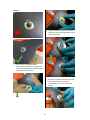
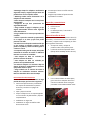
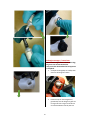
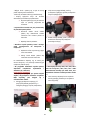
• Using a piece of curved wire (e.g. a tent
peg or old coat hanger ) hook the fuel
feed pipe within the tank and pull out as
shown, the fuel filter is attached to the
end .
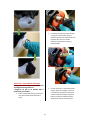
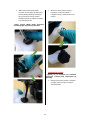
• Remo
ve the fuel filter by gripping the
feed pipe firmly and pulling the filter.
*If the pipe is damaged or frayed at the
end then trim it down with a pair of
scissors.
• Connect the replacement fuel filter by
pushing it into the fuel feed pipe,
ensuring the connection nozzle is not
visible.
18
La pagina si sta caricando...
La pagina si sta caricando...
La pagina si sta caricando...
La pagina si sta caricando...
La pagina si sta caricando...
La pagina si sta caricando...
La pagina si sta caricando...
La pagina si sta caricando...
La pagina si sta caricando...
La pagina si sta caricando...
La pagina si sta caricando...
La pagina si sta caricando...
La pagina si sta caricando...
La pagina si sta caricando...
La pagina si sta caricando...
La pagina si sta caricando...
La pagina si sta caricando...
La pagina si sta caricando...
La pagina si sta caricando...
La pagina si sta caricando...
La pagina si sta caricando...
La pagina si sta caricando...
La pagina si sta caricando...
La pagina si sta caricando...
La pagina si sta caricando...
La pagina si sta caricando...
La pagina si sta caricando...
La pagina si sta caricando...
La pagina si sta caricando...
La pagina si sta caricando...
La pagina si sta caricando...
La pagina si sta caricando...
La pagina si sta caricando...
La pagina si sta caricando...
La pagina si sta caricando...
La pagina si sta caricando...
La pagina si sta caricando...
La pagina si sta caricando...
La pagina si sta caricando...
La pagina si sta caricando...
La pagina si sta caricando...
La pagina si sta caricando...
La pagina si sta caricando...
La pagina si sta caricando...
La pagina si sta caricando...
La pagina si sta caricando...
La pagina si sta caricando...
La pagina si sta caricando...
La pagina si sta caricando...
La pagina si sta caricando...
La pagina si sta caricando...
La pagina si sta caricando...
La pagina si sta caricando...
La pagina si sta caricando...
La pagina si sta caricando...
La pagina si sta caricando...
La pagina si sta caricando...
La pagina si sta caricando...
La pagina si sta caricando...
La pagina si sta caricando...
La pagina si sta caricando...
La pagina si sta caricando...
La pagina si sta caricando...
La pagina si sta caricando...
La pagina si sta caricando...
La pagina si sta caricando...
La pagina si sta caricando...
La pagina si sta caricando...
La pagina si sta caricando...
La pagina si sta caricando...
La pagina si sta caricando...
La pagina si sta caricando...
La pagina si sta caricando...
La pagina si sta caricando...
La pagina si sta caricando...
La pagina si sta caricando...
La pagina si sta caricando...
La pagina si sta caricando...
La pagina si sta caricando...
La pagina si sta caricando...
La pagina si sta caricando...
La pagina si sta caricando...
La pagina si sta caricando...
La pagina si sta caricando...
La pagina si sta caricando...
La pagina si sta caricando...
La pagina si sta caricando...
La pagina si sta caricando...
La pagina si sta caricando...
La pagina si sta caricando...
La pagina si sta caricando...
La pagina si sta caricando...
La pagina si sta caricando...
La pagina si sta caricando...
La pagina si sta caricando...
La pagina si sta caricando...
La pagina si sta caricando...
La pagina si sta caricando...
La pagina si sta caricando...
La pagina si sta caricando...
La pagina si sta caricando...
La pagina si sta caricando...
La pagina si sta caricando...
La pagina si sta caricando...
La pagina si sta caricando...
La pagina si sta caricando...
La pagina si sta caricando...
La pagina si sta caricando...
La pagina si sta caricando...
La pagina si sta caricando...
La pagina si sta caricando...
La pagina si sta caricando...
La pagina si sta caricando...
La pagina si sta caricando...
La pagina si sta caricando...
La pagina si sta caricando...
La pagina si sta caricando...
La pagina si sta caricando...
La pagina si sta caricando...
La pagina si sta caricando...
La pagina si sta caricando...
La pagina si sta caricando...
La pagina si sta caricando...
La pagina si sta caricando...
La pagina si sta caricando...
La pagina si sta caricando...
La pagina si sta caricando...
La pagina si sta caricando...
La pagina si sta caricando...
La pagina si sta caricando...
La pagina si sta caricando...
La pagina si sta caricando...
La pagina si sta caricando...
La pagina si sta caricando...
La pagina si sta caricando...
La pagina si sta caricando...
La pagina si sta caricando...
La pagina si sta caricando...
La pagina si sta caricando...
La pagina si sta caricando...
La pagina si sta caricando...
La pagina si sta caricando...
La pagina si sta caricando...
La pagina si sta caricando...
La pagina si sta caricando...
La pagina si sta caricando...
La pagina si sta caricando...
La pagina si sta caricando...
La pagina si sta caricando...
La pagina si sta caricando...
La pagina si sta caricando...
La pagina si sta caricando...
La pagina si sta caricando...
La pagina si sta caricando...
La pagina si sta caricando...
La pagina si sta caricando...
La pagina si sta caricando...
La pagina si sta caricando...
La pagina si sta caricando...
La pagina si sta caricando...
La pagina si sta caricando...
La pagina si sta caricando...
La pagina si sta caricando...
La pagina si sta caricando...
La pagina si sta caricando...
La pagina si sta caricando...
La pagina si sta caricando...
La pagina si sta caricando...
La pagina si sta caricando...
La pagina si sta caricando...
La pagina si sta caricando...
La pagina si sta caricando...
La pagina si sta caricando...
La pagina si sta caricando...
La pagina si sta caricando...
La pagina si sta caricando...
La pagina si sta caricando...
La pagina si sta caricando...
-
 1
1
-
 2
2
-
 3
3
-
 4
4
-
 5
5
-
 6
6
-
 7
7
-
 8
8
-
 9
9
-
 10
10
-
 11
11
-
 12
12
-
 13
13
-
 14
14
-
 15
15
-
 16
16
-
 17
17
-
 18
18
-
 19
19
-
 20
20
-
 21
21
-
 22
22
-
 23
23
-
 24
24
-
 25
25
-
 26
26
-
 27
27
-
 28
28
-
 29
29
-
 30
30
-
 31
31
-
 32
32
-
 33
33
-
 34
34
-
 35
35
-
 36
36
-
 37
37
-
 38
38
-
 39
39
-
 40
40
-
 41
41
-
 42
42
-
 43
43
-
 44
44
-
 45
45
-
 46
46
-
 47
47
-
 48
48
-
 49
49
-
 50
50
-
 51
51
-
 52
52
-
 53
53
-
 54
54
-
 55
55
-
 56
56
-
 57
57
-
 58
58
-
 59
59
-
 60
60
-
 61
61
-
 62
62
-
 63
63
-
 64
64
-
 65
65
-
 66
66
-
 67
67
-
 68
68
-
 69
69
-
 70
70
-
 71
71
-
 72
72
-
 73
73
-
 74
74
-
 75
75
-
 76
76
-
 77
77
-
 78
78
-
 79
79
-
 80
80
-
 81
81
-
 82
82
-
 83
83
-
 84
84
-
 85
85
-
 86
86
-
 87
87
-
 88
88
-
 89
89
-
 90
90
-
 91
91
-
 92
92
-
 93
93
-
 94
94
-
 95
95
-
 96
96
-
 97
97
-
 98
98
-
 99
99
-
 100
100
-
 101
101
-
 102
102
-
 103
103
-
 104
104
-
 105
105
-
 106
106
-
 107
107
-
 108
108
-
 109
109
-
 110
110
-
 111
111
-
 112
112
-
 113
113
-
 114
114
-
 115
115
-
 116
116
-
 117
117
-
 118
118
-
 119
119
-
 120
120
-
 121
121
-
 122
122
-
 123
123
-
 124
124
-
 125
125
-
 126
126
-
 127
127
-
 128
128
-
 129
129
-
 130
130
-
 131
131
-
 132
132
-
 133
133
-
 134
134
-
 135
135
-
 136
136
-
 137
137
-
 138
138
-
 139
139
-
 140
140
-
 141
141
-
 142
142
-
 143
143
-
 144
144
-
 145
145
-
 146
146
-
 147
147
-
 148
148
-
 149
149
-
 150
150
-
 151
151
-
 152
152
-
 153
153
-
 154
154
-
 155
155
-
 156
156
-
 157
157
-
 158
158
-
 159
159
-
 160
160
-
 161
161
-
 162
162
-
 163
163
-
 164
164
-
 165
165
-
 166
166
-
 167
167
-
 168
168
-
 169
169
-
 170
170
-
 171
171
-
 172
172
-
 173
173
-
 174
174
-
 175
175
-
 176
176
-
 177
177
-
 178
178
-
 179
179
-
 180
180
-
 181
181
-
 182
182
-
 183
183
-
 184
184
-
 185
185
-
 186
186
-
 187
187
-
 188
188
-
 189
189
-
 190
190
-
 191
191
-
 192
192
-
 193
193
-
 194
194
-
 195
195
-
 196
196
-
 197
197
-
 198
198


in altre lingue
- English: Trueshopping BC5802D
- français: Trueshopping BC5802D
- español: Trueshopping BC5802D
- Deutsch: Trueshopping BC5802D
- Nederlands: Trueshopping BC5802D
- polski: Trueshopping BC5802D
Altri documenti
-
Ikra BF XL 30 SSB R6002 Okay Raiffeisen DE Manuale del proprietario
-
AL-KO AL-KO 142 Manuale utente
-
Echo RM-4000SI Manuale utente
-
Agria 4500 Manuale del proprietario
-
-
Solo 155 Manuale utente
-
-
Makita MS-22U Manuale utente
-
-
Scheppach MFH5200-4P Manuale utente