Tecmate TM-500 OptiMate DC-DC Manuale del proprietario
- Categoria
- Caricabatterie per auto
- Tipo
- Manuale del proprietario

1
INSTRUCTIONS FOR USE
IMPORTANT: Read completely
before charging
MODE D’EMPLOI
IMPORTANT: à lire avant
d’utiliser l’appareil
ANWENDUNGSVORSCHRIFTEN
WICHTIG: Vollständig vor der
Benutzung lesen
GEBRUIKSAANWIJZING
BELANGRIJK: Lees volledig
voor gebruik
MODO DE EMPLEO
IMPORTANTE: a leer antes de
utilizar el aparato
INSTRUÇÕES DE UTILIZAÇÃO
IMPORTANTE: Ler antes de
utilizar.
ISTRUZIONI PER L’USO
IMPORTANTE: da leggere prima
di utilizzare l’apparecchio
INSTRUKTIONER
VIKTIGT: läs följande fullständiga
instruktioner för användningen
innan du använder laddaren
Automatic charger for 12V lead-acid & 12.8V
LiFePO4 batteries • Chargeur automatique
pour batteries 12V plomb-acide & 12.8V
LiFePO4 • Automatische Ladegerät für 12V
Blei-Säure & 12.8V LiFePO4 Batterien
• Cargador automático para baterías 12V
plomo-ácido & 12.8V LiFePO4 • Caricabatterie
automatico per batterie 12V piombo-acido &
12.8V LiFePO4 • Automatische lader voor 12V
loodzuur & 12.8V LiFePO4 accu’s • Automatisk
laddare för 12V blybatterier & 12.8V LiFePO4
batterier • Carregador automático para
baterias de 12V chumbo/ácido & 12.8V
LiFePO4
MODEL: TM500 (v2 2017)
INPUT DC: 12V-16VDC 2.7A max.
OUTPUT DC: 2A 12V
12V - 16V
STD / AGM-MF / GEL /
AGM CYCLIC CELL / LITHIUM
+ -
DC IN / Courant d’entrée directe /
Gelijkstroom-ingang / entrada de corriente
directa / ingresso diretto di corrente /
entrada decorrente direta / Likström ingång /
Gleichstrom-Eingang
DC DC
DC DC
Low Volt
Start
(from 2V)
CHARGEOptiMate
DC-DC
Maintenance
5 6
Charge
retention
TEST
OPTIMIZEPULSE SAVE
copyright © 2017 TecMate International – TM500DC-IN1-170426
2V
13.6V
14.4V
1 2 3 4 5 6

12V
CHARGE
SAVE
MAINTAIN
TEST - - -
BATTERY SAVING
CHARGER-MAINTAINER
LEAD-ACID & LIFEPO4
12V
LIFEPO4LEAD-ACID
12.8V12.8V
LFP
12V
DC DC
DC DCDC DC
Model: TM500 v2
OUTPUT/SORTIE/SALIDA/LEISTUNG/
USCITA/UITGANG/UTSPÄNNING/
SAIDA: 12V 2A
DC IN / Courant d'entrée directe /
Gelijkstroom-ingang / entrada de
corriente directa / ingresso diretto di
corrente /entrada decorrente direta /
Likström ingång / Gleichstrom-Eingang
12-16V 2.7A
max
DC IN
LED #1 - SOURCE BATTERY LOW (<11V)
LED #2 - Reverse polarity
LED #3 - LOW VOLT SAVE (≥ 2V)
LED #4 - CHARGE & OPTIMIZE
LED #5 - GREEN: TEST & MAINTAIN
LED #6 - RED: TEST & MAINTAIN
12
34
5
6
12V SOURCE BATTERY
/ DC SUPPLY
12V / 12.8V BATTERY FOR
CHARGING & MAINTENANCE
25%
50%
75%
100%
12.8V
12.6V
12.4V
12.2V
12.0V
10%
10%
30%
13.0V
13.1V
50%
75%
13.2V
13.6V
100%
LiFePO4
AGM
25%
50%
75%
100%
10%
STD
11.8V
% : VOLTS
TABLE 1
2

3
DC DC
THIS PORTION OF THE MANUAL CONTAINS IMPORTANT SAFETY INSTRUCTIONS
FOR THE OPTIMATE DC-DC 12V 2A BATTERY CHARGER. IT IS OF THE UTMOST
IMPORTANCE THAT EACH TIME, BEFORE USING THE CHARGER, YOU READ AND
EXACTLY FOLLOW THESE INSTRUCTIONS. SAVE THESE INSTRUCTIONS.
AUTOMATIC CHARGER FOR 12V LEAD-ACID OR 12.8V LIFEPO4 BATTERIES
DO NOT USE FOR NiCd, NiMH, any other Li-Ion OR NON-RECHARGEABLE BATTERIES.
1. CAUTION : 12V DC APPLIANCE. DO NOT CONNECT TO AC POWER .
2. For indoor use only. Do not expose charger to rain or snow.
3. Use of an attachment not recommended or sold by the battery charger manufacturer may result in a risk of fire, electric shock,or
injury to persons.
4. To reduce risk of damage to electric plug and cord,pull by plug rather than cord when disconnecting charger.
5. An extension cord should not be used unless absolutely necessary. Use of improper extension cord could result in a risk of fire and
electric shock.If extension cord must be used make sure that :
a) pins on plug of extension cord are the same number, size and shape as those of plug on charger.
b) the extension cord is property wired and in good electrical condition,and
c) the conductor wire size is large enough for the DC ampere rating of the charger as specified in the table below.
DC INPUT RATING IN AMPERES
Equal to or greater than But less than LENGTH OF CORD,
FEET (m) AWG SIZE
OF CORD
2A 3A 25 (17.6)
50 (15.2)
100 (30.5)
18
16
14
6. Do not operate charger with damaged cord or plug - replace the cord or plug immediately.
7. Do not operate charger if it has received a sharp blow, been dropped,or otherwise damaged in any way; take it to a qualified
serviceman.
8. Do not disassemble charger; take it to a qualified serviceman when service or repair is required.
Incorrect reassembly may result in a risk of electric shock or fire.
9. To reduce risk of electric shock, unplug the charger from supply before attempting any maintenance or cleaning.
Turning off controls will not reduce this risk.Clean only with slightly moist,not wet, cloth. Do not use solvents.
10. WARNING - RISK OF EXPLOSIVE GASES.
a) WORKING IN VICINITY OF A LEAD-ACID BATTERY IS DANGEROUS. B ATTERIES GENERATE EXPLOSIVE GASES DURING NORMAL
BATTERY OPERATION. FOR THIS REASON, IT IS OF UTMOST IMPORTANCE THAT YOU FOLLOW THE INSTRUCTIONS EACH TIME YOU
USE THE CHARGER.
b) To reduce risk of battery explosion,follow these instructions and those published by the battery manufacturer and manufacturer of
any equipment you intend to use in vicinity of the battery. Review cautionary marking on these products and on engine.
11. PERSONAL PRECAUTIONS.
a) Someone should be within range of your voice OR close enough to come to your aid when you work near a lead-acid battery.
b) Have plenty of fresh water and soap nearby in case battery acid contacts skin, clothing or eyes.
c) Wear complete eye protection and clothing protection. Avoid touching eyes while working near battery.
d) If battery acid contacts or enters eye, flood eye with cold running water for at least 10 minutes and get medical attention
immediately. If battery acid contacts skin or clothing, wash immediately with soap & water. If acid enters an eye , immediately flood
eye with running cold water for at least 10 minutes & get medical attention immediately.
e) NEVER smoke or allow a spark or flame in vicinity of battery or engine.
f) Be extra cautious to reduce risk of dropping a metal tool onto battery. It might spark or short-circuit battery or other electrical part
that may cause explosion.
g) Remove personal metal items such as rings, bracelets ,necklaces , and watches when working with a lead-acid battery. A
lead-acid battery can produce a short-circuit current high enough to weld a ring or the like to metal, causing a severe burn.
i) NEVER charge a frozen battery.
IMPORTANT SAFETY
INSTRUCTIONS FOR CANADA &
USA
SAFETY

4
12. PREPARING TO CHARGE
a) If necessary to remove battery from vehicle to charge,always remove grounded terminal from battery first.
Make sure all accessories in the vehicle are off, so as not to cause an arc.
b) Be sure area around battery is well ventilated while battery is being charged. Gas can be forcefully blown away by using a piece of
cardboard or other non-metallic material as a fan.
c) Clean battery terminals.Be careful to keep corrosion from coming in contact with eyes.
d) Add distilled water in each cell until battery acid reaches level specified by battery manufacturer. This helps purge excessive gas
from cells. Do not overfill. For a battery without cell caps, such as valve regulated lead acid (VRLA) or absorbed glass mat (AGM)
batteries, carefully follow manufacturer’s recharging instructions.
e) Study all battery manufacturer’s specific precautions such as removing or not removing cell caps while charging and
recommended rates of charge.
f) Determine voltage of battery by referring to vehicle or other user’s manual and BEFORE MAKING THE BATTERY CONNECTIONS,
MAKE SURE TH AT THE VOLTAGE OF THE BATTERY YOU ARE GOING TO CHARGE MATCHES THE OUTPUT VOLTAGE OF THE CHARGER.
13. CHARGER LOCATION.
a) Locate charger as far away from battery as DC cables permit.
b) Never place charger directly above battery being charged; gases from battery will corrode and damage the charger. c) Never allow
battery acid to drip on charger when reading gravity or filling battery. Do not operate charger in a closed-in area or restrict ventilation
in any way.
d) Do not set a battery on top of charger. IMPORTANT : Place charger on a hard flat surface or mount onto a vertical surface. Do not
place on plastic, leather or textile surface.
14. DC CONNECTION PRECAUTIONS
a) Connect and disconnect DC output clips only after setting any charger switches to off position and removing DC cord from supply.
Never allow clips to touch each other, however should this happen no damage will result to the charger circuit & the automatic
charging programme will just reset to «start».
b) Attach clips to battery and chassis as indicated in 15(e), 15(f), and 16(b) through 16(d).
NOTE : This battery charger has an automatic safety feature that will prevent it from operating if the battery has been inversely
connected. Set charger switches to off position and/or removeDC cord from the DC supply, disconnect the battery clips, then
reconnect correctly according to the instructions below.
15. FOLLOW THESE STEPS WHEN BATTERY IS INSTALLED IN VEHICLE. A SPARK
NEAR A BATTERY MAY CAUSE BATTERY EXPLOSION. TO REDUCE RISK OF A
SPARK NEAR BATTERY :
a) Position AC and DC cords so as to reduce risk of damage by hood, door or moving engine part.
b) Stay clear of fan -blades, belts,pulleys,and other parts that can cause injury to persons.
c) Check polarity of battery posts.POSITIVE (POS, P, +) battery post usually has larger diameter than NEGATIVE (NEG, N,–) post.
d) Determine which post of battery is grounded (connected) to the chassis. If negative post is grounded to chassis (as in most
vehicles),see (e). If positive post is grounded to the chassis,see (f).
e) For negative-grounded vehicle, connect POSITIVE (RED) clip from battery charger to POSITIVE (POS, P, + ) ungrounded post of
battery. Connect NEGATIVE (BLACK) clip to vehicle chassis or engine block away from battery. Do not connect clip to carburetor, fuel
lines, or sheet-metal body parts. Connect to a heavy gage metal part of the frame or engine block.
f) For positive-grounded vehicle, connect NEGATIVE (BLACK) clip from battery charger to NEGATIVE (NEG. N , -) ungrounded post of
battery. Connect POSITIVE (RED) clip to vehicle chassis or engine block away from battery. Do not connect clip to carburetor, fuel
lines, or sheet-metal body parts. Connect to a heavy gage metal part of the frame or engine block.
g) When disconnecting charger, turn switches to off, disconnect AC cord,remove clip from vehicle chassis,and then remove clip from
battery terminal.
h) See operating instructions for length of charge information.
16. FOLLOW THESE STEPS WHEN BATTERY IS OUTSIDE VEHICLE. A SPARK NEAR THE BATTERY MAY CAUSE BATTERY
EXPLOSION. TO REDUCE RISK OF A SPARK NEAR BATTERY :
a) Check polarity of battery posts. POSITIVE (POS, P, +) battery post usually has a larger diameter than NEGATIVE (NEG,N, -) post.
b) This battery charger has an automatic safety feature that will prevent it from operating if the battery has been inversely connected.
The charger does not allow charge current unless a voltage of at least 1V is sensed.
c) Connect POSITIVE (RED) charger clip to POSITIVE (POS, P, +) post of battery.
d) Connect NEGATIVE (BLACK) charger clip to NEGATIVE (NEG, N, -) battery post of the battery.
e) Do not face battery when making final connection.
f) When disconnecting charger, always do so in reverse sequence of connecting procedure & break first connection while as far away
from battery as practical.
g) A marine (boat) battery must be removed & charged on shore. To charge it on board requires equipment specially designed for
marine use.
SAFETY US & CAN

5
DC DC
AUTOMATIC CHARGER FOR 12V LEAD-ACID & 12.8V LiFePO4 BATTERIES,
AS FOUND IN:
DO NOT USE FOR NiCd, NiMH, Li-Ion OR NON-RECHARGEABLE BATTERIES.
Input: 12 - 16VDC 2.7A max. (charged 12V BATTERY OR stable 15V 3A DC SUPPLY)
Charge rate: approximately 2 Ah / hour, will recharge a 96Ah battery in 48 hours.
IMPORTANT: READ THE FOLLOWING INSTRUCTIONS BEFORE USING THE CHARGER
This appliance can be used by children aged from 8 years and above and persons with reduced
physical,sensory or mental capabilities or lack of experience and knowledge if they have been
given supervision or instruction concerning use of the appliance in a safe way and understand
the hazards involved. Children shall not play with the appliance. Cleaning and user
maintenance shall not be made by children without supervision.
SAFETY WARNING AND NOTES: Batteries emit EXPLOSIVE GASES - prevent flame or sparks near batteries.
Disconnect DC input supply before making or breaking DC/battery connections. Battery acid is highly corrosive. Wear
protective clothing and eyewear and avoid contact. In case of accidental contact, wash immediately with soap and
water. Check that the battery posts are not loose; if so, have the battery professionally assessed. If the battery posts are
corroded, clean with a copper wire brush; if greasy or dirty clean with a rag damped in detergent. Use the charger only if
the input and output leads and connectors are in good, undamaged condition. If the input cable is damaged, it is
essential to have it replaced without delay by the manufacturer, his authorised service agent or a qualified workshop, to
avoid danger. Protect your charger from acid and acid fumes and from damp and humid conditions both during use and
in storage. Damage resulting from corrosion, oxidation or internal electrical short-circuiting is not covered by warranty.
Distance the charger from the battery during charging to avoid contamination by or exposure to acid or acidic vapours. If
using it in the horizontal orientation, place the charger on a hard, flat surface, but NOT on plastic, textile or leather. Use
the fixing holes provided in the enclosure base to attach the charger to any convenient, sound vertical surface.
EXPOSURE TO LIQUIDS: This charger is designed to withstand exposure to liquids accidentally spilled or splashed
onto the casing from above, or to light rainfall. Prolonged exposure to falling rain is inadvisable and longer service life
will be obtained by minimizing such exposure.Failure of the charger due to oxidation resulting from the eventual
penetration of liquid into the electronic components, connectors or plugs,is not covered by warranty.
BATTERY CONNECTIONS: INPUT: A set of fused battery clips is supplied. OUTPUT: 2 interchangeable connection
sets are available, supplied with the charger is a set of battery clips for charging the battery off-vehicle, the other
connection set comes with metal eyelet lugs for permanent connection to the battery posts, and re-sealable
weatherproof cap on the connector that connects to the charger output cable. This connection set allows easy and sure
connection of the charger to maintain the battery on-vehicle. The resealable weatherproof cap is designed to protect the
connector from dirt and damp whenever the charger is not attached. Consult a professional service agent for assistance
in attaching the metal eyelets to the battery posts. Secure the connector with weatherproof cap so that it cannot foul any
moving part of the vehicle or the cable can be pinched or damaged by sharp edges. The in-line fuse in the eyelets
connection set protects the battery against such accidental shorting across positive and negative conductors. Replace
any burnt fuse only with a similar new fuse of 15A rating.
CONNECTING THE CHARGER TO THE BATTERY
1. Disconnect SOURCE BATTERY before making or breaking DC / battery connections of battery under charge.
2. If charging a battery in the vehicle with the battery clips, before making connections, first check that the battery
clips can be safely and securely positioned clear from surrounding wiring, metal tubing or the chassis. Make
connections in the following order: First connect to the battery terminal not connected to the chassis (normally
positive), then connect the other battery clip (normally negative) to the chassis well away from the battery and fuel
line. Always disconnect in reverse sequence.
3. When charging a battery out of the vehicle with the battery clips, place it in a well ventilated area. Connect the
charger to the battery: RED clamp to POSITIVE (POS, P or +) terminal and BLACK clamp to NEGATIVE (NEG, N or –)
terminal. Make sure the connections are firm and secure. Good contact is important.
SAFETY

6
4. If the battery is deeply discharged (and possibly sulphated), remove from the vehicle and inspect the
battery before connecting the charger for a recovery attempt. Visually check the battery for mechanical
defects such as a bulging or cracked casing, or signs of electrolyte leakage. If the battery has filler caps and the
plates within the cells can be seen from the outside, examine the battery carefully to try to determine if any cells
seem different to the others (for example, with white matter between the plates, plates touching). If mechanical
defects are apparent do not attempt to charge the battery, have the battery professionally assessed. CHARGING:
For safety reasons, the OptiMate output will only activate if a battery retaining at least 1V is connected. A battery
left deep-discharged for an extended period may develop permanent damage in one or more cells. Such batteries
may heat up excessively during high current charging. Monitor the battery temperature during the first hour, then
hourly there-after. Check for unusual signs, such as bubbling or leaking electrolyte, heightened activity in one cell
compared to others, or hissing sounds. If at any time the battery is uncomfortably hot to touch or you notice any
unusual signs, DISCONNECT THE CHARGER IMMEDIATELY.
5. If the battery is new, before connecting the charger read the battery manufacturer’s safety and operational
instructions carefully. If applicable, carefully and exactly follow acid filling instructions.
USING THE OPTIMATE DC-DC: PROCEEDING TO CHARGE
CONNECTING THE CHARGER TO A DC SUPPLY (DC adapter rated at minimum 15V 3A or a fully
charged 12V battery): When the OptiMate DC-DC 12V 2A is connected to a SOURCE BATTERY or DC supply
measuring at least 12V (range: 12-16V) LED #3 and 4# will flash twice and then continue to slowly flash for one minute
to indicate it is ready for a battery requiring charge & maintenance to be connected. If a battery is not connected the
charger shuts off completely. The charger will activate if connected to a recipient battery measuring 10V or more OR to
reset the charger: 1) disconnect from source battery, 2) connect to the battery to be charged, 3) re-connect to the
SOURCE BATTERY or DC supply.
SOURCE BATTERY: Source battery capacity (in Ah) should ideally be 1.5 times higher than the battery to be charged.
E.G. to recharge a flat 10Ah battery, you need a 15Ah source battery. The 12V SOURCE BATTERY should ideally be rated
for deep cycle use.
POWER CONSUMPTION FROM SOURCE BATTERY WHEN MAINTAINING A VEHICLE BATTERY: The
power consumption depends on the current demand of vehicle / electronic circuitry from the battery to be maintained.
As an easy reference: For every 10mA of drain current by vehicle / connected circuitry, assume a drain of 0.30Ah per
day (24 hours) from the source battery. E.G. Source battery min. capacity for a 90 day period if current drain from
vehicle battery is 10mA : 0.3Ah x 90 = 27Ah.
CHARGING TIME: The time required for the OptiMate DC-DC 12V 2A to complete a charge on a flat but otherwise
undamaged battery is roughly equal to 1/2 the battery’s Ah rating, so a 10Ah battery should take no more than about 5
hours to progress to Step 4. Deep-discharged batteries may take significantly longer.
The LED indicators referred to below, and the clauses dealing with them, are sequenced as they may come on
through the course of the program.
12V
CHARGE
SAVE
MAINTAIN
TEST - - -
BATTERY SAVING
CHARGER-MAINTAINER
LEAD-ACID & LIFEPO4
12V
LIFEPO4LEAD-ACID
12.8V12.8V
LFP
12V
DC DC
DC DCDC DC
Model: TM500 v2
OUTPUT/SORTIE/SALIDA/LEISTUNG/
USCITA/UITGANG/UTSPÄNNING/
SAIDA: 12V 2A
DC IN / Courant d'entrée directe /
Gelijkstroom-ingang / entrada de
corriente directa / ingresso diretto di
corrente /entrada decorrente direta /
Likström ingång / Gleichstrom-Eingang
12-16V 2.7A
max
DC IN
12
34
5
6
1. LED #1 - Lights to warn the SOURCE BATTERY voltage has reduced below 12V (low charge level). Recharge
and reconnect for further maintenance. Once the SOURCE BATTERY voltage reduces below 11V OptiMate DC-DC
12V 2A will shut off to avoid deep discharging the SOURCE BATTERY.
2. LED #2 indicates inverse polarity - wrong output connections. Swap around to activate output.

7
3. LED #3 SAVE lights If the battery is extremely flat (deep-discharged or sulphated), Time: 4 hours.
3.1 LOW VOLT SAVE (from 2V) to 8.8V (LED #3 steady on ) : Current is limited to 200mA so that the battery may
gently recover to a safe voltage level of 8.8 Volts. Batteries able to accept 0.2A of charge current will advance to
PULSE recovery.
3.2 PULSE recovery - LED #3 steady on: Current up to 2A is delivered in pulses to prepare the battery to accept
normal charge. This mode is particularly effective for recovery of factory activated / “hi‑performance” pure lead
or cyclic cell AGM batteries
4. LED #4 Charge and charge verification
4.1 CHARGE: The BULK CHARGE stage delivers a constant current of about 2 Amps into the battery, up to a voltage
of 14.2 -14.5V.
4.2 Optimize / Pulsed absorption: Engages when the voltage has reached 14.3V for the first time during CHARGE
mode. Current is delivered in pulses, varying between 0.2 and 2A and up to a voltage of 14.2 - 14.4V, to bring the
battery to full charge in the shortest possible time. Charge time is usually extended if there is higher than expected
current draw by connected circuitry or battery health is less than optimal.
NOTE: For safety reasons there is an overall charge time limit of 48 hours.
5. VOLTAGE RETENTION TEST: LED #5 flashes every 3 seconds
(single flash = good lead-acid battery, double flash = good lithium battery)
Delivery of current to the battery is interrupted for 30 minutes to allow the program to determine the battery’s ability
to retain charge. For batteries with a good state of health LED #5 (green) should continue to flash for the full 30 minute
period (single flash = good lead-acid battery, double flash = good lithium battery). For a battery unable to retain at least
12.4V, LED #6 will light and the program will immediately progress to STEP6. Read the section NOTES ON TEST
RESULTS on reasons for poor test results or how to test a battery that returns a good result but cannot deliver sufficient
power once it is returned to service.
6. MAINTENANCE CHARGE: LED #5 / 6
LED #5 or 6 indicates depending on the outcome of the voltage retention test.
The maintenance charge mode is designed to preserve the DC source battery whilst maintaining the battery connected
for maintenance at full charge. Intermittent charge is delivered to keep the battery maintained at full charge.
Charge is delivered when voltage of the maintained battery reduces below 13.2V and continues until the voltage reaches
13.6V. LED #5 or 6 indicates continuously during the charge period. After reaching 13.6V charging is interupted and
the voltage is monitored. During battery monitoring mode LED #5 or 6 will flash. The Maintenance Charge (STEP 6)
and Voltage retention (STEP 5) alternate and repeat every 30 minutes until either the SOURCE battery (or DC supply) or
MAINTAINED battery is disconnected or the SOURCE battery is completely discharged.
NOTE 1: Current demand is determined by the battery and the circuitry connected to the battery. A higher current
demand will deplete the source battery faster.
NOTE 2: If during the MAINTENANCE CHARGE a battery voltage drops below 12.4V, possibly due to a high current draw
from an external circuit connected to the battery, LED #4 CHARGE lights and a continuous 2A charge will be delivered.
Maintaining a battery for extended periods: The OptiMate will maintain a battery whos basic condition is
good, for months at a time. At least once every two weeks, check that the connections between the charger and battery
are secure, and, in the case of batteries with filler caps on each cell, disconnect the battery from the charger, check the
level of the electrolyte and if necessary, top up the cells (with distilled water, NOT acid), then reconnect. When
handling batteries or in their vicinity, always take care to observe the SAFETY WARNINGS above.
Notes on TEST results:
1. If the red LED #6 lights a significant problem exists. The red LED means that after being charged the battery’s voltage
is not being sustained above 12.4V (roughly equal to 50% charge in a sealed AGM battery) or that despite recovery
attempts the battery was irrecoverable. This may be due to a defect in the battery itself, such as a short-circuited cell or
total sulphation, or, in the case of a battery still connected to the electrical system it supports, the red LED #6 may be
signalling a loss of current through deteriorated wiring or a degraded switch or contact, or in-circuit current-consuming
accessories. A sudden load such as vehicle headlights being switched on while the charger is connected can also cause
the battery voltage to dip significantly.
2. GOOD TEST RESULT, but the battery cannot deliver sufficient power: Permanent damage within the battery may be
causing excessive self discharge (caused by the battery itself, even a partly damaged battery may initially retain
sufficient power, but lose power faster than normal there-after). Disconnect the battery from the OptiMate. After at least
12 hours reconnect and observe if SAVE LED #3 lights, indicating the battery was unable to hold charge. If CHARGE LED
#4 lights the battery retained at least 12.4V. Or measure the voltage and compare to table 1 on page 2.

88
DC DC
INSTRUCTIONS IMPORTANTES CONCERNANT LA SÉCURITÉ
CONSERVER CES INSTRUCTIONS. CE MANUEL CONTIENT DES INSTRUCTIONS
IMPORTANTES CONCERNANT LA SÉCURITÉ ET LE FONCTIONNEMENT DU
CHARGEUR OPTIMATE DC-DC.
CHARGEUR AUTOMATIQUE POUR BATTERIES 12V PLOMB-ACIDE
& 12.8VLiFePO4
NE CONVIENT PAS POUR LES BATTERIES NiCd, NiMH,
Li-Ion OU NON RECHARGEABLES.
AVERTISSEMENT :
N’utiliser l’appareil qu’à l’intérieur. Ne pas exposer à la pluie ou à la neige.
ATTENTION: appareil à alimentation CC 12V. NE PAS CONNECTER UNE ALIMENTATION AC.
a) CONSERVER CES INSTRUCTIONS. CE MANUEL CONTIENT DES INSTRUCTIONS IMPORTANTES CONCERNANT LA
SÉCURITÉ ET LE FONCTIONNEMENT.
b) IL EST DANGEREUX DE TRAVAILLER A PROXIMITÉ D’UNE BATTERIE AU PLOMB. LES BATTERIES PRODUISENT DES GAZ
EXPLOSIFS EN SERVICE NORMAL. IL EST AUSSI IMPORTANT DE TOUJOURS RELIRE LES INSTRUCTIONS AVANT
D’UTILISER LE CHARGEUR ET DE LES SUIVRE À LA LETTRE.
c) POUR RÉDUIRE LE RISQUE D’EXPLOSION, LIRE CES INSTRUCTIONS ET CELLES QUI FIGURENT SUR LA BATTERIE.
d) NE JAMAIS FUMER PRÈS DE LA BATTERIE OU DU MOTEUR ET ÉVITER TOUTE ÉTINCELLE OU FLAMME NUE À
PROXIMITÉ DE CES DERNIERS.
e) UTILISER LE CHARGEUR POUR CHARGER UNE BATTERIE AU PLOMB UNIQUEMENT. CE CHARGEUR N’EST PAS CONÇU
POUR ALIMENTER UN RÉSEAU ÉLECTRIQUE TRÈS BASSE TENSION NI POUR CHARGER DES PILES SÈCHES. LE FAIT
D’UTILISER LE CHARGEUR POUR CHARGER DES PILES SÈCHES POURRAIT ENTRAÎNER L’ÉCLATEMENT DES PILES ET
CAUSER DES BLESSURES OU DES DOMMAGES.
f) NE JAMAIS CHARGER UNE BATTERIE GELÉE.
g) S’IL EST NÉCESSAIRE DE RETIRER LA BATTERIE DU VÉHICULE POUR LA CHARGER, TOUJOURS DÉBRANCHER LA
BORNE DE MISE À LA MASSE EN PREMIER. S’ASSURER QUE LE COURANT AUX ACCESSOIRES DU VÉHICULE EST COUPÉ
AFIN D’ÉVITER LA FORMATION D’UN ARC.
h) PRENDRE CONNAISSANCE DES MESURES DE PRÉCAUTION SPÉCIFIÉES PAR LE FABRICANT DE LA BATTERIE, P. EX.,
VÉRIFIER S’IL FAUT ENLEVER LES BOUCHONS DES CELLULES LORS DU CHARGEMENT DE LA BATTERIE, ET LES TAUX DE
CHARGEMENT RECOMMANDÉS.
i) SI LE CHARGEUR COMPORTE UN SÉLECTEUR DE TENSION DE SORTIE, CONSULTER LE MANUEL DE L’USAGER DE LA
VOITURE POUR DÉTERMINER LA TENSION DE LA BATTERIE ET POUR S’ASSURER QUE LA TENSION DE SORTIE EST
APPROPRIÉE. SI LE CHARGEUR N’EST PAS MUNI D’UN SÉLECTEUR, NE PAS UTILISER LE CHARGEUR À MOINS QUE LA
TENSION DE LA BATTERIE NE SOIT IDENTIQUE À LA TENSION DE SORTIE NOMINALE DU CHARGEUR.
j) NE JAMAIS PLACER LE CHARGEUR DIRECTEMENT SOUS LA BATTERIE À CHARGER OU AU-DESSUS DE CETTE DERNIÈRE.
LES GAZ OU LES FLUIDES QUI S’ÉCHAPPENT DE LA BATTERIE PEUVENT ENTRAÎNER LA CORROSION DU CHARGEUR OU
L’ENDOMMAGER. PLACER LE CHARGEUR AUSSI LOIN DE LA BATTERIE QUE LES CABLES C.C. LE PERMETTENT.
k) NE PAS FAIRE FONCTIONNER LE CHARGEUR DANS UN ESPACE CLOS ET/OU NE PAS GÊNER LA VENTILATION.
l) METTRE LES INTERRUPTEURS DU CHARGEUR HORS CIRCUIT ET RETIRER LE CORDON D’ALIMENTATION CC AVANT DE
METTRE ET D’ENLEVER LES PINCES DU CORDON C.C. S’ASSURER QUE LES PINCES NE SE TOUCHENT PAS.
m) SUIVRE LES ÉTAPES SUIVANTES LORSQUE LA BATTERIE SE TROUVE DANS LE VÉHICULE.
UNE ÉTINCELLE PRÈS DE LA BATTERIE POURRAIT PROVOQUER L’EXPLOSION DE CETTE DERNIÈRE. POUR RÉDUIRE LE RISQUE
D’ÉTINCELLE À PROXIMITÉ DE LA BATTERIE :
(i) PLACER LES CORDONS C.C. DE MANIÈRE À ÉVITER QU’ILS SOIENT ENDOMMAGÉS PAR LE CAPOT, UNE PORTIÈRE OU LES
PIÈCES EN MOUVEMENT DU MOTEUR ;
(ii) FAIRE ATTENTION AUX PALES, AUX COURROIES ET AUX POULIES DU VENTILATEUR AINSI QU’À TOUTE AUTRE PIÈCE
SUSCEPTIBLE DE CAUSER DES BLESSURES ;
(iii) VÉRIFIER LA POLARITÉ DES BORNES DE LA BATTERIE. LE DIAMÈTRE DE LA BORNE POSITIVE (POS, P, +) EST
GÉNÉRALEMENT SUPÉRIEUR À CELUI DE LA BORNE NÉGATIVE (NÉG, N, –) ;
SÉCURITÉ US & CAN

99
(iv) DÉTERMINER QUELLE BORNE EST MISE À LA MASSE (RACCORDÉE AU CHÂSSIS). SI LA BORNE NÉGATIVE EST RACCORDÉE
AU CHÂSSIS (COMME DANS LA PLUPART DES CAS), VOIR LE POINT (v). SI LA BORNE POSITIVE EST RACCORDÉE AU CHÂSSIS,
VOIR LE POINT (vi) ;
(v) SI LA BORNE NÉGATIVE EST MISE À LA MASSE, RACCORDER LA PINCE POSITIVE (ROUGE) DU CHARGEUR À LA BORNE
POSITIVE (POS, P, +) NON MISE À LA MASSE DE LA BATTERIE. RACCORDER LA PINCE NÉGATIVE (NOIRE) AU CHÂSSIS DU
VÉHICULE OU AU MOTEUR, LOIN DE LA BATTERIE. NE PAS RACCORDER LA PINCE AU CARBURATEUR, AUX CANALISATIONS
D’ESSENCE NI AUX PIÈCES DE LA CARROSSERIE EN TÔLE. RACCORDER À UNE PIÈCE DU CADRE OU DU MOTEUR EN TÔLE DE
FORTE ÉPAISSEUR ;
(vi) SI LA BORNE POSITIVE EST MISE À LA MASSE, RACCORDER LA PINCE NÉGATIVE (NOIRE) DU CHARGEUR À LA BORNE
NÉGATIVE (NÉG, N, –) NON MISE À LA MASSE DE LA BATTERIE. RACCORDER LA PINCE POSITIVE (ROUGE) AU CHÂSSIS DU
VÉHICULE OU AU MOTEUR, LOIN DE LA BATTERIE. NE PAS RACCORDER LA PINCE AU CARBURATEUR, AUX CANALISATIONS
D’ESSENCE NI AUX PIÈCES DE LA CARROSSERIE EN TÔLE. RACCORDER À UNE PIÈCE DU CADRE OU DU MOTEUR EN TÔLE DE
FORTE ÉPAISSEUR ;
(vii) BRANCHER LE CORDON D’ALIMENTATION C.A. DU CHARGEUR ;
(viii) POUR INTERROMPRE L’ALIMENTATION DU CHARGEUR, METTRE LES INTERRUPTEURS HORS CIRCUIT, RETIRER LE
CORDON C.A. DE LA PRISE, ENLEVER LA PINCE RACCORDÉE AU CHÂSSIS ET EN DERNIER LIEU CELLE RACCORDÉE À LA
BATTERIE.
n) SUIVRE LES ÉTAPES SUIVANTES LORSQUE LA BATTERIE EST À L’EXTÉRIEUR DU VÉHICULE.
UNE ÉTINCELLE PRÈS DE LA BATTERIE POURRAIT PROVOQUER L’EXPLOSION DE CETTE DERNIÈRE. POUR RÉDUIRE LE RISQUE D’ÉTINCELLE
À PROXIMITÉ DE LA BATTERIE :
(i) VÉRIFIER LA POLARITÉ DES BORNES DE LA BATTERIE. LE DIAMÈTRE DE LA BORNE POSITIVE (POS, P, +) EST
GÉNÉRALEMENT SUPÉRIEUR À CELUI DE LA BORNE NÉGATIVE (NÉG, N, –) ;
(ii) RACCORDER UN CÂBLE DE BATTERIE ISOLÉ No 6 AWG MESURANT AU MOINS 60 CM DE LONGUEUR À LA BORNE
NÉGATIVE (NÉG, N, –) ;
(iii) RACCORDER LA PINCE POSITIVE (ROUGE) À LA BORNE POSITIVE (POS, P, +) DE LA BATTERIE ;
(iv) SE PLACER ET TENIR L’EXTRÉMITÉ LIBRE DU CÂBLE AUSSI LOIN QUE POSSIBLE DE LA BATTERIE, PUIS RACCORDER LA
PINCE NÉGATIVE (NOIRE) DU CHARGEUR À L’EXTRÉMITÉ LIBRE DU CÂBLE ;
(v) NE PAS SE PLACER FACE À LA BATTERIE POUR EFFECTUER LE DERNIER RACCORDEMENT ;
(vi) RACCORDER LE CORDON D’ALIMENTATION C.A. DU CHARGEUR À LA PRISE ;
(vii) POUR INTERROMPRE L’ALIMENTATION DU CHARGEUR, METTRE LES INTERRUPTEURS HORS CIRCUIT, RETIRER LE
CORDON D’ALIMENTATION C.C., ENLEVER LA PINCE RACCORDÉE AU CHÂSSIS ET EN DERNIER LIEU CELLE RACCORDÉE À LA
BATTERIE. SE PLACER AUSSI LOIN QUE POSSIBLE DE LA BATTERIE POUR DÉFAIRE LA PREMIÈRE CONNEXION.
SÉCURITÉ US & CAN

10
SÉCURITÉ
DC DC
CHARGEUR AUTOMATIQUE POUR BATTERIES 12V PLOMB-ACIDE
& 12.8V LIFEPO4 :
NE CONVIENT PAS POUR LES BATTERIES NiCd, NiMH, Li-Ion
OU NON RECHARGEABLES.
Entrée : 12 - 16 VCC 2,7 A max. (BATTERIE 12 V OU ALIMENTATION CC 15 V 3A)
Vitesse de chargement : environ 2 Ah/heure, soit 48 heures pour une batterie de 96 Ah.
IMPORTANT : LIRE ENTIÈREMENT LES INSTRUCTIONS SUIVANTES
AVANT D’UTILISER LE CHARGEUR
Cet appareil peut être utilisé par des enfants âgés de 8 ans et plus et par des personnes
possédant des capacités physiques, sensorielles ou mentales réduites, ou manquant d’expérience
et de connaissance si elles bénéficient d’une surveillance ou ont reçu des instructions concernant
l’utilisation de l’appareil et comprennent les risques impliqués. Les enfants ne doivent pas jouer
avec l’appareil. Le nettoyage et l’entretien de l’appareil ne se fera pas par des enfants sans
surveillance.
AVERTISSEMENT DE SÉCURITÉ et REMARQUES : Les batteries émettent des GAZ EXPLOSIFS - il faut
interdire les flammes ou les étincelles à proximité.
Déconnecter l’alimentation d’entrée CC avant de connecter ou déconnecter l’alimentation CC batterie. L’acide des batteries est hautement
corrosif. L’acide des batteries est un puissant corrosif. Porter des vêtements et lunettes protecteurs et éviter tout contact. En cas de contact
accidentel, laver immédiatement à l’eau et au savon. S’assurer que les bornes des batteries ne sont pas branlantes ; le cas échéant la
batterie doit subir une évaluation professionnelle. Si les bornes sont corrodées, nettoyer à l’aide d’une brosse de cuivre ; s’ils sont gras ou
sales, nettoyer à l’aide d’un torchon trempé dans du détergent. Utiliser uniquement le chargeur si les câbles et connecteurs d’entrée et de
sortie sont en bon état et non endommagés. Si le câble d’entrée est endommagé, il est essentiel de le faire remplacer par le constructeur,
son agent de service autorisé ou un atelier qualifié, pour éviter tout danger. Protéger le chargeur contre les acides et fumées acides,
l’humidité et un environnement humide, aussi bien durant l’usage que l’entreposage. Les dégâts résultant de la corrosion, de l’oxydation ou
de courts-circuits internes ne sont pas couverts par la garantie. Durant le chargement, éloigner le chargeur de la batterie pour éviter la
contamination par l’acide ou les vapeurs acides ou l’exposition à ceux-ci. En cas d’utilisation horizontale, placer le chargeur sur une surface
dure et plane, PAS en plastique, tissu ou cuir. Utiliser les trous de fixation de la base pour fixer le chargeur sur toute surface verticale
appropriée et solide.
EXPOSITION AUX LIQUIDES : Ce chargeur est conçu pour résister à l’exposition aux liquides qui tomberaient accidentellement sur
le boîtier, ou à une pluie légère. Une exposition prolongée à des liquides tombants ou à la pluie est à déconseiller. Une durée de vie
supérieure résultera d’une telle précaution. Une panne due à l’oxydation résultant d’une pénétration de liquide dans les composants
électroniques,blocs connecteurs ou fiches,ne sera pas couverte par la garantie.
CONNEXIONS DE BATTERIE ENTRÉE : un jeu de pinces pour batterie à fusible est fourni.
SORTIE: l’appareil est livré avec deux jeux de connexion interchangeables, l’un muni de pinces crocodiles pour le chargement de
batteries hors véhicule, l’autre, optionnel, disposant de cosses à œillets pour la connexion permanente aux bornes de batterie, ainsi que
d’un capuchon résistant aux intempéries réouvrable sur le connecteur relié au chargeur. Ce jeu de connexion permet la connexion sûre et
facile du chargeur à la batterie sur véhicule. Le capuchon résistant aux intempéries réouvrable est conçu pour protéger le connecteur contre
la saleté et l’humidité lorsque le chargeur n’est pas connecté. Consulter un agent de service professionnel pour toute assistance à la
connexion des œillets métalliques aux bornes de batterie. Assurer le connecteur avec le capuchon résistant aux intempéries de manière à
ce qu’il ne puisse gêner aucune pièce mobile du véhicule et pour éviter le pincement du câble ou son endommagement par des bords
tranchants. Le fusible en ligne du jeu de connecteurs à œillets protège la batterie contre le court-circuitage accidentel des pôles positif et
négatif. Remplacer un fusible sauté uniquement par un autre similaire de 15A.
BRANCHEMENT DU CHARGEUR A LA BATTERIE
1. Déconnecter la BATTERIE SOURCE avant de connecter ou de déconnecter un l’alimentation CC batterie d’une batterie en charge.
2. Si vous chargez une batterie installée dans le véhicule avec les pinces pour batterie, avant les branchements, vérifiez d’abord que les
pinces pour batterie peuvent être positionnées en toute sécurité loin du câblage voisin, d’un tube métallique ou du châssis. Respectez
l’ordre qui suit : branchez d’abord la borne de la batterie non raccordée au châssis (normalement positive) puis, branchez l’autre
10

11
pince pour batterie (normalement négative) au châssis à un endroit bien éloigné de la batterie et du conduit de carburant. Débranchez
toujours dans l’ordre inverse.
3. Lorsque vous chargez une batterie hors du véhicule avec les pinces pour batterie, placez-la dans un endroit bien ventilé. Branchez le
chargeur à la batterie : La pince ROUGE sur la borne POSITIVE (POS, P ou +) et la pince NOIRE sur la borne NÉGATIVE (NEG, N ou –).
Vérifiez que les branchements sont bien fixés. Un bon contact est important.
4. Si la batterie est complètement déchargée (et probablement sulfatée), retirez-la du véhicule et inspectez la batterie avant de
brancher le chargeur pour une tentative de récupération. Vérifiez visuellement la batterie à la recherche de défauts mécaniques
tels qu’un gonflement ou un boîtier craquelé ou encore de signes de fuite d’électrolyte. Si la batterie présente des bouchons de
remplissage et que les plaques des cellules sont visibles de l’extérieur, examinez soigneusement la batterie pour tenter de déterminer
si certaines cellules semblent différentes des autres (par exemple, de la matière blanche entre les plaques, les plaques qui entrent en
contact). Si vous avez détecté des défauts mécaniques, ne chargez pas la batterie et faites-la examiner par un professionnel.
CHARGE: pour des raisons de sécurité, la sortie de l’OptiMate ne s’activera que si une batterie produisant au minimum 1V est
détectée. Une batterie profondément déchargée et négligée pour une période prolongée peut développer des dommages permanents
dans une ou plusieurs cellules. De telles batteries peuvent chauffer de manière excessive durant la charge à courant élevé. Vérifiez la
température de la batterie durant la première heure, ensuite toutes les heures. Surveillez des signes suspects, comme des
bouillonnements ou une fuite d’électrolyte, une activité plus importante dans une cellule comparée aux autres, ou des bruits de
sifflement. Si à un moment la batterie est inconfortablement chaude au toucher ou vous constatez des signes suspects,
DECONNECTEZ LE CHARGEUR IMMEDIATEMENT.
5. Si la batterie est neuve, avant de brancher le chargeur, lisez attentivement les instructions d’utilisation et de sécurité fournies par le
fabricant de la batterie. Si besoin est, suivez attentivement et exactement les instructions relatives au remplissage de l’acide.
UTILISER OPTIMATE CC-CC : CHARGE
RELIER LE CHARGEUR À UNE ALIMENTATION CC (tension/intensité nominale de l’adaptateur CC :
15 V/3 A minimum, ou batterie 12 V complètement chargée) : quand l’OptiMate CC-CC 12 V 2 A est
connecté à une BATTERIE SOURCE ou une source d’alimentation CC de 12 V minimum (plage : 12 – 16 V), les LED 3 et 4
s’allument deux fois, puis continuent à clignoter lentement pendant 1 minute pour indiquer que la batterie qui doit être
chargée et faire l’objet d’un entretien est prête à être connectée. Si aucune batterie n’est raccordée, le chargeur s’éteint
complètement. Le chargeur s’active s’il est relié à une batterie réceptrice mesurant 10V ou plus OU, pour réinitialiser le
chargeur: 1) débranchez-le de la batterie source, 2) branchez-le à la batterie à charger, 3) rebranchez-le à la BATTERIE
SOURCE ou à l’alimentation CC.
BATTERIE SOURCE : la capacité de la batterie source (en Ah) devrait idéalement être 1,5 fois plus grande que la batterie pour être
chargée. Par exemple, pour recharger une batterie de 10 Ah à plat, il vous faut une batterie source de 15 Ah. La BATTERIE SOURCE de 12 V
devrait être utilisée pour les cycles prolongés.
CONSOMMATION D’ÉNERGIE DE LA BATTERIE SOURCE LORS DE LA MAINTENANCE D’UNE BATTERIE
DE VÉHICULE : la consommation d’énergie dépend de la demande en courant du véhicule/du circuit électronique de la batterie qui doit
être entretenue. Comme référence simple : pour chaque courant débité de 10 mA par véhicule/circuit connecté, poser un drainage de
0,30Ah par jour (24h) à partir de la batterie source. Par exemple, une batterie source d’une capacité d’environ 90 jours si le drainage de
courant de la batterie du véhicule est de 10 mA : 0,3 Ah x 90 = 27 Ah.
TEMPS DE CHARGE : Le temps requis par l’OptiMate DC-DC 12V 2A si la batterie est déchargée mais toutefois en bon état, est
environ égal à la moitié de la capacité de la batterie en Ah. Il faudra donc à peu près 5 heures pour qu’une batterie de 10Ah soit amenée à
l’étape 4. Les batteries en état de décharge profonde peuvent prendre beaucoup plus de temps.
Les indications LED évoquées ci-dessous et les textes qui s’y rapportent apparaissent dans l’ordre de déroulement logique du
programme.
11
12V
CHARGE
SAVE
MAINTAIN
TEST - - -
BATTERY SAVING
CHARGER-MAINTAINER
LEAD-ACID & LIFEPO4
12V
LIFEPO4LEAD-ACID
12.8V12.8V
LFP
12V
DC DC
DC DCDC DC
Model: TM500 v2
OUTPUT/SORTIE/SALIDA/LEISTUNG/
USCITA/UITGANG/UTSPÄNNING/
SAIDA: 12V 2A
DC IN / Courant d'entrée directe /
Gelijkstroom-ingang / entrada de
corriente directa / ingresso diretto di
corrente /entrada decorrente direta /
Likström ingång / Gleichstrom-Eingang
12-16V 2.7A
max
DC IN
12
34
5
6

12
1. LED #1 S’allume pour signaler que la tension de la BATTERIE SOURCE est tombée sous 12 V (niveau de charge faible).
Recharger et reconnecter pour une maintenance complémentaire. Une fois que la tension de la BATTERIE SOURCE chute sous 11 V,
OptiMate DC-DC 12 V 2 A s’éteindra pour éviter une décharge profonde de la BATTERIE SOURCE
2. LED #2 polarités inverses – connexions erronées en sortie. Corriger pour activation.
3. LED #3 RÉCUPÉRATION s’allume si la batterie est extrêmement faible (c.-à-d. profondément déchargée ou sulfatée).
3.1 RÉCUPÉRATION FAIBLE VOLTAGE (de 2V) à 8,8V (LED nº3 fixe): le courant est limité à 200mA de sorte que la batterie peut
doucement revenir à un niveau de tension sûr de 8,8V. Les batteries pouvant accepter 0,2 A de charge électrique iront vers une
récupération par IMPULSION.
3.2 La récupération par IMPULSIONS - LED #3 fixe : le courant remove jusqu’à 2A est envoyé par impulsions pour préparer la batterie
à recevoir la charge.
4. LED #4 Charge et vérification de charge
4.1 CHARGE : Etape de CHARGE principale (LED #3) : un courant constant de 2A maximum est délivré dans la batterie, jusqu’à une
tension de 14,2 à 14,5V
4.2 Optimisation/Absorption par impulsions: s’engage quand la tension atteint 14,3V pour la première fois pendant le mode CHARGE. Le
courant passe par impulsion, variant de 0,2 à 2A et jusqu’à une tension de 14,2 à 14,4V pour ramener la batterie à pleine charge en un
temps le plus court possible. Le temps de charge est généralement élargi si la sollicitation est plus importante que prévu en raison de
l’état non optimal du circuit connecté ou de la batterie.
REMARQUE : pour des raisons de sécurité, il y a une limite de charge absolue de 48 heures.
5. TEST DE RÉTENTION DE TENSION : la LED nº 5 clignote toutes les 3 secondes
(clignotement simple = bonne batterie plomb-acide, clignotement double = bonne batterie au lithium).
L’arrivée du courant dans la batterie est interrompue pendant 30 minutes* pour permettre au programme de déterminer la capacité de la
batterie à retenir la charge. Pour des batteries en bon état, LED #5 (verte) devrait continuer à clignoter pendant toute la période des
30minutes*. Pour une batterie incapable de conserver au moins 12,4V, la LED nº6 s’allume et le programme passe immédiatement à
l’ÉTAPE 6. Lisez le chapitre REMARQUES SUR LES RÉSULTATS DES TESTS concernant les raisons des mauvais tests ou comment tester une
batterie qui renvoie un bon résultat au test, mais qui ne peut fournir assez de puissance lors de sa remise en service.
6. CHARGE DE MAINTENANCE : LED #5 / 6
La LED 5 ou 6 s’allume en fonction des résultats du test de rétention de tension.
Le mode de charge de maintenance permet de préserver la batterie source CC tout en maintenant en charge complète la batterie connectée
à des fins de maintenance. Une charge intermittente est fournie pour maintenir la batterie à pleine charge.
Une période de charge est activée quand la tension de la batterie entretenue tombe sous 13,3 V et continue jusqu’à ce que la tension
atteigne 13,6 V. La LED 5 ou 6 s’allume en continu durant la période de charge. Lorsqu’elle atteint 13,6V, la charge est interrompue et la
tension est contrôlée.
En mode de contrôle de la batterie, la LED 5 ou 6 clignotera. Les cycles de charge et de contrôle se répètent jusqu’à la déconnexion de la
batterie SOURCE (ou alimentation CC) ou de la batterie ENTRETENUE ou jusqu’à la décharge complète de la batterie SOURCE.
REMARQUE 1: si pendant la CHARGE DE MAINTENANCE, la tension d’une batterie baisse en deçà de 12,4V, éventuellement du fait d’une
sollicitation importante d’un circuit externe relié à la batterie, la LED nº4 CHARGE s’allume et une charge continue de 2A est délivrée.
REMARQUE 2: la demande en courant est déterminée par la batterie et le circuit relié à la batterie. Une plus forte demande en courant
épuisera plus vite la batterie source.
Maintenance d’une batterie durant des périodes prolongées : L’OptiMate maintiendra une batterie dont l’état est
bon, en toute sécurité durant plusieurs mois.
Vérifier au moins une fois par quinzaine la sécurité des connexions entre chargeur et batterie. Dans le cas de batteries équipées de
bouchons de remplissage sur chaque cellule, déconnecter la batterie du chargeur, vérifier le niveau d’électrolyte et faire l’appoint si
nécessaire (en eau distillée, PAS en acide), puis reconnecter. Lors de la manipulation de batteries ou à proximité de celles-ci, toujours
respecter les AVERTISSEMENTS DE SÉCURITÉ ci-dessus.
REMARQUES SUR LES RÉSULTATS DU TEST:
1. La LED #6 rouge s’allume si un problème sérieux se présente. Une lumière rouge indique qu’après un chargement, la tension de la
batterie ne se maintient pas au-dessus de 12,4 V (équivalant à une charge de 50 % pour une batterie AGM scellée) ou que la batterie n’était
pas récupérable malgré les tentatives de récupération. Ceci peut être dû à une panne de la batterie comme une cellule court-circuitée ou
une sulfatation totale, ou, dans le cas d’une batterie toujours connectée au système électrique supporté, le LED #6 rouge peut signaler la
perte de courant via un câblage détérioré ou un commutateur ou un contact dégradé, ou la présence d’accessoires consommateurs de
courant au sein du circuit. Une consommation soudaine, comme l’allumage des phares du véhicule lorsque le chargeur est connecté, peut
également entraîner une chute de tension significative sur la batterie.
2. BON RÉSULTAT DE TEST, mais la batterie ne peut pas libérer suffisamment de puissance : un dommage permanent dans la batterie peut
provoquer une auto-décharge excessive ; même une batterie en partie endommagée peut garder initialement assez de charge, mais perdra
de la puissance plus vite que normalement. Déconnectez la batterie de OptiMate. Après un minimum de 12 heures, reconnectez et observez
si la LED #3 RÉCUPÉRATION s’allume, ce qui indiquerait que la batterie n’a pas pu garder la charge. Si la LED #4 CHARGE s’allume, la
batterie a pu conserver au minimum 12,4 V. Ou mesurez la tension et comparez-la au tableau1 de la page2.

13
SICHERHEIT
DC DC
AUTOMATISCHE LADEGERÄT FÜR 12V BLEI-SÄURE & 12.8V LiFePO4 BATTERIEN:
NICHT VERWENDEN FÜR NiCd, NiMH, Li-Ion ODER NICHT AUFLADBARE
BATTERIEN.
Eingang: 12 - 16VDC 2,7A max. (12V BATTERIE ODER 15V 3A GLEICHSTROMNETZTEIL)
Laderate: ca. 2 Ah/Stunde, lädt eine 96Ah Batterie in 48 Stunden.
WICHTIG: LESEN SIE VOR GEBRAUCH DES LADEGERÄTS
DIE FOLGENDEN ANWEISUNGEN VOLLSTÄNDIG
Dieses Gerät darf von Kindern ab 8 Jahren und Personen mit reduzierten körperlichen,
sensorischen oder geistigen Fähigkeiten oder mangelnden Erfahrungen und Kenntnissen benutzt
werden, wenn dies unter Aufsicht geschieht oder wenn sie in der sicheren Benutzung des Gerätes
unterwiesen wurden und die damit zusammenhängenden Gefahren kennen. Kinder dürfen nicht
mit dem Gerät spielen. Kinder dürfen das Gerät nicht unbeaufsichtigt reinigen und warten.
SICHERHEITSWARNUNG und HINWEISE: Batterien sondern EXPLOSIVE GASE ab - halten Sie Flammen oder Funken von
Batterien fern. Klemmen Sie den Gleichstromeingang ab, bevor Sie Gleichstrom-/Batterieverbindungen herstellen oder trennen. Batteriesäure
ist stark ätzend.Batteriesäure ist stark ätzend. Schutzkleidung und Schutzbrille tragen und Kontakt vermeiden. Bei versehentlicher Berührung
sofort mit Wasser und Seife waschen. Prüfen, ob die Batteriepole lose sind, wenn ja, die Batterie von einem Fachmann überprüfen lassen.
Korrodierte Batteriepole mit einer Kupferdrahtbürste reinigen; verschmutzte oder fettige Pole mit einem in Reinigungsmittel befeuchteten Tuch
reinigen. Ladegerät nur benutzen, wenn die Zuleitungen und Batterieklemmen in einwandfreiem, unbeschädigten Zustand sind. Wenn das
Eingangskabel beschädigt ist, muss es unverzüglich vom Hersteller, seinem ermächtigten Serviceagenten oder einer qualifizierten Werkstatt
ersetzt werden, um Gefahren zu vermeiden. Schützen Sie Ihr Ladegerät bei Benutzung und Lagerung vor Säure und Säuredämpfen, sowie vor
Feuchtigkeit. Schäden durch Korrosion, Oxidation oder interne Kurzschlüsse sind nicht durch die Garantie abgedeckt. Stellen Sie das Ladegerät
während des Ladevorgangs von der Batterie entfernt auf, um Kontaminierung oder Beschädigung durch Säure oder Säuredämpfe zu vermeiden.
Bei Verwendung in horizontaler Ausrichtung muss das Ladegerät auf eine feste, ebene Fläche gestellt werden, jedoch NICHT auf Kunststoff,
Textilien oder Leder. Bringen Sie mittels der Befestigungsöffnungen im Gehäuseboden das Ladegerät an einer geeigneten, stabilen senkrechten
Fläche an.
AUSGESETZTSEIN ZU DEN FLÜSSIGKEITEN: Dieses Ladegerät ist konstruiert, um Ausgesetztsein zu den Flüssigkeiten, die
versehentlich auf das Gehäuse von oben verschüttet werden oder gespritzt sind, oder zum Nieselregen, zu widerstehen. Jedoch ist verlängertes
Ausgesetztsein nicht ratsam und längere Lebensdauer wird erreicht, indem man solches Ausgesetztsein minimiert. Ausfall des Gerätes wegen
der Oxidation, die aus dem etwaigen Durchgriff der Flüssigkeit in die elektronischen Bauelemente, Verbindungsstücke oder Stecker resultiert,
wird nicht durch die Garantie abgedeckt.
BATTERIEANSCHLÜSSE EINGANG: Ein Satz abgesicherter Batterieklemmen wird mitgeliefert. AUSGANG: austauschbare
Anschluss-Sets sind erhältlich, mit dem Ladegerät geliefert wird ein Satz Batterieklemmen, um die Batterie außerhalb des Fahrzeugs zu
laden, das optionale Anschluss-Set ist mit Metallösen zum permanenten Anschließen an die Batteriepole versehen sowie mit Schutzkappen
am Stecker zum Anschließen des Ausgangskabels des Ladegeräts. Dieses Anschluss-Set erlaubt das problemlose und sichere Anschließen
des Ladegeräts, wenn die Batterie im Fahrzeug bleiben soll. Die abnehmbare Schutzkappe schützt den Anschluss vor Schmutz und
Feuchtigkeit, wenn das Ladegerät nicht angeschlossen ist. Wenden Sie sich an einen Fachmann, um die Metallösen an den Batteriepolen
befestigen zu lassen. Sichern Sie den Anschluss mit der Schutzkappe, sodass er nicht in bewegende Teile des Fahrzeugs gerät und das
Kabel nicht eingeklemmt oder durch scharfe Kanten beschädigt werden kann. Die Leitungssicherung im Ösenanschluss schützt die Batterie
vor Kurzschlüssen zwischen Plus- und Minusleiter. Ersetzen Sie durchgebrannte Sicherungen nur durch gleiche neue 15A-Sicherungen.
ANSCHLUSS DES LADEGERÄTS AN DIE BATTERIE
1. Klemmen Sie die QUELLBATTERIE ab, bevor Sie Gleichstrom-/Batterieverbindungen einer Batterie, die gerade geladen wird, herstellen
oder trennen.
2.
Wenn Sie die Batterie im Fahrzeug belassen und mithilfe der Batterieklemmen aufladen möchten, müssen Sie zunächst sicherstellen, dass die
Klemmen sicher in einem Abstand zu den Kabeln, Metallrohren oder dem Fahrgestell positioniert werden können. Befolgen Sie beim
Anschluss die nachstehende Reihenfolge: Schließen Sie zunächst eine Klemme an den Batterieanschluss, der nicht mit dem Fahrgestell
verbunden ist (in der Regel der Pluspol) an. Schließen Sie anschließend die andere Klemme (in der Regel der Minuspol) an das Fahrgestell, in
einem weiten Abstand zur Batterie und Benzinleitung, an. Beim Abklemmen ist die entgegengesetzte Reihenfolgen einzuhalten.
3. Wenn Sie die Batterie außerhalb des Fahrzeuges über die Batterieklemmen aufladen, müssen Sie für eine ausreichende Belüftung

14
sorgen. Schließen Sie das Ladegerät an die Batterie an: ROTE Klemme an PLUSPOL (POS, P oder +) und SCHWARZE Klemme an
Minuspol (NEG, N oder –).Stellen Sie sicher, dass die Klemmen fest sitzen. Ein guter Kontakt ist wichtig.
4. Eine tiefentladene (und möglicherweise sulfatierte) Batterie ist vor einem Wiederbelebungsversuch auszubauen und zu
überprüfen. Überprüfen Sie die Batterie auf mechanische Defekte wie Ausbeulungen oder Risse im Gehäuse oder auf ein Auslaufen
der Säure. Wenn die Batterie über Einfüllverschlüsse verfügt und die Platten zwischen den Zellen von außen erkennbar sind, müssen
Sie sicherstellen, dass alle Zellen gleich aussehen (beispielsweise das weiße Material zwischen den Platten, der Abstand der Platten
usw.). Laden Sie die Batterie nicht auf, wenn mechanische Defekte erkennbar sind. Lassen Sie die Batterie in diesem Fall von einem
Fachmann untersuchen.
5. Wenn es sich um eine neue Batterie handelt, lesen Sie vor dem Anschluss des Ladegeräts die Sicherheitshinweise und
Betriebsanweisungen des Herstellers genau durch. Befolgen Sie gegebenenfalls die Anweisungen zum Auffüllen der Säure genau.
VERWENDUNG VON OPTIMATE DC-DC: LADEVERFAHREN
ANSCHLIESSEN DES LADEGERÄTS AN EINE GLEICHSTROMVERSORGUNG (Gleichstromnetzteil mit
mindestens 15V 3A oder eine voll geladene 12V-Batterie): Wenn das OptiMate DC-DC 12V 2A an eine QUELLBATTERIE
oder ein Gleichstromnetzteil mit mindestens 12V angeschlossen wird (Bereich: 12-16V), blinken die LEDs Nr. 3 und Nr. 4 zweimal und blinken
anschließend eine Minute lang langsam weiter, um anzuzeigen, dass das Gerät bereit zum Anschließen einer Batterie ist, die Ladung und
Wartung erfordert. Wenn keine Batterie angeschlossen ist, schaltet das Ladegerät vollständig ab. Das Ladegerät wird aktiviert, wenn es an eine
Empfängerbatterie anschlossen wird, bei der mindestens 10 V gemessen werden ODER zum Zurücksetzen des Ladegeräts: 1) von der
Quellbatterie trennen, 2) an die zu ladende Batterie anschließen, 3) erneut an die QUELL-BATTERIE oder die Gleichstromversorgung anschließen.
QUELLBATTERIE: Die Kapazität der Quellbatterie (in Ah) sollte im Idealfall 1,5 Mal höher sein als die der Batterie, die geladen werden soll.
Beispiel: zum Aufladen einer leeren 10Ah Batterie benötigen Sie eine 15Ah Quellbatterie. Die 12V QUELLBATTERIE sollte im Idealfall für
Deep-Cycle-Benutzung ausgelegt sein.
STROMVERBRAUCH DER QUELLBATTERIE BEI WARTUNG EINER FAHRZEUGBATTERIE: Der Stromverbrauch
hängt davon ab, wie viel Strom der angeschlossene Fahrzeug-/Elektronikstromkreis von der zu wartenden Batterie bezieht. Als Anhaltspunkt:
Gehen Sie für jeweils 10mA Stromentnahme durch den angeschlossenen Fahrzeug-/Elektronikstromkreis von einer Entnahme von 0,30Ah pro
Tag (24 Stunden) aus der Quellbatterie aus. BEISPIEL: Mindestkapazität der Quellbatterie für einen Zeitraum von 90 Tagen, wenn die
Stromentnahme aus der Fahrzeugbatterie 10mA beträgt: 0,3Ah x 90 = 27Ah.
LADEDAUER: Die Zeit, die der OptiMate™ DC-DC 12V 2A benötigt, um eine leere, aber nicht stark entladene und ansonsten unbeschädigte
Batterie aufzuladen, entspricht ungefähr der Ah-Angabe der Batterie, also dürfte bei einer 10Ah-Batterie das Programm bis zur Schritt 4 nicht
länger als 10 Stunden dauern. Bei tiefentladenen Batterien kann der Prozess erheblich länger dauern.
Die LED-Dioden, die sich unten beziehen, und die Klauseln die sie beschäftigen, erscheinen der Programmreihefolge nach.
12V
CHARGE
SAVE
MAINTAIN
TEST - - -
BATTERY SAVING
CHARGER-MAINTAINER
LEAD-ACID & LIFEPO4
12V
LIFEPO4LEAD-ACID
12.8V12.8V
LFP
12V
DC DC
DC DCDC DC
Model: TM500 v2
OUTPUT/SORTIE/SALIDA/LEISTUNG/
USCITA/UITGANG/UTSPÄNNING/
SAIDA: 12V 2A
DC IN / Courant d'entrée directe /
Gelijkstroom-ingang / entrada de
corriente directa / ingresso diretto di
corrente /entrada decorrente direta /
Likström ingång / Gleichstrom-Eingang
12-16V 2.7A
max
DC IN
12
34
5
6
1. LED Nr.1
- Zeigt an, dass die Spannung der QUELLBATTERIE unter 12V gesunken ist (niedriger Ladestatus). Aufladen und für die
weitere Wartung wieder anschließen. Sobald die Spannung der QUELLBATTERIE unter 11V sinkt, schaltet OptiMate DC-DC 12V 2A ab, um
eine Tiefentladung der QUELLBATTERIE zu vermeiden.
2. LED Nr.2 zeigt falsche Ausgangsanschlüsse an. Anschlüsse tauschen, um den Ausgang zu aktivieren.
3. LED Nr.3 (RETTEN) leuchtet, wenn die Batterie extrem entladen (tiefentladen oder sulfatiert) ist.
3.1 RETTUNG BEI NIEDRIGER SPANNUNG (ab 2 V) bis 8,8 V (LED Nr. leuchtet ständig): Der Strom wird auf 200 mA begrenzt, sodass
die Batterie langsam einen sicheren Spannungspegel von 8,8Volt erreichen kann Batterien, die einen Ladestrom von 0,2A
annehmen, werden im Modus IMPULS wiederhergestellt.

15
3.2 IMPULS-Wiederherstellung in den letzten 15 Minuten – LED 3 leuchtet: Strom bis zu 2A wird in Impulsen abgegeben, um die
Batterie auf eine normale Ladung vorzubereiten. Dieser Modus ist vor allem für die Wiederherstellung werksseitig aktivierter/von
„Hochleistungsbatterien“ aus Blei oder AGM‑Batterien mit zyklischen Zellen zu empfehlen.
4. LED Nr.4 Laden und überprüfen der Ladung.
4.1 LADEN: Die GRUNDLADEPHASE versorgt die Batterie mit einem Konstantstrom von rund max. 2 Ampere, bis zu einer Spannung von
14,2 - 14,5V.
4.2 Optimieren/Impulsabsorption: Beginnt, wenn die Spannung erstmals 14,3 V im LADE-Modus erreicht. Der Strom wird impulsartig
bereitgestellt, er variiert zwischen 0,2 und 2 A, bis zu einer Spannung von 14,2 - 14,4V, um die Batterie innerhalb möglichst kurzer
Zeit wieder auf volle Ladung zu bringen. Die Ladedauer wird normalerweise verlängert, wenn die Stromentnahme durch
angeschlossene Verbraucher höher als erwartet ist oder wenn der Gesundheitszustand der Batterien nicht optimal ist.
HINWEIS: Aus Sicherheitsgründen ist die Ladezeit auf 48 Stunden begrenzt.
5. SPANNUNGSHALTEPRÜFUNG: LED Nr. 5 blinkt alle 3 Sekunden.
(einzelnes Blinken = intakter Bleiakku, doppeltes Blinken = intakte Lithiumbatterie).
Die Stromabgabe an die Batterie wird für 30 Minuten unterbrochen, damit das Programm die Fähigkeit der Batterie zum
Spannungserhalt prüfen kann. Bei Batterien in gutem Zustand blinkt die LED 5 während der gesamten 30 Minuten. Bei einer Batterie,
die nicht in der Lage ist, mindestens 12,4 V zu halten, leuchtet LED Nr. 6 und das Programm wechselt sofort zu SCHRITT 6. Lesen Sie
den Abschnitt mit HINWEISEN ZU TESTERGEBNISSEN, wenn Sie Informationen zu schlechten Testergebnissen oder zu Test benötigen, die
zwar ein gutes Ergebnis hervorbringen, ohne dass die Batterie jedoch ausreichend Energie abgibt.
6. WARTUNGSLADUNG: LED Nr. 5/6
LED Nr. 5 oder 6 leuchtet je nach Ergebnis der Spannungshalteprüfung auf.
Der Wartungslademodus dient zum Schutz der Gleichstrom-Quellbatterie während der Wartung der angeschlossenen Batterie, um die
volle Ladung aufrecht zu erhalten. Die Ladung erfolgt in Intervallen, um die volle Ladung der Batterie zu erhalten. Eine Ladeperiode wird
aktiviert, wenn die Spannung der gewarteten Batterie unter 13,2 V sinkt und hält an, bis die Spannung 13,6 V erreicht. LED Nr. 5 oder 6
leuchtet während der Ladeperiode permanent. Nachdem 13,6 V erreicht sind, wird der Ladevorgang unterbrochen und die Spannung
überwacht.
Die Ladung erfolgt in Intervallen, um die volle Ladung der Batterie zu erhalten. Im Batterieüberwachungsmodus blinkt LED Nr. 5 oder 6.
Die Lade- und Überwachungszyklen wiederholen sich, bis entweder die QUELLBATTERIE (oder das Gleichstromnetzteil) oder die
GEWARTETE Batterie abgeklemmt wird oder die QUELLBATTERIE komplett entladen ist.
HINWEIS 1: Wenn während der ERHALTUNGSLADUNG die Spannung einer Batterie auf unter 12,4 V fällt, eventuell aufgrund einer hohen
Stromaufnahme durch einen an die Batterie angeschlossenen externen Verbraucher, leuchtet die LED Nr. 4 (LADEN) und eine
Dauerladung von 2 A wird bereitgestellt.
HINWEIS 2: Der Strombedarf wird durch die Batterie und den an die Batterie angeschlossenen Verbraucher bestimmt. Durch einen
höheren Strom-bedarf wird die Quellbatterie schneller geleert.
Wartung einer Batterie über einen längeren Zeitraum: Das OptiMate wartet monatelang sicher, eine Batterie, deren
grundlegender Zustand gut ist. Überprüfen Sie mindestens einmal alle zwei Wochen, ob die Verbindungen zwischen Ladegerät und Batterie
sicher sind, klemmen Sie bei Batterien mit Verschlussdeckeln die Batterie vom Ladegerät ab, prüfen Sie in den einzelnen Zellen den
Elektrolytstand, füllen Sie die Zellen bei Bedarf auf (mit destilliertem Wasser, NICHT mit Säure), und schließen Sie die Batterie wieder an.
Beachten Sie beim Umgang mit Batterien oder bei Arbeiten in ihrer Nähe immer sorgfältig die oben genannten SICHERHEITSWARNUNGEN.
HINWEISE ZU DEN TESTERGEBNISSEN:
1. Wenn die rote LED #6 leuchtet, liegt ein erhebliches Problem vor. Das Aufleuchten der roten LED bedeutet, dass die Spannung der Batterie
nach dem Laden nicht über 12,4V (etwa gleich 50% der Ladung einer gekapselten AGM-Batterie) gehalten wird oder dass die Batterie trotz
entsprechender Versuche nicht zu retten war. Dies kann auf einen Defekt in der Batterie selbst, etwa auf eine kurzgeschlossene Zelle oder
völlige Sulfatierung zurückzuführen sein, oder, im Falle einer Batterie, die noch an die Fahrzeugelektrik angeschlossen ist, weist die rote LED
#6 eventuell auf einen Verlust von Strom durch eine defekte Verkabelung oder einen defekten Schalter oder Kontakt oder einen
Stromverbraucher in der Fahrzeugelektrik hin. Auch eine plötzliche Belastung, etwa das Einschalten der Scheinwerfer, während das
Ladegerät angeschlossen ist, kann zu einem signifikanten Abfallen der Batteriespannung führen.
2. GUTES TESTERGEBNIS, aber die Batterie kann nicht genügend Energie abgeben: Ein dauerhafter Schaden in der Batterie kann zu
übermäßiger Selbstentladung führen (diese wird durch die Batterie selbst verursacht, auch wenn eine teilweise beschädigte Batterie
genügend Energie speichern kann. Diese Energie geht schneller als üblich wieder verloren.). Trennen Sie die Batterie vom OptiMate. Nach
mindestens 12 Stunden wieder anschließen und beobachten, ob die LED #3 (RETTEN) leuchtet, woran zu erkennen ist, dass die Batterie
nicht in der Lage war, die Ladung zu halten. Wenn die LED #4 (LADEN) leuchtet, hat die Batterie mindestens 12,4V gehalten. Oder messen
Sie die Spannung und vergleichen Sie den Wert mit Tabelle 1 auf Seite 2.

16
SEGURIDAD
DC DC
CARGADOR AUTOMÁTICO PARA BATERÍAS 12V PLOMO-ÁCIDO & 12.8V LiFePO4
ENCONTRADAS EN:
NO UTILIZAR CON BATERÍAS DE NiCd, NiMH, Li-Ion O BATERÍAS NO RECARGABLES.
Alimentación: 12 - 16 V CC y 2,7 A máx. (BATERÍA DE 12 V O SUMINISTRO DE 15 V Y 3 A CC)
Tasa de carga: aproximadamente 2 Ah/hora, recarga una batería de 96 Ah en 48 horas.
IMPORTANTE: LEA COMPLETAMENTE LAS SIGUIENTES INSTRUCCIONES
ANTES DE UTILIZAR EL CARGADOR
Este aparato pueden utilizarlo niños a partir de 8 años y personas con capacidades físicas,
sensoriales o mentales disminuidas, o bien con falta de experiencia y conocimientos, si se las
supervisa o instruye sobre el uso seguro del aparato y entienden los peligros que conlleva. Los
niños no deben jugar con el aparato. Los niños sin supervisión no deben limpiar ni realizar el
mantenimiento del aparato.
AVISOS Y PRECAUCIONES DE SEGURIDAD: Las baterías emiten GASES EXPLOSIVOS, evite la posibilidad de llamas o
chispas cerca de las baterías. Desconecte la alimentación de entrada de CC antes de efectuar o deshacer las conexiones de CC/
batería. El ácido de las baterías es muy corrosivo. El ácido de la batería es altamente corrosivo. Utilice ropa y gafas de protección y evite el
contacto con el ácido. En caso de contacto accidental, enjuague inmediatamente la zona afectada con agua y jabón. Compruebe que los polos de
la batería no estén sueltos, y si lo están, lleve la batería a un servicio técnico. Si los bornes presentan corrosión, límpielos con un cepillo de hilo
de cobre, y si presentan grasa o suciedad, límpielos con un trapo humedecido en detergente. Utilice el cargador solamente si los cables y
conectores de entrada y salida se encuentran en bunas condiciones y sin daños. Si el cable de entrada está dañado, es fundamental que el
fabricante, el servicio técnico autorizado o un taller capacitado lo sustituyan sin demora para evitar riesgos. Proteja el cargador del ácido y de las
emisiones de gases de ácido y de ambientes húmedos o superficies mojadas durante su utilización y almacenamiento. La garantía no cubre
daños derivados de la corrosión, oxidación o cortocircuitos eléctricos internos. Coloque el cargador a una distancia adecuada de la batería
durante la recarga para evitar la contaminación o la exposición al ácido o vapores de ácido. Si se utiliza en posición horizontal, coloque el
cargador en una superficie dura y plana, PERO NUNCA sobre plástico, tela o piel. Utilice los orificios de fijación de la base de la carcasa para fijar
el cargador en una superficie cómoda y totalmente horizontal.
EXPOSICIÓN A LÍQUIDOS: Este cargador fue desarrollado para resistir a líquidos que hubieran sido derramados de forma
accidental o a intemperies ligeras. No obstante, no se recomiendan las exposiciones prolongadas, que podrían menguar la duración de vida
del cargador. Los desgastes, resultado de la oxidación debida al ataque eventual de líquidos en los componentes electrónicos, los
conectadores o enchufes no se cubren por la garantía
CONEXIONES DE BATERÍA: ALIMENTACIÓN: se suministra un kit de pinzas de batería con fusible. SALIDA: hay disponibles
2juegos de conectores intercambiables, se suministra con el cargador un juego de pinzas de batería para recargarla fuera del vehículo, el
juego de conexión opcional tiene unos orificios metálicos para conectarlos permanentemente a los bornes de la batería y una tapa
impermeable resellable en el conector que conecta al cable de salida del cargador. Este tipo de conector permite una conexión fácil y segura
al cargador sin tener que sacar la batería del vehículo. La tapa impermeable resellable está diseñada para proteger el conector de la
suciedad y la humedad cuando el cargador no esté conectado. Pregunte a un mecánico profesional antes de conectar el conector de
orificios a los bornes de la batería. Asegure los tapones impermeables a los conectores para evitar que se enganchen con alguna pieza
móvil del vehículo o estropeen o dañen algún cable con los bordes afilados. El fusible en línea del juego de conectores con orificios protege
la batería frente a cortocircuitos accidentales entre los conductores positivo y negativo. Sustituya los fusibles quemados con un fusible
nuevo similar de 15 A.
CONEXIÓN DEL CARGADOR A LA BATERÍA
1. Desconecte la BATERÍA ORIGEN antes de efectuar o deshacer las conexiones de CC/batería de la batería que se está cargando.
2. Si se va a cargar una batería montada en el vehículo con las pinzas, compruebe primero que las pinzas se pueden colocar de forma
segura y correcta, lejos del cableado, los tubos metálicos o el bastidor, antes de efectuar las conexiones. Realice las conexiones en
este orden: realice primero la conexión al terminal de la batería que no está conectado con el bastidor (normalmente positivo), luego
conecte la otra pinza de batería (normalmente negativa) al bastidor a una distancia suficiente de la batería y de la tubería de
combustible. Desconecte siempre realizando los pasos anteriores en orden inverso.
3. Cuando cargue una batería fuera del vehículo con las pinzas, colóquela en un lugar bien ventilado. Conecte el cargador a la batería:

17
pinza ROJA con el terminal POSITIVO (POS, P o +) y pinza NEGRA con el terminal NEGATIVO (NEG, N o –).Asegúrese de que las
conexiones son firmes y seguras. Es importante que hagan bien contacto.
4. Si la batería está excesivamente descargada (y posiblemente sulfatada), retírela del vehículo e inspecciónela antes de
conectar el cargador para intentar recuperarla. Examine visualmente la batería en busca de desperfectos mecánicos, como
combas o fisuras en la carcasa, o indicios de fugas de electrólito. Si la batería tiene tapones de llenado y se pueden ver desde fuera
las placas del interior de las células, examine detenidamente la batería para comprobar si hay células que parezcan distintas de las
demás (por ejemplo, con materia blanca entre las placas o placas en contacto). Si se han detectado desperfectos mecánicos, no
intente cargar la batería, encargue su evaluación a personal cualificado.
5. Si la batería es nueva, lea atentamente las instrucciones de seguridad y uso del fabricante de la misma antes de conectar el
cargador. En su caso, siga estrictamente las instrucciones de llenado de ácido.
UTILIZACIÓN DE OPTIMATE CC-CC : PROCEDIMIENTO DE CARGA
CONEXIÓN DEL CARGADOR AL SUMINISTRO DE CC (adaptador de CC de un mínimo de 15 V y 3 A o
una batería de 12 V totalmente cargada): Una vez conectado OptiMate CC-CC 12 V 2 A a una BATERÍA ORIGEN o a un
suministro de CC que mida al menos 12 V (intervalo: 12-16 V), los LED n.º 3 y n.º 4 parpadearán dos veces y, a continuación, seguirán
parpadeando lentamente durante un minuto para indicar que se puede conectar una batería que precise carga y mantenimiento. Si no se
conecta ninguna batería, el cargador se apaga completamente. El cargador se activará al conectarlo a una batería receptora de 10V o más.
De otro modo, para reiniciar el cargador:
1) desconéctelo de la batería origen, 2) conéctelo a la batería que desea cargar, 3) reconéctelo a la BATERÍA ORIGEN o a la fuente de
alimentación de CC.
BATERÍA ORIGEN: la capacidad de la batería origen (en Ah) idealmente debe ser 1,5 veces mayor que la de la batería que se carga.
Por ejemplo, para cargar una batería de 10 Ah, necesita una batería origen de 15 Ah. Lo ideal sería que la BATERÍA ORIGEN de 12 V sea
adecuada para un uso de ciclo profundo.
CONSUMO DE CORRIENTE DE LA BATERÍA ORIGEN DURANTE EL MANTENIMIENTO DE LA BATERÍA
DE UN VEHÍCULO: el consumo de energía depende de la demanda actual del vehículo / los circuitos electrónicos de la batería a la que
se realiza el mantenimiento. Una referencia sencilla: por cada 10 mA de corriente de drenaje por vehículo / circuitos conectados, suponga
que hay un drenaje de 0,30 Ah al día (24 horas) de la batería origen. Por ejemplo, la capacidad mínima de la batería origen para un periodo
de 90 días si el drenaje de corriente de la batería del vehículo es de 10 mA es: 0,3 Ah × 90 = 27 Ah.
TIEMPO DE CARGA: El tiempo necesario para recargar una batería totalmente descargada pero en buen estado al medio del
OptiMate™DC-DC 12V 2A es más o menos igual a la capacidad de la batería en Ah. Entonces se necesita cerca de 10 horas para que una
batería de 10Ah alcance la etapa 4. Las baterías en estado de descarga profunda pueden necesitar mucho más tiempo.
Las indicaciones LED evocadas a continuación y los textos relacionados aparecen según el orden de secuencia lógico del
programa.
12V
CHARGE
SAVE
MAINTAIN
TEST - - -
BATTERY SAVING
CHARGER-MAINTAINER
LEAD-ACID & LIFEPO4
12V
LIFEPO4LEAD-ACID
12.8V12.8V
LFP
12V
DC DC
DC DCDC DC
Model: TM500 v2
OUTPUT/SORTIE/SALIDA/LEISTUNG/
USCITA/UITGANG/UTSPÄNNING/
SAIDA: 12V 2A
DC IN / Courant d'entrée directe /
Gelijkstroom-ingang / entrada de
corriente directa / ingresso diretto di
corrente /entrada decorrente direta /
Likström ingång / Gleichstrom-Eingang
12-16V 2.7A
max
DC IN
12
34
5
6
1. LED n.º 1 : se ilumina para advertir de que la tensión de la BATERÍA ORIGEN ha caído por debajo de 12 V (bajo nivel de carga).
Recargue y vuelva a conectar para continuar con el mantenimiento. Una vez que la tensión de la BATERÍA ORIGEN baja de 11 V,
OptiMate DC-DC 12 V 2 A se apaga para evitar seguir descargando la BATERÍA ORIGEN.
2. LED n.º 2 - polaridades invertidas – conexiones erróneas en salida. Corregir para activación.
3. El LED n.º 3 de RECUPERACIÓN se enciende si la batería está muy descargada (descargada o sulfatada),
3.1. RECUPERACIÓN EN CASO DE BAJA TENSIÓN (desde 2V) hasta 8,8V (LED n.º3 fijo) : la corriente está limitada a 200mA para
que la batería pueda recuperarse gradualmente hasta un nivel de tensión de seguridad de 8,8voltios.
3.2. Recuperación POR IMPULSOS (últimos 15 minutos, LED #3 fijo): se suministra hasta 2A de corriente por impulsos para preparar

18
a la batería a que acepte una carga normal. Este modo es especialmente eficaz para la recuperación de baterías activadas de
fábrica / baterías «de alto rendimiento» de plomo puro o baterías AGM con células cíclicas.
4. LED n.º 4 Carga y verificación de carga
4.1. Carga: Etapa de CARGA principal : una corriente constante de máximo 2A se suministra, hasta una tensión de 14,2-14,5 V.
4.2. Optimización / Modo de absorción pulsado: se activa cuando la tensión alcanza los 14,3V por primera vez durante el modo de
CARGA. La corriente se suministra por impulsos, que varían entre 0,2 y 2A y hasta una tensión de 14,2-14,4V, para cargar
completamente la batería en el menor tiempo posible. El tiempo de carga suele aumentar cuando los circuitos conectados realizan
un consumo de corriente superior al esperado o si la batería no está en un estado óptimo.
OBSERVACIÓN: por razones de seguridad hay un límite temporal de carga general de 48 horas.
5. PRUEBA DE RETENCIÓN DE TENSIÓN: el LED n.º 5 parpadea cada 3 segundos
(un solo parpadeo: batería plomo-ácido en buen estado, parpadeo doble: batería de litio en buen estado).
El suministro de corriente a la batería se interrumpe durante 30 minutos para permitir que el programa determine la capacidad de la batería
de retener la carga. Para las baterías en buen estado, el LED
n.º
5 (verde) debería seguir parpadeando durante el período completo de
30 minutos. Si una batería no consigue retener al menos 12,4V, se encenderá el LED n.º6 y el programa avanzará inmediatamente al
PASO6. Lea el apartado OBSERVACIONES SOBRE LOS RESULTADOS DE LA PRUEBA para averiguar las razones de resultados de pruebas
deficientes o cómo probar una batería que ofrece un buen resultado, pero no puede suministrar suficiente potencia una vez que está de
nuevo operativa.
6. CARGA DE MANTENIMIENTO: LED n.º 5 / 6
Se ilumina el LED n.º 5 o 6 según el resultado de la prueba de retención de tensión.
El modo de carga de mantenimiento está diseñado para conservar la batería origen de CC mientras se mantiene la batería conectada para
su mantenimiento a carga plena. Se suministra una carga intermitente para mantener la batería alimentada a carga plena. El periodo de
carga se activa cuando la tensión de la batería mantenida desciende de 13,2 V y continúa hasta que alcanza los 13,6 V. El LED n.º 5 o 6
permanece iluminado durante el periodo de carga.
Al alcanzar los 13,6V, se interrumpe la carga y se supervisa la tensión. Durante el modo de supervisión de batería, el LED n.º 5 o 6
parpadea.
NOTA 1: durante la CARGA DE MANTENIMIENTO, si la tensión de una batería cae por debajo de los 12,4V, tal vez debido a un alto consumo
de corriente por parte de un circuito externo conectado a la batería, se encenderá el LED n.º4 de CARGA y se suministrará una carga
continua de 2A.
NOTA 2: la batería y los circuitos conectados a esta determinan la demanda de corriente. Un aumento e la demanda de corriente hará que la
batería origen se agote más rápido.
Mantenimiento de la batería en períodos prolongados de tiempo: El OptiMate mantendrá una batería cuyo
estado es bueno, en total seguridad durante varios meses. Al menos una vez cada dos semanas, compruebe que las conexiones entre el
cargador y la batería está correctas, y en el caso de baterías con un tapón en cada celda, desconecte la batería del cargador, compruebe el
nivel de electrolito y si es necesario, rellene las celdas (con agua destilada, NO ácido), y vuelva a conectarla. Al manipular baterías o junto
a las mismas, tenga en cuenta las ADVERTENCIAS DE SEGURIDAD mencionadas anteriormente.
OBSERVACIONES SOBRE LOS RESULTADOS DE LA PRUEBA:
1. Si el LED rojo n.º 6 se enciende, existe un problema importante. El LED rojo implica que, tras haber realizado la carga, la tensión de la
batería no se mantiene por encima de 12,4 V (aproximadamente equivale al 50 % de la carga de una batería AGM sellada) o que, a pesar de
las tentativas de recuperación, la batería no se puede recuperar. Esto puede deberse a un defecto propio de la batería, tal como un
cortocircuito en una celda o un sulfatado total, o en el caso de una batería conectada al sistema eléctrico al que suministra corriente, el LED
#6 rojo puede indicar una pérdida de corriente por un cable o contacto defectuoso, o un accesorio del circuito que esté consumiendo
corriente. Una carga repentina como por ejemplo el encendido de las luces mientras el cargador está conectado, también puede hacer que
el voltaje de la batería baje de forma significativa.
2. RESULTADO SATISFACTORIO DE LA PRUEBA, pero la batería no puede suministrar suficiente potencia: el daño permanente en la batería
puede estar causando una autodescarga excesiva ((causada por la propia batería; incluso una batería parcialmente deteriorada puede
conservar inicialmente una potencia suficiente, pero después pierde potencia más rápidamente de lo normal). Desconecte la batería de
OptiMate. Pasadas 12 horas, como mínimo, vuelva a conectar y compruebe si el LED n.º 3 de RECUPERACIÓN se enciende, indica que no se
pudo mantener la carga. Si se enciende el LED n.º 4 de CARGA, la batería mantuvo como mínimo 12,4 V. O mida la tensión y compárela con
la tabla 1 de la página 2.

19
SICUREZZA
DC DC
CARICABATTERIE AUTOMATICO PER BATTERIE 12V PIOMBO-ACIDO
& 12.8V LiFePO4 PER:
NON IDONEO PER BATTERIE NiCd, NiMH, Li-Ion O NON RICARICABILI.
INGRESSO: 12 - 16 V CC 2,7 A MAX. (BATTERIA DA 12 V O ALIMENTAZIONE CC DA 15 V 3 A)
VELOCITÀ DI CARICA: CA. 2 AH/ORA, CARICA UNA BATTERIA DA 96 AH IN 48 ORE
IMPORTANTE: LEGGERE ATTENTAMENTE LE SEGUENTI ISTRUZIONI
PRIMA DI UTILIZZARE IL CARICATORE
L’utilizzo di questo apparecchio non è consentito a bambini di età superiore agli 8 anni e a persone con ridotte capacità fisiche,
sensoriali o mentali o con esperienza e conoscenza inadeguate, salvo sotto sorveglianza o a meno che non abbiano ricevuto
istruzioni riguardanti l’utilizzo dell’apparecchio in modo sicuro e abbiano consapevolezza dei potenziali pericoli derivanti. I
bambini non devono giocare con l’apparecchio. La pulizia e la manutenzione non devono essere effettuate da bambini senza la
supervisione di un adulto.
AVVERTENZE e NOTE DI SICUREZZA: Le batterie emettono GAS ESPLOSIVI – evitare di produrre fiamme o scintille vicino alle
batterie. Scollegare l’alimentazione CC prima di effettuare o interrompere connessioni con la batteria/CC. L’acido della batteria è altamente
corrosivo. Indossare indumenti e occhiali di protezione ed evitare il contatto diretto. In caso di contatto accidentale, lavarsi immediatamente con
acqua e sapone. Verificare che i poli non siano allentati; in caso contrario portare la batteria da un professionista. Qualora i poli fossero corrosi, pulirli
con uno spazzolino a fili di rame; rimuovere il grasso e lo sporco con un panno inumidito con detergente. Azionare il caricatore solo se i conduttori in
uscita e in entrata e i connettori sono in buone condizioni e non presentano danni. Qualora il cavo di alimentazione fosse danneggiato, è essenziale
farlo sostituire immediatamente dal fabbricante, da un suo agente di servizio autorizzato o da un’officina qualificata, onde evitare possibili pericoli.
Proteggere il caricatore da acidi e vapori acidi e dall’umidità sia durante l’uso sia al momento di riporlo. I danni dovuti alla corrosione, ossidazione o
corto circuito dei circuiti elettrici interno non sono coperti da garanzia. Distanziare il caricatore dalla batteria durante la carica per evitare la
contaminazione o esposizione agli acidi e vapori acidi. Se utilizzato in posizione orizzontale, posizionare il caricatore su una superfici dura e piatta,
ma NON su plastica, tessuto o pelle. Servirsi degli appositi fori praticati nella base di appoggio per attaccare il caricatore a una solida e adatta
superficie verticale.
ESPOSIZIONE AI LIQUIDI: Se sistemato in posizione orizzontale su una superficie piatta, questo caricatore è progettato in modo da
prevenire danni al circuito elettrico in caso di esposizione a liquidi versati o spruzzati accidentalmente dall’alto. I guasti del caricatore in
seguito a ossidazione del pannello di controllo elettronico dovuta a un’eventuale penetrazione di liquido nei componenti elettronici non sono
coperti da garanzia. I connettori o le prese non vanno mai esposti alla pioggia o alla neve.
COLLEGAMENTI: INGRESSO: Set di morsetti della batteria con fusibile incluso. USCITA: sono disponibili 2 set di collegamenti
intercambiabili, uno a morsetti fornito con il caricatore per caricare la batteria fuori dal veicolo, l’altro in opzione con occhielli in metallo per
la connessione permanente ai poli, e un tappo a tenuta stagna richiudibile sul connettore di collegamento al caricatore. Questo set permette
un facile e sicuro collegamento del caricatore per la mantenimento della batteria senza rimozione dal veicolo. Il tappo a tenuta stagna
richiudibile è progettato per proteggere il connettore dalla sporcizia e dall’umidità quando il caricatore non è collegato. Consultare un
professionista per il collegamento degli occhielli metallici ai poli. Assicurare il connettore al tappo a tenuta stagna per evitare che possa
interferire con parti semoventi del veicolo o che il cavo sia pizzicato o danneggiato da bordi taglienti. Il fusibile in linea nel set di
collegamento a occhielli protegge la batteria da cortocircuiti accidentali fra i conduttori positivo e negativo. Sostituire i fusibili bruciati solo
con fusibili nuovi similari da 15A.
CONNESSIONE DEL CARICABATTERIE ALLA BATTERIA
1. Scollegare la BATTERIA DI ALIMENTAZIONE prima di effettuare o di eliminare delle connessioni alla batteria/CC sotto carica.
2. Se si carica la batteria del veicolo con i morsetti della batteria, prima di effettuare le connessioni verificare che i morsetti della batteria
possano essere posizionati in modo sicuro e protetto, distanti da cavi e tubi metallici circostanti o dal telaio. Eseguire le connessioni
procedendo come segue: collegare innanzitutto il terminale della batteria non collegato al telaio (solitamente positivo), quindi collegare
l’altro morsetto della batteria (solitamente negativo) al telaio, mantenendo le distanze dalla batteria e dalla linea del combustibile.
Scollegare sempre nella sequenza contraria.
3. Quando si carica una batteria smontata dal veicolo utilizzando i morsetti della batteria, posizionare quest’ultima in una zona ben
ventilata. Collegare il caricabatterie alla batteria: morsetto ROSSO a terminale POSITIVO (POS, P o +) e morsetto NERO a terminale
NEGATIVO (NEG, N o -). Verificare che le connessioni siano salde e sicure. Un buon contatto è fondamentale.

20
4. Se la batteria è molto scarica (e probabilmente solfatizzata), rimuoverla dal veicolo e ispezionarla prima di collegare il
caricabatterie per effettuare un tentativo di recupero. Effettuare un’ispezione visiva della batteria per rilevare la presenza di
eventuali difetti meccanici, quali una scatola curvata o incrinata, oppure segni di perdite di elettroliti. Se la batteria presenta tappi per
riempimento e le placche nelle celle sono visibili dall’esterno, esaminare attentamente la batteria per cercare di stabilire se alcune celle
hanno un aspetto diverso dalle altre (ad esempio, se presentano del materiale bianco tra le placche o se le placche sono in contatto tra
loro). Qualora vengano rilevati difetti meccanici, non cercare di ricaricare le batterie, ma sottoporle a una verifica da parte di esperti.
5. Se la batteria è nuova, prima di procedere alla connessione del caricabatterie, leggere attentamente le istruzioni di sicurezza e di
funzionamento del produttore della batteria. Ove necessario, attenersi scrupolosamente alle istruzioni di riempimento di acido.
USARE OPTIMATE CC-CC: ESECUZIONE DELLA CARICA
COLLEGARE IL CARICABATTERIE ALL’ALIMENTAZIONE CC (adattatore CC tarato a min. 15 V 3 A o
batteria da 12 V carica): Quando OptiMate CC-CC 12 V 2 A viene collegato a una BATTERIA DI ALIMENTAZIONE o a un’alimentazione
CC di almeno 12 V (intervallo: 12-16 V), i LED N. 3 e N. 4 lampeggiano due volte e poi continuano a lampeggiare lentamente per un minuto,
indicando che lo strumento è pronto per il collegamento di una batteria che richiede carica e mantenimento. Se non viene collegata una batteria,
il caricabatterie si spegne completamente. Il caricabatterie si attiva non appena è collegato a una batteria da 10 V o più, OPPURE per riavviare il
caricabatterie: 1) scollegarlo dalla batteria di alimentazione, 2) collegarlo alla batteria da caricare, 3) collegarlo nuovamente alla BATTERIA DI
ALIMENTAZIONE o a un’alimentazione CC.
BATTERIA DI ALIMENTAZIONE: La capacità della batteria di alimentazione (in Ah) dovrebbe essere idealmente 1,5 volte superiore
alla batteria da caricare. Ad esempio, per ricaricare una batteria scarica da 10 Ah, è necessaria una batteria di alimentazione da 15 Ah. La
BATTERIA DI ALIMENTAZIONE da 12 V dovrebbe essere tarata idealmente per l’uso a ciclo profondo.
CONSUMO DI ENERGIA DELLA BATTERIA DI ALIMENTAZIONE DURANTE IL MANTENIMENTO DELLA
BATTERIA DEL VEICOLO: Il consumo di energia dipende dalla domanda di corrente del veicolo/circuito elettronico alla batteria da
mantenere. Come semplice riferimento: per ogni 10 mA di consumo di corrente da parte del veicolo/circuito collegato, si avrà un consumo della
batteria di alimentazione di 0,30 Ah al giorno (24 ore). Ad esempio, se il consumo di corrente dalla batteria del veicolo è di 10 mA, la batteria di
alimentazione avrà una capacità minima di 90 giorni. 0,3 Ah x 90 = 27 Ah.
TEMPO DI CARICA: Il tempo richiesto dal OptiMate™ DC-DC 12V 2A per completare la carica di una batteria non particolarmente scarica
è uguale alla capacita’ di amperora (Ah) della batteria. Così, per una batteria di 10Ah dovrebbero occorrere circa 10 ore per giungere alla fase 4.
Le batterie estremamente scariche possono invece necessitare di un tempo significativamente più lungo
Le indicazione LED di seguito riportate ed i relativi testi appaiono nell’ordine di sequenza logica del programma.
12V
CHARGE
SAVE
MAINTAIN
TEST - - -
BATTERY SAVING
CHARGER-MAINTAINER
LEAD-ACID & LIFEPO4
12V
LIFEPO4LEAD-ACID
12.8V12.8V
LFP
12V
DC DC
DC DCDC DC
Model: TM500 v2
OUTPUT/SORTIE/SALIDA/LEISTUNG/
USCITA/UITGANG/UTSPÄNNING/
SAIDA: 12V 2A
DC IN / Courant d'entrée directe /
Gelijkstroom-ingang / entrada de
corriente directa / ingresso diretto di
corrente /entrada decorrente direta /
Likström ingång / Gleichstrom-Eingang
12-16V 2.7A
max
DC IN
12
34
5
6
1. LED N. 1 si accende per segnalare che la tensione della BATTERIA DI ALIMENTAZIONE è inferiore a 12 V (livello di carica basso).
Ricaricarla e ricollegarla per mantenimento ulteriore. Quando la tensione della BATTERIA DI ALIMENTAZIONE scende al di sotto di
11V, OptiMate DC-DC 12 V 2 A si spegnerà per evitare che la BATTERIA DI ALIMENTAZIONE si scarichi completamente.
2. LED N. 2 Indica la polarità inversa , collegamenti errati. Correggere per attivare l’uscita.
3. Il LED N. 3 RECUPERO si illumina se la batteria è estremamente scarica (completamente scarica o solfatata),
3.1 RECUPERO A TENSIONE BASSA - (da 2 V) a 8,8 V (LED n. 3 con luce fissa su ) : La corrente è limitata a 200 mA per permettere
alla batteria di recuperare gradualmente fino a un livello di tensione sicuro pari a 8,8 V. Le batterie in grado di sopportare una
corrente di carica da 0,2 A passano al recupero AD IMPULSI.
3.2 Recupero AD IMPULSI - ultimi 15 minuti - LED 3 luce fissa: viene consegnata corrente AD IMPULSI da 2 A max. per preparare la
batteria a sopportare una carica normale. Questa modalità è particolarmente efficace per il recupero di batterie AGM cicliche o al
piombo puro ad alte prestazioni / attivate in fabbrica.
La pagina si sta caricando...
La pagina si sta caricando...
La pagina si sta caricando...
La pagina si sta caricando...
La pagina si sta caricando...
La pagina si sta caricando...
La pagina si sta caricando...
La pagina si sta caricando...
La pagina si sta caricando...
La pagina si sta caricando...
La pagina si sta caricando...
La pagina si sta caricando...
La pagina si sta caricando...
La pagina si sta caricando...
La pagina si sta caricando...
La pagina si sta caricando...
-
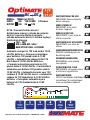 1
1
-
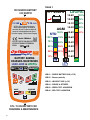 2
2
-
 3
3
-
 4
4
-
 5
5
-
 6
6
-
 7
7
-
 8
8
-
 9
9
-
 10
10
-
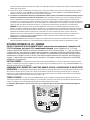 11
11
-
 12
12
-
 13
13
-
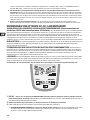 14
14
-
 15
15
-
 16
16
-
 17
17
-
 18
18
-
 19
19
-
 20
20
-
 21
21
-
 22
22
-
 23
23
-
 24
24
-
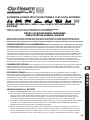 25
25
-
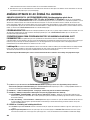 26
26
-
 27
27
-
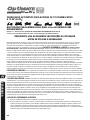 28
28
-
 29
29
-
 30
30
-
 31
31
-
 32
32
-
 33
33
-
 34
34
-
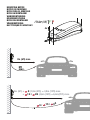 35
35
-
 36
36


Tecmate TM-500 OptiMate DC-DC Manuale del proprietario
- Categoria
- Caricabatterie per auto
- Tipo
- Manuale del proprietario
in altre lingue
- français: Tecmate TM-500 OptiMate DC-DC Le manuel du propriétaire
- español: Tecmate TM-500 OptiMate DC-DC El manual del propietario
- Deutsch: Tecmate TM-500 OptiMate DC-DC Bedienungsanleitung
- Nederlands: Tecmate TM-500 OptiMate DC-DC de handleiding
- português: Tecmate TM-500 OptiMate DC-DC Manual do proprietário
Documenti correlati
-
Tecmate TM-180 OptiMate 6 Ampmatic Manuale del proprietario
-
-
-
-
Tecmate OptiMATE Lithium TM298 Manuale del proprietario
-
-
-
Altri documenti
-
KTM A61029974144 Manuale del proprietario
-
Topdon Tornado4000 Manuale utente
-
Topdon TB6000Pro Manuale utente
-
-
 BSCHARGER BK20 Smart Bank Battery Charger and Maintainer Manuale utente
-
 BS BATTERY BS10 Smart Battery Charger and Maintainer Manuale utente
-
BS BATTERY BK 20 Smart Bank Battery Charger and Maintainer Manuale utente
-
 AlcaPower LiFE-PO4-100 Guida d'installazione


