Alpine i905D-F Guida di riferimento
- Categoria
- Amplificatori audio per auto
- Tipo
- Guida di riferimento

ALPINE iLX-F905D 68-41657Z79-C QRG (EN)
EN
DE
FR
ES
IT
RU
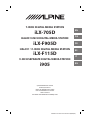
7-INCH DIGITAL MEDIA STATION
iLX-705D
HALO9 9-INCH DIGITAL MEDIA STATION
iLX-F905D
HALO11 11-INCH DIGITAL MEDIA STATION
iLX-F115D
9-INCH SEPARATE DIGITAL MEDIA STATION
i905
QUICK REFERENCE GUIDE
KURZANLEITUNG
GUIDE DE RÉFÉRENCE RAPIDE
GUÍA DE REFERENCIA RÁPIDA
GUIDA RAPIDA
КРАТКОЕ СПРАВОЧНОЕ РУКОВОДСТВО

ALPINE iLX-F905D 68-41657Z79-C QRG (EN)

ALPINE iLX-F905D 68-41657Z79-C QRG (EN)
1-EN
EN
DE
FR
ES
IT
RU
IMPORTANT
Please record the serial number of your unit in the space provided below and keep it as a permanent record.
SERIAL NUMBER:
ISO SERIAL NUMBER: AL
INSTALLATION DATE:
INSTALLATION TECHNICIAN:
PLACE OF PURCHASE:
For details on all functions, refer to the Owner’s Manual published on our website at
https://www.alpine-europe.com/alpine-europe.html If required, an ALPINE dealer will readily
provide you with a print out of the Owner’s Manual published on the website.
Contents
WARNING ................................................................................................................................................................2
CAUTION .................................................................................................................................................................3
Getting Started .....................................................................................................................................................4
Apple CarPlay Operation (Optional)..............................................................................................................8
Android Auto™ (Optional).................................................................................................................................8
Radio/RDS Operation .........................................................................................................................................9
DAB/DAB+/DMB Operation .............................................................................................................................9
USB Flash drive Operation (Optional).........................................................................................................10
iPod mode on iPhone (Optional)..................................................................................................................11
Hands-Free Phone Control .............................................................................................................................12
Installation............................................................................................................................................................13
Connections (iLX-705D/iLX-F905D/iLX-F115D).......................................................................................18
Connections (i905).............................................................................................................................................21
Specifications ......................................................................................................................................................24

ALPINE iLX-F905D 68-41657Z79-C QRG (EN) ALPINE iLX-F905D 68-41657Z79-C QRG (EN)
2-EN
WARNING
WARNING
This symbol means important instructions. Failure
to heed them can result in serious injury or death.
INSTALL THE PRODUCT CORRECTLY SO THAT THE DRIVER
CANNOT WATCH TV/VIDEO UNLESS THE VEHICLE IS STOPPED
AND THE PARKING BRAKE IS APPLIED.
It is dangerous for the driver to watch TV/Video while driving a vehicle.
Installing this product incorrectly enables the driver to watch TV/Video
while driving. This may cause a distraction, preventing the driver from
looking ahead, thus causing an accident. The driver or other people
could be severely injured.
DO NOT WATCH VIDEO WHILE DRIVING.
Watching the video may distract the driver from looking ahead of the
vehicle and cause an accident.
DO NOT OPERATE ANY FUNCTION THAT TAKES YOUR
ATTENTION AWAY FROM SAFELY DRIVING YOUR VEHICLE.
Any function that requires your prolonged attention should only be
performed after coming to a complete stop. Always stop the vehicle in a
safe location before performing these functions. Failure to do so may
result in an accident.
KEEP THE VOLUME AT A LEVEL WHERE YOU CAN STILL HEAR
OUTSIDE NOISES WHILE DRIVING.
Excessive volume levels that obscure sounds such as emergency vehicle
sirens or road warning signals (train crossings, etc.) can be dangerous
and may result in an accident. LISTENING AT LOUD VOLUME
LEVELS IN A CAR MAY ALSO CAUSE HEARING DAMAGE.
MINIMIZE DISPLAY VIEWING WHILE DRIVING.
Viewing the display may distract the driver from looking ahead of the
vehicle and cause an accident.
DO NOT DISASSEMBLE OR ALTER.
Doing so may result in an accident, fire or electric shock.
USE ONLY IN CARS WITH A 12 VOLT NEGATIVE GROUND.
(Check with your dealer if you are not sure.) Failure to do so may result
in fire, etc.
KEEP SMALL OBJECTS SUCH AS SCREWS OUT OF THE REACH
OF CHILDREN.
Swallowing them may result in serious injury. If swallowed, consult a
physician immediately.
USE THE CORRECT AMPERE RATING WHEN REPLACING
FUSES.
Failure to do so may result in fire or electric shock.
DO NOT BLOCK VENTS OR RADIATOR PANELS.
Doing so may cause heat to build up inside and may result in fire.
USE THIS PRODUCT FOR MOBILE 12V APPLICATIONS.
Use for other than its designed application may result in fire, electric
shock or other injury.
MAKE THE CORRECT CONNECTIONS.
Failure to make the proper connections may result in fire or product
damage.
BEFORE WIRING, DISCONNECT THE CABLE FROM THE
NEGATIVE BATTERY TERMINAL.
Failure to do so may result in electric shock or injury due to electrical
shorts.
DO NOT ALLOW CABLES TO BECOME ENTANGLED IN
SURROUNDING OBJECTS.
Arrange wiring and cables in compliance with the manual to prevent
obstructions when driving. Cables or wiring that obstruct or hang up on
places such as the steering wheel, gear lever, brake pedals, etc. can be
extremely hazardous.
DO NOT SPLICE INTO ELECTRICAL CABLES.
Never cut away cable insulation to supply power to other equipment.
Doing so will exceed the current carrying capacity of the wire and result
in fire or electric shock.
DO NOT DAMAGE PIPE OR WIRING WHEN DRILLING HOLES.
When drilling holes in the chassis for installation, take precautions so as
not to contact, damage or obstruct pipes, fuel lines, tanks or electrical
wiring. Failure to take such precautions may result in fire.
DO NOT USE BOLTS OR NUTS IN THE BRAKE OR STEERING
SYSTEMS TO MAKE GROUND CONNECTIONS.
Bolts or nuts used for the brake or steering systems (or any other
safety-related system), or tanks should NEVER be used for installations
or ground connections. Using such parts could disable control of the
vehicle and cause fire etc.
DO NOT INSTALL IN LOCATIONS WHICH MIGHT HINDER
VEHICLE OPERATION, SUCH AS THE STEERING WHEEL OR
SHIFT LEVER.
Doing so may obstruct forward vision or hamper movement etc. and
results in serious accident.
CAUTION
This symbol means important instructions. Failure
to heed them can result in injury or material
property damage.
HALT USE IMMEDIATELY IF A PROBLEM APPEARS.
Failure to do so may cause personal injury or damage to the product.
Return it to your authorized Alpine dealer or the nearest Alpine Service
Center for repairing.
HAVE THE WIRING AND INSTALLATION DONE BY EXPERTS.
The wiring and installation of this unit requires special technical skill
and experience. To ensure safety, always contact the dealer where you
purchased this product to have the work done.
USE SPECIFIED ACCESSORY PARTS AND INSTALL THEM
SECURELY.
Be sure to use only the specified accessory parts. Use of other than
designated parts may damage this unit internally or may not securely
install the unit in place. This may cause parts to become loose resulting
in hazards or product failure.
ARRANGE THE WIRING SO IT IS NOT CRIMPED OR PINCHED
BY A SHARP METAL EDGE.
Route the cables and wiring away from moving parts (like the seat rails)
or sharp or pointed edges. This will prevent crimping and damage to the
wiring. If wiring passes through a hole in metal, use a rubber grommet
to prevent the wire’s insulation from being cut by the metal edge of the
hole.
DO NOT INSTALL IN LOCATIONS WITH HIGH MOISTURE OR
DUST.
Avoid installing the unit in locations with high incidence of moisture or
dust. Moisture or dust that penetrates into this unit may result in
product failure.

ALPINE iLX-F905D 68-41657Z79-C QRG (EN) ALPINE iLX-F905D 68-41657Z79-C QRG (EN)
3-EN
EN
DE
FR
ES
IT
RU
WARNING
USE THIS PRODUCT FOR MOBILE 12V APPLICATIONS.
Use for other than its designed application may result in fire, electric
shock or other injury.
MAKE THE CORRECT CONNECTIONS.
Failure to make the proper connections may result in fire or product
damage.
BEFORE WIRING, DISCONNECT THE CABLE FROM THE
NEGATIVE BATTERY TERMINAL.
Failure to do so may result in electric shock or injury due to electrical
shorts.
DO NOT ALLOW CABLES TO BECOME ENTANGLED IN
SURROUNDING OBJECTS.
Arrange wiring and cables in compliance with the manual to prevent
obstructions when driving. Cables or wiring that obstruct or hang up on
places such as the steering wheel, gear lever, brake pedals, etc. can be
extremely hazardous.
DO NOT SPLICE INTO ELECTRICAL CABLES.
Never cut away cable insulation to supply power to other equipment.
Doing so will exceed the current carrying capacity of the wire and result
in fire or electric shock.
DO NOT DAMAGE PIPE OR WIRING WHEN DRILLING HOLES.
When drilling holes in the chassis for installation, take precautions so as
not to contact, damage or obstruct pipes, fuel lines, tanks or electrical
wiring. Failure to take such precautions may result in fire.
DO NOT USE BOLTS OR NUTS IN THE BRAKE OR STEERING
SYSTEMS TO MAKE GROUND CONNECTIONS.
Bolts or nuts used for the brake or steering systems (or any other
safety-related system), or tanks should NEVER be used for installations
or ground connections. Using such parts could disable control of the
vehicle and cause fire etc.
DO NOT INSTALL IN LOCATIONS WHICH MIGHT HINDER
VEHICLE OPERATION, SUCH AS THE STEERING WHEEL OR
SHIFT LEVER.
Doing so may obstruct forward vision or hamper movement etc. and
results in serious accident.
CAUTION
This symbol means important instructions. Failure
to heed them can result in injury or material
property damage.
HALT USE IMMEDIATELY IF A PROBLEM APPEARS.
Failure to do so may cause personal injury or damage to the product.
Return it to your authorized Alpine dealer or the nearest Alpine Service
Center for repairing.
HAVE THE WIRING AND INSTALLATION DONE BY EXPERTS.
The wiring and installation of this unit requires special technical skill
and experience. To ensure safety, always contact the dealer where you
purchased this product to have the work done.
USE SPECIFIED ACCESSORY PARTS AND INSTALL THEM
SECURELY.
Be sure to use only the specified accessory parts. Use of other than
designated parts may damage this unit internally or may not securely
install the unit in place. This may cause parts to become loose resulting
in hazards or product failure.
ARRANGE THE WIRING SO IT IS NOT CRIMPED OR PINCHED
BY A SHARP METAL EDGE.
Route the cables and wiring away from moving parts (like the seat rails)
or sharp or pointed edges. This will prevent crimping and damage to the
wiring. If wiring passes through a hole in metal, use a rubber grommet
to prevent the wire’s insulation from being cut by the metal edge of the
hole.
DO NOT INSTALL IN LOCATIONS WITH HIGH MOISTURE OR
DUST.
Avoid installing the unit in locations with high incidence of moisture or
dust. Moisture or dust that penetrates into this unit may result in
product failure.

ALPINE iLX-F905D 68-41657Z79-C QRG (EN) ALPINE iLX-F905D 68-41657Z79-C QRG (EN)
4-EN
Owner’s manual Location of Controls, Turning Power On or Off
Getting Started
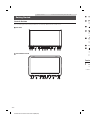
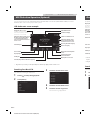
Controls Position
The screen design used in the Quick Reference Guide may differ from the actual screen.
iLX-705D
iLX-F905D/iLX-F115D
Dimmer Sensor
Sense the brightness of the car interior.
button
Activate Siri function or voice recognition mode while
Apple CarPlay or Android Auto is connected.
/ (DOWN/UP) button
Adjusts the volume.
(MUTE) button
Activates/deactivates MUTE mode.
Press and hold this button for at least 2 seconds to turn
off the screen/button illumination.
(Audio) button
Displays the Audio playback screen.
Audio sources can be switched while the Audio
playback screen is displayed.
Power indicator
(HOME) button
Activates the HOME screen.
The Sound Setup screen is displayed while the HOME
screen is displayed.
Press and hold this button for at least 2 seconds to turn
the power off.
Turning Power On or Off
1 Turn the ignition key to the ACC or ON position.
The system is turned on.
• When using the system for the first time, the HOME screen is displayed.
CAUTION (iLX-F905D/iLX-F115D only)
To adjust the display angle, hold the center of the
top and bottom of the display to move it.
To protect the display, do not hold the left and
right ends to move it.

ALPINE iLX-F905D 68-41657Z79-C QRG (EN) ALPINE iLX-F905D 68-41657Z79-C QRG (EN)
5-EN
EN
DE
FR
ES
IT
RU
Owner’s manual Location of Controls, Turning Power On or Off
Getting Started
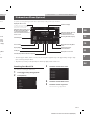
Controls Position
The screen design used in the Quick Reference Guide may differ from the actual screen.
iLX-705D
iLX-F905D/iLX-F115D
Dimmer Sensor
Sense the brightness of the car interior.
button
Activate Siri function or voice recognition mode while
Apple CarPlay or Android Auto is connected.
/ (DOWN/UP) button
Adjusts the volume.
(MUTE) button
Activates/deactivates MUTE mode.
Press and hold this button for at least 2 seconds to turn
off the screen/button illumination.
(Audio) button
Displays the Audio playback screen.
Audio sources can be switched while the Audio
playback screen is displayed.
Power indicator
(HOME) button
Activates the HOME screen.
The Sound Setup screen is displayed while the HOME
screen is displayed.
Press and hold this button for at least 2 seconds to turn
the power off.
(CAM) button
Displays the image of Camera2 (Rear/Front/Side/Other)
or Camera1 (Rear).
Press for 1 second or more to return to the previous
screen.
/ button
Press to seek up/down a station in radio mode or up/
down a track, etc., in other audio/visual sources.
(MAP) button
Displays the map screen for Apple CarPlay /
Android Auto when Apple CarPlay or Android Auto
is connected.
Displays the navigation map screen when the
optional Navigation Stick (KTX-NS01EU) is
connected.
Remote Sensor
Point the remote control transmitter towards the
remote sensor within a range of 2 meters.
Turning Power On or Off
1Turn the ignition key to the ACC or ON position.
The system is turned on.
•When using the system for the first time, the HOME screen is displayed.
CAUTION (iLX-F905D/iLX-F115D only)
To adjust the display angle, hold the center of the
top and bottom of the display to move it.
To protect the display, do not hold the left and
right ends to move it.

ALPINE iLX-F905D 68-41657Z79-C QRG (EN) ALPINE iLX-F905D 68-41657Z79-C QRG (EN)
6-EN
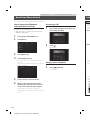
About the HOME Screen
Select the audio source on the HOME screen to perform various settings and operations of the function.
1Press the (HOME) button.
The HOME screen is displayed.
Normal mode screen example
Enhanced Text mode screen example
Touch to display the Sound Setup screen.
Touch to change the page.
Pages can also be changed by swiping the HOME
screen horizontally with your finger.
Setup button
Displays the Setup screen.
Audio source select area
Touch your desired source icon to change the audio
source.
Android Auto button
Displays the Android Auto screen, high light displayed
when an Android Smartphone installed Android Auto
App is connected.
Apple CarPlay button
Displays the Apple CarPlay screen, high light displayed
when Apple CarPlay is turned on and an iPhone 6s or
later is connected.
HOME screen navigation
Phone button
Displays the Phone menu screen.
The Device List screen is displayed when a Hands-free
Phone, Apple CarPlay or Android Auto device is not
connected.
•The button is changed to the [Ext Acc Ctrl] button
when the optional External Accessory Control
module (KAC-001) is connected. (i905 only)
Thumbnail window for the current source
Source name, artwork and title information are
displayed. Touch the artwork to display the source
screen. Touch [ ] to play/pause a track or video.
Setting the Home Screen Type
The Home screen can be changed to the Enhanced Text mode.
1Press the (HOME) button.
The HOME screen is displayed.
2Touch [Setup].
The Setup screen is displayed.
3Touch [System].
4Touch [Home Screen Type].
5Touch [NORMAL] or [Enhanced Text].

ALPINE iLX-F905D 68-41657Z79-C QRG (EN) ALPINE iLX-F905D 68-41657Z79-C QRG (EN)
7-EN
EN
DE
FR
ES
IT
RU
About the HOME Screen
Select the audio source on the HOME screen to perform various settings and operations of the function.
1Press the (HOME) button.
The HOME screen is displayed.
Normal mode screen example
Enhanced Text mode screen example
Apple CarPlay button
Displays the Apple CarPlay screen, high light displayed
when Apple CarPlay is turned on and an iPhone 6s or
later is connected.
HOME screen navigation
Phone button
Displays the Phone menu screen.
The Device List screen is displayed when a Hands-free
Phone, Apple CarPlay or Android Auto device is not
connected.
•The button is changed to the [Ext Acc Ctrl] button
when the optional External Accessory Control
module (KAC-001) is connected. (i905 only)
Thumbnail window for the current source
Source name, artwork and title information are
displayed. Touch the artwork to display the source
screen. Touch [ ] to play/pause a track or video.
Setting the Home Screen Type
The Home screen can be changed to the Enhanced Text mode.
1Press the (HOME) button.
The HOME screen is displayed.
2Touch [Setup].
The Setup screen is displayed.
3Touch [System].
4Touch [Home Screen Type].
5Touch [NORMAL] or [Enhanced Text].

ALPINE iLX-F905D 68-41657Z79-C QRG (EN) ALPINE iLX-F905D 68-41657Z79-C QRG (EN)
8-EN
Owner’s manual Apple CarPlay (Optional)
Apple CarPlay Operation (Optional)
Apple CarPlay is a smarter, safer way to use your iPhone in the car. Apple CarPlay takes the things you want to do
with your iPhone while driving and puts them right on this unit. You can get directions, make calls, send and
receive messages, and listen to music, all in a way that allows you to stay focused on the road.
1Press the (HOME) button.
The HOME screen is displayed.
2Touch [Apple CarPlay].
The Apple CarPlay screen is displayed.
•Refer to “Apple CarPlay” in the Owner’s Manual for information on how to operate Apple CarPlay.
Owner’s manual Android Auto™ (Optional)
Android Auto™ (Optional)
Android Auto brings your favorite smartphone apps into one place, making it easier for drivers to access their
favorite navigation, media, and communication apps on the road while minimizing the distractions. Talk to Google
on Android Auto™ and get things done with your voice so you can keep your eyes on the road and hands on the
wheel. Easily send messages, get directions, control media and more. Just short-press or long-press the voice
control button on your steering wheel.
1Press the (HOME) button.
The HOME screen is displayed.
2Touch [Android Auto].
The Android Auto screen is displayed.
•Refer to “Android Auto” in the Owner’s Manual for information on how to operate Android Auto.
Owner’s manual Radio/RDS
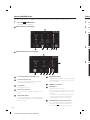
Radio/RDS Operation
•The patterns of some keys in the Quick Reference Guide may differ from the actual screen.
Owner’s manual DAB/DAB+/DMB
DAB/DAB+/DMB Operation
•The patterns of some keys in the Quick Reference Guide may differ from the actual screen.
Preset button
Displays the preset stations with a
short touch.
Touch for at least 2 seconds to
memorise the current station as a
preset station.
Touch for at least 1 second
to memorises stations
automatically
Switches a Seek mode
Displays the Phone screen
The Device List screen is
displayed when a Phone, CarPlay
or Android Auto device is not
connected.
Preset button
Displays the preset stations with a
short touch.
Touch for at least 2 seconds to
memorise the current station as a
preset station.
Switches a Seek mode
Displays the search screen
Slide Show
Displays the Phone screen
The Device List screen is
displayed when a Phone, CarPlay
or Android Auto device is not
connected.

ALPINE iLX-F905D 68-41657Z79-C QRG (EN) ALPINE iLX-F905D 68-41657Z79-C QRG (EN)
9-EN
EN
DE
FR
ES
IT
RU
Owner’s manual Apple CarPlay (Optional)
Apple CarPlay Operation (Optional)
Apple CarPlay is a smarter, safer way to use your iPhone in the car. Apple CarPlay takes the things you want to do
with your iPhone while driving and puts them right on this unit. You can get directions, make calls, send and
receive messages, and listen to music, all in a way that allows you to stay focused on the road.
1Press the (HOME) button.
The HOME screen is displayed.
2Touch [Apple CarPlay].
The Apple CarPlay screen is displayed.
•Refer to “Apple CarPlay” in the Owner’s Manual for information on how to operate Apple CarPlay.
Owner’s manual Android Auto™ (Optional)
Android Auto™ (Optional)
Android Auto brings your favorite smartphone apps into one place, making it easier for drivers to access their
favorite navigation, media, and communication apps on the road while minimizing the distractions. Talk to Google
on Android Auto™ and get things done with your voice so you can keep your eyes on the road and hands on the
wheel. Easily send messages, get directions, control media and more. Just short-press or long-press the voice
control button on your steering wheel.
1Press the (HOME) button.
The HOME screen is displayed.
2Touch [Android Auto].
The Android Auto screen is displayed.
•Refer to “Android Auto” in the Owner’s Manual for information on how to operate Android Auto.
Owner’s manual Radio/RDS
Radio/RDS Operation
•The patterns of some keys in the Quick Reference Guide may differ from the actual screen.
Owner’s manual DAB/DAB+/DMB
DAB/DAB+/DMB Operation
•The patterns of some keys in the Quick Reference Guide may differ from the actual screen.
Information display
Preset button
Displays the preset stations with a
short touch.
Touch for at least 2 seconds to
memorise the current station as a
preset station.
Displays the Radio setting
screen
Increases frequency
Touch and hold to change the
frequency continuously.
Touch for at least 1 second
to memorises stations
automatically
Switches a Seek mode
Switches band
Displays the Phone screen
The Device List screen is
displayed when a Phone, CarPlay
or Android Auto device is not
connected.
Decreases frequency
Touch and hold to change
the frequency continuously.
Information display
Preset button
Displays the preset stations with a
short touch.
Touch for at least 2 seconds to
memorise the current station as a
preset station.
Increases frequency
Switches a Seek mode
Displays the search screen
TP/EON indicator
Signal Strength indicator
Slide Show
Displays the Phone screen
The Device List screen is
displayed when a Phone, CarPlay
or Android Auto device is not
connected.
Switches band
TP indicator
Displays the Radio setting
screen
Decreases frequency
Traffic Information mode On/Off
Traffic Information mode On/Off

ALPINE iLX-F905D 68-41657Z79-C QRG (EN) ALPINE iLX-F905D 68-41657Z79-C QRG (EN)
10-EN
Owner’s manual USB Flash drive Operation (Optional)
USB Flash drive Operation (Optional)
You can play back music files (MP3/WMA/AAC/FLAC/WAV/APE) and video files (MP4/MOV/FLV/MKV) stored in a
USB flash drive on the internal player of this system.
USB Audio main screen example
•The patterns of some keys in the Quick Reference Guide may differ from the actual screen.
Finds the beginning of the current
file/Finds a previous file within 3
seconds after playback starts/
Fast-reverses when touched for at
least 1 second
Information display
Finds the beginning of next
chapter/Fast-forwards when
touched for at least 1 second
Shuffle play
Repeat playback
Artwork display
Displays the search screen
Pause and Play
Searching for a Music File
For example: Searching by Artist name
1Touch [ (Search)] during playback.
2Touch [Artists].
Owner’s manual iPod mode on iPhone (Optional)
iPod mode on iPhone (Optional)
A separately sold Lightning to USB cable is required depending on the type of iPhone.
•This unit supports iPhone (iPhone 6s or later) only. For using music playback only, set the “Apple CarPlay” setting to “Off ”
before connecting with your iPhone.
•The patterns of some keys in the Quick Reference Guide may differ from the actual screen.
Finds the beginning of the current
file/Finds a previous file within 3
seconds after playback starts/
Fast-reverses when touched for at
least 1 second
Displays the Phone screen
The Device List screen is displayed
when a Phone, CarPlay or Android
Auto device is not connected.
Next song information display
Switches to USB Video mode
Hi-Res icon display
Displays the USB Setup Menu
screen
Current track number/
Total track number
Time Bar (Elapsed time/Total time for playing)
Shuffle play
Repeat playback
Artwork display
Pause and Play
Time Bar (Elapsed time/Total time for playing)
Displays the Phone screen
The Device List screen is displayed
when a Phone, CarPlay or Android
Auto device is not connected.
Searching for a Music File
For example: Searching by Artist name
1Touch [ (Search)] during playback.
2Touch [Artists].
3Touch the desired artist’s name.
4Touch the desired album’s name.
5Touch the desired song’s name.
The selected song is played back.
USB1/USB2 indicator

ALPINE iLX-F905D 68-41657Z79-C QRG (EN) ALPINE iLX-F905D 68-41657Z79-C QRG (EN)
11-EN
EN
DE
FR
ES
IT
RU
Owner’s manual USB Flash drive Operation (Optional)
USB Flash drive Operation (Optional)
You can play back music files (MP3/WMA/AAC/FLAC/WAV/APE) and video files (MP4/MOV/FLV/MKV) stored in a
USB flash drive on the internal player of this system.
USB Audio main screen example
•The patterns of some keys in the Quick Reference Guide may differ from the actual screen.
Information display
Finds the beginning of next
chapter/Fast-forwards when
touched for at least 1 second
Displays the search screen
Searching for a Music File
For example: Searching by Artist name
1Touch [ (Search)] during playback.
2Touch [Artists].
3Touch the desired artist’s name.
4Touch the desired album’s name.
5Touch the desired song’s name.
The selected song is played back.
Owner’s manual iPod mode on iPhone (Optional)
iPod mode on iPhone (Optional)
A separately sold Lightning to USB cable is required depending on the type of iPhone.
•This unit supports iPhone (iPhone 6s or later) only. For using music playback only, set the “Apple CarPlay” setting to “Off ”
before connecting with your iPhone.
•The patterns of some keys in the Quick Reference Guide may differ from the actual screen.
Finds the beginning of the current
file/Finds a previous file within 3
seconds after playback starts/
Fast-reverses when touched for at
least 1 second
Information display
Finds the beginning of the next
file/Fast-forwards when
touched for at least 1 second
Next song information display
Switches to USB Video mode
Hi-Res icon display
Displays the USB Setup Menu
screen
Current track number/
Total track number
Shuffle play
Repeat playback
Artwork display
Pause and Play
Time Bar (Elapsed time/Total time for playing)
Displays the search screen
Displays the iPod Setup Menu
screen
Current track number/
Total track number
Next song information display
Displays the Phone screen
The Device List screen is displayed
when a Phone, CarPlay or Android
Auto device is not connected.
3Touch the desired artist’s name.
4Touch the desired album’s name.
5Touch the desired song’s name.
The selected song is played back.
USB1/USB2 indicator

ALPINE iLX-F905D 68-41657Z79-C QRG (EN) ALPINE iLX-F905D 68-41657Z79-C QRG (EN)
12-EN
Owner’s manual Bluetooth Setup, Bluetooth Operation
Hands-Free Phone Control
The unit can connect with up to two hands-free phones.
How to connect to a Bluetooth
compatible device (Pairing)
To display the Setup HOME screen:
•Bring your vehicle to a complete stop at a safe location.
Engage the parking brake.
1Touch [Setup] on the HOME screen.
2Touch [Device].
3Touch [Device List].
4Touch [Add New Device].
A search for devices to connect wirelessly to the
unit starts.
The Search List is displayed, and the list of searched
devices is displayed.
5Touch a device to connect in the list.
6When a code is displayed on the device,
check that the code is the same as the one
on the screen of the unit, and touch [Yes].
When the device connection is complete, a
message appears and the device returns to normal
mode.
Answering a Call
1An incoming call triggers the ringtone and
an incoming call display.
2Touch [ ].
The call starts.
Hanging up the Telephone
1Touch [ ] (End Call).
The call finishes.
Owner’s manual Installation
Installation
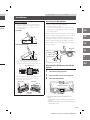
Note on installation
•Install at an angle between horizontal and 30°.
Note that installing at an angle outside of this
range will result in a loss of performance and
possible damage.
<iLX-705D>
0 - 30°
<iLX-F905D/iLX-F115D>
0 - 30°
•Do not block the unit’s heat sink, which would
prevent air circulation. If blocked, heat will
accumulate inside the unit and may cause a fire.
Air ventilation hole
Rear of the Unit
•When installing the display unit and main unit, do
not touch the connectors with your hands.
(iLX-F905D/iLX-F115D only)
Connectors
<Main unit><Display unit>

ALPINE iLX-F905D 68-41657Z79-C QRG (EN) ALPINE iLX-F905D 68-41657Z79-C QRG (EN)
13-EN
EN
DE
FR
ES
IT
RU
Owner’s manual Bluetooth Setup, Bluetooth Operation
Hands-Free Phone Control
The unit can connect with up to two hands-free phones.
Answering a Call
1An incoming call triggers the ringtone and
an incoming call display.
2Touch [ ].
The call starts.
Hanging up the Telephone
1Touch [ ] (End Call).
The call finishes.
Owner’s manual Installation
Installation
Note on installation
•Install at an angle between horizontal and 30°.
Note that installing at an angle outside of this
range will result in a loss of performance and
possible damage.
<iLX-705D>
0 - 30°
<iLX-F905D/iLX-F115D>
0 - 30°
•Do not block the unit’s heat sink, which would
prevent air circulation. If blocked, heat will
accumulate inside the unit and may cause a fire.
Air ventilation hole
Rear of the Unit
•When installing the display unit and main unit, do
not touch the connectors with your hands.
(iLX-F905D/iLX-F115D only)
Connectors
<Main unit><Display unit>
Mounting the Microphone
For safe use, make sure of the following:
• Location is stable and firm.
• Driver’s view and operations are not obstructed.
• Microphone is located where the driver’s voice can
be easily picked up.
When you speak into the microphone, you should not
have to change your driving posture. This may cause a
distraction, taking your attention away from safely
driving your vehicle. Carefully consider direction and
distance while mounting the microphone. Confirm
that the driver’s voice can be easily picked up at the
selected location.
Steering column
Microphone
Adhesive tape
Microphone base
Mounting the GPS Antenna inside the
vehicle
1Clean the mounting location.
2Put on the GPS Antenna mounting plate.
3Mount the GPS Antenna.
GPS Antenna
Antenna mounting plate
This unit
•Do not mount the GPS Antenna inside the centre
console.
–Mount the GPS Antenna on a flat plane of the dash board or
rear tray.
–Make sure the GPS Antenna is not covered (obstructed) by any
metallic surface or object.

ALPINE iLX-F905D 68-41657Z79-C QRG (EN) ALPINE iLX-F905D 68-41657Z79-C QRG (EN)
14-EN
•If the GPS Antenna is mounted near the unit, the
reception becomes poor, and the location of your vehicle
may not be displayed correctly.
–Mount the GPS Antenna far away enough from the unit.
–Bundle the GPS Antenna cable away from the rear of the unit.
•Some thermal reflection type or thermal absorption type
glass may interrupt high frequency waves. If reception is
poor with the antenna installed inside the car, try to
mount the antenna outside the car.
Note on using HDMI Connection Cables
When using HDMI connection cables, secure the
cables to the HDMI Terminals with the supplied HDMI
Fixation Bracket.
1Secure the HDMI Fixation Bracket with the
screw (A).
HDMI Fixation Bracket
(Included)
HDMI Terminal
(A)
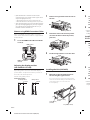
Adjusting the display position
(iLX-F905D/iLX-F115D)
Depending on the vehicle, the front-back display
position differs. To adjust the front-back position, set
the slider to the forward position.
Default setting: Back position
Front-back position
51.5 mm 31.5 mm
<Forward position> <Back position>
1Remove 4 hexagon bolts from both sides of
the unit.
Hexagon bolts ×4
2Pull out the slider to the forward position.
(To return the slider to the back position,
push it in.)
Slider
3Install 4 hexagon bolts to secure the slider.
Installing the Unit (iLX-705D)
1Mount the original mounting bracket to
the unit using the supplied screws.
If you do not have the original mounting bracket,
mount the Double din KIT* (provided with the side
mounting bracket), etc. to the main unit.
*Sold separately.
Face plate (Included)
Screws (M5 × 8)
(included)
Original Mounting
Bracket
2Connect all other leads of the unit
according to details described in the
“Connections (iLX-705D/iLX-F905D/
iLX-F115D)” (page18) or “Connections
(i905)” (page21).
3Mounting the unit in a car.
•Fix the cables carefully. Do not damage them by tucking
them into movable parts, such as a seat rail, or by
locating them against sharp or pointed edges.
Installing the Unit (iLX-F905D/
iLX-F115D)
1Mount the original mounting bracket to the
main unit using the supplied screws.
•If you do not have the original mounting bracket,
mount the Double din KIT* (provided with the
side mounting bracket), etc. to the main unit.
*Sold separately.
Screws (M5 × 8)
(included)
Original Mounting
Bracket
2Connect all other leads of the main unit
according to details described in the
“Connections (iLX-705D/iLX-F905D/
iLX-F115D)” (page18) or “Connections
(i905)” (page21).
3Mount the unit in a car.
•Fix the cables carefully. Do not damage them by
mounting them into movable parts, such as the seat rail,
or by locating them against sharp or pointed edges.

ALPINE iLX-F905D 68-41657Z79-C QRG (EN) ALPINE iLX-F905D 68-41657Z79-C QRG (EN)
15-EN
EN
DE
FR
ES
IT
RU
1Remove 4 hexagon bolts from both sides of
the unit.
Hexagon bolts ×4
2Pull out the slider to the forward position.
(To return the slider to the back position,
push it in.)
Slider
3Install 4 hexagon bolts to secure the slider.
Installing the Unit (iLX-705D)
1Mount the original mounting bracket to
the unit using the supplied screws.
If you do not have the original mounting bracket,
mount the Double din KIT* (provided with the side
mounting bracket), etc. to the main unit.
*Sold separately.
Face plate (Included)
Screws (M5 × 8)
(included)
Original Mounting
Bracket
2Connect all other leads of the unit
according to details described in the
“Connections (iLX-705D/iLX-F905D/
iLX-F115D)” (page18) or “Connections
(i905)” (page21).
3Mounting the unit in a car.
•Fix the cables carefully. Do not damage them by tucking
them into movable parts, such as a seat rail, or by
locating them against sharp or pointed edges.
Installing the Unit (iLX-F905D/
iLX-F115D)
1Mount the original mounting bracket to the
main unit using the supplied screws.
•If you do not have the original mounting bracket,
mount the Double din KIT* (provided with the
side mounting bracket), etc. to the main unit.
*Sold separately.
Screws (M5 × 8)
(included)
Original Mounting
Bracket
2Connect all other leads of the main unit
according to details described in the
“Connections (iLX-705D/iLX-F905D/
iLX-F115D)” (page18) or “Connections
(i905)” (page21).
3Mount the unit in a car.
•Fix the cables carefully. Do not damage them by
mounting them into movable parts, such as the seat rail,
or by locating them against sharp or pointed edges.
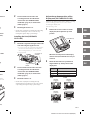
Adjust the up-down position of the
Display unit (iLX-F905D/iLX-F115D)
Adjust the up-down position of the display according
to the mounting position on the vehicle before
mounting the display unit.
Default setting: 0 mm
1Remove the 4 screws on the rear of the
display unit, then adjust the up-down
position.
Screws (M2.6× 8)
When the vertical position of the display
unit is decided, fix it with the 4 screws you
removed.
2Attach the Sheet Rear in a position that
aligns with the up-down position of the
display unit.
Sheet Rear
(Included) up-down position
2×50 mm: for up-down position 0 mm or -60mm
2×35 mm: for up-down position -15 mm or -45mm
2×20 mm: for up-down position -30 mm
0 mm
Sheet Rear
(2×50 mm)
-15 mm
Sheet Rear
(2×35 mm)
-30 mm
Sheet Rear
(2×20 mm)
Sheet Rear
(2×20 mm)
-45 mm
Sheet Rear
(2×35 mm)

ALPINE iLX-F905D 68-41657Z79-C QRG (EN) ALPINE iLX-F905D 68-41657Z79-C QRG (EN)
16-EN
-60 mm
Sheet Rear
(2×50 mm)
3Attach the Cover Rear to the rear of the
display unit using 2 screws (M2.6×6).
Secure the screws, then attach the Sheet
caps.
Screws
(M2.6× 6)
(Included)
Cover Rear (Included)
Sheet caps (Included)
Install the display unit (iLX-F905D/
iLX-F115D)
1Fix the Display unit to the slider of the main
unit using 4 screws (M5×8).
Screws (M5×8) (Included)
CAUTION
Do not adjust the display angle when the display
unit is not fixed to the slider of the main unit using
4 screws (M5 × 8). Doing so may not turn power
on.
2Mount the Power Plate.
Power Plate (Included)
•If the Power Plate is not mounted, the display unit
may not be turned power on. Make sure to
mount it.
3Mount the Cover Hinge using 2 screws
(M3×4).
Secure the screws, then attach the Sheet
Hinges.
Sheet Hinges
(Included)
Cover Hinge
(Included)
Screws (M3×4)
(Included)
Connection Diagram of SPST Switch (sold separately)
(If the ACC power supply is not available)
Battery
FUSE (20A) (Optional)
FUSE (5A) (Optional)
SPST SW (Optional)
(Yellow)
BATTERY
(Red)
ACC
iLX-705D
iLX-F905D
iLX-F115D
i905
•If your vehicle has no ACC power supply, add an SPST (Single-Pole, Single-Throw) switch (sold separately) and fuse (sold
separately).
•The diagram and the fuse amperage shown above are in the case when the unit is used individually.
•If the switched power (ignition) lead of the unit is connected directly to the positive (+) post of the vehicle’s battery, the unit
draws some current (several hundred milliamperes) even when its switch is placed in the OFF position, and the battery
may be discharged.

ALPINE iLX-F905D 68-41657Z79-C QRG (EN) ALPINE iLX-F905D 68-41657Z79-C QRG (EN)
17-EN
EN
DE
FR
ES
IT
RU
CAUTION
Do not adjust the display angle when the display
unit is not fixed to the slider of the main unit using
4 screws (M5 × 8). Doing so may not turn power
on.
2Mount the Power Plate.
Power Plate (Included)
•If the Power Plate is not mounted, the display unit
may not be turned power on. Make sure to
mount it.
3Mount the Cover Hinge using 2 screws
(M3×4).
Secure the screws, then attach the Sheet
Hinges.
Sheet Hinges
(Included)
Cover Hinge
(Included)
Screws (M3×4)
(Included)
Connection Diagram of SPST Switch (sold separately)
(If the ACC power supply is not available)
Battery
FUSE (20A) (Optional)
FUSE (5A) (Optional)
SPST SW (Optional)
(Yellow)
BATTERY
(Red)
ACC
iLX-705D
iLX-F905D
iLX-F115D
i905
•If your vehicle has no ACC power supply, add an SPST (Single-Pole, Single-Throw) switch (sold separately) and fuse (sold
separately).
•The diagram and the fuse amperage shown above are in the case when the unit is used individually.
•If the switched power (ignition) lead of the unit is connected directly to the positive (+) post of the vehicle’s battery, the unit
draws some current (several hundred milliamperes) even when its switch is placed in the OFF position, and the battery
may be discharged.

ALPINE iLX-F905D 68-41657Z79-C QRG (EN) ALPINE iLX-F905D 68-41657Z79-C QRG (EN)
18-EN
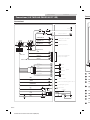
Owner’s manual Connections
Connections (iLX-705D/iLX-F905D/iLX-F115D)
Connection 1
Antenna
Microphone (included)
To amplifier or equalizer
To plus side of the back lamp signal lead of the car
To the parking brake signal lead
Ignition key
Battery
Power cable
PRE OUT cable
Speakers
Rear Left
Front Left
Front Right
Rear Right
To input terminal of amplifier when
adding an external amplifier
REAR OUT
REMO
(Blue/White)
REVERSE
(Orange/White)
PARKING BRAKE
(Yellow/Blue)
ACC
(Red)
BATT
(Yellow)
GND
(Black)
(Green)
(Green/Black)
(White)
(White/Black)
(Gray/Black)
(Gray)
(Violet/Black)
(Violet)
SUBW
FRONT OUT
P. ANT
(Blue)
To power antenna
STEERING REMOTE
HDMI-REMO-OUT
AUX-REMO-OUT
To steering remote control interface
To HDMI Selector Interface
To AUX device (TV Tuner, etc.)
REMOTE cable
(Gray)
(Brown)
MIC IN
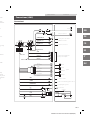
Connection 2
To USB flash drive, iPhone, Android smartphone or
optional Navigation Stick (KTX-NS01EU).
To USB flash drive or optional Navigation Stick
(KTX-NS01EU).
To iPhone or Android smartphone (For charging
only)..
To Rear camera
To Front or Side camera
To CAN Interface box
To Dash Cam
GPS Antenna (Included)
USB1 2.4A (Black)
USB2 1.5A (Gray)
REAR CAMERA
FRONT CAMERA
CONNECT2 I/F (UART I/F)
LIN
DRIVE RECODER IN
CAMERA cable
SPEED SENSOR
(Green/White) To the vehicle speed pulse line
HDMI Input Connector
HDMI Output Connector
CAMERA Connector
GPS Antenna Receptacle
Connect to GPS antenna (Included).
AUX Input Connector
Input lead for AUX audio signal.
Power Supply Connector
PRE OUT Connector
REM Connector
DAB Antenna Connector
To DAB Antenna (sold separately).
Radio Antenna Receptacle
La pagina sta caricando ...
La pagina sta caricando ...
La pagina sta caricando ...
La pagina sta caricando ...
La pagina sta caricando ...
La pagina sta caricando ...
La pagina sta caricando ...
La pagina sta caricando ...
La pagina sta caricando ...
La pagina sta caricando ...
La pagina sta caricando ...
La pagina sta caricando ...
La pagina sta caricando ...
La pagina sta caricando ...
-
 1
1
-
 2
2
-
 3
3
-
 4
4
-
 5
5
-
 6
6
-
 7
7
-
 8
8
-
 9
9
-
 10
10
-
 11
11
-
 12
12
-
 13
13
-
 14
14
-
 15
15
-
 16
16
-
 17
17
-
 18
18
-
 19
19
-
 20
20
-
 21
21
-
 22
22
-
 23
23
-
 24
24
-
 25
25
-
 26
26
-
 27
27
-
 28
28
-
 29
29
-
 30
30
-
 31
31
-
 32
32
-
 33
33
-
 34
34


Alpine i905D-F Guida di riferimento
- Categoria
- Amplificatori audio per auto
- Tipo
- Guida di riferimento
in altre lingue
- English: Alpine i905D-F Reference guide
Documenti correlati
-
Alpine iLX-F115S907 Guida di riferimento
-
Alpine iLX-F115DU8 Guida di riferimento
-
-
-
-
-
-
Alpine iLX-W690D Manuale utente
-
Alpine iLX-700 Manuale del proprietario
