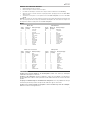
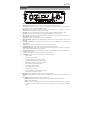
iON Karaoke Star Plus Guida Rapida
- Categoria
- Microfoni
- Tipo
- Guida Rapida

Karaoke Star Plus
Quickstart Guide English ( 3 – 6 )
Guía de inicio rápido Español ( 7 – 11 )
Guide d'utilisation rapide Français ( 12 – 15 )
Guida rapida Italiano ( 16 – 20 )
Schnellstart-Anleitung Deutsch ( 21 – 25 )
Snelstartgids Nederlands ( 26 – 30 )
Appendix English ( 31 )

2

3
Quickstart Guide (English)
Introduction
• Sing karaoke using your favorite YouTube music on your smartphone, tablet, or computer
with Karaoke Star Plus’s Bluetooth connection.
• Connect a variety of audio sources to Karaoke Star Plus’s Aux input to play karaoke
songs.
• Use the built-in FX processor to match your singing to favorite music genres, vocal
harmonies, gender voices, or other versatile effects.
• Light Mode offers a full range of color options and patterns to let you control the light
show.
Box Contents
Karaoke Star Plus
Power Cable (standard IEC)
(2) Microphones with mic cables
3.5mm (1/8”) Aux Cable
Quickstart Guide
Safety & Warranty Manual
Support
For the latest information about this product (documentation, technical specifications, system
requirements, compatibility information, etc.) and product registration, visit ionaudio.com.
For additional product support, visit ionaudio.com/support.
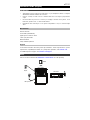
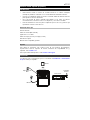
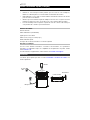
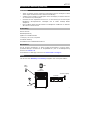
Setup
Items shown but not listed under Introduction > Box Contents are sold separately.
Tablet
MP3
Pla
y
er
Microphone
Power
REAR PANEL
FRONT PANEL

4
Features
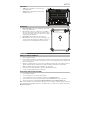
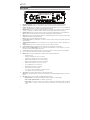
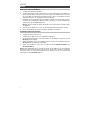
Front Panel
1. Microphone Inputs: Connect the included dynamic microphones to these 1/4” (6.35 mm) inputs.
2. Microphone Volume: Adjust this dial to control the volume for both microphone inputs.
3. Master Volume: Adjust this dial to control the speaker’s main mix volume, which includes the microphone inputs, Aux
input, and the audio from a paired Bluetooth device.
4. Aux Input: Connect a smartphone, MP3 player, DVD player, computer soundcard, or other line-level audio source to
this 1/8” (3.5 mm) Aux input.
5. Aux Volume +/-: Press these buttons to control the volume for the Aux input and Bluetooth signal.
Note: The Aux input volume will be adjusted separately from the Bluetooth volume.
6. Bluetooth: Press this button to pair to a Bluetooth device. Press this button again to unpair from a connected
Bluetooth device.
Note: Volume on your Bluetooth device should be turned up.
7. Bluetooth Icon: The Bluetooth icon will be lit solid when a device is paired to Karaoke Star Plus.
8. Aux/Headphone Output: Connect this 1/8” (3.5 mm) output to headphones, a powered speaker, or a recorder.
9. FX Group: Press one of the A-D buttons to select an effect category.
10. FX Group Icon: The display will show the selected category for the built-in effects.
11. Voice Effect On/Off: Press this button to activate/deactivate the built-in effects. The built-in effects are applied to both
microphone inputs.
12. Voice Effect Icon: The display will show the effect preset icon when the built-in effects are activated.
13. -/+: Use these buttons to select one of the built-in effects.
14. Light Mode: Press this button to cycle through these different light effects:
• Off (no lights)
• EQ Bars (reactive to music)
• Horizontal Color Wipe (non-reactive to music)
• Shimmering Large Blocks (non-reactive to music)
• Shimmering Small Blocks (non-reactive to music)
• Falling Blocks (non-reactive to music)
• Wavy Line (reactive to music)
• Pulsating Block (reactive to music)
• Light Bar (reactive to music)
• Snowflake/Square Lights (non-reactive to music)
• Vertical Lights (non-reactive to music)
15. USB Charge: Connect your device’s charge cable here to charge it.
Note: The USB charging port does not play music. Use Bluetooth or the Aux input to play your music source.
16. Charge LED: Indicates battery charging status of Karaoke Star Plus.
• Blinking LED = The unit is powered on, the battery is low and needs to be recharged.
• Solid LED = The battery is charging.
• LED OFF = If the power cable is connected, the battery is fully charged. If the unit is ON with the power cable
not connected, the battery has not yet reached a low charge level.
1
3
4
2
1
2
1
4
8
6
7
9
11
11
13
13
5
2
3
14
14
10
10
16
16
15
15

5
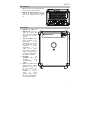
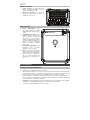
Top Panel
1. Cradle: Place your tablet here to view lyrics if you
are singing karaoke.
2. Storage Tray: Use this integrated storage tray for
smartphones, keys, etc.
Rear Panel
1. Power Cable Input: Connect the included IEC power cable
from here to a power outlet.
2. Fuse Cover: If the unit’s fuse is broken, use a screwdriver or
other tool to lift this tab to replace the fuse. Replace it with a
fuse of the same rating. Using a fuse with an incorrect rating
can damage the unit and/or fuse.
3. Power Switch: Use this switch to turn the unit on/off.
4. Bass Port: This port enhances the bass generated by the
woofer to increase the low-frequencies. Make sure this hole is
not obstructed since this will adversely affect bass response.
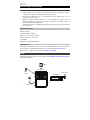
Operation
Pairing to a Bluetooth Device
1. Turn on your Bluetooth device.
2. Power on Karaoke Star Plus. If you have previously connected to a Bluetooth device, Karaoke Star Plus will
reconnect to it. If this is the first time connecting to the device, press the Bluetooth button on Karaoke Star
Plus to enter pairing mode.
3. Navigate to your Bluetooth device’s setup screen, find “Karaoke Star Plus” and connect. When the device is
“paired” to Karaoke Star Plus, the Bluetooth icon will be lit solid and a confirmation tone will be heard.
Note: If your Bluetooth device prompts for a pairing code, enter “0000”.
4. Press and release the Bluetooth button to disconnect a paired Bluetooth device.
5. To connect to another Bluetooth device, repeat step 3.
Performing with Karaoke Star Plus
1. Power on Karaoke Star Plus.
2. Connect a microphone to one of the microphone inputs.
3. To use the built-in effects, select a category by pressing one of the FX Group buttons.
4. Use the -/+ buttons to select an effect preset; then press the Voice Effect button to turn on the effects.
5. Sing into the microphone while adjusting the Microphone Volume dial and the Master Volume dial.
Note: To avoid feedback, move the microphone away from the front of Karaoke Star Plus’s speaker, as this will
cause high pitched and damaging sound waves. If feedback starts, move away from the speaker and lower the
Microphone Volume dial.
1
3
4
2
1
2
1
4
15
8
6
7
9
11
13
5
2
3
14
10
12
1
3
4
2
1
2
1
4
8
6
7
9
11
13
5
2
3
14
10
16
15

6
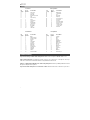
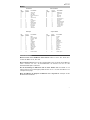
Effects
Gender Effects
Novelty Effects
FX
Group
Preset
Number
Preset Name FX
Group
Preset
Number
Preset Name
C 1 Barry D 1 D-
V
ader
C 2 Male to Female D 2 Aliens
C 3 Female to Male D 3 Flea
C 4 Pop Eye D 4 Froggy
C 5 Olive D 5 Little Robot
C 6 Tinker Bell D 6 Evil Robot
C 7 Octivator D 7 Robot Chorus
C 8 Prankster D 8 Monster
C 9 Munchkin D 9 Psycho
C 10 Way Down D 10 Warehouse
C 11
V
entriloquist D 11 Flange
C 12 Hip Deep D 12 Telephone
C 13 Stadium D 13 Echo
C 14 Station D 14 Big Echo
C 15 David & Goliath D 15 Grand Canyon
Troubleshooting
If you can’t hear any sound from the microphone: Make sure the microphone On/Off switch is “on”.
If the sound is distorted: Try lowering the volume control of your sound source or microphone. Also, try to
reduce the overall volume of Karaoke Star Plus using the Master Volume knob.
If there is a high-pitched whistling noise when using microphones: This is probably feedback. Point the
microphone away from the speaker.
If you can’t hear the microphone over the music volume: Turn down the music volume from your source.
Core Effects
FX
Group
Preset
Number
Preset Name
A 1 Super Star
A
2 On Stage
A 3 Auto-Pain
A
4 Modern Pop Tuned
A 5 Star
A 6 Super Group
A
7 Arena
A 8 Lead Singer
A
9 Grunge
A 10 Modern Rap
A 11 Classic Rap
A
12 Rock Out
A 13 Rockabilly
A
14 Church
A 15 Cathedral
Harmony Effects
FX
Group
Preset
Number
Preset Name
B 1 Barbershop
B 2 Chapel Girls
B 3 Trio
B 4 Bohemian
B 5 Rapsody
B 6 Group Harmony
B 7 Tuned Girls
B 8 Girl Pop
B 9 Tuned Girl Group
B 10 Tuned On Stage
B 11 Angelic Choir
B 12 Country Ladies
B 13 Country Gent
B 14 Hmmmm

7
Guía de inicio rápido (Español)
Introducción
• Cante karaoke usando su música de YouTube favorita en su teléfono inteligente
(smartphone), tableta un ordenador con la conexión Bluetooth del Karaoke Star Plus.
• Conecte una variedad de fuentes de audio a la entrada auxiliar del Karaoke Star Plus
para reproducir canciones de karaoke.
• Use el procesador de efectos integrado para adaptar su voz según sus géneros
musicales favoritos, armonías vocales, voces de género y otros efectos versátiles.
• El modo de iluminación ofrece una gama completa de opciones de color y patrones que
le permitirán controlar el show de luces.
Contenido de la caja
Karaoke Star Plus
Cable de corriente (IEC estándar)
(2) Micrófonos con cables
Cable de 1/8 pulg. (3,5 mm) a 1/8 pulg. (3,5 mm)
Guía de inicio rápido
Manual sobre la seguridad y garantía
Soporte
Para obtener la información más reciente acerca de este producto (documentación,
especificaciones técnicas, requisitos de sistema, información de compatibilidad, etc.) y
registrarlo, visite ionaudio.com.
Para soporte adicional del producto, visite ionaudio.com/support.
Instalación
Los elementos que se muestran pero que no se enumeran en Introducción > Contenido de
la caja se venden por separado.
Tableta
Reproductor de
MP3
Micrófono
Suministro
eléctrico
PANEL TRASERO
PANEL FRONTAL

8
Características
Panel frontal
1. Entradas de micrófono: Conecte a estas entradas de 6,35 mm (1/4 pulg.) los micrófonos dinámicos incluidos.
2. Volumen del micrófono: Ajuste este cuadrante para controlar el volumen de ambas entradas de micrófono.
3. Volumen maestro: Ajuste este cuadrante para controlar la mezcla principal del altavoz, que incluye las entradas de
micrófono, la entrada auxiliar y el audio de un dispositivo Bluetooth apareado.
4. Entrada auxiliar: Conecte un teléfono inteligente (smartphone), reproductor mp3, reproductor de DVD, la tarjeta de
sonido de un ordenador u otra fuente de audio de nivel de línea a esta entrada auxiliar de 3,5 mm (1/8 pulg.).
5. Volumen auxiliar +/-: Pulse estos botones para controlar el volumen de la entrada auxiliar y de la señal de Bluetooth.
Nota: El volumen de la entrada auxiliar se ajusta de forma independiente del volumen de Bluetooth.
6. Bluetooth: Pulse este botón para aparear la unidad con un dispositivo Bluetooth. Pulse este botón nuevamente para
desaparear la unidad de un dispositivo Bluetooth.
Nota: El volumen en su dispositivo Bluetooth debe subirse.
7. Icono de Bluetooth: El icono de Bluetooth se enciende con luz azul continua cuando hay un dispositivo apareado al
Karaoke Star Plus.
8. Salida auxiliar/para auriculares: Conecte esta salida de 3,5 mm (1/8 pulg.) auriculares, altavoces alimentados o un
grabador.
9. Grupo de efectos: Pulse uno de los botones A-D para seleccionar una categoría de efecto.
10. Icono del grupo de efectos: La pantalla mostrará la categoría seleccionada de efectos integrados.
11. Efecto de voz encendido/apagado: Pulse este botón para activar/desactivar los efectos integrados. Los efectos
integrados se aplican a ambas entradas de micrófono.
12. Icono del efecto de voz: La pantalla mostrará el icono del preset de efecto cuando se activan los efectos integrados.
13. -/+: Use estos botones para seleccionar uno de los efectos integrados.
14. Modo de luz: Pulse este botón para alternar los siguientes efectos de iluminación diferentes:
• Apagado (sin luces)
• Barras de ecualización (reacciona con la música)
• Barrido de color horizontal (no reacciona con la música)
• Bloques grandes brillantes (no reacciona con la música)
• Bloques pequeños brillantes (no reacciona con la música)
• Bloques descendentes (no reacciona con la música)
• Línea ondulada (reacciona con la música)
• Bloque pulsante (reacciona con la música)
• Barra de luz (reacciona con la música)
• Luces tipo copo de nieve/cuadrado (no reactivas a la música)
• Luces verticales (no reacciona con la música)
15. Carga USB: Conecte aquí el cable de carga de su dispositivo para cargarlo.
Nota: El puerto de carga USB no reproduce música. Use el Bluetooth o la entrada auxiliar para reproducir su fuente de
música.
16. LED carga: Indica los diversos estados de actividad del Karaoke Star Plus.
• LED intermitente = La unidad está encendida pero la batería está baja y necesita recargarse.
• LED encendido permanentemente = La batería se está cargando.
• LED apagado = Si el cable de corriente está conectado, la batería está completamente cargada. Si la unidad
está encendida y el cable de corriente está desconectado, la batería aún no ha alcanzado un nivel bajo de
carga.
1
3
4
2
1
2
1
4
8
6
7
9
11
11
13
13
5
2
3
14
14
10
10
16
16
15
15

9
Panel superior
1. Base: Coloque aquí su tableta para leer
la letra si está cantando karaoke.
2. Bandeja de almacenamiento: Use esta
bandeja de almacenamiento integrada
para colocar teléfonos móviles, llaves,
etc.
Panel trasero
1. Entrada del cable de
alimentación: Conecte el
cable de corriente IEC
incluido desde aquí hasta
una toma de corriente
estándar.
2. Tapa de fusibles: Si se
quemó el fusible, use un
destornillador u otra
herramienta para levantar
esta lengüeta a fin de
reemplazar el fusible.
Reemplácelo por un
fusible de la misma
especificación. Si utiliza un
fusible de especificación
incorrecta, puede dañarse
la unidad y/o el fusible.
3. Interruptor de
encendido: Utilice este
interruptor para
encender/apagar la
unidad.
4. Puerto de graves: Este
puerto mejora los graves
generados por el woofer a
fin de aumentar las
frecuencias bajas.
Asegúrese de que el
orificio no quede
obstruido, puesto que se
afectará perjudicialmente
a la respuesta en graves.
1
3
4
2
1
2
1
4
15
8
6
7
9
11
13
5
2
3
14
10
12
1
3
4
2
1
2
1
4
8
6
7
9
11
13
5
2
3
14
10
16
15

10
Funcionamiento
Apareamiento de un dispositivo Bluetooth
1. Encienda su dispositivo Bluetooth.
2. Encienda el Karaoke Star Plus. Si ya lo había conectado a otro dispositivo Bluetooth, el
Karaoke Star Plus se reconectará a él. Si esta es la primera vez que se conecta a ese
dispositivo, pulse el botón Bluetooth del Karaoke Star Plus para entrar al modo de
apareamiento.
3. Navegue a la pantalla de configuración de su dispositivo Bluetooth, busque “Karaoke
Star Plus” y establezca la conexión. Cuando el dispositivo está "apareado" con el
Karaoke Star Plus, el icono Bluetooth quedará encendido permanentemente y se
escuchara un tono de confirmación.
Nota: Si su dispositivo Bluetooth solicita un código de apareamiento, ingrese "0000".
4. Pulse y suelte el botón de Bluetooth para desconectar un dispositivo Bluetooth
apareado.
5. Para conectarse a otro dispositivo Bluetooth repita los pasos 3 y 4.
Cómo cantar con el Karaoke Star Plus
1. Encienda el Karaoke Star Plus.
2. Conecte un micrófono a una de las entradas de micrófono.
3. Para usar los efectos integrados, seleccione una categoría pulsando uno de los botones
FX Group.
4. Use los botones -/+ para seleccionar un preset de efecto; luego pulse el botón Voice
Effect para activar los efectos.
5. Cante al micrófono mientras ajusta el cuadrante del volumen del micrófono y el
cuadrante del volumen maestro.
Nota: Para evitar el acople, aleje el micrófono del frente del altavoz del Karaoke Star Plus, ya
que de lo contrario se generarán ondas de sonido agudas y dañinas. Si se genera acople,
aléjese del altavoz y disminuya el ajuste del cuadrante del volumen del micrófono.

11
Efectos
Efectos de género
Efectos novedosos
Grupo
de
efectos
Preset
Número
Nombre del preset Grupo
de
efectos
Preset
Número
Nombre del preset
C 1 Barry D 1 D-Vader
C 2 Male to Female D 2 Aliens
C 3 Female to Male D 3 Flea
C 4 Pop Eye D 4 Froggy
C 5 Olive D 5 Little Robot
C 6 Tinker Bell D 6 Evil Robot
C 7 Octivator D 7 Robot Chorus
C 8 Prankster D 8 Monster
C 9 Munchkin D 9 Psycho
C 10 Way Down D 10 Warehouse
C 11 Ventriloquist D 11 Flange
C 12 Hip Deep D 12 Telephone
C 13 Stadium D 13 Echo (Eco)
C 14 Station D 14 Big Echo
C 15 David & Goliath D 15 Grand Canyon
Solución de problemas
Si no puede escuchar el sonido del micrófono: Asegúrese de que el interruptor de encendido/apagado
del micrófono esté conectado.
Si el sonido está distorsionado: Pruebe bajando el control de volumen de su fuente de sonido o
micrófono. Pruebe también reduciendo el volumen general del Karaoke Star Plus utilizando la perilla de
volumen maestro.
Hay un silbido agudo cuando se utilizan micrófonos: Probablemente sea realimentación. Apunte el
micrófono apartándolo del altavoz.
Si no puede oír el micrófono por arriba del volumen de la música: Disminuya el volumen de la música
en su fuente.
Efectos principales
Grupo
de
efectos
Preset
Número
Nombre del preset
A 1 Super Star
A
2 On Stage
A
3 Auto-Pain
A
4 Modern Pop Tuned
A
5 Star
A
6 Super Group
A
7 Arena
A 8 Lead Singer
A 9 Grunge
A
10 Modern Rap
A 11 Classic Rap
A
12 Rock Out
A 13 Rockabilly
A 14 Iglesia
A
15 Cathedral
Efectos de armonía
Grupo
de
efectos
Preset
Número
Nombre del preset
B 1 Barbershop
B 2 Chapel Girls
B 3 Trio
B 4 Bohemian
B 5 Rapsody
B 6 Group Harmony
B 7 Tuned Girls
B 8 Girl Pop
B 9 Tuned Girl Group
B 10 Tuned On Stage
B 11 Angelic Choir
B 12 Country Ladies
B 13 Country Gent
B 14 Hmmmm

12
Guide d’utilisation rapide (Français)
Présentation
• Chantez sur votre musique YouTube préférée que vous avez sur votre smartphone,
tablette ou ordinateur grâce à la connexion Bluetooth de la Karaoke Star Plus.
• Reliez différentes sources audio à l'entrée auxiliaire de la Karaoke Star Plus afin de faire
jouer des chansons de karaoké.
• Utilisez le processeur d’effets intégré afin d’adapter votre voix selon vos genres musicaux
préférés, les harmonies vocales, le sexe de la voix ou pour d’autres effets polyvalents.
• Le mode d’éclairage offre une gamme complète de choix de couleurs et de motifs pour
vous permettre de contrôler le spectacle de lumière.
Contenu de la boîte
Karaoke Star Plus
Câble d'alimentation (standard CEI)
(2) Microphones avec câbles
Câble 3,5 mm (1/8 po) à 3,5 mm (1/8 po)
Guide d'utilisation rapide
Consignes de sécurité et informations concernant la garantie
Assistance technique
Pour les toutes dernières informations concernant la documentation, les spécifications
techniques, la configuration requise, la compatibilité et l’enregistrement du produit, veuillez
visiter ionaudio.com.
Pour de l’assistance supplémentaire, veuillez visiter le site ionaudio.com/support.
Installation
Les articles qui ne figurent pas dans la section Présentation > Contenu de la boîte sont
vendus séparément.
Tablette
Lecteur
MP3
Microphone
Alimentation
PANNEAU ARRIÈRE
PANNEAU AVANT

13
Caractéristiques
Panneau avant
1. Entrées microphone : Ces entrées 6,35 mm permettent de brancher les microphones électrodynamiques inclus.
2. Volume microphone : Cette molette permet de contrôler le volume des deux entrées microphone.
3. Volume général : Cette molette permet de régler le volume du mix général de l’enceinte qui comprend les entrées
microphones, l’entrée auxiliaire et l'audio provenant d'un appareil Bluetooth jumelé.
4. Entrée auxiliaire : Cette entrée 3,5 permet de brancher un smartphone, un lecteur MP3, un lecteur DVD, une carte son
d’ordinateur ou une autre source audio à niveau ligne.
5. Vol auxiliaire +/- : Ces touches permettent de régler le volume de l'entrée auxiliaire et du signal Bluetooth.
Remarque : Le volume de l'entrée auxiliaire est réglé séparément du volume Bluetooth.
6. Bluetooth : Cette touche permet de jumeler un appareil Bluetooth. Appuyer de nouveau sur cette touche permet de
déjumeler un appareil Bluetooth.
Remarque : Le volume sur votre appareil Bluetooth devrait être est assez élevé.
7. Icône Bluetooth : L’icône Bluetooth s’allume lorsqu'un appareil est jumelé à la Karaoke Star Plus.
8. Sortie auxiliaire/casque : Cette sortie 3,5 mm permet de brancher un casque d’écoute, une enceinte amplifiée ou un
enregistreur.
9. FX Group : Ces touches (A à D) permettent de sélectionner une catégorie d’effets.
10. Icône FX Group : La catégorie d’effets intégrés sélectionnée s’affiche sur l’écran.
11. Voice Effects On/Off : Cette touche permet d’activer et de désactiver les effets de voix intégrés. Les effets intégrés
sont ajoutés aux deux entrées microphone.
12. Icône Voice Effect : L’icône du préréglage des effets s’affiche lorsque les effets intégrés sont activés.
13. -/+: Ces touches permettent de sélectionner un des effets intégrés.
14. Light Mode : Cette touche permet de parcourir les différents modes d’éclairage :
• Éteint (aucune lumière)
• Barres d'égalisation (mode réactif à la musique)
• Effet de volet de couleur horizontal (mode non réactif à la musique)
• Grands blocs chatoyants (mode non réactif à la musique)
• Petits blocs chatoyants (mode non réactif à la musique)
• Blocs en chute (mode non réactif à la musique)
• Trait ondulé (mode réactif à la musique)
• Bloc pulsatoire (mode réactif à la musique)
• Barre de lumière (mode réactif à la musique)
• Flocons de neige et carrés (mode non réactif à la musique)
• Lumières verticales (mode non réactif à la musique)
15. Port de rechargement USB : Ce port permet de brancher le câble de rechargement de votre appareil afin de le
recharger.
Remarque : La lecture de musique ne peut se faire à partir du port de rechargement USB. Veuillez utiliser la connexion
Bluetooth ou l’entrée auxiliaire afin de faire la lecture de la source audio.
16. DEL rechargement: Indique les différents états d'activité de la Karaoke Star Plus.
• DEL clignotante = L’appareil est sous tension, mais la batterie est faible et doit être rechargée.
• DEL allumée = La batterie se recharge.
• DEL éteinte = Si le câble d'alimentation est branché, la batterie est complètement rechargée. Si l’appareil est
sous tension et que le câble d’alimentation n’est pas branché, la batterie n’a pas encore atteint le niveau de
charge faible.
1
3
4
2
1
2
1
4
8
6
7
9
11
11
13
13
5
2
3
14
14
10
10
16
16
15
15

14
Panneau supérieur
1. Station d’accueil : Ce support permet de
placer votre tablette afin d’afficher les paroles
lorsque vous utilisez le karaoké.
2. Plateau de rangement : Ce plateau de
rangement intégré permet de placer un
smartphone, des clefs, etc.
Panneau arrière
1. Entrée d'alimentation : Cette
entrée permet de brancher le câble
d’alimentation CEI fourni à une prise
secteur.
2. Compartiment du fusible : Si le
fusible de l’appareil est endommagé,
utiliser un tournevis ou autre outil
pour soulever le couvercle afin de
remplacer le fusible par un nouveau
de même calibre. L’utilisation d’un
fusible de calibre inapproprié
pourrait endommager l’appareil
et/ou le fusible.
3. Interrupteur d'alimentation : Cet
interrupteur permet de mettre
l'appareil sous et hors tension.
4. Évent : Le port arrière améliore les
basses générées par le haut-parleur
d’extrêmes graves, augmentant les
basses fréquences. Assurez-vous
que ce port n’est pas obstrué, car
cela pourrait nuire à la réponse en
basse.
Fonctionnement
Jumelage d'un appareil Bluetooth
1. Veuillez mettre votre appareil Bluetooth sous tension.
2. Mettez la Karaoke Star Plus sous tension. Si vous aviez précédemment jumelé un appareil Bluetooth,
l'enceinte Karaoke Star Plus se reconnectera à cet appareil. Si c’est la première fois que vous jumelez
l’appareil, appuyez sur la touche Bluetooth de la Karaoke Star Plus pour lancer le jumelage.
3. Accédez à l'écran de configuration de votre appareil Bluetooth, recherchez « Karaoke Star Plus » et
lancez le jumelage. Lorsque l’appareil est jumelé à la Karaoke Star Plus, l’icône Bluetooth s’allumera
et vous entendrez une « tonalité de confirmation ».
Remarque : Si votre appareil Bluetooth vous demande d’entrer un code de jumelage, entrez « 0000 ».
4. Pour déjumeler un appareil Bluetooth, appuyez et relâchez la touche de jumelage.
5. Pour jumeler un autre appareil Bluetooth, répétez l’étape 3.
1
3
4
2
1
2
1
4
15
8
6
7
9
11
13
5
2
3
14
10
12
1
3
4
2
1
2
1
4
8
6
7
9
11
13
5
2
3
14
10
16
15

15
Chanter avec la Karaoke Star Plus
1. Mettez la Karaoke Star Plus sous tension.
2. Reliez un microphone à l’une des entrées microphone.
3. Pour utiliser les effets intégrés, sélectionnez une catégorie d’effets en utilisant les touches FX Group.
4. Utilisez les touches -/+ afin de sélectionner le préréglage d’effets, puis appuyez sur la touche Voice Effect
afin de les activer.
5. Chantez dans le microphone tout en ajustant le bouton du volume microphone et le bouton du volume
général.
Remarque : Pour éviter toute rétroaction, déplacez le microphone loin du devant du haut-parleur de la Karaoke Star
Plus, car cela provoquerait des sons aigus et potentiellement dommageables. En cas de rétroaction, éloignez-vous
du haut-parleur et diminuez le réglage du bouton du volume microphone.
Effets
Effets selon le sexe de la voix
Effets spéciaux
Groupe
d’effets
Numéro du
préréglage
Nom du préréglage Groupe
d’effets
Numéro du
préréglage
Nom du préréglage
C 1 Barry D 1 D-Vader
C 2 Male to Female D 2 Aliens
C 3 Female to Male D 3 Flea
C 4 Pop Eye D 4 Froggy
C 5 Olive D 5 Little Robot
C 6 Tinker Bell D 6 Evil Robot
C 7 Octivator D 7 Robot Chorus
C 8 Prankster D 8 Monster
C 9 Munchkin D 9 Psycho
C 10 Way Down D 10 Warehouse
C 11 Ventriloquist D 11 Flange
C 12 Hip Deep D 12 Telephone
C 13 Stadium D 13 Echo
C 14 Station D 14 Big Echo
C 15 David & Goliath D 15 Grand Canyon
Dépannage
Lorsque vous ne pouvez entendre le son du microphone : Veuillez vous assurer que l’interrupteur
d’alimentation du microphone a été activé.
Lorsqu’il y a de la distorsion : Essayez de diminuer le volume de votre appareil ou du microphone.
Essayez également de réduire le volume général de l’enceinte Karaoke Star Plus avec le bouton de volume
générale.
Lorsqu’il y a un sifflement aigu lors de l’utilisation des microphones : Ceci est probablement causé par
la rétroaction (effet Larsen). Pointez le microphone dans la direction opposée de l’enceinte.
Lorsque vous ne pouvez entendre le microphone à cause du volume trop élevé de la musique :
Diminuez le volume sur votre appareil source.
Effets de base
Groupe
d’effets
Numéro du
préréglage
Nom du préréglage
A
1 Super Star
A 2 On Stage
A
3 Auto-Pain
A 4 Modern Pop Tuned
A 5 Star
A
6 Super Group
A 7 Arena
A
8 Lead Singer
A 9 Grunge
A 10 Modern Rap
A
11 Classic Rap
A 12 Rock Out
A
13 Rockabilly
A 14 Church
A 15 Cathedral
Effets d'harmonie
Groupe
d’effets
Numéro du
préréglage
Nom du préréglage
B 1 Barbershop
B 2 Chapel Girls
B 3 Trio
B 4 Bohemian
B 5 Rapsody
B 6 Group Harmony
B 7 Tuned Girls
B 8 Girl Pop
B 9 Tuned Girl Group
B 10 Tuned On Stage
B 11 Angelic Choir
B 12 Country Ladies
B 13 Country Gent
B 14 Hmmmm

16
Guida rapida (Italiano)
Introduzione
• Canta il karaoke con la tua musica preferita di YouTube sul tuo smartphone, tablet o
computer grazie al collegamento Bluetooth del Karaoke Star Plus.
• Collega tutta una serie di fonti audio all'ingresso Aux del Karaoke Star Plus per riprodurre
canzoni da karaoke.
• Utilizza il processore FX incorporato per abbinare i tuoi generi musicali preferiti, le
armonie vocali, voci per genere o altri effetti versatili.
• La modalità Light offre una gamma completa di opzioni cromatiche e pattern che
consentono di controllare lo show luminoso.
Contenuti della confezione
Karaoke Star Plus
Cavo di alimentazione (standard IEC)
(2) Microfoni con relativi cavi
Cavo da 3,5mm (1/8”) a 3,5mm (1/8”)
Guida rapida
Istruzioni di sicurezza e garanzia
Assistenza
Per le ultime informazioni in merito a questo prodotto (documentazione, specifiche tecniche,
requisiti di sistema, informazioni sulla compatibilità, ecc.) e per effettuarne la registrazione,
recarsi alla pagina ionaudio.com.
Per ulteriore assistenza sul prodotto, recarsi alla pagina ionaudio.com/support.
Configurazione
Elementi illustrati, ma non elencati sotto Introduzione > Contenuti della confezione sono
venduti separatamente.
Tablet
Lettore
MP3
Microfono
Alimentazione
PANNELLO POSTERIORE
PANNELLO ANTERIORE

17
Caratteristiche
Pannello anteriore
1. Ingressi microfono: collegare i microfoni dinamici in dotazione a questi ingressi da 1/4" (6,35 mm).
2. Volume microfono: regolare questa manopola per controllare il volume di entrambi gli ingressi microfono.
3. Volume Master: servirsi di questo comando per regolare il volume principale di mix dell'altoparlante, che
comprende gli ingressi microfono, l'ingresso ausiliario (aux) e l'audio di un dispositivo Bluetooth collegato.
4. Ingresso Aux: collegare uno smartphone, un lettore MP3, un lettore DVD, la scheda audio di un computer o
altre fonti audio a livello di linea a questo ingresso Aux da 1/8” (3,5 mm).
5. Aux Volume +/-: premere questi tasti per regolare il volume dell'ingresso Aux e del segnale Bluetooth.
Nota bene: il volume dell'ingresso Aux sarà regolato separatamente dal volume Bluetooth.
6. Bluetooth: premere questo tasto per effettuare il collegamento a un dispositivo Bluetooth. Premere
nuovamente questo pulsante per scollegare un dispositivo Bluetooth collegato.
Nota bene: il volume a livello del dispositivo Bluetooth deve essere acceso.
7. Icona Bluetooth: quando un dispositivo è collegato al Karaoke Star Plus, l'icona Bluetooth è illuminata in
maniera fissa.
8. Uscita Aux/cuffie: collegare questa uscita da 1/8” (3,5 mm) a cuffie, un altoparlante o a un registratore.
9. Gruppo FX: premere uno dei tasti A-D per selezionare una categoria di effetti.
10. Icona Gruppo FX: a display compare la categoria selezionate per gli effetti incorporati.
11. Effetto vocale On/Off: premere questo tasto per attivare o disattivare gli effetti incorporati. Gli effetti
incorporati sono applicati a entrambi gli ingressi microfono.
12. Icona effetto vocale: a display compare l'icona relativa all'effetto predefinito quando gli effetti incorporati
sono attivati.
13. -/+: servirsi di questi tasti per selezionare uno degli effetti incorporati.
14. Modalità luci (light): premere questo tasto per commutare tra i diversi effetti di illuminazione disponibili:
• Off (nessuna luce)
• Barre EQ (reattive alla musica)
• Colore a comparsa orizzontale (non reattivo alla musica)
• Grandi blocchi brillanti (non reattivi alla musica)
• Piccoli blocchi brillanti (non reattivi alla musica)
• Blocchi a cascata (non reattivi alla musica)
• Linea ondulata (reattiva alla musica)
• Blocco pulsante (reattivo alla musica)
•
Barra luminosa (reattiva alla musica)
• Luci a fiocchi di neve/quadrati (non reattive alla musica)
• Luci verticali (non reattive alla musica)
15. Carica USB: collegare a questo livello il cavo di ricarica del dispositivo per ricaricarlo.
Nota bene: la porta di carica USB non riproduce musica. Servirsi dell'ingresso Bluetooth o Aux per riprodurre
la propria fonte musicale.
16. LED carica: indica i diversi stati di attività del Karaoke Star Plus.
• LED lampeggiante = L’apparecchio è acceso, la batteria è scarica e deve essere ricaricata.
• LED fisso = La batteria è sotto carica.
• LED spento = Se il cavo di alimentazione è collegato, la batteria è carica. Se l’apparecchio è acceso
(ON) e il cavo di alimentazione non è collegato, la batteria non è ancora scarica.
1
3
4
2
1
2
1
4
8
6
7
9
11
11
13
13
5
2
3
14
14
10
10
16
16
15
15

18
Pannello superiore
1. Cradle: collocare il tablet qui per
visualizzare il testo delle canzoni se si
canta il karaoke.
2. Vassoio: servirsi di questo vassoio
integrato per riporre smartphone, chiavi,
ecc.
Pannello posteriore
1. Ingresso cavo di alimentazione:
collegare il cavo IEC di
alimentazione in dotazione da
questo livello a una presa di
alimentazione.
2. Coperchio dei fusibili: se il
fusibile dell'apparecchio è rotto,
sollevare questa linguetta
servendosi di un cacciavite o di un
altro strumento per sostituirlo.
Sostituirlo con un fusibile dalla
stessa tensione
nominale. L'utilizzo di un fusibile
dalla tensione nominale errata può
danneggiare l'apparecchio e/o il
fusibile.
3. Interruttore di alimentazione:
servirsi di questo interruttore per
accendere o spegnere
l'apparecchio.
4. Porta dei bassi: questa porta
migliora i bassi generati dal woofer
per aumentare le basse frequenze.
Assicurarsi che questa non sia
ostruita, in quanto ciò influirebbe
negativamente sulla risposta dei
bassi.
1
3
4
2
1
2
1
4
15
8
6
7
9
11
13
5
2
3
14
10
12
1
3
4
2
1
2
1
4
8
6
7
9
11
13
5
2
3
14
10
16
15

19
Uso
Collegamento di un dispositivo Bluetooth
1. Accendere il dispositivo Bluetooth.
2. Accendere il Karaoke Star Plus. Se in precedenza è stato collegato a un altro dispositivo
Bluetooth, il Karaoke Star Plus vi si riconnetterà. Se è la prima volta che ci si connette al
dispositivo, premere il tasto Bluetooth sul Karaoke Star Plus per entrare in modalità di
collegamento.
3. Navigare nella schermata di configurazione del dispositivo Bluetooth, trovare “Karaoke
Star Plus” e collegarlo. Quando il dispositivo è “collegato” al Karaoke Star Plus, l'icona
Bluetooth sarà illuminata in maniera fissa e si sentirà un tono di conferma.
Nota bene: se il dispositivo Bluetooth richiede un codice, digitare “0000”.
4. Premere e rilasciare il tasto Bluetooth per scollegare un dispositivo Bluetooth collegato.
5. Per collegarlo ad un altro dispositivo Bluetooth, ripetere la fase 3.
Esibirsi con il Karaoke Star Plus
1. Accendere il Karaoke Star Plus.
2. Collegare un microfono a uno degli ingressi microfono.
3. Per utilizzare gli effetti incorporati, selezionare una categoria premendo uno dei tasti FX
Group (gruppo FX).
4. Servirsi dei tasti -/+ per selezionare un effetto predefinito; quindi premere il tasto Voice
Effect per accendere gli effetti.
5. Cantare nel microfono regolando al tempo stesso la manopola del Volume microfono e
la manopola Volume master.
Nota bene: per evitare il feedback, allontanare il microfono dalla parte anteriore
dell'altoparlante del Karaoke Star Plus in quanto ciò provocherà tonalità alte e onde sonore
dannose. In caso di feedback, allontanarsi dall'altoparlante e abbassare la manopola Volume
microfono.

20
Effetti
Effetti per genere
Effetti novità
Gruppo
FX
Numero
di
preset
Nome preset Gruppo
FX
Numero
di
preset
Nome preset
C 1 Barry D 1 D-Vader
C 2 Male to Female D 2 Aliens
C 3 Female to Male D 3 Flea
C 4 Pop Eye D 4 Froggy
C 5 Olive D 5 Little Robot
C 6 Tinker Bell D 6 Evil Robot
C 7 Octivator D 7 Robot Chorus
C 8 Prankster D 8 Monster
C 9 Munchkin D 9 Psycho
C 10 Way Down D 10 Warehouse
C 11 Ventriloquist D 11 Flange
C 12 Hip Deep D 12 Telephone
C 13 Stadium D 13 Echo
C 14 Station D 14 Big Echo
C 15 David & Goliath D 15 Grand Canyon
Risoluzione di problemi
Se non si sente alcun suono dal microfono: assicurarsi che l'interruttore On/Off del
microfono sia impostato su “on”.
Il suono è distorto: provare ad abbassare il volume della propria fonte audio o del microfono.
Inoltre, provare a ridurre il volume complessivo del Karaoke Star Plus utilizzando la manopola
Volume Master.
Quando si utilizzano i microfoni si verifica un fischio ad alto pitch: si tratta probabilmente
di ritorno. Puntare il microfono lontano dall'altoparlante.
Se non si sente il microfono al di sopra della musica: abbassare il volume della musica
dalla fonte.
Effetti principali
Gruppo
FX
Numero
di
preset
Nome preset
A 1 Super Star
A
2 On Stage
A 3 Auto-Pain
A 4 Modern Pop Tuned
A
5 Star
A 6 Super Group
A
7 Arena
A 8 Lead Singer
A 9 Grunge
A
10 Modern Rap
A 11 Classic Rap
A
12 Rock Out
A 13 Rockabilly
A 14 Church
A
15 Cathedral
Effetti armonici
Gruppo
FX
Numero
di
preset
Nome preset
B 1 Barbershop
B 2 Chapel Girls
B 3 Trio
B 4 Bohemian
B 5 Rapsody
B 6 Group Harmony
B 7 Tuned Girls
B 8 Girl Pop
B 9 Tuned Girl Group
B 10 Tuned On Stage
B 11 Angelic Choir
B 12 Country Ladies
B 13 Country Gent
B 14 Hmmmm
La pagina si sta caricando...
La pagina si sta caricando...
La pagina si sta caricando...
La pagina si sta caricando...
La pagina si sta caricando...
La pagina si sta caricando...
La pagina si sta caricando...
La pagina si sta caricando...
La pagina si sta caricando...
La pagina si sta caricando...
La pagina si sta caricando...
La pagina si sta caricando...
-
 1
1
-
 2
2
-
 3
3
-
 4
4
-
 5
5
-
 6
6
-
 7
7
-
 8
8
-
 9
9
-
 10
10
-
 11
11
-
 12
12
-
 13
13
-
 14
14
-
 15
15
-
 16
16
-
 17
17
-
 18
18
-
 19
19
-
 20
20
-
 21
21
-
 22
22
-
 23
23
-
 24
24
-
 25
25
-
 26
26
-
 27
27
-
 28
28
-
 29
29
-
 30
30
-
 31
31
-
 32
32


iON Karaoke Star Plus Guida Rapida
- Categoria
- Microfoni
- Tipo
- Guida Rapida
in altre lingue
- français: iON Karaoke Star Plus Guide de démarrage rapide
- Deutsch: iON Karaoke Star Plus Schnellstartanleitung
- Nederlands: iON Karaoke Star Plus Snelstartgids
Documenti correlati
-
iON Karaoke Star Guida Rapida
-
-
-
iON Bluetooth Wireless Rock Speaker Manuale del proprietario
-
-
-
-
-
