Electrolux EUN621 Manuale utente
- Categoria
- Frigo-congelatori
- Tipo
- Manuale utente

c o n gelatore / congelador / freezer
LIBRETTO ISTRUZIONI
LIBRO DE INSTRUCCIONES
INSTRUCTION BOOK
2223 067-62
EUN 621
I
E
GB
ELECTROLUX HOME PRODUCTS OPERATIONS EUROPE

2
AVVERTENZE E CONSIGLI IMPORTANTI
È molto importante che questo libretto istruzioni sia conservato assieme all’apparecchiatura per
qualsiasi futura consultazione. Se l’apparecchiatura dovesse essere venduta o trasferita ad un’altra
persona, assicurarsi che il libretto venga fornito assieme, in modo che il nuovo utente possa essere
messo al corrente del funzionamento della macchina e delle avvertenze relative.
Queste avvertenze sono state redatte per la Vostra sicurezza e per quella degli altri. Vi preghiamo,
dunque, di volerle leggere attentamente prima d’installare e di utilizzare l’apparecchiatura.
Sicurezza generale
•
Qualora questa apparecchiatura, munita di
chiusura magnetica, venisse usata in
sostituzione di una con chiusura a scatto,
consigliamo di rendere quest’ultima inservibile.
Cio’ eviterà che i bambini, giocando, vi
rimangano intrappolati, con grave pericolo per la
loro vita.
•
Togliere la spina dalla presa di corrente prima di
procedere a qualsiasi operazione di pulizia e
manutenzione (come nel caso di sostituzione
della lampadina, sulle apparecchiature che ne
sono provviste).
•
Quest’apparecchiatura è stata progettata per
essere utilizzata da persone adulte. Fare
attenzione, quindi, che i bambini non si avvicinino
con l’intento di giocarvi.
•
È pericoloso modificare o tentare di modificare
le caratteristiche di quest’ apparecchiatura.
•
Questa apparecchiatura contiene idrocarburi nel
circuito refrigerante; pertanto la manutenzione e
la ricarica deve essere effettuata esclusivamente
da personale autorizzato dall’azienda.
•
Prestare la massima cura nella
movimentazione per non dannegiare parti del
circuito refrigerante onde evitare possibili
fuoriuscite di fluido.
•
L’apparecchiatura non deve essere collocata
nelle vicinanze di termosifoni o cucine a gas.
•
Evitate ogni esposizione prolungata
dell’apparecchiatura ai raggi solari.
•
La parte posteriore dell’apparecchiatura deve
ricevere una sufficiente circolazione d’aria e
deve essere evitato qualsiasi danno al
circuito refrigerante.
•
Solo per i congelatori (esclusi incassati): una
collocazione ottimale è la cantina.
•
Non introdurre apparecchi elettrici all’interno
dell’apparecchiatura (ad es. gelatiera)
Assistenza / Riparazioni
•
Ogni eventuale modifica che si rendesse
necessaria all’impianto elettrico domestico, per
poter installare l’apparecchiatura, dovrà essere
eseguita solo da personale abilitato.
•
Mai riparare l’apparecchiatura da soli. Le
riparazioni effettuate da persone non competenti
possono provocare dei danni. Contattare il
Centro di Assistenza più vicino ed esigere solo
ricambi originali
.
Uso
•
I frigoriferi e/o congelatori domestici sono
destinati unicamente alla conservazione e/o
congelazione degli alimenti.
•
Le migliori prestazioni si hanno con temperature
dell’ambiente comprese tra +18°C e +43°C
(Classe T); + 18°C e +38°C (Classe ST); +16°C
e +32°C (Classe N); +10°C e +32°C (Classe
SN); la classe di appartenenza é riportata sulla
targa matricola ubicata nella cella a fianco del
vano verdura.
Attenzione: al di fuori delle temperature
ambiente indicate dalla classe climatica di
appartenenza di questo prodotto, si devono
osservare le seguenti indicazioni: quando la
temperatura ambiente scende al di sotto del
valore minimo può non essere garantita la
temperatura di conservazione nel vano
congelatore; pertanto si consiglia di consumare
al più presto gli alimenti in esso contenuti .
•
In tutte le apparecchiature ci sono delle superfici
che si coprono di brina. A seconda del modello,
tale brina può essere eliminata automaticamente
(sbrinamento automatico) oppure manualmente.
Non tentare mai di togliere la brina con un
oggetto appuntito, si rischierebbe di danneggiare
irrimediabilmente l’evaporatore. Utilizzare a tale
scopo l’apposita paletta fornita con
I’apparecchiatura.
•
Non mettere mai nello scompartimento a bassa
temperatura (congelatore o conservatore) bibite
gassate: possono esplodere.
•
Non introdurre mai liquidi o alimenti caldi e non
riempire fino all’orlo i recipienti muniti di
coperchio.
•
Non usare alcun dispositivo meccanico o altro
mezzo artificiale per accelerare il processo di
sbrinamento tranne quelli qui raccomandati.
•
Non usare mai oggetti metallici per pulire
l’apparecchiatura; essa potrebbe venir
danneggiata.

3
INDICE
Installazione
•
Durante il normale funzionamento il
condensatore ed il compressore, che sono posti
sul retro dell’apparecchiatura, si riscaldano
sensibilmente. Assicurarsi quindi che
l’installazione venga eseguita come da istruzioni
riportate sul libretto. Un’aerazione insufficiente
comporterà sicuramente un cattivo
funzionamento e dei danni all’apparecchiatura.
•
Assicurarsi, dopo aver installato
l’apparecchiatura, che essa non appoggi sul cavo
di alimentazione.
Importante: se il cavo di alimentazione si
danneggiasse, dovrà essere sostituito da uno
speciale cavo o assieme disponibili presso il
costruttore o il servizio di assistenza tecnica.
•
Se l’apparecchiatura viene trasportata in
posizione orizzontale è possibile che l’olio
contenuto nel compressore defluisca nel circuito
refrigerante. Lasciare l’apparecchiatura in
posizione verticale almeno 2 ore prima di
metterla in funzione per dar modo all’olio di
refluire nel compressore.
•
L’apparecchiatura non deve essere collocata
nelle vicinanze di termosifoni o cucine a gas.
•
Evitate ogni esposizione prolungata
dell’apparecchiatura ai raggi solari.
•
La parte posteriore dell’apparecchiatura deve
ricevere una sufficiente circolazione d’aria e deve
essere evitato qualsiasi danno al circuito
refrigerante.
Protezione dell’ambiente
Questa apparecchiatura non contiene, nel
circuito refrigerante e nell’isolamento, gas
refrigeranti nocivi per l’ozono. L’apparecchiatura
non deve essere smaltita con rifiuti urbani e
rottami. Deve essere evitato il danneggiamento
del circuito refrigerante, soprattutto nella parte
posteriore vicino allo scambiatore. Informazioni
sui centri di raccolta vengono forniti dall’autorità
comunale. I materiali usati in questa
apparecchiatura contrassegnati dal simbolo
sono riciclabili.
Smaltimento di apparecchi vecchi
Il simbolo sul prodotto o sulla confezione
indica che il prodotto non deve essere considerato
come un normale rifiuto domestico, ma deve essere
portato nel punto di raccolta appropriato per il
riciclaggio di apparecchiature elettriche ed
elettroniche.
Provvedendo a smaltire questo prodotto in modo
appropriato, si contribuisce a evitare potenziali
conseguenze negative per l'ambiente e per la salute,
che potrebbero derivare da uno smaltimento
inadeguato del prodotto. Per informazioni più
dettagliate sul riciclaggio di questo prodotto,
contattare l'ufficio comunale, il servizio locale di
smaltimento rifiuti o il negozio in cui è stato
acquistato il prodotto.
Avvertenze e consigli importanti . . . . . . . . . . . . . . . . . . . . . . . . . . . . . . . . . . . . . . . . . . . . . . . . . . . . .2
Uso / Pulizia - Funzionamento - Regolazione della temperatura - Congelazione rapida - Lampada . . .
spia di allarme - Congelazione dei cibi freschi . . . . . . . . . . . . . . . . . . . . . . . . . . . . . . . . . . . . . . . . . . . . .4
Uso / Conservazione dei cibi surgelati - Scongelazione - Cubetti di ghiaccio . . . . . . . . . . . . . . . . . . . . .5
Consigli / Consigli per la congelazione - Consigli per la conservazione dei surgelati . . . . . . . . . . . . . . .6
Manutenzione / Pulizia periodica - Periodi di inattività - Sbrinamento . . . . . . . . . . . . . . . . . . . . . . . . . . .7
Se qualcosa non va - Dati tecnici . . . . . . . . . . . . . . . . . . . . . . . . . . . . . . . . . . . . . . . . . . . . . . . . . . . . .8
Installazione / Posizionamento - Collegamento elettrico . . . . . . . . . . . . . . . . . . . . . . . . . . . . . . . . . . . . .9
Installazione / Istruzioni per l’incasso integrale . . . . . . . . . . . . . . . . . . . . . . . . . . . . . . . . . . . . . . . . . . . .10
Centri Assistenza . . . . . . . . . . . . . . . . . . . . . . . . . . . . . . . . . . . . . . . . . . . . . . . . . . . . . . . . . . . . . . . . . .13
34
PR167
Ha
Hb
8mm
Ha
8mm
K
PR167/1
Hd
Hb
PR168
Hb
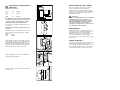
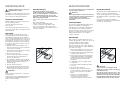
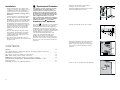
Open the appliance door and the furniture door at
90°. Insert the small square (Hb) into guide (Ha).
Put together the appliance door and the furniture
door and mark the holes as indicated in the figure.
Remove the brackets and mark a distance of 8 mm
from the outer edge of the door where the nail must
be fitted (K).
Place the small square on the guide again and fix it
with the screws supplied.
Should the lining up of the furniture door be
necessary, use the clearance of slots.
At the end of operations, it is necessary to check if
the door of the furniture closes properly.
Fix cover (Hd) on guide (Hb) until it clips into place.

4
Pulizia delle parti interne
Prima dell’uso e del collegamento elettrico pulire
tutte le parti interne con acqua tiepida e sapone
neutro allo scopo di togliere il caratteristico odore di
nuovo indi asciugare accuratamente.
Non usare detersivi nè polveri abrasive
che sono dannose alle finiture.
USO
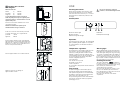
Pannello comandi
A
B
C
D
E
MA X
min
A - Lampada spia di funzionamento
B - Manopola di regolazione della temperatura
C - Lampada spia di congelazione rapida
D - Interruttore della congelazione rapida
E - Lampada spia di allarme
II congelatore è contraddistinto dal simbolo
il quale indica che esso è adatto alla
congelazione di cibi freschi e alla
conservazione, a lungo termine, di cibi congelati
e surgelati.
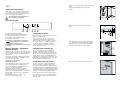
Messa in funzione - regolazione
della temperatura
Introdurre la spina nella presa di corrente. Ruotare la
manopola (B) oltre la posizione «■», la lampada spia
(A) si accenderà; ciò indica che l’apparecchiatura è
sotto tensione.
Per la buona conservazione degli alimenti surgelati
e congelati, la temperatura del congelatore deve
essere di -18°C o più fredda.
numeri bassi = meno freddo
numeri alti = più freddo
Si consiglia, pertanto, di ruotare la manopola (B) su
una posizione intermedia. La temperatura del
congelatore é regolata automaticamente per una
buona conservazione degli alimenti.
Se l’apparecchiatura non lavora in condizioni
ambientali normali, quali scarsa ventilazione ,
elevata o bassa temperatura ambiente e/o frequenti
aperture della porta é necessaria una regolazione
più adeguanta.
L’arresto del funzionamento si ottiene con la
manopola (B) sulla posizione «
■».
Congelazione rapida
Premere il tasto (D). La spia gialla (C) si accende
(funzione SUPER inserita).
Se la congelazione rapida non e’ disinserita
manualmente, tale funzione termina in modo
autonomo dopo 52 h. La spia gialla (C) si spenge.
La funzione SUPER o congelazione rapida può
essere disinserita manualmente in qualsiasi
momento premendo nuovamente sul tasto (D).
La spia gialla (C) si spenge.
Lampada spia di allarme (E)
Ha lo scopo di segnalare che la temperatura
all’interno dell’apparecchiatura è tale da non
garantire una buona conservazione degli alimenti.
Quando l’apparecchiatura viene messa in funzione,
oppure quando vengono introdotti gli alimenti da
congelare, questa spia rimane accesa sino a che la
temperatura non ha raggiunto il valore richiesto per
la conservazione degli alimenti stessi.
Congelazione dei cibi freschi
Per poter congelare la massima quantità di cibi
freschi (come indicato nella targa matricola) é
necessario premere l’interruttore della congelazione
rapida (D) almeno 24 ore prima di introdurre i cibi da
congelare. E comunque possibile ridurre il tempo di
tale preraffreddamento qualora la quantità di cibi da
congelare fosse inferiore alla quantità massima.
Porre i cibi da congelare nello scomparto inferiore.
La congelazione può essere considerata ultimata
dopo 24 ore. Trascorso questo periodo ripremere
l’interruttore (D).
33
B
E
C
D
PR266
Ha
Hb
Hc
Hd
2
1
m
m
2
1
m
m
ca. 50 mm
90°
90°
ca. 50 mm
PR33
Hc
Ha
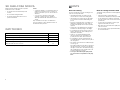
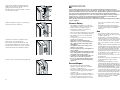
Apply covers (C-D) on joint cover lugs and into hinge
holes.
Snap vent grille (B) and hinge cover (E) into
position.
Separate parts Ha, Hb, Hc, Hd as shown in the
figure
Place guide (Ha) on the inside part of the furniture
door, up and down as shown in the figure and mark
the position of external holes. After having drilled
holes, fix the guide with the screws supplied.
Fix cover (Hc) on guide (Ha) until it clips into place.

5
Conservazione dei cibi surgelati
Al momento della messa in funzione o dopo un
periodo di inattività, introdurre gli alimenti
nell’apparecchio dopo averlo fatto funzionare per
almeno due ore con l’interruttore della congelazione
rapida inserito; quindi riportarsi sulla posizione di
funzionamento normale.
Importante
In caso di scongelamento per cause accidentali,
ad esempio per mancanza di corrente, se il
periodo dell’interruzione é superiore al valore
riportato nella tabella dei dati tecnici sotto la
voce “tempo di risalita” sarà necessario
consumare i cibi entro breve o cucinarli subito e
ricongelarli (una volta raffreddati).
Scongelazione
Gli alimenti surgelati o congelati, prima di essere
usati, possono essere scongelati nel frigorifero o a
temperatura ambiente, a seconda del tempo
disponibile per l’operazione. I pezzi piccoli possono
essere cucinati direttamente appena tolti dal
congelatore; in questo caso, però, il tempo di cottura
sarà più lungo.
Cubetti di ghiaccio
II frigorifero è equipaggiato con una o più vaschette
per la formazione dei cubetti di ghiaccio. Dette
vaschette vanno riempite di acqua potabile e riposte
nello scomparto congelatore. Si raccomanda di non
usare utensili metallici per staccare le vaschette.
32
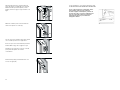
Instructions for totally built-in
appliances
Dimensions of the recess
Height (1) 600 mm
Depth (2) 550 mm
Width (3) 560 mm
The appliance’s door has been locked in position
for transport by means of pins on both sides. Ac-
cording to the door opening direction, remove
relevant pins at the top and at the bottom.
For safety reasons, minimum ventilation must be as
shown in Fig.
Attention: keep ventilation openings clear of ob-
struction.
Furthermore, it is necessary that the niche is provid
with a conduct of ventilation having the following
dimensions:
depth 50 mm
width 540 mm
PR0
540
50
3
2
1
50 mm
min.
200 cm
2
200 cm
2
min.
D567
D022
1
2
I
D724
Fit the appliance in the niche by making sure that it
stands against the interior surface of the unit on the
side where the door hinges of the appliances are
fitted. Insert the appliance until the upper strip butts
up against the unit (1) and make sure that the lower
hinge is in line with the surface of the unit (2).
Fasten the appliance with 4 screws provided in the
kit included with the appliance
Press in the joint covers between the appliance and
the kitchen unit.

6
CONSIGLI
Consigli per la congelazione
Per ottenere i massimi vantaggi dal processo di
congelazione diamo alcuni consigli importanti:
• la quantità massima di alimenti che possono
essere congelati in 24 h è riportata sulla
«targhetta matricola»;
• il processo di congelamento dura 24 ore.In
questo lasso di tempo non si dovrebbe
aggiungere altro cibo da congelare;
• congelare solo alimenti di ottima qualità, freschi e
ben puliti;
• dividere tutto in piccole parti, in modo da favorire
la rapidità della congelazione e consentire lo
scongelamento solo della quantità necessaria;
• avvolgere gli alimenti in fogli di alluminio o
politene.Gli stessi devono essere bene aderenti
ai cibi e ben chiusi;
• evitare di mettere i prodotti da congelare a
contatto di quelli già congelati; ciò eviterà
l’innalzamento della temperatura di questi ultimi;
• tenere presente che gli alimenti magri si
conservano meglio e più a lungo di quelli grassi e
che il sale riduce il tempo di conservazione;
• non consumare immediatamente i ghiaccioli
prelevati dallo scomparto congelatore possono
provocare scottature da freddo;
• è consigliabile indicare sulla confezione la data di
inizio della congelazione al fine di poter
controllare il tempo di conservazione;
• i simboli sui cassetti indicano diversi tipi di
prodotti da congelare.
Le cifre indicano il periodo di immagazzinaggio in
mesi per ciascun tipo di prodotto da congelare.
Se é valido il valore superiore oppure quello
inferiore del periodo di immagazzinaggio indicato,
dipende dalla qualità dei prodotti alimentari e dal
proprio pretrattamento prima del congelamento.
Per gli alimenti notevolmente grassi vale sempre
il valore inferiore ;
• non mettere nello scomparto congelatore
bevande gassate: possono esplodere
Consigli per la conservazione dei
surgelati
Per utilizzare nel modo migliore lo scomparto è
necessario:
• assicurarsi che i surgelati siano stati ben
conservati dal rivenditore;
• che il trasporto, dall’acquisto alla sistemazione
nello scomparto, sia breve;
• non aprire troppo frequentemente la porta dello
scomparto e non lasciarla aperta più del
necessario.
• Una volta scongelati, gli alimenti si deteriorano in
breve tempo e non possono venir ricongelati.
• Non superare il periodo di conservazione indicato
sulle confezioni dal produttore dei cibi.
31
Electrical connection
Before plugging in, ensure that the voltage and
frequency shown on the serial number plate
correspond to your domestic power supply. Voltage
can vary by ±6% of the rated voltage.
For operation with different voltages, a suitably sized
auto-transformer must be used.
The appliance must be earthed.
The power supply cable plug is provided with a
contact for this purpose.
If the domestic power supply socket is not earthed,
connect the appliance to a separate earth in
compliance with current regulations, consulting a
specialist technician.
The Manufacturer declines all responsibility if
the above safety precautions are not observed.
INSTALLATION
Location
The appliance should be installed well away from
sources of heat such as radiators, boilers, direct
sunlight etc.
For building into kitchen units follow the special “
Building-in” instructions given.
Attention
It must be possible to disconnect the appliance from
the mains power supply; the plug must therefore be
easily accessible after installation.
CUSTOMER SERVICE AND SPARE PARTS
If the appliance is not functioning properly, check
that:
• the plug is firmly in the wall socket and the mains
power switch is on;
• there is an electricity supply (find out by plugging
in another appliance);
• the thermostat control knob is in the correct
position.
• If your appliance is still not working properly after
making the above checks, contact the nearest
service centre.
To obtain fast service, it is essential that when you
apply for it you specify the model and serial number
of your appliance which can be found on the
guarantee certificate or on the rating plate located
inside the appliance, on the bottom left-hand side.
TECHNICAL INFORMATION
60
0,51
186
9
23
Energy Consumption kWh/24h
Energy Consumption kWh/year
Freezing Capacity kg
Rising time h
Net Frezer Capacity lt.
The technical infomation are situated in the rating plate on the internal left side of the appliance .
This appliance complies with the following
E.E.C. Directives:
- 87/308 EEC of 2/6/87 relative to radio interference
suppression.
- 73/23 EEC of 19.2.73 (Low Voltage Directive) and
subsequent modifications;
- 89/336 EEC of 3.5.89 (Electromagnetic
Compatibility Directive) and subsequent
modifications.

7
MANUTENZIONE
Staccare la spina dalla presa di corrente prima di
eseguire qualsiasi operazione.
Attenzione:
Questa apparecchiatura contiene idrocarburi nel
circuito refrigerante; pertanto la manutenzione e
la ricarica devono essere effettuate
esclusivamente da personale autorizzato
dall’azienda.
Pulizia periodica
Non usare mai oggetti metallici per pulire l’apparec-
chiatura; essa potrebbe venir danneggiata.
Pulire l’interno con acqua tiepida e bicarbonato di
soda. Risciacquare e asciugare accuratamente.
Pulire il condensatore e il motocompressore con una
spazzola o un aspirapolvere. Questa operazione
migliorerà il funzionamento con conseguente
risparmio di energia.
Periodi di inattività
Durante i periodi in cui l’apparecchiatura non è in
funzione osservare le seguenti precauzioni:
staccare la spina dalla presa di corrente; togliere
tutti gli alimenti; sbrinare e pulire l’interno e tutti gli
accessori;
lasciare le porte socchiuse per facilitare la
circolazione di aria all’interno in modo da evitare la
formazione di odori sgradevoli.
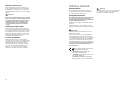
Sbrinamento
Nello scomparto congelante la brina deve essere
eliminata ogni qualvolta si è formato uno spessore di
4 mm circa, utilizzando l’apposita paletta
raschiabrina fornita con l’apparecchiatura.
Qualora si formasse uno spesso strato di ghiaccio,
sarà necessario effettuare un completo sbrinamento,
procedendo come segue:
1. staccare la spina dalla presa di corrente o porre
la manopola del termostato in posizione «
■»;
2. avvolgere gli alimenti in parecchi fogli di giornale
e riporli in un luogo molto fresco;
3. lasciare la porta aperta e inserire nell’apposita
sede la paletta raschiabrina come grondaia di
prolungamento: porre al di sotto una bacinella
per la raccolta dell’acqua derivante dallo
sbrinamento;
4. a sbrinamento avvenuto asciugare le pareti
accuratamente.
5. conservare la paletta raschiabrina per utilizzi
successivi;
6. reinserire la spina nella presa;
7. riportare la manopola del termostato nella
posizione desiderata o reinserire la spina nella
presa di corrente e inserire la congelazione
rapida.
Dopo due o tre ore di funzionamento
l’apparecchio é di nuovo pronto per la
conservazione dei cibi surgelati e la
congelazione rapida può essere desinserita.
D068
Attenzione:
Si raccomanda di non impiegare utensili
metallici per asportare la brina onde evitare gravi
danni all’apparecchio.
Non usare alcun dispositivo meccanico o altro
mezzo artificiale per accelerare il processo di
sbrinamento tranne quelli qui
raccomandati.
Un innalzamento della temperatura dei surgelati
potrebbe ridurne il tempo di conservazione.
MAINTENANCE
Periods of non-operation
When the appliance is not in use for long periods,
take the following precautions:
remove the plug from the wall socket;
remove all food;
defrost and clean the interior and all accessories;
leave the door ajar to allow air to circulate to prevent
unpleasant smells.
Unplug the appliance before carrying out
any maintenance operation.
Warning
This appliance contains hydrocarbons in its cooling
unit; maintenance and recharging must therefore
only be carried out by authorized technicians.
Periodic cleaning
Many proprietary kitchen surface cleaners
contain chemicals that can attack/damage the
plastics used in this appliance. For this reason it
is recommended that the outer casing of this
appliance is only cleaned with warm water with a
little washing-up liquid added.
Clean the inside with warm water and bicarbonate of
soda.
Rinse and dry thoroughly.
Clean the condenser (black grill) and the
compressor at the back of the appliance with a
brush or a vacuum cleaner. This operation will
improve the performance of the appliance and save
electricity consumption.
Defrosting
Scrape away the frost with the plastic scraper
provided with the freezer when this layer arrives to
approximately 4 mm in height. For this operation,
you do not need to unplug the freezer or remove all
frozen foods. Whenever the layer of frost exceeds 4
mm in thickness, you must proceed to a complete
defrosting. Take advantage of the periods when you
do not trave too much food in storage to do this by
proceeding as follows:
1. Empty the freezer and temporarily store the
frozen food removed in a cool place, wrapped in
several sheets of newspaper.
2. Set the thermostat to the «
■
» position or unplug
the freezer from the wall socket.
3. Keep the freezer door open.
4. Use the scraper together with a collecting tray
and insert it in the lower central part of the
freezer as shown in Figure.
5. The collecting tray should be positioned directly
below in order to receive the water which will exit
during defrosting. Afterwards, dry all freezer
surfaces with care.
6. Keep the scraper for future use.
7. Re-connect the plug and set the freezer to the
quickfreezing position. After two hours you may
replace the frozen foods previously removed.
Important
Never use knives or metal objects to scrape away
accumulated frost.
An increase in the surface temperature of the frozen
foods during defrosting will notable diminish the
duration of their conservation.
D068
30

8
SE QUALCOSA NON VA
Qualora l’apparecchiatura presentasse qualche
disfunzione, è bene controllare:
• che la spina sia ben inserita nella presa di
corrente;
• che non manchi l’energia elettrica
• che la manopola del termostato si trovi in
posizione intermedia.
Inoltre:
• se l’apparecchiatura è eccessivamente rumorosa
verificare che i fianchi non siano a contatto con
mobili o schienali che possono causare rumore o
vibrazioni;
• se vi sono tracce di acqua sul fondo dello
scomparto, verificare che il foro di deflusso
dell’acqua derivante dallo sbrinamento non sia
ostruito.
Dopo le verifiche di cui sopra, se la disfunzione
dovesse permanere, è bene chiamare il Centro di
Assistenza Tecnica più vicino.
DATI TECNICI
60
0,51
186
9
Capacità netta in litri del congelatore
Consumo energetico in kWh/annuo
Capacità di congelamento in kg/24h
Consumo energetico in kWh/24h
I dati tecnici sono riportati sulla targhetta matricola posizionata sul lato sinistro interno dell’apparecchiatura.
Tempo di risalita da -18°C a -9°C al h
23
29
HINTS
Hints for freezing
To help you make the most of the freezing process,
here are some important hints:
• the maximum quantity of food which can be
frozen in 24 hrs. is shown on the rating plate;
• the freezing process takes 24 hours. No further
food to be frozen should be added during this
period;
• prepare food in small portions to enable it to be
rapidly and completely frozen and to make it
possible subsequently to thaw only the quantity
required;
• wrap up the food in aluminium foil or polythene
and make sure that the packages are airtight;
• do not allow fresh, unfrozen food to touch food
which is already frozen, thus avoiding a rise in
temperature of the latter;
• water ices, if consumed immediately after
removal from the freezer compartment, can
possibly cause the skin to be freeze burnt;
• it is advisable to show the freezing-in date on
each individual pack to enable you to keep tab of
the storage time;
• The symbols on the drawers show different types
of frozen goods.
The numbers indicate storage times in months for
the appropriate types of frozen goods. Whether
the upper or lower value of the indicated storage
time is valid depends on the quality of the foods
and pre-treating before freezing.
• do not put carbonated liquids (fizzy drinks,
etc.) in the freezer compartment as they may
burst.
Hints for storage of frozen food
To obtain the best performance from this appliance,
you should:
• make sure that the commercially frozen
foodstuffs were adequately stored by the retailer;
• be sure that frozen foodstuffs are transferred
from the foodstore to the freezer in the shortest
possible time;
• not open the door frequently or leave it open
longer than absolutely necessary.
• Once defrosted, food deteriorates rapidly and
cannot be refrozen.
• Do not exceed the storage period indicated by
the food manufacturer.

9
Collegamento elettrico
Assicurarsi, prima di inserire la spina nella presa
di corrente, che la tensione e la frequenza
riportate sulla targhetta matricola corrispondano
a quelle dell’impianto domestico.
È ammessa una oscillazione di ±6% sulla tensione
nominale.
Per il funzionamento a tensioni diverse si dovrà
utilizzare un autotrasformatore di potenza adeguata.
Importante
E’ indispensabile collegare l’apparecchio ad una
efficiente presa di terra.
A tale scopo la spina del cavo di alimentazione é
dotata dell’apposito contatto. Qualora la presa di
corrente dell’impianto domestico non sia collegata a
terra, allacciare l’apparecchiatura ad un impianto di
terra a parte conformemente alle norme in vigore
consultando in proposito un tecnico specializzato.
La Casa Costruttrice declina ogni responsabilità
qualora questa norma antinfortunistica non
fosse rrispettata.
Questa apparecchiatura è conforme alle
seguenti Direttive Comunitarie
- 87/308/CEE del 2/6/87 relativa alla
soppressione dei disturbi radio.
- 73/23/CEE del 19/02/73 (Bassa Tensione) e
successive modificazioni;
- 89/336/CEE del 03/05/89 (Compatibilità
Elettromagnetica) e successive modificazioni.
INSTALLAZIONE
Posizionamento
Collocare l’apparecchiatura lontana da fonti di
calore, quali: termosifoni, stufe da riscaldamento,
esposizione diretta ai raggi solari ecc.
Attenzione
L’apparecchio deve poter essere scollegato dalla
rete; é quindi necessario che la spina rimanga
accessibile ad installazione avvenuta.
28
Storage of frozen food
When first starting-up or after a period out of use,
before putting the products in the compartment let
the appliance run at least two hours on the quick
freezing setting, then return to the normal operating
position.
Important
In the event of accidental defrosting, for example
due to a power failure, if the power has been off
for longer that the value shown in the technical
characteristics chart under “rising time”, the
defrosted food must be consumed quickly or
cooked immediately and then refrozen (after
cooling).
Thawing out frozen foods
Frozen foods must be allowed to thaw out before
use either in the refrigerator (meat, poultry, fish, etc.)
or at room temperature (ali other foods) according to
the available time. Frozen products which come in
small-sized or separate packages may be cooked
directly without thawing; obviously, in this case, the
cooking time will fast a little longer.
Ice-cube production
Fill the trays with water to 3/4 of their height, to
permit the expansion of the ice, then put them in the
space below the quick-freezing compartment (see
the diagram). If the water in your area is rich in
minerai salts (limestone, in particular), we advise
you to use noncarbonated mineral water for the
production of ice cubes. The ice-cubes may be
shaken out of the plastic trays with a slight twist.

10
Istruzioni per l’incasso
integrale
Dimensioni del vano
Altezza (1) 600 mm
Profondità (2) 550 mm
Larghezza (3) 560 mm
La porta dell’apparecchiatura è fissata per
mezzo di perni, per il trasporto. Togliere il perno
superiore e inferiore, conformemente al senso di
apertura della porta.
Per motivi si sicurezza la ventilazione deve essere
come indicato in figura.
Attenzione: mantenere le aperture per la
ventilazione libere da ogni ostruzione.
Inoltre é necessario che la nicchia sia provvista di
un camino d’areazione con le seguenti misure:
profondità: 50 mm
larghezza: 540 mm
Inserire l’apparecchiatura nel vano appoggiandola
alla parete interna corrispondente al lato di apertura
della porta sino a quando il coprifuga superiore va in
battuta (1) e assicurare che la cerniera inferiore sia
in linea con la parete del mobile (2).
Fissare l’apparecchiatura con le 4 viti in dotazione.
Applicare a pressione il coprifuga, tra
apparecchiatura e mobile.
D028
50-min. cm
2
200
min.
cm
2
200
PR0
540
50
3
2
1
D022
1
2
I
D724
27
Cleaning the interior
Before using the appliance for the first time, wash
the interior and all internal accessories with luke-
warm water and some neutral soap so as to remove
the typical smell of a brand-new product, then dry
thoroughly.
USE
Do not use detergents or abrasive
powders, as these will damage the finish.
A
B
C
D
E
MAX
min
Operation
Insert the plug into the wall socket. The pilot light will
light up, indicating that the appliance is in operation.
To stop the appliance, turn the thermostat knob to
position «
■
».
Temperature regulation
The temperature is automatically regulated and can
be increased to achieve a higher temperature
(warmer) by rotating the thermostat knob towards
minimum or reduced (colder) by rotating the knob
towards maximum. However, the exact setting should
be chosen keeping in mina that the temperature
inside the refrigerator depends on:
room temperature;
how often the door is opened;
the quantity of food stored;
location of appliance.
To stop operation, simply turn the thermostat knob to
position «
■
».
Fast freezing
For quick-freezing, press the N/S knob (D). The
quick-freezing indicator light (C) will then light up.
If the quick-freezing function is not ended manually,
the appliance switch off the quick-freezing function
after 52 hours. The yellow light goes out.
The quick-freezing function can be ended manually
at any time by pressing the button (D) again. The
yellow light goes out.
Warning light
Warning light (E) lights up when the temperature
inside the freezer compartment has increased to a
value which might endanger the long-term storage
of food in the compartment. When the appliance is
switched on for the first time or when food is placed
in the compartment for freezing, it is normal for this
light to remain on until the temperature has reached
the level required for correct storage.
Freezing fresh food
The 4-star compartment is suitable for
long term storage of commercially frozen food, and
for freezing fresh food. Do not exceed the storage
times shown by the manufacturer on the
commercially frozen food packets.
If the freezer has already been working for some
time, press the N/S knob (D) at least 24 hours
before introducing the food into the freezer in order
to ensure better freezing results.
Place the food to be frozen on the bottom
compartment.
Control panel
A. Function indicator light
B. Thermostat knob
C. Quick-freezing indicator light
D. N/S knob
E. Temperature alarm light

11
Applicare i coperchietti (C-D) sulle alette dei
coprifuga e nei fori per le cerniere.
Applicare la griglia di aerazione (B) e il coperchio
copricerniera (E) inserendoli a scatto.
B
E
C
D
PR266
Ha
Hb
Hc
Hd
2
1
m
m
2
1
m
m
ca. 50 mm
90°
90°
ca. 50 mm
PR33
Hc
Ha
Inserire a scatto il coperchietto (Hc) sulla guida (Ha)
Separare i pezzi Ha, Hb, Hc, Hd come da figura
Appoggiare la guida (Ha) sulla parte interna della
porta del mobile sopra e sotto come indicato in
figura e segnare la posizione dei fori esterni. Dopo
aver preparato i fori fissare la guida con le viti in
dotazione.
26
CONTENTS
Environment Protection
This appliance does not contain gasses which
could damage the ozone layer, in either its
refrigerant circuit or insulation materials.The
appliance shall not be discarded together with
the urban refuse and rubbish. Avoid damaging
the cooling unit, especially at the rear near the
heat exchanger. Information on your local
disposal sites may be obtained from municipal
authorities.The materials used on this appliance
marked by the symbol are recyclable.
Disposal of old Appliances
The symbol on the product or on its packaging
indicates that this product may not be treated as
household waste. Instead it shall be handed over to
the applicable collection point for the recycling of
electrical and electronic equipment. By ensuring this
product is disposed of correctly, you will help prevent
potential negative consequences for the
environment and human health, which could
otherwise be caused by inappropriate waste
handling of this product. For more detailed
information about recycling of this product, please
contact your local city office, your household waste
disposal service or the shop where you purchased
the product.
Installation
• During normal operation, the condenser and
compressor at the back of the appliance heat up
considerably. For safety reasons, minimum
ventilation must be as shown in the instructions.
Attention: keep ventilation openings clear of
obstruction.
• Care must be taken to ensure that the appliance
does not stand on the electrical supply cable.
Important: if the supply cord is damaged, it must
be replaced by a special cord or assembly availa-
ble from the manufacturer or its service agent.
• If the appliance is transported horizontally, it is
possible that the oil contained in the compressor
flows in the refrigerant circuit. It is advisable to
wait at least two hours before connecting the
appliance to allow the oil to flow back in the
compressor.
• There are working parts in this product which
heat up. Always ensure that there is adequate
ventilation as a failure to do this will result in
component failure and possible food loss. See
installation instructions.
• Parts which heat up should not be exposed.
Wherever possible the back of the product should
be against a wall.
Warnings . . . . . . . . . . . . . . . . . . . . . . . . . . . . . . . . . . . . . . . . . . . . . . . . . . . . . . . . . . . . . . . . . . . . . . . . . . .25
Use - Cleaning the interior - Control panel - Operation - Temperature regulation - Fast freezing . . . . . . . . . . .
Warning light - Freezing fresh food . . . . . . . . . . . . . . . . . . . . . . . . . . . . . . . . . . . . . . . . . . . . . . . . . . . . . . . . . . . .27
Use - Storage of frozen food - Thawing - Ice-cube production - . . . . . . . . . . . . . . . . . . . . . . . . . . . . . . . . . . . . . .28
Hints - Hints for freezing - Hints for storage of frozen food . . . . . . . . . . . . . . . . . . . . . . . . . . . . . . . . . . . . . . . . . .29
Maintenance - Periodic cleaning - Periods of non-operation - Defrosting - . . . . . . . . . . . . . . . . . . . . . . . . .30
Customer service and spare parts - Technical information - Installation - Location - . . . . . . . . . . . . .
Electrical connection . . . . . . . . . . . . . . . . . . . . . . . . . . . . . . . . . . . . . . . . . . . . . . . . . . . . . . . . . . . . . . . . . . .31
Positioning - Instructions for totally built-in applinces . . . . . . . . . . . . . . . . . . . . . . . . . . . . . . . . . . . . . . . . .32

12
Aprire la porta dell’apparecchiatura e quella del
mobile a 90° ca. Inserire la squadretta (Hb) nella
guida (Ha). Tenere insieme la porta
dell’apparecchiatura e quella del mobile e segnare i
fori come indicato in figura.
PR167
Ha
Hb
8mm
Ha
8mm
K
Togliere le squadrette e segnare con il chiodo (K) a
8 mm dal bordo esterno della porta.
PR167/1
Hd
Hb
Inserire a scatto il coperchietto (Hd) sulla guida (Hb)
PR168
Hb
Posizionare nuovamente la squadretta sopra la
guida e fissare con le viti in dotazione.
Per l’eventuale operazione di allineamento della
porta del mobile, utilizzare il gioco dei fori asolati.
Al termine delle operazioni è necessario controllare
l’esatta chiusura della porta dell’apparecchiatura.
25
WARNINGS
It is most important that this instruction book should be retained with the appliance for future
reference. Should the appliance be sold or transferred to another owner, or should you move house
and leave the appliance, always ensure that the book is supplied with the appliance in order that the
new owner can be acquainted with the functioning of the appliance and the relevant warnings.
If this appliance featuring magnetic door seals is to replace an older appliance having a spring lock
(latch) on the door or lid, be sure to make that spring lock unusable before you discard the old
appliance. This will prevent it from becoming a death-trap for a child.
These warnings are provided in the interest of safety.You must read them carefully before installing or
using the appliance.
General Safety
• This appliance is designed to be operated by
adults. Children should not be allowed to tamper
with the controls or play with the product.
• It is dangerous to alter the specifications or
modify this product in any way.
• Before any cleaning or maintenance work is carried
out, be sure to switch off and unplug the appliance.
• This appliance is heavy. Care should be taken
when moving it
• Ice lollies can cause frost burns if consumed
straight from the appliance.
• Take utmost care when handling your
appliance so as not to cause any damages to
the cooling unit with consequent possible
fluid leakages.
• The appliance must not be located close to
radiators or gas cookers.
• Avoid prolonged exposure of the appliance to
direct sunlight.
• There must be adequate ventilation round the
back of the appliance and any damage to the
refrigerant circuit must be avoided.
• For freezers only (except built-in models): an
ideal location is the cellar or basement.
• Do not use other electrical appliances (such
as ice cream makers) inside of refrigerating
appliances.
Service/Repair
• Any electrical work required to install this
appliance should be carried out by a qualified
electrician or competent person
• This product should be serviced by an authorized
Service Centre, and only genuine spare parts
should be used.
• Under no circumstances should you attempt to
repair the appliance yourself. Repairs carried out
by inexperienced persons may cause injury or
more serious malfunctioning. Refer to your local
Service Centre, and always insist on genuine
spare parts.
• This appliance contains hydrocarbons in its
cooling unit; maintenance and recharging must
therefore only be carried out by authorized
technicians.
Use
• The domestic refrigerators and freezers are
designed to be used specifically for the storage
of edible foodstuffs only.
• Best performance is obtained with ambient
temperature between +18°C and +43°C (class T);
+18°C and +38°C (class ST); +16°C and +32°C
(class N); +10°C and +32°C (class SN). The
class of your appliance is shown on its rating
plate.
Warning: when the ambient temperature is not
included within the range indicated for the class
of this appliance, the following instructions must
be observed: when the ambient temperature
drops below the minimum level, the storage
temperature in the freezer compartment cannot
be guaranteed; therefore it is advisable to use the
food stored as soon as possible.
• Frozen food must not be re-frozen once it has
been thawed out.
• Manufacturers’ storage recommendations should
be strictly adhered to. Refer to relevant
instructions.
• The inner lining of the appliance consists of
channels through which the refrigerant passes. If
these should be punctured this would damage the
appliance beyond repair and cause food loss. DO
NOT USE SHARP INSTRUMENTS to scrape off
frost or ice. Frost may be removed by using the
scraper provided. Under no circumstances should
solid ice be forced off the liner. Solid ice should be
allowed to thaw when defrosting the appliance.
• Do not place carbonated or fizzy drinks in the
freezer as it creates pressure on the container,
which may cause it to explode, resulting in
damage to the appliance.

13
Per un sollecito intervento è importante, all’atto
della chiamata, indicare il tipo di difetto, il
modello di apparecchiatura (Mod.), il numero di
prodotto (Prod. No.) e il numero di fabbricazione
(Ser. No.), rilevati dal certificato di garanzia o
dalla targhetta matricola posta all’interno
dell’apparecchiatura.
CENTRI ASSISTENZA
24
Abrir la puerta del aparato y la del mueble a 90°
aprox. Introducir la escuadrita (Hb) en la guía (Ha).
Mantener unidas la puerta del aparato y la del
mueble y marcar los agujeros según se indica en la
figura.
PR167
Ha
Hb
8mm
Ha
8mm
K
Quitar las escuadras y marcar a 8 mm del borde
externo de la puerta con el clavo (K).
PR167/1
Hd
Hb
PR168
Hb
Colocar otra vez la escuadrita sobre la guía y fijarla
con los tornillos presentes en el equipo base.
En caso de que sea necesario alinear la puerta del
mueble, utilizar el juego de los agujeros de ojal.
Al término de las operaciones es preciso controlar
que la puerta del aparato esté cerrada
correctamente.
Introducir la tapa (Hd), presionándola hasta oír el
resorte, en la guía (Hb).
-
 1
1
-
 2
2
-
 3
3
-
 4
4
-
 5
5
-
 6
6
-
 7
7
-
 8
8
-
 9
9
-
 10
10
-
 11
11
-
 12
12
-
 13
13


Electrolux EUN621 Manuale utente
- Categoria
- Frigo-congelatori
- Tipo
- Manuale utente
in altre lingue
- English: Electrolux EUN621 User manual

