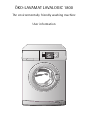
AEG LAVALOGIC1800 Manuale utente
- Categoria
- Lavatrici
- Tipo
- Manuale utente

ÖKO-LAVAMAT LAVALOGIC 1800
The environmentally friendly washing machine
User information

2
Dear customer,
Please read these user information carefully.
Pay particular attention to the section “Safety information” on the first
few pages. Please retain this user information for later reference. Pass
them on to possible new owners of the appliance.
The following symbols are used in the text:
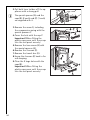
1 Safety instructions
Warning: Information concerning your personal safety.
Important: Information on how to avoid damaging the appliance.
3 Information and practical tips
2 Environmental information
1. These numbers indicate step by step how to use the appliance.
2. …
3. …
This user information contain information on steps you can take your-
self to rectify a possible malfunction. Refer to the section “What to do
if...”.
In the event of any technical problems please contact your nearest cus-
tomer service centre at any time. (Addresses and telephone numbers
may be found in the appendix under "Customer Service Centres“).
You should also refer to the section "Service".
Printed on recycled paper.
Thinking ecologically means acting ecologically …

3
Contents
Operating Instructions. . . . . . . . . . . . . . . . . . . . . . . . . . . . . . . . . . . . . 6
Safety . . . . . . . . . . . . . . . . . . . . . . . . . . . . . . . . . . . . . . . . . . . . . . . . . . . . . . . . . 6
Disposal . . . . . . . . . . . . . . . . . . . . . . . . . . . . . . . . . . . . . . . . . . . . . . . . . . . . . . . 8
Environmental tips. . . . . . . . . . . . . . . . . . . . . . . . . . . . . . . . . . . . . . . . . . . . . . 8
Switching on the appliance for the first time – setting the language 9
Description of appliance. . . . . . . . . . . . . . . . . . . . . . . . . . . . . . . . . . . . . . . . . 10
Front view . . . . . . . . . . . . . . . . . . . . . . . . . . . . . . . . . . . . . . . . . . . . . . . . . . . . . 10
Drawer for detergent and conditioner . . . . . . . . . . . . . . . . . . . . . . . . . . . . . . 10
Control panel with display . . . . . . . . . . . . . . . . . . . . . . . . . . . . . . . . . . . . . . . . 11
Indicators in the display . . . . . . . . . . . . . . . . . . . . . . . . . . . . . . . . . . . . . . . 11
Information panel . . . . . . . . . . . . . . . . . . . . . . . . . . . . . . . . . . . . . . . . . . . . 11
Main control features . . . . . . . . . . . . . . . . . . . . . . . . . . . . . . . . . . . . . . . . . . . 12
Switching the appliance on and off . . . . . . . . . . . . . . . . . . . . . . . . . . . . . . . . 12
Cancelling settings. . . . . . . . . . . . . . . . . . . . . . . . . . . . . . . . . . . . . . . . . . . . . . . 12
Navigation display . . . . . . . . . . . . . . . . . . . . . . . . . . . . . . . . . . . . . . . . . . . . . . . 13
Turning knob and pages . . . . . . . . . . . . . . . . . . . . . . . . . . . . . . . . . . . . . . . . . . 13
Buttons and levels . . . . . . . . . . . . . . . . . . . . . . . . . . . . . . . . . . . . . . . . . . . . . . . 14
Setting a programme: an example. . . . . . . . . . . . . . . . . . . . . . . . . . . . . . . . . . 15
Overview of functions. . . . . . . . . . . . . . . . . . . . . . . . . . . . . . . . . . . . . . . . . . . 17
Programmes (Level 1) . . . . . . . . . . . . . . . . . . . . . . . . . . . . . . . . . . . . . . . . . . . . 17
Wash programmes . . . . . . . . . . . . . . . . . . . . . . . . . . . . . . . . . . . . . . . . . . . . 17
Special programmes. . . . . . . . . . . . . . . . . . . . . . . . . . . . . . . . . . . . . . . . . . . 18
Options (level 2). . . . . . . . . . . . . . . . . . . . . . . . . . . . . . . . . . . . . . . . . . . . . . . . . 19
Extras (level 3) . . . . . . . . . . . . . . . . . . . . . . . . . . . . . . . . . . . . . . . . . . . . . . . . . . 20
Preparing for a wash cycle. . . . . . . . . . . . . . . . . . . . . . . . . . . . . . . . . . . . . . . 22
Sorting and preparing the washing . . . . . . . . . . . . . . . . . . . . . . . . . . . . . . . . . 22
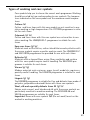
Types of washing and care symbols . . . . . . . . . . . . . . . . . . . . . . . . . . . . . . . . . 23
Detergent and Conditioners . . . . . . . . . . . . . . . . . . . . . . . . . . . . . . . . . . . . . . . 24
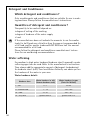
Which detergent and conditioners?. . . . . . . . . . . . . . . . . . . . . . . . . . . . . . 24
Quantities of detergent and conditioners? . . . . . . . . . . . . . . . . . . . . . . . . 24
Water softening . . . . . . . . . . . . . . . . . . . . . . . . . . . . . . . . . . . . . . . . . . . . . . . . . 24
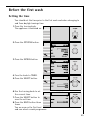
Before the first wash. . . . . . . . . . . . . . . . . . . . . . . . . . . . . . . . . . . . . . . . . . . . 25
Setting the time. . . . . . . . . . . . . . . . . . . . . . . . . . . . . . . . . . . . . . . . . . . . . . . . . 25
Carrying out a wash programme prior to first use. . . . . . . . . . . . . . . . . . . . . 26

4
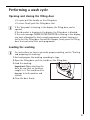
Performing a wash cycle. . . . . . . . . . . . . . . . . . . . . . . . . . . . . . . . . . . . . . . . . 27
Opening and closing the filling door. . . . . . . . . . . . . . . . . . . . . . . . . . . . . . . . 27
Loading the washing . . . . . . . . . . . . . . . . . . . . . . . . . . . . . . . . . . . . . . . . . . . . . 27
Adding detergents/conditioners . . . . . . . . . . . . . . . . . . . . . . . . . . . . . . . . . . . 28
Setting a wash programme. . . . . . . . . . . . . . . . . . . . . . . . . . . . . . . . . . . . . . . . 29
Set the options, e.g. DELAY START . . . . . . . . . . . . . . . . . . . . . . . . . . . . . . . . . . 30
Starting a wash programme . . . . . . . . . . . . . . . . . . . . . . . . . . . . . . . . . . . . . . . 31
Wash programme progress . . . . . . . . . . . . . . . . . . . . . . . . . . . . . . . . . . . . . . . . 32
When the wash cycle is complete . . . . . . . . . . . . . . . . . . . . . . . . . . . . . . . . . . 33
MEMORY . . . . . . . . . . . . . . . . . . . . . . . . . . . . . . . . . . . . . . . . . . . . . . . . . . . . . . 35
Saving a programme setting. . . . . . . . . . . . . . . . . . . . . . . . . . . . . . . . . . . . . . . 35
Cancelling a saved programme setting . . . . . . . . . . . . . . . . . . . . . . . . . . . . . . 37
Changing the language. . . . . . . . . . . . . . . . . . . . . . . . . . . . . . . . . . . . . . . . . . 38
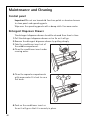
Maintenance and Cleaning . . . . . . . . . . . . . . . . . . . . . . . . . . . . . . . . . . . . . . 40
Control panel . . . . . . . . . . . . . . . . . . . . . . . . . . . . . . . . . . . . . . . . . . . . . . . . . . . 40
Detergent Dispenser Drawer. . . . . . . . . . . . . . . . . . . . . . . . . . . . . . . . . . . . . . . 40
Washing Machine Drum . . . . . . . . . . . . . . . . . . . . . . . . . . . . . . . . . . . . . . . . . . 41
Main door . . . . . . . . . . . . . . . . . . . . . . . . . . . . . . . . . . . . . . . . . . . . . . . . . . . . . . 41
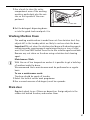
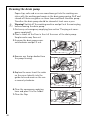
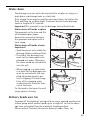
Cleaning the drain pump . . . . . . . . . . . . . . . . . . . . . . . . . . . . . . . . . . . . . . . . . 42
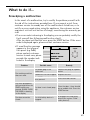
What to do if.... . . . . . . . . . . . . . . . . . . . . . . . . . . . . . . . . . . . . . . . . . . . . . . . . 43
Remedying a malfunction. . . . . . . . . . . . . . . . . . . . . . . . . . . . . . . . . . . . . . . . . 43
If the washing results are not satisfactory . . . . . . . . . . . . . . . . . . . . . . . . . . . 47
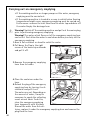
Carrying out an emergency emptying. . . . . . . . . . . . . . . . . . . . . . . . . . . . . . . 48
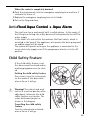
Anti-flood Aqua Control + Aqua Alarm . . . . . . . . . . . . . . . . . . . . . . . . . . . 49
Child Safety Feature . . . . . . . . . . . . . . . . . . . . . . . . . . . . . . . . . . . . . . . . . . . . 49
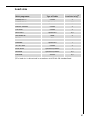
Consumption values and load sizes . . . . . . . . . . . . . . . . . . . . . . . . . . . . . . . 50
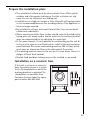
Installation and connection instructions. . . . . . . . . . . . . . . . . 52
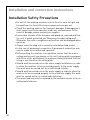
Installation Safety Precautions . . . . . . . . . . . . . . . . . . . . . . . . . . . . . . . . . . . 52
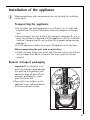
Installation of the appliance . . . . . . . . . . . . . . . . . . . . . . . . . . . . . . . . . . . . . 53
Transporting the appliance . . . . . . . . . . . . . . . . . . . . . . . . . . . . . . . . . . . . . . . . 53
Remove transport packaging . . . . . . . . . . . . . . . . . . . . . . . . . . . . . . . . . . . . . . 53
Prepare the installation place. . . . . . . . . . . . . . . . . . . . . . . . . . . . . . . . . . . . . . 55
Installation on a concrete base. . . . . . . . . . . . . . . . . . . . . . . . . . . . . . . . . . 55
Installation on vibrating floors . . . . . . . . . . . . . . . . . . . . . . . . . . . . . . . . . . 56
Compensate for floor unevenness . . . . . . . . . . . . . . . . . . . . . . . . . . . . . . . . . . 56

5
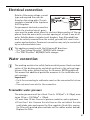
Electrical connection. . . . . . . . . . . . . . . . . . . . . . . . . . . . . . . . . . . . . . . . . . . . 57
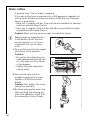
Water connection . . . . . . . . . . . . . . . . . . . . . . . . . . . . . . . . . . . . . . . . . . . . . . 57
Permissible water pressure . . . . . . . . . . . . . . . . . . . . . . . . . . . . . . . . . . . . . . . . 57
Water inflow. . . . . . . . . . . . . . . . . . . . . . . . . . . . . . . . . . . . . . . . . . . . . . . . . . . . 58
Water drain. . . . . . . . . . . . . . . . . . . . . . . . . . . . . . . . . . . . . . . . . . . . . . . . . . . . . 59
Delivery heads over 1m . . . . . . . . . . . . . . . . . . . . . . . . . . . . . . . . . . . . . . . . . . . 59
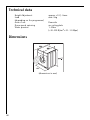
Technical data . . . . . . . . . . . . . . . . . . . . . . . . . . . . . . . . . . . . . . . . . . . . . . . . . 60
Dimensions. . . . . . . . . . . . . . . . . . . . . . . . . . . . . . . . . . . . . . . . . . . . . . . . . . . . . 60
Guarantee Conditions. . . . . . . . . . . . . . . . . . . . . . . . . . . . . . . . . . . . . . 61
Customer Service Centres . . . . . . . . . . . . . . . . . . . . . . . . . . . . . . . . . 63
Index . . . . . . . . . . . . . . . . . . . . . . . . . . . . . . . . . . . . . . . . . . . . . . . . . . . . . . . . 66
Service . . . . . . . . . . . . . . . . . . . . . . . . . . . . . . . . . . . . . . . . . . . . . . . . . . . . . . 67

6
Operating Instructions
1 Safety
The safety features of AEG electrical appliances comply with accepted
technical standards and the German Appliance Safety Law. However, we
also consider it our obligation as a manufacturer to inform you about
the following safety information.
Prior to initial start-up
• Observe the "Installation and Connection Instructions" in this in-
struction book.
• If the appliance is delivered in the winter months and temperatures
are below freezing: Store the washing machine at room temperature
for a few hours before putting it into operation.
Intended Use
• The washing machine is only intended for washing normal domestic
washing. If the appliance is used for any other purpose or incorrectly
operated, the manufacturer accepts no liability for any damages
which may result.
• It is dangerous to alter the specifications or attempt to modify this
product in any way.
• Only use detergents which are suitable for automatic washing ma-
chines, and follow the recommendations of the detergent manufac-
turer.
• Garments which have been in contact with flammable solvents
should not be washed. Also bear this in mind when washing pre-
cleaned washing.
• Do not use the washing machine for dry-cleaning.
• Dyes and bleaching agents may only be used if specifically permitted
by the manufacturer of these products. We cannot be held liable for
any damages.
• This appliance must be connected to the cold water supply only.
• Damage due to frost is not covered by the guarantee. If the washing
machine is located in a room in which below freezing temperatures
may occur, emergency emptying must be carried out (see "carrying
out an emergency emptying“).

7
Child Safety
• Packaging materials (e.g. films, styrofoam) can be dangerous for chil-
dren. There is a risk of suffocation! Keep all packaging well away from
children.
• This appliance is designed to be operated by adults. Do not allow
children to tamper with the controls or play with the appliance.
• Pets and children have been known to climb into washing machines.
Please check the drum before use.
• When disposing of the appliance, cut off the mains cable, and destroy
the plug. Disable the door lock to prevent young children being
trapped inside.
General Safety
• Repairs to the washing machine must only be carried out by qualified
personnel. Repairs carried out by inexperienced persons may cause
injury or serious malfunctioning. Contact your local AEG Service
Force Centre.
• Never operate the washing machine if the mains cable is damaged or
the control panel, work top or base area are damaged allowing inter-
nal components to be accessible.
• Switch off the appliance and isolate from the mains supply before
carrying out any cleaning or maintenance work.
• If the appliance will be out of operation for an extended period of
time, unplug it from the mains.
• Do not use the mains cable to pull the plug out of the socket.
• Adapters and extension cables must not be used. There is a danger
of overheating!
• Do not clean the washing machine with a water jet. There is a danger
of electrical shock!
• During high temperature wash programmes, the glass of the door
may become hot. Do not touch!
• Allow the water to cool down before cleaning the drain pump, carry-
ing out emergency emptying or opening the door in an emergency.
• Small animals/pets can chew on power cables and water hoses. This
can cause the danger of an electrical shock to the animal and water
damage to the appliance and property. Keep small animals away from
the appliance.

8
2 Disposal
Packaging
Dispose of the packaging material correctly. All packaging materials
used are environmentally friendly and can be disposed of without any
danger to the environment.
• Plastic parts can be recycled and are identified as follows:
• Cardboard packaging is manufactured from recycled paper and
should be deposited in the waste paper collection for recycling.
When disposing of the washing machine!
Cut off the mains cable and destroy the plug. Disable the door catch to
prevent young children becoming trapped inside. Use an authorised
disposal site.
2 Environmental tips
• It is not usually necessary to Pre-wash or Soak normally soiled wash-
ing. This will save you detergent, water and time (and protect the en-
vironment as well).
• It is more economical to wash full loads.
• When washing small loads, use half to two thirds the recommended
quantity of detergent.
• Pre-treat stains, if necessary, and then wash at a lower temperature.
• It can be possible to wash without fabric softeners, if clothes are
dried in a tumble dryer, as this can give soft and fluffy results.
• In hard water areas, the use of a water softening agent can reduce
the amount of detergent necessary. See manufacturer’s recommen-
dations.
>PE< for polyethylene, e.g. the outer covering and the bags in
the interior.
>PS< for polystyrene, e.g. padding (always CFC-free)
>POM< for polyoxymethylene, e.g. plastic clips

9
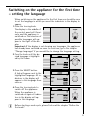
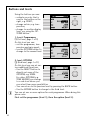
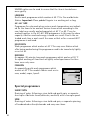
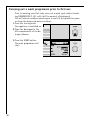
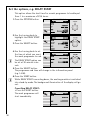
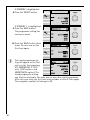
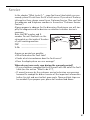
Switching on the appliance for the first time
– setting the language
When switching on the appliance for the first time you should be sure
to set the language in which you want the indicators in the display to
appear.
1. Press the turning knob.
The display in the middle of
the control panel will illumi-
nate, and the appliance is
switched on. The selection of
possible languages will ap-
pear in the right of the dis-
play.
Important: If the display is not showing any languages, the appliance
has already been switched on once. In such case, go to the chapter
“Change languages” if you would like to change the language setting.
2. Turn the knob until the de-
sired language is highlight-
ed by the frame.
3. Press the SELECT button.
A tick will appear next to the
highlighted language. All in-
dicators in the display will
appear in this language from
now on.
4. Press the turning knob to
switch off the appliance.
When the appliance is
switched on again all indica-
tors in the display will ap-
pear in this language.
3 Before starting a wash cycle, please first read the chapter “Before the
first wash”.
EXTRAS
Í
EXTRAS
Í
EXTRAS
Í

10
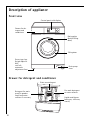
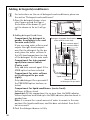
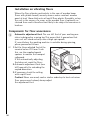
Description of appliance
Front view
Drawer for detergent and conditioner
Drawer for de-
tergent and
conditioner
Filling door
Screw-type legs
(height adjusta-
ble);
rear left:
automatic
adjustment foot
Control panel with display
Drain pump
cover
Rating plate
(behind filling
door)
Pre-wash detergent
or water softener
Detergent for main
wash (in powder
form) and water-
softener if necessary
Stain removal agent
Liquid conditioners
(softeners, stiffeners,
starch)

11
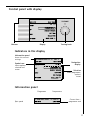
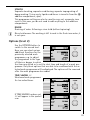
Control panel with display
Indicators in the display
Information panel
LINEN/EASY-C. 60°C
F î
H
Buttons Turning knobDisplay
LINEN/EASY-C. 60°C
F î
H
Navigation
display
Symbol row
shows options
selected and
extras
Selection
Wash programme,
options,
extras
Information panel
shows the current
settings
LINEN/EASY-C. 60°C
Programme Temperature
Spin speed
Current time –
programme end

12
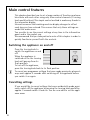
Main control features
This chapter describes how to set a large number of functions and com-
bine them with each other using only a few control elements (1 turning
knob and 4 buttons). This simple control method is made easy thanks to
the interactive display.
Interactive means that washing machine display changes to reflect
each step you have entered. This ensures that only those settings are
made that make sense.
You are able to see the current settings at any time in the information
panel and in the symbol row.
We recommend that you take particular note of this chapter in order to
quickly familiarise yourself with the controls.
Switching the appliance on and off
Press the turning knob to
switch the appliance on and
off.
When the appliance is
switched on the the turning
knob will pop up from its
flush position.
To turn off the appliance,
press the turning knob back to its flush position.
3 To cancel any programme settings that were made previously, please al-
ways wait approx. 3 seconds after switching off the appliance before
you switch it on again.
Cancelling settings
If you would like to cancel settings that were accidentally made previ-
ously, switch off the appliance by pressing the turning knob and after
approx. 3 seconds switch it back on. You are now able to set the appli-
ance anew.

13
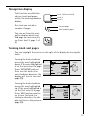
Navigation display
The functions are distribut-
ed over levels and pages
within the washing machine
display.
One level can include a
number of pages.
You can see from the navi-
gation display which level
and page you are currently
on (here: level 3, page 1 of
2).
Turning knob and pages
You can highlight the entries on the right of the display by turning the
knob.
Turning the knob clockwise
moves the area highlighted
down. If the area highlighted
is on the last entry of a page
(here: WOOLENS) and you
then turn the knob in an
anti-clockwise direction, the
display will turn to the next
page (ö).
Turning the knob clockwise
moves the area highlighted
up. If the area highlighted is
on the first entry of a page
(here: SILK) and you contin-
ue to turn the knob in a
clockwise direction, the dis-
play will turn to the previous
page (î).
Current page
Total number pages
Level 3 (Current level)
Level 2
Level 1
WOOLLENS 30°C
î
H
SILK 30°C
ö
H

14
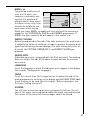
Buttons and levels
Using the buttons you can:
– activate an entry that is
next to the button on the
right, e.g. START;
– change entries, e.g. tem-
perature;
– change to another display
level, e.g. using the OP-
TIONS button.
1. Level: Programmes
î (1st level, page 1 of 3)
On this level you can:
– uet the programme, tem-
perature and spin speed;
– use the OPTIONS button to
change to the second level.
2. level: OPTIONS
ç (2nd level, page 1 of 1)
On this level you can set var-
ious additional functions.
– Use the SELECT button to
directly set some of the
OPTIONS, e.g. STAIN.
For other OPTIONS (e.g.
TIME SAVING) you change
to a sub-level where you
can select from many possibilities.
– You can return to the previous level by pressing the BACK button.
– Use the EXTRAS button to change to the third level.
3 You can set one or more options for each programme. When doing this
please note:
First set the programme (level 1), then the option (level 2).
LINEN/EASY-C. 60°C
î
H
DELICATES 40°C
î
H
DELICATES 40°C
ç

15
3. level: EXTRAS
ì (3rd level, page 1 of 2)
On this level you can set var-
ious basic settings. These ba-
sic settings will not be
cancelled when you switch
off the washing machine.
These basic settings will re-
main active until they are
deselected.
You will find a detailed description of this in the chapter “Extras”.
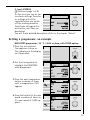
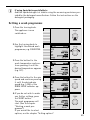
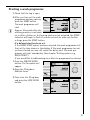
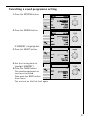
Setting a programme: an example
DELICATES programme, 30 °C, 1,000 rev/min, with STAIN option.
1. Press the turning knob.
The appliance is now on.
The indicators in the display
are illuminated.
2. Use the turning knob to
highlight the DELICATES
wash programme.
3. Press the wash temperature
button a number of times
until a temperature of 30°
appears.
4. Press the button for the spin
speed a number of times un-
til a spin speed of 1,000 ap-
pears.
EXTRAS
ì
DELICATES 40°C
î
H
DELICATES 30°C
î
H
DELICATES 30°C
î
H

16
5. Press the OPTIONS button.
6. Use the turning knob to
highlight the STAIN option.
7. Press the SELECT button.
A tick will appear on the
right next to STAIN. The op-
tion has been activated.
F will appear in the symbol
row.
3 Please refer to the chapter “Adding detergents and conditioners” and
“Loading the machine” before you start the wash programme.
8. If you want to start the pro-
gramme set in this example:
– Press the START button.
The wash programme will
start.
– If not, press the turning
knob to switch off the ap-
pliance.
The indicators in the dis-
play will go out.
All of the settings de-
scribed above have now
been cancelled.
DELICATES 30°C
î
H
DELICATES 30°C
ç
DELICATES 30°C
F ç
DELICATES 30°C
F ç
DELICATES 30°C
F ç

17
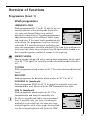
Overview of functions
Programmes (Level 1)
Wash programmes
LINEN/EASY-CARE
Wash programme (20 °C to 60 °C) able to be uni-
versally used for cottons/coloureds (cotton/lin-
en), easy-care (mixed fabrics, e.g. cotton/
polyester) and synthetics. The wash programme is
adjusted according to the different fabric types
and load sizes. If the wash load is predominantly
cotton/linen, the programme is set for cottons/
coloureds. If it consists mainly of synthetics, the
easy-care programme should be selected. If the load to be washed con-
tains easy-care items only, not more than 2.5 kg should be loaded in or-
der to avoid a greater number of creases in the washing.
2 ENERGY SAVING
Special energy-saving and water-saving wash programme which wash-
es at 60 °C for lightly to normally soiled cottons/coloureds (cotton/lin-
en).
COTTONS
Wash programme which washes at 95 °C for cottons/coloureds (cotton/
linen).
DELICATES
Wash programme for delicates which washes at 30 °C or 40 °C.
WOOLENS H (handwash)
Wash programme (COLD to 40 °C) for machine-washable wool and
handwashable wool fabrics with the ï (handwash) care label.
SILK H (handwash)
Wash programme which washes at 30 °C for
handwashable and machine-washable silk.
3 As silk is a very delicate fabric we recommend
that, if possible, only one item of clothing be
washed at a time and that silk items are never
washed together with other rough-textured fab-
rics. For extremely delicate silk items the TIME
LINEN/EASY-C. 60°C
î
H
SILK 30°C
ö
H

18
SAVING option can be used to ensure that the item is treated even
more gently.
LINGERIE
Gentle wash programme which washes at 40 °C for fine and delicate
fabrics. Important: Place padded lingerie in a washing net or bag.
40°-60° MIX
Programme for coloureds when various wash temperatures are indicat-
ed for the items to be washed. Various items which according to the
care labels are usually washed separately at 40 °C or 60 °C can be
washed together in the 40°-60° MIX programme. In this way the drum
capacity is better used and energy is saved as a result. Due to the ex-
tended wash time a wash result the same as that as for a normal 60°C
programme is achieved.
EASY IRON
Wash programme which washes at 40 °C for easy-care fabrics which
after being washed using this programme need to be ironed only lightly
or not at all.
REFRESH
An approx. 20-minute-long wash programme which washes at 30 °C
for quick washing of items such as lightly soiled sportswear that has
been worn only once.
FASHION
An especially gentle wash programme which
washes at 40 °C for modern fabrics such as vis-
cose, modal, cupro, lyocell.
Special programmes
SHORT SPIN
Draining of water following a rinse hold and gentle spin, or separate
short spin of delicate items (delicates, woollens) with a low spin speed.
SPIN
Draining of water following a rinse hold and spin, or separate spinning
of handwashed cottons/coloureds and easy-care items.
FASHION 40°C
ú

19
STARCH
Separate starching, separate conditioning, separate impregnating of
damp washing (1 rinse cycle, liquid conditioner is rinsed in from the æ
additive compartment, spin).
This programme setting can also be used to carry out a separate rinse
cycle. In this case, you do not need to add anything to the additives
compartment.
DRAIN
Draining of water following a rinse hold (without spinning).
3 Rinse hold means: The washing is left to soak in the final rinse water; it
is not spun.
Options (level 2)
Use the OPTIONS button to
switch to the second level.
Here you can select various
additional functions for the
previously selected wash
programme, e.g. to adjust
the programme to the type
of fabric or degree to which
the items are soiled, or to set the start time and length of a wash pro-
gramme. Only those options that are able to be combined with the se-
lected wash programme will be displayed. The options will be removed
after the wash programme has ended.
TIME SAVING Z
Shortened wash programme
for less soiled items.
If TIME SAVING has been set,
Z will appear in the symbol
row.
LINEN/EASY-C. 60°C
î
H
LINEN/EASY-C. 60°C
ç
LINEN/EASY-C. 60°C
è

20
DELAY START
The DELAY START option allows the start of a wash programme to be
delayed. The DELAY START option can be set at 30-minute intervals. The
current time and the programme end time will be shown in the display
(e.g. 14:23 - 20:28).
SENSITIVE S
A special additional function with considerably more effective rinse
function (additional rinse cycle) an improved fabric care at the same
time (reduced drum movement). This is ideal when frequent washes are
necessary, for example in cases of highly sensitive skin. An additional
rinse cycle (RINSE+) is able to be selected in addition (see chapter “Ex-
tras”). If SENSITIVE has been set, S is displayed in the symbol row.
STAIN F
For heavily soiled or stained washing. (In-wash stain treatment prod-
ucts (salts or tablets) are drawn in at the optimum time during the pro-
gramme.) If STAIN has been set, F is displayed in the symbol row.
PRE WASH V
A cold pre wash cycle prior to the main wash cycle, which follows auto-
matically. If PRE WASH has been set, V is displyed in the symbol row.
Extras (level 3)
Use the EXTRAS button to
change to the third level.
Here you can select various
basic settings without af-
fecting the particular wash
programme. These basic set-
tings will remain active until
they are deselected.
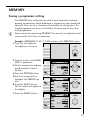
MEMORY
Programme settings that are frequently used can be saved (e.g. LINEN/
EASY-C., 40°C, 1200 rev/min, with TIME SAVING).
There are four memory cells available for this purpose. The saved pro-
gramme setting will appear as an entry on the first programme page
(e.g. M1:LINEN/EASY-C.) and can be deselcted as for a normal wash
programme. (See chapter “Memory: Saving a programme setting”.)
LINEN/EASY-C. 60°C
ç
La pagina si sta caricando...
La pagina si sta caricando...
La pagina si sta caricando...
La pagina si sta caricando...
La pagina si sta caricando...
La pagina si sta caricando...
La pagina si sta caricando...
La pagina si sta caricando...
La pagina si sta caricando...
La pagina si sta caricando...
La pagina si sta caricando...
La pagina si sta caricando...
La pagina si sta caricando...
La pagina si sta caricando...
La pagina si sta caricando...
La pagina si sta caricando...
La pagina si sta caricando...
La pagina si sta caricando...
La pagina si sta caricando...
La pagina si sta caricando...
La pagina si sta caricando...
La pagina si sta caricando...
La pagina si sta caricando...
La pagina si sta caricando...
La pagina si sta caricando...
La pagina si sta caricando...
La pagina si sta caricando...
La pagina si sta caricando...
La pagina si sta caricando...
La pagina si sta caricando...
La pagina si sta caricando...
La pagina si sta caricando...
La pagina si sta caricando...
La pagina si sta caricando...
La pagina si sta caricando...
La pagina si sta caricando...
La pagina si sta caricando...
La pagina si sta caricando...
La pagina si sta caricando...
La pagina si sta caricando...
La pagina si sta caricando...
La pagina si sta caricando...
La pagina si sta caricando...
La pagina si sta caricando...
La pagina si sta caricando...
La pagina si sta caricando...
La pagina si sta caricando...
La pagina si sta caricando...
-
 1
1
-
 2
2
-
 3
3
-
 4
4
-
 5
5
-
 6
6
-
 7
7
-
 8
8
-
 9
9
-
 10
10
-
 11
11
-
 12
12
-
 13
13
-
 14
14
-
 15
15
-
 16
16
-
 17
17
-
 18
18
-
 19
19
-
 20
20
-
 21
21
-
 22
22
-
 23
23
-
 24
24
-
 25
25
-
 26
26
-
 27
27
-
 28
28
-
 29
29
-
 30
30
-
 31
31
-
 32
32
-
 33
33
-
 34
34
-
 35
35
-
 36
36
-
 37
37
-
 38
38
-
 39
39
-
 40
40
-
 41
41
-
 42
42
-
 43
43
-
 44
44
-
 45
45
-
 46
46
-
 47
47
-
 48
48
-
 49
49
-
 50
50
-
 51
51
-
 52
52
-
 53
53
-
 54
54
-
 55
55
-
 56
56
-
 57
57
-
 58
58
-
 59
59
-
 60
60
-
 61
61
-
 62
62
-
 63
63
-
 64
64
-
 65
65
-
 66
66
-
 67
67
-
 68
68


AEG LAVALOGIC1800 Manuale utente
- Categoria
- Lavatrici
- Tipo
- Manuale utente
in altre lingue
- English: AEG LAVALOGIC1800 User manual