Mamiya SCM1 Manuale utente
- Categoria
- Macchine da caffè
- Tipo
- Manuale utente

Realizzazione grafica: Andreani - Foligno (PG) - 010304
SG-075
SCM1
I
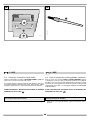
Leggere attentamente le istruzioni d’uso
prima di procedere al posizionamento,
installazione e messa in funzione della
macchina.
GB
Read these instructions carefully before
positioning, installing and using the
machine
F
Lisez attentivement le mode d’emploi
avant de procéder à la mise en place, à
l’installation et à la mise en service de
la machine à café.
D
Lesen Sie die Bedienungsanleitung auf-
merksam, bevor Sie die Maschine auf-
stellen, installieren und in Betrieb
nehmen.
NL
Lees met aandacht de instructies voor
het gebruik voordat u verdergaat met de
plaatsing, installatie en inwerkingstelling
van het apparaat.
E
Lean atentamente las instrucciones para
el uso antes de colocar la máquina en
su sitio, antes de instalarla y antes de
que empiece a funcionar.
P
Ler com atenção as instruções de utiliza-
ção antes de proceder ao posicionamento,
instalação e início de funcionamento da
máquina.
F
MACHINE A CAFE AUTOMATIQUE ELECTRONIQUE ENCASTREE
Mode d’emploi
GB
BUILT-IN AUTOMATIC ELECTRONIC COFFEE MACHINE
Installation handbook
D
AUTOMATISCHE ELEKTRONISCHE EINBAUKAFFEEMASCHINE
Handbuch für Installation
NL
AUTOMATISCH ELEKTRONISCH INBOUW-KOFFIEZETAPPARAAT
Instructies voor montage
E
MÁQUINA PARA CAFÉ AUTOMÁTICA ELECTRÓNICA QUE SE PUEDE EMPOTRAR
Manual de instalación
P
MÁQUINA DE CAFÉ AUTOMÁTICA ELECTRÓNICA DE ENCASTRO
Manual de instalação
MACCHINA PER CAFFÈ AUTOMATICA ELETTRONICA DA INCASSO
Manuale di installazione
I

3
F D
NL E
P
I GB
Gentile Cliente,
abbiamo preparato questo libretto per consentirLe di utilizzare
appieno la macchina automatica da incasso e trarne la gioia di tanti
buoni caffè.
Le raccomandiamo di leggere attentamente il presente libretto
in tutte le sue parti prima di utilizzare la macchina.
Conservare accuratamente queste istruzioni.
La macchina automatica
da incasso
incorpora componenti già col-
laudati e montati di serie su macchine professionali e quindi siamo
certi che seguendo i nostri suggerimenti potrà utilizzare la macchina
per lungo tempo con la massima soddisfazione.
BENVENUTI
Dear Customer,
We have prepared this booklet so you may use your super-automatic
electronic coffee machine to the full, and enjoy a good cup of coffee.
Please read this handbook carefully before using the machine.
Keep these instructions in a safe place.
The component parts of the built-in automatic coffee machine have
already been tested and assembled on standard professional
machines, and we are certain that if you follow our advice, your
machine will continue to give you great satisfaction for a long time.
WELCOME
Cher Client
,
Cette notice a été rédigée pour vous permettre d’utiliser au mieux la
machine à café automatique et électronique et de savourer de bons
cafés.
Vous êtes priés de lire attentivement et complètement cette
notice avant d’utiliser la machine à café.
Conservez soigneusement cette notice.
La machine automatique encastrée incorpore des éléments déjà
testés et montés de série sur des percolateurs professionnels et
donc nous sommes certains qu’en suivant nos conseils vous pourrez
utiliser la machine pendant longtemps avec la plus grande
satisfaction.
BIENVENUE!
Lieber Kunde
,
Wir haben diese Broschüre zusammengestellt um sicher zu stellen,
dass Sie diese elektronische, superautomatische Maschine problemlos
benutzen können um damit in den Genuss vieler Tassen guten Kaffees
zu kommen.
Wir raten Ihnen, alles Teile dieses Büchleins aufmerksam zu
lesen bevor Sie die Maschine benutzen. Bewaren Sie diese
Informationen sorgfältig auf.
Die elektronische Einbaukaffeemaschine besteht aus getesteten und
fertig installierten Einzelteilen, die auch in professionellen
Großmaschinen verwendet werden. Wir sind deshalb sicher, dass
sie die Maschine bei genauem Befolgen unserer Hinweise lange
und mit großer Zufriedenheit werden benutzen können.
WILLKOMMEN
Geachte Klant,
we hebben dit boekje samengesteld om u in staat te stellen het
automatische inbouw-koffiezetapparaat ten volle te benutten en van
vele goede kopjes koffie te kunnen genieten.
Wij raden u aan dit boekje met aandacht volledig te lezen voor-
dat u het apparaat in gebruik neemt. Bewaar deze instructies
zorgvuldig.
Het automatische inbouw-koffiezetapparaat bevat componenten die
reeds getest en in serie in professionele koffiezetapparaten gemon-
teerd zijn. Daarom zijn we er zeker van dat u, indien u onze sugges-
ties volgt, langdurig en tot volle tevredenheid gebruik kunt maken
van het apparaat.
WELKOM
Estimado cliente:
Hemos preparado este librito de instrucciones para que usted pueda
sacar el mejor partido a la máquina súper automática electrónica, y
gozar de muchos excelentes cafés.
Le aconsejamos que lea atentamente el presente librito en todas
sus partes antes de utilizar la máquina.
Conserve con atención estas instrucciones.
La máquina automática que se puede empotrar incorpora
componentes ya probados y montados de serie en las máquinas
profesionales y, como consecuencia, estamos seguros de que
siguiendo nuestras sugerencias podrá utilizar la máquina durante
mucho tiempo con la mayor satisfacción posible.
¡BIENVENIDOS!
Amável cliente,
preparámos este pequeno manual para lhe consentir de utilizar ao
máximo a máquina automática de encastro e poder assim ter o
gosto de tantos bons cafés.
Aconselhamos de ler atentamente o presente manual, em todas
as suas partes, antes de utilizar a máquina.
Conservar cuidadosamente estas instruções.
A máquina automática de encastro incorpora componentes já veri-
ficados e montados de série em máquinas profissionais e portanto
estamos certos que, seguindo as nossas sugestões, poderá utilizar
a máquina, durante muito tempo, com a máxima satisfação.
BEM-VINDO

4
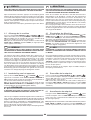
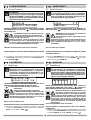
LEGENDA SIMBOLI
Il triangolo di avverten-
za indica tutte le voci im-
portanti per la sicurezza
dell’utente, alle quali bi-
sogna attenersi scrupo-
losamente.
Se insieme al triangolo di
avvertenza appaiono
questi due simboli, l’uten-
te deve prestare ancora
più attenzione alle pre-
scrizioni.
Attenzione!
Superfici calde.
KEY TO SYMBOLS
The warning triangle
indicates important in-
structions which must be
followed very carefully to
ensure the user’s safety.
If the following two sym-
bols appear together with
the warning triangle, the
user must pay extra at-
tention to the instructions.
Warning! Hot
surfaces.
GB
LEGENDE DES SYMBOLES
Le triangle d’avertisse-
ment signale tous les élé-
ments importants pour
votre sécurité et qui doi-
vent absolument être re-
spectés.
Si le triangle d’avertisse-
ment est accompagné de
ces deux symboles, il fau-
dra encore faire plus at-
tention aux prescriptions.
Attention!
Surfaces chauades.
F
LEGENDE DER SYMBOLE
Das Hinweisdreieck weist
auf die für den Benutzer
wichtigen Sicherheitsaspe-
kte hin, die unbedingt be-
achtet werden müssen.
Falls diese beiden Symbole
gemeinsam mit dem Hin-
weisdreieck erscheinen,
muss der Benutzer die
jeweiligen Hinweise noch
genauer beachten!
Achtung!
Heiße Oberflächen.
D
LEGENDA SYMBOLEN
De waarschuwingsdriehoek
duidt op alle opmerkingen
die van belang zijn voor de
veiligheid van de gebruiker,
en waar deze zich strikt aan
dient te houden.
Indien, samen met de
waarschuwingsdriehoek,
deze twee symbolen ge-
toond worden dan dient de
gebruiker nog meer aan-
dacht aan de voorschriften
te besteden.
Let op!
Hete oppervlakken.
NL
LECTURA DE LOS
SÍMBOLOS
El triángulo de adver-
tencias indica todas las
cosas importantes para la
seguridad del usuario, a
las que hay que atenerse
escrupulosamente.
Si junto al triángulo de
advertencias aparecen
estos dos símbolos, el
usuario debe prestar
más atención a las
prescripciones.
¡Atención!
Superficies calientes
E
.
LEGENDA SíMBOLOS
O triângulo de advertên-
cia indica todos os ele-
mentos importantes para
a segurança do utilizador,
as quais é necessário res-
peitar escrupulosamente.
Se juntamente ao triângu-
lo de advertência apare-
cem estes dois símbolos,
o utilizador deve presta
ulterior atenção às indica-
ções fornecidas.
Atenção!
Superfícies quentes.
P
1
1
1.1
1.2
SG-080
SAE2012-040
SG-210
BER-150
SG-400
7
8
4
6
5
2
3
10
SA2904-250
M3,5x16
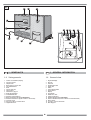
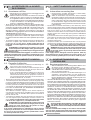
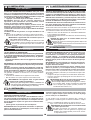
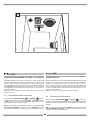
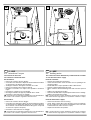
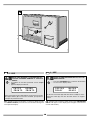
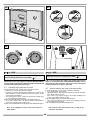
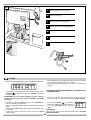
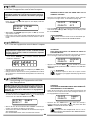
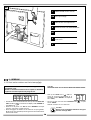
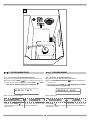
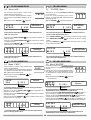
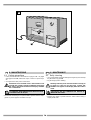
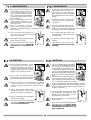
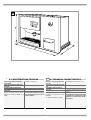
1 - GENERALITÀ
I
L’imballo in cui è stata chiusa questa macchina è particolarmente
resistente e impedisce che questa subisca danni durante il traspor-
to.
Si consiglia di conservarlo per rispedire la macchina al fornitore nel
caso in cui vi sia la necessità.
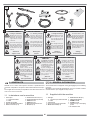
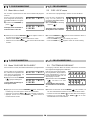
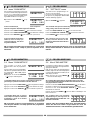
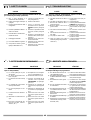
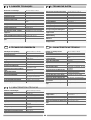
1.1 In dotazione con la macchina
1 Lancia vapore
1.1 Presina antiscottature
1.2 Bulbo
2Pennellino per la pulizia
3Tubo per collegamento alla rete idrica
4OR silicone mod. 4106 (n
°
4)
5 Fusibile macinino 5x20 1A T (n
°
2)
6 Fusibile alimentazione (6,3x32 10A)
7OR NBR mod. 2068
8OR NBR mod. 3043
9Bustina decalcificante monodose
10 Viti M3,5x16 (n
°
6)
Your machine comes wrapped in strong packaging to protect it during
transport.
We advise you to keep this packaging in case you need to send the
machine back to your supplier for any reason.
1.1 Supplied with the machine
1 Steam pipe
1.1 Pot-holder to prevent burns and scalds
1.2 Bulb
2 Cleaning brush
3 Pipe for connection to the water mains
4 OR silicone mod. 4106 (n
°
4)
5Grinder fuse 5x20 1A T (n
°
2)
6 Supply fuse (6,3x32 10A)
7 OR NBR mod. 2068
8 OR NBR mod. 3043
9 Single-dose bag of decalcifying
product
10 No. 6 M3,5x16 screws
1 - GENERAL INFORMATION
GB
I
9
La pagina sta caricando ...

6
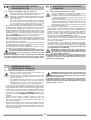
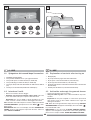
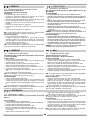
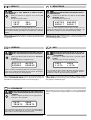
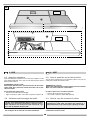
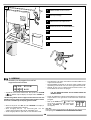
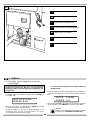
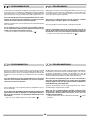
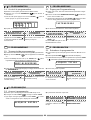
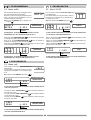
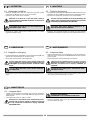
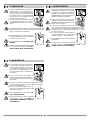
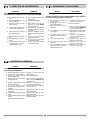
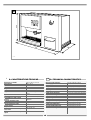
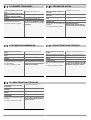
1.2 Vista generale
1Tastiera con visualizzatore (display)
2 Coperchio superiore
3 Campana caffè
4Manopola vapore / acqua calda
5Cavo di alimentazione
6 Guide
7 Cassetto fondi caffè
8 Cappuccinatore
9Vaschetta raccogli gocce
10 Griglia appoggia tazzine
11 Porta fusibile macinino
12 Interruttore generale luminoso
13 Manopola regolazione macinatura (FINE/GROSSA)
14 Interruttore inserimento acqua (da contenitore o da rete idrica)
15 Contenitore acqua
16 Ingresso per allaccio a rete idrica da 3/4
17 Targhetta dati tecnici
SG-065
8
1
3
4
6
2
7
9
10
G
R
O
S
S
O
F
I
N
E
BER-146
12
13
11
14
16
15
17
5
1 - GENERALITÀ
I
1 - GENERAL INFORMATION
GB
2
1.2 General view
1Keypad with display
2 Upper lid
3 Coffee bell
4 Steam/hot water knob
5 Supply cable
6 Guides
7 Coffee emptying drawer
8 Cappuccinatore
9 Drip tray
10 Cup grid plate
11 Grinder fuse carrier
12 Luminous main switch
13 Grinding adjustment knob (FINE/COARSE)
14 Switch to fill with water (from the container or from the water mains)
15 Water container
16 3/4 “ inlet to connect to water mains
17 Data rating plate
La pagina sta caricando ...

8
PLACA
DADOS TÉCNICOS
MODEL:
VOLT / Hz
WATT
S/N
Made in Italy
PLACA DE
DATOS TÉCNICOS
MODEL:
VOLT / Hz
WATT
S/N
Made in Italy
TECHNISCHE
GEGEVENS
MODEL:
VOLT / Hz
WATT
S/N
Made in Italy
TECHNISCHE
DATENTAFEL
MODEL:
VOLT / Hz
WATT
S/N
Made in Italy
PLAQUETTE
D’IDENTIFICATION
MODEL:
VOLT / Hz
WATT
S/N
Made in Italy
TECHNICAL
DATA RATING PLATE
MODEL:
VOLT / Hz
WATT
S/N
Made in Italy
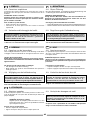
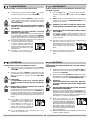
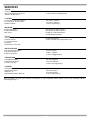
NB: In caso di problemi rivolgersi esclusivamente ai centri
di assistenza autorizzati.
Importante! Leggere le istruzioni d’uso prima di mettere
in funzione la macchina; vi sono date importanti informa-
zioni sulla sicurezza, sull’uso e la manutenzione in modo
da evitare danni a persone o cose.
La ditta produttrice non risponde di danni causati da un
uso improprio o errato della macchina.
TARGA
DATI TECNICI
MODEL:
VOLT / Hz
WATT
S/N
Made in Italy
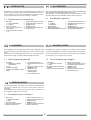
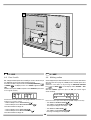
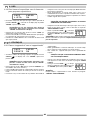
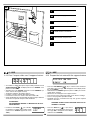
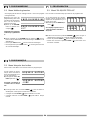
2.1 Targa dati
Prima di allacciare la macchina alla rete elettrica:
• controllare la targa dati (posta all’interno della macchina) per
accertarsi che la tensione e potenza siano corrispondenti a quel-
la della rete e la presa di collegamento sia idonea.
In caso di dubbio interpellare un elettricista qualificato.
2-AVVERTENZE PER LA SICUREZA
E CONSIGLI
I
2 - SAFETY WARNINGS AND ADVICE
GB
I GB F
D NL E
P
NB: In case of problems contact exclusively a authorized
assistance centre.
Important!
Read the instructions before using the machine; they
contain important information on safety, use and
maintenance in order to prevent damage to persons and
things.
The manufacturer is not responsible for damage caused
by improper or incorrect machine use.
2.1 Dataplate
Before connecting the machine to the mains power supply:
• Check the data rating plate (on the back of the machine) to make
sure that both voltage and power correspond to the mains supply
and check that the connection socket is suitable.
In case of doubt contact a qualified electrician.
La pagina sta caricando ...

10
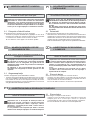
2- AVVERTENZE PER LA SICUREZ-
ZA E CONSIGLI
I
2-SAFETY WARNINGS AND ADVICE
GB
2 - SICHERHEITSHINWEISE UND
RATSCHLÄGE
D
2.2 Avvertenze sull’Uso
• Durante l’incasso, la manutenzione o lo smontaggio, staccare
la spina dalla presa di corrente.
• Mettere in funzione la macchina solo ad incasso avvenuto, in
modo tale da non venire a contatto con componenti elettrici.
•È consigliabile installare un rubinetto (in caso di allaccio della
macchina alla rete idrica) a monte dell’elettrovalvola di ingres-
so acqua, da chiudere, in caso di lunga inattività, per manu-
tenzione o scollegamento della macchina.
• Si può tenere la macchina sempre accesa (almeno il gruppo caffè),
poiché quando sarà trascorso un tempo prestabilito (si può variare
entrando in programmazione modificando i parametri inseriti in fab-
bricazione) dall’ultima erogazione di caffè o vapore/acqua calda, un
dispositivo elettronico automatico farà posizionare la macchina in
STANDBY fino al raggiungimento di una seconda fase di AUTOSPE-
GNIMENTO della macchina stessa.
Se si vuole riaccendere la macchina premere il tasto caffè espresso o
caffè lungo per attivare solo la caldaia caffè, oppure il tasto “vapore”
per attivare insieme alla caldaia caffè anche quella del vapore/acqua
calda.
• La macchina è dotata al suo interno di un piccolo ma potente micro-
processore col quale si può comunicare attraverso la tastiera e il
visualizzatore di messaggi (display); quanto occorre per fare un
buon caffè o un buon cappuccino è già memorizzato in questo
computer.
ATTENZIONE! La macchina genera vapore e acqua calda
ad alta temperatura! Non dirigere mai il getto di vapore o
di acqua calda verso parti del corpo, maneggiare con pru-
denza la lancia.
Se il cavo di alimentazione è danneggiato, esso deve essere so-
stituito dal costruttore o dal suo servizio assistenza tecnica o co-
munque da una persona con qualifica similare, in modo da preve-
nire ogni rischio.
2.2 Information concerning Use
• During machine assembly, maintenance, or disassembly,
remove the plug from the mains supply.
• Switch on the machine only when it has been assembled
into position in order to avoid contact with any electrical parts.
•We advise installing a tap (if the machine is connected to the
mains supply) above the water inlet solenoid valve, in order
to shut off the water supply if the machine remains unused
for a long period, or during maintenance or when the machine
is disconnected.
• The machine can remain switched on (i.e. the coffee unit), so that
after the set time (which can be varied by entering the programming
menu and modifying the parameters pre-set during manufacturing)
from the last coffee or jet of steam/hot water has passed, an
automatic electronic device sets the machine in stand-by until the
machine reaches the second stage, during which it SWITCHES
ITSELF OFF.
If you wish to switch on the machine again, press the espresso or
large coffee key in order to start up the coffee heater only, or press
the “steam” key to start up the coffee heater together with the
steam/hot water heater.
•A keyboard enables you to communicate with a small, powerful
microprocessor inside the machine and the messages appear on
the display; all you need to make a good cup of coffee or cap-
puccino has already been memorised in this computer.
WARNING! The hot steam and water generated by this
machine are extremely hot! Never aim the jet of steam
or hot water at parts of your body, and move the nozzle
with extreme caution.
If the supply cable is damaged, it must be replaced either by
the manufacturer or by his technical assistance service, or at
least by a similarly qualified person, in order to avoid any risks.
2.2 Conseils d’utilisation
• Durante l’encastrement, l’entretien ou le démontage, en-
lever la fiche de la prise de courant.
• Mettre en fonction la machine seulement lorsque l’encas-
trement aura été achevé, de sorte de ne pas être en con-
tact avec des éléments électriques.
• Il est à conseiller d’installer un robinet (en cas de raccor-
dement de la machine au réseau hydrique) en amont de
l’électrovalve de l’entrée de l’eau, qui puisse se fermer, en
cas d’un longue période d’inactivité, lors de l’entretien ou
du débranchement de la machine.
• Si può tenere la macchina sempre accesa (almeno il gruppo caffè),
• La machine peut être laissée allumée (au moins le groupe café)
car après un délai préétabli (qui peut être modifié en entrant dans
la programmation et en changeant les paramètres mis au point
en usine) à partir de la dernière extraction de café ou de vapeur/
eau chaude, un dispositif électronique placera automatiquement
la machine en VEILLEUSE, puis l’ETEINDRA AUTOMATIQUE-
MENT dans une deuxième phase.
Pour rallumer la machine, appuyez sur la touche expresso ou
café long pour n’activer que la chaudière café ou sur la touche
“vapeur” pour activer la chaudière de la vapeur/eau chaude en
plus de celle du café.
• La machine est équipée d’un petit, mais puissant, microproces-
seur avec lequel on peut communiquer à travers le clavier et le
visuel. Toutes les informations nécessaires pour faire un bon
café ou un bon cappuccino y sont déjà mémorisées.
ATTENTION! La machine produit de la vapeur et de l’eau
chaude à haute température! Ne dirigez jamais le jet de
vapeur ou d’eau chaude vers des parties du corps,
manipulez la buse avec prudence.
Si le cordon d’alimentation est endommagé, celui-ci doit être
remplacé par le fabricant ou son service après-vente et de tou-
tes façons par une personne ayant des qualifications similai-
res afin de prévenir tout risque.
2.2 Benutzungshinweise
• Während des Einbaus, der Wartung und des Abbaus muss
der Stecker aus der Steckdose entfernt werden.
• Um jeden Kontakt mit elektrischen Teilen zu vermeiden,
sollte die Maschine nur in Betrieb genommen werden, nach-
dem sie eingebaut worden ist.
• Im Fall eines Anschlusses an eine Wasserleitung ist es zu
empfehlen, einen Wasserhahn vor dem elektrischen
Einlassventil der Maschine anzubringen und diesen bei
längerer Nichtbenutzung, während der Wartung oder zum
Abbau der Maschine zu schließen.
•Sie können die Maschine immer eingeschaltet lassen (zumindest den
Kaffeeteil), denn sobald ein bestimmter, vorgewählter Zeitraum (die-
ser kann variiert werden indem man das Programmierprogramm ak-
tiviert und dann die vom Hersteller eingestellten Parameter verändert)
seit der letzten Kaffeeherstellung oder Entnahme von Dampf oder
Heißwasser verstrichen ist, schaltet die Maschine automatisch auf
Stand-By; noch später schaltet die Maschine automatisch ab. Falls
Sie die Maschine wieder anschalten wollen, drücken Sie die Tasten
Espresso Kaffee oder Verlängerter Kaffee, um den Kaffeebereich zu
aktivieren, oder die Taste Dampf um gemeinsam mit dem Kaffee-
bereich auch die Dampf-/Heißwasserproduktion in Betrieb zu setzen.
• Die Maschine verfügt über einen kleinen aber sehr leistungsstarken
Mikroprozessor, mit dem man über die Tastatur und die Displayanzeige
kommunizieren kann. Der Computer verfügt bereits über das nötige
Wissen, um einen guten Kaffee und einen guten Cappuccino
produzieren zu können.
Vorsicht! Die Maschine produziert sehr heißen Dampf und
sehr heißes Wasser! Richten Sie niemals den Dampf-
oder Wasserstrahl auf einen Körperteil. Benutzen Sie den
Hahn mit Vorsicht.
Falls das Stromkabel beschädigt ist, muss dieses vom Hersteller
oder von einem autorisierten technischen Servicezentrum oder
aber von einer qualifizierten Person ersetzt werden, um jegliches
Risiko auszuschließen.
2 - MISES EN GARDE ET CONSEILS
F
La pagina sta caricando ...

12
Evitare di apportare modifiche tecniche o
manomissioni di alcun genere; questo può costituire
fonte di rischio pertanto la casa costruttrice non si
assume nessuna responsabilità a riguardo.
• La manutenzione deve essere effettuata a macchina
fredda, dopo aver staccato la spina dalla presa di rete.
•L’impianto elettrico deve avere un efficiente collegamento
di terra come previsto dalle norme Europee (EN) per
garantire la sicurezza elettrica della macchina. La casa
costruttrice non può essere ritenuta responsabile
di danni causati dalla mancanza o interruzione del
conduttore di messa a terra.
• Nel caso in cui si verificassero forti sbalzi di tensione
dovuti a temporali con scariche atmosferiche è
consigliabile spegnere la macchina dall’interruttore ge-
nerale e scollegarla dalla presa di corrente.
All’interno della macchina, nella parte posteriore, è presente un
portafusibile contenente il fusibile di alimentazione (FUSE 6,3x32
10A) che nel caso in cui venisse danneggiato deve essere sosituito
solo da personale qualificato o presso un centro di assistenza
autorizzato.
2- AVVERTENZE PER LA
SICUREZZAE CONSIGLI
I
2- SAFETY WARNINGS AND ADVICE
GB
Do not make any technical modifications or tamper with
the machine; this can cause high risk therefore the
manufacturer is not responsible in this respect.
• Maintenance must be carried out with the machine cold,
after disconnecting the plug from the mains outlet.
• The electrical system must have an efficient earth
connection as required by European regulations (EN)
to guarantee the machine’s electrical safety.
The manufacturer cannot be held responsible for
damage caused by the lack of an earth wire or its
interruption.
• Should there be any sudden changes in voltage due to
lightening storms, we advise you to switch off the
machine at the main switch and take the plug out of the
mains socket.
Inside the machine, in the back side, there is a fuse holder containing
the feeding fuse (6,3x32 10A FUSE) that in case of damage must
be replaced only by qualified personnel or by an authorised
technical assistance centre
.
BER-300
2
La pagina sta caricando ...

14
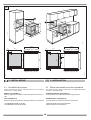
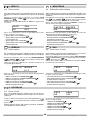
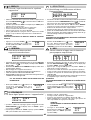
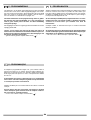
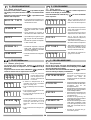
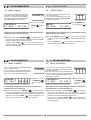
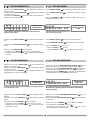
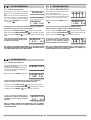
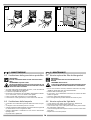
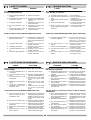
3.1 Possibilità di incasso
Questa macchina per caffè è adatta per l’incasso in un mobile a
colonna (1) o sottopensile (2).
MOBILE A COLONNA (1)
Dimensioni di ingombro per l’installazione della macchina all’interno di un mobile a co-
lonna.
SOTTO PENSILE (2)
Dimensioni di ingombro per l’installazione della macchina all’interno di un sottopensile.
Profondità minima senza allaccio rete idrica
* Profondità minima con allaccio alla rete idrica
3 - INSTALLAZIONE
I
3 - INSTALLATION
GB
3.1 Where the machine can be assembled
This coffee machine can be used to fit into an upright cupboard (1)
or inside a wall cupboard (2).
STANDING UPRIGHT CUPBOARD (1)
The overall dimensions to install the machine inside an upright cupboard.
HANGING WALL CUPBOARD (2)
The overall dimensions to install the machine inside a wall cupboard.
Minimum depth without water network attachment
* Minimum depth water network attachment
3
563
538
450
310
595
20
≥ 315-335*
563
434
BER-012
1
310
595
563
538
450
20
≥ 315-335*
563
434
2
BER-022
BER-016
BER-014
19
419
12
434
20 310
≥ 315
19
419
12
434
20 310
≥ 335
25
La pagina sta caricando ...

16
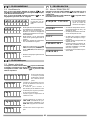
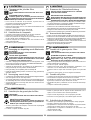
IMPORTANTE!
Il mobile in cui installare la macchina deve essere
saldamente ancorato al muro o fissato agli altri
mobili e di robustezza tale da sostenere il peso della
macchina.
6mm
36mm
11
1
2
2
BER-061
BER-051EPS
A
BER-120EPS
BER-130EPS
A
B
A
B
A
V
BER-081
A
B
A
B
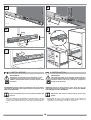
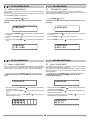
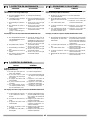
ATTENZIONE! Attenersi alle misure indicate solo per le dimen-
sioni interne del mobile come rappresentate al paragrafo “POS-
SIBILITÀ DI INCASSO”.
• Afferrare saldamente l’elettrodomestico dal lato destro e sinistro,
e inserire la guida B nella guida A; spingere l’elettrodomestico
completamente all’interno del suo vano, fino alla battuta di arre-
sto.
Questa operazione deve essere eseguita da almeno due
persone.
3 - INSTALLAZIONE
I
4
7
8
6
5
IMPORTANT!
The cupboard which is to hold the machine must be
firmly fastened to the wall or to other pieces of kitchen
furniture and must be strong enough to support the
weight of the machine.
WARNING! Follow the measurements given above only for the
internal dimensions of the cupboard as shown in paragraph “WHERE
THE MACHINE CAN BE ASSEMBLED”.
• Firmly hold the front of the machine facing you and place the
wheel R into the guide-run of part B; push the machine inside the
cupboard as far as it will go so that it is hooked on.
Operations that must be carried out by at least two
people.
3 - INSTALLATION
GB
La pagina sta caricando ...

18
FM05038 -140
BER-100
3 - INSTALLAZIONE
I
ATTENZIONE! PERICOLO DI RIBALTAMENTO!
Può avvenire nel caso in cui l’elettrodomestico non è corret-
tamente installato o se il mobile non è correttamente fissato;
inoltre se la macchina è al di fuori del suo alloggio e sospesa
sulle guide di scorrimento NON appoggiarsi, aggrapparsi e
posizionarci sopra oggetti.
IMPORTANTE! Una volta eseguite le normali operazioni di ri-
parazione o manutenzione, inserire sempre la macchina al-
l’interno del mobile.
Il mancato rispetto di queste norme potrebbe causare danni a
persone e all’elettrodomestico stesso, nonchè essere fonte
di pericolo per i bambini e gli utenti.
La ditta costruttrice non risponde di alcun danno causato da una
errata installazione delle guide all’utente installatore e alla mac-
china.
• Accertarsi della stabilità della macchina all’interno del mobile.
• Collegare la spina alla presa di rete dotata di contatto di terra.
AVVERTENZE!
INPORTANTE! L’apparecchio deve essere installato in
modo che le spina sia accessibile.
Non utilizzare in alcun caso prolunghe, riduttori o spine
triple; questi non garantiscono la sicurezza della mac-
china (ad esempio possono provocare surriscalda-
mento etc.)
3 - INSTALLATION
GB
9
WARNING! DANGER OF OVERTURNING!
This could happen if the appliance is not installed correctly or
if the cupboard has not been fastened correctly; in addition, if
the machine is outside the cupboard and is hanging on the
guide-runs YOU MUST NEVER lean on it, catch hold of it or
place objects on top of it.
IMPORTANT! Once routine repair or maintenance operations
have been carried out, always replace the machine inside the
cupboard.
Failure to follow these instructions could result in damage to
people or to the machine itself, and could prove dangerous
for children and users.
The manufacturer shall not be held responsible for any damage to
the user and/or installer or to the machine due to incorrect
installation of the guide-runs.
• Make sure the machine is stable inside the cupboard.
•
Connect the plug to a mains outlet provided with earth contact.
CAUTION!
IMPORTANT! The device must be installed in such a
way as to make the plug reachable.
Never use extension leads, reducers or triple plugs; these
do not guarantee machine safety (e.g. they can cause
overheating, etc.)
La pagina sta caricando ...

20
6
SG-210
SG-260
SG-275
B
F
SG-280
B
G
G
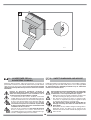
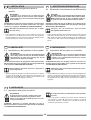
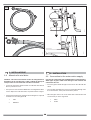
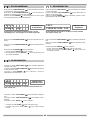
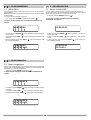
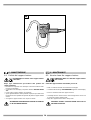
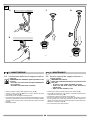
3.3 Allaccio alla rete idrica
Utilizzare solo ed esclusivamente il tubo di collegamento in
dotazione con la macchina per il caffè. L’utilizzo di altri tipi di
tubi possono causare danni alla macchina e all’utente.
• Inserire la guarnizione all’interno del raccordo del tubo dal lato
dove è presente la curva.
•Fare passare il bocchettone B del tubo di collegamento idrico
sul foro F presente sulla macchina, nel punto indicato in figura.
•Portate il bocchettone fino all’elettrovalvola di ingresso acqua ed
avvitatelo con forza alla ghiera G.
1Curva
2 Guarnizione
3 - INSTALLAZIONE
I
3 - INSTALLATION
GB
B
10
3.3 Connection to the water mains supply
Use only the connection pipe supplied with the coffee machine.
Other types of pipes could cause damage to the machine and
could harm the user.
• Insert the gasket inside the pipe connection on the side with the
elbow.
•Pass the pipe union B of the water connection pipe through hole
F on the machine, at the point shown in the picture.
•Move the pipe union as far as the water inlet solenoid valve and
screw it firmly on to the ring nut G.
1 Elbow
2 Gasket
1
2
2
La pagina sta caricando ...

22
G
R
O
S
S
O
F
I
N
E
BER-146
12
11
4 - USO
I
LA MACCHINA DEVE ESSERE UTILIZZATA SOLO DA ADULTI
O PERSONE PREVENTIVAMENTE ISTRUITE AL SUO IMPIEGO.
Una volta installata la macchina e collegata la spina alla presa di
corrente, accendere l’interruttore generale luminoso 12 (posto al-
l’interno della macchina); il microprocessore farà un self-check di
controllo delle parti elettriche e meccaniche visualizzando sul display
“AUTODIAGNOSI” poi mettendo la macchina in una posizione di
stand-by. Questa operazione è ripetuta ogni volta che sarà chiuso lo
sportello superiore.
Durante il corso di utilizzo lasciare sempre l’interruttore generale
luminoso acceso.
4.1 Accensione della macchina
Premere il tasto ACQUA CALDA ( ) o VAPORE ( ) per ac-
cendere la macchina; sotto la dicitura CAFFÈ e VAPORE compari-
rà ON (indica che è in corso il riscaldamento della caldaia caffè e
della caldaia del vapore/acqua calda).
N.B: A riscaldamento ultimato di ogni caldaia, sotto la dicitura CAF-
FÈ, ACQUA o VAPORE, comparirà la scritta PRONTO (verranno
emessi rispettivamente un segnale acustico e due segnali acustici).
4 - USE
GB
THE MACHINE MUST ONLY BE USED BY ADULTS OR PERSONS
TRAINED IN ITS USE.
When the machine has been installed and the plug has been inserted
into the mains socket, switch on the main light switch 12 (inside the
machine);
the microprocessor will carry out a self-check of the ele-
ctrical and mechanical parts and first the message “SELFTEST” will
appear on the display after which the machine will be placed in stand-
by.
This operation will be repeated each time the side door or the
upper cover are removed.
During use, always leave the luminous main switch on.
4.1 Turning on the machine
Press the button HOT WATER ( )or STEAM ( ) to turn the
machine on; ON will appear under the wording COFFEE and STEAM
indicating that the coffee boiler and the steam/hot water boiler are
working.
N.B: On final heating of the boiler, READY will appear underneath
COFFEE, WATER or STEAM, (a single acoustic and two acoustic
signals will be emitted respectively).
La pagina sta caricando ...

24
4 - USO
I
4 - USE
GB
1
SG-025
2 3
4
5
6
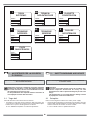
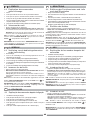
4.2 Spiegazione dei comandi dopo l’accensione
1 Visualizzatore messaggi (display).
2Tasto per fermare una funzione in corso e per spegnere la macchina.
3Tasto per caffè espresso; accende la macchina (solo caldaia caffè).
4Tasto per caffè (lungo); accende la macchina (solo caldaia caffè).
5Tasto acqua calda (accende la macchina attivando sia caldaia caffè sia caldaia va-
pore).
6Tasto vapore; accende la macchina (caldaia caffè e caldaia vapore).
4.3 Introdurre il caffè
• Estrarre la macchina dal suo alloggio.
• Introdurre solo ed esclusivamente caffè in grani nella cam-
pana caffè visibile sulla parte superiore della macchina.
Attenzione! Non versare liquidi o chicchi pretrattati con cara-
mello, zucchero o simili; lo zucchero danneggia la macchina.
N.B.: Quando il caffè nella campana è esaurito, il display visualizzerà
“ERRORE MACININO”, quindi premere il tasto STOP
( )
e intro-
durre il caffè.
IMPORTANTE! Nel caso in cui il display visualizzi “ERRORE MA-
CININO” anche se nella campana è presente del caffè, vedere ca-
pitolo “DIFETTI E RIMEDI”.
SG-038
1312
4.2 Explanation of controls after turning on
1Message display.
2Key to stop a function in progress and to turn off the machine.
3Key for espresso coffee; turns the machine on (coffee heater only).
4Key for large coffee; turns the machine on (coffee heater only).
5 Hot water key (this switches on the machine and starts both the coffee heater and
the steam heater).
6 Steam key; turns the machine on (coffee heater and steam boiler).
4.3
Add coffee and empty the grounds drawer
• Remove the machine from its housing.
• Only put coffee in grains in the coffee bell visible on top of the
machine.
Important! Do not pour in liquids or coffee beans pre-treated
with caramel, sugar or other similar substances: the sugar will
damage the machine.
N.B.: When the coffee grinder bell is empty, the message “COFFEE
GRINDER ERROR” will appear on the display. Press the STOP
( )
key and refill with coffee.
IMPORTANT! If the message “COFFEE GRINDER ERROR”
appears, even though there is still some coffee in the grinder bell,
please refer to chapter entitled “PROBLEMS AND SOLUTIONS”.
La pagina sta caricando ...

26
SG-105
7
2
SAE2012-040
14 15
2
1
4.4 Svuotare il cassetto fondi caffè
Ogni 25 caffè il display visualizza “SVUOTARE FONDI”, quindi sarà
necessario scaricare il cassetto fondi caffè 7.
Si consiglia di pulire eventuali residui di caffè all’interno della mac-
china (che potrebbero rimanere sullo scivolo dei fondi caffè - vedere
paragrafo “Pulizia interna”) utilizzando il pennello 2 in dotazione.
QUANDO COMPARE IL MESSAGGIO RESETTARE LA MEMORIA
PREMENDO IL TASTO STOP ( ).
• Estrarre il cassetto fondi, svuotarlo e reinserirlo nel suo alloggio.
Attenzione! Il mancato svuotamento del cassetto fondi può
causare gravi danni alla macchina
4 - USO
I
4 - USE
GB
4.4 How to empty the coffee grounds container
After 25 coffees, the message “EMPTY COFFEE GROUNDS” appears
on the display, so that the coffee ground drawer 7 will have to be emptied.
We advise you to use the brush 2 supplied with your machine in order
to remove any coffee grounds from inside the machine (coffee grounds
could remain on the slide - see paragraph “HOW TO CLEAN INSIDE
THE MACHINE”).
WHEN THE MESSAGE APPEARS, RESET THE MEMORY BY
PRESSING THE STOP KEY
( ).
• Remove the coffee grounds drawer, empty it and reinsert it into
position.
Warning! Failure to empty the drawer regularly could
seriously damage the machine.
La pagina sta caricando ...

28
4 - USO
I
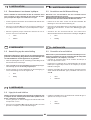
4.5 Introdurre l’acqua
Può avvenire in due modi:
da contenitore o dalla rete idrica.
Da contenitore:
• Estrarre la macchina dal suo alloggio.
• Controllare che l’interruttore 14 per la selezione della fonte idrica
sia posizionato sul simbolo del contenitore.
• Scollegare il tubicino del tappo T tirandolo verso l’alto.
• Estrarre il contenitore 15 e svitare il tappo T.
• Riempire il contenitore con acqua fresca potabile e riavvitare il
tappo.
• Reinserire il contenitore nel suo alloggio.
• Ricollegare il tubicino al tappo T premendo fino in fondo.
• Reinserire la macchina nel suo alloggio.
NB: è normale che nel contenitore rimanga una certa quantità d’ac-
qua, anche se la macchina segnala la sua mancanza.
Da rete idrica:
• Estrarre la macchina dal suo alloggio.
• Controllare che l’interruttore 14 per la selezione della fonte idrica
sia posizionato sul simbolo del rubinetto (in caso di installazione
di un rubinetto a monte dell’elettrovalvola di ingresso acqua 16,
accertarsi che questo sia aperto).
• Reinserire la macchina nel suo alloggio.
NB: è normale che nel contenitore rimanga una certa quantità d’ac-
qua, anche se la macchina segnala la sua mancanza.
G
R
O
S
S
O
F
I
N
E
BER-146
15
T
14
G
R
O
S
S
O
F
I
N
E
BER-146
14
16
4 - USE
GB
16 17
4.5 Adding water
This can be done in two different ways: either from the container
or from the water mains supply.
From the container:
• Remove the machine from its housing.
• Check that switch 15 to select the water source is pointing to the
container symbol.
• Pull the little tube of cap T upwards in order to disconnect it.
• Remove container 16 and unscrew cap T.
• Fill the container with fresh drinking water and screw the cap back
on.
• Replace the container into position.
• Reconnect the little tube to cap T and push it down as far as it will go.
• Replace the machine into position.
NB: a certain amount of water will always remain in the container
even when the message appears to say that the container is empty.
From the water mains supply:
• Remove the machine from its housing.
• Check that the switch 15 to select the water source is pointing to
the tap symbol (if a tap has been installed above the water inlet
solenoid valve 17, make sure this is open).
• Replace the machine into position.
NB: a certain amount of water will always remain in the container
even when the message appears to say that the container is empty.
La pagina sta caricando ...

30
4 - USO
I
4 - USE
GB
DOPO AVER INSERITO IL CONTENITORE DEL-
L’ACQUA OCCORRE RIEMPIRE IL CIRCUITO
IDRICO:
CAFFÈ ACQUA
PRONTO PRONTO
girare la manopola acqua calda (14) fino a fare fuoriuscire acqua
dal cappuccinatore (8) con una certa continuità, poi riportare la
manopola in posizione iniziale.
• accendiamo la macchina premendo il tasto “acqua
calda”;
• appena il display visualizzerà:
N.B.: quando l’acqua nel contenitore è esaurita, il display visualiz-
zerà “MANCA ACQUA” (è normale che nel contenitore rimanga una
certa quantità d’acqua).
4
SG-065
18
AFTER FITTING THE WATER BOTTLE, FILL THE
WATER CIRCUIT:
COFFEE WATER
READY READY
turn the hot water knob (14) until water flows steadily out of the
cappuccino maker (8), then turn the knob back to its original
position.
• press the “HOT WATER” key to switch on the machine;
• as soon as the display shows:
N.B.: when the water container is empty, the message “WATER TANK
EMPTY” will appear on the display (even though a certain amount
of water still remains).
8
La pagina sta caricando ...

32
SG-302
10
19
4.6 Fare il caffè
N.B.: il display visualizzerà quando manca il CAFFÈ (per caricare il caffè fare rif. al par.
4.3) o ACQUA (per caricare l’acqua facciamo riferimento al par. 4.6)
Accendere la caldaia caffè premendo il tasto CAFFÈ ESPRESSO ( )
o LUNGO (
), sul display sotto la voce “CAFFÈ” apparirà la scritta
“ON”
Attendere che al posto di “ON” compaia la scritta “PRONTO” (verrà emes-
so un segnale acustico).
CAFFÈ ACQUA
O N O F F
Posizionare una o due tazzine sulla griglia 10 della vaschetta rac-
cogli gocce e premere il tasto:
• Premere 1 VOLTA per avere un CAFFÈ ESPRESSO ( ).
• Premere 2 VOLTE per avere un DOPPIO CAFFÈ ESPRESSO ( ).
La macchina visualizzerà sul display “X2”.
• Premere 1 VOLTA per avere un CAFFÈ LUNGO ( ).
• Premere 2 VOLTE per avere un DOPPIO CAFFÈ LUNGO ( ).
La macchina visualizzerà sul display “X2”.
4 - USO
I
4 - USE
GB
4.6 Making coffee
N.B.: the display will tell you when the machine has no coffee (in order to fill the machine
with coffee, please refer to paragr. 4.3) or WATER (in order to add water, please refer to
paragr. 4.6).
Switch the coffee boiler on by pressing the EXPRESS COFFEE
key (
) or LONG ( ), on the display under “COFFEE” - “ON”
will appear
Wait until “READY” appears in place of “ON” (an acoustic signal
will be emitted).
C A F FE E W A T E R
O N O F F
Place one or two cups on the drip tray grid 10 and press the key:
• Press ONCE for an ESPRESSO COFFEE ( ).
• Press TWICE for a double ESPRESSO COFFEE ( ).
The message “X2” will appear on the display.
• Press ONCE for a LARGE COFFEE ( ).
• Press TWICE for a double LARGE COFFEE ( ).
The message “X2” will appear on the display.
La pagina sta caricando ...

34
G
R
O
S
S
O
F
I
N
E
13
CB23301-060
CB23301-050
G
R
O
S
S
O
F
I
N
E
13
G
R
O
S
S
O
F
I
N
E
BER-146
13
SG-302
10
20 21
23
22
BE2001-060
BE2001-050
BE2001-040
4 - USO
I
L’erogazione è programmata in fabbrica ma se vogliamo arre-
starla in anticipo premiamo il tasto STOP (
).
NB: Se si sta eseguendo un doppio caffè e subito dopo l’erogazione
del primo manca l’acqua (il display visualizzerà “MANCA ACQUA”)
occorre riempire il contenitore e ultimare sempre l’erogazione del
secondo caffè, premendo lo stesso tasto.
4.7 Consigli utili per fare il caffè
Per fare dei buoni caffè teniamo conto dei seguenti fattori:
• Utilizzare un caffè in grani di buona qualità.
• Regolare il macinino (già impostato in fabbrica) in modo che du-
rante l’infusione il caffè scenda nella tazza non a gocce, ma ne-
anche troppo rapidamente.
• Se il caffè è poco cremoso e chiaro, la macinatura è troppo gros-
sa o la temperatura troppo bassa.
In questo caso la macinatura dovrà essere più fine, ruotare quindi la manopola 13.
• Se il caffè è troppo nero e di gusto “bruciato” la macinatura è
troppo fine o la temperatura troppo alta.
In questo caso la macinatura dovrà essere più grossa, ruotare quindi la mano pola 13.
4 - USE
GB
Pouring is factory set; to stop it press STOP ( ).
N.B: If you are making two coffees and straight after the first
there is insufficient water (INSUFFICIENT WATER will be
displayed). Fill the container and always finish making the
second coffee, by pressing the same key.
4.7 Useful advice on how to make coffee
To make good cups of coffee, bear in mind the following:
• use a good quality coffee grind;
• adjust the machine so that the coffee pours into the cup smoothly;
not in drops and not too fast.
• If the coffee is not creamy enough or is too light, grinding is too
coarse or the temperature is too low.
In this case grinding must be coarser, therefore turn the knob 13.
• If the coffee is too black or has a “burnt” taste, grinding is too fine
or the temperature too high.
In this case grinding must be finer, therefore turn the knob 13.
N.B.: se la manopola 13 arriva a fine corsa, non la si
deve forzare.
N.B.: if knob 13 has been turned as far as it will go, do
not force it any further.
La pagina sta caricando ...

36
SG-380
F
C
SG-390
C
24
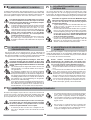
4.8 Apertura superiore
L’apertura della parte superiore è necessaria per compiere la varia-
zione del dosaggio del caffè, oltre che alla manutenzione interna
della macchina stessa.
ATTENZIONE! Superfici calde.
Alcune parti della macchina, possono trovarsi ad una tempe-
ratura molto alta e provocare ustioni! Accertarsi che la mac-
china sia fredda.
Per accedere alla parte interna
• Estrarre la macchina dal suo alloggio.
• Agire sul foro F per aprire verso l’alto il coperchio superiore C.
4 - USO
I
4 - USE
GB
4.8 How to open the top of the machine
The top of the machine has to be opened in order to carry out any
maintenance inside the machine itself.
WARNING! Hot surfaces.
Some parts of the machine become extremely hot and can burn!
Make sure the machine has cooled down.
In order to gain access inside the machine:
• Remove the machine from its housing.
• Use hole F to open the upper lid C upwards.
I tecnici, prima dell’imballaggio della macchina, eseguono
ripetute prova di infusione, regolando la macchina in ma-
niera standard e con una dose di caffè macinato di 7 gr.
circa, tale da ottenere un buon caffè.
4.9 Variazione del dosaggio del caffè
Se si vuole variare la quantità di caffè macinato è indispensa-
bile rivolgersi ad un centro di assistenza autorizzato.
Before packaging the machine, technicians carry out
repeated tests with water and adjust the machine to a
standard measure of 7 gr. coffee to give a good cup of coffee.
4.9 How to vary the amount of coffee
If you wish to change the amount of coffee, please contact an
authorised assistance centre.
La pagina sta caricando ...

38
8
B
b1
b2
4
SG-040
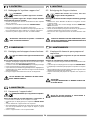
25
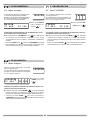
Utilizzare una tazza o un bricco in acciaio.
I
Use a cup or a steel jug.
GB
Utilisez une tasse ou un récipient en acier.
F
Benutzen Sie eine Tasse oder ein Edelstahlkännchen.
D
Gebruik een beker of een stalen kan.
NL
Utilicen una taza o una jarra de acero.
E
Utilizar uma taça ou uma leiteira em aço.
P
8
SG-150
B
b1
b2
• Accendere la caldaia del vapore/acqua calda premendo il tasto
VAPORE (
), sul display sotto la voce “VAPORE”, comparirà
la scritta “ON”.
CAFFÈ VAPORE
PRONTO ON
ATTENZIONE! L’uso del cappuccinatore, per fare il cappucci-
no, deve avvenire solo con la funzione “VAPORE” visualizzata
sul display.
4.10 Fare il cappuccino con il cappuccinatore
4 - USO
I
CAFFÈ VAPORE
PRONTO OFF
• Attendere che al posto di “ON” compaia la scritta “PRONTO” (sa-
ranno emessi due segnali acustici).
• Collegare il tubicino B all’attacco b1 del cappuccinatore 8 come in
figura.
• Inserire il tubicino B all’interno della confezione del latte fino a toc-
care il fondo.
• Posizionare la tazza o un bricco in acciaio sotto il becco b2 del
cappuccinatore.
ATTENZIONE! RIPOSIZIONARE SEMPRE LA MANOPOLA IN
POSIZIONE INIZIALE.
• Porre la tazza di latte sotto l’erogatore del caffè e fare un il caffè
espresso o lungo come descritto al paragrafo
“FARE IL CAFFÈ”.
• Premere il tasto STOP ( ) se si desidera
spegnere la caldaia vapore/acqua calda (sot-
to la voce “VAPORE” apparirà la scritta
“OFF”).
ATTENZIONE!
Pulire sempre il cappuccinatore 8 come descritto nel par. “PULIZIA
CAPPUCCINATORE”.
• Girare gradualmente la manopola 4 del vapore, insieme al riscalda-
mento del latte si produrrà anche tanta schiuma.
• Usare lo spinotto del cappuccinatore se si vuole variare il grado di
schiuma.
La pagina sta caricando ...
La pagina sta caricando ...
La pagina sta caricando ...
La pagina sta caricando ...
La pagina sta caricando ...
La pagina sta caricando ...
La pagina sta caricando ...
La pagina sta caricando ...
La pagina sta caricando ...
La pagina sta caricando ...
La pagina sta caricando ...
La pagina sta caricando ...
La pagina sta caricando ...
La pagina sta caricando ...
La pagina sta caricando ...
La pagina sta caricando ...
La pagina sta caricando ...
La pagina sta caricando ...
La pagina sta caricando ...
La pagina sta caricando ...
La pagina sta caricando ...
La pagina sta caricando ...
La pagina sta caricando ...
La pagina sta caricando ...
La pagina sta caricando ...
La pagina sta caricando ...
La pagina sta caricando ...
La pagina sta caricando ...
La pagina sta caricando ...
La pagina sta caricando ...
La pagina sta caricando ...
La pagina sta caricando ...
La pagina sta caricando ...
La pagina sta caricando ...
La pagina sta caricando ...
La pagina sta caricando ...
La pagina sta caricando ...
La pagina sta caricando ...
La pagina sta caricando ...
La pagina sta caricando ...
La pagina sta caricando ...
La pagina sta caricando ...
La pagina sta caricando ...
La pagina sta caricando ...
La pagina sta caricando ...
La pagina sta caricando ...
La pagina sta caricando ...
La pagina sta caricando ...
La pagina sta caricando ...
La pagina sta caricando ...
La pagina sta caricando ...
La pagina sta caricando ...
La pagina sta caricando ...
La pagina sta caricando ...
La pagina sta caricando ...
La pagina sta caricando ...
La pagina sta caricando ...
La pagina sta caricando ...
La pagina sta caricando ...
La pagina sta caricando ...
La pagina sta caricando ...
La pagina sta caricando ...
La pagina sta caricando ...
La pagina sta caricando ...
-
 1
1
-
 2
2
-
 3
3
-
 4
4
-
 5
5
-
 6
6
-
 7
7
-
 8
8
-
 9
9
-
 10
10
-
 11
11
-
 12
12
-
 13
13
-
 14
14
-
 15
15
-
 16
16
-
 17
17
-
 18
18
-
 19
19
-
 20
20
-
 21
21
-
 22
22
-
 23
23
-
 24
24
-
 25
25
-
 26
26
-
 27
27
-
 28
28
-
 29
29
-
 30
30
-
 31
31
-
 32
32
-
 33
33
-
 34
34
-
 35
35
-
 36
36
-
 37
37
-
 38
38
-
 39
39
-
 40
40
-
 41
41
-
 42
42
-
 43
43
-
 44
44
-
 45
45
-
 46
46
-
 47
47
-
 48
48
-
 49
49
-
 50
50
-
 51
51
-
 52
52
-
 53
53
-
 54
54
-
 55
55
-
 56
56
-
 57
57
-
 58
58
-
 59
59
-
 60
60
-
 61
61
-
 62
62
-
 63
63
-
 64
64
-
 65
65
-
 66
66
-
 67
67
-
 68
68
-
 69
69
-
 70
70
-
 71
71
-
 72
72
-
 73
73
-
 74
74
-
 75
75
-
 76
76
-
 77
77
-
 78
78
-
 79
79
-
 80
80
-
 81
81
-
 82
82
-
 83
83
-
 84
84
-
 85
85
-
 86
86
-
 87
87
-
 88
88
-
 89
89
-
 90
90
-
 91
91
-
 92
92
-
 93
93
-
 94
94
-
 95
95
-
 96
96
-
 97
97
-
 98
98
-
 99
99
-
 100
100
-
 101
101


Mamiya SCM1 Manuale utente
- Categoria
- Macchine da caffè
- Tipo
- Manuale utente
in altre lingue
- English: Mamiya SCM1 User manual
- français: Mamiya SCM1 Manuel utilisateur
- español: Mamiya SCM1 Manual de usuario
- Deutsch: Mamiya SCM1 Benutzerhandbuch
- Nederlands: Mamiya SCM1 Handleiding
- português: Mamiya SCM1 Manual do usuário
Altri documenti
-
Smeg SCM1 Manuale utente
-
Polti ESPRESSO SUPER AUTOMATIC Aroma Manuale del proprietario
-
Whirlpool 20RI-D4 ESPRESSO Program Chart
-
Candy AC SIST FILT Manuale utente
-
Bezzera BZ16 Manuale utente
-
-
Saeco SIN 007 Operating Instructions Manual
-
Philips Xsmall Steam E.S. Manuale del proprietario
-
Rancilio EPOCA E-S-S-Tank Use And Maintenance
-
Princess 01 242154 01 001 Manuale del proprietario