Indesit F093973 Manuale utente
- Categoria
- Cappe da cucina
- Tipo
- Manuale utente
Questo manuale è adatto anche per

IT
EN
FR
Italiano, 13
English, 17
Français, 21
ES
PT
DE
Español, 25
Português, 29
Deutsch, 33
NL
PL
RU
Nederlands, 37
Polski, 41
РУССКИЙ, 45
UK
CS
SK
Ucraino, 49
Český, 53
Slovenský, 57
KK
AR
Kazakh, 61
ة
ّ
يبرع, 67
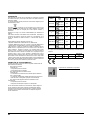
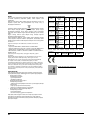
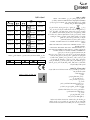
IHF 6.4 AM X
IHGC 6.4 AM X
IHGC 6.5F AM X
IHBS 9.5 AM X
IHBS 6.4 AM X
IHGC 9.5F AM X
Istruzioni per l’uso
Instructions for use
Mode d’emploi
Instrucciones de uso
Instruções de uso
Betriebsanleitung
Gebruiksaanwijzingen
Instrukcja obsugi
Návod k použití
Návod na používanie

2

3

4

5

6

7

8

9

10

11

12

Italiano
13
IT
SICUREZZA GENERALE
Prima di qualsiasi operazione di pulizia o
manutenzione, disinserire la cappa dalla rete elettrica
togliendo la spina o staccando l’interruttore generale
dell’abitazione.
Per tutte le operazioni di installazione e
manutenzione utilizzare guanti da lavoro.
L’apparecchio può essere utilizzato da bambini di età
non inferiore a 8 anni e da persone con ridotte
capacità fisiche, sensoriali o mentali, o prive di
esperienza o della necessaria conoscenza, purchè
sotto sorveglianza oppure dopo che le stesse abbiano
ricevuto istruzioni relative all’uso sicuro
dell’apparecchio e alla comprensione dei pericoli ad
esso inerenti.
I bambini devono essere controllati affinché non
giochino con l’apparecchio.
La pulizia e la manutenzione non deve essere
effettuata da bambini senza sorveglianza.
Il locale deve disporre di sufficiente ventilazione,
quando la cappa da cucina viene utilizzata
contemporaneamente ad altri apparecchi a
combustione di gas o altri combustibili.
La cappa va frequentemente pulita sia internamente
che esternamente (ALMENO UNA VOLTA AL
MESE), rispettare comunque quanto espressamente
indicato nelle istruzioni di manutenzione riportate in
questo manuale.
L’inosservanza delle norme di pulizia della cappa e
della sostituzione e pulizia dei filtri comporta rischi di
incendi.
E’ severamente vietato fare cibi alla fiamma sotto la
cappa.
L’impiego di fiamma libera è dannoso ai filtri e può
dar luogo ad incendi, pertanto deve essere evitato in
ogni caso.
La frittura deve essere fatta sotto controllo onde
evitare che l’olio surriscaldato prenda fuoco.
ATTENZIONE: Quando il piano di cottura è in
funzione le parti accessibili della cappa possono
diventare calde.
Per la sostituzione della lampada utilizzare solo il tipo
lampada indicato nella sezione manutenzione
/sostituzione lampada di questo manuale.
Attenzione! Non collegare l’apparecchio alla rete
elettrica finche l’installazione non è totalmente
completata.
Per quanto riguarda le misure tecniche e di sicurezza
da adottare per lo scarico dei fumi attenersi
strettamente a quanto previsto dai regolamenti delle
autorità locali competenti.
L’aria aspirata non deve essere convogliata in un
condotto usato per lo scarico dei fumi prodotti da
apparecchi a combustione di gas o di altri
combustibili.
Non utilizzare o lasciare la cappa priva di lampade
correttamente montate per possibile rischio di scossa
elettrica.
Mai utilizzare la cappa senza griglia correttamente
montata!
La cappa non va MAI utilizzata come piano di
appoggio a meno che non sia espressamente
indicato.
Utilizzare solo le viti di fissaggio in dotazione con il
prodotto per l'installazione o, se non in dotazione,
acquistare il tipo di viti corretto. Utilizzare la
lunghezza corretta per le viti che sono identificati
nella Guida all'installazione. In caso di dubbio,
consultare il centro di assistenza autorizzato o
personale qualificata similare.
ATTENZIONE! La mancata installazione di viti e
dispositivi di fissaggio in conformità di queste
istruzioni può comportare rischi di natura elettrica.
Si declina ogni responsabilità per eventuali
inconvenienti, danni o incendi provocati
all’apparecchio derivati dall’inosservanza delle
istruzioni riportate in questo manuale.
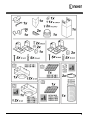
La cappa può avere estetiche differenti rispetto a quanto illustrato nei
disegni di questo libretto, comunque le istruzioni per l'uso, la
manutenzione e l'installazione rimangono le stesse.
Attenersi strettamente alle istruzioni riportate in questo manuale. Si declina
ogni responsabilità per eventuali inconvenienti, danni o incendi provocati
all'apparecchio derivati dall'inosservanza delle istruzioni riportate in questo
manuale. La cappa è concepita per l'aspirazione dei fumi e vapori della cottura
ed è destinata al solo uso domestico.
! E' importante conservare questo manuale per poterlo consultare in ogni
momento. In caso di vendita, di cessione o di trasloco, assicurarsi che resti
insieme al prodotto.
! Leggere attentamente le istruzioni: ci sono importanti informazioni
sull'installazione, sull'uso e sulla sicurezza.
! Non effettuare variazioni elettriche o meccaniche sul prodotto o sulle
condotte di scarico.
! Prima di procedere nell'installazione dell'apparecchio verificare che tutti i
componenti non siano danneggiati. In caso contrario contattare il rivenditore
e non proseguire con l'installazione.
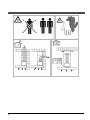
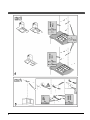
La distanza minima fra la superficie di supporto dei recipienti sul dispositivo di
cottura e la parte più bassa della cappa da cucina deve essere non inferiore a
50cm in caso di cucine elettriche e di 65cm in caso di cucine a gas o miste.
Se le istruzioni di installazione del dispositivo di cottura a gas specificano una
distanza maggiore, bisogna tenerne conto.

14
COLLEGAMENTO ELETTRICO
La tensione di rete deve corrispondere alla tensione riportata sull’etichetta
caratteristiche situata all’interno della cappa. Se provvista di spina allacciare la
cappa ad una presa conforme alle norme vigenti posta in zona accessibile anche
dopo l’installazione. Se sprovvista di spina (collegamento diretto alla rete) o la
spina non è posta in zona accessibile, anche dopo installazione, applicare un
interruttore bipolare a norma che assicuri la disconnessione completa della rete
nelle condizioni della categoria di sovratensione III, conformemente alle regole di
installazione.
Attenzione! Prima di ricollegare il circuito della cappa all’alimentazione di rete e
di verificarne il corretto funzionamento, controllare sempre che il cavo di rete sia
stato montato correttamente.
Sostituzione del cavo di alimentazione
La cappa è provvista di un cavo alimentazione speciale; in caso di
danneggiamento del cavo, richiederlo al servizio assistenza tecnica.
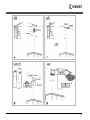
SCARICO DELL' ARIA
(per le versioni aspiranti)
Collegare la cappa a tubi e fori di scarico a parete con diametro equivalente
all'uscita d'aria (flangia di raccordo).
L'utilizzo di tubi e fori di scarico a parete con diametro inferiore determinerà una
diminuizione delle prestazioni di aspirazione ed un drastico aumento della
rumorosità.
Si declina perciò ogni responsabilità in merito.
! Usare un condotto lungo il minimo indispensabile.
! Usare un condotto con minor numero di curve possibile (angolo massimo
della curva: 90°).
! Evitare cambiamenti drastici di sezione del condotto.
! Usare un condotto con l’interno più liscio possibile.
! Il materiale del condotto deve essere approvato normativamente.
! L'azienda declina ogni responsabilità qualora queste norme non vengano
rispettate.
FILTRANTE O ASPIRANTE ?
! La vostra cappa è pronta per essere utilizzata in versione aspirante.
Per utilizzare la cappa in versione filtrante va installato l’apposito KIT
ACCESSORIO.
Verificate nelle prime pagine di questo manuale se il KIT ACCESSORIO è
già fornito a corredo o va acquistato a parte.
Nota: Se fornito a corredo, in alcuni casi, il sistema di filtraggio aggiuntivo a
base di carboni attivi potrebbe essere già installato sulla cappa.
Le informazioni per la trasformazione della cappa da versione aspirante a
versione filtrante sono già contenute in questo manuale.
Versione aspirante
I vapori vengono evacuati verso l’esterno tramite un tubo di scarico fissato alla
flangia di raccordo.
Il diametro del tubo di scarico deve essere equivalente al diametro dell'anello di
connessione.
Attenzione! Il tubo di evacuazione non è fornito e va acquistato.
Nella parte orizzontale, il tubo deve avere una leggera inclinazione verso l’alto
(10° circa) in modo da poter trasportare l’aria verso l’esterno più facilmente.
Se la cappa è provvista di filtri al carbone, questi devono essere tolti.
Versione filtrante
L’aria aspirata verrà sgrassata e deodorata prima di essere riconvogliata nella
stanza. Per utilizzare la cappa in questa versione è necessario installare un
sistema di filtraggio aggiuntivo a base di carboni attivi.

15
COMANDI
La cappa è fornita di un pannello comandi con un controllo delle velocità di
aspirazione ed un controllo di accensione della luce per l'illuminazione del piano
di cottura.
Usare la velocità maggiore in caso di particolare concentrazione di vapori di
cucina. Consigliamo di accendere l'aspirazione 5 minuti prima di iniziare a
cucinare e di lasciarla in funzione a cottura terminata per altri 15 minuti circa.
T1. Interruttore luce ON/OFF.
T2. Interruttore OFF/velocità 1
T3. Selezione velocità 2
T4. Selezione velocità 3
MANUTENZIONE
Pulizia
La cappa va frequentemente pulita (almeno con la stessa frequenza con cui si
esegue la manutenzione dei filtri grassi), sia internamente che esternamente.
Per la pulizia usare ESCLUSIVAMENTE un panno inumidito con detersivi liquidi
neutri. NON UTILIZZARE UTENSILI O STRUMENTI PER LA PULIZIA!
Evitare l’uso di prodotti contenenti abrasivi. NON UTILIZZARE ALCOOL!
Attenzione: L’inosservanza delle norme di pulizia dell’apparecchio e della
sostituzione dei filtri comporta rischi di incendi. Si raccomanda quindi di attenersi
alle istruzioni suggerite.
Si declina ogni responsabilità per eventuali danni al motore, incendi provocati da
un’impropria manutenzione o dall’inosservanza delle suddette avvertenze.
Pannello di aspirazione perimetrale
Pulire il pannello di aspirazione perimetrale con la stessa frequenza del filtro
antigrasso, usare un panno ed un detergente liquido non troppo concentrato.
Non utilizzare mai sostanze abrasive.
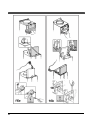
Manutenzione dei filtri antigrasso
Trattiene le particelle di grasso derivanti dalla cottura.
Deve essere pulito una volta al mese (o quando il sistema di indicazione di
saturazione dei filtri - se previsto sul modello in possesso- indica questa
necessità), con detergenti non aggressivi, manualmente oppure in lavastoviglie a
basse temperature ed a ciclo breve.
Con il lavaggio in lavastoviglie il filtro antigrasso metallico può scolorirsi ma le
sue caratteristiche di filtraggio non cambiano assolutamente.
Per smontare il filtro grassi tirare la maniglia di sgancio a molla.
Manutenzione del filtro al carbone
Trattiene gli odori sgradevoli derivanti dalla cottura.
La saturazione del filtro carbone si verifica dopo un uso più o meno prolungato a
seconda del tipo di cucina e della regolarità della pulizia del filtro grassi. In ogni
caso è necessario sostituire la cartuccia al massimo ogni quattro mesi (o quando
il sistema di indicazione di saturazione dei filtri - se previsto sul modello in
possesso- indica questa necessità).
NON può essere lavato o rigenerato
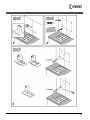
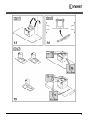
Montaggio
Agganciare il filtro ai carboni attivi prima posteriormente sulla linguetta metallica
della cappa, poi anteriormente con i due pomelli.
Smontaggio
Rimuovere il filtro ai carboni attivi girando di 90° i pomelli che lo fissano alla
cappa.
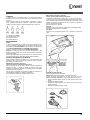
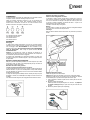
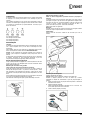
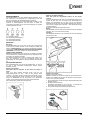
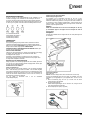
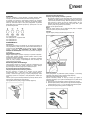
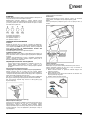
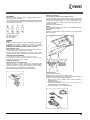
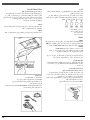
Sostituzione delle lampade
Disinserire l’apparecchio dalla rete elettrica.
Attenzione! Prima di toccare le lampade sincerarsi che siano fredde.
Sostituire la lampada danneggiata con una dello stesso tipo così come
specificato nell'etichetta caratteristica o vicino alla lampada stessa sulla cappa.
1. Estrarre la protezione facendo leva con un piccolo giravite a taglio o simile
utensile.
2. Sostituire la lampada danneggiata.
Utilizzare solo lampade alogene da 12V -20W max - G4, avendo cura di non
toccarle con le mani.
3. Richiudere la protezione (fissaggio a scatto).

16
SMALTIMENTO
Questo apparecchio è contrassegnato in conformità alla Direttiva Europea
2012/19/EC, Waste Electrical and Electronic Equipment (WEEE). Assicurandosi
che questo prodotto sia smaltito in modo corretto, l'utente contribuisce a
prevenire le potenziali conseguenze negative per l'ambiente e la salute.
Il simbolo
sul prodotto o sulla documentazione di accompagnamento
indica che questo prodotto non deve essere trattato come rifiuto domestico ma
deve essere consegnato presso l'idoneo punto di raccolta per il riciclaggio di
apparecchiature elettriche ed elettroniche. Disfarsene seguendo le normative
locali per lo smaltimento dei rifiuti. Per ulteriori informazioni sul trattamento,
recupero e riciclaggio di questo prodotto, contattare l'idoneo ufficio locale, il
servizio di raccolta dei rifiuti domestici o il negozio presso il quale il prodotto è
stato acquistato.
Apparecchiatura progettata, testata e realizzata nel rispetto delle norme sulla:
• Sicurezza: EN/IEC 60335-1; EN/IEC 60335-2-31, EN/IEC 62233.
• Prestazione: EN/IEC 61591; ISO 5167-1; ISO 5167-3; ISO 5168; EN/IEC
60704-1; EN/IEC 60704-2-13; EN/IEC 60704-3; ISO 3741; EN 50564; IEC
62301.
• EMC: EN 55014-1; CISPR 14-1; EN 55014-2; CISPR 14-2; EN/IEC 61000-3-2;
EN/IEC 61000-3-3. Suggerimenti per un corretto utilizzo al fine di ridurre
l’impatto ambientale: Quando iniziate a cucinare, accendere la cappa alla
velocità minima, lasciandola accesa per alcuni minuti anche dopo il termine della
cottura. Aumentare la velocità solo in caso di grandi quantità di fumo e vapore,
utilizzando la funzione booster solo in casi estremi. Per mantenere ben efficiente
il sistema di riduzione degli odori, sostituire, quando è necessario, il/i filtro/i
carbone. Per mantenere ben efficiente il filtro del grasso, pulirlo in caso di
necessità. Per ottimizzare l’efficienza e minimizzare i rumori, utilizzare il diametro
massimo del sistema di canalizzazione indicato in questo manuale.
ANOMALIE DI FUNZIONAMENTO
Se qualcosa non sembra funzionare, prima di chiamare il Servizio Assistenza
effettuare i seguenti semplici controlli:
• Se la cappa non funziona:
Verificare che:
- non c’è interruzione di corrente.
- è stata selezionata una velocità.
• Se la cappa ha un rendimento scarso:
Verificare che:
- La velocità motore selezionata è sufficiente per la quantità di fumo e di
vapori liberata.
- La cucina è sufficientemente areata per permettere una presa d’aria.
- Il filtro carbone non è consumato (cappa in versione filtrante).
• Se la cappa si è spenta nel corso del normale funzionamento:
Verificare che:
- non c’è interruzione di corrente.
- il dispositivo di interruzione omnipolare non è scattato.
In caso di eventuali anomalie di funzionamento, prima di rivolgerVi al servizio
assistenza scollegate per almeno 5 sec. l’apparecchio dall’alimentazione
elettrica estraendo la spina e collegatelo poi nuovamente. Nel caso in cui
l’anomalia di funzionamento dovesse perdurare, rivolgersi al servizio
d’assistenza.
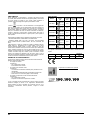
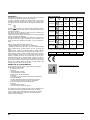
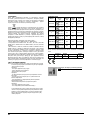
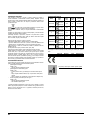
DATI TECNICI
Modello
Altezza
(cm)
Larghezza
(cm)
Profondità
(cm)
Ø del tubo
di scarico
(cm)
IHF6.4AMX
60-112,5
68,5-112,5
59,8 45 15-12,5-12
IHGC6.4AM X
60-112,5
68,5-112,5
59,8 45 15-12,5-12
IHGC6.5FAM X
60-112,5
68,5-112,5
59,8 45 15-12,5-12
IHBS9.5AM X
61,9-114
70,4-114
89,8 45 15-12,5-12
IHBS6.4AM X
61,9-114
70,4-114
59,8 45 15-12,5-12
IHGC9.5FAMX
62,3-114,8
72,7-114,8
89,8 45 15-12,5-12
Vedi targhetta caratteristiche per l'assorbimento totale e l'assorbimento della
lampada.
Potenza (W) Tensione (V) Attacco
Dimensioni
(mm)
Alogena 2 x 20W 12 G4 33xØ10
Componenti non in dotazione con il prodotto

English
17
EN
GENERAL SAFETY
Before any cleaning or maintenance operation,
disconnect hood from the mains by removing the plug
or disconnecting the mains electrical supply.
Always wear work gloves for all installation and
maintenance operations.
This appliance can be used by children aged from 8
years and above and persons with reduced physical,
sensory or mental capabilities or lack of experience
and knowledge if they have been given supervision or
instruction concerning use of the appliance in a safe
way and understand the hazards involved.
Children shall not be allowed to tamper with the
controls or play with the appliance.
Cleaning and user maintenance shall not be made by
children without supervision.
The premises where the appliance is installed must
be sufficiently ventilated, when the kitchen hood is
used together with other gas combustion devices or
other fuels.
The hood must be regularly cleaned on both the
inside and outside (AT LEAST ONCE A MONTH).
This must be completed in accordance with the
maintenance instructions provided in this manual.
Failure to follow the instructions provided in this user
guide regarding the cleaning of the hood and filters
will lead to the risk of fires.
The flaming of foods beneath the hood itself is
severely prohibited.
The use of exposed flames is detrimental to the filters
and may cause a fire risk, and must therefore be
avoided in all circumstances.
Any frying must be done with care in order to make
sure that the oil does not overheat and ignite.
CAUTION: Accessible parts of the hood may become
hot when used with cooking appliances.
For lamp replacement use only lamp type indicated in
the Maintenance/Replacing lamps section of this
manual.
WARNING! Do not connect the appliance to the
mains until the installation is fully complete.
With regards to the technical and safety measures to
be adopted for fume discharging it is important to
closely follow the regulations provided by the local
authorities.
The ducting system for this appliance must not be
connected to any existing ventilation system which is
being used for any other purpose such as discharging
exhaust fumes from appliances burning gas or other
fuels.
Do not use or leave the hood without the lamp
correctly mounted due to the possible risk of electric
shocks.
Never use the hood without effectively mounted grids.
The hood must NEVER be used as a support surface
unless specifically indicated.
Use only the fixing screws supplied with the product
for installation or, if not supplied, purchase the correct
screws type.
Use the correct length for the screws which are
identified in the Installation Guide.
In case of doubt, consult an authorised service
assistance centre or similar qualified person.
WARNING! Failure to install the screws or fixing
device in accordance with these instructions may
result in electrical hazards.
We will not accept any responsibility for any faults,
damage or fires caused to the appliance as a result of
the non-observance of the instructions included in this
manual.
The hood can look different to that illustrated in the drawings in this
booklet. The instructions for use, maintenance and installation, however,
remain the same.
Closely follow the instructions set out in this manual. All responsibility, for
any eventual inconveniences, damages or fires caused by not complying with the
instructions in this manual, is declined. The hood is conceived for the suction of
cooking fumes and steam and is destined only for domestic use.
! It is important to conserve this booklet for consultation at any moment. In
the case of sale, cession or move, make sure it is together with the product.
! Read the instructions carefully: there is important information about
installation, use and safety.
! Do not carry out electrical or mechanical variations on the product or on the
discharge conduits.
! Before proceeding with the installation of the appliance verify that there are
no damaged all components. Otherwise contact your dealer and do not
proceed with the installation.
The minimum distance between the supporting surface for the cooking
equipment on the hob and the lowest part of the range hood must be not less
than 50cm from electric cookers and 65cm from gas or mixed cookers.
If the instructions for installation for the gas hob specify a greater distance, this
must be adhered to.

18
ELECTRICAL CONNECTION
The mains power supply must correspond to the rating indicated on the plate
situated inside the hood. If provided with a plug connect the hood to a socket in
compliance with current regulations and positioned in an accessible area, after
installation. If it not fitted with a plug (direct mains connection) or if the plug is not
located in an accessible area, after installation, apply a double pole switch in
accordance with standards which assures the complete disconnection of the
mains under conditions relating to over-current category III, in accordance with
installation instructions.
Warning! Before re-connecting the hood circuit to the mains supply and
checking the efficient function, always check that the mains cable is correctly
assembled.
Replacing the power cable
The hood is provided with a special power cable ; if the cable is damaged,
request a new one from Technical Service.
AIR VENT
(for the suction versions)
Connect the hood and discharge holes on the walls with a diameter equivalent to
the air outlet (connection flange).
Using the tubes and discharge holes on walls with smaller dimensions will cause
a diminution of the suction performance and a drastic increase in noise.
Any responsibility in the matter is therefore declined.
! Use a duct of the minimum indispensible length.
! Use a duct with as few elbows as possible (maximum elbow angle: 90°).
! Avoid drastic changes in the duct cross-section.
! Use a duct as smooth as possible inside.
! The duct must be made of certified material.
! The company declines any responsibility whenever these regulations are
not respected.
FILTERING OR DUCTING ?
! Your cooker hood is ready to be used in suction version.
To use the hood in filtering version the special ACCESSORY KIT must be
installed.
Check on the first pages of this manual if the ACCESSORY KIT is furnished
or must be bought separately.
Note: If furnished, in certain cases, the additional activated carbon filtering
system may be installed on the hood.
Information about the conversion of the hood from suction version to filtering
version is present in this manual.
Ducting version
In this case the fumes are conveyed outside of the building by means of a
special pipe connected with the connection ring located on top of the hood.
Attention! The exhausting pipe is not supplied and must be purchased apart.
Diameter of the exhausting pipe must be equal to that of the connection ring.
In the horizontal runs the exhausting pipe must be slightly slanted (about 10°)
and directed upwards to vent the air easily from the room to the outside.
Attention! If the hood is supplied with active charcoal filter, then it must be
removed.
Filter version
The aspirated air will be degreased and deodorised before being fed back into
the room.
In order to use the hood in this version, you have to install a system of additional
filtering based on activated charcoal.

19
CONTROLS
The hood is fitted with a control panel with aspiration speed selection control and
a light switch to control cooking area lights.
Use the high suction speed in cases of concentrated kitchen vapours. It is
recommended that the cooker hood suction is switched on for 5 minutes prior to
cooking and to leave in operation during cooking and for another 15 minutes
approximately after terminating cooking.
T1. ON/OFF light switch
T2. Speed 1/OFF switch
T3. 2-speed selection
T4. 3-speed selection
MAINTENANCE
Cleaning
The cooker hood should be cleaned regularly (at least with the same frequency
with which you carry out maintenance of the fat filters) internally and externally.
Clean using ONLY the cloth dampened with neutral liquid detergent. DO NOT
CLEAN WITH TOOLS OR INSTRUMENTS. Do not use abrasive products. DO
NOT USE ALCOHOL!
Warning! Failure to carry out the basic cleaning recommendations of the cooker
hood and replacement of the filters may cause fire risks.
Therefore, we recommend observing these instructions.
The manufacturer declines all responsibility for any damage to the motor or any
fire damage linked to inappropriate maintenance or failure to observe the above
safety recommendations.
Perimeter aspiration panel
Clean the perimeter aspiration panel with the same frequency as the ant-fats
filter, using a cloth and not too concentrated liquid detergent. Do not use
abrasive substances.
Maintenance of the anti-grease filters
Traps cooking grease particles.
This must be cleaned once a month (or when the filter saturation indication
system – if envisaged on the model in possession – indicates this necessity)
using non aggressive detergents, either by hand or in the dishwasher, which
must be set to a low temperature and a short cycle.
When washed in a dishwasher, the grease filter may discolour slightly, but this
does not affect its filtering capacity.
To remove the grease filter, pull the spring release handle.
Maintenance of the charcoal filter
It absorbs unpleasant odours caused by cooking.
The saturation of the charcoal filter occurs after more or less prolonged use,
depending on the type of cooking and the regularity of cleaning of the grease
filter.
In any case it is necessary to replace the cartridge at least every four mounths
(or when the filter saturation indication system – if envisaged on the model in
possession – indicates this necessity).The charcoal filter may NOT be washed or
regenerated.
Assembly
Hook the charcoal filter at the back on the metal tongue of the hood first, then on
the front with the two knobs.
Disassembly
Remove the charcoal filter by turning the knobs fixing it to the hood by 90°.
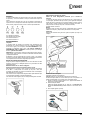
Replacing lamps
Disconnect the appliance from the electricity.
Warning! Prior to touching the light bulbs ensure they are cooled down.
Replace the old light bulb with the one of the same type as specified in the
feature label or near the light lamp on the hood.
1. Using a flat head screwdriver or equivalent tool, carefully pry loose the light
cover.
2. Remove the damaged light and replace with a new 12 Volt, 20 Watt
(Maximum) halogen light made for a G-4 base SUITABLE FOR USE IN
OPEN LUMINAIRES. Follow package directions and do not touch new light
with bare hands.
3. Reinstall the light cover. (it will snap shut).

20
DISPOSAL
This appliance is marked according to the European directive 2012/19/EC on
Waste Electrical and Electronic Equipment (WEEE). By ensuring this product is
disposed of correctly, you will help prevent potential negative consequences for
the environment and human health, which could otherwise be caused by
inappropriate waste handling of this product.
The symbol
on the product, or on the documents accompanying the
product, indicates that this appliance may not be treated as household waste.
Instead it should be taken to the appropriate collection point for the recycling of
electrical and electronic equipment. Disposal must be carried out in accordance
with local environmental regulations for waste disposal.
For further detailed information regarding the process, collection and recycling of
this product, please contact the appropriate department of your local authorities
or the local department for household waste or the shop where you purchased
this product.
Appliance designed, tested and manufactured according to:
• Safety: EN/IEC 60335-1; EN/IEC 60335-2-31, EN/IEC 62233.
• Performance: EN/IEC 61591; ISO 5167-1; ISO 5167-3; ISO 5168; EN/IEC
60704-1; EN/IEC 60704-2-13; EN/IEC 60704-3; ISO 3741; EN 50564; IEC
62301.
• EMC: EN 55014-1; CISPR 14-1; EN 55014-2; CISPR 14-2; EN/IEC 61000-3-2;
EN/IEC 61000-3-3. Suggestions for a correct use in order to reduce the
environmental impact: Switch ON the hood at minimum speed when you start
cooking and kept it running for few minutes after cooking is finished. Increase the
speed only in case of large amount of smoke and vapour and use boost speed(s)
only in extreme situations. Replace the charcoal filter(s) when necessary to
maintain a good odour reduction efficiency. Clean the grease filter(s) when
necessary to maintain a good grease filter efficiency. Use the maximum diameter
of the ducting system indicated in this manual to optimize efficiency and
minimize noise.
MALFUNCTIONS
If something appears not to be working properly, do the following simple checks
before calling Technical Service:
• If the hood is not working:
Check that:
- The power has not been disconnected.
- A speed has been selected.
• If the hood performs inefficiently:
Check that:
- The motor speed selected is sufficient for the amount of smoke and
vapours released.
- The kitchen is sufficiently ventilated to allow air intake.
- The charcoal filter is not worn (hood in filtering version).
• If the hood has turned off during normal functioning:
Check that:
- The power has not been disconnected.
- the omnipolar disconnection device has not tripped.
If the hood fails to operate correctly, briefly disconnect it from the mains power
supply for almost 5 sec. by pulling out the plug. Then plug it in again and try once
more before contacting the Technical Assistance Service.
TECHNICAL DATA
Model
Height
(cm)
Width
(cm)
Tiefe
(cm)
Ø of
exhaust tube
(cm)
IHF6.4AMX
60-112,5
68,5-112,5
59,8 45 15-12,5-12
IHGC6.4AM X
60-112,5
68,5-112,5
59,8 45 15-12,5-12
IHGC6.5FAM X
60-112,5
68,5-112,5
59,8 45 15-12,5-12
IHBS9.5AM X
61,9-114
70,4-114
89,8 45 15-12,5-12
IHBS6.4AM X
61,9-114
70,4-114
59,8 45 15-12,5-12
IHGC9.5FAMX
62,3-114,8
72,7-114,8
89,8 45 15-12,5-12
Please check the plate in order to verify the total absorption and the light
absorption.
Power
(W)
Voltage
(V)
Cap
Dimensions
(mm)
Halogen 2 x 20W 12 G4 33xØ10
Components not provided with the product
La pagina si sta caricando...
La pagina si sta caricando...
La pagina si sta caricando...
La pagina si sta caricando...
La pagina si sta caricando...
La pagina si sta caricando...
La pagina si sta caricando...
La pagina si sta caricando...
La pagina si sta caricando...
La pagina si sta caricando...
La pagina si sta caricando...
La pagina si sta caricando...
La pagina si sta caricando...
La pagina si sta caricando...
La pagina si sta caricando...
La pagina si sta caricando...
La pagina si sta caricando...
La pagina si sta caricando...
La pagina si sta caricando...
La pagina si sta caricando...
La pagina si sta caricando...
La pagina si sta caricando...
La pagina si sta caricando...
La pagina si sta caricando...
La pagina si sta caricando...
La pagina si sta caricando...
La pagina si sta caricando...
La pagina si sta caricando...
La pagina si sta caricando...
La pagina si sta caricando...
La pagina si sta caricando...
La pagina si sta caricando...
La pagina si sta caricando...
La pagina si sta caricando...
La pagina si sta caricando...
La pagina si sta caricando...
La pagina si sta caricando...
La pagina si sta caricando...
La pagina si sta caricando...
La pagina si sta caricando...
La pagina si sta caricando...
La pagina si sta caricando...
La pagina si sta caricando...
La pagina si sta caricando...
La pagina si sta caricando...
La pagina si sta caricando...
La pagina si sta caricando...
La pagina si sta caricando...
-
 1
1
-
 2
2
-
 3
3
-
 4
4
-
 5
5
-
 6
6
-
 7
7
-
 8
8
-
 9
9
-
 10
10
-
 11
11
-
 12
12
-
 13
13
-
 14
14
-
 15
15
-
 16
16
-
 17
17
-
 18
18
-
 19
19
-
 20
20
-
 21
21
-
 22
22
-
 23
23
-
 24
24
-
 25
25
-
 26
26
-
 27
27
-
 28
28
-
 29
29
-
 30
30
-
 31
31
-
 32
32
-
 33
33
-
 34
34
-
 35
35
-
 36
36
-
 37
37
-
 38
38
-
 39
39
-
 40
40
-
 41
41
-
 42
42
-
 43
43
-
 44
44
-
 45
45
-
 46
46
-
 47
47
-
 48
48
-
 49
49
-
 50
50
-
 51
51
-
 52
52
-
 53
53
-
 54
54
-
 55
55
-
 56
56
-
 57
57
-
 58
58
-
 59
59
-
 60
60
-
 61
61
-
 62
62
-
 63
63
-
 64
64
-
 65
65
-
 66
66
-
 67
67
-
 68
68


Indesit F093973 Manuale utente
- Categoria
- Cappe da cucina
- Tipo
- Manuale utente
- Questo manuale è adatto anche per
in altre lingue
- français: Indesit F093973 Manuel utilisateur
- español: Indesit F093973 Manual de usuario
- português: Indesit F093973 Manual do usuário
- slovenčina: Indesit F093973 Používateľská príručka
- polski: Indesit F093973 Instrukcja obsługi
Documenti correlati
Altri documenti
-
Ariston AHC 9.7F��LB X Guida utente
-
Whirlpool HHF 9.5 F AM X Guida utente
-
Whirlpool SHBS 9.8F LTI Guida utente
-
-
-
HOTPOINT/ARISTON HHPC 9.5F AM K Guida utente
-
Candy CBG52SX Manuale utente
-
-
Candy CBG620/1W Manuale utente