
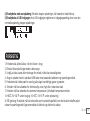
User Manual
VAPORESSO GTX ONE


1English
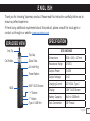
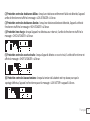
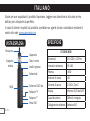
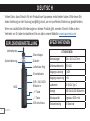
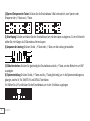
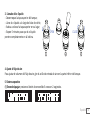
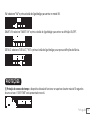
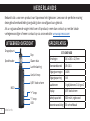
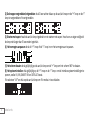
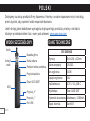
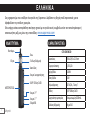
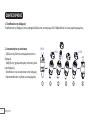
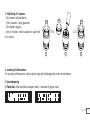
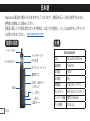
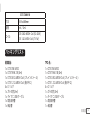
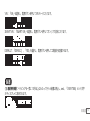
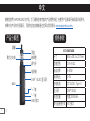
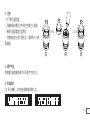
Drip Tip
Top Cap
Coil Holder
Air-inlet Ring
MOD
Type-C USB Port
“+” Button
“-” Button
0.69’’ OLED Screen
Power Button
Glass Tube
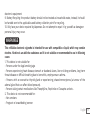
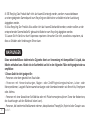
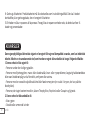
Thank you for choosing Vaporesso product. Please read this instruction carefully before use to
ensure a perfect experience.
If there is any additional requirement about this product, please consult the local agent or
contact us through our website: www.vaporesso.com
ENGLISH
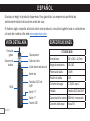
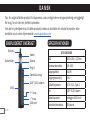
EXPLODED VIEW SPECIFICATION
GTX ONE MOD
Dimensions 83.6 x 29.3 x 22.7mm
Resistance Range 0.15-5Ω
Output Power 5-40W
Output Voltage 0-4V
Charging Current DC 5V/2A, Type-C
Display 0.69" OLED Screen
Battery Capacity Built-in 2000mAh
Tank Connection 510 Thread

2English
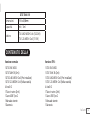
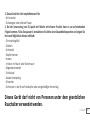
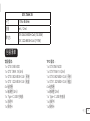
PACKING LIST
Regular Version:
1 x GTX ONE MOD
1 x GTX TANK 18 (3ml)
1 x GTX 0.8Ω MESH Coil (Pre-installed)
1 x GTX 1.2Ω MESH Coil (In Box)
4 x O-ring
1 x Glass Tube (2ml)
1 x Type-C USB Cable
1 x User Manual
1 x Warranty Card
TPD Version:
1 x GTX ONE MOD
1 x GTX TANK 18 (2ml)
1 x GTX 0.8Ω MESH Coil (Pre-installed)
1 x GTX 1.2Ω MESH Coil (In Box)
4 x O-ring
1 x Glass Tube (2ml)
1 x Type-C USB Cable
1 x User Manual
1 x Warranty Card
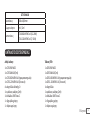
GTX TANK 18
Dimensions Φ18 x 48.6mm
Capacity 3ml / 2ml
Coils GTX 0.8Ω MESH Coil (12-20W)
GTX 1.2Ω MESH Coil (7-11W)

3English
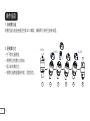
USE INSTRUCTIONS
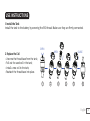
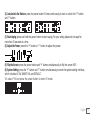
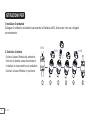
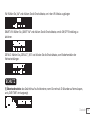
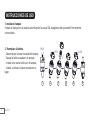
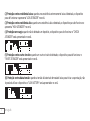
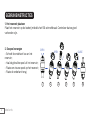
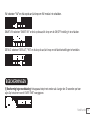
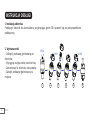
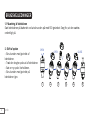
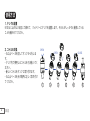
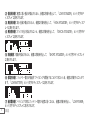
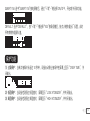
1. Install the Tank
Install the tank to the battery by screwing the 510 thread. Make sure they are rmly connected.
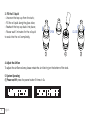
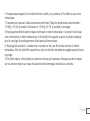
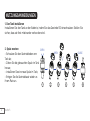
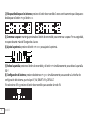
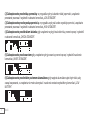
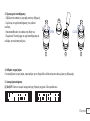
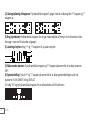
2. Replace the Coil
- Unscrew the thread base from the tank;
- Pull out the used coil in the tank;
- Install a new coil to the tank;
- Reattach the thread base into place.
1
OPEN
OPEN CLOSE
2 3 4 5 6

4English
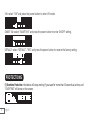
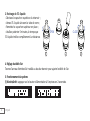
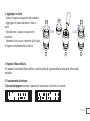
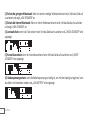
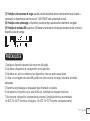
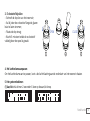
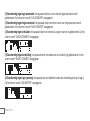
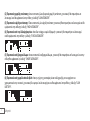
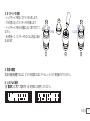
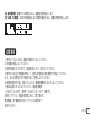
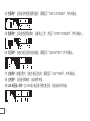
3. Fill the E-liquid
- Unscrew the top cap from the tank;
- Fill the e-liquid along the glass tube;
- Reattach the top cap back into place;
- Please wait 5 minutes for the e-liquid
to soak into the coil completely.
4. Adjust the Airow
To adjust the airow volume, please rotate the air-inlet ring on the bottom of the tank.
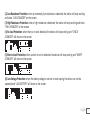
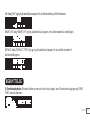
5. System Operating
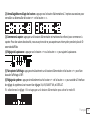
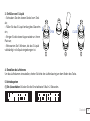
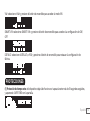
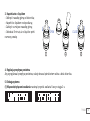
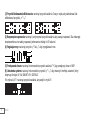
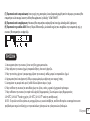
(1) Power on/off: press the power button 5 times in 2s.
OPEN CLOSE
1 2 3

5English
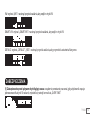
(2) Lock/unlock the Buons: press the power button 3 times continuously to lock or unlock the “+” button
and “-” button.
(3) Start Vaping: press and hold the power button to start vaping. For your safety, please do not vape for
more than 10 seconds at a time.
(4) Adjust the Power: press the “+” button or “-” button to adjust the power.
(5) Flip the Screen: press the power button and “+” button simultaneously to ip the screen 180°.
(6) System Seing: press the “+” button and “-” button simultaneously to enter the system setting interface,
which includes VV, VW, SMART VW, and DEFAULT.
VV: select “VV”and press the power button to enter VV mode.

6English
VW: select “VW” and press the power button to enter VW mode.
SMART VW: select “SMART VW” and press the power button to enter ON/OFF setting.
DEFAULT: select “DEFAULT”, “YES” and press the power button to restore the factory setting.
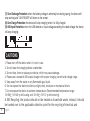
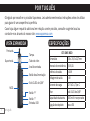
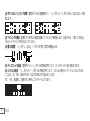
PROTECTIONS
(1) Overtime Protection: the device will stop working if you vape for more than 10 seconds at a time, and
“OVER TIME” will show on the screen.

7English
(2) Low Resistance Protection: when an extremely low resistance is detected, the device will stop working
and show “LOW ATOMIZER” on the screen.
(3) High Resistance Protection: when a high resistance is detected, the device will stop working and show
“HIGH ATOMIZER” on the screen.
(4) No-load Protection: when there is no tank detected, the device will stop working and “CHECK
ATOMIZER” will show on the screen.
(5) Short-circuit Protection: when a short-circuit is detected, the device will stop working and “SHORT
ATOMIZER” will show on the screen.
(6) Low Voltage Protection: when the battery voltage is too low to start vaping, the device can not be
operated and “LOW BATTERY” will show on the screen.

8English
1. Please turn off the device when it is not in use.
2. Do not leave the charging device unattended.
3. Do not drop, throw or abuse your device, which may cause damage.
4. Please use a standard USB output charger with proper charging current and voltage range.
5. Keep away from the water or any ammable gas, liquid .
6. Do not expose the device to direct sunlight, dust, moisture or mechanical shock.
7. Do not expose the device to extreme temperature. (Recommended temperature range:
-10~60℃ /14~140 ℉ while using and -10~45℃ /14~113 ℉ while storing).
8. EEE Recycling: the product should not be treated as household waste, instead, it should
be handed over to the applicable collection point for the recycling of electrical and
CAUTIONS
(7) Over Discharge Protection: when the battery voltage is extremely low during vaping, the device will
stop working and “LOW POWER” will show on the screen.
(8) Over Charge Protection: the device will stop charging when it is fully charged.
(9) USB Input Protection: when the USB detects an input voltage exceeding the rated voltage, the device
will stop charging.

9English
electronic equipment.
9. Battery Recycling: the product battery should not be treated as household waste, instead, it should
be handed over to the applicable used battery collection point for recycling.
10. Only have your device repaired by Vaporesso. Do not attempt to repair it by yourself as damage or
personal injury may occur.
This rellable electronic cigaree is intended for use with compatible e-liquid, which may contain
nicotine. Nicotine is an addictive substance and it is not suitable or recommended to use in following
cases:
1. This device is not suitable for:
- Persons under the legal smoking age.
- Persons experiencing heart disease, stomach or duodenal ulcers, liver or kidney problems, long-term
throat disease or difcult breathing due to bronchitis, emphysema or asthma.
- Persons with an overactive thyroid gland or experiencing phaeochromocytoma (a tumour of the
adrenal gland that can affect blood pressure).
- Persons taking certain medications like Theophylline, Ropinirole or Clozapine and etc..
2. This device is not recommended for:
- Non-smokers
- Pregnant or breastfeeding women
WARNINGS

10 English
This device should not be used by persons under the legal
smoking age.
3. You may experience the following results if you use nicotine containing e-liquid with this product. If
it happens, please consult a healthcare professional and show them this leaet if possible:
- Feeling faint - Nausea - Dizziness - Headache - Coughing
- Irritation of the mouth or throat - Stomach discomfort
- Hiccups - Nasal congestion - Vomition
- Chest palpitations/pain or an irregular heart rate

1Français
FRANÇAIS
Nous vous remercions d’avoir choisi un produit Vaporesso. Veuillez lire attentivement les
présentes instructions avant de l’utiliser an de garantir une expérience optimale.
S’il existe des exigences supplémentaires relatives à ce produit, veuillez contacter votre agent
local ou prendre contact avec nous sur notre site Web: www.vaporesso.com
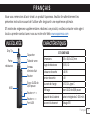
Drip Tip
Capuchon
Porte-
résistance Anneau
d’entrée d’air
MOD
Port USB
Bouton « + »
Bouton « - »
Écran OLED de
0,69 pouce
Bouton
Tube de verre
VUE ÉCLATÉE CARACTÉRISTIQUES
GTX ONE MOD
Dimensions 83,6 x 29,3 x 22,7mm
Plage de résistance 0,15-5,0 Ω
Puissance de sortie 5-40 W
Tension de sortie 0-4V
Courant de charge 5 VCC/2 A, type C
Afchage Écran OLED de 0,69 pouce
Capacité de la batterie Batterie intégrée de 2 000 mAh
Raccord du réservoir Filetage 510

2Français
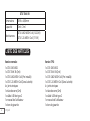
LISTE DES ARTICLES
GTX TANK 18
Dimensions Φ18 x 48,6mm
Capacité 3ml / 2ml
Résistances GTX 0.8Ω MESH Coil (12-20W)
GTX 1.2Ω MESH Coil (7-11W)
Version normale:
1 x GTX ONE MOD
1 x GTX TANK 18 (3ml)
1 x GTX 0.8Ω MESH Coil (Pre installé)
1 x GTX 1.2Ω MESH Coil (Dans la boite)
4 x joints toriques
1 x tube de verre (2ml)
1 x câble USB de type C
1 x manuel de l’utilisateur
1 x bon de garantie
Version TPD:
1 x GTX ONE MOD
1 x GTX TANK 18 (2ml)
1 x GTX 0.8Ω MESH Coil (Pre installé)
1 x GTX 1.2Ω MESH Coil (Dans la boite)
4 x joints toriques
1 x tube de verre (2ml)
1 x câble USB de type C
1 x manuel de l’utilisateur
1 x bon de garantie

3Français
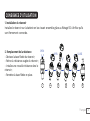
CONSIGNES D’UTILISATION
1. Installation du réservoir
Installez le réservoir sur la batterie en les vissant ensemble grâce au letage 510. Vériez qu’ils
sont fermement connectés.
2. Remplacement de la résistance
- Dévissez la base letée du réservoir;
- Retirez la résistance usagée du réservoir;
- Installez une nouvelle résistance dans le
réservoir;
- Remettez la base letée en place.
1
OPEN
OPEN CLOSE
2 3 4 5 6

4Français
3. Recharge de l’E.-liquide
- Dévissez le capuchon supérieur du réservoir ;
- Versez l’E.-liquide à travers le tube de verre ;
- Remettez le capuchon supérieur en place ;
- Veuillez patienter 5 minutes, le temps que
l’E.-liquide imbibe complètement la résistance.
4. Réglage du débit d’air
Tournez l’anneau d’entrée d’air installé au bas du réservoir pour ajuster le débit de l’air.
5. Fonctionnement du système
(1) Marche/Arrêt : appuyez sur le bouton d'alimentation à 5 reprises en 2 secondes.
OPEN CLOSE
1 2 3

5Français
(2) Verrouillage/déverrouillage des boutons : appuyez sur le bouton d'alimentation à 3 reprises successives pour
verrouiller ou déverrouiller le bouton « + » et le bouton « - ».
(3) Commencer à vapoter : appuyez sur le bouton d’alimentation et maintenez-le enfoncé pour commencer à
vapoter. Pour des raisons de sécurité, nous vous prions de ne pas vapoter sans interruption pendant plus de 10
secondes d'aflée.
(4) Réglage de la puissance : appuyez sur le bouton « + » ou le bouton « - » pour ajuster la puissance.
(5) Faire pivoter l’afchage : appuyez simultanément sur le bouton d'alimentation et le bouton « + » pour faire
basculer l’afchage à 180°.
(6) Réglage du système : appuyez simultanément sur le bouton « + » et le bouton « - » pour accéder à l'interface
de réglage du système où se trouvent les réglages VV, VW, SMART VW, et DEFAULT.
VV : sélectionnez le réglage « VV » et appuyez sur le bouton d’alimentation pour activer le mode VV.

6Français
VW : sélectionnez le réglage « VW » et appuyez sur le bouton d’alimentation pour activer le mode VW.
SMART VW : sélectionnez le réglage « SMART VW » et appuyez sur le bouton d’alimentation pour accéder au
réglage de ON/OFF.
DEFAULT : sélectionnez le réglage « DEFAULT » et la conrmation « YES », et appuyez sur le bouton d'alimentation
pour rétablir les paramètres d’usine.
PROTECTIONS
(1) Protection contre le vapotage excessif l’appareil cesse de fonctionner quand on vapote pendant plus de 10
secondes successives. Le message « OVER TIME » apparaît à l’écran.

7Français
(2) Protection contre les résistances faibles : lorsqu’une résistance extrêmement faible est détectée, l’appareil
arrête de fonctionner et afche le message « LOW ATOMIZER » à l’écran.
(3) Protection contre les résistances élevées : lorsqu’une résistance élevée est détectée, l’appareil arrête de
fonctionner et afche le message « HIGH ATOMIZER » à l’écran.
(4) Protection hors charge : lorsque l’appareil ne détecte aucun réservoir, il arrête de fonctionner et afche le
message « CHECK ATOMIZER » à l’écran.
(5) Protection contre les courts-circuits : lorsque l’appareil détecte un court-circuit, il arrête de fonctionner et
afche le message « SHORT ATOMIZER » à l’écran.
(6) Protection contre les basses tensions : lorsque la tension de la batterie est trop basse pour que le
vapotage s’effectue, l’appareil ne fonctionne pas et le message « LOW BATTERY » apparaît à l’écran.

8Français
1. Veuillez éteindre l’appareil quand vous ne l’utilisez pas.
2. Ne laissez pas le dispositif de charge sans surveillance.
3. Ne faites pas tomber, ne jetez pas et ne faites aucune utilisation abusive ou excessive de votre
appareil, car cela pourrait occasionner des dommages.
4. Veuillez utiliser un chargeur à sortie USB standard au courant de charge et à la plage de tensions
appropriés.
5. Tenez votre appareil à l’écart de l’eau, des gaz inammables et des liquides.
MISES EN GARDE
(7) Protection contre la décharge excessive : lorsque le niveau de charge de la batterie est extrêmement
bas pendant le vapotage, l’appareil cesse de fonctionner et le message « LOW POWER » apparaît à l’écran.
(8) Protection contre la charge excessive : la charge de la batterie s’arrête dès que celle-ci est
complètement chargée.
(9) Protection de l’entrée USB : la charge de la batterie de l’appareil s’arrête dès que le port USB détecte
une tension d'entrée supérieure à la tension nominale.
La pagina si sta caricando...
La pagina si sta caricando...
La pagina si sta caricando...
La pagina si sta caricando...
La pagina si sta caricando...
La pagina si sta caricando...
La pagina si sta caricando...
La pagina si sta caricando...
La pagina si sta caricando...
La pagina si sta caricando...
La pagina si sta caricando...
La pagina si sta caricando...
La pagina si sta caricando...
La pagina si sta caricando...
La pagina si sta caricando...
La pagina si sta caricando...
La pagina si sta caricando...
La pagina si sta caricando...
La pagina si sta caricando...
La pagina si sta caricando...
La pagina si sta caricando...
La pagina si sta caricando...
La pagina si sta caricando...
La pagina si sta caricando...
La pagina si sta caricando...
La pagina si sta caricando...
La pagina si sta caricando...
La pagina si sta caricando...
La pagina si sta caricando...
La pagina si sta caricando...
La pagina si sta caricando...
La pagina si sta caricando...
La pagina si sta caricando...
La pagina si sta caricando...
La pagina si sta caricando...
La pagina si sta caricando...
La pagina si sta caricando...
La pagina si sta caricando...
La pagina si sta caricando...
La pagina si sta caricando...
La pagina si sta caricando...
La pagina si sta caricando...
La pagina si sta caricando...
La pagina si sta caricando...
La pagina si sta caricando...
La pagina si sta caricando...
La pagina si sta caricando...
La pagina si sta caricando...
La pagina si sta caricando...
La pagina si sta caricando...
La pagina si sta caricando...
La pagina si sta caricando...
La pagina si sta caricando...
La pagina si sta caricando...
La pagina si sta caricando...
La pagina si sta caricando...
La pagina si sta caricando...
La pagina si sta caricando...
La pagina si sta caricando...
La pagina si sta caricando...
La pagina si sta caricando...
La pagina si sta caricando...
La pagina si sta caricando...
La pagina si sta caricando...
La pagina si sta caricando...
La pagina si sta caricando...
La pagina si sta caricando...
La pagina si sta caricando...
La pagina si sta caricando...
La pagina si sta caricando...
La pagina si sta caricando...
La pagina si sta caricando...
La pagina si sta caricando...
La pagina si sta caricando...
La pagina si sta caricando...
La pagina si sta caricando...
La pagina si sta caricando...
La pagina si sta caricando...
La pagina si sta caricando...
La pagina si sta caricando...
La pagina si sta caricando...
La pagina si sta caricando...
La pagina si sta caricando...
La pagina si sta caricando...
La pagina si sta caricando...
La pagina si sta caricando...
La pagina si sta caricando...
La pagina si sta caricando...
La pagina si sta caricando...
La pagina si sta caricando...
La pagina si sta caricando...
La pagina si sta caricando...
La pagina si sta caricando...
La pagina si sta caricando...
La pagina si sta caricando...
La pagina si sta caricando...
La pagina si sta caricando...
La pagina si sta caricando...
La pagina si sta caricando...
La pagina si sta caricando...
La pagina si sta caricando...
La pagina si sta caricando...
La pagina si sta caricando...
La pagina si sta caricando...
-
 1
1
-
 2
2
-
 3
3
-
 4
4
-
 5
5
-
 6
6
-
 7
7
-
 8
8
-
 9
9
-
 10
10
-
 11
11
-
 12
12
-
 13
13
-
 14
14
-
 15
15
-
 16
16
-
 17
17
-
 18
18
-
 19
19
-
 20
20
-
 21
21
-
 22
22
-
 23
23
-
 24
24
-
 25
25
-
 26
26
-
 27
27
-
 28
28
-
 29
29
-
 30
30
-
 31
31
-
 32
32
-
 33
33
-
 34
34
-
 35
35
-
 36
36
-
 37
37
-
 38
38
-
 39
39
-
 40
40
-
 41
41
-
 42
42
-
 43
43
-
 44
44
-
 45
45
-
 46
46
-
 47
47
-
 48
48
-
 49
49
-
 50
50
-
 51
51
-
 52
52
-
 53
53
-
 54
54
-
 55
55
-
 56
56
-
 57
57
-
 58
58
-
 59
59
-
 60
60
-
 61
61
-
 62
62
-
 63
63
-
 64
64
-
 65
65
-
 66
66
-
 67
67
-
 68
68
-
 69
69
-
 70
70
-
 71
71
-
 72
72
-
 73
73
-
 74
74
-
 75
75
-
 76
76
-
 77
77
-
 78
78
-
 79
79
-
 80
80
-
 81
81
-
 82
82
-
 83
83
-
 84
84
-
 85
85
-
 86
86
-
 87
87
-
 88
88
-
 89
89
-
 90
90
-
 91
91
-
 92
92
-
 93
93
-
 94
94
-
 95
95
-
 96
96
-
 97
97
-
 98
98
-
 99
99
-
 100
100
-
 101
101
-
 102
102
-
 103
103
-
 104
104
-
 105
105
-
 106
106
-
 107
107
-
 108
108
-
 109
109
-
 110
110
-
 111
111
-
 112
112
-
 113
113
-
 114
114
-
 115
115
-
 116
116
-
 117
117
-
 118
118
-
 119
119
-
 120
120
-
 121
121
-
 122
122
-
 123
123
-
 124
124


Vaporesso GTX ONE MOD Manuale utente
- Tipo
- Manuale utente
- Questo manuale è adatto anche per
in altre lingue
- français: Vaporesso GTX ONE MOD Manuel utilisateur
- español: Vaporesso GTX ONE MOD Manual de usuario
- Deutsch: Vaporesso GTX ONE MOD Benutzerhandbuch
- Nederlands: Vaporesso GTX ONE MOD Handleiding
- português: Vaporesso GTX ONE MOD Manual do usuário
- polski: Vaporesso GTX ONE MOD Instrukcja obsługi
- 日本語: Vaporesso GTX ONE MOD ユーザーマニュアル
Documenti correlati
-
 Vaporesso XIRON Manuale utente
-
 Vaporesso LUXE Q2 Manuale utente
-
 Vaporesso Luxe Q2 SE Manuale utente
-
 Vaporesso GTX GO 40 Manuale utente
-
 Vaporesso Target 80 Manuale utente
-
 Vaporesso Target PM80 Manuale utente
-
 Vaporesso Target PM80 SE Manuale utente
-
 Vaporesso GEN PT60 Manuale utente
-
Vaporesso Target 200 Manuale utente
-
Vaporesso GEN-FIT-40 Guida utente


