Rotel la passione plus Manuale utente
- Categoria
- Amplificatore per strumenti musicali
- Tipo
- Manuale utente
Questo manuale è adatto anche per

RC-971
STEREO CONTROL AMPLIFIER
PRÉAMPLIFICATEUR STÉRÉO
STEREO-VORVERSTÄRKER
PREAMPLIFICATORE STEREO
PREAMPLIFICADOR ESTEREOFONICO
STEREO VOORVERSTERKER
Owner’s Manual
Manuel de l’utilisateur
Bedienungsanleitung
Manuale di Istruzioni
Manual de Instrucciones
Gebruiksaanwijzing
VOLUME L R
LISTENING
TUNER
CD
AUX
TAPE 1
TAPE 2
RECORDING
TUNER
OFF
CD
AUX
TAPE 1
STEREO CONTROL AMPLIFIER RC-971
POWER PHONES BASS TREBLE
OFF
TONE
ON

CAUTION: TO PREVENT ELECTRIC SHOCK, MATCH WIDE BLADE
OF PLUG TO WIDE SLOT. INSERT FULLY.
APPLICABLE FOR USA, CANADA OR WHERE
APPROVED FOR THE USAGE
ATTENTION: POUR EVITER LES CHOCS ELECTRIQUES,
INTRODUIRE LA LAME LA PLUS LARGE DE LA FICHE
DANS LA BORNE CORRESPONDANTE DE LA PRISE ET
POUSSER JUSQU AU FOND.
CAUTION
RISK OF ELECTRIC SHOCK
DO NOT OPEN
CAUTION: TO REDUCE THE RISK OF ELECTRIC SHOCK, DO
NOT REMOVE COVER. NO USER-SERVICEABLE PARTS INSIDE.
REFER SERVICING TO QUALIFIED SERVICE PERSONNEL.
WARNING:
There are no user serviceable parts inside. Refer all servicing to
qualified service personnel.
WARNING:
To reduce the risk of fire or electrical shock, do not expose the unit
to moisture or water. Do not allow foreign objects to get into the
enclosure. If the unit is exposed to moisture, or a foreign object
gets into the enclosure, immediately disconnect the power cord
from the wall. Take the unit to a qualified service person for in-
spection and necessary repairs.
Read all the instructions before connecting or operating the unit. Keep this
manual so you can refer to these safety instructions.
Heed all warnings and safety information in these instructions and on the
product itself. Follow all operating instructions.
Clean the unit only with a dry cloth or a vacuum cleaner.
Keep the ventilation inlets on the unit unobstructed. For example, do not place
the unit on a bed, sofa, rug, or similar surface that could block the ventilation
slots. If the unit is placed in a bookcase or cabinet, there must be sufficient
clearance around the unit and ventilation of the cabinet to allow proper cooling.
Keep the unit away from radiators, heat registers, stoves, or any other
appliance that produces heat.
The unit must be connected to a power supply only of the type
and voltage specified on the rear panel of the unit.
Connect the unit to the power outlet only with the supplied 2-pin polarized
power supply cable or an exact equivalent. Do not modify the supplied cable in
any way. Do not attempt to defeat grounding and/or polarization provisions. The
cable should be connected to a 2-pin polarized wall outlet, matching the wide
blade of the plug to the wide slot of the receptacle. Do not use extension cords.
Do not route the power cord where it will be crushed, pinched, bent at severe
angles, exposed to heat, or damaged in any way. Pay particular attention to the
power cord at the plug and where it exits the back of the unit.
The power cord should be unplugged from the wall outlet if the unit is to be left
unused for a long period of time.
Immediately stop using the unit and have it inspected and/or serviced by a
qualified service agency if:
• The power supply cord or plug has been damaged.
• Objects have fallen, or liquid has been spilled, into the unit.
• The unit has been exposed to rain.
• The unit shows signs of improper operation
• The unit has been dropped or damaged in any way
Place the unit on a fixed, level surface strong
enough to support its weight. Do not place the
unit on a moveable cart that could tip over.
This symbol is to alert the user to the
presence of uninsulated dangerous
voltages inside the product's enclosure
that may constitute a risk of electric shock.
This symbol is to alert the user to important
operating and maintenance (service)
instructions in this manual and literature
accompanying the product.

3
Figure 1: Controls and Connections
Commandes et branchements
Bedienelemente und Anschlüsse
Controlli e Collegamenti
Controles y Conexiones
De bedieningsorganen en de ingangen voor de bronnen
TAPE 1
IN OUT
AUXCD TUNER TAPE 2
IN OUT
OUTPUTS
12
LEFT
RIGHT
CONTROL AMPLIFIER
MODEL NO. RC-971
POWER CONSUMPTION: 10W
AC 3.3A 400W MAX
SWITCHED
LEFT
RIGHT
SERIAL NO.
913
10 11 12
VOLUME L R
LISTENING
TUNER
CD
AUX
TAPE 1
TAPE 2
RECORDING
TUNER
OFF
CD
AUX
TAPE 1
STEREO CONTROL AMPLIFIER RC-971
POWER PHONES BASS TREBLE OFF
TONE
ON
1
2378
6
45
Figure 2: Output Connections
Prises de sortie
Anschluß einer Endstufe
Collegamenti d’uscita
Conexiones de Salida
De verbindingen met de eindversterker
SERIAL NO.
LEFTRIGHT
SPEAKERS
WARNING:
TO REDUCE THE RISK OF FIRE
OR ELECTRICAL SHOCK, DO NOT EXPOSE
THIS EQUIPMENT TO RAIN OR MOISTURE.
CAUTION
RISK OF ELECTRIC SHOCK
DO NOT OPEN
AVIS:
RISQUE DE CHOC ELECTRIQUE–NE PAS OUVRIR
SPEAKER IMPEDANCE
STEREO 4 OHMS MINIMUM
BRIDGED 8 OHMS MINIMUM
POWER AMPLIFIER
MODEL NO. RB-981
POWER CONSUMPTION: 400W
SERIAL NO.
LEFT INPUTRIGHT INPUT
ROTEL RB-981
TAPE 1
IN OUT
AUXCD TUNER TAPE 2
IN OUT
OUTPUTS
12
LEFT
RIGHT
CONTROL AMPLIFIER
MODEL NO. RC-971
POWER CONSUMPTION: 10W
AC 3.3A 400W MAX
SWITCHED
LEFT
RIGHT
ROTEL RC-971
STEREO CONTROL AMPLIFIER RC-971

4
SERIAL NO.
CD PLAYER
OUTPUT
L R
TAPE 1
IN OUT
AUXCD TUNER TAPE 2
IN OUT
OUTPUTS
12
LEFT
RIGHT
CONTROL AMPLIFIER
MODEL NO. RC-971
POWER CONSUMPTION: 10W
AC 3.3A 400W MAX
SWITCHED
LEFT
RIGHT
ROTEL RC-971
Figure 3: Line Level Input Connection
Branchement des sources niveau Ligne
Anschluß eines CD-Players
Collegamenti ingresso linea
Conexiones de Nivel de Línea
De verbindingen met de lijnniveaubronnen
Figure 4: Recorder Connections
Branchements d’un magnétophone
Anschluß eines Recorders
Collegamenti registratore
Conexión de Componentes de Grabación
De verbindingen met een opname/weergave apparaat
SERIAL NO.
RECORDER
INPUT
L R
OUTPUT
L R
TAPE 1
IN OUT
AUXCD TUNER TAPE 2
IN OUT
OUTPUTS
12
LEFT
RIGHT
CONTROL AMPLIFIER
MODEL NO. RC-971
POWER CONSUMPTION: 10W
AC 3.3A 400W MAX
SWITCHED
LEFT
RIGHT
ROTEL RC-971
STEREO CONTROL AMPLIFIER RC-971

5
About Rotel
A family whose passionate interest in music led them to manufac-
ture high fidelity components of uncompromising quality founded
Rotel over 30 years ago. Through the years that passion has re-
mained undiminished and the family goal of providing exceptional
value for audiophiles and music lovers, regardless of their budget,
is shared by all Rotel employees.
The engineers work as a close team, listening to, and fine tuning
each new product until it reaches their exacting musical stan-
dards. They are free to choose components from around the
world in order to make that product the best they can. You are
likely to find capacitors from the United Kingdom and Germany,
semi conductors from Japan or the United States, while toroidal
power transformers are manufactured in Rotel’s own factory.
Rotel’s reputation for excellence has been earned through hun-
dreds of good reviews and awards from the most respected re-
viewers in the industry, who listen to music every day. Their
comments keep the company true to its goal – the pursuit of
equipment that is musical, reliable and affordable.
All of us at Rotel thank you for buying this product and hope it will
bring you many hours of enjoyment.
Getting Started
Thank you for purchasing the Rotel RC-971 Stereo Control Ampli-
fier. When used in a high-quality music audio system, it will pro-
vide years of musical enjoyment.
The RC-971 is a full featured, high performance preamplifier. All
aspects of the design have been optimized to retain the full dy-
namic range and subtle nuances of your music. The RC-971 has a
highly regulated power supply incorporating a Rotel custom-de-
signed power transformer. This low impedance power supply has
ample power reserves, which enables the RC-971 to easily repro-
duce the most demanding audio signals. This type of design is
more expensive to manufacture, but it is better for the music.
The RC-971 printed circuit boards (PCB) are designed with Sym-
metrical Circuit Traces. This insures that the precise timing of the
music is maintained and faithfully recreated. The RC-971 circuitry
uses metal film resistors and polystyrene or polypropylene ca-
pacitors in important signal paths. All aspects of this design have
been examined with the final goal being faithful reproduction of
music.
The RC-971 is straightforward in its installation and operation. If
you have experience with other stereo systems, you shouldn’t find
anything perplexing. Simply plug in the associated components
and enjoy.
Contents (circled numbers refer to illustration)
About Rotel __________________________________________ 5
Getting Started ______________________________________ 5
A Few Precautions 6
Placement 6
Cables 6
AC Power and Control ________________________________ 6
AC Power Input
13
6
Power Switch
2
and Power Indicator
1
6
Auxiliary Power Outputs
12
6
Input Signal Connections
9
_________________________ 7
Recorder Connections
10
____________________________ 7
Output Connections
11
______________________________ 7
Front Panel Controls __________________________________ 7
Volume Control
6
7
Tone On/Off Switch
5
7
Bass and Treble Controls
4
7
Listening Selector
8
8
Recording Selector
7
8
Phones Output
3
8
Troubleshooting ______________________________________ 8
Power Indicator Is Not Lit 8
Fuse Replacement 8
No Sound 8
Specifications _______________________________________ 30
English

6
A Few Precautions
Please read this manual carefully. It provides complete informa-
tion on how to incorporate the RC-971 into your system as well as
general information that will help you get optimum sound perfor-
mance. Please contact your authorized Rotel dealer for answers
to any questions you might have. In addition, all of us at Rotel wel-
come your questions and comments.
Save the RC-971 shipping carton and all enclosed packing mate-
rial for future use. Shipping or moving the RC-971 in anything other
than the original packing material may result in severe damage to
your amplifier.
Fill out and send in the owner’s registration card packed with the
RC-971. Also be sure to keep the original sales receipt. It is your
best record of the date of purchase, which you will need in the
event warranty service is ever required.
Placement
Like all audio components that handle low-level signals, the
RC-971 can be affected by its environment. Do not stack the
RC-971 on top of a power amplifier. This will minimize chance it
will pick up hum or interference. We recommend installing the
RC-971 in furniture designed to house audio components. Such
furniture is designed to reduce or suppress vibration which can
adversely affect sound quality. Ask your authorized Rotel dealer
for advice about component furniture and proper installation of
audio components.
Cables
Be sure to keep the power cords, digital signal cables and regular
audio signal cables in your installation away from each other. This
will minimize the chance of the regular audio signal cables pick-
ing up noise or interference from the power cords or digital
cables. Using only high quality, shielded cables will also help to
prevent noise or interference from degrading the sound quality of
your system. If you have any questions see your authorized Rotel
dealer for advice about the best cable to use with your system
AC Power and Control
AC Power Input
13
The RC-971 does not use a significant amount of power. However
there are two auxiliary power outlets on the back of the unit,
which can be used to supply power for other units. Consequently
it is usually best to plug the RC-971 directly into a 2-pin polarized
wall outlet. Avoid the use of extension cords. A heavy duty multi-
tap power outlet strip may be used if it (and the wall outlet) is
rated to handle the current demanded by the components con-
nected to it.
Note: Do not connect the power cord for a power amplifier to the
auxiliary power outlets on the RC-971. Power amplifiers often
draw more power than these outlets can provide.
Your RC-971 is configured at the factory for the proper AC line
voltage in the country where you purchased it (either 115 volts AC
or 230 volts AC with a line frequency of either 50 Hz or 60 Hz). The
AC line configuration is noted on a decal on the back panel.
Note: Should you move your RC-971 amplifier to another country,
it is possible to reconfigure your amplifier for use on a different
line voltage. Do not attempt to perform this conversion yourself.
Opening the enclosure of the RC-971 exposes you to dangerous
voltages. Consult a qualified service person or the Rotel factory
service department for information.
If you are going to be away from home for an extended period of
time such as a month-long vacation, it is a sensible precaution to
unplug your amplifier (as well as other audio and video compo-
nents) while you are away.
Power Switch
2
and Power Indicator
1
The Power switch is located on the left side of the front panel.
When it is pushed in the RC-971 is turned on and the Power Indi-
cator light is illuminated. Press the Power switch again to turn the
RC-971 off.
Auxiliary Power Outputs
12
(U.S.A. version)
The RC-971 has two switched outlets on the back panel. Power is
available from these outlets when the RC-971 is turned on. These
outlets can provide up to a total of 400 watts. They are appropri-
ate for supplying power to signal sources, such as CD players,
tuners, or tape decks. They should not be used for power amplifi-
ers. Connecting components that will draw more than 400 watts to
these outputs could damage the Standby switch in the RC-971.
STEREO CONTROL AMPLIFIER RC-971

7
Output Connections
11
[See Figure 2 for RCA output connection illustration.]
The RC-971 has RCA-type output connectors that are compatible
with the inputs of most power amplifiers. Use high quality cables
and be sure to connect the Left and Right channel outputs of the
RC-971 to the correct channels of the amplifier.
Note: There are two sets of outputs on the RC-971. The second
set of outputs may be used in custom system configurations to
drive a second power amplifier or to supply a signal to a special
signal processor.
Front Panel Controls
Volume Control
6
The front panel Volume control is actually two separate controls.
The control knobs are “friction connected”, so both controls nor-
mally operate together. Turn the controls
clockwise
to increase
the volume, or
counterclockwise
to decrease the volume.
The two controls can be operated separately by holding one con-
trol knob while turning the other. Normally this is necessary only
to compensate for problems in the program material.
Tone On/Off Switch
5
When the switch is in the Off position the tone control circuits are
bypassed to ensure the purest possible sound. Leave the switch in
the Off position unless you want to use the tone controls. Turn the
switch to the On position if you want to adjust the tone controls.
Bass and Treble Controls
4
When the Tone Switch is in the On position, turning the Bass and
Treble controls adjusts the tone balance of the sound. Turn the
controls
clockwise
to increase the bass or treble output. Turn the
controls
counterclockwise
to decrease the bass or treble output.
A properly set up high-performance audio system produces the
most natural sound with little or no adjustment of the tone con-
trols. Use these controls sparingly. Be particularly careful when
turning the controls up (clockwise). This increases the power out-
put in the bass or treble range, increasing the load on the ampli-
fier and speakers.
Input Signal Connections
9
[See Figure 3 for input connection illustration.]
The RC-971 has conventional RCA type input connectors, the type
found on nearly all audio equipment.
Note: To prevent loud noises that neither you nor your speakers
will appreciate, make sure the system is turned off when you
make any signal connections.
The CD, Tuner, and Aux inputs of the RC-971 are “line level” in-
puts. These are for connecting components such as CD players,
Hi Fi or NICAM Stereo video cassette recorders, tuners for audio
or video, Laser Disc players or the analog output from a CD ROM
drive.
The Left and Right channels are clearly labeled and should be
connected to the corresponding channels of the source compo-
nent. The Left RCA connectors are white, the Right connectors
are red. Use high quality RCA cables for connecting input source
components to the RC-971. Ask your authorized Rotel dealer for
advice about cables.
Note: The addition of a Rotel RQ-970BX Phono Equalizer enables
you to connect a phonograph to the RC-971. See your authorized
Rotel dealer for more information.
Recorder Connections
10
[See Figure 4 for recorder connection illustration.]
The Tape 1 and Tape 2 inputs and outputs can be connected to
any record/playback device that accepts standard line level ana-
log input and output signals. Typically that will be a conventional
tape recorder.
When connecting a recorder to the RC-971 remember that the
out-
puts
of the recorder must be connected to the tape
inputs
of the
RC-971. Similarly the tape
outputs
of the RC-971 must be con-
nected to the
inputs
of the recorder. As with other sources be
sure to connect the Left and Right channels of each device to the
proper channels on the associated components. Use high quality
connecting cables to prevent loss of sound quality.
English

8
Listening Selector
8
The setting of the Listening Selector controls which of the input
signals goes to the main outputs and onto the power amplifier –
or, more simply, which source is heard.
Recording Selector
7
The setting of the Recording Selector controls which of the input
signals goes to the record outputs. When you are not recording,
the Recording Selector should be set to the Off position to mini-
mize the chance of interference from other components in the
system.
Having a separate Recording and Listening selector adds a sig-
nificant degree of flexibility in how you can use the RC-971. For
example by setting the Record Selector to CD and the Listening
Selector to Tuner you could record a CD onto a tape while listen-
ing to the tuner.
There is no Tape 2 position on the Recording Selector. Conse-
quently, if you wish to duplicate (“dub”) a recording from one re-
corder to another, the source unit must be connected to Tape 1
input. Set the Recording Selector to Tape 1. Connect the unit re-
cording the signal to the Tape 2 output.
Phones Output
3
The Phones output allows you to connect headphones for private
listening. This output accommodates standard stereo phone (1/4”)
plugs. If your headphones have another type of plug, such as a
1/8” mini-plug, you will need an adapter plug. Contact your autho-
rized Rotel dealer, to get the correct adapter plug. Note: Plugging
in a set of headphones does not cut off the signal to the outputs.
The power amplifier will continue to receive a signal and the
speakers will continue to play.
Troubleshooting
Most difficulties in audio systems are the result of incorrect con-
nections, or improper control settings. If you encounter problems,
isolate the area of the difficulty, check the control settings, deter-
mine the cause of the fault and make the necessary changes. If
you are unable to get sound from the RC-971, refer to the sugges-
tions for the following conditions:
Power Indicator Is Not Lit
The Power Indicator should be lit whenever the RC-971 is plugged
into the wall power outlet and the Power Switch is pushed in. If it
does not light, test the power outlet with another electrical de-
vice, such as a lamp. Be sure the power outlet being used is not
controlled by a switch that has been turned off.
Fuse Replacement
If another electrical device works when plugged into the power
outlet, and the Power Indicator still will not light, it indicates that
the internal power fuse may have blown. If you believe this has
happened, contact your authorized Rotel dealer to get the fuse re-
placed.
No Sound
Check the signal source to see if it is functioning properly. Make
sure the cables from the signal source to the RC-971 inputs are
connected properly. Be sure the Listening Selector is set to the
proper input. Check the power amplifier for power and proper op-
eration. Check all the wiring between the RC-971 and the power
amplifier, and the power amplifier and speakers.
STEREO CONTROL AMPLIFIER RC-971

9
ATTENTION␣ :
Il n’y a à l’intérieur aucune pièce susceptible d’être modifiée par
l’utilisateur. Adressez-vous impérativement à une personne
qualifiée.
ATTENTION␣ :
Prenez garde à ce qu’aucun objet ou liquide ne tombe à l’intérieur
de l’appareil par ses orifices de ventilation␣ ; Si l’appareil est exposé
à l’humidité ou si un objet tombe à l’intérieur, couper
immédiatement l’alimentation secteur de tous les appareils.
Débrancher l’appareil des autres maillons, et adressez-vous
immédiatement et uniquement à une personne qualifiée et agréée.
Lisez les instructions - Tous les conseils de sécurité et d’installation doivent
être lus avant de faire fonctionner l’appareil. Conservez soigneusement ce
livret - Vous devez pouvoir le consulter à nouveau pour de futures références.
Respectez tous les conseils - Tous les conseils de sécurité doivent être
soigneusement respectés. Suivez les instructions - Respectez les procédures
d’installation et de fonctionnement indiquées dans ce manuel.
Entretien - L’appareil doit être nettoyé uniquement avec un chiffon sec ou un
aspirateur.
Ventilation - L’appareil doit être placé de telle manière que sa propre ventilation
puisse fonctionner. Par exemple, il ne doit pas être posé sur un fauteuil, un
canapé, une couverture ou tout autre surface susceptible de boucher ses ouïes
d’aération␣ ; ou placé dans un meuble empêchant la bonne circulation d’air
autour des orifices d’aération.
Chaleur - Cet appareil doit être placé loin de toute source de chaleur, tels que
radiateurs, chaudières, bouches de chaleur ou d’autres appareils (y compris
amplificateurs de puissance) produisant de la chaleur.
Cet appareil doit être branché sur une prise d’alimentation secteur,
d’une tension et d’un type conformes à ceux qui sont indiqués sur
la face arrière de l’appareil.
Brancher l’appareil uniquement grâce au cordon secteur fourni, ou à un
modèle équivalent. Ne pas tenter de modifier ou changer la prise. Notamment,
ne pas tenter de supprimer la prise de terre si celle-ci est présente. Ne pas
utiliser de cordon-rallonge.
Prendre garde à ce que ce cordon d’alimentation ne soit pas pincé, écrasé ou
détérioré sur tout son trajet, à ce qu’il ne soit pas mis en contact avec une
source de chaleur. Vérifier soigneusement la bonne qualité des contacts, à
l’arrière de l’appareil comme dans la prise murale.
Si l’appareil ne doit pas être utilisé pendant une longue période, la prise
secteur sera débranchée.
Service après vente - L’appareil doit être immédiatement éteint, débranché puis
retourné au service après-vente agréé dans les cas suivants␣ :
• Un objet est tombé, ou du liquide a coulé à l’intérieur de l’appareil.
• L’appareil a été exposé à la pluie.
• L’appareil ne fonctionne pas normalement, ou ses performances sont
anormalement limitées.
• L’appareil est tombé, ou le coffret est endommagé.
Placer l’appareil sur une surface plane, solide et rigide. Ne jamais placer
l’appareil sur une surface ou un support mobile pouvant basculer.
Sommaire
(Les numéros cerclés correspondent aux illustrations)
Au sujet de Rotel ____________________________________ 10
Démarrage __________________________________________ 10
Quelques précisions 10
Positionnement 10
Câbles 10
Alimentation électrique et mise en service ____________ 11
Prise d’alimentation secteur
13
11
Interrupteur de mise sous tension
2
et indicateur
Power
1
11
Prises de renvoi secteur
12
11
Branchements des sources en entrée
9
_____________ 11
Branchements d’un magnétophone
10
_______________ 11
Branchements en sortie
11
__________________________ 11
Face avant␣ : les commandes principales _______________ 12
Commande de volume
6
12
Mise hors service des correcteurs de timbre
5
12
Correcteurs de timbre
4
12
Sélecteur de la source en lecture
8
12
Sélecteur de la source en enregistrement
7
12
Prise casque
3
12
Problèmes de fonctionnement _______________________ 12
La diode Power ne s’allume pas 12
Remplacement du fusible 12
Pas de son 12
Spécifications _______________________________________ 30
Français

10
Au sujet de Rotel
C’est une famille de passionnés de musique qui a fondé Rotel, il y
a maintenant plus de trente ans. Pendant toutes ces années, leur
passion ne s’est jamais émoussée et tous les membres de la
famille se sont toujours battus pour fabriquer des appareils
présentant un exceptionnel rapport musicalité-prix, suivis en cela
par tous les employés.
Les ingénieurs travaillent toujours en équipe réduite, écoutant et
peaufinant soigneusement chaque appareil pour qu’il
corresponde parfaitement à leurs standards musicaux. Ils sont
libres de choisir n’importe quels composants dans le monde
entier, uniquement en fonction de leur qualité. C’est ainsi que
vous trouvez dans les appareils Rotel des condensateurs
britanniques ou allemands, des transistors japonais ou
américains, tandis que tous les transformateurs toriques sont
directement fabriqués dans une usine Rotel.
L’excellente réputation musicale des appareils Rotel a été saluée
par la plupart des magazines spécialisées␣ ; ils ont reçu
d’innombrables récompenses, et sont choisis par de nombreux
journalistes-critiques du monde entier, parmi les plus célèbres,
ceux qui écoutent de la musique quotidiennement. Leurs
commentaires restent immuables␣ : Rotel propose toujours des
maillons à la fois musicaux, fiables et abordables.
Mais plus que tout, Rotel vous remercie pour l’achat de cet
appareil, et souhaite qu’il vous apporte de nombreuses heures de
plaisir musical.
Démarrage
Nous vous remercions pour votre acquisition de ce
préamplificateur stéréo Rotel RC-971. En tant que maillon d’un
système haute-fidélité de très haute qualité, il vous apportera des
années de plaisir musical.
Le RC971 est un préamplificateur complet, de très hautes perfor-
mances, conçu pour reproduire toute la dynamique et les plus
subtiles nuances de votre musique préférée. Le RC971 utilise une
alimentation parfaitement régulée, avec un transformateur
toroïdal de conception Rotel. Il garantit à l’alimentation une très
faible impédance, d’où une parfaite réserve de puissance pour
tous les circuits. Ce type de conception est plus coûteux à
fabriquer, mais il est meilleur pour la musique.
Les circuits imprimés (PCB) sont conçus avec des trajets du sig-
nal parfaitement symétriques. Cela garantit un respect total des
composantes temporelles de la musique, là où des pistes
électriques de longueur différente pour les deux canaux
détruisent cette homogénéité temporelle. Les résistances à
couche métallique et les condensateurs au polystyrène ou
polypropylène sont spécialement choisis pour leur respect de la
musique. Le câblage interne est également réduit au minimum afin
d’obtenir la meilleure qualité sonore possible.
L’installation du RC971 est aussi simple que son utilisation. Si vous
êtes déjà habitué à une autre installation hifi, vous ne
rencontrerez aucun problème. Il suffit de brancher les maillons
complémentaires et d’écouter␣ !
Quelques précautions
Veuillez lire très soigneusement ce manuel d’utilisation. Il vous
indique tout ce qu’il faut savoir pour intégrer parfaitement ce
préamplificateur dans votre chaîne, et comment en tirer les per-
formances optimales. Si vous vous posez ensuite encore des
questions, veuillez contacter votre revendeur agréé Rotel, qui se
fera un plaisir d’y répondre.
Conservez le carton d’emballage et tous ses composants. Il
constitue le meilleur moyen pour transporter l’appareil dans le
futur, sans risque de détérioration.
Conservez la facture d’achat et renvoyez le bon d’enregistrement
fourni avec l’appareil. Vous avez ainsi la preuve de la date
d’achat, qui vous sera utile dans le cas où il serait nécessaire de
faire jouer la garantie.
Positionnement
Comme tous les appareils traitant des signaux de faible tension et
intensité, le RC971 est relativement sensible à son environnement
proche. Evitez de le poser sur l’amplificateur de puissance, ce qui
pourrait générer une sensibilité aux interférences émises par ce
dernier. Nous vous recommandons d’installer le RC971 dans un
meuble spécialement destiné aux appareils hifi. De tels meubles
adaptés réduisent ou suppriment également les vibrations, ce qui
améliore la qualité sonore de tous les maillons de la chaîne. Pour
de plus amples renseignements sur ce type de meuble et sur
l’installation correcte des divers éléments de la chaîne haute-
fidélité, veuillez-vous adresser à votre revendeur agréé Rotel.
Câbles
Pendant l’installation, prenez un soin particulier aux trajets
respectifs des câbles d’alimentation secteur, câbles de modula-
tion analogique et câbles de signal numérique, afin d’éviter toute
interférence entre eux. N’utilisez que des câbles de haute qualité,
soigneusement blindés afin d’éviter toute dégradation du signal
entre les maillons. Votre revendeur agréé Rotel est en mesure de
vous apporter toute l’information nécessaire concernant le choix
de câbles de liaison de qualité.
PRÉAMPLIFICATEUR STÉRÉO RC-971

11
Alimentation électrique
et mise en service
Prise d’alimentation secteur
13
Le RC-971 ne consomme pas beaucoup de courant secteur.
Cependant, il est équipé de deux prises de renvoi en face arrière
qui peuvent servir à alimenter deux autres appareils du système.
Branchez le câble d’alimentation secteur dans une prise murale.
Evitez d’utiliser des câbles rallonges. Si vous utilisez les prises de
renvoi secteur à l’arrière, prévoyez une prise d’alimentation de
capacité suffisante (fort ampérage). Le préamplificateur RC971 est
configuré en usine, sa tension correcte étant indiquée sur sa face
arrière (115 ou 230␣ volts, 50 ou 60␣ Hz). Ne pas respecter cette ten-
sion entraîne la destruction de l’appareil et annule la garantie.
Note␣ : si vous devez déménager dans un autre pays, il est possible
de modifier la tension d’alimentation de votre appareil. Cette
modification est exclusivement réalisée en usine␣ : demandez
conseil à un revendeur agréé Rotel. Il n’y a pas de pièces
susceptibles d’être modifiées ou de commandes à l’intérieur du
coffret. Ne pas enlever son capot␣ : vous risqueriez l’électrocution.
Cela peut également endommager les circuits internes, et annule
la garantie.
Si vous quittez votre domicile pendant une longue période (un
mois ou plus), débranchez la prise d’alimentation secteur (de
même que celles des autres maillons audio et vidéo).
Interrupteur de mise sous tension
2
et
indicateur Power
1
L’interrupteur de mise sous tension se trouve à gauche de la face
avant. Lorsque l’appareil est effectivement sous tension, la diode
Power s’allume. Une seconde pression sur cet interrupteur éteint
l’appareil.
Prises de renvoi secteur
12
(appareils USA
uniquement)
Les récentes normes électriques européennes CE ne rendent pas
compatibles, sur les appareils commercialisés en France (et en
Europe), a présence et l’usage de ces prises.
Branchements des sources
en entrée
9
[Voir la figure 3 pour la position des différentes prises]
Le RC971 est équipé de prises d’entrée au standard traditionnel
Cinch-RCA, le type le plus répandu sur les maillons audio vidéo.
Note␣ : pour éviter tout bruit parasite susceptible d’endommager
les enceintes acoustiques, toujours éteindre le système avant
d’effectuer des branchements sur celui-ci.
Les entrées repérées CD, Tuner et Aux du RC971 sont des entrées
de type «␣ haut niveau␣ ». Elles peuvent recevoir des appareils aussi
différents qu’un tuner radio, un lecteur de Cd, un magnétoscope
(en lecture son), un lecteur de CD-Rom␣ , etc.
Les canaux Gauche (Left) et Droit (Right) sont clairement repérés
et doivent être reliés aux canaux correspondants des sources. Le
canal gauche est blanc, le canal droit rouge. N’utilisez que des
câbles blindés de très haute qualité. Pour cela, demandez conseil
à votre revendeur agréé Rotel.
Note␣ : le maillon complémentaire Rotel RQ970BX est un
préamplificateur Phono qui vous permettra de brancher sur le
RC971 une platine tourne-disque. Consultez votre revendeur agréé
Rotel pour de plus amples renseignements sur ce maillon
optionnel.
Branchement d’un magnétophone
10
[Voir la figure 4 pour la position des différentes prises]
Pour branche un enregistreur de type analogique (cassette,
magnétoscope, etc.), utilisez les prises d’entrée et sortie repérées
TAPE 1 IN et OUT.
N’oubliez jamais que les prises IN reçoivent le signal en prov-
enance de l’enregistreur (pour lecture d’une bande, sorties Out
sur l’enregistreur)) tandis que les prises OUT envoient le signal
depuis le préamplificateur RC971 vers le magnétophone, pour
enregistrement (prises In sur l’enregistreur). Le jeu de prises
TAPE 2 fonctionne de la même manière, pour un second
enregistreur. Comme pour les autres entrées, respectez les
canaux gauche et droit et utilisez des câbles de haute qualité.
Branchements en sortie
11
[Voir la figure 2 pour la position des différentes prises de sortie]
Le RC971 possède des prises de sortie au standard Cinch-RCA,
compatibles avec la majorité des entrées des amplificateurs de
puissance. Utilisez du câble de très haute qualité, et respectez ici
aussi le bon branchement des canaux gauche (left) et droit (right).
Note␣ : une seconde paire de prises est disponible, afin de pouvoir
fournir le signal à un second amplificateur de puissance
stéréophonique ou à un processeur de son particulier.
Français

12
Face avant␣ :
les commandes principales
Contrôle de volume
6
Le bouton de VOLUME permet d’augmenter ou de diminuer
simultanément le niveau sonore sur les deux canaux gauche (L) et
droit (R). La rotation dans le sens des aiguilles d’une montre
augmente le volume, et la rotation dans le sens inverse des aigu-
illes d’une montre le diminue. Pour compenser un éventuel
déséquilibre de niveau entre les deux canaux, vous noterez que
ce bouton est en fait constitué de deux parties.
Pour modifier le volume sur un seul canal, maintenez une des
deux parties du bouton de VOLUME (avant ou arrière) tout en
tournant l’autre. Ce double potentiomètre permet de régler les
niveaux de manière très précise.
Mise hors service des correcteurs de timbre
5
Lorsque ce sélecteur est en position «␣ Off␣ », les circuits de correc-
tion de timbre sont court-circuités afin de conserver le son le plus
naturel et le plus pur possible. Nous vous conseillons de laisser
toujours ce sélecteur sur Off, sauf lorsque, pour une source
particulière, vous désirez utiliser les correcteurs de timbre.
Correcteurs de timbre
4
Lorsque la commande précédente est en position «␣ On␣ », le fait de
tourner les boutons repérés Bass (Grave) et Treble (Aigu) permet de
régler la balance tonale du son. Le bouton repéré BASS permet
d’augmenter ou de diminuer le niveau des fréquences graves. Tournez-
le vers la droite pour augmenter le niveau, vers la gauche pour
l’atténuer. Le bouton repéré TREBLE fonctionne exactement de la
même manière, mais pour les fréquences aiguës. La position centrale
crantée garantit une réponse en fréquence complètement linéaire.
Normalement, on doit pourvoir se passer des correcteurs de tim-
bre dans un système de haute qualité, avec des sources
particulièrement équilibrées. Si toutefois vous désirez utiliser ces
correcteurs de timbre, faites-le de manière parcimonieuse.
N’oubliez pas non plus qu’en augmentant les fréquences aiguës et
surtout graves, vous augmentez la puissance fournie par
l’amplificateur et donc la charge de travail des haut-parleurs.
Sélecteur de la source en lecture
8
Le sélecteur d’écoute Listening vous permet de choisir la source
que vous désirez écouter. Il est totalement indépendant du
sélecteur d’enregistrement Recording, ce qui vous permet
d’écouter n’importe quelle source pendant que vous en
enregistrez une autre.
Sélecteur de la source en enregistrement
7
Le sélecteur d’enregistrement Recording permet d’enregistrer
n’importe quelle source en la sélectionnant simplement sur une
position de sa course. Les connexions vers les enregistreurs sont
repérées Tape 1 et Tape 2.
Vous noterez que vous pouvez copier de Tape 1 sur Tape 2 (copie
de bande à bande), mais pas de Tape 2 vers Tape 1␣ : la position
correspondante du sélecteur Recording n’existe pas. Il est pos-
sible d’écouter n’importe quelle source pendant que l’on en
enregistre une autre.
Quand vous ne faites aucun enregistrement, nous vous
recommandons de laisser ce sélecteur sur la position repérée Off,
afin de conserver la plus grande pureté sonore possible. Cela
élimine complètement le sélecteur du circuit du signal. Ce
sélecteur est totalement indépendant du sélecteur d’écoute Lis-
tening.
Prise casque
3
Elle permet d’utiliser un casque équipé d’une prise au format jack
6,35␣ mm. Des adaptateurs existent pour les casques équipés
d’une prise différente (jack 3,5␣ mm, par exemple). Contactez votre
revendeur pour de plus amples informations. Note␣ : le fait de
brancher un casque ne coupe pas le son dans les sorties vers les
amplificateurs de puissance␣ ; ceux-ci continuent à être alimentés
s’ils sont allumés.
Problèmes de fonctionnement
La majorité des problèmes dans une chaîne haute-fidélité provient
de mauvais branchements, ou de sélecteurs ou commandes mal
positionnés. En cas de difficulté, essayez de cerner le problème
(quelle source, quel canal, etc.), vérifiez la position des différents
interrupteurs et sélecteurs et effectuez les modifications
nécessaires.
La diode Power ne s’allume pas
Cette diode Power doit être allumée lorsque le RC971 est sous
tension et allumé. Vérifiez que la prise murale est bien enfoncée,
le bouton Power pressé. Vérifiez que la prise est bien alimentée,
en branchant par exemple une lampe d’éclairage à la place du
RC971.
Remplacement du fusible
Si la diode ne s’allume toujours pas alors que tout est par ailleurs
normal, le fusible de protection interne du RC971 a peut-être
fondu. Veuillez dans ce cas contactez votre revendeur agréé Rotel
qui se chargera de le vérifier et éventuellement de le changer.
Pas de son
Vérifiez la présence réelle de signal à la source. Vérifiez que tous
les branchements sont correctement effectués. Vérifiez que le
sélecteur d’écoute Listening est bien positionné sur la bonne
source. Vérifiez que l’amplificateur de puissance est bien
branché, allumé, et fonctionne correctement. Vérifiez une fois en-
core tous les câbles entre le RC971 et l’amplificateur de puis-
sance, puis entre celui-ci et les enceintes acoustiques.
PRÉAMPLIFICATEUR STÉRÉO RC-971

13
SICHERHEITS- UND WARNHINWEISE
Bitte lesen Sie sich die Bedienungsanleitung vor Gebrauch des Gerätes genau
durch. Sie enthält wichtige Sicherheitsvorschriften, die unbedingt zu beachten
sind! Bewahren Sie die Bedienungsanleitung so auf, daß sie jederzeit
zugänglich ist.
Außer den in der Bedienungsanleitung beschriebenen Handgriffen sollten vom
Bediener keine Arbeiten am Gerät vorgenommen werden. Das Gerät ist
ausschließlich von einem qualifizierten Fachmann zu öffnen und zu reparieren.
Dieses Gerät darf nur in trockenen Räumen betrieben werden. Um die Gefahr
von Feuer oder eines elektrischen Schlags auszuschließen, dürfen keine
Flüssigkeiten oder Fremdkörper in das Gerät gelangen. Sollte dieser Fall
trotzdem einmal eintreten, trennen Sie das Gerät sofort vom Netz ab. Lassen
Sie es von einem Fachmann prüfen und die notwendigen Reparaturarbeiten
durchführen.
Befolgen Sie alle Warn- und Sicherheitshinweise in der Bedienungsanleitung
und auf dem Gerät.
Dieses Gerät sollte, wie andere Elektrogeräte auch, nicht unbeaufsichtigt
betrieben werden.
Ist das Gerät z.B. während des Transports über längere Zeit Kälte ausgesetzt
worden, so warten Sie mit der Inbetriebnahme, bis es sich auf Raumtemperatur
erwärmt hat und das Kondenswasser verdunstet ist.
Die Ventilationsöffnungen am Gerät dürfen nicht blockiert werden. Stellen Sie
das Gerät daher weder auf ein Bett, Sofa, Teppich oder ähnliche Oberflächen.
Ferner sollte es nicht an einem Ort aufgestellt werden, an dem keine
ausreichende Luftzufuhr gegeben ist, zum Beispiel in einem engen Regalfach
oder in einem Einbauschrank.
Stellen Sie das Gerät nicht in die Nähe von Wärmequellen (Heizkörper,
Wärmespeicher, Öfen oder sonstige wärmeerzeugende Geräte).
Bevor Sie das Gerät in Betrieb nehmen, prüfen Sie, ob die
Betriebsspannung mit der örtlichen Netzspannung übereinstimmt.
Die Betriebsspannung ist an der Rückseite des Gerätes angegeben.
Schließen Sie das Gerät nur mit dem dazugehörigen zweipoligen Netzkabel an
die Wandsteckdose an. Modifizieren Sie das Netzkabel auf keinen Fall.
Versuchen Sie nicht, die Erdungs- und/oder Polarisationsvorschriften zu
umgehen. Das Netzkabel sollte an eine zweipolige Wandsteckdose
angeschlossen werden. Verwenden Sie keine Verlängerungskabel.
Netzkabel sind so zu verlegen, daß sie nicht beschädigt werden können (z.B.
durch Trittbelastung, Möbelstücke oder Erwärmung). Besondere Vorsicht ist
dabei an den Steckern, Verteilern und den Anschlußstellen des Gerätes
geboten.
Sollten Sie das Gerät für eine längere Zeit nicht in Betrieb nehmen, ziehen Sie
den Netzstecker aus der Steckdose.
Schalten Sie das Gerät sofort aus und ziehen Sie geschultes Fachpersonal zu
Rate, wenn:
• das Netzkabel oder der Stecker beschädigt sind,
• Gegenstände bzw. Flüssigkeit in das Gerät gelangt sind,
• das Gerät Regen ausgesetzt war,
• das Gerät nicht ordnungsgemäß funktioniert bzw. eine deutliche
Leistungsminderung aufweist,
• das Gerät hingefallen ist bzw. beschädigt wurde.
Ziehen Sie den Netzstecker aus der Steckdose, bevor Sie mit der Reinigung des
Gerätes beginnen. Reinigen Sie die Oberflächen des Gerätes nur mit einem
weichen, trockenen Tuch. Verwenden Sie keine scharfen Reinigungs- oder
Lösungsmittel. Vor der erneuten Inbetriebnahme des Gerätes ist
sicherzustellen, daß an den Anschlußstellen keine Kurzschlüsse bestehen und
alle Anschlüsse ordnungsgemäß sind.
Stellen Sie das Gerät waagerecht auf eine feste, ebene Unterlage. Es sollte
weder auf beweglichen Unterlagen noch Wagen oder fahrbaren Untergestellen
transportiert werden.
Inhaltsverzeichnis
(die mit einem Kreis markierten Zahlen beziehen sich
auf die Abbildungen)
Die Firma Rotel ______________________________________ 14
Zu dieser Anleitung __________________________________ 14
Einige Vorsichtsmaßnahmen 14
Aufstellung des Gerätes 14
Kabel 14
Netzspannung und Bedienung _______________________ 15
Netzanschluß
13
15
Netzschalter
2
und Betriebsanzeige
1
15
Eingangsanschlüsse
9
_____________________________ 15
Tape-Anschlüsse
10
_________________________________ 15
Ausgangsanschlüsse
11
_____________________________ 15
Bedienelemente an der Gerätefront ___________________ 16
Lautstärkeregelung (VOLUME)
6
16
Klangregelung (TONE)
5
16
Tiefen- und Höhenregler (BASS/TREBLE)
4
16
Listening-Wahlschalter
8
16
Record-Select-Wahlschalter
7
16
Kopfhörerbuchse (PHONES)
3
16
Bei Störungen _______________________________________ 16
Die Betriebsanzeige leuchtet nicht 16
Austauschen der Sicherung 16
Kein Ton 16
Technische Daten ____________________________________ 30
Deutsch

14
Die Firma Rotel
Die Firma Rotel wurde vor mehr als 30 Jahren von einer Familie
gegründet, deren Interesse an Musik so groß war, daß sie
beschloß, hochwertigste HiFi-Produkte herzustellen und
Musikliebhabern ungeachtet ihres Geldbeutels einen
außergewöhnlichen Wert zukommen zu lassen. Ein Ziel, das von
allen Rotel-Angestellten verfolgt wird.
Die Ingenieure arbeiten als Team eng zusammen. Sie hören sich
jedes Gerät an und optimieren es klanglich, bis es den
gewünschten Musikstandards entspricht. Die eingesetzten
Bauteile stammen aus verschiedenen Ländern und wurden
ausgewählt, um das jeweilige Produkt zu optimieren. So finden
Sie Kondensatoren aus Großbritannien und Deutschland,
Halbleiter aus Japan oder den USA und direkt bei Rotel gefertigte
Ringkerntransformatoren.
Rotels guter Ruf wird durch hunderte von Testerfolgen von den
angesehensten Testern der Branche, die jeden Tag Musik hören,
untermauert. Die Ergebnisse beweisen, daß das Unternehmen
sein Ziel konsequent verfolgt hat, mit Equipment hoher Musikalität
und Zuverlässigkeit bei gleichzeitig günstigen Preisen.
Wir danken Ihnen für Ihr Vertrauen in die Marke Rotel und
wünschen Ihnen viel Hörvergnügen.
Zu dieser Anleitung
Wir danken Ihnen, daß Sie sich für den Rotel-Stereo-
Vorverstärker RC-971 entschieden haben. Dieses einzigartige
Gerät kann optimal in jedem hochwertigen Audio-System
eingesetzt werden.
Der RC-971 überzeugt durch höchste Wiedergabequalität und ist
mit einer Vielzahl von Ausstattungsmerkmalen ausgestattet. Bei
der Entwicklung des RC-971 wurde besonderer Wert darauf
gelegt, den kompletten Dynamikbereich und feinste Nuancen der
Musik wiederzugeben. Der RC-971 überzeugt mit einem großzügig
dimensionierten Netzteil mit Ringkerntransformator. Dieses
niederohmige Netzteil hat extreme Leistungsreserven, die es dem
Vorverstärker ermöglichen, die anspruchsvollsten Musiksignale
zu verarbeiten. Zwar ist diese Konstruktion teurer in der
Herstellung, die Musikwiedergabe jedoch profitiert davon
deutlich.
Die Signalwege sind streng symmetrisch gehalten, um
Laufzeitunterschiede in den Kanälen zu verhindern. Auf der
Platine werden Metallfilmwiderstände und Polystyrol- bzw.
Polypropylenkondensatoren eingesetzt, die die Signale
klanggetreu übertragen. Alle Aspekte dieser Konstruktion dienen
nur dem Ziel der möglichst originalgetreuen Wiedergabe von
Musik.
Der RC-971 ist einfach zu installieren und zu bedienen. Sollten Sie
bereits Erfahrung mit der Installation anderer Stereo-Systeme
haben, dürften keinerlei Probleme auftreten. Schließen Sie
einfach die gewünschten Geräte an (siehe Anschlußdiagramme
am Anfang dieser Bedienungsanleitung).
Einige Vorsichtsmaßnahmen
Lesen Sie sich die Bedienungsanleitung bitte vor der
Inbetriebnahme genau durch. Neben grundsätzlichen Installa-
tions- und Bedienungshinweisen (bitte beachten Sie auch die
Sicherheits- und Warnhinweise am Anfang der
Bedienungsanleitung) enthält sie allgemeine Informationen, die
Ihnen helfen werden, Ihr System mit seiner maximalen
Leistungsfähigkeit zu betreiben. Bitte setzen Sie sich bei etwaigen
Fragen mit Ihrem autorisierten Rotel-Fachhändler in Verbindung.
Bewahren Sie den Versandkarton und das übrige
Verpackungsmaterial des RC-971 für einen eventuellen späteren
Einsatz auf. Der Versand oder Transport des Vorverstärkers in
einer anderen als der Originalverpackung kann zu erheblichen
Beschädigungen des Gerätes führen.
Schicken Sie die Ihrem Vorverstärker beiliegende
Garantieanforderungskarte ausgefüllt an den Rotel-Distributor in
Ihrem Land. Bewahren Sie bitte die Original-Kaufquittung auf. Sie
belegt am besten das Kaufdatum, das für Sie wichtig wird, sobald
Sie eine Garantieleistung in Anspruch nehmen.
Aufstellung des Gerätes
Wie bei vielen anderen Audio-Komponenten auch, kann die
Signalqualität des RC-971 durch andere Geräte beeinträchtigt
werden. Stellen Sie den RC-971 nicht auf eine Endstufe. So
verhindern Sie Brummen bzw. Interferenzen. Wir empfehlen, ihn
in entsprechendem HiFi-Mobiliar unterzubringen. HiFi-Mobiliar ist
so ausgelegt, daß klangbeeinträchtigende Erschütterungen
gedämpft bzw. unterdrückt werden. Lassen Sie sich von Ihrem
autorisierten Rotel-Fachhändler in bezug auf HiFi-Mobiliar und die
optimale Aufstellung von Audio-Komponenten beraten.
Kabel
Achten Sie bitte darauf, daß Netz-, Digital- und die normalen
Audio-Signalkabel separat verlaufen. Dies minimiert die
Wahrscheinlichkeit, daß Netz- bzw. Digitalkabel die Signale der
Analogkabel stören. Wir empfehlen, hochwertige abgeschirmte
Kabel zu verwenden. Wenden Sie sich bei etwaigen Fragen zu
den optimalen Kabeln für Ihr System an Ihren autorisierten Rotel-
Fachhändler.
STEREO-VORVERSTÄRKER RC-971

15
Netzspannung und Bedienung
Netzanschluß
13
Der RC-971 benötigt keine hohen Strommengen. Dennoch sollte
der RC-971 direkt an eine zweipolige Wandsteckdose
angeschlossen werden. Verwenden Sie kein Verlängerungskabel.
Ihr RC-971 wird von Rotel so eingestellt, daß er der in Ihrem Land
üblichen Wechselspannung (entweder 230 Volt Wechselspannung
oder 115 Volt Wechselspannung mit einer Netzfrequenz von 50 Hz
oder 60 Hz) entspricht. Die Einstellung ist an der Geräterückseite
angegeben.
HINWEIS: Sollten Sie mit Ihrem RC-971 in ein anderes Land
umziehen, kann die Einstellung des Vorverstärkers geändert
werden, so daß er mit einer anderen Netzspannung betrieben
werden kann. Versuchen Sie auf keinen Fall, diese Änderung
selber vorzunehmen. Durch Öffnen des Vorverstärkergehäuses
setzen Sie sich gefährlichen Spannungen aus. Ziehen Sie hierzu
stets qualifiziertes Servicepersonal zu Rate.
Sind Sie, wie z.B. bei einer mehrwöchigen Urlaubsreise, für
längere Zeit nicht zu Hause, sollten Sie Ihren Vorverstärker
(ebenso wie alle anderen Audio- und Videokomponenten)
während Ihrer Abwesenheit vom Netz trennen.
Netzschalter
2
und Betriebsanzeige
1
Der Netzschalter ist links in die Gerätefront integriert. Durch
Drücken des Netzschalters wird der Vorverstärker eingeschaltet,
und die Betriebsanzeige beginnt zu leuchten. Durch erneutes
Drücken wird der Vorverstärker ausgeschaltet.
Eingangsanschlüsse
9
[siehe Anschlußdiagramm in Abb. 3]
Der RC-971 verfügt über Cinch-Anschlüsse wie sie an jedem
hochwertigen Audiogerät zu finden sind.
HINWEIS: Beim Verkabeln und Anschließen sollten die Geräte
generell abgeschaltet sein.
Bei den mit CD, TUNER und AUX gekennzeichneten Eingängen
des RC-971 handelt es sich um Hochpegeleingänge. Diese dienen
zum Anschluß von Geräten wie CD-Playern, HiFi-Stereo-Video-
und -Cassettenrecordern, Tunern für Audio oder Video, Minidisc-
Playern oder des Analogausgangs eines CD-ROM-Laufwerks.
Die linken und rechten Kanäle sind farbig gekennzeichnet.
Die linken Cinch-Buchsen weiß, die rechten Cinch-Buchsen
rot. Sie sind an die entsprechenden Kanäle der
Quellkomponenten anzuschließen. Wir empfehlen Ihnen, zum
Anschluß der Eingangsquellen an den RC-971 hochwertige
Cinch-Kabel zu verwenden. Lassen Sie sich diesbezüglich
von Ihrem autorisierten Rotel-Fachhändler beraten.
HINWEIS: Durch den Anschluß des Rotel-Phono-
Vorverstärkers RQ-970 kann der RC-971 mit einem
Plattenspieler verbunden werden. Lassen Sie sich
diesbezüglich von Ihrem autorisierten Rotel-Fachhändler
beraten.
Tape-Anschlüsse
10
[siehe Anschlußdiagramm in Abb. 4]
Die mit Tape 1 und Tape 2 gekennzeichneten Ein- und
Ausgänge können an jedes beliebige Aufnahme- und
Wiedergabegerät angeschlossen werden, das analoge
Hochpegel-Ein- und Ausgangssignale verarbeiten kann.
Normalerweise wird dies ein herkömmlicher
Cassettenrecorder sein.
Denken Sie beim Anschluß eines Recorders an den RC-971
daran, daß die Ausgänge des Recorders mit den Tape-
Eingängen des RC-971 verbunden werden müssen.
Dementsprechend sind die Tape-Ausgänge des RC-971 mit
den Tape-Eingängen des Recorders zu verbinden. Stellen Sie,
wie bei den anderen Quellen auch, sicher, daß die linken und
rechten Kanäle zu jedem Gerät mit den entsprechenden
Kanälen der angeschlossenen Komponenten verbunden
werden. Verwenden Sie hochwertige Verbindungskabel, um
eine optimale Klangqualität zu gewährleisten.
Ausgangsanschlüsse
11
[siehe Anschlußdiagramm in Abb. 2]
Der RC-971 verfügt über Cinch-Ausgangsanschlüsse, die mit
den Eingangsanschlüssen der meisten Endstufen verbunden
werden können. Schließen Sie nun zwei Kabel an die
Ausgänge des Vorverstärkers an und verbinden diese mit
den Eingängen der Endstufe. Auch hier empfehlen wir,
hochwertige Kabel einzusetzen. Achten Sie auf die korrekte
Polung der Anschlüsse.
Hinweis: An der Rückseite des RC-971 befindet sich
zusätzlich ein weiteres Paar Cinch-Ausgangsbuchsen.
Dieses gleichwertige Buchsenpaar dient in besonderen
Systemkonfigurationen zum Anschluß einer zweiten Endstufe
bzw. zur Signalübertragung an einen speziellen
Signalprozessor.
Deutsch

16
Bedienelemente an der Gerätefront
Lautstärkeregelung (VOLUME)
6
Durch Drehen des Lautstärkereglers (VOLUME) im Uhrzeigersinn
wird die Lautstärke auf beiden Kanälen erhöht, durch Drehen
gegen den Uhrzeigersinn reduziert. Sie können aber auch die
Lautstärke nur eines Kanals verändern. Dazu besteht der Regler
aus zwei gegeneinander verdrehbaren Teilen. Halten Sie den
vorderen (bzw. hinteren) Teil des Lautstärkereglers fest und
drehen Sie den anderen Teil auf die gewünschte Lautstärke. Auf
diese Weise können Sie das Kanalgleichgewicht einstellen oder
die Musik nur über einen Kanal hören.
Klangregelung (TONE)
5
Normalerweise sollten Sie diesen Schalter in der OFF-Position
lassen. Die Klangregler arbeiten dann nicht, und die Signale
werden ohne Beeinträchtigung der Klangqualität am
Klangregelnetzwerk vorbeigeleitet. Möchten Sie den Klang
verändern, so stellen Sie diesen Regler in die ON-Position.
Tiefen- und Höhenregler (BASS/TREBLE)
4
Der BASS-Regler dient zur Einstellung der Tiefen, der TREBLE-
Regler zur Einstellung der Höhen. Stehen die beiden Regler in der
Mittenposition, so erhält man einen ausgeglichenen
Frequenzgang. Zum Anheben der Frequenzbereiche drehen Sie
den jeweiligen Regler nach rechts, zum Absenken nach links.
Ein exakt eingestelltes erstklassiges Audio-System erzeugt einen
originalgetreuen Klang, so daß nur geringe oder gar keine
Änderungen in der Klangregelung vorgenommen werden müssen.
Seien Sie besonders vorsichtig, wenn Sie die Regler im
Uhrzeigersinn drehen, da sich hierdurch die Belastung für
Endstufe und Lautsprecher erhöht.
Listening-Wahlschalter
8
Die Einstellung des Listening-Wahlschalters entscheidet darüber,
welche Quelle Sie über die Lautsprecher hören.
Record-Select-Wahlschalter
7
Mit dem Record-Select-Wahlschalter wird die Aufnahmequelle
angewählt. Möchten Sie nicht aufnehmen, empfehlen wir, den
Record-Select-Wahlschalter in die Off-Position zu setzen, um die
Wahrscheinlichkeit von Wechselwirkungen mit anderen
Systemkomponenten auf ein Minimum zu reduzieren.
Separate Listening- und Record-Select-Wahlschalter erhöhen die
Flexibilität beim Einsatz des RC-971. Stellen Sie beispielsweise
den Record-Select-Wahlschalter auf CD und den Listening-
Wahlschalter auf Tuner, so können Sie die CD aufnehmen,
während Sie mit dem Tuner Musik hören.
Der Record-Select-Wahlschalter besitzt keine Tape 2-Position.
Möchten Sie eine Aufnahme von einem Recorder auf einen
anderen überspielen, so schließen Sie das Quellgerät an den
Tape 1-Eingang an. Setzen Sie den Record-Select-Schalter auf
Position „Tape 1“. Schließen Sie das Aufnahmegerät an den
Tape 2-Ausgang an.
Kopfhörerbuchse (PHONES)
3
Über die Kopfhörerbuchse (PHONES) kann ein Kopfhörer
angeschlossen werden. Diese Buchse ist auf die Verwendung von
Standard-Stereo-Kopfhörersteckern ausgelegt. Sollte der Stecker
Ihres Kopfhörers nicht passen, fragen Sie Ihren autorisierten
Rotel-Fachhändler nach einem geeigneten Adapter.
Hinweis: Auch bei Verwendung von Kopfhörern erhält die Endstufe
Signale, und über die Lautsprecher ist weiterhin Musik zu hören.
Bei Störungen
Tritt eine scheinbare Fehlfunktion auf, sollten zuerst die
nachstehend aufgeführten Punkte überprüft werden. Viele
Probleme beruhen auf Einstellungsfehlern oder fehlerhaften
Anschlüssen. Sollten Störungen auftreten, grenzen Sie den
Bereich ein. Versuchen Sie, die Ursache für die Störung
herauszufinden. Prüfen Sie die Einstellung der Regler und nehmen
Sie gegebenenfalls die erforderlichen Änderungen vor. Läßt sich
das Problem nicht beheben, wenden Sie sich bitte an Ihren
autorisierten Rotel-Fachhändler.
Die Betriebsanzeige leuchtet nicht
Bei ordnungsgemäßem Betrieb beginnt die Betriebsanzeige zu
leuchten, wenn der RC-971 an eine stromführende Wandsteckdose
angeschlossen wird. Leuchtet sie nicht, prüfen Sie mit einem anderen
elektrischen Verbraucher, z.B. einer Lampe, ob die Steckdose
tatsächlich Strom führt. Prüfen Sie, ob der Strom nicht durch einen
dazwischengeschalteten Schalter abgeschaltet worden ist.
Austauschen der Sicherung
Funktioniert ein anderes elektrisches Gerät an einer Steckdose,
während die Betriebsanzeige RC-971 nicht leuchtet, wenn der
Vorverstärker an diese Steckdose angeschlossen wird, so kann
dies ein Hinweis darauf sein, daß die Grobsicherung im
Gehäuseinnern durchgebrannt ist. Trennen Sie den Vorverstärker
vom Netz und lassen Sie die Sicherung von Ihrem autorisierten
Rotel-Fachhändler auswechseln.
Kein Ton
Prüfen Sie, ob die Signalquelle einwandfrei funktioniert.
Vergewissern Sie sich, ob die Kabel von der Signalquelle zu den
Eingängen des RC-971 ordnungsgemäß angeschlossen sind.
Stellen Sie sicher, daß der Listening-Wahlschalter auf den
richtigen Eingang geschaltet ist und die Endstufe einwandfrei
arbeitet. Prüfen Sie alle Verbindungskabel zwischen dem RC-971
und der Endstufe bzw. der Endstufe und den Lautsprechern.
STEREO-VORVERSTÄRKER RC-971

17
Italiano
Avvertenza:
Non contiene parti ad uso dell’utente. Per l’assistenza fate
riferimento a personale qualificato.
Avvertenza:
Per ridurre il rischio di scossa o incendio, non esponete questo
apparecchio a pioggia o umidità. Non lasciate che oggetti estranei
cadano all’interno dell’apparecchio. Nel caso questo venisse
esposto a umidità o un oggetto estraneo vi cadesse all’interno,
togliete immediatamente il cordone di alimentazione dalla parete.
Portate l’apparecchio a una persona qualificata per la
manutenzione per effettuare un controllo e le necessarie
riparazioni.
Leggere le istruzioni tutte le istruzioni d’uso e di sicurezza prima di attivare
l’apparecchiatura. Conservate questo manuale di istruzioni per farvi
riferimento in caso di sicurezza.
Seguite tutte le avvertenze e le istruzioni di sicurezza in questo manuale e sul
prodotto stesso. Seguite tutte le indicazioni di utilizzo.
Pulite l’apparecchio solo con un panno asciutto o un aspirapolvere.
Mantenete le prese di ventilazione sull’apparecchiatura libere. Per esempio,
l’apparecchiatura non dovrebbe essere posta su un letto, divano, tappeto, o
posti che possano bloccare le aperture di ventilazione. Se l’apparecchiatura
viene collocata in una libreria o in un armadietto ci deve essere sufficiente
passaggio d’aria intorno all’apparecchio per rendere possibile un corretto
raffreddamento.
Mantenete l’apparecchiatura lontano da caloriferi, termostati, stufe, o altri
apparecchi che producano calore
L’apparecchiatura dovrebbe essere collegata solamente a una
sorgente elettrica del tipo e del voltaggio segnato sul pannello
posteriore dell’apparecchiatura.
Collegate l’apparecchiatura ad una presa di alimentazione solo con il cavo di
alimentazione provvisto a due fili polarizzati o con uno similare. Non modificate
in alcun caso il cavo fornito. Non cercate di evitare la messa a terra o la
polarizzazione. Il cavo dovrebbe essere collegato a una spina a muro a due
poli compatibile con la presa a lamella. Non fate uso di prolunghe.
Non fate passare i cavi di alimentazione dove potrebbero essere calpestati o
piegati ad angoli acuti, esposti a calore o danneggiati in alcun caso. Fate
particolare attenzione al cavo di alimentazione in corrispondenza della spina e
del punto da cui esce dall’apparecchiatura.
Il cordone di alimentazione dovrebbe essere scollegato quando
l’apparecchiatura è inutilizzata per un periodo piuttosto lungo.
Smettete immediatamente di utilizzare l’apparecchiatura e fatela ispezionare e/
o controllare da un’assistenza qualificata se:
a. Il cavo di alimentazione o la spina sono stati danneggiati.
b. Oggetti sono caduti, o del liquido è stato versato nell’apparecchio.
c. L’apparecchiatura è stata esposta alla pioggia.
d. L’apparecchiatura non sembra funzionare in modo normale.
e. L’apparecchiatura è caduta, o il cabinet è rimasto danneggiato.
L’apparecchiatura dovrebbe essere collocata su una superficie fissa e piana
forte abbastanza per portarne il peso. Non collocate l’apparecchiatura su un
carrello mobile che potrebbe ribaltarsi.
AVVERTENZA
PER RIDURRE IL RISCHIO DI SCOSSA ELETTRICA NON
ESPONETE L’APPARECCHIO A PIOGGIA O UMIDITA’
Rischio di scossa
elettrica, non aprire.
Avvertenza: per ridurre il rischio di scossa, non togliete il
coperchio del cabinet. Non contiene parti utili per l'utente.
Per l'assistenza fate riferimento a personale qualificato.
ATTENZIONE
Il fulmine inserito in un triangolo vi avverte
della presenza di materiale non isolato a
"voltaggio elevato" all'interno del prodotto
che può essere abbastanza potente da
costituire pericolo di folgorazione.
Il punto esclamativo entro un triangolo
equilatero vi avverte della presenza di
istruzioni importanti per l'utilizzo e la
manutenzione nel manuale che
accompagna l'apparecchiatura.
Indice
(i numeri in grassetto fanno riferimento alle
illustrazioni)
Alcune parole sulla Rotel _____________________________ 18
Per cominciare ______________________________________ 18
Alcune precauzioni 18
Posizionamento 18
Cavi 18
Collegamento alla rete e controlli _____________________ 18
Ingresso in corrente alternata
13
18
Interruttore
2
e spia di accensione
1
Uscite ausiliarie
12
19
Collegamenti per i segnali di ingresso
9
_____________ 19
Collegamenti del registratore
10
_____________________ 19
Collegamenti in uscita _______________________________ 19
Comandi sul pannello anteriore ______________________ 20
Controllo del volume
6
20
Interruttore dei toni ON/OFF
5
20
Controlli di Bass e Treble
4
20
Selettore d’ascolto
8
20
Selettore di registrazione
7
20
Uscita cuffia
3
20
Ricerca guasti _______________________________________ 20
La spia di accensione non è illuminata 20
Sostituzione fusibile 20
Nessun suono 20
Caratteristiche ______________________________________ 30

18
Alcune parole sulla Rotel
Una famiglia, la cui passione per la musica ha spinto a realizzare
componenti hi-fi di elevata qualità, fondò la Rotel più di 30 anni fa.
Attraverso gli anni la passione è rimasta intatta e l’obbiettivo di
offrire prodotti eccezionali agli audiofili e amanti della musica ad
un costo non elevato è condiviso da tutti alla Rotel.
Gli ingegneri lavorano come una squadra affiatata, ascoltando e
mettendo a punto ogni nuovo prodotto finché non raggiunge
perfettamente i loro standard musicali. Sono liberi di scegliere i
componenti in qualsiasi parte del mondo al fine di realizzare il
prodotto nel miglior modo possibile. Così potrete trovare
condensatori provenienti dall’Inghilterra e dalla Germania,
semiconduttori dal Giappone o dagli Stati Uniti, mentre i
trasformatori toroidali sono prodotti proprio dalla Rotel.
La fama di eccellenza della Rotel è stata guadagnata grazie a
centinaia di ottime recensioni e riconoscimenti conferiti dai più
autorevoli esperti del settore, che ascoltano la musica ogni giorno. I
loro commenti confermano l’ obiettivo della società - La ricerca di
un apparecchio che sia musicale, affidabile e conveniente.
Vi ringraziamo per aver scelto questo prodotto augurandovi molte
ore di piacevole intrattenimento musicale.
Per cominciare
Grazie per aver acquistato il preamplificatore stereo con comando
a distanza Rotel RC-971. Utilizzato in un impianto hi-fi di alta
qualità o in un sistema home theater vi garantirà numerosi anni di
intrattenimento musicale.
L’RC-971 è un preamplificatore versatile di elevate prestazioni.
Tutti gli aspetti del design sono stati ottimizzati per conservare la
piena gamma dinamica e per restituirvi anche i minimi dettagli
della vostra musica. L’RC-971 ha uno stadio di alimentazione
altamente regolato che comprende un trasformatore toroidale
specificamente progettato dalla Rotel e da appositi condensatori
slit-foil. Questa alimentazione a bassa impedenza ha ampie
riserve di potenza che consentono all’RC-971 di riprodurre i
segnali audio più complessi. Questo tipo di progetto è più costoso
da produrre ma è migliore per la musica.
Abbiamo progettato le schede dei circuiti stampati (PCB) con
Tracce a Circuito Simmetrico. Ciò garantisce che il tempo esatto
della musica venga mantenuto e fedelmente riprodotto. Il circuito
dell’RC-971 contiene resistenze a film metallico e condensatori in
polistirene o polipropilene che vengono utilizzati in sezioni
importanti sul percorso del segnale. Tutti gli aspetti di questo
progetto sono stati studiati con lo scopo finale della più fedele
riproduzione sonora.
L’istallazione dell’RC-971 e il suo funzionamento sono facili. Se
avete già esperienza con altri sistemi stereo, non dovreste
incontrare alcuna difficoltà. Collegate semplicemente i
componenti abbinati e ascoltate la musica.
Alcune precauzioni
Leggete attentamente questo manuale. Oltre alle istruzioni rela-
tive alle istruzioni di base e al funzionamento fornisce
interessanti informazioni su diverse configurazioni di sistema
dell’RC-971 come indicazioni generali che vi aiuteranno a ottenere
prestazioni ottimali dal vostro impianto. Vi preghiamo di
contattare il vostro rivenditore autorizzato Rotel per consigli o
domande. Inoltre tutti noi alla Rotel saremo ben lieti di rispondere
alle vostre domande e commenti.
Conservate l’imballaggio dell’RC-971 e tutto il materiale di
imballaggio interno per un uso futuro. Trasportare l’RC-971 in un
imballo non originale potrebbe danneggiare il vostro
preamplificatore.
Compilate e inviate la carta di registrazione allegata all’RC-971.
Assicuratevi anche di conservare la ricevuta della vendita
originale. E’ il vostro migliore documento per la data di acquisto
di cui avrete bisogno ogni volta sia necessario il servizio di
garanzia.
Posizionamento
Come tutti i componenti audio che utilizzano segnali a basso
livello, l’RC-971 può essere condizionato dal suo ambiente. Non
appoggiate l’RC 971 sopra un amplificatore di potenza. Questo
ridurrà al minimo il surriscaldamento e le possibili interferenze o
disturbi. Vi raccomandiamo di installarlo in mobili progettati per
accogliere componenti audio. I mobili appositi sono progettati per
ridurre o perfino eliminare le vibrazioni che possono influenzare
negativamente la qualità sonora. Chiedete consiglio al vostro
rivenditore autorizzato Rotel hi-fi circa l’arredamento dedicato e
una corretta istallazione dei componenti audio.
Cavi
Durante l’istallazione fate attenzione a mantenere separati i
cordoni di alimentazione dai cavi di segnale digitali e quelli di
segnale audio normali. Questo ridurrà la possibilità di
un’interferenza e disturbo fra i cordoni di alimentazione o i cavi
digitali. Utilizzando cavi schermati di alta qualità contribuirà
anche a evitare che disturbo o interferenza riducano la qualità
sonora del vostro impianto. Se avete domande contattate il
vostro rivenditore autorizzato Rotel per un consiglio sul migliore
cavo per il vostro impianto.
Collegamento alla rete e controlli
Ingresso in corrente alternata
13
L’RC-971 non impiega una notevole quantità di corrente. Tuttavia,
ci sono due uscite di alimentazione ausiliarie sulla parte
posteriore dell’apparecchiatura che possono essere utilizzate per
fornire alimentazione ad altre unità. Pertanto l’RC-971 sarebbe
meglio fosse collegato in genere direttamente a una presa a muro
polarizzata a due poli. Non usate una prolunga . Una robusta
ciabatta a prese multiple può pilotare la corrente richiesta
dall’RC-971 e dagli altri componenti collegati ad essa.
PREAMPLIFICATORE STEREO RC-971

19
NOTA: Non collegate il cordone di alimentazione di un
amplificatore di potenza alle uscite di alimentazione ausiliarie
sull’RC-971. Gli amplificatori di potenza spesso necessitano
maggiore alimentazione di quella che queste uscite possano
fornire.
Il vostro RC-971 è già stato predisposto in fabbrica per il voltaggio
corretto per il paese dove lo avete acquistato (o 115 volt o 230 volt
con una frequenza di linea di o 50 Hz o 60 Hz). La configurazione
di linea di corrente alternata è indicata su un adesivo sul pannello
anteriore .
NOTA: Nel caso doveste trasportare il vostro RC-971 in un altro
paese è possibile riconfigurare l’amplificatore per un utilizzo su
una diversa linea di voltaggio. Non cercate di provvedere a
questa conversione da soli. Aprire il cabinet dell’RC-971 vi espone
a voltaggi pericolosi. Consultate personale di servizio qualificato
o il centro di servizio della Rotel per informazioni.
Se vi assentate da casa per un lungo periodo, come una vacanza
di un mese, è consigliabile staccare il vostro amplificatore dalla
rete (così come per gli altri componenti audio e video) durante la
vostra assenza.
Interruttore di accensione
2
e
spia di accensione
1
L’interruttore di accensione è collocato sul lato sinistro del
pannello anteriore. Quando viene premuto l’RC-971 si attiva e la
spia di accensione si illumina. Premendo nuovamente
l’interruttore l’RC-971 si spegne.
Uscite di alimentazione ausiliarie
12
(versione U.S.A.)
L’RC-971 è provvisto di due uscite con interruttore sul pannello
posteriore. L’alimentazione è disponibile da queste uscite quando
l’RC-971 è acceso. L’alimentazione a queste due uscite viene
disattivata quando l’RC-971 si trova in modalità Standby. Queste
uscite possono fornire fino a un totale di 400 watt. Sono adatte
per fornire alimentazione a sorgenti di segnale come lettori CD,
sintonizzatori, o piastre di registrazione. Non dovrebbero essere
utilizzate per amplificatori di potenza. Collegando componenti che
richiedono più di 400 watt a queste uscite potrebbe voler dire
danneggiare l’interruttore standby dell’RC-971.
Collegamenti di segnale in
ingresso
9
(vedi figura 3 per le illustrazioni dei collegamenti in ingresso)
L’RC-971 ha connettori di ingresso convenzionali del tipo RCA, il
tipo che si trova su quasi tutti gli apparecchi audio.
NOTA: per evitare rumori forti che non sarebbero apprezzati ne’
da voi ne’ dai diffusori, assicuratevi che l’impianto sia spento
quando effettuate qualsiasi collegamento di segnale.
Il CD, il video, il sintonizzatore e gli ingressi Aux dell’RC-971 sono
ingressi “line level”. Servono per collegare componenti come i
lettori CD, i registratori a cassetta video HiFi o NICAM, i
sintonizzatori per l’audio o il video, i lettori Laser Disc o l’uscita
analogica da un lettore CD ROM.
I canali destro e sinistro sono chiaramente etichettati e
dovrebbero essere collegati ai canali corrispondenti del
componente di sorgente. I connettori RCA del canale sinistro sono
bianchi, i connettori del canale destro sono rossi. Utilizzate cavi
RCA di alta qualità per collegare componenti di sorgente in
ingresso all’RC-971. Chiedete al vostro rivenditore autorizzato
Rotel per avere un consiglio sui cavi.
NOTA: L’aggiunta di un equalizzatore fono Rotel RQ-970BX vi
permette di collegare un giradischi all’RC-971. Consultate il vostro
rivenditore autorizzato per maggiori informazioni.
Collegamenti del registratore
10
(Vedi figura 4 per l’illustrazione del collegamento al registratore)
Gli ingressi e le uscite Tape 1 e Tape 2 possono essere collegate a
qualsiasi apparecchio di registrazione/riproduzione che accetti
segnali standard di ingresso e di uscita di livello di linea analogici.
Generalmente si tratterà di un registratore a cassetta
convenzionale.
Quando collegate un registratore all’RC-971 ricordate che le
uscite del registratore devono essere collegate agli ingressi tape
dell’RC-971. Allo stesso modo le uscite tape dell’RC-971 devono
essere collegate agli ingressi del registratore. Come per altre
sorgenti assicuratevi di collegare i canali destro e sinistro di ogni
apparecchio al giusto canale sui componenti in abbinamento.
Utilizzate cavi di collegamento di alta qualità per evitare una
perdita della qualità sonora.
Collegamenti in uscita
11
(vedi figura 2 per il collegamento delle uscite RCA)
L’RC-971 è dotato di connettori d’uscita RCA che sono compatibili
con gli ingressi della maggior parte degli amplificatori . Come
sempre utilizzate cavi di alta qualità e assicuratevi di collegare le
uscite per i canali destro e sinistro dell’RC-971 ai canali corretti
dell’amplificatore.
NOTA: Ci sono due set di uscite RCA sull’RC-971. Il secondo set di
uscite può essere utilizzato in configurazioni particolari per
pilotare un secondo amplificatore di potenza o per fornire un
segnale a un processore di segnale speciale.
Italiano

20
Comandi del pannello anteriore
Controllo del volume
6
Il comando del volume sul pannello anteriore riunisce due
comandi separati. Le manopole di controllo sono “a frizione”
pertanto entrambi i controlli normalmente funzionano insieme.
Ruotate in senso orario per aumentare il volume e in senso
antiorario per diminuirlo.
I due comandi possono essere controllati separatamente tenendo
ferma una delle manopole mentre si ruota l’altra. Generalmente
questo si rende necessario solo per compensare i problemi
relativi al materiale di sorgente.
Interruttore dei toni ON/OFF
5
Quando l’interruttore è in posizione OFF i circuiti di controllo dei
toni sono bypassati per assicurare il suono più puro possibile.
Lasciate l’interruttore in posizione OFF a meno che desideriate
utilizzare i controlli di tono. Ponete l’interruttore in posizione ON
se desiderate regolare i controlli dei toni.
Controlli dei toni bassi e acuti (Bass / Treble)
4
Quando l’interruttore dei toni è in posizione ON, girando le
manopole Bass e Treble si regolano i bilanciamenti tonali del
suono. Girate i comandi in senso orario per aumentare l’uscita
dei bassi o degli acuti. Girateli in senso antiorario per diminuire
l’uscita dei bassi e degli acuti.
Un sistema audio di alte prestazioni, adeguatamente messo a punto,
produce un suono più naturale con poca o nessuna regolazione dei
controlli di tono. Fate un uso moderato di questi controlli. Fate
particolare attenzione quando ruotate in senso orario i controlli.
Questo aumenta la potenza d’uscita sulla gamma bassa e acuta,
aumentando il carico sull’amplificatore e sui diffusori.
Selettore di ascolto
8
Il selettore di ascolto controlla quale dei segnali in ingresso è
diretto alle uscite principali e all’amplificatore di potenza - o, più
semplicemente, quale sorgente si stia ascoltando.
Selettore di registrazione
7
Il selettore di registrazione controlla quale dei segnali d’ingresso
è diretto alle uscite di registrazione. La sorgente scelta viene
indicata da una spia che si illumina accanto al nome della
sorgente sul pannello anteriore. Quando non state registrando, il
selettore di registrazione dovrebbe essere posto in posizione OFF
per ridurre al minimo la possibilità di interferenza da parte di altre
componenti nell’impianto.
Il fatto di avere un selettore di registrazione e di ascolto separato
aggiunge un notevole grado di flessibilità al modo in cui l’RC-971
può essere utilizzato. Per esempio, regolando il selettore di
registrazione sul CD e il selettore di ascolto sul sintonizzatore
potreste registrare un CD su un nastro mentre ascoltate il
sintonizzatore.
Non vi è una posizione Tape 2 sul selettore di registrazione. Di
conseguenza se desiderate duplicare (“dub”) una registrazione
da un registratore a un altro, l’unità di sorgente dovrebbe essere
collegata all’ingresso Tape 1. Il selettore di registrazione deve
essere posto in Tape 1. Collegate l’unità che registra il segnale
all’uscita Tape 2.
Uscita cuffia 3
L’uscita cuffia vi permette di collegare la cuffia per un ascolto
individuale. Questa uscita accetta un jack per cuffia stereo stan-
dard. Se la vostra cuffia ha un altro tipo di spina, come una mini-
jack da 1/8”, avrete bisogno di un adattatore. Contattate il vostro
rivenditore autorizzato Rotel per acquistare l’adattatore giusto.
Nota: l’inserimento di una cuffia non elimina il segnale dalle
uscite. L’amplificatore di potenza continuerà a ricevere un
segnale e i diffusori continueranno a funzionare.
Ricerca dei guasti
Nei sistemi audio molti problemi derivano da collegamenti
sbagliati o inadeguate regolazioni dei controlli. Se vi si pone un
problema, isolate l’area critica, verificate le regolazioni dei
controlli, determinate la causa del problema e operate i necessari
cambiamenti. Se non siete in grado di far suonare l’RC-971 fate
riferimento ai suggerimenti per le condizioni che seguono:
La spia di accensione non si illumina
La spia di accensione dovrebbe essere accesa ogni volta che
l’RC-971 è collegato alla presa di alimentazione nel muro e viene
premuto il pulsante di accensione. Se non si accende controllate
la presa di alimentazione con un’altro apparecchio elettrico, come
una lampada. Assicuratevi che la presa di alimentazione in uso
non sia controllata da un interruttore che è stato disattivato.
Sostituzione del fusibile
Se un altro apparecchio elettrico funziona una volta collegato alla
presa di alimentazione, e la spia di accensione continua a non
illuminarsi, significa che potrebbe essersi bruciato il fusibile di
alimentazione interno. Se ritenete che ciò sia successo,
contattate il vostro rivenditore Rotel per la sostituzione del
fusibile.
Nessun suono
Controllate la sorgente di segnale se sta funzionando
correttamente. Assicuratevi che i cavi dalla sorgente di segnale
agli ingressi dell’RC 971 siano collegati correttamente. Controllate
che il selettore d’ascolto sia posizionato sull’ingresso corretto.
Controllate il funzionamento del finale di potenza. Controllate tutti i
cablaggi tra l’RC 971 e il finale di potenza e tra il finale e i diffusori.
PREAMPLIFICATORE STEREO RC-971
La pagina si sta caricando...
La pagina si sta caricando...
La pagina si sta caricando...
La pagina si sta caricando...
La pagina si sta caricando...
La pagina si sta caricando...
La pagina si sta caricando...
La pagina si sta caricando...
La pagina si sta caricando...
La pagina si sta caricando...
La pagina si sta caricando...
La pagina si sta caricando...
-
 1
1
-
 2
2
-
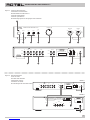 3
3
-
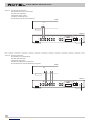 4
4
-
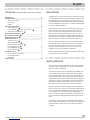 5
5
-
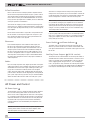 6
6
-
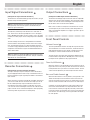 7
7
-
 8
8
-
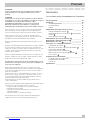 9
9
-
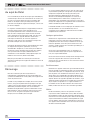 10
10
-
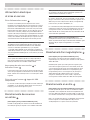 11
11
-
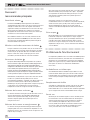 12
12
-
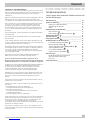 13
13
-
 14
14
-
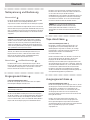 15
15
-
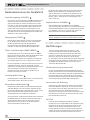 16
16
-
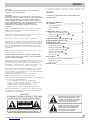 17
17
-
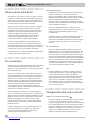 18
18
-
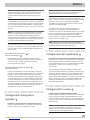 19
19
-
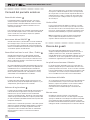 20
20
-
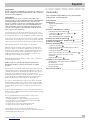 21
21
-
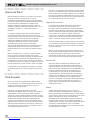 22
22
-
 23
23
-
 24
24
-
 25
25
-
 26
26
-
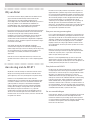 27
27
-
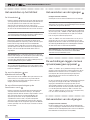 28
28
-
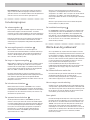 29
29
-
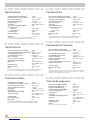 30
30
-
 31
31
-
 32
32


Rotel la passione plus Manuale utente
- Categoria
- Amplificatore per strumenti musicali
- Tipo
- Manuale utente
- Questo manuale è adatto anche per
in altre lingue
- français: Rotel la passione plus Manuel utilisateur
- español: Rotel la passione plus Manual de usuario
- Deutsch: Rotel la passione plus Benutzerhandbuch
- Nederlands: Rotel la passione plus Handleiding