Yamaha PSR-SX600 Manuale utente
- Categoria
- Software
- Tipo
- Manuale utente

EN
Digital Workstation
Manual Development Department
© 2020 Yamaha Corporation
Published 07/2020 PO-A0
This Reference Manual explains advanced features of the PSR-SX600.
Please read the Owner’s Manual first, before reading this Reference Manual.
Reference Manual

2 PSR-SX600 Reference Manual
Table of Contents
Table of Contents
1 Voices 3
Selecting MegaVoice, GM, XG, and GM2 voices .............. 3
Changing Detailed Settings for Metronome or Tap Tempo
... 4
Making Detailed Settings for Harmony/Arpeggio............... 5
Pitch-Related Settings ....................................................... 6
Using the LIVE CONTROL Knobs ..................................... 9
Editing Voices (Voice Set) ............................................... 13
Changing Detailed Voice Settings (Touch Response,
Mono/Poly, Arpeggio) ................................................ 18
Disabling Automatic Selection of Voice Sets (Effects,
etc.)............................................................................ 19
Adding New Contents—Expansion Packs....................... 20
2Styles 22
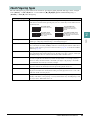
Chord Fingering Types .................................................... 23
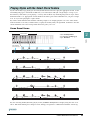
Playing Styles with the Smart Chord Feature .................. 25
Learning How To Play Specific Chords (Chord Tutor)..... 27
Having Style Playback Follow Your Performance
(Unison & Accent)...................................................... 28
Style Playback Related Settings...................................... 31
Memorizing Original Settings to One Touch Setting........ 34
Creating/Editing Styles (Style Creator) ............................ 35
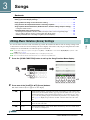
3Songs51
Editing Music Notation (Score) Settings .......................... 51
Editing Lyrics/Text Display Settings................................. 53
Playing while Canceling a Particular Part of a Song........ 54
Using the Auto Accompaniment Features with Song
Playback .................................................................... 55
Song Playback Related Parameters (Guide Function,
Channel settings, Repeat settings)............................ 56
Creating/Editing Songs (Song Creator) ........................... 60
4 USB Audio Player/Recorder 66
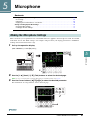
5 Microphone 67
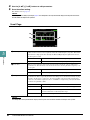
Making the Microphone Settings ..................................... 67
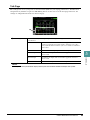
Saving or Calling Up the Mic Settings ............................. 71
6Multi Pads 72
Creating Multi Pads (Multi Pad Creator) .......................... 72
Editing Multi Pads ............................................................ 74
7Registration Memory 76
Editing the Registration Memory...................................... 76
Disabling Recall of Specific Items (Freeze) ..................... 77
Calling Up Registration Memory Numbers in Order
(Registration Sequence) ............................................ 78
Using Playlist ................................................................... 82
8 Mixer 85
Editing Vol/Pan/Voice Parameters ................................... 85
Editing Filter Parameters ................................................. 86
Editing Effect Parameters ................................................ 87
Editing EQ (EQ/Master EQ) Parameters ......................... 90
Editing Master Compressor Parameters.......................... 92
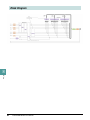
Block Diagram ................................................................. 94
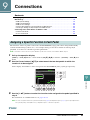
9 Connections 95
Assigning a Specific Function to Each Pedal .................. 95
MIDI Settings ................................................................... 99
Connecting with a Smart Device via Wireless LAN ....... 105
10 Function (Menu) 107
Utility.............................................................................. 107
System ........................................................................... 111
Index 114
Each chapter in this Reference Manual corresponds to the relevant chapters in the Owner’s Manual.
• The illustrations and LCD screens as shown in this manual are for instructional purposes only, and may appear somewhat dif-
ferent from those on your instrument.
• The “Data List” and “Smart Device Connection Manual” documents can be downloaded from the Yamaha website:
https://download.yamaha.com/
• The company names and product names in this manual are the trademarks or registered trademarks of their respective compa-
nies.
Using the PDF manual
• To quickly jump to items and topics of interest, click on the desired items in the “Bookmarks” index to the left of the main
display window. (Click the “Bookmarks” tab to open the index if it is not displayed.)
• Click the page numbers that appear in this manual to go directly to the corresponding page.
• Select “Find” or “Search” from the Adobe Reader “Edit” menu and enter a keyword to locate related information anywhere
in the document.
NOTE The names and positions of menu items may vary according to the version of Adobe Reader being used.

1
1
PSR-SX600 Reference Manual 3
Voices
Voices
Contents
Selecting MegaVoice, GM, XG, and GM2 voices . . . . . . . . . . . . . . . . . . . . . . . . . . . . . . . . . . . . . . .3
• Selecting MegaVoice or Legacy Voices . . . . . . . . . . . . . . . . . . . . . . . . . . . . . . . . . . . . . . . . . . . . . .3
• Voice Types (Characteristics). . . . . . . . . . . . . . . . . . . . . . . . . . . . . . . . . . . . . . . . . . . . . . . . . . . . . .4
• Selecting GM, XG and GM2 Voices. . . . . . . . . . . . . . . . . . . . . . . . . . . . . . . . . . . . . . . . . . . . . . . . .4
Changing Detailed Settings for Metronome or Tap Tempo . . . . . . . . . . . . . . . . . . . . . . . . . . . . . .4
Making Detailed Settings for Harmony/Arpeggio . . . . . . . . . . . . . . . . . . . . . . . . . . . . . . . . . . . . . .5
Pitch-Related Settings . . . . . . . . . . . . . . . . . . . . . . . . . . . . . . . . . . . . . . . . . . . . . . . . . . . . . . . . . . . .6
• Fine-tuning the Pitch of the Entire Instrument . . . . . . . . . . . . . . . . . . . . . . . . . . . . . . . . . . . . . . . . .6
• Scale Tuning . . . . . . . . . . . . . . . . . . . . . . . . . . . . . . . . . . . . . . . . . . . . . . . . . . . . . . . . . . . . . . . . . .7
• Adjusting the Pitch for the Parts. . . . . . . . . . . . . . . . . . . . . . . . . . . . . . . . . . . . . . . . . . . . . . . . . . . .8
• Changing the Part Assignment of the TRANSPOSE Buttons . . . . . . . . . . . . . . . . . . . . . . . . . . . . .9
Using the LIVE CONTROL Knobs . . . . . . . . . . . . . . . . . . . . . . . . . . . . . . . . . . . . . . . . . . . . . . . . . . .9
• Assigning the Functions to the LIVE CONTROL Knobs . . . . . . . . . . . . . . . . . . . . . . . . . . . . . . . .10
• Detailed Settings for Assigned Functions. . . . . . . . . . . . . . . . . . . . . . . . . . . . . . . . . . . . . . . . . . . .11
Editing Voices (Voice Set) . . . . . . . . . . . . . . . . . . . . . . . . . . . . . . . . . . . . . . . . . . . . . . . . . . . . . . . .13
• Editable Parameters in the Voice Set Displays . . . . . . . . . . . . . . . . . . . . . . . . . . . . . . . . . . . . . . .14
Changing Detailed Voice Settings (Touch Response, Mono/Poly, Arpeggio) . . . . . . . . . . . . . . .18
Disabling Automatic Selection of Voice Sets (Effects, etc.) . . . . . . . . . . . . . . . . . . . . . . . . . . . . .19
Adding New Contents—Expansion Packs . . . . . . . . . . . . . . . . . . . . . . . . . . . . . . . . . . . . . . . . . . .20
• Installing the Expansion Pack data from the USB Flash Drive. . . . . . . . . . . . . . . . . . . . . . . . . . . .20
• Uninstalling the Expansion Pack data . . . . . . . . . . . . . . . . . . . . . . . . . . . . . . . . . . . . . . . . . . . . . .20
• Saving the Instrument Info File to the USB Flash Drive. . . . . . . . . . . . . . . . . . . . . . . . . . . . . . . . .21
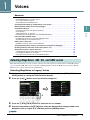
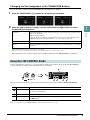
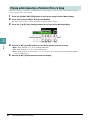
This instrument features a variety of Voices ideal for use with sequencer software. These include MegaVoice
(page 4), XG and GM. These Voices cannot be called up directly from the VOICE category selection buttons.
However, they can be called up as described below.
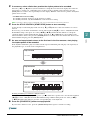
Selecting MegaVoice or Legacy Voices
1 Press one of the VOICE category selection buttons (other than the [EXPANSION/
USER] button) to call up the Voice Selection display.
2 Press the [8 ] () button to call up the Voice categories.
3 Press the [1 ]/[2 ] buttons to select the P1 or P2 folder.
4 Use the Cursor buttons [][][E][F] to select the desired Voice category folder from
MegaVoice (P2) or Legacy (P1), and then press the [ENTER] button.
Selecting MegaVoice, GM, XG, and GM2 voices
2
NEXT PAGE

4 PSR-SX600 Reference Manual
1
Voices
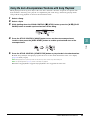
5 Use the Cursor buttons [][][E][F] to select the desired Voice, and then press the
[ENTER] button.
Voice Types (Characteristics)
The particular type of a Voice is classified into nine kinds (Owner’s Manual, chapter 1). The MegaVoice is
covered here.
Selecting GM, XG and GM2 Voices
GM & XG voices, as well as GM2 voices, are also available on the instrument—playable by MIDI messages
from sequencer software, etc. Songs that correspond to these formats can be properly reproduced by
sequence software, and suitable voices will be selected automatically.
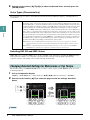
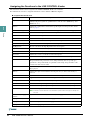
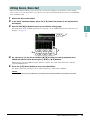
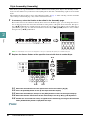
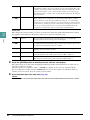
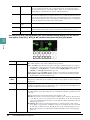
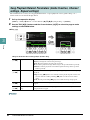
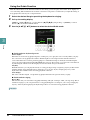
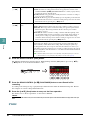
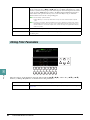
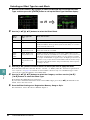
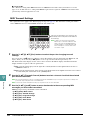
The detailed settings for METRONOME (such as volume, sound, or beat) or TAP TEMPO can be accessed
in the display below.
1 Call up the operation display.
[MENU]
→
TAB [E] Menu1
→
Cursor buttons [][][E][F] Metronome Setting
→
[ENTER]
2 Use the Cursor buttons [][] to select the page to make the settings described
below.
MegaVoice With normal Voices, you can control the volume of notes or change the timbre or tone of a sound,
depending on key velocity (how strongly or softly you play). However, MegaVoices respond com-
pletely differently to velocity and make special use of velocity switching. Each velocity range has a
completely different sound. For example, a guitar MegaVoice includes the sounds of various perfor-
mance techniques. In conventional instruments, different Voices having those sounds would be
called up via MIDI and played in combination to achieve the desired effect. In contrast, MegaVoices
lets you play a convincing guitar part with just a single Voice, using specific velocity values to play
the desired sounds. Because of the complex nature of these Voices and the precise velocities need to
play the sounds, they’re not intended for actual performance from the keyboard. They are, however,
very useful and convenient when creating MIDI data—especially when you want to avoid using sev-
eral different Voices just for a single instrument part. Actual sound maps for the Mega-Voices are
provided in the “Mega Voices Map” in the Data List on the website.
NOTE MegaVoices are not compatible with other instrument models. For this reason, any Song or Style you’ve created on this
instrument using these Voices will not sound properly when played back on the instruments which do not have these types of
Voices.
NOTE MegaVoices sound differently depending on keyboard range, velocity, touch, etc. Hence, if you turn on the [HARMONY/
ARPEGGIO] button or change the Voice Set parameters, unexpected or undesired sounds may result.
Changing Detailed Settings for Metronome or Tap Tempo
Use the Cursor
buttons [][].
NEXT PAGE

PSR-SX600 Reference Manual 5
1
Voices
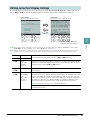
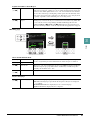
1 Metronome
2 Tap
This allows you to set the percussion sound and the velocity which sounds when the [TAP TEMPO] button
is tapped.
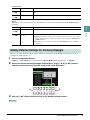
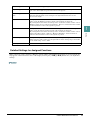
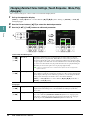
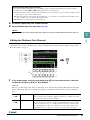
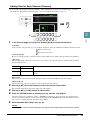
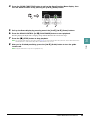
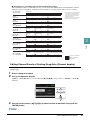
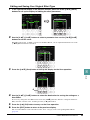
This lets you make detailed settings, such as adjusting volume level of added Harmony/Arpeggio sound, or
assigning the keyboard part, etc.
1 Call up the operation display.
[MENU] → TAB [E] Menu1 → Cursor buttons [][][E][F] Harmony/Arpeggio → [ENTER]
2 Select the desired Harmony/Arpeggio CATEGORY by using [1 ]–[3 ] buttons,
and then select the desired Type by using [4 ]–[6 ] buttons.
3 Use the [7 ] (Detail) buttons to call up the detailed setting window.
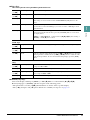
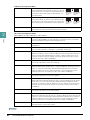
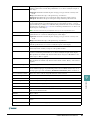
[2 ] Volume Determines the volume of the metronome sound.
[3 ]–
[5 ]
Sound Determines whether a bell accent is sounded or not at the first beat of each mea-
sure.
[6 ]/
[7 ]
Time Signature Determines the time signature of the metronome sound.
[2 ] Volume Determines the volume of the percussion sound.
[3 ]–
[5 ]
Sound Selects the percussion sound.
[7 ]/
[8 ]
Style Section Reset
On Off
Turns on or off the Style Section Reset function.
On: During playback of a Style, you can rewind to the top of the section (“reset”
the playback position, for stutter repeat effects) by tapping the [RESET/TAP
TEMPO] button.
Off: Returns only to the function of the usual TAP TEMPO. (Owner’s Manual,
chapter 2)
Making Detailed Settings for Harmony/Arpeggio
3
2
NEXT PAGE

6 PSR-SX600 Reference Manual
1
Voices
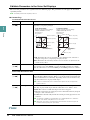
4 Use the [3 ]–[8 ] buttons to make various Harmony/Arpeggio settings.
When any one of the Arpeggio types is selected, only the parameters indicated by “*” in the list below can
be set. None of the parameters in the list below are available when the Harmony category “Multi Assign”
type is selected.
NOTE The settings for the Arpeggio Quantize function and the Arpeggio Hold function can be made on the display called up via [MENU] → TAB [E] Menu1 →
Cursor buttons [][][E][F] Voice Setting → [ENTER] → TAB [E ][F] Setting/Arpeggio
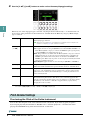
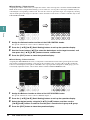
Fine-tuning the Pitch of the Entire Instrument
You can fine-tune the pitch of the entire instrument such as keyboard, Style and Song parts (except the
keyboard part played by the Drum Kit or SFX Kit Voices, and audio playback)—a useful feature when
playing the PSR-SX600 along with other instruments or audio files.
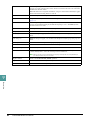
[3 ] Volume* Determines the volume level of the Harmony/Arpeggio notes generated by the
Harmony/Arpeggio function.
NOTE When you are using certain Voices, such as Organ Voices, in which the Touch Sense Depth is set to
0 in the Voice Set display (page 14), the volume does not change.
[4 ]/
[5 ]
Assign* Determines the keyboard part to which the effect is assigned.
Auto: Applies the effect to the part (RIGHT 1/2) for which PART ON/OFF is on.
If the Harmony/Echo category is selected, the RIGHT 1 part is given priority
over the RIGHT 2 part when both parts are on.
Multi: This parameter is available when the Harmony/Echo category is selected.
When both parts are on, the note played on the keyboard is sounded by the
RIGHT 1 part and the harmonies (effect) are divided to the RIGHT 1 and
RIGHT 2 parts. When only one part is on, the note played on the keyboard and
effect are sounded by that part.
Right1, Right2: Applies the effect to the selected part (RIGHT 1 or RIGHT 2).
[6 ] Speed This parameter is only available when the “Echo” category (Echo, Tremolo, or
Trill) is selected. It determines the speed of the Echo, Tremolo, and Trill effects.
[7 ] Chord Note Only This parameter is only available when the “Harmony” category is selected. When
this is set to “On,” the Harmony effect is applied only to the note (played in the
right-hand section of the keyboard) that belongs to a chord played in the chord
section of the keyboard.
[8 ] Minimum Velocity Determines the lowest velocity value at which the harmony, echo, tremolo, or trill
will sound in the right-hand area. This allows you to selectively apply the har-
mony by your playing strength, letting you create harmony accents in the melody.
The harmony, echo, tremolo, or trill effect is applied when you play the key
strongly (above the set value).
Pitch-Related Settings
NEXT PAGE

PSR-SX600 Reference Manual 7
1
Voices
1 Call up the operation display.
[MENU]
→
TAB [
F
]
Menu2
→
Cursor buttons
[][][E][F]
Master Tune/Scale Tune
→
[ENTER]
→
TAB [
E
]
Master Tune
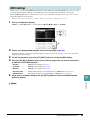
2 Use the [4 ]/[5 ] buttons to set the tuning in 0.2 Hz steps.
Press both [] and [] buttons (of 4 or 5) simultaneously to reset the value to the factory setting of 440.0
Hz.
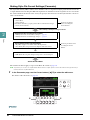
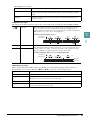
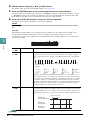
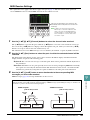
Scale Tuning
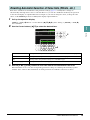
You can select various scales for playing in custom tunings for specific historical periods or music genres.
1 Call up the operation display.
[MENU]
→
TAB [
F
]
Menu2
→
Cursor buttons
[][][E][F]
Master Tune/Scale Tune
→
[ENTER]
→
TAB [
F
]
Scale Tune
2 Use the [1 ] buttons to select the desired scale.
Preset Scale types
Equal The pitch range of each octave is divided equally into twelve. This is the most com-
monly used tuning in music today.
Pure Major, Pure Minor These tunings preserve the pure mathematical intervals of each scale, especially for
triad chords (root, third, fifth). You can hear this best in actual vocal harmonies—such
as choirs and a cappella singing.
Pythagorean This scale was devised by the famous Greek philosopher and is created from a series of
perfect fifths, which are collapsed into a single octave. The 3rd in this tuning are slightly
unstable, but the 4th and 5th are beautiful and suitable for some leads.
Mean-Tone This scale was created as an improvement on the Pythagorean scale, by making the
major third interval more “in tune.” It was especially popular from the 16th century to
the 18th century. Handel, among others, used this scale.
Werckmeister, Kirnberger This composite scale combines the Werckmeister and Kirnberger systems, which were
themselves improvements on the mean-tone and Pythagorean scales. The main feature
of these scales are that each key has its own unique character. These scales were used
extensively during the time of Bach and Beethoven, and even now it is often used when
performing period music on the harpsichord.
Arabic1, Arabic2 Use these tunings when playing Arabic music.
3
2
The tuning of each note for
the currently selected scale
is shown.
NEXT PAGE

8 PSR-SX600 Reference Manual
1
Voices
3 Change the following settings as necessary.
NOTE To register the Scale Tune settings to Registration Memory, be sure to checkmark the Scale Tune item in the Registration Memory display called up via the
[MEMORY] button.
Adjusting the Pitch for the Parts
You can adjust the pitch-related parameters (such as Tuning, Octave, etc.) for each part.
1 Call up the operation display.
[MENU]
→
TAB [E] Menu1
→
Cursor buttons [][][E][F] Voice Setting
→
[ENTER]
→
TAB [F]
Tune
2 Move the Cursor on the display by using the Cursor buttons [][][E][F], and use
the [3 ]–[8 ] buttons to edit parameters.
[2 ] Base Note Determines the base note for each scale. When the base note is changed, the pitch
of the keyboard is transposed, yet maintains the original pitch relationship
between the notes.
[3 ]/
[4 ]
Tune Select the desired note to be tuned by using the [3 ] buttons and tune it in
cents by using the [4 ] buttons.
NOTE In musical terms a “cent” is 1/100th of a semitone. (100 cents equal one semitone.)
[5 ]–
[8 ]
Part Select Determines whether the Scale Tune setting is applied to each part or not.
Tuning Determines the pitch of each keyboard part.
Octave Determines the range of the pitch change in octaves, over two octaves up or down for
each keyboard part. The value set here is added to the setting made via the UPPER
OCTAVE [-]/[+] buttons.
Portamento Time Portamento is a function that creates a smooth transition in pitch from the first note
played on the keyboard to the next. The Portamento Time determines the pitch transi-
tion time. Higher values result in a longer pitch change time. Setting this to “0” results
in no effect. This parameter is available when the selected keyboard part is set to
MONO (page 18).

PSR-SX600 Reference Manual 9
1
Voices
Changing the Part Assignment of the TRANSPOSE Buttons
You can determine to which parts the TRANSPOSE [-]/[+] buttons are applied.
1 Press the TRANSPOSE [+]/[-] buttons to call up the pop-up display.
2 While the pop-up display is shown, use the Cursor buttons [E][F] buttons to select
the desired part assignment.
NOTE With the default initial settings, the part assignment is set to “Master.”
NOTE You can change the time that elapses before the pop-up displays automatically close. For details, refer to page 109.
The assignment can be confirmed by the pop-up display called up via the TRANSPOSE [-]/[+] buttons.
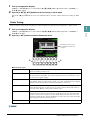
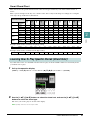
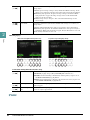
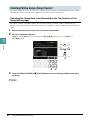
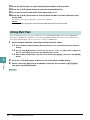
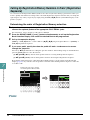
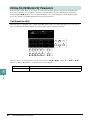
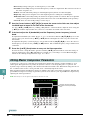
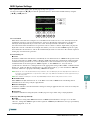
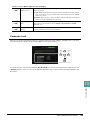
You can add dynamic variations to your performance intuitively in real-time by using the LIVE CONTROL
[1] and [2] knobs, to which various functions have been assigned.
When you rotate the knobs, the current status of the knobs is shown in the LIVE CONTROL MONITOR.
NOTE You can select whether the LIVE CONTROL MONITOR is shown or hidden. For details, refer to page 109.
Keyboard The TRANSPOSE [-]/[+] buttons affect the pitches of the items below—but they do not
affect Song playback.
• Keyboard played Voices
• Style playback (controlled by the performance in the chord section of the keyboard)
• Multi Pad playback (when Chord Match is on, and chords are indicated)
Song The TRANSPOSE [-]/[+] buttons affect only the pitch of Song playback.
Master The TRANSPOSE [-]/[+] buttons affect the overall pitch of the instrument, except audio
playback.
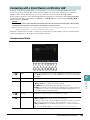
Using the LIVE CONTROL Knobs
Assign type The selected Knob Assign Type will be highlighted.
Function name Displays the currently assigned function name. When a function cannot be operated, it
is grayed out in the display.
Value Displays the assigned function’s parameter value.
Reset Resets the assigned function’s parameter value to the default by pressing the [4 ]/
[8 ] buttons.

10 PSR-SX600 Reference Manual
1
Voices
Assigning the Functions to the LIVE CONTROL Knobs
The functions which can be assigned to the LIVE CONTROL knobs are as follows.
For instructions on how to assign the functions, refer to Owner’s Manual, chapter 1.
Assignable Knob Functions
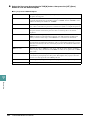
Volume Adjusts the volume of the selected parts or channels. For details, refer to page 12.
Keyboard Volume Adjusts the volume of all keyboard parts. This is convenient for adjusting the volume of
all keyboard parts together for optimum balance with the others (MIDI Song, Style,
Multi Pads, etc.).
Balance Adjusts the volume balance between the specified parts and other parts. For details,
refer to page 12.
MIDI/Audio Song Balance Adjusts the volume balance between MIDI Song playback and Audio Song playback.
Pan Determines the stereo position of the selected parts.
Reverb Adjusts the Reverb depth.
Chorus Adjusts the Chorus depth.
Reverb & Chorus Adjusts both Reverb and Chorus depth of the selected parts.
Insertion Effect Depth Adjusts the Insertion Effect depth of the selected parts.
EQ High Gain Boosts or attenuates the high EQ band for the selected parts.
EQ Low Gain Boosts or attenuates the low EQ band for the selected parts.
Cutoff Adjusts the cutoff frequency of the filter for the selected parts.
Resonance Adjusts the resonance of the filter for the selected parts.
Cutoff & Resonance Adjusts the cutoff frequency and resonance of the filter for the selected parts.
Filter Adjusts parameters such as filter cutoff frequency and resonance for the selected parts.
Keep in mind that the parameters do not change uniformly, but are specially pro-
grammed to change individually for optimum sound, letting change the filter of the
sound for the best musical results.
Attack Adjusts the length of time until the selected parts reach their maximum level after the
key is played.
Release Adjusts the length of time until the selected parts decay to silence after the key is
released.
Attack & Release Adjusts both the Attack and Release time of the selected parts.
Modulation Applies vibrato and other effects to notes played on the keyboard.
Tuning Determines the pitch of the selected keyboard parts.
Octave Determines the range of the pitch change in octave for the selected keyboard parts.
Pitch Bend Range Determines the range of the pitch change in octave for the selected keyboard parts.
Portamento Time Determines the pitch transition time.
NOTE Portamento is a function that creates a smooth transition in pitch from the first note played on the keyboard
to the next.
Kbd Harmony/Arpeggio
Vo l u m e
Adjusts the volume of the Keyboard Harmony or Arpeggio function.
Arpeggio Velocity Adjusts the velocity of each note of Arpeggio.
Arpeggio Gate Time Adjusts the length of each note of Arpeggio.
Arpeggio Unit Multiply Adjusts the Arpeggio speed.
NEXT PAGE

PSR-SX600 Reference Manual 11
1
Voices
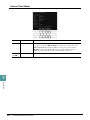
Detailed Settings for Assigned Functions
When a function (such as Volume or Balance) which enables individual detailed settings is selected, Detail Set-
ting appears at the bottom left corner of the display. Pressing the [1 ]/[2 ] buttons lets you adjust these
settings.
Style Retrigger Rate Adjusts the Style Retrigger length.
Style Retrigger On/Off Turns the Style Retrigger function on/off. When set to on, a specific length of the first
part of the current Style is repeated when the chord is played.
Style Retrigger On/Off &
Rate
Turns the Style Retrigger function on/off and adjusts its length. Rotating the knob to the
left-most turns the function off; rotating it to the right turns the function on and
decreases the length.
Style Track Mute A Turns playback of the Style channels on/off. Rotating the knob to the left-most position
turns on only the Rhythm 2 channel, and the other channels are turned off.
By rotating the knob clockwise from that position, channels are turned on in the order of
Rhythm 1, Bass, Chord 1, Chord 2, Pad, Phrase 1, Phrase 2, and all channels are turned
on when the knob reaches to the right-most position.
Style Track Mute B Turns playback of the Style channels on/off. Rotating the knob to the left-most position
turns on only the Chord 1 channel, and the other channels are turned off.
By rotating the knob clockwise from that position, channels are turned on in the order of
Chord 2, Pad, Bass, Phrase 1, Phrase 2, Rhythm 1, Rhythm 2, and all channels are
turned on when the knob reaches to the right-most position.
Master Tempo Changes the tempo of the currently selected Style or Song. Rotating the knob to the left
makes it slower, while rotating it to the right makes it faster. Setting range is from 50%
of the default tempo value to 150%.
No Assign No function is assigned.
NEXT PAGE

12 PSR-SX600 Reference Manual
1
Voices
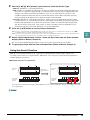
Detail Setting—Volume function
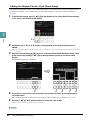
Assigning the Volume function lets you adjust the volume of the selected parts or channels with the LIVE CON-
TROL knobs. In this example Detail Setting, you can select two or more parts as the target simultaneously for
controlling the corresponding volume levels. You can also select one part as the target; for example, by selecting
only the Audio part as the target to control the volume, the knobs can be used as a volume controller only for the
USB AUDIO PLAYER.
1 Assign the Volume function to either of the LIVE CONTROL knobs.
For specific instructions, refer to Owner’s Manual, chapter 1.
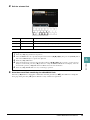
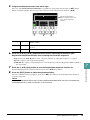
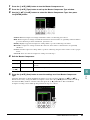
2 Press the [1 ]/[2 ] (Detail Setting) buttons to call up the operation display.
3 Use the Cursor buttons [][] to select the desired part as the target to control, and
then press the [1 ]–[8 ] buttons to enter a check mark.
4 Press the [EXIT] button to close the operation display.
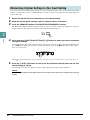
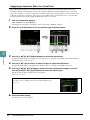
Detail Setting—Balance function
Assigning the BALANCE function lets you adjust the volume balance between the specified parts and other
parts. In this example Detail Setting, each part can be sent either to the A group or B group. By sending the
sound via external input (a microphone, AUX IN) to the A group and the other parts to the B group, you can
conveniently adjust the relative sound volume balance with the LIVE CONTROL knobs.
1 Assign the Balance function to either of the LIVE CONTROL knobs.
For specific instructions, refer to Owner’s Manual, chapter 1.
2 Press the [1 ]/[2 ] (Detail Setting) buttons to call up the operation display.
3 Select the desired part by using the [2 ]–[4 ] buttons, and then use the
[5 ]/[6 ] buttons in order to send the part’s sound to the A group or B group.
4 Press the [EXIT] button to close the operation display.
2
2

PSR-SX600 Reference Manual 13
1
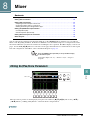
Voices
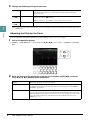
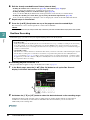
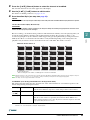
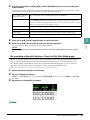
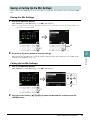
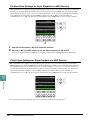
The Voice Set function allows you to create your own Voices by editing some parameters of the existing
Voices. Once you’ve created a Voice, you can save it as a file to internal memory (User drive) or a USB flash
drive for future recall.
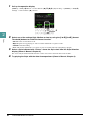
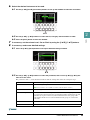
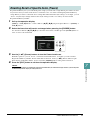
1 Select the Voice to be edited.
2 In the Voice selection display, press the [5 ] (Voice Set) button to call up the Voice
Set display.
3 Use the TAB [E][F] buttons to call up the relevant setting page.
For information on the available parameters in each page, see the “Editable Parameters in the Voice Set
Displays” on page 14.
4 As necessary, use the Cursor buttons [][] to select the item (parameter) to be
edited and edit the Voice by using the [1 ]–[7 ] buttons.
While editing, press the [8 ] (Compare) button to compare the sound of the edited Voice with the
original (unedited) Voice.
5 Press the [8 ] (Save) button to save your edited Voice.
For details on the Save operation, refer to “Basic Operations” in the Owner’s Manual.
NOTICE
The settings will be lost if you select another Voice or turn off the power to the instrument without carrying out the Save operation.
Editing Voices (Voice Set)
4
5
3

14 PSR-SX600 Reference Manual
1
Voices
Editable Parameters in the Voice Set Displays
The Voice Set parameters are organized into five different pages. The parameters in each page are described
separately, below.
NOTE The available parameters differ depending on the Voice.
Common Page
1 Volume/Touch Sense/Part Octave
2 Mono/Poly Portamento Time
[2 ] Volume Adjusts the volume of the current edited Voice.
[3 ]/
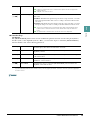
[4 ]
Touch Sense Adjusts the touch sensitivity (velocity sensitivity), or how greatly the volume
responds to your playing strength.
Depth: Determines the velocity sensitivity, or how much the level of the Voice
changes in response to your playing strength (velocity).
Offset: Determines the amount by which received velocities are adjusted for the
actual velocity effect.
[5 ]/
[6 ]
Part Octave Shifts the octave range of the edited Voice up or down in octaves. When the edited
Voice is used as any of the RIGHT 1–2 parts, the R1/R2 parameter is available;
when the edited Voice is used as the LEFT part, the LEFT parameter is available.
[1 ]/
[2 ]
Mono/Poly Determines whether the edited Voice is played monophonically (Mono) or poly-
phonically (Poly). When selecting “Mono,” you can play single, lead sounds such
as brass instruments more realistically. Depending on the Voice, Portamento may
be produced when notes are played with legato.
NOTE Portamento is a function that creates a smooth transition in pitch from the first note played on the
keyboard to the next.
[3 ]/
[4 ]
Mono Type Determines the behavior of the notes of decaying sounds, such as a guitar Voice,
when they are played with legato with the edited Voice set to “Mono” above.
Normal: The next note sounds after the previous note is stopped.
Legato: The sound of the previously played note is maintained and only the pitch
changes to that of the next note.
Crossfade: The sound smoothly transitions from the previously played note to the
next note.
NOTE This parameter is unavailable for Super Articulation Voices and Drum/SFX Kit Voices, and behaves
the same as the “Normal” setting when these Voices are selected.
NOTE When Legato or Crossfade is selected, the behavior (other than what is described here) may be dif-
ferent from Normal, depending on the panel settings.
0
64 127
64
127
0
64 127
64
127
Actual Velocity for
tone generator
Depth = 127 (twice)
Depth = 64 (normal)
Depth = 32 (half)
Depth = 0
Touch Sense Depth
Changes to velocity curve according to
VelDepth (with Offset set to 64)
Received Velocity
(Actual KeyOn speed)
Touch Sense Offset
Changes to velocity curve according to
VelOffset (with Depth set to 64)
Actual Velocity for
tone generator
Received Velocity
(Actual KeyOn
speed)
Offset = 96 (+64)
Offset = 127 (+127)
Offset = 64 (normal)
Offset = 32 (-64)
Offset = 0 (-127)
Depends
on offset
Depends
on offset
NEXT PAGE

PSR-SX600 Reference Manual 15
1
Voices
Controller Page
Modulation
The [MODULATION] wheel can be used to modulate the parameters below as well as the pitch (vibrato),
the filter (wah), or the amplitude (tremolo). Here, you can set the degree to which the [MODULATION]
wheel modulates each of the following parameters.
NOTE LFO (Low Frequency Oscillator) is a device which periodically varies (oscillates) a signal by using a low frequency wave. For example, a vibrato effect can
be produced by applying LFO to the pitch, a wah effect can be produced by applying it to the filter, and a tremolo effect can be produced by applying it to
the volume of a Voice.
[5 ] Portamento Time Determines the pitch transition time when the edited Voice is set to Mono above.
NOTE Portamento is a function that creates a smooth transition in pitch from the first note played on the
keyboard to the next.
NOTE Setting this to “0” results in no effect.
[6 ]/
[7 ]
Portamento Type Determines how the actual pitch transition time is calculated from the Portamento
Time value.
Fixed Rate: Determines the pitch change rate from a range of 0: max., 127: min.
The actual pitch transition time varies according to the interval between the
two notes.
Fixed Time: Determines the pitch change rate from a range of 0: min., 127: max.
The pitch change rate varies according to the interval between the two notes.
NOTE The basic rule of Portamento Time is unchanged even if this setting is changed. When the value of
Portamento Time is smaller, the actual time is shorter; when the value is larger, the actual time is
longer.
NOTE The greater the value of Portamento Time, the clearer the effect of this setting will be.
[2 ] Filter Determines the degree to which the [MODULATION] wheel modulates the Filter
Cutoff Frequency. For details about the filter, see below.
[3 ] Amplitude Determines the degree to which the [MODULATION] wheel modulates the
amplitude (volume).
[5 ] LFO PMOD Determines the degree to which the [MODULATION] wheel modulates the pitch,
or the vibrato effect.
[6 ] LFO FMOD Determines the degree to which the [MODULATION] wheel modulates the Filter
modulation, or the wah effect.
[7 ] LFO AMOD Determines the degree to which the [MODULATION] wheel modulates the
amplitude, or the tremolo effect.
NEXT PAGE

16 PSR-SX600 Reference Manual
1
Voices
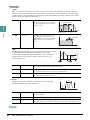
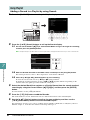
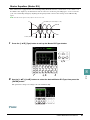
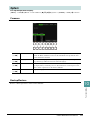
Sound Page
1 Filter/EG
• Filter
Filter is a processor that changes the timbre or tone of a sound by either blocking or passing a specific
frequency range. The parameters below determine the overall timbre of the sound by boosting or cutting a
certain frequency range. In addition to making the sound either brighter or mellower, Filter can be used to
produce electronic, synthesizer-like effects.
• EG
The EG (Envelope Generator) settings determine how the level of the
sound changes in time. This lets you reproduce many sound
characteristics of natural acoustic instruments—such as the quick
attack and decay of percussion sounds, or the long release of a
sustained piano tone.
2 Vibrato
Vibrato is a quavering, vibrating sound effect that is produced by
regularly modulating the pitch of the Voice.
[2 ] Cutoff Determines the cutoff frequency or
effective frequency range of the filter
(see diagram). Higher values result in a
brighter sound.
[3 ] Resonance Determines the emphasis given to the
cutoff frequency (resonance), set in
BRIGHT. above (see diagram). Higher
values result in a more pronounced
effect.
[4 ] Attack Determines how quickly the sound reaches its maximum level after the key is
played. The lower the value, the quicker the attack.
[5 ] Decay Determines how quickly the sound reaches its sustain level (a slightly lower level
than maximum). The lower the value, the quicker the decay.
[6 ] Release Determines how quickly the sound decays to silence after the key is released. The
lower the value, the quicker the decay.
[3 ] Depth Determines the intensity of the Vibrato effect. Higher settings result in a more
pronounced Vibrato.
[4 ] Speed Determines the speed of the Vibrato effect.
[5 ] Delay Determines the amount of time that elapses between the playing of a key and the
start of the Vibrato effect. Higher settings increase the delay of the Vibrato onset.
Volume
These frequencies are
“passed” by the filter.
Cutoff
range
Frequency
(pitch)
Cutoff Frequency
Volume
Frequency (pitch)
Resonance
Time
Level
Key on Key off
Sustain
Level
ATTACK DECAY RELEASE
Pitch
DELAY
SPEED
DEPTH
Time
NEXT PAGE

PSR-SX600 Reference Manual 17
1
Voices
Effect Page
1 Reverb Depth/Chorus Depth/DSP Depth/Panel Sustain
2 DSP Type
3 EQ
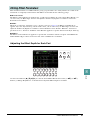
Harmony/Arp Page
Same as the display called up via [MENU] → TAB [E] Menu1 → Cursor buttons [][][E][F]
Harmony/Arpeggio → [ENTER], with the exception of the following points:
• The parameters set via the [7 ] (Detail) buttons are shown on the top of the display.
•The [8] (Compare) and [8 ] (Save) buttons are available (see steps 4–5 on page 13).
[1 ]/
[2 ]
Reverb Depth Adjusts the reverb depth.
[3 ]/
[4 ]
Chorus Depth Adjusts the chorus depth.
[5 ] DSP On/Off Determines whether the DSP effect is on or off.
This setting can also be made from the VOICE EFFECT [DSP] button on the
panel.
[6 ] DSP Depth Adjusts the DSP depth.
If you want to re-select the DSP type, you can do so in the “2 DSP Type” menu
explained below.
[7 ] Panel Sustain Determines the sustain level applied to the edited Voice when the sustain effect is
on. To turn on/off the sustain effect, press the [SUSTAIN] button, or set it from
the display below.
[MENU] → TAB [E] Menu1 → Cursor buttons [][][E][F] Voice Setting →
[ENTER] → TAB [E] Voice Control
[2 ]/
[3 ]
Category Selects the DSP effect category and type. Select a type after selecting a category.
[4 ]/
[5 ]
Type
[6 ]/ Detail Calls up a detailed setting display. Use the [2 ]–[4 ] buttons to select the
desired parameter, and then use the [5 ]–[6 ] buttons to adjust the value
of the desired parameter. To close the detailed setting display, press the [EXIT]
button.
[1 ]/
[2 ]
Low Frequency Determines the desired frequency of the low frequency band to be controlled, over
a range of 32Hz–2.0kHz.
[3 ] Low Gain Boosts or attenuates the low EQ band set above over a range of -12dB–12dB.
[4 ]/
[5 ]
High Frequency Determines the desired frequency of the high frequency band to be controlled,
over a range of 500Hz–16kHz.
[6 ]
High Gain Boosts or atten
uates the high EQ band set above over a range of -12dB–12dB.

18 PSR-SX600 Reference Manual
1
Voices
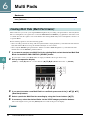
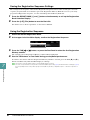
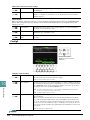
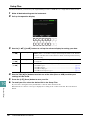
The common settings for a Voice can be accessed in the display below.
1 Call up the operation display.
[MENU] → TAB [E] Menu1 → Cursor buttons [][][E][F] Voice Setting → [ENTER] → TAB [E]
Setting/Arpeggio
2 Use the Cursor buttons [][] to select the desired parameter.
3 Use the [2 ]–[7 ] buttons to edit each parameter.
1 Mono/Poly Touch Response
2 Arpeggio
Changing Detailed Voice Settings (Touch Response, Mono/Poly,
Arpeggio)
[2 ]/
[3 ]/
[4 ]
Mono/Poly Determines whether the Voice of the keyboard part selected above is played
monophonically or polyphonically. When Mono is selected, the part’s Voice is
played monophonically (only one note at the time) with last note priority, letting
you play single, lead sounds such as brass instruments more realistically. Depend-
ing on the Voice, Portamento may be produced when notes are played with legato.
When Poly is selected, the part’s Voice is played polyphonically.
NOTE Portamento is a function that creates a smooth transition in pitch from the first note played on the
keyboard to the next.
[6 ]/
[7 ]
Touch Response Turns the Touch Response of the keyboard on or off. When this is set to “Off,” the
same volume is produced no matter how strongly or softly you play the keyboard.
On the display called up via the following operations, you can change the Touch
setting (touch sensitivity). For details, refer to the Owner’s Manual.
[MENU] → TAB [E] Menu1 → Cursor buttons [][][E][F] Controller →
[ENTER] → TAB [F] Setting
[3 ]/
[4 ]
Arpeggio Quantize Synchronize Arpeggio playback with Song/Style playback—allowing any slight
imperfections in the timing to be corrected. When not making it synchronize,
select “Off.”
[5 ]/
[6 ]
Arpeggio Hold Turns the Arpeggio Hold function on or off. When this is set to “On,” while this is
set to “On,” while the [HARMONY/ARPEGGIO] button is on, Arpeggio play-
back can be continued even after the note has been released. To stop Arpeggio
playback, press the [HARMONY/ARPEGGIO] button to turn it off.
2
Use the Cursor
buttons [][].

PSR-SX600 Reference Manual 19
1
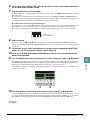
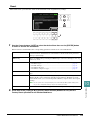
Voices
Each Voice is linked to its default Voice Set parameter settings (page 13). Usually these settings are
automatically called up when a Voice is selected. However, you can also disable this feature by the operation
in the relevant display as explained below. For example, if you want to change the Voice yet keep the same
effect, set the EFFECT parameter to OFF (in the display explained below).
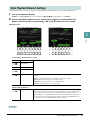
1 Call up the operation display.
[MENU] → TAB [E] Menu1 → Cursor buttons [][][E][F] Voice Setting → [ENTER] → TAB [F]
Voice Set Filter
2 Use the Cursor buttons [][] to select the desired item.
3 Use the [3 ]–[8 ] buttons to turn each item for the selected Part on or off.
When the button is set to On, the corresponding parameter settings are called up automatically together
with the Voice selection. For information on which parameters are linked to each item, see above.
Disabling Automatic Selection of Voice Sets (Effects, etc.)
Voice Corresponds to the parameter settings of the Common, Controller, and Sound pages.
Effect Corresponds to the parameter settings of 1 and 2 in the Effect page.
EQ Corresponds to the parameter settings of 3 in the Effect page.
Harmony/Arpeggio Corresponds to the Harmony/Arp page.
3
2

20 PSR-SX600 Reference Manual
1
Voices
Installing Expansion Packs lets you add a variety of optional Voices and Styles to the “Expansion” folder in
the User drive.
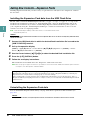
Installing the Expansion Pack data from the USB Flash Drive
The file which contains the bundled Expansion Packs (“***.ppi,” “***.cpi,” “***.pqi,” or “***.cqi”) to be
installed to the instrument is referred to as “Pack Installation file.” Only one Pack Installation file can be
installed to the instrument. If you want to install multiple Expansion Packs, bundle the packs together on
your computer by using the “Yamaha Expansion Manager” software. For information on how to use the
software, refer to the accompanying manual.
NOTE To obtain the Yamaha Expansion Manager software and its manuals, access the Yamaha Downloads website:
https://download.yamaha.com/
NOTICE
You will need to restart the instrument after installation has been completed. Make sure to save all data currently being edited beforehand,
otherwise it will be lost.
1 Connect the USB flash drive in which the desired Pack Installation file is saved to the
[USB TO DEVICE] terminal.
2 Call up the operation display.
[MENU] → TAB [F] Menu2 → Cursor buttons [][][E][F] Expansion
→
[ENTER]
→
Cursor
buttons [][] Pack Installation
→
[ENTER]
3 Use the Cursor buttons [][][E][F] to select the desired Pack Installation file.
4 Press the [6 ] (INSTALL) button.
5 Follow the on-display instructions.
This installs the selected Pack data to the “Expansion” folder in the User drive.
NOTE When a message appears saying the User drive has no space available, move the file from User tab to USB tab, then install the file again. For instructions
on moving files, refer to “Basic Operations” in the Owner’s Manual.
Uninstalling the Expansion Pack data
You can uninstall the Expansion Pack data by carrying out the Reset operation for Files & Folders (see
page 113).
NOTICE
When you reset Files & Folders, not only the Expansion Pack data, but all other files and folders in the User drive are deleted.
Adding New Contents—Expansion Packs
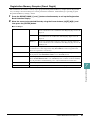
Song, Style or Registration Memory containing Expansion Voices or Styles
If the Expansion Pack data does not exist in the instrument, Song, Style or Registration Memory containing any
Expansion Voices or Styles will not sound properly or cannot be called up.
We recommend that you write down the name of the Expansion Pack when you create the data (Song, Style or
Registration Memory) using Expansion Voices or Styles, so that you can easily find and install the Expansion Pack
when necessary.
La pagina si sta caricando...
La pagina si sta caricando...
La pagina si sta caricando...
La pagina si sta caricando...
La pagina si sta caricando...
La pagina si sta caricando...
La pagina si sta caricando...
La pagina si sta caricando...
La pagina si sta caricando...
La pagina si sta caricando...
La pagina si sta caricando...
La pagina si sta caricando...
La pagina si sta caricando...
La pagina si sta caricando...
La pagina si sta caricando...
La pagina si sta caricando...
La pagina si sta caricando...
La pagina si sta caricando...
La pagina si sta caricando...
La pagina si sta caricando...
La pagina si sta caricando...
La pagina si sta caricando...
La pagina si sta caricando...
La pagina si sta caricando...
La pagina si sta caricando...
La pagina si sta caricando...
La pagina si sta caricando...
La pagina si sta caricando...
La pagina si sta caricando...
La pagina si sta caricando...
La pagina si sta caricando...
La pagina si sta caricando...
La pagina si sta caricando...
La pagina si sta caricando...
La pagina si sta caricando...
La pagina si sta caricando...
La pagina si sta caricando...
La pagina si sta caricando...
La pagina si sta caricando...
La pagina si sta caricando...
La pagina si sta caricando...
La pagina si sta caricando...
La pagina si sta caricando...
La pagina si sta caricando...
La pagina si sta caricando...
La pagina si sta caricando...
La pagina si sta caricando...
La pagina si sta caricando...
La pagina si sta caricando...
La pagina si sta caricando...
La pagina si sta caricando...
La pagina si sta caricando...
La pagina si sta caricando...
La pagina si sta caricando...
La pagina si sta caricando...
La pagina si sta caricando...
La pagina si sta caricando...
La pagina si sta caricando...
La pagina si sta caricando...
La pagina si sta caricando...
La pagina si sta caricando...
La pagina si sta caricando...
La pagina si sta caricando...
La pagina si sta caricando...
La pagina si sta caricando...
La pagina si sta caricando...
La pagina si sta caricando...
La pagina si sta caricando...
La pagina si sta caricando...
La pagina si sta caricando...
La pagina si sta caricando...
La pagina si sta caricando...
La pagina si sta caricando...
La pagina si sta caricando...
La pagina si sta caricando...
La pagina si sta caricando...
La pagina si sta caricando...
La pagina si sta caricando...
La pagina si sta caricando...
La pagina si sta caricando...
La pagina si sta caricando...
La pagina si sta caricando...
La pagina si sta caricando...
La pagina si sta caricando...
La pagina si sta caricando...
La pagina si sta caricando...
La pagina si sta caricando...
La pagina si sta caricando...
La pagina si sta caricando...
La pagina si sta caricando...
La pagina si sta caricando...
La pagina si sta caricando...
La pagina si sta caricando...
La pagina si sta caricando...
La pagina si sta caricando...
-
 1
1
-
 2
2
-
 3
3
-
 4
4
-
 5
5
-
 6
6
-
 7
7
-
 8
8
-
 9
9
-
 10
10
-
 11
11
-
 12
12
-
 13
13
-
 14
14
-
 15
15
-
 16
16
-
 17
17
-
 18
18
-
 19
19
-
 20
20
-
 21
21
-
 22
22
-
 23
23
-
 24
24
-
 25
25
-
 26
26
-
 27
27
-
 28
28
-
 29
29
-
 30
30
-
 31
31
-
 32
32
-
 33
33
-
 34
34
-
 35
35
-
 36
36
-
 37
37
-
 38
38
-
 39
39
-
 40
40
-
 41
41
-
 42
42
-
 43
43
-
 44
44
-
 45
45
-
 46
46
-
 47
47
-
 48
48
-
 49
49
-
 50
50
-
 51
51
-
 52
52
-
 53
53
-
 54
54
-
 55
55
-
 56
56
-
 57
57
-
 58
58
-
 59
59
-
 60
60
-
 61
61
-
 62
62
-
 63
63
-
 64
64
-
 65
65
-
 66
66
-
 67
67
-
 68
68
-
 69
69
-
 70
70
-
 71
71
-
 72
72
-
 73
73
-
 74
74
-
 75
75
-
 76
76
-
 77
77
-
 78
78
-
 79
79
-
 80
80
-
 81
81
-
 82
82
-
 83
83
-
 84
84
-
 85
85
-
 86
86
-
 87
87
-
 88
88
-
 89
89
-
 90
90
-
 91
91
-
 92
92
-
 93
93
-
 94
94
-
 95
95
-
 96
96
-
 97
97
-
 98
98
-
 99
99
-
 100
100
-
 101
101
-
 102
102
-
 103
103
-
 104
104
-
 105
105
-
 106
106
-
 107
107
-
 108
108
-
 109
109
-
 110
110
-
 111
111
-
 112
112
-
 113
113
-
 114
114
-
 115
115


Yamaha PSR-SX600 Manuale utente
- Categoria
- Software
- Tipo
- Manuale utente
in altre lingue
- English: Yamaha PSR-SX600 User manual
- français: Yamaha PSR-SX600 Manuel utilisateur
- español: Yamaha PSR-SX600 Manual de usuario
- Deutsch: Yamaha PSR-SX600 Benutzerhandbuch
- русский: Yamaha PSR-SX600 Руководство пользователя
- Nederlands: Yamaha PSR-SX600 Handleiding
- português: Yamaha PSR-SX600 Manual do usuário
- dansk: Yamaha PSR-SX600 Brugermanual
- polski: Yamaha PSR-SX600 Instrukcja obsługi
Documenti correlati
-
Yamaha PSR-SX600 Manuale del proprietario
-
Yamaha CVP-601 Manuale del proprietario
-
Yamaha PSR-A5000 Manuale utente
-
Yamaha PSR-S670 Manuale utente
-
Yamaha PSR-S770 Manuale utente
-
-
-
Yamaha PSR-A3000 Manuale del proprietario
-
-