Canon PIXMA TR7540 Manuale utente
- Categoria
- Giocattoli
- Tipo
- Manuale utente

Aloitusopas
Lue Turvallisuus ja tärkeitä tietoja
(lisähuomautus) ensin.
Før du begynder
Læs Sikkerhedsoplysninger og vigtige
oplysninger (tillæg) først.
Komme i gang
Les Sikkerhetsinformasjon og viktig
informasjon (tillegg) først.
Uppstartsguide
Läs Information om säkerhet och annan viktig
information (bilaga) först.
Ξεκινώντας
Διαβάστε πρώτα τις Πληροφορίες για την ασφάλεια
και σημαντικές πληροφορίες (συμπλήρωμα).
Guía de inicio
Lea primero Información de seguridad
e información importante (apéndice).
Para Começar
Leia Informações Importantes e Sobre
Segurança (adendo) primeiro.
Guida Rapida
Leggere preventivamente le Informazioni
importanti e sulla sicurezza (appendice).
Aan de Slag-gids
Lees eerst Veiligheidsinformatie
en belangrijke informatie (addendum).
Inbetriebnahme
Lesen Sie Sicherheitsinformationen
und wichtige Hinweise (Anhang) zuerst.
Démarrage
Lire Sécurité et informations importantes
(addendum) en premier.
Getting Started
Read Safety and Important Information
(addendum) rst.

1
2
Tulostimen asennus ..................................................................................sivu 1
Yhdistäminen tietokoneeseen ja älypuhelimeen/tablet-tietokoneeseen .... sivu 4
Tulostimen pitäminen Havainnollistavat videot
Installation af printeren ..............................................................................side 1
Tilslutning med computer og smartphone/tablet ........................................side 4
Sådan holder du printeren Forklarende lm
Installere skriveren ....................................................................................side 1
Koble til datamaskin og smarttelefon/nettbrett ..........................................side 4
Hvordan holde skriveren Forklarende lmer
Installera skrivaren ....................................................................................sida 1
Ansluta med dator och smarttelefon/surfplatta ..........................................sida 4
Hur du håller skrivaren Förklarande lmer
Εγκατάσταση του εκτυπωτή ..................................................................σελίδα 1
Σύνδεση με υπολογιστή και Smartphone/Tablet ....................................σελίδα 4
Πώς να κρατάτε τον εκτυπωτή
Επεξηγηματικές ταινίες
Instalación de la impresora................................................................... página 1
Conexión con el ordenador y con el teléfono inteligente o la tableta ... página 4
Cómo sujetar la impresora Películas explicativas
Instalando a impressora ....................................................................... página 1
Conectando a um computador e smartphone/tablet ............................ página 4
Como segurar a impressora Filmes explicativos
Installazione della stampante ............................................................... pagina 1
Connessione con computer e smartphone/tablet ................................. pagina 4
Come sospendere la stampante
Filmati esplicativi
De printer installeren ............................................................................ pagina 1
Verbinden met een computer en smartphone/tablet............................. pagina 4
De printer vasthouden Films met uitleg
Installation des Druckers .........................................................................Seite 1
Herstellen einer Verbindung mit einem Computer und Smartphone/Tablet
....Seite 4
Halten des Druckers Anleitungsvideos
Installation de l'imprimante ...................................................................... page 1
Connexion avec un ordinateur et un smartphone ou une tablette ........... page 4
Manipulation de l'imprimante Vidéos explicatives
Installing the Printer ................................................................................. page 1
Connecting with Computer and Smartphone/Tablet ................................ page 4
How to Hold Printer Explanatory Movies

1
ENGLISH
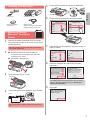
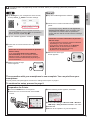
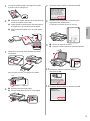
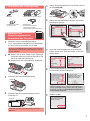
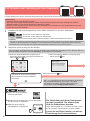
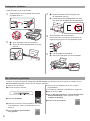
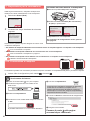
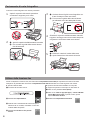
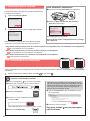
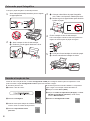
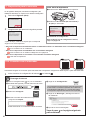
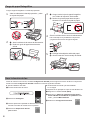
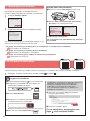
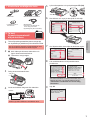
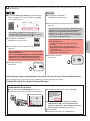
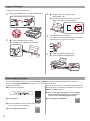
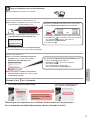
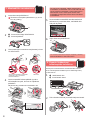
1. Checking Included Items
□ Setup CD-ROM for
Windows PC
□ Power cord
□ Safety and Important Information
□ Modular cable
□ Ink tanks for setup
□ Getting Started (this manual)
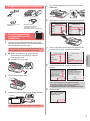
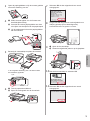
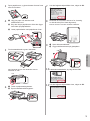
2. Removing Packing
Materials / Turning on
Printer
1
Remove the packing materials (such as orange
tape and protective lm on the touch screen) from
outside the printer.
Using the printer with the protective lm attached
may cause malfunction.
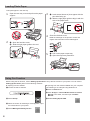
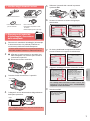
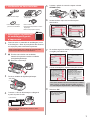
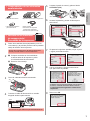
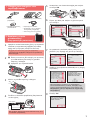
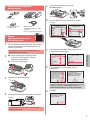
2
aHook the hollows on the both sides of
the printer with your ngers and open the
scanning unit / cover.
bRemove the orange tape.
b
a
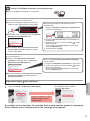
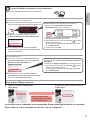
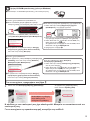
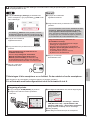
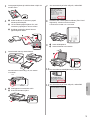
3
Close the scanning unit / cover.
4
Connect the power cord diagonally from the back.
Back
Do not connect any cables except the power cord
yet.
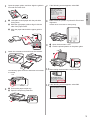
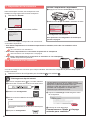
5
Lift the operation panel and press the ON button.
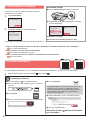
6
Drag the screen and tap the language to select.
7
If the following screen appears, tap your country or
region to select.
8
Read the messages and follow the on-screen
instructions.
For details about information that is sent to Canon,
refer to "Sending Data To Canon" in Safety and
Important Information.
9
Select OK.

2
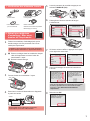
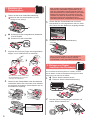
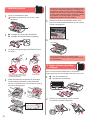
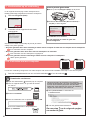
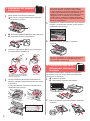
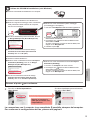
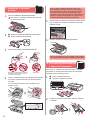
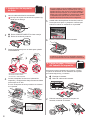
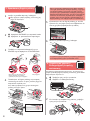
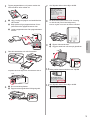
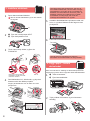
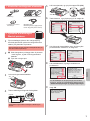
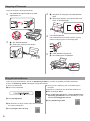
3. Installing Ink Tank
1
Open the scanning unit / cover.
Do not touch the print head holder (A) until it
stops.
(A)
2
aCOMPLETELY remove the orange tape.
bRemove the protective wrap.
a
b
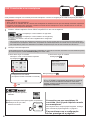
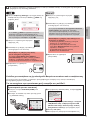
3
Hook the orange cap with your nger to remove it
GENTLY.
Do not push the both sides of the
ink tank with the Y-shape air hole
blocked.
Do not touch.
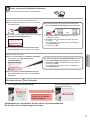
4
Insert the ink tank into the print head and push it
down rmly until it snaps into place.
The color of the ink tank that you set appears on
screen.
If the color is not displayed on the screen even
though you have installed the ink tank, the color
of the ink tank may be wrong or you may have
installed an ink tank, such as one with a different
model number, that is not supported by this printer.
Either install an ink tank for the correct color or use
the provided ink tank for setup.
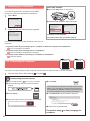
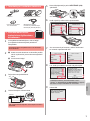
5
Install all the ink tanks the same way as in step
4, and then conrm that all the colors appear on
screen.
6
Close the scanning unit / cover.
If an error message appears on the screen, make
sure the ink tanks are installed correctly.
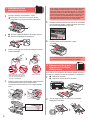
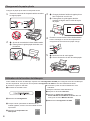
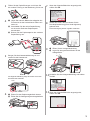
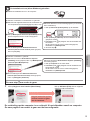
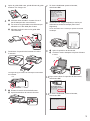
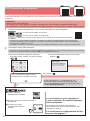
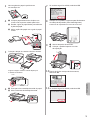
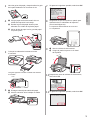
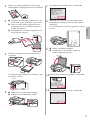
4. Loading Paper / Aligning
Print Head
To obtain a better print result, print a pattern for Print Head
Alignment and scan it.
1
aPull out the cassette.
bRemove the cassette cover.
a
b
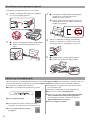
2
While pressing on the lock of the cassette, extend
the cassette.

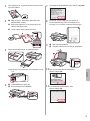
3
ENGLISH
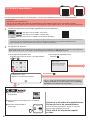
3
Open the paper guides, and then align the guide in
front with the mark of A4.
4
aLoad plain A4 size paper with the print side
facing down.
bSlide the right paper guide to align it with the
side of the paper stack.
cAlign the paper stack with the paper guide in
front.
a
b
c
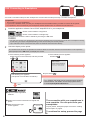
5
Attach the cassette cover and insert the cassette.
The following gure shows the state after the cassette
is inserted.
Side
6
aPull out the paper output tray.
bOpen the output tray extension.
a
b
7
If the following screen appears, select OK.
8
Make sure that a pattern is printed for Print Head
Alignment.
It takes about 2 minutes to nish printing.
9
aOpen the document cover.
bLoad the printed pattern on the platen glass.
a
b
10
After closing the document cover, select OK.
11
If the following screen appears, select OK.

4
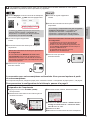
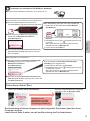
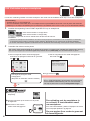
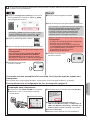
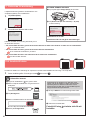
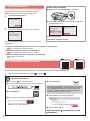
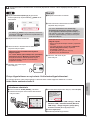
6-A. Connecting to Computer
Mac OS
Windows
You need a connection setup for each computer. Proceed with the setup from step 1 for each computer.
1
Start the setup le for either method or method .
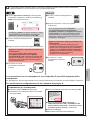
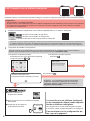
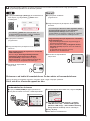
5. Preparing for Connection
In the following description, smartphones and tablet
devices are collectively described as smartphone.
1
Select Next.
2
Make sure that the following screen appears.
From here on, proceed to a step according to how you use
the printer.
Use Only Printer
aPress the Stop button on the printer.
bSelect Do not connect > Yes in this order.
The setup is now complete.
To continue fax setup, proceed to page 8.
aOpen a web browser ( etc.) on your computer.
bInput the following URL and access the Canon
website.
cSelect Set Up.
dInput the model name of your printer and click OK.
You can select a model name from the list.
eClick Setup.
The procedures for Windows and Mac OS are shown
below. If you are using a computer with an OS other
than Windows or Mac OS, such as a Chrome OS, do
the setup according to the on-screen instructions.
fClick Download and download the setup le.
gExecute the downloaded le.
Proceed to step on the next page to
continue.
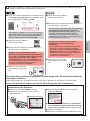
Downloading from the Internet
• To use the printer by connecting only to a computer or both to a computer and smartphone
"6-A. Connecting to Computer"
• To use the printer by connecting only to a smartphone
"6-B. Connecting to Smartphone" on page 6
• To use the printer without connecting to a computer or smartphone
"Use Only Printer"

5
ENGLISH
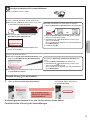
Using Setup CD-ROM (Windows Only)
aLoad the Setup CD-ROM in your computer.
■ When using Windows 10 or Windows 8.1:
bWhen the following message appears on the right
side of your computer screen, click it.
cIf the following screen appears, click Run
Msetup4.exe.
dIf the User Account Control dialog box appears,
click Yes.
When This Message Does Not Appear (or Has
Disappeared)
1. Click File Explorer on the taskbar.
or
2. Click This PC on the left side of the opened window.
3. Double-click the
CD-ROM icon on the right side of
the window.
If the contents of the CD-ROM appear, double-click
Msetup4.exe.
4. Proceed to step d.
■ When using Windows 7:
b When the AutoPlay screen appears, click Run
Msetup4.exe.
c If the User Account Control dialog box appears,
click Continue.
When AutoPlay Screen Does Not Appear
1. Click Computer from the start menu.
2. Double-click the
CD-ROM icon on the right side of
the opened window.
If the contents of the CD-ROM appear, double-click
Msetup4.exe.
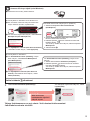
Proceed to step to continue.
2
Click Start Setup.
The connection with your computer is now complete. You can print from your
computer.
To continue fax setup, proceed to page 8.
If the following screen appears, click Exit.
Follow the on-screen
instructions to proceed
with the setup.

6
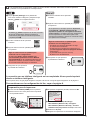
6-B. Connecting to Smartphone
Android
iOS
You need a connection setup for each smartphone. Proceed with the setup from step 1 for each smartphone.
Preparation
• Turn on Wi-Fi on your smartphone.
• If you have a wireless router, connect your smartphone to the wireless router you want to connect to the printer.
* For operations, refer to manuals of your smartphone and the wireless router or contact those manufacturers.
1
Install the application software Canon PRINT Inkjet/SELPHY in your smartphone.
: Search "Canon PRINT" in App Store.
: Search "Canon PRINT" in Google Play.
Or access the Canon website by scanning the QR code.
* You may not connect your smartphone to the Internet wirelessly during connecting the printer to the smartphone directly.
In that case, you may be charged depending on the contract with your service provider.
* Up to 5 devices can be connected to the printer via wireless LAN connection directly.
2
Check the display on the printer.
The screen turns off when no operation is made for about 10 minutes. Press one of the buttons on the operation
panel (except for the ON button) to display the screen.
■ If the following screen appears:
Check the icon on the lower left, and then proceed
to
or .
If appears, the printer cannot communicate by wireless
LAN connection. For details, access "http://ij.start.canon"
to see Frequently Asked Questions.
■ If the following screen appears:
Proceed to
.
No (Proceed to
.)
YES
aTap the installed application
software.
bFollow the on-screen instructions to register the
printer.
cMake sure that the right
screen appears.
The connection with your smartphone is
now complete. You can print from your
smartphone.
To print photos, load photo paper. Proceed to "Loading
Photo Paper" on page 8.
To continue fax setup, proceed to page
8.
The following icon appears.
(The printer is connected to a network.)

7
ENGLISH
Procedures below vary depending on iOS or Android. Select your operating system and proceed to its
procedure.
aTap Settings on your smartphone's home screen,
and tap Canon_ij_XXXX in the Wi-Fi settings.
If Canon_ij_XXXX does not appear on the list,
see "Preparation for Printer" below to operate the
printer, and then repeat step a.
bTap the installed application software.
cFollow the on-screen instructions to register the
printer.
Follow the on-screen instructions to proceed
with the setup.
If you select Auto Select Conn. Method
(recommended) on the connection method
selecting screen, the appropriate connection
method is selected automatically depending on
your environment.
dMake sure that the right
screen appears.
aTap the installed application software.
bFollow the on-screen instructions to register the
printer.
If a message saying "Printer is not registered.
Perform printer setup?" does not appear, see
"Preparation for Printer" below to operate the
printer, and then wait for a while until the message
appears.
Follow the on-screen instructions to proceed
with the setup.
• The appropriate connection method is selected
depending on your environment.
• If two printer names appear on the Register
Printer screen as shown below, select A.
A) TR7500 series (xxx.xxx.xxx.xxx)
B) Direct-xxxx-TR7500series
cMake sure that the right
screen appears.
The connection with your smartphone is now complete. You can print from your
smartphone.
To print photos, load photo paper. Proceed to "Loading Photo Paper" on page 8.
To continue fax setup, proceed to page 8.
aPress the HOME button on the printer.
bSelect the icon on the lower left of the HOME
screen.
a
b
cIf the following screen appears, select No.
dSelect LAN settings > Wireless LAN > Wireless
LAN setup > Easy wireless connect in this order.
eSelect Yes.
fReturn to the operation of your smartphone.
Preparation for Printer

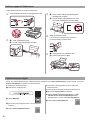
8
1
Open the rear tray cover and pull out the paper
support.
2
aOpen the feed slot cover.
bSlide the right paper guide to the end.
a
b
3
aLoad several sheets of photo paper with the
print side facing up.
bSlide the right paper guide to align it with the
side of the paper stack.
a
b
4
Close the feed slot cover.
Read the message on the printer's screen and
register the information of the loaded paper.
5
aPull out the paper output tray.
bOpen the output tray extension.
a
b
■ Opening from the website
aAccess the Canon website.
bSelect Set Up.
cWhen the screen for selecting a model appears, input
the model name of your printer.
dSelect Making Fax Ready for Use.
■ Opening from the manual installed into your computer
The following is an example using Windows 10.
aClick the Start button.
bClick All apps > Canon TR7500 series On-screen
Manual in this order, and then open the Basic
Manual.
cSelect Setting Up the FAX.
Loading Photo Paper
Using Fax Function
Before using the fax function, refer to Setting Up the FAX to set up the fax function of your printer. You can refer to
Setting Up the FAX by either of the following methods.
Load photo paper in the rear tray.

1
FRANÇAIS
1. Vérication des éléments fournis
□ CD-ROM d'installation
pour PC Windows
□ Cordon
d'alimentation
□ Sécurité et informations importantes
□ Câble modulaire
□ Cartouches d'encre pour
la conguration
□ Démarrage (ce manuel)
2. Retrait des matériaux
d'emballage / Mise sous
tension de l'imprimante
1
Retirez les matériaux d'emballage (tels que la
bande orange et le lm protecteur sur l'écran
tactile) de l'imprimante.
L'utilisation de l'imprimante avec le lm protecteur
en place risque d'entraîner un dysfonctionnement.
2
aPlacez vos doigts dans les cavités de chaque
côté de l'imprimante et ouvrez l'unité de
numérisation / capot.
bRetirez la bande orange.
b
a
3
Fermez l'unité de numérisation / capot.
4
Branchez le cordon d'alimentation en diagonale
à partir de l'arrière.
Arrière
Ne branchez aucun câble pour le moment,
à l'exception du cordon d'alimentation.
5
Levez le panneau de contrôle et appuyez sur
le bouton MARCHE (ON).
6
Faites glisser l'écran et touchez la langue
à sélectionner.
7
Si l'écran suivant s'afche, appuyez sur le pays
ou la région de votre choix.
8
Lisez les messages et suivez les instructions
à l'écran.
Pour plus de détails sur les informations envoyées
à Canon, reportez-vous à « Envoi De Données
A Canon » dans Sécurité et informations
importantes.
9
Sélectionnez OK.

2
3. Installation d'une
cartouche d'encre
1
Ouvrez l'unité de numérisation / capot.
Évitez tout contact avec le support de tête
d'impression (A) jusqu'à l'arrêt du mécanisme.
(A)
2
aRetirez COMPLÈTEMENT la bande orange.
bRetirez l'emballage de protection.
a
b
3
Placez vos doigts sur la capsule orange et retirez-
la DOUCEMENT.
Ne poussez pas sur les deux
côtés de la cartouche d'encre
alors que le trou d'aération en
forme de Y est bloqué.
Ne pas toucher.
4
Insérez la cartouche d'encre dans le support de tête d'impression
et enfoncez-la fermement jusqu'à entendre un déclic.
La couleur de la cartouche d'encre que vous congurez apparaît à
l'écran.
Si la couleur ne s'afche pas à l'écran alors que vous
avez installé la cartouche d'encre, la couleur de la
cartouche d'encre est peut-être fausse, ou vous avez
peut-être installé une cartouche d'encre non prise en
charge par l'imprimante, par exemple une cartouche
avec un numéro de modèle différent. Installez une
cartouche d'encre de la bonne couleur ou utilisez la
cartouche d'encre fournie pour la conguration.
5
Installez toutes les cartouches d'encre en procédant
comme décrit à l'étape 4, puis conrmez que toutes
les couleurs apparaissent à l'écran.
6
Fermez l'unité de numérisation / capot.
Si un message d'erreur apparaît à l'écran, vériez que
les cartouches d'encre sont correctement installées.
4. Chargement du papier /
Alignement de la tête
d'impression
Pour obtenir une impression de meilleure qualité, imprimez
un motif pour l'Alignement tête d'impression et numérisez-le.
1
aRetirez la cassette.
bRetirez le couvercle de la cassette.
a
b
2
Tout en appuyant sur le verrou de la cassette,
déployez la cassette.

3
FRANÇAIS
3
Ouvrez les guides papier, puis alignez le guide
à l'avant avec la marque A4.
4
aChargez du papier ordinaire au format A4 avec
la face à imprimer vers le bas.
bFaites glisser le guide papier droit de manière
à l'aligner avec le côté de la pile de papier.
cAlignez la pile de papier avec le guide papier
avant.
a
b
c
5
Attachez le couvercle de la cassette et insérez
la cassette.
Dans la gure suivante, la cassette est insérée.
Côté
6
aRetirez le bac de sortie papier.
bOuvrez l'extension du bac de sortie papier.
a
b
7
Si l'écran suivant s'afche, sélectionnez OK.
8
Assurez-vous qu'un motif est imprimé pour
Alignement tête d'impression.
L'impression nécessite environ 2 minutes.
9
aOuvrez le capot du scanner.
bChargez le motif imprimé sur la vitre d'exposition.
a
b
10
Après avoir fermé le capot du scanner,
sélectionnez OK.
11
Si l'écran suivant s'afche, sélectionnez OK.

4
6-A. Connexion à un ordinateur
Mac OS
Windows
Vous devez congurer une connexion pour chaque ordinateur. Poursuivez la conguration à partir de l'étape 1 pour
chaque ordinateur.
1
Démarrez le chier de conguration pour la méthode ou la méthode .
5. Préparation de la connexion
Dans la description suivante, les smartphones et les
tablettes sont regroupés sous le terme smartphone.
1
Sélectionnez Suivant.
2
Assurez-vous que l'écran suivant s'afche.
Poursuivez avec l'étape correspondant à la manière dont
vous utilisez l'imprimante.
Utiliser uniquement l'imprimante
aAppuyez sur le bouton Arrêt (Stop) de l'imprimante.
bSélectionnez Ne pas connecter > Oui dans cet ordre.
La conguration est terminée.
Pour poursuivre la conguration de la télécopie,
passez à la page 8.
aOuvrez un navigateur Web ( etc.) sur votre ordinateur.
bEntrez l'URL suivante et accédez au site Web Canon.
cSélectionnez Conguration.
dEntrez le nom de modèle de votre imprimante et cliquez
sur OK.
Vous pouvez sélectionner un nom de modèle à partir
de la liste.
eCliquez sur Conguration.
Les procédures pour Windows et Mac OS sont
présentées ci-dessous. Si vous utilisez un ordinateur
équipé d'un système d'exploitation autre que
Windows ou Mac OS (Chrome OS, par exemple)
procédez à la conguration en fonction des
instructions qui s'afchent à l'écran.
fCliquez sur Télécharger et téléchargez le chier
de conguration.
gExécutez le chier téléchargé.
Poursuivez avec l'étape à la page
suivante pour continuer.
Téléchargement depuis Internet
• Pour utiliser l'imprimante en la connectant uniquement à un ordinateur, ou à la fois à un ordinateur et à un
smartphone
« 6-A. Connexion à un ordinateur »
• Pour utiliser l'imprimante en la connectant uniquement à un smartphone
« 6-B. Connexion à un smartphone » à la page 6
• Pour utiliser l'imprimante sans la connecter à un ordinateur ou à un smartphone
« Utiliser uniquement l'imprimante »

5
FRANÇAIS
Utilisation du CD-ROM d'installation (Windows uniquement)
aChargez le CD-ROM d'installation dans votre ordinateur.
■ Si vous utilisez Windows 10 ou Windows 8.1 :
bLorsque le message suivant apparaît sur la droite
de l'écran de l'ordinateur, cliquez dessus.
cSi l'écran suivant s'afche, cliquez sur Exécuter
Msetup4.exe.
dSi la boîte de dialogue Contrôle de compte
d'utilisateur apparaît, cliquez sur Oui.
Lorsque ce message n'apparaît pas (ou n'est plus afché)
1. Cliquez sur Explorateur de chiers dans la barre
des tâches.
ou
2. Cliquez sur Ce PC dans la partie gauche de la fenêtre
ouverte.
3. Double-cliquez sur
l'icône de CD-ROM dans la
partie droite de la fenêtre.
Si le contenu du CD-ROM s'afche, double-cliquez
sur Msetup4.exe.
4. Passez à l'étape d.
■ Si vous utilisez Windows 7 :
b Lorsque l'écran Lecture automatique apparaît,
cliquez sur Exécuter Msetup4.exe.
c Si la boîte de dialogue Contrôle de compte
d'utilisateur apparaît, cliquez sur Continuer.
Lorsque l'écran Lecture automatique ne s'afche pas
1. Cliquez sur Ordinateur à partir du menu Démarrer.
2. Double-cliquez sur
l'icône de CD-ROM dans la
partie droite de la fenêtre ouverte.
Si le contenu du CD-ROM s'afche, double-cliquez
sur Msetup4.exe.
Poursuivez avec l'étape pour continuer.
2
Cliquez sur Commencer la conguration.
La connexion avec votre ordinateur est terminée. Vous pouvez imprimer à partir
de votre ordinateur.
Pour poursuivre la conguration de la télécopie, passez à la page 8.
Si l'écran suivant s'afche,
cliquez sur Quitter.
Suivez les instructions
à l'écran pour poursuivre
la conguration.

6
6-B. Connexion à un smartphone
Android
iOS
Vous devez congurer une connexion pour chaque smartphone. Poursuivez la conguration à partir de l'étape 1 pour
chaque smartphone.
Préparation
• Activez Wi-Fi sur votre smartphone.
• Si vous avez un routeur sans l, connectez votre smartphone au routeur sans l que vous voulez connecter à l'imprimante.
* Pour le fonctionnement, reportez-vous aux manuels de votre smartphone et du routeur sans l ou prenez contact avec les fabricants.
1
Installez le logiciel d'application Canon PRINT Inkjet/SELPHY sur votre smartphone.
: Recherchez « Canon PRINT » dans App Store.
: Recherchez « Canon PRINT » dans Google Play.
Vous pouvez également accéder au site Web Canon en numérisant le code QR.
* Il se peut que vous ne parveniez pas à connecter votre smartphone via une connexion sans l à Internet lorsque
l'imprimante est connectée directement au smartphone. Dans ce cas, vous risquez de devoir payer des frais en fonction
du contrat avec votre fournisseur de services.
* Jusqu'à 5 périphériques peuvent être connectés directement à l'imprimante via une connexion réseau sans l.
2
Vériez l'afchage sur l'imprimante.
L'écran s'éteint si aucune action n'est effectuée pendant environ 10 minutes environ. Appuyez sur un des boutons du panneau
de contrôle (sauf sur le bouton MARCHE (ON)) pour afcher l'écran.
■ Si l'écran suivant s'afche :
Vériez l'icône dans la partie inférieure gauche, puis
passez à l'étape
ou .
Si apparaît, l'imprimante ne peut pas communiquer
via une connexion réseau sans l. Pour plus de détails,
accédez à « http://ij.start.canon » pour consulter la section
Foire aux questions.
■ Si l'écran suivant s'afche :
Passez à l'étape
.
Non (Passez à l'étape
.)
OUI
aTouchez le logiciel
d'application installé.
bSuivez les instructions à l'écran pour enregistrer
l'imprimante.
cAssurez-vous que l'écran
de droite s'afche.
La connexion avec votre smartphone
est terminée. Vous pouvez imprimer
à partir de votre smartphone.
Pour imprimer des photos, chargez du papier photo. Passez
à la section « Chargement de papier photo », à la page 8.
Pour poursuivre la conguration de la
télécopie, passez à la page 8.
L'icône suivante s'afche.
(L'imprimante est connectée à un réseau.)

7
FRANÇAIS
Les procédures ci-dessous varient selon que vous utilisez iOS ou Android. Sélectionnez votre système
d'exploitation et poursuivez avec la procédure s'y rapportant.
aTouchez Réglages sur l'écran d'accueil du smartphone,
puis touchez Canon_ij_XXXX dans les réglages Wi-Fi.
Si Canon_ij_XXXX n'apparaît pas dans la liste,
reportez-vous à la section « Préparation de
l'imprimante » ci-dessous pour faire fonctionner
l'imprimante, puis répétez l'étape a.
bTouchez le logiciel d'application
installé.
cSuivez les instructions à l'écran pour enregistrer
l'imprimante.
Suivez les instructions à l'écran pour poursuivre
la conguration.
Si vous sélectionnez Méthode sél. auto conn.
(recommandé) dans l'écran de sélection de la
méthode de connexion, la méthode de connexion
appropriée est sélectionnée automatiquement selon
votre environnement.
dAssurez-vous que l'écran
de droite s'afche.
aTouchez le logiciel d'application
installé.
bSuivez les instructions à l'écran pour enregistrer
l'imprimante.
Si le message « L'imprimante n'est pas enregistrée.
Congurer l'imprimante ? » ne s'afche pas,
reportez-vous à la section « Préparation de
l'imprimante » ci-dessous pour faire fonctionner
l'imprimante et attendez que le message s'afche.
Suivez les instructions à l'écran pour poursuivre
la conguration.
• La méthode de connexion appropriée est
sélectionnée selon votre environnement.
• Si deux noms d'imprimantes apparaissent sur
l'écran Enreg. imprimante comme indiqué ci-
dessous, sélectionnez A.
A) TR7500 series (xxx.xxx.xxx.xxx)
B) Direct-xxxx-TR7500series
cAssurez-vous que l'écran
de droite s'afche.
La connexion avec votre smartphone est terminée. Vous pouvez imprimer à partir
de votre smartphone.
Pour imprimer des photos, chargez du papier photo. Passez à la section « Chargement de papier photo », à la page 8.
Pour poursuivre la conguration de la télécopie, passez à la page 8.
aAppuyez sur le bouton ACCUEIL (HOME)
de l'imprimante.
bSélectionnez l'icône dans le coin inférieur gauche
de l'écran ACCUEIL.
a
b
cSi l'écran suivant s'afche, sélectionnez Non.
dSélectionnez Param. réseau > Réseau sans l >
Cong. du réseau sans l > Connexion facile
sans l dans cet ordre.
eSélectionnez Oui.
fRevenez au fonctionnement de votre smartphone.
Préparation de l'imprimante

8
1
Ouvrez le couvercle du réceptacle arrière et retirez
le support papier.
2
aOuvrez le couvercle de la fente d'alimentation.
bFaites glisser le guide papier de droite vers
l'extrémité.
a
b
3
aChargez plusieurs feuilles de papier photo
face à imprimer vers le haut.
bFaites glisser le guide papier droit de
manière à l'aligner avec le côté de la pile
de papier.
a
b
4
Fermez le couvercle de la fente d'alimentation.
Lisez le message sur l'écran de l'imprimante et
enregistrez les informations du papier chargé.
5
aRetirez le bac de sortie papier.
bOuvrez l'extension du bac de sortie papier.
a
b
■ Ouverture à partir du site Web
aAccédez au site Web Canon.
bSélectionnez Conguration.
cLorsque 'l'écran permettant de sélectionner un
modèle apparaît, entrez le nom de modèle de votre
imprimante.
dSélectionnez Préparation du
télécopieur.
■ Ouverture à partir du manuel installé sur votre
ordinateur
L'exemple ci-dessous utilise Windows 10.
aCliquez sur le bouton Démarrer.
bCliquez sur Toutes les applications >
Canon TR7500 series Manuel à l'écran dans cet
ordre, puis ouvrez le Manuel de base.
cSélectionnez Conguration du FAX.
Chargement de papier photo
Utilisation de la fonction de télécopie
Avant d'utiliser la fonction de télécopie, reportez-vous à Conguration du FAX pour congurer la fonction de télécopie
de votre imprimante. Vous pouvez vous reporter à Conguration du FAX via l'une des méthodes suivantes.
Chargez du papier photo dans le réceptacle arrière.

1
DEUTSCH
1. Überprüfen des Lieferumfangs
□ Installations-CD-ROM
für Windows-PCs
□ Netzkabel
□ Sicherheitsinformationen
und wichtige Hinweise
□ Modularkabel
□ Tintenbehälter für die Einrichtung
□ Inbetriebnahme (dieses Handbuch)
2. Entfernen des
Verpackungsmaterials/
Anschalten des Druckers
1
Entfernen Sie das Verpackungsmaterial
(z. B. orangefarbenes Klebeband und Schutzfolie
auf dem Touchscreen) außen am Drucker.
Es kann zu Fehlfunktionen kommen, wenn sich die
Schutzfolie bei Verwendung des Druckers noch an
diesem bendet.
2
aGreifen Sie mit Ihren Fingern in die Öffnungen
an beiden Seiten des Druckers und öffnen Sie
das Scan-Modul/die Abdeckung.
bEntfernen Sie das orangefarbene Klebeband.
b
a
3
Schließen Sie Scan-Modul/Abdeckung.
4
Schließen Sie das Netzkabel diagonal an der
Rückseite an.
Rückseite
Schließen Sie außer dem Netzkabel noch keine
Kabel an.
5
Heben Sie das Bedienfeld an und drücken Sie auf
die Taste EIN (ON).
6
Ziehen Sie den Bildschirm und tippen Sie auf die
gewünschte Sprache.
7
Wenn der folgende Bildschirm angezeigt wird,
wählen Sie Ihr Land oder Ihre Region, indem Sie
darauf tippen.
8
Lesen Sie die Meldungen und befolgen Sie die
Anweisungen auf dem Bildschirm.
Nähere Angaben dazu, welche Informationen an
Canon gesendet werden, nden Sie unter „Daten
an Canon senden” in Sicherheitsinformationen
und wichtige Hinweise.
9
Wählen Sie OK.

2
3. Einsetzen des
Tintenbehälters
1
Öffnen Sie das Scan-Modul/die Abdeckung.
Berühren Sie den Druckkopfhalter (A) nicht,
solange er sich bewegt.
(A)
2
aEntfernen Sie das orangefarbene Klebeband
VOLLSTÄNDIG.
bEntfernen Sie die Schutzhülle.
a
b
3
Ergreifen Sie mit Ihrem Finger die orangefarbene
Kappe, um sie VORSICHTIG zu entfernen.
Üben Sie keinen Druck auf die Seiten
des Tintenbehälters aus, wenn das
Y-förmige Loch blockiert ist.
Nicht berühren.
4
Setzen Sie den Tintenbehälter in den Druckkopf ein
und drücken Sie ihn fest nach unten, bis er einrastet.
Die Farbe des eingesetzten Tintenbehälters wird auf
dem Bildschirm angezeigt.
Wenn die Farbe nicht auf dem Bildschirm angezeigt wird,
obwohl Sie den Tintenbehälter eingesetzt haben, ist die
Farbe des Tintenbehälters möglicherweise falsch oder Sie
haben beispielsweise einen Tintenbehälter mit einer anderen
Modellnummer eingesetzt, der von diesem Drucker nicht
unterstützt wird. Setzen Sie entweder einen Tintenbehälter
der richtigen Farbe ein oder verwenden Sie den im
Lieferumfang enthaltenen Tintenbehälter für die Einrichtung.
5
Setzen Sie alle Tintenbehälter wie in Schritt 4
beschrieben ein und vergewissern Sie sich, dass
alle Farben auf dem Bildschirm angezeigt werden.
6
Schließen Sie Scan-Modul/Abdeckung.
Wenn eine Fehlermeldung auf dem Bildschirm
angezeigt wird, stellen Sie sicher, dass die
Tintenbehälter ordnungsgemäß eingesetzt sind.
4. Einlegen von Papier/
Ausrichten des Druckkopfs
Um ein besseres Druckergebnis zu erhalten, drucken
Sie ein Muster für die Druckkopfausrichtung (Print Head
Alignment) und scannen Sie dieses.
1
aZiehen Sie die Kassette heraus.
bEntfernen Sie die Kassettenabdeckung.
a
b
2
Drücken Sie die Verriegelung der Kassette und
ziehen Sie die Kassette aus.
La pagina si sta caricando...
La pagina si sta caricando...
La pagina si sta caricando...
La pagina si sta caricando...
La pagina si sta caricando...
La pagina si sta caricando...
La pagina si sta caricando...
La pagina si sta caricando...
La pagina si sta caricando...
La pagina si sta caricando...
La pagina si sta caricando...
La pagina si sta caricando...
La pagina si sta caricando...
La pagina si sta caricando...
La pagina si sta caricando...
La pagina si sta caricando...
La pagina si sta caricando...
La pagina si sta caricando...
La pagina si sta caricando...
La pagina si sta caricando...
La pagina si sta caricando...
La pagina si sta caricando...
La pagina si sta caricando...
La pagina si sta caricando...
La pagina si sta caricando...
La pagina si sta caricando...
La pagina si sta caricando...
La pagina si sta caricando...
La pagina si sta caricando...
La pagina si sta caricando...
La pagina si sta caricando...
La pagina si sta caricando...
La pagina si sta caricando...
La pagina si sta caricando...
La pagina si sta caricando...
La pagina si sta caricando...
La pagina si sta caricando...
La pagina si sta caricando...
La pagina si sta caricando...
La pagina si sta caricando...
La pagina si sta caricando...
La pagina si sta caricando...
La pagina si sta caricando...
La pagina si sta caricando...
La pagina si sta caricando...
La pagina si sta caricando...
La pagina si sta caricando...
La pagina si sta caricando...
La pagina si sta caricando...
La pagina si sta caricando...
La pagina si sta caricando...
La pagina si sta caricando...
La pagina si sta caricando...
La pagina si sta caricando...
La pagina si sta caricando...
La pagina si sta caricando...
La pagina si sta caricando...
La pagina si sta caricando...
La pagina si sta caricando...
La pagina si sta caricando...
La pagina si sta caricando...
La pagina si sta caricando...
La pagina si sta caricando...
La pagina si sta caricando...
La pagina si sta caricando...
La pagina si sta caricando...
La pagina si sta caricando...
La pagina si sta caricando...
La pagina si sta caricando...
La pagina si sta caricando...
La pagina si sta caricando...
La pagina si sta caricando...
La pagina si sta caricando...
La pagina si sta caricando...
La pagina si sta caricando...
La pagina si sta caricando...
La pagina si sta caricando...
La pagina si sta caricando...
La pagina si sta caricando...
La pagina si sta caricando...
-
 1
1
-
 2
2
-
 3
3
-
 4
4
-
 5
5
-
 6
6
-
 7
7
-
 8
8
-
 9
9
-
 10
10
-
 11
11
-
 12
12
-
 13
13
-
 14
14
-
 15
15
-
 16
16
-
 17
17
-
 18
18
-
 19
19
-
 20
20
-
 21
21
-
 22
22
-
 23
23
-
 24
24
-
 25
25
-
 26
26
-
 27
27
-
 28
28
-
 29
29
-
 30
30
-
 31
31
-
 32
32
-
 33
33
-
 34
34
-
 35
35
-
 36
36
-
 37
37
-
 38
38
-
 39
39
-
 40
40
-
 41
41
-
 42
42
-
 43
43
-
 44
44
-
 45
45
-
 46
46
-
 47
47
-
 48
48
-
 49
49
-
 50
50
-
 51
51
-
 52
52
-
 53
53
-
 54
54
-
 55
55
-
 56
56
-
 57
57
-
 58
58
-
 59
59
-
 60
60
-
 61
61
-
 62
62
-
 63
63
-
 64
64
-
 65
65
-
 66
66
-
 67
67
-
 68
68
-
 69
69
-
 70
70
-
 71
71
-
 72
72
-
 73
73
-
 74
74
-
 75
75
-
 76
76
-
 77
77
-
 78
78
-
 79
79
-
 80
80
-
 81
81
-
 82
82
-
 83
83
-
 84
84
-
 85
85
-
 86
86
-
 87
87
-
 88
88
-
 89
89
-
 90
90
-
 91
91
-
 92
92
-
 93
93
-
 94
94
-
 95
95
-
 96
96
-
 97
97
-
 98
98
-
 99
99
-
 100
100


Canon PIXMA TR7540 Manuale utente
- Categoria
- Giocattoli
- Tipo
- Manuale utente
in altre lingue
- français: Canon PIXMA TR7540 Manuel utilisateur
- español: Canon PIXMA TR7540 Manual de usuario
- Deutsch: Canon PIXMA TR7540 Benutzerhandbuch
- Nederlands: Canon PIXMA TR7540 Handleiding
- português: Canon PIXMA TR7540 Manual do usuário
- dansk: Canon PIXMA TR7540 Brugermanual
Documenti correlati
-
Canon PIXMA TR8550 Manuale utente
-
Canon PIXMA TS6151 Manuale utente
-
Canon Pixma TS9150 - Mac Manuale utente
-
Canon PIXMA TS6251 Manuale utente
-
Canon PIXMA TS5140 Manuale del proprietario
-
Canon PIXMA TS8140 Manuale del proprietario
-
Canon PIXMA TS8250 Manuale del proprietario
-
Mode d'Emploi pdf Pixma TS-9551 C Manuale utente
-
Canon Pixma TS3140 - Mac Manuale utente
-
Mode d'Emploi pdf Pixma TR4540 - Mac Manuale utente