
USER MANUAL
Label dispenser
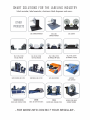
DN01 - DN02 - DP03 - DP02
Please keep the original packaging in case you need to return the unit.
If we receive the system in non-original packaging, the warranty may be void.
Si prega di conservare l’imballo originale nel caso in cui sia necessario restituire l’unità.
La garanzia potrebbe decadere a causa di spedizione in un imballo non conforme.


index / indice
Characteristics / Caratteristiche 3 13
Programming / Programmazione
• Exiting menu / Uscita dal menú 4 14
• Enable rst menu / Abilitazione primo menú
• Setting series of label / Selezione serie di etichette 4 14
• Enable second menu / Abilitazione secondo menú
• Setting feed type / Selezione tipo di avanzamento 5 15
• Enable third menu / Abilitazione terzo menú
• Setting counter / Selezione contatore 7 17
• Enable fourth menu / Abilitazione quarto menú
• Setting company name / Scrittura nome societá 8 18
• Enable fth menu / Abilitazione quinto menú
• Sensor test / Test sensore 9 19
• Motor manual advance / Avanzamento manuale motore 10 20
• Counter zero setting / Azzeramento contatore 10 20
• Roll load on the dispenser / Caricamento bobina 10 20
• Sensor calibration / Calibrazione sensore 12 22
2

CHARACTERISTICS
Electrical Characteristics
• External power supply with 100/240VAC - 5A at 24V
• Fuse protection 3.15A
Electronic Characteristics
• Photocell to detect label presence
• Tachometer to control the label length
• Display with 2 lines of 16 characters
Electrical Characteristics
• Personalization of company name
• Photocell function control
• Programmable quantity of labels to detach from 0 to 999
• Continual display of the detached label quantity
• Continual display of the number of detached label series
• Programmable length of detached part of label
• Three dierent feed types
• Acoustic alarm sounds when the number of label series reaches the programmed quantity
• Programmable series from 2 to 3 labels of dierent lengths
Mechanical Characteristics
• Maximum dimensions
DN01 and DN02: W=330mm (12.99”); H=240mm (9.45”); D=410mm (16.14”)
DP02: W=320mm (12.60”); H=210mm (8.26”); D=260mm (10.24”)
DP03: W=240mm; H=210mm (8.26”); D=260mm (10.24”)
• Speed 120 rpm
• Roll diameter up to 300mm (11.81”) (DN01 - DN02) or 200mm (7.87”) (DP02 - DP03)
• Core holder from 30mm (1.18”)
• Label width up to 70mm (2.75”) (DP03), 150mm (5.90”) (DN01 - DP02)
or 210mm (8.26”) (DN02)
• Table to write on label if required before removal
• Mechanical regulation of the clutch
3

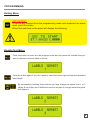
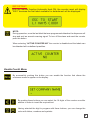
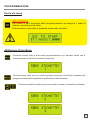
IMPORTANT
To exit at any moment from the programming mode and implement an alarm
reset, push this button.
When rst switched on the panel will display the following:
PROGRAMMING
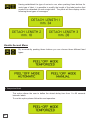
Exiting Menu
Enable First Menu
Push this button to enter into the program mode and the panel will indicate that you
wish to detach one series label at a time.
Push this button again if you don’t want to select the series type and set the detached
label length.
By successively pushing these buttons you can change the series from 1 to 3
labels. Even if they are of dierent sizes but are part of a single series the panel
will display it:
4

Having established the type of series to use, when pushing these buttons for
each type of label, it is possible to modify the length of the label section that
needs to be detached for each single label. The panel will then display on the
following three types of messages.
Enable Second Menu
By successfully pushing these buttons you can choose three dierent feed
types.
This option allows the user to dene the detach delay time from 1 to 60 seconds
between labels.
To run this option please follow the next operation.
> Temporized feed
5

By successively pushing this button you enter in the setting seconds menu.
By successfully pushing these button you can select the detach delay time from
1 to 60 seconds between labels.
Example: In this case you can detach a label every 15 seconds.
This function dispenses the labels automatically.
> Automatic feed
This function dispenses the label only if you push the ESC button or the pedal (optional
accessory).
> Manual feed
IMPORTANT
In both cases the dispenser will be stopped if the counter function is active and
you reach the set number of labels.
6

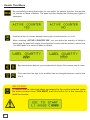
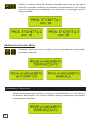
Enable Third Menu
By successfully pushing this button you can select the counter function that presets
the number of labels to detach. The panel will then display the following two types of
messages.
Push this button to choose between having the counter function on or o.
When selecting “ACTIVE COUNTER YES” you can dene the quantity of labels to
detach and the panel will display the sequential counter with the option to select from
1 to 9999 labels or a series of labels to detach.
By pushing these buttons you can select the 4 digits of the counter one at a time.
Once selected, the digit to be modied can be changed between a value from
0 to 9.
IMPORTANT
To ensure that the detached labels correspond to the number selected under
the active counter menu YOU MUST push this button for a few seconds to
reset the counter.
7

IMPORTANT
With the manual function Automatic feed ON, the counter reset will display
“0001” because the rst label available for detachment will be displayed.
NOTE:
During operation, once the last label that was programmed detaches the dispenser will
stop and emit an acoustic warning signal. To turn o the alarm and reset the counter
push this button.
When selecting “ACTIVE COUNTER NO” the counter is disabled and the labels can
be detached with undened quantities.
Enable Fourth Menu
By successfully pushing this button you can enable the function that allows the
customers name to appear on the display.
By pushing these buttons you can select the 16 digits of the counter one after
another in order to insert the required text.
Having selected the digit to program with these buttons, you can change the
value with letters, numbers and symbols.
8

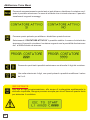
Enable Fifth Menu
By successfully pushing this button you enable the control of the sensor functions
for label presence. All of the digits will be on, as shown below with the functioning
sensors not in use.
By covering the sensor next to the panel with a nger, the digits turn o. As shown in
the following which demonstrates the use of the sensors by the label.
9

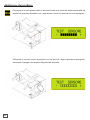
MOTOR MANUAL ADVANCE
Press this key for manual advance of the motor.
COUNTER ZERO SETTING
Press this key for 4 seconds to reset the counter to 0. When reset the dispenser will
emit a sound.
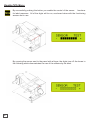
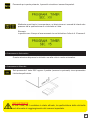
ROLL LOAD ON THE DISPENSER
Load the roll of labels on the hub. Tighten the roll by attaching the plate. The tighter the plate the
more tension is applied to the roll.
Note: If during standard operation more than one label is detached pls increase the pressure
on the plate springs.
DN01 and DN02 DP02 and DP03
1 1
2 2
10

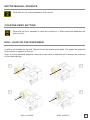
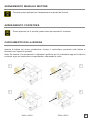
Follow the load procedure as seen below:
Open the drag roller and pass the backing through the rollers.
Block the backing with the fork on the recovery roller. Close the drag roller.
Push the displayed button to roll up the backing on the recovery roll.
DN01 and DN02 DP02 and DP03
3 3
4 4
5 5
11

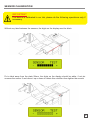
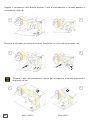
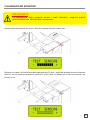
SENSOR CALIBRATION
Without any label between the sensors, the digits on the display must be black.
IMPORTANT
The device is calibrated in our lab, please do the following operations only if
necessary.
Put a label away from the plate 20mm, the digits on the display should be white; if not pls
unscrew the sensor 2 and move it up or down to obtain this condition then tighten the screws.
12

CARATTERISTICHE
Caratteristiche Elettriche
• Alimentazione esterna con trasformatore 100/240VAC - 2.5A a 24V
• Fusibile di protezione 3.15A
Caratteristiche Elettroniche
•Fotocellule per rilevamento etichetta
• Tachimetrica per controllo lunghezza etichetta
• Display a 2 righe da 16 caratteri
Caratteristiche Controllo Software
• Personalizzazione nome azienda
• Controllo funzionalità fotocellule
• Impostazione numero etichette da spellicolare, da 0 a 9999
• Visualizzazione costante del numero di etichette spellicolate
• Segnalazione acustica al termine del numero etichette impostate
• Impostazione lunghezza in mm della spellicolatura
• 3 dierenti tipi di avanzamento: manuale-automatico-temporizzato
• Impostazione serie da 2 a 3 etichette con diversa lunghezza
• Visualizzazione costante del numero della serie di etichette
• Segnalazione acustica al termine del numero della serie di etichette impostate
Caratteristiche Meccaniche
• Dimensioni:
DN01 and DN02: W=330mm (12.99”); H=240mm (9.45”); D=410mm (16.14”)
DP02: W=320mm (12.60”); H=210mm (8.26”); D=260mm (10.24”)
DP03: W=240mm; H=210mm (8.26”); D=260mm (10.24”)
• Velocità 120 rpm
• Diametro rotolo massimo:
300mm (11.81”) (DN01 - DN02)
200mm (7.87”) (DP02 - DP03)
• Diametro anima da 30mm
• Larghezza etichetta massima 70mm (2.75”) (DP03), 150mm (5.90”) (DN01 - DP02)
o 210mm (8.26”) (DN02)
• Piano per eventuale scrittura su etichette prima del distacco
• Frizione meccanica ssa
13

IMPORTANTE
Per uscire in ogni momento dalla programmazione ed eseguire il reset di
allarme, premere questo tasto.
All’accensione il pannello si presenta come sotto riportato:
PROGRAMMAZIONE
Uscita dal menù
Abilitazione Primo Menù
Premendo questo tasto si entra nella programmazione ed il pannello indica che si
intende staccare etichetta con stessa lunghezza.
Premere questo tasto se non si vuole impostare altre serie di etichette e passare alla
programmazione della lunghezza di spellicolatura delle etichette.
Premendo questi due tasti si possono sceliere le serie di etichette da utilizzare.
14

Stabilito il numero di serie da utilizzare, premendo questi tasti su ogni tipo di
etichetta è possibile modicare la lunghezza di spellicolatura di ogni singola
serie ed il pannello può visualizzare i tre diversi tipi di messaggio come di
seguito riportato.
Abilitazione Secondo Menù
Premendo questi tasti si può scegliere il tipo di avanzamento: temporizzato,
automatico, manuale.
Questa funzione permette di denire un tempo di ritardo variabile, da 1 a 60 secondi,
nel distacco dell’etichetta. Per rendere operativo questo avanzamento posizionarsi
nella seguente schermata.
> Avanzamento Temporizzato
15

Premendo poi questo pulsante, il pannello visualizza i secondi impostati.
Mediante questi tasti si incrementano o si diminuiscono i secondi di ritardo che
passano tra la spellicolatura di un’etichetta e l’altra.
Esempio:
in questo caso il tempo di avanzamento tra un’etichetta e l’altra è di 15 secondi.
Questa selezione dispensa le etichette una alla volta in modo automatico.
> Avanzamento Automatico
Solo premendo il tasto ESC oppure il pedale (acessorio opzionale) viene presentata
l’etichetta spellicolata.
> Avanzamento Manuale
IMPORTANTE
In tutti i casi, se il contatore è stato attivato, la spellicolatura delle etichette
sarà bloccata al raggiungimento del numero impostato.
16

Abilitazione Terzo Menù
Premendo successivamente questo tasto si può attivare o disattivare il contatore con il
quale è possibile selezionare il numero di etichette che si intende staccare. Il pannello
visualizzerà i seguenti messaggi:
Premere questo pulsante per abilitare o disabilitare questa funzione.
Selezionando “CONTATORE ATTIVO SI” è possibile stabilire il numero di etichette da
staccare ed il pannello visualizza il contatore seguente con la possibilità di selezionare
da 1 a 9999 etichette da staccare.
Premendo questi tasti è possibile selezionare uno alla volta i 4 digit del contatore.
Una volta selezionato il digit, con questi pulsanti e possibile modicare il valore
da 0 a 9.
IMPORTANTE
Alla ne di ogni programmazione, allo scopo di conteggiare esattamente le
etichette impostate, bisogna premere sempre per alcuni secondi questo tasto
per azzerare il contatore.
17

IMPORTANTE
Nel caso dell’avanzamento manuale dopo questa operazione il contatore
segnerà già 0001, che corrisponde all’etichetta presente sul piano pronta per
essere staccata.
NOTA:
Durante il funzionamento quando si è arrivati all’ultima etichetta programmata il
dispenser si ferma ed emette un segnale acustico di avviso. Premere questo pulsante
per spegnere il suono e resettare il contatore.
Selezionando “CONTATORE ATTIVO NO” il contatore non viene abilitato e le etichette
si potranno staccare in quantità indenita.
Abilitazione Quarto Menù
Premendo questo tasto viene abilitata la funzione che consente di far apparire il nome
del cliente sul display.
Premendo questi tasti è possibile selezionare uno dopo l’altro i 16 digits del
contatore per eseguire la scrittura desiderata.
Una volta selezionato il digit da impostare con questi tasti è possibile variare il
valore impostato: lettere, numeri o simboli.
18

Abilitazione Quinto Menù
Premendo di nuovo questo tasto si attiva la funzione di controllo della funzionalità dei
sensori di presenza etichetta, con i digit accesi, sensori funzionanti e non impegnati.
Ostruendo il sensore vicino al pannello con un dito tutti i digit si dovranno spengnere,
simulando l’impegno dei sensori da parte dell’etichetta.
19
La pagina si sta caricando...
La pagina si sta caricando...
La pagina si sta caricando...
La pagina si sta caricando...
-
 1
1
-
 2
2
-
 3
3
-
 4
4
-
 5
5
-
 6
6
-
 7
7
-
 8
8
-
 9
9
-
 10
10
-
 11
11
-
 12
12
-
 13
13
-
 14
14
-
 15
15
-
 16
16
-
 17
17
-
 18
18
-
 19
19
-
 20
20
-
 21
21
-
 22
22
-
 23
23
-
 24
24


