Soundmaster PL711 Manuale utente
- Categoria
- Giradischi audio
- Tipo
- Manuale utente

DEUTSCH
ITALIANO
ENGLISH
SLOVENSKÝ
FRANÇAIS
ČEŠTINA
NEDERLANDS
PL711
Hersteller
Wörlein GmbH Tel.: +49 9103/71670
Gewerbestrasse 12 Fax.: +49 9103/716712
D 90556 Cadolzburg Email. info@soundmaster.de
GERMANY Web: www.soundmaster.de

Sicherheits- / Umwelt- / Aufstellhinweise
DE
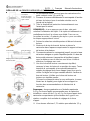
HINWEIS ZUM UMWELTSCHUTZ
Das Symbol auf dem Produkt, in der
Gebrauchsanleitung oder auf der Verpackung weist
darauf hin, dass es am Ende seiner Lebensdauer nicht
über den normalen Haushaltsabfall entsorgt werden
darf. Es muss an einem Recycling Sammelpunkt von
elektrischen und elektronischen Geräten abgegeben
werden.
Die Werkstoffe sind gemäß Ihrer Kennzeichnung
wiederverwertbar. Mit der Wiederverwendung der stofflichen
Verwertung oder anderen Formen der Verwertung von Altgeräten
und Verpackungen, leisten Sie einen wichtigen Beitrag zum
Schutze unserer Umwelt. Entfernen Sie dazu, wenn möglich,
Batterien und personenbezogene Daten vor der für Sie
kostenlosen Entsorgung.
Fragen Sie Ihren Händler oder die Gemeindeverwaltung nach
der, von uns Systemmäßig mitunterstützten, zuständigen
Entsorgungsstelle.
Verbrauchte Batterien sind Sonderabfall und gehören
NICHT in den Hausmüll! Als Verbraucher sind Sie
gesetzlich verpflichtet alle Batterien und Akkus egal
ob Schadstoffe *) enthalten oder nicht zur
umweltschonenden Entsorgung und zur
Wiedergewinnung von Rohstoffen zurückzugeben.
*) gekennzeichnet mit Cd = Cadmium, Hg =Quecksilber, Pb = Blei
Sie können alle Batterien oder Akkus bei den öffentlichen
Sammelstellen in Ihrer Gemeinde oder dort unentgeltlich abgeben
wo Batterien und Akkus der betreffenden Art verkauf werden. Um
die Umwelt zu schonen Verwenden Sie, wenn möglich Akkus
anstelle von Einwegbatterien. Unsachgemäße Entsorgung von
Batterien/Akkus belastet die Umwelt und setzt für Menschen,
Tiere, und Pflanzen schädigende Stoffe frei.
Batterien und Akkus bitte nur in entladenem Zustand abgeben.
Kleben Sie bei lithiumhaltigen Batterien und Akkus die Kontakte
ab, um Kurzschlüsse und deren mögl. Folgen (Feuer/Explosion)
zu vermeiden.
• Verwenden Sie nur Batterien, die frei von Quecksilber &
Cadmium sind.
• Batterien dürfen nicht in die Hände von Kindern gelangen.
Kinder können Batterien verschlucken. Wurde eine Batterie
verschluckt, muss sofort medizinische Hilfe in Anspruch
genommen werden.
• Überprüfen Sie regelmäßig die Batterien um ein Auslaufen der
Batterie zu vermeiden.
• Batterien dürfen keiner Hitze (z. B. Sonnenbestrahlung), Feuer
ausgesetzt werden.
• ACHTUNG: Explosionsgefahr bei falscher
Batteriehandhabung. Nur durch denselben oder baugleichen
Batterietyp ersetzen.
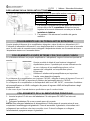
WARNUNG
Gefahr elektrischer Schläge
Gerät nicht öffnen!
Zur Vermeidung von Stromschlägen darf dieses Gerät nicht geöffnet
werden. Es enthält keine Bauteile, die vom Benutzer gewartet oder
repariert werden können, Wartungs- und Reparaturarbeiten dürfen nur
von Fachpersonal ausgeführt werden.
Dieses Symbol zeigt an, dass im Inneren des Gerätes
gefährliche Spannungen vorhanden sind, und einen
Stromschlag verursachen können.
Dieses Symbol weist auf wichtige Bedienungs- und
Wartungsanweisungen bezüglich des Geräts hin.
• Das Gerät ausnahmslos nur in trockenen Innenräumen
betreiben und niemals mit Feuchtigkeit in Verbindung
bringen.
• Schützen Sie das Gerät vor tropfenden oder spritzenden
Flüssigkeiten, und stellen Sie keine mit Flüssigkeit
gefüllten Gefäße (z. B. Vasen) auf das Gerät.
• Betreiben Sie das Gerät nur in einem gemäßigten Klima.
• Schließen Sie das Gerät nur an eine vorschriftsmäßig
installierte und geerdete Netzsteckdose an. Die
Netzspannung muss mit den Angaben auf dem
Typenschild des Gerätes übereinstimmen.
• Achten Sie darauf, dass im Betrieb das Netzkabel
niemals nass oder feucht wird. Das Netzkabel darf nicht
eingeklemmt oder anderweitig beschädigt werden.
• Der Netzstecker dient als Trennvorrichtung und muss
ohne Schwierigkeiten benutzbar sein.
• Achten Sie beim Verlegen des Netzkabels darauf, dass
es beim Betrieb des Gerätes nicht zu einer Stolperfalle
werden kann.
• Lassen Sie beschädigte Netzstecker oder Netzkabel
sofort von dem Kundenservice austauschen.
• Prüfen Sie das Gerät, das Netzkabel sowie den
Netzstecker regelmäßig auf sichtbare Beschädigungen.
Verwenden Sie das Gerät auf keinen Fall, wenn Sie
Beschädigungen festgestellt haben.
• Benutzen Sie das Gerät nicht, wenn es Beschädigungen
aufweist, wenn es heruntergefallen ist oder nicht
einwandfrei funktioniert.
• Sie dürfen das Gehäuse nicht öffnen oder reparieren. In
diesem Falle ist die Sicherheit nicht gegeben und die
Garantie erlischt. Reparaturen bzw. wechseln der fest
eingebauten Akkus sind ausschließlich durch einen
Service-/ Kundencenter oder Fachbetrieb auszuführen.
• Ziehen Sie bei Gewitter oder einer längeren
Abwesenheit (z.B. Urlaub) den Netzstecker und
entnehmen Sie ggf. die Batterien.
• Kinder sollten das Gerät nur unter Aufsicht Erwachsener
betreiben.
• Lassen Sie das Gerät während des Gebrauchs nicht
unbeaufsichtigt.
• Das Gerät ausnahmslos nur mit einem trockenen
Abstaubtuch reinigen.
• KEINE REINIGUNGSMITTEL oder TÜCHER mit
GROBEN Material verwenden!!!
• Das Gerät keiner Sonnenbestrahlung oder anderen
Hitzequellen aussetzen.
• Stellen Sie das Gerät so auf, dass kein Hitzestau
entstehen kann, also frei und gut belüftet.
• Achten Sie darauf, dass an den Seiten ein
Mindestabstand von 10 cm besteht, um eine
ausreichende Luftzirkulation zu gewährleisten.
• Decken Sie niemals die Belüftungsöffnungen zu!!!
• Offene Brandquellen, wie z.B. brennende Kerzen, dürfen
nicht auf das Gerät gestellt werden.
• Das Gerät an einem sicheren, erschütterungsfreien Platz
aufstellen.
• Benutzen Sie das Gerät nicht, wenn es Beschädigungen
aufweist, wenn es heruntergefallen ist oder nicht
einwandfrei funktioniert.
• Gerät möglichst weit entfernt von Computern und
Mikrowellengeräten platzieren, da es sonst evtl. zu
Empfangsstörungen im Radiobetrieb kommen kann.
• Treten wegen einer elektrostatischen Entladung oder
kurzeitigen Netzüberspannung Fehlfunktionen auf,
setzen Sie das Gerät zurück. Ziehen Sie hierfür den
Netzstecker bzw. Netzadapter und schließen ihn nach
einigen Sekunden wieder an.

PL711 / Deutsche Bedienungsanleitung
1
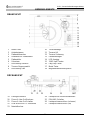
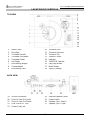
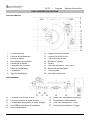
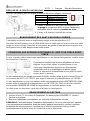
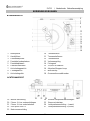
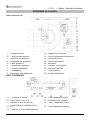
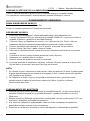
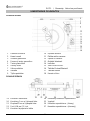
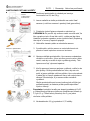
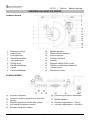
BEDIENELEMENTE
DRAUFSICHT
1
Motor Rolle
10
Tonarmauflage
2
Antriebsriemen
11
Tonarm Lift
3
Plattentellerachse
12
Tonarm Sicherung
4
Unterteller für Plattenteller
13
Lautstärkeregler
5
Plattenteller
14
LED Anzeige
6
Schaniere
15
33/45 UpM Tasten
7
Anti-Skating Gewicht
16
Play/Stop Taste
8
Tonarm Gegengewicht
17
Mode Taste
9
Anti-Skating Stift
18
Magnettonabnehmersystem
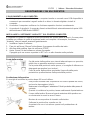
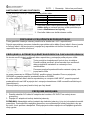
RÜCKANSICHT
19
Erdungsschraube
24
Lautsprecher Anschlussklemmen
20
Phono & Line Out Buchsen
25
EIN-/AUS-Schalter
21
Phono & Line Out Schalter
26
Lautsprecheranschluss (schwarz)
22
USB Buchse für PC Aufnahme
27
Lautsprecheranschluss (rot)
23
Netzteilbuchse

PL711 / Deutsche Bedienungsanleitung
2
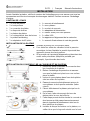
INSTALLATION
Überprüfen Sie vor der Installation des Plattenspielers den Verpackungsinhalt auf
Beschädigung. Bewahren Sie bitte das Originalverpackungsmaterial auf.
LIEFERUMFANG
➢ 1 x Hauptgerät
➢ 1 x Antriebsriemen
➢ 2 x Lautsprecherboxen
➢ 1 x Unterteller frü Plattenteller
➢ 1 x Plattenspielerabdeckung
➢ 1 x Riemenhaken
➢ 1 x Matte für Plattenteller
➢ 1 x Netzadapter
➢ 1 x Plattenteller
➢ 2 x Lautsprecheranschlusskabel
➢ 1 x Tonarmgegengewicht
➢ 1 x USB Anschlusskabel
➢ 1 x Anti-Skating Gewicht
➢ 1 x Systemausrichtungshilfe
➢ 1 x 45 UpM Adapter
➢ 1 x Bedienungsanleitung & Garantiekarte
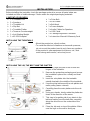
PLATTENSPIELER AUFSTELLUNG
・Stellen Sie den Plattenspieler auf eine ebenen Fläche.
•Um Vibrationen und Rückkopplung zu vermeiden,
platzieren Sie die Lautsprecher nicht direkt neben den
Plattenspieler.
・Ist der Plattenspieler zu nahen an einem Mobiltelefon
platziert können Geräusche erzeugt werden.
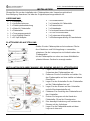
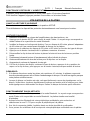
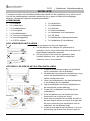
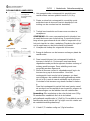
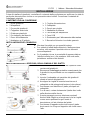
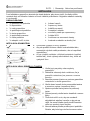
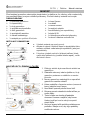
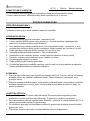
INSTALLATION DER ABDECKHAUBE, DES RIEMENS UND DES PLATTENTELLERS
1. Fügen Sie die Abdeckhaube in die
Scharniere des Plattenspielers ein.
2. Entfernen Sie die Schutzfolie und stellen Sie
den Plattenspieler auf eine stabile und ebene
Oberfläche.
3. Legen Sie den Unterteller für den Plattenteller
auf die Plattentellerachse auf.
3. Legen Sie den Riemen auf den Unterteller
und die Messingmototrolle auf.
4. Platzieren Sie vorsichtig den Plattenteller auf
den Unterteller.
5. Drehen Sie langsam mit der Hand den
Plattenteller 10-mal im Uhrzeigersinn.
6. Dies beseitigt Verdrehung und zentriert den
Riemen auf der Aufnahme.
7. Legen Sie die Plattentellermatte mit dem
Logo nach oben auf.

PL711 / Deutsche Bedienungsanleitung
3
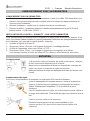
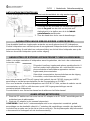
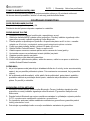
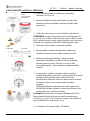
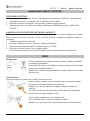
SYSTEMAUFLAGEGEWICHT EINSTELLEN
Gegengewicht
Auflagegewicht
Skala
Bezugslinie
Gegengewicht Tonarm
Für Balance einstellen
1. Das beiliegende Gegengewicht ist für
Tonabnehmersysteme von 3,0 bis 6,0 gr. verwendbar.
2. Schieben Sie das Gegengewicht, mit der Anzeige nach
vorne durch drehen , von hinten vorsichtig auf den
Tonarm auf.
3. Ziehen Sie den Nadelschutz vorsichtig nach vorne ab.
HINWEIS: Wird der Nadelschutz nach unten abgezogen,
kann es passieren, dass sich die Nadel vom System
löst. Dies macht sich mit sich mit zu geringer Lautstärke
bemerkbar. Setzen Sie dann die wie unter “Nadel
ersetzen” wieder richtig ein.
4. Entfernen Sie die Tonarmsicherung.
5. Senken Sie den Tonarm mit dem Lifthebel ab und
positionieren Sie den Tonabnehmer in dem Raum
zwischen der Tonarmstütze und dem Plattenteller.
6. Drehen Sie vorsichtig das Gegengewicht auf die Achse
auf, bis der Tonarm die Balance erreicht. Der Tonarm
sollte in diese ausgeglichene Position zurückkehren,
wenn er nach oben oder unten bewegt wird. Diese
Einstellung muss sorgfältig vorgenommen werden.
7. Sobald der Tonarm ausbalanciert ist, legen sie den
Tonarm auf die Tonarmauflage ab. Halten Sie das
Gegengewicht, ohne es zu bewegen, und drehen Sie
die Auflagegewichtanzeige vorsichtig, bis die Null mit
der schwarzen Mittellinie auf der Oberseite des
Tonarms übereinstimmt.
HINWEIS: Jede Markierung auf der Skala entspricht 0,05 g.
Die empfohlene Auflagekraft für das werkseitig montierte
System beträgt 3,5 g ± 0,5 g.
8. Um das benötigte Auflagegewicht von 3,5 g zu
erreichen, drehen Sie nun das Auflagegewicht
zusammen mit der Skala 1,75 mal auf die Achse auf.

PL711 / Deutsche Bedienungsanleitung
4
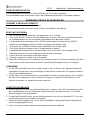
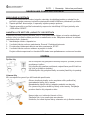
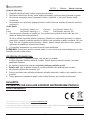
ANTI - SKATING EINSTELLUNG
Die Anti – Skating Einstellung muss Entsprechend des Auflagegewichtes gewählt werden.
Auflagekraft
Rille am Stift
1 - 2 g
1. Rille von der Lagerung
2 - 3 g
2. Rille von der Lagerung
3 - 4 g
3. Rille von der Lagerung
>4 g
4. Rille von der Lagerung
Für das werkseitige installierte System, schieben Sie die
Schlaufe des Anti-Skating Gewichtes über die 3. Rille und
führen Sie den Faden durch die Schlaufe des Drahtbügels.
ANSCHLIESSEN DER IM LIEFERUMFANG ENTHALTENEN LAUTSPRECHER
Dieser Plattenspieler enthält einen eingebauten Verstärker und wird mit Hi-Fi-Lautsprechern
geliefert.
Verbinden Sie die Lautsprecher mit dem mitgelieferten Lautsprecherkabel (schwarzes Kabel mit
schwarzer Kabelklemme; und rotes Kabel mit roter Kabelklemme). Verbinden Sie den linken
Lautsprecher mit dem linken und den rechten Lautsprecher mit dem rechten Ausgang.
ANSCHLUSS AN EXTERN GERÄTEN MIT DEM CHINCH -AUDIOKABEL
Wenn Sie den Plattenspieler an Ihren eigenen Verstärker oder Ihre eigenen Lautsprecher
anschließen möchten, befolgen Sie bitte die nachstehenden Anweisungen
Dieser Plattenspieler verfügt über einen eingebauten
Phono-Vorverstärker. Sie können damit das Gerät auch
verwenden, wenn Ihr Verstärker keinen eingebauten
Phonoverstärker oder das anschließende Gerät keinen
Phonovorverstärker hat.
Verwenden Sie den Vorverstärker-Wahlschalter, um den
Ausgang wie unten beschrieben einzustellen.
Wenn Sie einen Verstärker mit PHONO-Eingang haben, verwenden Sie bitte die Phono-
Eingangsbuchsen und den GROUND-Anschluss und schalten Sie den Vorverstärker-
Wahlschalter auf PHONO.
Wenn Sie einen Verstärker oder aktive Lautsprecher mit LINE-EINGANG haben, schalten Sie
bitte den Vorverstärker-Wahlschalter auf LINE und verbinden Sie ihn mit den LINE-
Eingangsbuchsen des Verstärkers/der aktiven Lautsprecher
Das rote Kabel ist für den rechten Kanal und das weiße für den linken Kanal.
NETZANSCHLUSS
1. Stecken Sie den Netzteilstecker des Netzadapterkabels in die DC INPUT-Buchse auf der
Rückseite des Plattenspielers.
2. Stecken Sie das Netzteil in eine normale Steckdose.
HINWEIS: Schließen Sie das Netzteil nicht an eine Steckdose an, bevor der Plattenspieler
vollständig zusammengebaut ist. Bevor Sie ihn einschalten, überprüfen Sie noch einmal alle
Verbindungen, um sicherzustellen, dass sie korrekt und sicher sind. Schalten Sie den Platten-
spieler immer aus, bevor Sie ihn an die Stromversorgung anschließen oder davon trennen.

PL711 / Deutsche Bedienungsanleitung
5
POWER-MANAGEMENT-FUNKTION
Der Plattenspieler wechselt nach 15 Minuten inaktivität automatisch in den Standby-Modus.
Um den Betrieb wieder aufzunehmen, halten Sie die Mode-Taste 3 Sekunden lang gedrückt.
PLATTENSPIELER BETRIEB
BEVOR SIE EINE SCHALLPLATTE ABSPIELEN
Schalten Sie den Plattenspieler mit dem EIN/AUS-Schalter ein.
Nehmen Sie vorsichtig den Nadelschutz ab.
ABSPIELEN EINER SCHALLPLATTE
1. Verringern Sie die Lautstärke des Verstärkers oder der angeschlossenen Lautsprecher usw.
2. Drücken Sie die MODE-Taste, um den Plattenspieler-Modus auszuwählen. Die rote
Kontrollleuchte zeigt den Plattenspieler-Modus und die blaue Kontrollleuchte zeigt den
Bluetooth-Modus an.
3. Legen Sie die Schallplatte auf die Matte. Wenn Sie Schallplatten mit 45 U/min verwenden,
setzen Sie den 45-U/min-Adapter auf die Spindel, bevor Sie die Schallplatte auf den
Plattenteller legen.
4. Je nach verwendeter Schallplatte drücken Sie die Geschwindigkeitstaste 33 oder 45 U/min.
5. Drücken Sie die Play/Stop-Taste, der Plattenteller beginnt sich zu drehen.
6. Entriegeln Sie die Tonarmablage und stellen Sie den Lifthebel in die obere Position.
7. Positionieren Sie den Tonarm über der gewünschten Stelle (Rille) auf der Schallplatte.
8. Senken Sie den Tonarm vorsichtig auf die Schallplatte mit den Tonarmlift ab.
9. Bei Bedarf erhöhen Sie die Lautstärke des Plattenspielers mit dem Lautstärkeregler.
10. Wenn die Schallplatte abgespielt ist, heben Sie den Tonarm mit den Lift an, bringen Sie ihn
zurück auf die Tonarmablage und drücken Sie zum Stoppen die Play/Stop-Taste.
HINWEIS:
1. Um die Schallplatte nicht zu beschädigen, hört der Plattenteller automatisch auf sich zu
drehen, wenn Pausen zwischen den einzelnen Titeln länger als 3 Minuten sind.
Dieser Stillstand bedeutet nicht, dass der Plattenspieler defekt ist.
2. Wenn die Filzmatte schmutzig wird, kann sie die Schallplatte zerkratzen. Säubern Sie daher
die Matte regelmäßig und wischen Sie den Staub ab.
3. Schützen Sie die Schallplatte vor Kratzern und Verformungen und entfernen Sie diese nach
Gebrauch und bewahren Sie die Platte in der Schutzhülle auf.
BLUETOOTH OPERATION
1. Drücken Sie die MODE-Taste um den Bluetooth-Modus auszuwählen. Die blaue LED-
Anzeige für Bluetooth leuchtet auf. Sie hören einen Aktivierungston in den Lautsprechern.
2. Schalten Sie die Bluetooth-Funktion Ihres Mediengeräts ein und starten Sie die Suche nach
PL711. Koppeln Sie nun das Mediengerät mit dem Plattenspieler.
4. Sobald Ihr Mediengerät erfolgreich mit dem Plattenspieler gekoppelt wurde, geben die
Lautsprecher einen kurzen Bestätigungston aus.
5. Starten Sie nun die Wiedergabe auf dem Mediagerät und stellen Sie die gewünschte
Lautstärke mit dem Lautstärkeregler am Plattenspieler und Mediengerät ein.

PL711 / Deutsche Bedienungsanleitung
6
AUFNAHME MIT PC
VERBINDEN MIT EINEM PC
1. Schließen Sie diesen Plattenspieler mit einem handelsüblichen USB-Kabel an einen
Computer an, um Audiosignale von einer Schallplatte in digitale Daten umzuwandeln und
an den Computer zu senden.
2. Schalten Sie den PC an und warten Sie bis er vollständig gestartet ist.
3. Schalten Sie den Plattenspieler ein und der PC erkennt automatisch den Plattenspieler und
identifiziert ihn als "USB Audio CODEC".
INSTALLATION DER “AUDACITY” SOFTWARE AM PC
Um Musik von diesem Plattenspieler mit einem Computer aufzunehmen, müssen Sie zuerst
eine Software installieren, die für die Audioaufnahme auf dem Computer verwendet werden
kann. Bitte laden Sie z.B. die frei verfügbare Software “Audacity herunter.
1. Installieren und öffnen Sie das Programm.
2. Klicken Sie in der Software auf das Aufnahme-Symbol. Die Aufnahme startet.
3. Zum Beenden der Aufnahme drücken Sie auf das Stop-Symbol.
4. Öffnen Sie das Symbol “Datei” in der Software und speichern Sie die Datei.
Der Titel kann nach Belieben in MP3 oder einem andere Audioformate exportiert werden.
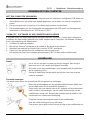
PFLEGE
NADEL
Wenn Schmutz und Dreck an der Nadelspitze haften, reinigen Sie
sie mit einer handelsüblichen Bürste. Wir empfehlen die
Verwendung eines Nadelreinigers (nicht im Lieferumfang
enthalten), wenn die Nadelspitze stark verschmutzt ist.
Reinigen Sie die Nadelspitze, indem Sie die Bürste von der
Rückseite zur Vorderseite der Nadelspitze bewegen.
ERSETZEN DER ABTASTNADEL
Es wird empfohlen, die Systemnadel nach 400 Betriebsstunden zu wechseln
Zusätzlich zur Verschlechterung der Klangqualität können
Schallplatten auch beschädigt werden, wenn sich die Nadelspitze
des Tonabnehmers abnutzt. Achten Sie darauf, das Netzteil des
Produkts von der Steckdose zu trennen.
Halten Sie beim Austauschen der Nadel den Tonabnehmerkörper
fest. Klappen Sie die Nadel nach unten und ziehen Sie die Nadel
ab.
Bringen Sie die neue Ersatznadel am Tonabnehmer an
Heben Sie den Stift an, bis Sie ein Klicken hören
Stellen Sie sicher, dass kein Spalt zwischen Nadelträger und
Tonabnehmersystems vorhanden ist.

PL711 / Deutsche Bedienungsanleitung
7
Wechseln des Tonabnehmersystems
1. Entfernen Sie vorsichtig die Anschlussleitungen von dem Tonabnehmersystem.
2 Lösen Sie die beiden Sicherungsschrauben am Tonabnehmerträger und entfernen Sie dann
den Tonabnehmer.
3 Montieren Sie den neuen Tonabnehmer am Tonabnehmerträger und ziehen Sie ihn leicht
fest. Ziehen Sie die Schrauben zu diesem Zeitpunkt noch nicht vollständig an.
4 Schließen Sie die Drahtleitungen an die Anschlüsse des neuen Tonabnehmersystems an.
Die Kabelfarben der Kabel sind wie folgt:
WEISS linker Kanal positiv (L+) ROT rechter Kanal positiv (R+)
SCHWARZ linker Kanal negativ (L-) SCHWARZ rechter Kanal negativ (R-)
5. Um sicherzustellen, dass die Position des Tonabnehmers genau auf dem
Tonabnehmerträger ausgerichtet ist, passen Sie ihn mit der mitgelieferten
Systemausrichtungshilfe an. Platzieren Sie ihn dazu über der Plattentellerachse, heben Sie
den Tonarm vorsichtig an und setzen Sie die Nadelspitze auf die mit 130 mm bzw. 250 mm
markierten Punkte, sodass die Nadel die Rillen perfekt parallel verfolgt. Passen Sie die
Position des Tonabnehmers auf dem Tonabnehmerträger an, bis der Tonabnehmer an
beiden Punkten perfekt parallel zu den Referenzlinien ist.
6. Ziehen Sie die Schrauben vollständig an, sobald die perfekte Ausrichtung erreicht ist.
HINWEIS: Wenn Sie mit der Durchführung dieses Verfahrens nicht vertraut oder unwohl sind,
empfehlen wir, sich an einen Fachmann zu wenden, um die Installation durchzuführen.
WENN DER PLATTENSPIELER TRANSPORTIERT WIRD
1. Verpacken Sie den Plattenspieler mit dem Originalverpackungsmaterial in umgekehrter
Reihenfolge wie beim Auspacken.
Wenn Sie das Verpackungsmaterial nicht haben, ergreifen Sie folgende Maßnahmen:
2. Nachdem Sie das Netzteil von der Steckdose getrennt haben, entfernen Sie die Filzmatte
und den Plattenteller und wickeln Sie diesen dann so ein, dass sie nicht beschädigt
werden bzw. nichts beschädigen können.
3. Bringen Sie den Nadelschutz an.
4. Damit der Tonarm sich nicht löst, befestigen Sie ihn mit einer Schnur oder ähnlichem an der
Auflage,
5. Umwickeln Sie den Plattenspielerkörper mit Papier oder einem weichen Tuch, damit er nicht
beschädigt wird.
ACHTUNG:
FÜR UNSACHGEMÄSS VERSENDETE GERÄTE WIRD KEINE HAFTUNG
ÜBERNOMMEN!
The current instruction manual can be downloaded from www.soundmaster.de
Technical changes and misprints reserved.
Copyright by Woerlein GmbH, 90556 Cadolzburg, www.soundmaster.de
Duplication only with the permission of Woerlein GmbH

Safety, Environmental and Setup Instructions
EN
ENVIRONMENTAL PROTECTION
Do not dispose of this product with the normal household
waste at the end of its life cycle. Return it to a collection
point for the recycling of electrical and electronic devices.
This is indicated by the symbol on the product, user
manual or packaging
The materials are recyclable according to their labeling. By
reusing materials or other forms of recycling old devices and
packaging, you are making an important contribution to protecting
our environment. If necessary, remove batteries and personal
data before disposal free of charge and ask your local authority
about the responsible disposal point
WARNING
Risk of electric shock
Do not open!
Caution: To reduce the risk of electric shock, do not remove the
cover (or back). There are no user serviceable parts inside.
Refer servicing to qualified service personnel.
This symbol indicates the presence of dangerous
voltage inside the enclosure, sufficient enough to
cause electric shock.
This symbol indicates the presence of important
operating and maintenance instructions for the device
Used batteries are hazardous waste and NOT to be
disposed of with the household waste! As a
consumer you are legally obligated to return all
batteries for environmentally responsible recycling –
no matter whether or not the batteries contain harmful
substances*)
Return batteries free of charge to public collection points in your
community or shops selling batteries of the respective kind.
Only return fully discharged batteries
*) marked Cd = cadmium, Hg = mercury, Pb = lead
• Only use mercury and cadmium-free batteries.
• Used batteries are hazardous waste and NOT to
be disposed of with the household waste!!!
• Keep batteries away from children. Children might
swallow batteries.
• Contact a physician immediately if a battery was
swallowed.
• Check your batteries regularly to avoid battery
leakage.
• Batteries shall not be exposed to excessive heat
such as sunshine, fire or the like.
• CAUTION: Danger of explosion if battery is
incorrectly replaced
• Replace only with the same or equivalent type
• Use the device in dry indoor environments only.
• Protect the device from humidity.
• This apparatus is for moderate climates areas
use, not suitable for use in tropical climates
countries.
• No objects filled with liquids, such as vases,
shall be placed on the apparatus.
• The mains plug or an appliance coupler is
used as the disconnect device, the
disconnect devices shall remain readily
operable.
• Connect this device to a properly installed
and earthed wall outlet only. Make sure the
mains voltage corresponds with the
specifications on the rating plate.
• Make sure the mains cable stays dry during
operation. Do not pinch or damage the
mains cable in any way.
• A damaged mains cable or plug must
immediately be replaced by an authorized
service center.
• In case of lightning, immediately disconnect
the device from the mains supply.
• Children should be supervised by parents
when using the device.
• Clean the device with a dry cloth only.
• Do NOT use CLEANING AGENTS or
ABRASIVE CLOTHS!
• Do not expose the device to direct sunlight
or other heat sources.
• Install the device at a location with sufficient
ventilation in order to prevent heat
accumulation.
• Do not cover the ventilation openings!
• Install the device at a safe and vibration-free
location.
• Install the device as far away as possible
from computers and microwave units;
otherwise radio reception may be disturbed.
• Do not open or repair the enclosure. It is not
safe to do so and will void your warranty.
Repairs only by authorized service/ customer
center.
• No naked flame sources, such as lighted
candles, should be placed on the unit.
• When you are necessary to ship the unit
store it in its original package. Save the
package for this purpose.
• In case of malfunction due to electrostatic
discharge or fast transient (burst), remove
and reconnect the power supply.
• If the unit is not using for a long period of
time, disconnect it from the power supply by
unplugging the power plug. This is to avoid
the risk of fire.

PL711 / English Instruction Manual
1
LOCATION OF CONTROLS
TOP VIEW
1
Motor Pulley
10
Tonearm Rest
2
Drive Belt
11
Tonearm Lift Lever
3
Turntable Spindle
12
Tonearm Clip
4
Turntable Sub-platter
13
Volume Control
5
Turntable Platter
14
Indicator
6
Lid Hinges
15
33/45RPM Selector
7
Anti-Skating Weight
16
Play/Stop Button
8
Counterweight
17
Mode Button
9
Anti-Skating Stick
18
Stylus Cartridge
BACK VIEW
19
Ground Connector
24
External Speaker Jacks
20
Phono & Line Out Jacks
25
Power Switch
21
Phono & Line Out Switch
26
Speaker Jack- (black)
22
USB Port for PC Link
27
Speaker Jack + (red)
23
Power Cord Jack

PL711 / English Instruction Manual
2
INSTALLATION
Before installing the turntable, check the package contents to ensure all parts below are
included and free of visible damage. Please retain the original packaging materials.
CONTENT OF DELIVERY
➢ 1 x Turntable Unit
➢ 1 x Drive Belt
➢ 2 x Speakers
➢ 1 x Sub-Platter
➢ 1 x Turntable Lid
➢ 1 x Belt Hook
➢ 1 x Slip Mat
➢ 1 x Power Adapter
➢ 1 x Turntable Platter
➢ 2 x Audio Cables for Speakers
➢ 1 x Tonearm Counterweight
➢ 1 x USB Cable
➢ 1 x Anti-Skating Weight
➢ 1 x Cartridge Alignment Protractor
➢ 1 x 45 RPM Adapter
➢ 1 x Instruction Manual & Warranty Card
INSTALLING THE TURNTABLE
・Mount the product on a level surface.
•To avoid the effects of vibrations and acoustic pressure,
do not mount the product next to such items as speakers.
•If the product is near equipment (cell phone, etc.) that
emits strong radio waves, noise may occur.
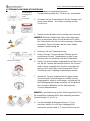
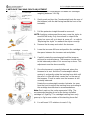
INSTALLING THE LID, THE BELT AND THE PLATTER
1. Insert the hinge pockets of the lid onto the
hinges of the turntable.
2. Remove the protective packaging and ensure
the turntable is placed on a sturdy and level
surface.
3. Insert the sub-platter into the turntable
spindle located in the middle of the turntable.
4. Loop the drive belt around the sub-platter and
motor pulley (brass-colored).
5. Carefully place the main platter onto the sub-
platter
6. Using your hands, slowly rotate the platter ten
times in the direction of the arrow.
7. This step is for getting rid of any twists in the
belt and making sure the belt rides smoothly
along the drive rim on the underside of the
platter.
8. Place the slip mat on top of the platter. Make
sure the logo on the mat is facing up.

PL711 / English Instruction Manual
3
CARTRIDGE TRACKING FORCE ADJUSTMENT
Counterweight
Tracking Force
Dial
Center Line
Counterweight Tonearm
Adjust for balanced tonearm
1. The supplied Counterweight is suitable for cartridges
weighing between 3.0-6.0g.
2. Gently push and turn the Counterweight onto the rear of
the tonearm (with the dial facing toward the front of the
turntable).
3. Pull the protector straight forward to remove it.
NOTE: Applying a downward force may cause the stylus to
come off the body. Only low volume is output if the
stylus has come off; or is about to come off;so refer to
"Replacing the stylus” to reattach the stylus correctly.
4. Remove the tie-wrap and unlock the tonearm.
5. Lower the tonearm lift lever and position the cartridge in
the space between the tonearm rest and platter.
6. Carefully rotate the counterweight until the tonearm
achieves a neutral balance. The tonearm should return
to this balanced position if it is moved up or down. This
adjustment must be done carefully.
7. Once the tonearm is correctly balanced, return the
tonearm to its rest. Hold the Counterweight without
moving it, and gently rotate the tracking force dial until
the zero is in line with black center line on the rear of
the tonearm. Check to make sure the tonearm is still
neutrally balanced.
Rotate the counterweight counter clockwise (as seen
from the front) to adjust the tracking force according to
the cartridge manufacturer's recommendations.
Note: Each mark on the scale represents 0.05g. The
recommended tracking force for the factory-installed
cartridge is 3.5g±0.5g. The cartridge tracking force only
goes up to 2g for one rotation of the tracking force dial.
8. You will need 1.75 rotations to reach 3.5g.

PL711 / English Instruction Manual
4
ANTI - SKATING FORCE ADJUSTMENT
The anti-skating force must be adjusted corresponding to the tracking force as follows:
Tracking Force
Groove in the Stick
1 - 2 g
1st from the bearing ring
2 - 3 g
2nd from the bearing ring
3 - 4 g
3rd from the bearing ring
>4 g
4th from the bearing ring
1. Slip the loop of the anti-skating weight's thread over the
3rd groove of the stick to set the correct anti-skating
force for the factory-installed cartridge.
2. Feed the thread through the loop of the wire hanger
CONNECTION TO THE INCLUDED SPEAKERS
This turntable includes a built-in amplifier and comes supplied with Hi-Fi speakers.
Connect the speakers using the supplied speaker cable (black cable to black clamp; & red cable
to red clamp) connect the left speaker with left and right speaker with the right outlet clamps.
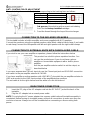
CONNECTION TO EXTERNAL UNITS WITH CHINCH AUDIO CABLE
If you wish to use your own amplifier or speakers, please follow the instructions below
This product has a built-in phono equalizer function. You
can use the product even if you do not have a phono
amplifier or connectable equipment with a built-in phono
amplifier.
Use the pre-amplifier selector switch to set the output, as
described below
If you have amplifier with PHONO input pls use the Phono input jack and GROUND connection
and switch to the pre amplifier selector to PHONO.
If you have amplifier or active speakers with LINE INPUT pls switch the pre amplifier selector to
LINE and connect to the LINE input sockets of the amplifier/active speakers
The red cable is for the right channel and the white is for the left channel.
MAIN POWER CONNECTION
1. Insert the DC plug of the AC adapter cord into the DC INPUT Jack at the back of the
turntable.
2. Plug the AC adapter into a normal power outlet.
NOTE: Do not plug the AC power adapter into a power outlet before all turntable assembly is
completed. Before turning on turntable power, recheck all connections to make sure they are
correct and secure. Always turn off the turntable before connecting or disconnecting from
power.

PL711 / English Instruction Manual
5
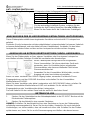
POWER MANAGEMENT FUNCTION
The turntable will automatically go into standby mode after 15 minutes of inactivity.
To resume operation, press and hold the Mode button for 3 seconds.
TURNTABLE OPERATION
BEFORE PLAYING A RECORD
Switch the Power Switch to the ON position.
Pull the protector straight forward to remove it carefully.
PLAYING A RECORD
1. Sufficiently lower the volume of the amplifier, speakers, etc.
2. Press the MODE button to choose turntable mode. The Red indicator light indicates
Turntable mode and blue indicator light indicates Bluetooth mode.
3. Place the record on the slip mat. If using 45RPM records, put the 45RPM adapter on the
center spindle before placing the record on the platter.
4. Press the 33 or 45 RPM speed button according to the type of record.
5. Press the Play/Stop button. The platter will start spinning.
6. Unlock the tonearm clip and set the tonearm lift lever to the up position.
7. Position the tonearm over the desired location (groove) on the record.
8. Carefully lower the tonearm on the record.
9. Turn up the volume of the turntable as needed.
10. When you are finished playing the record, raise the tonearm, return it to rest on the arm clip
and press the Play/Stop button to stop.
NOTE:
1. If the silent pause time between each track is longer than 3 minutes, the platter will stop
spinning automatically to avoid damaging the record. This stoppage does not mean the
turntable is defective.
2. If the felt mat gets dirty, it can easily scratch the record, so remove the felt mat periodically
and wipe off any dust
3. prevent the record from scratches and warping, remove it after use.
BLUETOOTH OPERATION
1. Press the MODE button to choose Bluetooth mode. The red indicator light indicates
Turntable mode and blue indicator light indicates Bluetooth mode. You will hear an
activation sound from the turntable.
2. Turn on the Bluetooth feature of your media device and search for and select PL711 to pair
the media device with turntable,
3. Once your media device is successfully paired with the turntable, the turntable will play a
short confirmation sound.
4. Play and stream music from your media device to the turntable.

PL711 / English Instruction Manual
6
RECORDING WITH A COMPUTER
CONNECTING WITH A COMPUTER
1. Connect this record player to a computer using a commercially-available USB cable to
convert audio signals from a record to digital data and send them to the computer.
2. Turn the computer on: confirm that the operating system is working correctly.
3. Turn the record player on and the computer will automatically detect and identify the unit's
USB port as "USB Audio CODEC".
INSTALL “AUDACITY” SOFTWARE IN YOUR COMPUTER
With a computer, you can record the audio from this record player. You must first install a
software that can be used for audio recording on the computer. For example, the software
“Audacity” for free download.
1. Install and open the software.
2. Click the “Record” icon in the software. The encoding is going on.
3. When finish the encoding, click “STOP” icon.
4. Open the Files icon in the software and save the project.
The project can be exported in MP3 or other audio format as you like.
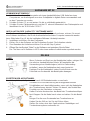
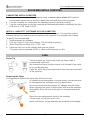
CARE
Stylus Tip
If dirt and grime are stuck to the stylus tip, clean it with a
commercially sold brush,
We recommend using a stylus cleaner (not included) if the stylus
tip is considerably dirty.
Clean the stylus tip by moving the brush from the rear to the front
of the stylus tip.
Replacing the Stylus
It's suggested to replace the stylus after 400 hours of use.
In addition to the deterioration of sound quality, records may also
be damaged as the cartridge's stylus tip wears down.
Be sure to disconnect the products AC adapter from the outlet.
When replacing the stylus, hold the head shell and the cartridge
body tightly. Move the front of the stylus in a forward and down
motion.
Mount the new replacement stylus to the cartridge
Lift the stylus up until you hear a click
Make sure there is no gap between the headshell and cartridge.

PL711 / English Instruction Manual
7
Cartridge Replacement
1. Carefully remove the wire leads from the original cartridge.
2 Loosen the two screws on the headshell that are securing the cartridge and then remove
the original cartridge.
3 Mount the new cartridge to the headshell and tighten it lightly. Do not completely tighten the
screws at this moment.
4 Connect the wire leads to the new cartridge's terminals. The wire lead color codes are as
below:
Wire Channel
White Left channel positive (L+) Red Right channel positive (R+)
Black Left channel negative (L-) Black Right channel negative (R-)
5. Adjust the cartridge's position to make sure it is precisely aligned on the headshell so that
the stylus will be tracking the grooves in parallel perfectly.
To achieve this, place the included paper cartridge alignment protractor over the turntable
spindle, carefully lift the tone arm and place the tip of the stylus on the points marked
130mm and 250mm respectively. Fine tune the cartridge's position on the head shell until
the cartridge is perfectly in parallel with the reference lines at both points.
6. Tighten the screws completely once the perfect alignment is achieved.
NOTE: If you are unfamiliar or uncomfortable with completing this procedure, we recommend
consulting with a professional to perform the installation.
WHEN THE TURNTABLE IS MOVED
1. Wrap the turntable in the reverse order from when you unwrapped it.
Using the products original packing materials, if you do not have the packaging materials,
take the following measures:
2. After disconnecting the AC adapter from the outlet, remove the felt mat and platter.
3. Wrap the platter that it cannot damaged or damage any part during the transport.
3. Attach the protector to the cartridge.
4. Use a string or something similar to tie the tonearm to the rest so that it does not become
dislodged.
5. Wrap the turntable body with paper or a soft cloth so that it does not get damaged.
IMPORTANT :
NO LIABILITY IS ACCEPTED FOR IMPROPERLY SHIPPED
DEVICES!
The current instruction manual can be downloaded from www.soundmaster.de
Technical changes and misprints reserved.
Copyright by Woerlein GmbH, 90556 Cadolzburg, www.soundmaster.de
Duplication only with the permission of Woerlein GmbH

Consignes de sécurité, d’environnement et d’installation
FR
PROTECTION DE L’ENVIRONNEMENT
Ne jetez pas ce produit avec les ordures ménagères
lorsqu’il est usagé. Retournez-le à un point de collecte
pour le recyclage des appareils électriques et
électroniques. Cette recommandation est indiquée par
le symbole sur le produit, le mode d’emploi ou
l’emballage.
Les matériaux sont recyclables selon leur étiquetage. En
réutilisant des matériaux ou d'autres formes de recyclage
d'anciens appareils et emballages, vous apportez une
contribution importante à la protection de notre environnement. Si
nécessaire, retirez les piles et les données personnelles avant
l'élimination gratuitement et demandez à votre autorité locale le
point d'élimination responsable
ATTENTION
Risque d’électrocution
Ne pas ouvrir!
Attention!: Pour réduire le risque d’électrocution, ne retirez
pas le couvercle (ou l’arrière). L’usager ne peut entretenir
aucune pièce à l’intérieur. Confiez l’entretien à un
personnel qualifié.ntretenir aucune pièce à l’intérieur.
Confiez l’entretien à un personnel qualifié.
Ce symbole indique la présence d’une tension
dangereuse à l’intérieur de l'appareil, qui est
suffisante pour provoquer un choc électrique.
Ce symbole indique la présence de consignes
importantes de fonctionnement et d’entretien de pour
l’appareil
Les piles usages sont des déchets dangereux et
ne doivent PAS être jetées avec les ordures
ménagères ! La loi impose aux consommateurs de
disposer de toutes les piles pour un recyclage
écologique – et ce que les piles soient de contenance
dangereuse ou pas*).
Disposer gratuitement des piles dans les points de collecte
de votre communauté ou auprès des magasins détaillant
les piles de même catégories.
Ne disposez que de piles entièrement vides.
*) marquée Cd = cadmium, Hg = mercure, Pb = plomb
• N'utilisez l'appareil qu’à l’intérieur dans un lieu
sec
• Protégez l’appareil contre l’humidité
• N’ouvrez pas l’appareil RISQUE
D’ELECTROCUTION ! Faites effectuer
l’ouverture et l’entretien par un personnel
qualifié
• Ne connectez cet appareil qu'à une prise
murale correctement installée et reliée à la terre
Assurez-vous que la tension principale
corresponde aux recommandations de la
plaque d’indice
• Assurez-vous que le câble d’alimentation reste
au sec pendant le fonctionnement. Ne pincez
pas le câble et ne l’endommagez d’aucune
façon
• Un câble de réseau ou une prise abimés
doivent être immédiatement remplacés par
un centre agréé.
• En cas de tonnerre, débranchez
immédiatement l’appareil de l’alimentation.
• Les enfants doivent être surveillés par leurs
parents lorsqu’ils utilisent l’appareil.
• Ne nettoyez l’appareil qu’avec un tissu sec.
N’utilisez PAS de PRODUITS
DETERGENTS ou de CHIFFONS
ABRASIFS !
• N’exposez pas l’appareil à la lumière directe
du soleil ou toute autre source de chaleur
• Installez l’appareil dans un emplacement
suffisamment ventilé pour éviter une
accumulation de chaleur.
• Ne recouvrez pas les grilles d’aération !
• Installez l’appareil dans un emplacement
sécurisé et sans vibrations.
• Ne pas installer l’appareil à proximité
d’ordinateurs et fours à micro-ondes; sinon
la réception de radio pourrait être perturbée.
• Ne pas ouvrir ou réparer l’appareil. Cela est
dangereux et annulerait la garantie. La
réparation doit être uniquement effectuée
que par un centre de réparations / service
agréé.
• N’utilisez que des piles au mercure et sans
cadmium.
• Les piles usagées sont des déchets
dangereux et ne doivent PAS être jetées
avec les ordures ménagères !!! Ramenez
les piles à votre point de vente ou aux
points de collecte de votre ville.
• Eloignez les piles des enfants. Les enfants
pourraient avaler les piles. En cas
d’ingestion d’une pile, contactez
immédiatement un médecin.
• Vérifiez régulièrement vos piles pour éviter
les fuites.
• La prise de courant ou un coupleur
d’appareil est utilisé comme dispositif de
déconnexion, les dispositifs de déconnexion
doivent rester facilement utilisables.
• Aucune source de flamme nue, telle que
des bougies allumées, ne doit être placée
sur l’appareil.
• Aucun objet rempli de liquide, tel que des
vases, ne doit être placé sur l’appareil.
• Cet appareil, conçu pour les climats
modérés, ne convient pas pour une
utilisation dans les pays au climat tropical.

PL711
/
Français
Manuel d’instructions
1
EMPLACEMENT DES BOUTONS
VUE ARRIÈRE
19
Connecteur de mise à la terre
24
Prises pour haut-parleurs externes
20
Prises pour phono et sortie de ligne
25
Commutateur d’alimentation
21
Commutateur pour phono et sortie de ligne
26
Prise pour haut-parleur - (noir)
22
Port USB de connexion à l’ordinateur
27
Prise pour haut-parleur + (rouge)
23
Prise d’alimentation
VUE DE DESSUS
1
Poulie motorisée
10
Support du bras de lecture
2
Courroie d’entraînement
11
Levier du bras de lecture
3
Axe de la platine
12
Clip du bras de lecture
4
Sous-plateau de la platine
13
Molette du volume
5
Plateau de la platine
14
Voyant
6
Charnières du couvercle
15
Sélecteur de vitesse 33/45 tr/min
7
Poids de l’antiskating
16
Bouton de lecture/d’arrêt
8
Contrepoids
17
Touche mode
9
Tige de l’antiskating
18
Stylet de la cartouche

PL711
/
Français
Manuel d’instructions
2
INSTALLATION
Avant d’installer la platine, vérifiez le contenu de l’emballage pour vous assurer que tous les
accessoires sont fournis et exempts de dommages visibles. Veuillez conserver l’emballage
d’origine.
CONTENU DE L’ENVOI
➢ 1 x unité de platine
➢ 1 x courroie d’entraînement
➢ 2 x haut-parleurs
➢ 1 x sous-plateau
➢ 1 x couvercle de platine
➢ 1 x crochet de courroie
➢ 1 x disque de feutrine
➢ 1 x adaptateur d’alimentation
➢ 1 x plateau de platine
➢ 2 x câbles audio pour haut-parleurs
➢ 1 x contrepoids de bras de lecture
➢ 1 x câble USB
➢ 1 x poids d’antiskating
➢ 1x rapporteur d’alignement de la cartouche
➢ 1 x adaptateur de 45 tr/min
➢ 1 x manuel d’instructions et carte de garantie
INSTALLATION DE LA PLATINE
● Installez le produit sur une surface plane.
● Pour éviter les effets des vibrations et de la pression
acoustique, évitez d’installer le produit à proximité des
appareils comme des haut-parleurs.
● Si le produit est à proximité d’appareils qui émettent des
ondes radio puissantes (téléphone portable, par
exemple), il peut émettre des bruits.
INSTALLATION DU COUVERCLE, DE LA COURROIE ET DU PLATEAU
1. Insérez les porte-charnières du couvercle dans
les charnières de la platine.
2. Retirez l’emballage de protection et assurez-
vous que la platine est placée sur une surface
plane et stable.
3. Insérez le sous-plateau dans l’axe de la platine
situé au milieu de la platine.
4. Passez la courroie d’entraînement autour du
sous-plateau et de la poulie motorisée (laiton
coloré).
5. Placez délicatement le plateau principal sur le
sous-plateau.
6. De la main, faites doucement dix tours de
plateau dans le sens de la flèche.
7. Cette étape permet de bien tendre la courroie et
de s’assurer qu’elle passe harmonieusement
dans le logement d’entraînement situé sur la
face intérieure du plateau.
8. Installez le disque de feutrine sur le plateau, en
veillant à ce que le logo soit orienté vers le haut.
Figure 1
La pagina si sta caricando...
La pagina si sta caricando...
La pagina si sta caricando...
La pagina si sta caricando...
La pagina si sta caricando...
La pagina si sta caricando...
La pagina si sta caricando...
La pagina si sta caricando...
La pagina si sta caricando...
La pagina si sta caricando...
La pagina si sta caricando...
La pagina si sta caricando...
La pagina si sta caricando...
La pagina si sta caricando...
La pagina si sta caricando...
La pagina si sta caricando...
La pagina si sta caricando...
La pagina si sta caricando...
La pagina si sta caricando...
La pagina si sta caricando...
La pagina si sta caricando...
La pagina si sta caricando...
La pagina si sta caricando...
La pagina si sta caricando...
La pagina si sta caricando...
La pagina si sta caricando...
La pagina si sta caricando...
La pagina si sta caricando...
La pagina si sta caricando...
La pagina si sta caricando...
La pagina si sta caricando...
La pagina si sta caricando...
La pagina si sta caricando...
La pagina si sta caricando...
La pagina si sta caricando...
La pagina si sta caricando...
La pagina si sta caricando...
La pagina si sta caricando...
La pagina si sta caricando...
-
 1
1
-
 2
2
-
 3
3
-
 4
4
-
 5
5
-
 6
6
-
 7
7
-
 8
8
-
 9
9
-
 10
10
-
 11
11
-
 12
12
-
 13
13
-
 14
14
-
 15
15
-
 16
16
-
 17
17
-
 18
18
-
 19
19
-
 20
20
-
 21
21
-
 22
22
-
 23
23
-
 24
24
-
 25
25
-
 26
26
-
 27
27
-
 28
28
-
 29
29
-
 30
30
-
 31
31
-
 32
32
-
 33
33
-
 34
34
-
 35
35
-
 36
36
-
 37
37
-
 38
38
-
 39
39
-
 40
40
-
 41
41
-
 42
42
-
 43
43
-
 44
44
-
 45
45
-
 46
46
-
 47
47
-
 48
48
-
 49
49
-
 50
50
-
 51
51
-
 52
52
-
 53
53
-
 54
54
-
 55
55
-
 56
56
-
 57
57
-
 58
58
-
 59
59


Soundmaster PL711 Manuale utente
- Categoria
- Giradischi audio
- Tipo
- Manuale utente
in altre lingue
- français: Soundmaster PL711 Manuel utilisateur
- Deutsch: Soundmaster PL711 Benutzerhandbuch
- Nederlands: Soundmaster PL711 Handleiding
- slovenčina: Soundmaster PL711 Používateľská príručka
Documenti correlati
Altri documenti
-
Lenco LS-480 Manuale utente
-
Lenco LBT-288 Manuale utente
-
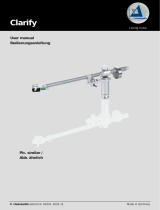 Clearaudio Clarify Manuale utente
-
Grundig PS2500 Manuale del proprietario
-
Rotel RP-300 Manuale del proprietario
-
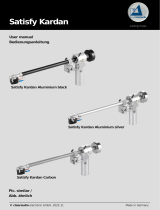 Clearaudio SATISFY Manuale utente
-
-
-
-
Lenco LS-500OK Manuale utente

