
User manual
Bedienungsanleitung
© clearaudio electronic GmbH, 2022-11 Made in Germany
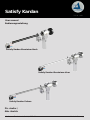
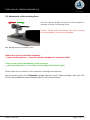
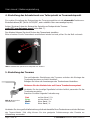
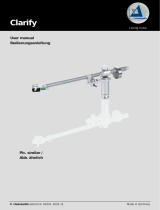
Satisfy Kardan
Pic. similar /
Abb. ähnlich
Satisfy Kardan Aluminium black
Satisfy Kardan Aluminium silver
Satisfy Kardan Carbon

User manual / Bedienungsanleitung
Page / Seite 2 © clearaudio electronic GmbH, 2022-11
User manual .................................................2 - 17
Bedienungsanleitung ...................................18 - 33
Dear Clearaudio customer,
Thank you for your decision to purchase a
Satisfy Kardan
tonearm from Clearaudio.
This tonearm is manufactured to the highest degree of tolerance and quality.
The
Satisfy Kardan
is available with Carbon bre, Aluminum black or Aluminum silver tonearm tube.
This product has been developed with a focus on excellent quality, functionality and ease of use.
Please take a moment to read this product manual to ensure correct set-up and to avoid any
possible damage.
Clearaudio wishes you much enjoyment with your new
Satisfy Kardan
tonearm.
Clearaudio electronic GmbH

User manual / Bedienungsanleitung
Made in Germany Page / Seite 3
Safety instructions
1. General information
Check the tonearm for any damage before using it. Do not connect the tonearm if damaged!
Never connect the tonearm if it has been dropped or gotten wet, contact your dealer to have the
tonearm checked.
Never expose the tonearm to rain or moisture.
The inside of the tonearm is maintenance free. Never open the case or attempt to repair the unit
yourself, since this can lead to loss of warranty!
Before using the tonearm for the rst time or after a long period of inactivity the lift must be
operated approx. 4-5 times to loosen the grease in the tonearm lift to lower the lift bar evenly again.
2. Intended use
The
Satisfy Kardan
is a tonearm for playing music and is intended exclusively for use on turntables.
Only use the
Satisfy Kardan
tonearm in accordance with the information provided in the user manual.
3. Location of installation
Avoid locations with direct sunlight, temperature uctuations and high humidity. Likewise, avoid
placing electronic devices near heaters, heat lamps, or other devices that produce heat.
The device is designed for operation at room temperature.
No objects with an open ame may be placed on or near the device (burning candles or similar).
4. Maintenance
We recommend that you move the tonearm lift at regular intervals to keep the bearing grease supple
and to prevent the tonearm from getting stuck during playback if you do not use your Clearaudio
tonearm for a longer period.
Never use aggressive cleaning agents.
Do not use dry cloths for cleaning as this generates static electricity. Suitable cleaning and care
products from Clearaudio are available at www.analogshop.de or from specialist retailers.
Only use a soft cloth with a smooth surface or a soft brush for cleaning.

User manual / Bedienungsanleitung
Page / Seite 4 © clearaudio electronic GmbH, 2022-11
5. Health information
Permanently high volume can lead to various types of hearing damage. Use high volume responsibly!
6. Service
The
Satisfy Kardan
tonearm should be repaired during the guarantee period by the manufacturer
only, otherwise the warranty claim expires. All Clearaudio products should only be serviced by
specialist retailer.
If, despite the high production standard, a service is necessary, the
Satisfy Kardan
tonearm must be
send to Clearaudio through your dealer.
7. Transport
Use the original packing material for further transportation of the
Satisfy Kardan
tonearm, otherwise
serious damage could occur.
Be sure to pack the device exactly as it was shipped.
Safe transport is only guaranteed in the original packaging.
Proceed in reverse as described for assembly when packing.
8. Disposal
Do not dispose this product together with other waste.
WEEE Reg. No.: DE26004446
9. CE Marking
This electronic product corresponds to the applicable guidelines for obtaining the CE mark.

User manual / Bedienungsanleitung
Made in Germany Page / Seite 5
Contents
1. List of components .......................................................................... 6
2. Mounting the tonearm base
2.1 Mounting the tonearm base on the Clearaudio Performance DC or Ovation turntable .....7
2.2 Mounting the clamping ring on a other manufacturers’ turntables ................................... 8
3. Mounting the
Satisfy Kardan
tonearm ............................................ 9
4. Adjustment of the distance between spindle and pivot point ........ 10
5. Adjustment of the tonearm ..............................................................10
5.1 Adjustment of the VTA .......................................................................................................11
5.2 Alignment and adjustment of the cartridge .......................................................................12
5.3 Adjustment of the tracking force ....................................................................................... 13
5.4 Adjustment of the azimuth .................................................................................................14
5.5 Adjustment of the anti-skating ..........................................................................................15
6. Troubleshooting .............................................................................. 16
7. Technical details .............................................................................. 17
Warranty information .......................................................................... 34 - 35

User manual / Bedienungsanleitung
Page / Seite 6 © clearaudio electronic GmbH, 2022-11
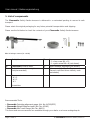
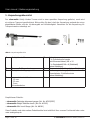
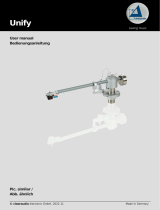
1. List of components
The Clearaudio
Satisfy Kardan
tonearm is delivered in a customized packing to ensure its safe
transport.
Please retain the original packaging for any future potential transportation and shipping.
Please see the list below to check the contents of your Clearaudio
Satisfy Kardan
tonearm.
1.
Satisfy Kardan
tonearm 5. Screws:
- 3 x hex screw M4 x 10
- 1 x grub screw M6 x 8 (not shown)
2. Clearaudio tonearm base 6. Paper tonearm alignment (not shown)
3.
Satisfy Kardan
counterweight
(not pre-mounted) 7. User manual, Quality Certicate,
Warranty card and return delivery note
(not shown)
4. Hex wrench:
- # 1.5
- # 2.5
- # 3
Screwdriver
Pic. 1: Package content (Pic. similar)
Recommended Tools:
• Clearaudio Cartridge alignment gauge (Art. No. AC005/IEC)
• Clearaudio Weight Watcher touch (Art. No. AC163)
• Clearaudio Mini Level Gauge (Art. No. AK001)
This items and more accessories are available through your dealer or at www.analogshop.de.
1 2
3
4 5

User manual / Bedienungsanleitung
Made in Germany Page / Seite 7
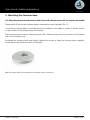
2. Mounting the tonearm base
2.1 Mounting the tonearm base on the Clearaudio Performance DC or Ovation turntable
Please check if the correct tonearm base is mounted on your turntable (Pic. 2).
If the wrong tonearm base is mounted place the turntable on the edge of a table or similar surface
to gain access to the tonearm base from below.
Remove the tonearm base by loosening the six M4 x 35mm screws with a hex wrench on the bottom
side of the clamping ring.
Exchange the tonearm base and loosely tighten the screws to keep the tonearm base rotatable.
Please ensure the perfect location of the base.
Pic. 2: Tonearm base for Performance DC & Ovation (Art. No. AC031-4)

User manual / Bedienungsanleitung
Page / Seite 8 © clearaudio electronic GmbH, 2022-11
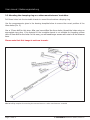
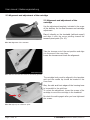
2.2 Mounting the clamping ring on a other manufacturers’ turntables
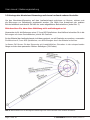
Drill three holes into the turntable chassis to mount the aluminium clamping ring.
Use the measurements given in the drawing template below to ensure the correct position of the
three holes (Pic. 3).
Use a 3.3mm drill for this step. After you have drilled the three holes, thread the holes using an
appropriate tap cutter. If the material of the turntable chassis is not suitable for threading, please
use a 4.5mm drill for the holes. In this case, you will need longer screws with nuts to t the tonearm
base.
Please note that this image is not true to scale.
Pic. 3: Drilling template for mounting the tonearm base on a other manufacturers‘ turntable

User manual / Bedienungsanleitung
Made in Germany Page / Seite 9
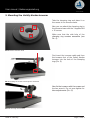
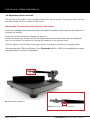
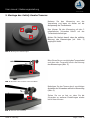
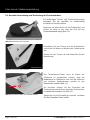
Pic. 5: Putting the tonearm through the armboard
Pic. 4: Mount tonearm base
Pic. 6: Securing the tonearm
3. Mounting the
Satisfy Kardan
tonearm
Take the clamping ring and place it on
the recess in the tonearm base.
Now you can attach the clamping ring to
the tonearm base with the 3 supplied M4
x 10 screws.
Make sure that the side hole of the
clamping ring remains accessible (see
Pic. 4).
First insert the tonearm cable and then
the tonearm foot of the
Satisfy Kardan
tonearm into the hole of the clamping
ring (Pic. 5).
Now x the tonearm with the screws and
the hex wrench. Do not over-tighten for
later adjustments (Pic. 6)!

User manual / Bedienungsanleitung
Page / Seite 10 © clearaudio electronic GmbH, 2022-11
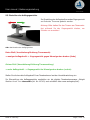
Pic. 7: Distance from pivot to stylus
222 mm
4. Adjustment of the distance between spindle and pivot point
We recommend to use the Clearaudio alignment gauge (Art. No. AC005/IEC, also available from
www.analogshop.de) for the exact setting of the tonearm pivot point.
Make sure that the distance between spindle and the pivot point of the tonearm is exactly 222mm.
You can adjust the distance by rotating the tonearm base.
Please tighten the tonearm base and check the measurement again after adjustment.
5. Adjustment of the tonearm
The following settings require to mount the cartridge on the headshell.
Always follow the cartridge manufacturer’s instructions.
Leave the stylus protector on your cartridge to avoid any
damages!
Now you can connect the respective signal cable with the matching
color pins of the cartridge.
Please note the following colour coding:
Red: right channel / R+
Green: right channel / R-
White: left channel / L+
Blue: left channel / L-
Connect the pins of your cartridge to the jacks of the tonearm cable, taking care not to use too
much force.
Use suitable precision pliers or tweezers for assistance if necessary.
Pic. 8: Mounting the cartridge

User manual / Bedienungsanleitung
Made in Germany Page / Seite 11
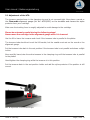
5.1 Adjustment of the VTA
The tonearm remains loose in the clamping ring and is not screwed tight. Now place a record or
the Clearaudio alignment gauge (Art. No. AC005/IEC) on the turntable and remove the stylus
protector from your cartridge.
Make sure the tracking force is roughly adjusted to avoid damage to the cartridge.
Please be extremely careful during the following steps!
Never move the cartridge in the alignment gauge while it is lowered.
Use the lift to lower the tonearm and check if the tonearm tube is parallel to the platter.
The tonearm tube should not touch the lift bracket, but the needle must rest on the record or the
alignment gauge.
Put the tonearm tube back in the rest position if the tonearm tube is not parallel and shows a slight
incline.
Now carefully lower/raise the entire tonearm in the clamping ring until the tonearm tube is parallel
to the platter.
Hand-tighten the clamping ring while the tonearm is in this position.
Put the tonearm back in the rest position holder and add the stylus protector if the position is still
correct.
Pic. 9: Adjustment of the tonearm height

User manual / Bedienungsanleitung
Page / Seite 12 © clearaudio electronic GmbH, 2022-11
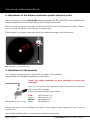
5.2 Alignment and adjustment of the
cartridge
Use the adjustment template, included in the scope
of the delivery for the nal tonearm and cartridge
adjustment.
Place it directly on the turntable (without record)
and align it with the arrow pointing toward the
tonearm pivot point (Pic. 10).
Take the tonearm out of the rest position and align
it in the area of the cross lines.
Lower the tonearm and check the alignment.
The cartridge body must be aligned in the template
grid and the needle tip should be located in the
cross lines.
Also, the side and front edges of the housing have
to be parallel to the grid lines.
To correct the adjustment, loosen the screws of the
cartridge to move the cartridge in the headshell.
Re-check the setting again after you have tightened
the screws.
Pic. 10: Alignment of the tonearm
Pic. 11: The tonearm tube must be absolutely parallel
Pic. 12: Stylus tip on reference point
5.2 Alignment and adjustment of the cartridge

User manual / Bedienungsanleitung
Made in Germany Page / Seite 13
5.3 Adjustment of the tracking force
Turn the counter weight at the end of the tonearm to
increase or lower the tracking force.
Caution: Please hold the tonearm tube while rotating
the counterweight to avoid any damages.
Red arrow (to the end of the tonearm)
= lower tracking force -> turn the counter weight anti-clockwise (left)
Green arrow (to the beginning of the tonearm)
= more tracking force -> turn the count weight clockwise (right)
Please follow the instructions of the respective cartridge manufacturer.
We recommend using the Clearaudio „Weight Watcher touch“ digital cartridge scale (Art. No.
AC163, also available at www.analogshop.de) for the correct setting.
Pic. 13: Adjustment of the tracking force

User manual / Bedienungsanleitung
Page / Seite 14 © clearaudio electronic GmbH, 2022-11
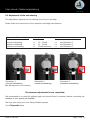
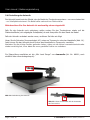
5.4 Adjustment of the azimuth
The azimuth is the angle of the cartridge stylus to the record surface. Viewed from the front, the
cartridge needle has to be vertical to the record.
Please note: The azimuth is already set at the factory.
Lower the cartridge onto the record surface and check the position of the needle if you still want to
optimize the azimuth.
Please proceed as following to change the azimuth:
Loosen the screw (hex wrench #2) on the bottom side of the tonearm tube near the headshell.
Now you can adjust the azimuth by turning the headshell in the tonearm tube.
Carefully tighten the small hex screw again without changing the previously selected position.
We recommend the “Mini Level Gauge” from Clearaudio (Art.No.: AK001; also available from www.
analogshop.de) to check the adjustment.
Pic. 14: Azimuth adjustment
Pic. 15: Screw to adjust the headshell

User manual / Bedienungsanleitung
Made in Germany Page / Seite 15
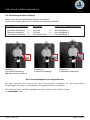
5.5 Adjustment of the anti-skating
This adjustment depends on the tracking force of your cartridge.
Please follow the instructions of the respective cartridge manufacturer.
The tonearm adjustment is now completed.
We recommend to re-check all settings again and correct them if necessary before connecting the
tonearm to your phono pre-amplier.
We hope you enjoy your new
Satisfy Kardan
tonearm.
Your Clearaudio team
alignment of the antiskating tracking force position of the antiskating screw
minimal antiskating >> 10 – 15mN >> see illustration 1
medium antiskating >> 15 – 20mN >> see illustration 2
maximum antiskating >> 20mN and more >> see illustration 3
Illustration 1 Illustration 2 Illustration 3
(minimal antiskating ) (medium antiskating) (maximum antiskating)
Pic. 16: Alignment of the antiskating

User manual / Bedienungsanleitung
Page / Seite 16 © clearaudio electronic GmbH, 2022-11
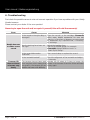
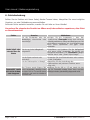
6. Troubleshooting
First check the possible causes to rule out incorrect operation if you have a problem with your
Satisfy
Kardan
tonearm.
Please contact your dealer if the error persists!
Never try to open the unit and/or repair it yourself, this will void the warranty!
Error Cause Measure
Needle bounces
or slides across
record
Is the record or the stylus dirty or
damaged? Clean the record / or the cartridge. Clearaudio
oers many helpful accessories for care and
cleaning. In the event of damage, we recommend
an assessment by a specialist and, if necessary,
an exchange.
Has the tracking force been set
too high? Adjust the tracking force.
Use only a suitable gauge! For example
Clearaudio „Weight Watcher touch“ or
„Smart Stylus Gauge“.
Is the record deformed or
scratched? Use a record clamp or replace the record.
Is the turntable leveled? Check the alignment of the turntable and adjust
if necessary.
Tonearm lift
does not lower
or lowers very
slowly
The tonearm has not been used
for a long time, which means that
the greas in the tonearm lift can
harden and lower with diculty.
Operate the lift about 4-5 times to loosen the
grease in the tonearm lift and the lift bar will lower
evenly again.

User manual / Bedienungsanleitung
Made in Germany Page / Seite 17
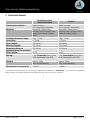
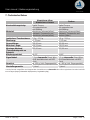
7. Technical details
Aluminum silver
Aluminum black Carbon
Construction details: Radial tonearm
With magnetic antiskating Radial tonearm
With magnetic antiskating
Material: Aluminium (black/silver),
stainless steel, tonearm tube
made of aluminium (black/
silver)
Aluminium (black/silver),
stainless steel, tonearm tube
made of carbon (silver)
Cartridge balance range: 2.5g - 17.0g 2.5g - 17.0g
Overhang: 17.12mm 17.12mm
Total length: 305.00mm 305.00mm
Eective length: 239.12mm 239.12mm
Mounting distance
(tonearm pivot to spindle): 222.00mm 222.00mm
Oset angle: 24.02° 24.02°
Wiring: 1.1m Clearaudio Direct Wire
PLUS terminated with RCA 1.1m Clearaudio Direct Wire
PLUS terminated with RCA
Weight: Approx. 490g
(incl. counterweight)
Approx. 480g
(incl. counterweight)
Manufacturer’s warranty: 2 years* 2 years*
* Provided that the warranty card is correctly completed and returned to Clearaudio, or your product is registered
online at https://clearaudio.de/en/service/registration.php, within 14 days of purchase.

User manual / Bedienungsanleitung
Page / Seite 18 © clearaudio electronic GmbH, 2022-11
Sehr geehrte clearaudio Kundin, sehr geehrter clearaudio Kunde,
Sie haben sich für einen
Satisfy Kardan
Tonarm entschieden, ein hochwertiges Produkt der
clearaudio electronic GmbH.
Wir bedanken uns bei Ihnen für das uns entgegengebrachte Vertrauen.
Der Tonarm ist mit einem Tonarmrohr aus Carbon oder Aluminium (silbern oder schwarz eloxiert)
erhältlich.
Um alle Vorteile des
Satisfy Kardan
Tonarms nutzen zu können, lesen Sie bitte diese Bedienungsan-
leitung aufmerksam durch.
Alle Hinweise dienen dem Ausschöpfen der vollen Klangeigenschaften und bewahren Sie vor
Fehlbedienungen.
Wir wünschen Ihnen viel Freude mit Ihrem neuen clearaudio
Satisfy Kardan
Tonarm.
clearaudio electronic GmbH

User manual / Bedienungsanleitung
Made in Germany Page / Seite 19
Sicherheitshinweise
1. Allgemeine Hinweise
Überprüfen Sie den Tonarm vor der Inbetriebnahme auf vorhandene Schäden.
Ist der Tonarm beschädigt, sollten Sie diesen nicht anschließen!
Schließen Sie den Tonarm niemals an, wenn er heruntergefallen oder nass geworden ist, kontaktieren
Sie Ihren Händler, um den Tonarm überprüfen zu lassen.
Setzen Sie den Tonarm niemals Regen oder Feuchtigkeit aus.
Das Innere des Tonarms ist wartungsfrei, önen Sie niemals das Gehäuse oder versuchen Sie das
Gerät selbst zu reparieren. Dies führt zu Garantieverlust!
Vor dem erstmaligen Benutzen oder nach längerem Stillstand muss der Lift ca. 4-5x betätigt werden,
damit sich das Fett im Tonarmlift lösen kann und der Liftbügel wieder gleichmäßig abgesenkt wird.
Nicht für Kinder geeignet! Lieferumfang kann verschluckbare Kleinteile enthalten.
2. Bestimmungsgemäßer Gebrauch
Der
Satisfy Kardan
ist ein Tonarm zur Musikwiedergabe und zur ausschließlichen Verwendung auf
Plattenspielern bestimmt.
Der bestimmungsgemäße Gebrauch des
Satisfy Kardan
Tonarms ist die Verwendung in
Übereinstimmung mit den in der Bedienungsanleitung bereitgestellten Informationen.
3. Aufstellungsort
Vermeiden Sie Aufstellungsorte mit direkter Sonneneinstrahlung, Temperaturschwankungen sowie
hohe Luftfeuchtigkeit. Ebenso sollten Sie Elektrogeräte nicht in der Nähe von Heizungen, Heizlampen
oder anderen Geräten platzieren die Wärme Produzieren.
Das Gerät ist für den Betrieb in beheizten Räumen konzipiert.
Auf dem Gerät dürfen keine Gegenstände mit oener Flamme aufgestellt werde (brennende Kerzen
o.Ä.).
4. Pege
Falls Sie Ihren clearaudio Tonarm längere Zeit nicht benutzen, empfehlen wir Ihnen den Tonarmlift
in regelmäßigen Abständen zu bewegen, um das Lagerfett geschmeidig zu halten und ein mögliches
Haken des Tonarms beim Abspielen zu vermeiden.
Verwenden Sie auf keinen Fall aggressives Reinigungsmittel.
Verwenden Sie zum Reinigen keine trockenen Tücher, da dies elektrostatische Auadung erzeugt.
Geeignete Reinigungs- und Pegemittel von clearaudio sind über www.analogshop.de oder über
den Fachhandel erhältlich.
Verwenden Sie zur Reinigung nur ein weiches Tuch mit glatter Oberäche bzw. einen weichen Pinsel.

User manual / Bedienungsanleitung
Page / Seite 20 © clearaudio electronic GmbH, 2022-11
5. Gesundheitshinweise
Dauerhaft hohe Lautstärke kann zu diversen Schädigungen des Gehörs führen.
Gehen Sie verantwortungsbewusst mit hohen Lautstärken um!
6. Service
Der
Satisfy Kardan
darf während der Garantiezeit nur vom Hersteller repariert werden, ansonsten
erlischt der Garantieanspruch. Der Service für alle clearaudio Produkte sollte ausschließlich beim
Fachhändler erfolgen.
Sollte trotz des hohen Fertigungsstandards ein Service erforderlich werden, muss die clearaudio
Satisfy Kardan
über Ihren Fachhandel an clearaudio eingeschickt werden.
7. Transport
Beim Transport des clearaudio
Satisfy Kardan
Tonarms ist stets die Originalverpackung zu
verwenden. Achten Sie darauf, das Gerät genauso zu verpacken, wie es ausgeliefert wurde.
Nur in originalverpacktem Zustand ist ein sicherer Transport gewährleistet.
Beim Verpacken umgekehrt verfahren, wie bei dem Aufbau und der Inbetriebnahme beschrieben.
8. Entsorgung
Dieses Produkt darf nicht zusammen mit Restmüll entsorgt werden.
WEEE Reg.Nr.: DE26004446
9. CE-Markierung
Dieses Elektronikprodukt entspricht den gültigen Richtlinien zur Erlangung des CE-Zeichens.
La pagina si sta caricando...
La pagina si sta caricando...
La pagina si sta caricando...
La pagina si sta caricando...
La pagina si sta caricando...
La pagina si sta caricando...
La pagina si sta caricando...
La pagina si sta caricando...
La pagina si sta caricando...
La pagina si sta caricando...
La pagina si sta caricando...
La pagina si sta caricando...
La pagina si sta caricando...
La pagina si sta caricando...
La pagina si sta caricando...
La pagina si sta caricando...
-
 1
1
-
 2
2
-
 3
3
-
 4
4
-
 5
5
-
 6
6
-
 7
7
-
 8
8
-
 9
9
-
 10
10
-
 11
11
-
 12
12
-
 13
13
-
 14
14
-
 15
15
-
 16
16
-
 17
17
-
 18
18
-
 19
19
-
 20
20
-
 21
21
-
 22
22
-
 23
23
-
 24
24
-
 25
25
-
 26
26
-
 27
27
-
 28
28
-
 29
29
-
 30
30
-
 31
31
-
 32
32
-
 33
33
-
 34
34
-
 35
35
-
 36
36


in altre lingue
- English: Clearaudio SATISFY User manual
- Deutsch: Clearaudio SATISFY Benutzerhandbuch
Documenti correlati
-
 Clearaudio Clarify Manuale utente
-
 Clearaudio concept mc / concept mc Signature Manuale utente
-
 Clearaudio Unify Manuale utente
-
Clearaudio 24v Manuale utente
-
Clearaudio Electronic GmbH Statement Phono Manuale utente
-
Clearaudio CONCEPT MC Manuale utente
-
Clearaudio Ovation Silver Manuale utente
-
Clearaudio INNOVATION Manuale utente
-
Clearaudio Master Innovation Manuale utente


