
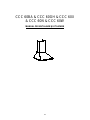
CCC 60BA & CCC 60GH & CCC 60X
& CCC 60N & CCC 60W
ENGLISH--------------------------------------------------------------------------------------page 001
ITALIAN----------------------------------------------------------------------------------------page 016
FRENCH---------------------------------------------------------------------------------------page 032
SPANISH--------------------------------------------------------------------------------------page 047
PORTUGUESE------------------------------------------------------------------------------page 062
POLISH----------------------------------------------------------------------------------------page 078
CZECK (cs) -----------------------------------------------------------------------------------page 094
SLOVENIAN----------------------------------------------------------------------------------page 109
SLOVAK (SK) --------------------------------------------------------------------------------page 124
GREEK-----------------------------------------------------------------------------------------page 139
HUNGARIAN---------------------------------------------------------------------------------page 156
ROMANIAN-----------------------------------------------------------------------------------page 171
CROATIAN (hr) ------------------------------------------------------------------------------page 186
RUSSIAN (ru) --------------------------------------------------------------------------------page 201
UKRAINAN (UK) ----------------------------------------------------------------------------page 217

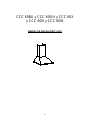
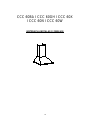
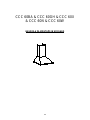
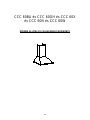
CCC 60BA & CCC 60GH & CCC 60X
& CCC 60N & CCC 60W
INSTALLATION AND USER’S MANUAL

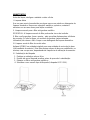
INTRODUCTION
Thank you for choosing this cooker hood.
This instruction manual is designed to provide you with all required instructions
related to the installation, use and maintenance of the appliance. In order to
operate the unit correctly and safety, please read this instruction manual carefully
before installation and usage.
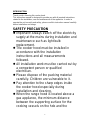
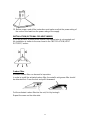
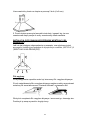
Important! Always switch off the electricity
supply at the mains during installation and
maintenance such as light bulb
replacement.
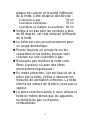
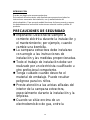
SAFETY PRECAUTION
The cooker hood must be installed in
accordance with the installation
instructions and all measurements
followed.
All installation work must be carried out by
a competent person or qualified
electrician.
Please dispose of the packing material
carefully. Children are vulnerable to it.
Pay attention to the sharp edges inside
the cooker hood especially during
installation and cleaning.
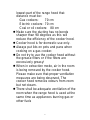
When the range hood is located above a
gas appliance, the minimum distance
between the supporting surface for the
cooking vessels on the hob and the

lowest part of the range hood that
distance must be:
Gas cookers: 70 cm
Electric cookers: 70 cm
Coal or oil cookers: 80 cm
Make sure the ducting has no bends
sharper than 90 degrees as this will
reduce the efficiency of the cooker hood.
Cooker hood is for domestic use only.
Always put lids on pots and pans when
cooking on a gas cooker.
Do not try to use the cooker hood without
the grease filters or if the filters are
excessively greasy!
When in extraction mode, air in the room
is being removed by the cooker hood.
Please make sure that proper ventilation
measures are being observed. The
cooker hood removes odours from room
but not steam.
There shall be adequate ventilation of the
room when the range hood is used at the
same time as appliances burning gas or
other fuels

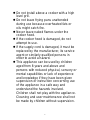
Do not install above a cooker with a high
level grill.
Do not leave frying pans unattended
during use because overheated fats or
oils might catch fire.
Never leave naked flames under the
cooker hood.
If the cooker hood is damaged, do not
attempt to use.
If the supply cord is damaged, it must be
replaced by the manufacturer, its service
agent or similarly qualified persons in
order to avoid a hazard.
This appliance can be used by children
aged from 8 years and above and
persons with reduced physical, sensory or
mental capabilities or lack of experience
and knowledge if they have been given
supervision or instruction concerning use
of the appliance in a safe way and
understand the hazards involved.
Children shall not play with the appliance.
Cleaning and user maintenance shall not
be made by children without supervision.

Caution: The appliance and its accessible
parts can become hot during operation.
Be careful to avoid touching the heating
elements. Children younger than 8 years
old should stay away unless they are
under permanent supervision.
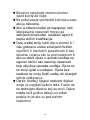
– There shall be adequate ventilation of
the room when the range hood is used at
the same time as appliances burning gas
or other fuels
– There is a fire risk if cleaning is not
carried out in accordance with the
instructions
– Do not flambé under the cooker hood.
– CAUTION: Accessible parts may
become hot when used with cooking
appliances.
–The air must not be discharged into a
flue that is used for exhausting fumes
from appliances burning gas or other fuels.
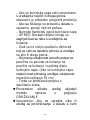
–The minimum distance between the
supporting surface for the cooking vessels
on the hob and the lowest part of the
range hood. (When the range hood is

located above a gas appliance, this
distance shall be at least 70 cm
–Regulations concerning the discharge of
air have to be fulfilled.
Clean your appliance periodically by
following the method given in the chapter
MAINTENANCE
.
Warning: Failure to install the screws or
fixing device in accordance with these
instructions may result in electrical
hazards
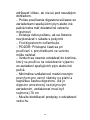
Regarding the instructions method of
fixing for the fixed appliance and how the
appliance is to be fixed to its support,
thanks to refer to the section
“INSTALLATION AND FIXING”.
Regarding the instructions for the bulb
changing, thanks to refer to the section
“bulb changing”.

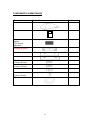
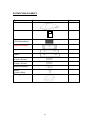
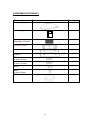
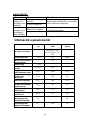
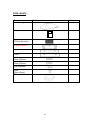
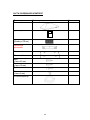
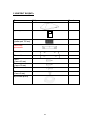
PARTS SUPPLIED
Description
Illustration
Qty.
Cooker hood
1
Chimney
1
Exhaust Pipe
(150mm diameter)
1
Wall bracket
1
Plate I
1
Plate II
1
Screw
(4mm x 40mm)
7
Screw
(4mm x 30mm)
2
Wall plug
9
Screw
(4mm x 8mm)
6
Charcoal filter
2

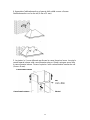
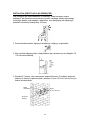
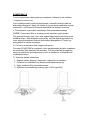
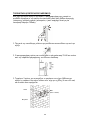
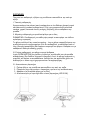
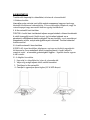
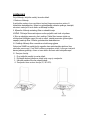
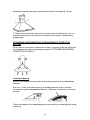
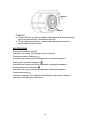
If you have an outlet to the outside, your cooker hood can be connected as below
picture by means of an extraction duct (enamel, aluminum, flexible pipe or
inflammable material with an interior diameter of 150mm)
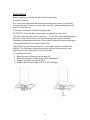
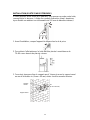
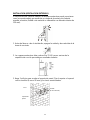
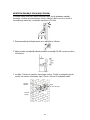
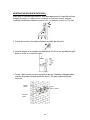
INSTALLATION (VENT OUTSIDE)
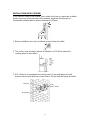
1. Before installation, turn the unit off and unplug it from the outlet.
2. The cooker hood should be placed at a distance of 70~80cm above the
cooking plane for best effect.
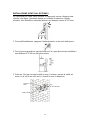
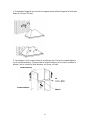
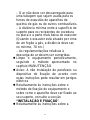
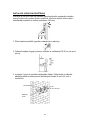
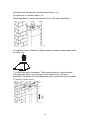
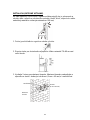
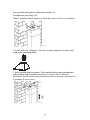
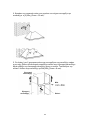
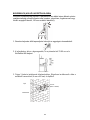
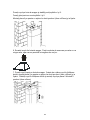
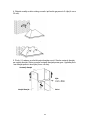
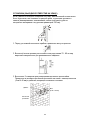
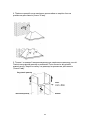
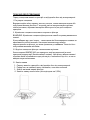
3. Drill 3 holes to accommodate the wall bracket. Screw and tighten the wall
bracket onto the wall with the screws (4mm x 40 mm) and wall plugs provided.
Screw
(4mm x 40mm)
Wall plug
Wall bracket

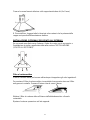
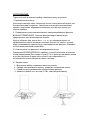
4 Hang the appliance onto the wall bracket hook and fix the appliance by the 2
screws (4mm x 30mm).
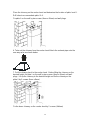
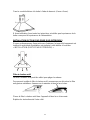
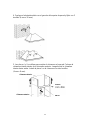
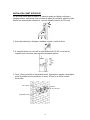
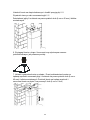
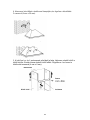
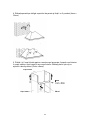
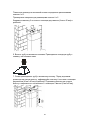
5. Plate I and II are used to fix the chimney on he wall. Put the inner chimney on
the outer chimney. Then pull the inner chimney upwards. Install plate I on the
chimney by two screws (4 mm x 8mm).
Inner chimney
Outer chimney
Plate I
Screw

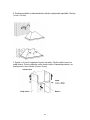
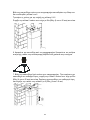
Place the chimney on the cooker hood and determine the location of plate I and II.
Drill holes to accommodate plate I & II.
Fix plate II on the wall by two screws (4mm x 40mm) and wall plugs.
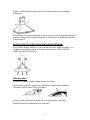
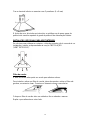
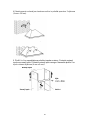
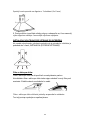
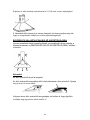
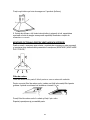
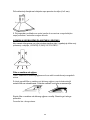
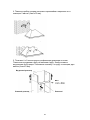
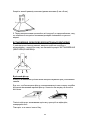
6. Take out the chimney from the cooker hood Attach the exhaust pipe onto the
one-way-valve as shown below.
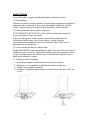
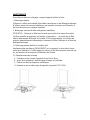
7. Put the chimney back to the cooker hood. Before lifting the chimney on the
desired height, fix plate I on the wall by two screws (4mm x 40mm) and wall
plugs. Lift up the chimney to the desired height and fix the chimney on the
plate II by 2 screws (4mm x 8mm)
Fix the lower chimney on the cooker hood by 2 screws (4x8mm)

10. Before usage, read all the instructions and make sure that the power rating of
the cooker hood matches the power rating of the supply.
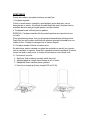
If you do not have an outlet to the outside, the exhaust pipe is not required and
the installation is similar to the one shown in the “INSTALLATION (VENT
OUTSIDE)” section
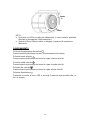
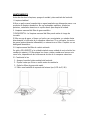
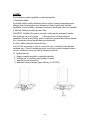
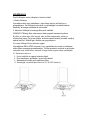
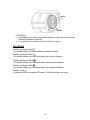
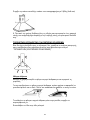
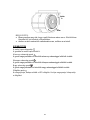
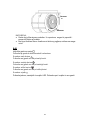
INSTALLATION (OPTIONAL FOR VENT INSIDE)
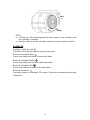
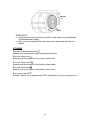
Activated carbon filter can be used to trap odors.
Carbon Filter
In order to install the activated carbon filter, the metallic anti-grease filter should
be detached first. Press the lock and pull it downward.
Put the activated carbon filter into the unit, fix it by turning it.
Repeat the same on the other side.

NOTE:
o Make sure the filter is securely locked. Otherwise, it could loosen and
cause damage to unit.
o When activated carbon filter attached, the suction power will be lowered.
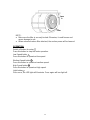
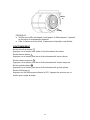
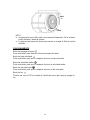
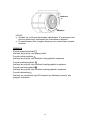
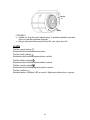
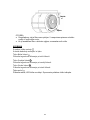
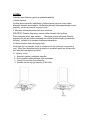
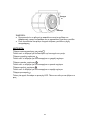
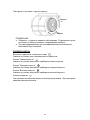
Switch off button for motor
OPERATION
Press this button to stop the motor operation.
Low Speed button
Press this button to operate at low speed.
Medium Speed button
Press this button to operate at medium speed.
High Speed button
Press this button to operate at high speed.
Light button
Press once, the LED light will illuminate. Press again will turn light off.
Close
Open

Before cleaning, switch the unit off and pull out the plug.
MAINTENANCE
I. Regular Cleaning
Use a soft cloth moistened with hand-warm mildly soapy water or household
cleaning detergent. Never use metal pads, chemical, abrasive material or stiff
brush to clean the unit.
II. Monthly Cleaning for metallic anti-grease filter
ESSENTIAL: Clean the filter every month can prevent any risk of fire.
The filter collects grease, smoke and dust…... so the filter is directly affecting the
efficiency of the cooker hood. If not cleaned, the grease residue (potential
flammable) will saturate on the filter. Clean it with household cleaning detergent.
III. Annual Cleaning for Activated Carbon Filter
Apply SOLELY to unit that installed as a recirculation unit (not vented to the
outside). This filter traps odours and must be replaced at least once a year
depending on how frequent the cooker hood used.
IV. Light Replacement
1. Switch the unit off and pull out the plug first.
2. Wait until the light is cooled down before replacement.
3. Remove the metal anti-grease filters.
4. Replace with the same type of bulb (2.5W LED light).

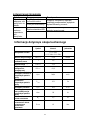
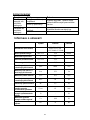
Fault
TROUBLESHOOTING
Cause
Solution
Light on, but
fan does not
work
The fan blade is
jammed.
Switch off the unit. Repair to carried
out by qualified service personnel
only.
The motor is damaged.
Both light and
fan do not
work
LED light burn.
Replace the light with correct rating.
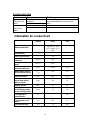
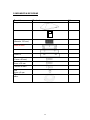
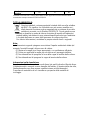
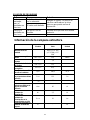
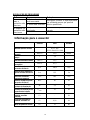
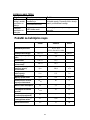
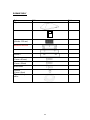
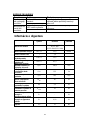
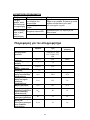
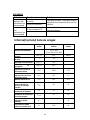
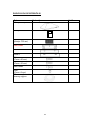
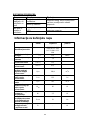
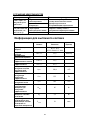
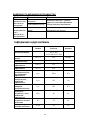
Information for cooker hood
Symbol Value Unit
Model identification
CCC 60BA & CCC
60GH & CCC 60X
& CCC 60N & CCC
60W
Annual Energy
Consumption
AEC
52,0
hood
kWh/a
Time increase factor
f 1,6
Fluid Dynamic
Efficiency
FDE 12,2
hood
Energy Efficiency
Index
EEI 81,3
hood
Measured airflow rate
at the best efficiency
Q 248,4
BEP
m
3
/h
Measured air pressure
at best efficiency point
P 152
BEP
Pa
Maximum airflow
Q 423
max
m
3
/h
Measured electric
power input at best
efficiency point
W 86
BEP
W
Nominal power of the
lighting system
W 2,5
L
W
Average illumination
of the lighting system
on the cooking surface
E 61
middle
lux
Measured power
consumption on
standby mode
P -
S
W
Measured power
consumption on off
mode
P 0,00
O
W
Sound power level
L 70
WA
dB

The measurement and calculation method of the above table was done in accordance with
commission regulation (EU) No 65/2014 & 66/2014.
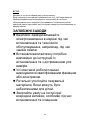
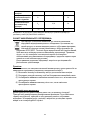
ENVIRONMENTAL PROTECTION
This product is marked with the symbol on the selective sorting of
waste electronic equipment. This means that this product must not be
disposed of with household waste but must be supported by a system
of selective collection in accordance with Directive 2012/19/EC. It will
then be recycled or dismantled to minimize impacts on the environment,
electrical and electronic products are potentially dangerous for the
environment and human health due to the presence of hazardous
substances.
:
For more information, please contact your local or regional authorities.
Note
The following shows how to reduce total environmental impact (e.g. energy use)
of the cooking process).
:
(1) Install the cooker hood in a proper place where there is efficient ventilation.
(2) Clean the cooker hood regularly so as not to block the airway.
(3) Remember to switch off the cooker hood light after cooking.
(4) Remember to switch off the cooker hood after cooking.
Do not dismantle the appliance in a way which is not shown in the user manual.
The appliance could not be dismantled by user. At the end of life, the appliance
should not be disposed of with household waste. Check with you Local
Authority or retainer for recycling advice.
Information for dismantling

CCC 60BA & CCC 60GH & CCC 60X
& CCC 60N & CCC 60W
LIBRETTO DI USO E INSTALLAZIONE

INTRODUZIONE
Grazie per avere scelto questa cappa.
Questo libretto di istruzioni mira a fornirvi tutte le informazioni relative
all'installazione, all'uso e alla manutenzione dell'elettrodomestico. Per azionare
l'elettrodomestico correttamente e in piena sicurezza, si consiglia di leggere
attentamente il presente libretto di istruzioni prima dell'installazione e dell'uso.
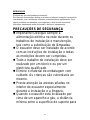
Importante! Spegnere sempre
l'alimentazione elettrica di rete durante
l'installazione e la manutenzione, ad
esempio durante la sostituzione delle
lampadine.
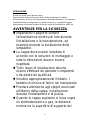
AVVERTENZE PER LA SICUREZZA
La cappa deve essere installata in
accordo con le istruzioni di montaggio e
tutte le dimensioni devono essere
rispettate.
Tutti i lavori di installazione devono
essere effettuati da operatori competenti
o da elettricisti qualificati.
Smaltire appropriatamente l'imballo. I
bambini rischiano di ferirsi nel manipolarlo.
Prestare attenzione agli spigoli acuminati
all'interno della cappa, in particolare
durante l'installazione e la pulizia.
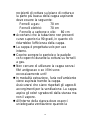
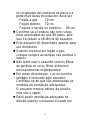
Quando la cappa aspirante si trova sopra
un elettrodomestico a gas, la distanza
minima tra la superficie di supporto dei

recipienti di cottura sul piano di cottura e
la parte più bassa della cappa aspirante
deve essere la seguente:
Fornelli a gas: 70 cm
Fornelli elettrici: 70 cm
Fornello a carbone o olio: 80 cm
Accertarsi che la tubazione non presenti
curve superiori a 90 gradi, in quanto ciò
ridurrebbe l’efficienza della cappa.
La cappa è progettata solo per uso
interno.
Coprire sempre le pentole e le padelle
con coperchi durante la cottura su fornelli
a gas.
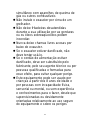
Non cercare di utilizzare la cappa senza i
filtri antigrasso o se i filtri sono
eccessivamente unti!
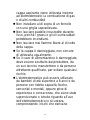
In modalità estrazione, l'aria nell'ambiente
viene aspirata tramite la cappa.
Assicurarsi che siano rispettati gli appositi
accorgimenti per la ventilazione. La cappa
aspira gli odori sgradevoli dalla stanza ma
non il vapore.
All'interno della stanza deve esserci
un'adeguata ventilazione quando la

cappa aspirante viene utilizzata insieme
ad elettrodomestici a combustione di gas
o di altri combustibili
Non installare al di sopra di un fornello
con una griglia sopraelevata.
Non lasciare padelle incustodite durante
l'uso, perché i grassi o gli oli surriscaldati
potrebbero incendiarsi.
Non lasciare mai fiamme libere al di sotto
della cappa.
Se la cappa è danneggiata, non cercare
di utilizzarla ugualmente.
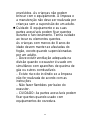
Se il cavo di alimentazione è danneggiato,
deve essere sostituito dal produttore, da
un suo tecnico manutentore o da persone
altrettanto qualificate, per evitare qualsiasi
rischio.
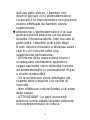
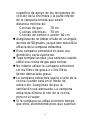
L'elettrodomestico può essere utilizzato
da bambini di età superiore a 8 anni e da
persone con ridotte capacità fisiche,
sensoriali o mentali, oppure prive di
esperienza e conoscenza, che siano state
supervisionate o istruite riguardo all’uso
dell’elettrodomestico in sicurezza,
comprendendo i rischi che derivano
La pagina si sta caricando...
La pagina si sta caricando...
La pagina si sta caricando...
La pagina si sta caricando...
La pagina si sta caricando...
La pagina si sta caricando...
La pagina si sta caricando...
La pagina si sta caricando...
La pagina si sta caricando...
La pagina si sta caricando...
La pagina si sta caricando...
La pagina si sta caricando...
La pagina si sta caricando...
La pagina si sta caricando...
La pagina si sta caricando...
La pagina si sta caricando...
La pagina si sta caricando...
La pagina si sta caricando...
La pagina si sta caricando...
La pagina si sta caricando...
La pagina si sta caricando...
La pagina si sta caricando...
La pagina si sta caricando...
La pagina si sta caricando...
La pagina si sta caricando...
La pagina si sta caricando...
La pagina si sta caricando...
La pagina si sta caricando...
La pagina si sta caricando...
La pagina si sta caricando...
La pagina si sta caricando...
La pagina si sta caricando...
La pagina si sta caricando...
La pagina si sta caricando...
La pagina si sta caricando...
La pagina si sta caricando...
La pagina si sta caricando...
La pagina si sta caricando...
La pagina si sta caricando...
La pagina si sta caricando...
La pagina si sta caricando...
La pagina si sta caricando...
La pagina si sta caricando...
La pagina si sta caricando...
La pagina si sta caricando...
La pagina si sta caricando...
La pagina si sta caricando...
La pagina si sta caricando...
La pagina si sta caricando...
La pagina si sta caricando...
La pagina si sta caricando...
La pagina si sta caricando...
La pagina si sta caricando...
La pagina si sta caricando...
La pagina si sta caricando...
La pagina si sta caricando...
La pagina si sta caricando...
La pagina si sta caricando...
La pagina si sta caricando...
La pagina si sta caricando...
La pagina si sta caricando...
La pagina si sta caricando...
La pagina si sta caricando...
La pagina si sta caricando...
La pagina si sta caricando...
La pagina si sta caricando...
La pagina si sta caricando...
La pagina si sta caricando...
La pagina si sta caricando...
La pagina si sta caricando...
La pagina si sta caricando...
La pagina si sta caricando...
La pagina si sta caricando...
La pagina si sta caricando...
La pagina si sta caricando...
La pagina si sta caricando...
La pagina si sta caricando...
La pagina si sta caricando...
La pagina si sta caricando...
La pagina si sta caricando...
La pagina si sta caricando...
La pagina si sta caricando...
La pagina si sta caricando...
La pagina si sta caricando...
La pagina si sta caricando...
La pagina si sta caricando...
La pagina si sta caricando...
La pagina si sta caricando...
La pagina si sta caricando...
La pagina si sta caricando...
La pagina si sta caricando...
La pagina si sta caricando...
La pagina si sta caricando...
La pagina si sta caricando...
La pagina si sta caricando...
La pagina si sta caricando...
La pagina si sta caricando...
La pagina si sta caricando...
La pagina si sta caricando...
La pagina si sta caricando...
La pagina si sta caricando...
La pagina si sta caricando...
La pagina si sta caricando...
La pagina si sta caricando...
La pagina si sta caricando...
La pagina si sta caricando...
La pagina si sta caricando...
La pagina si sta caricando...
La pagina si sta caricando...
La pagina si sta caricando...
La pagina si sta caricando...
La pagina si sta caricando...
La pagina si sta caricando...
La pagina si sta caricando...
La pagina si sta caricando...
La pagina si sta caricando...
La pagina si sta caricando...
La pagina si sta caricando...
La pagina si sta caricando...
La pagina si sta caricando...
La pagina si sta caricando...
La pagina si sta caricando...
La pagina si sta caricando...
La pagina si sta caricando...
La pagina si sta caricando...
La pagina si sta caricando...
La pagina si sta caricando...
La pagina si sta caricando...
La pagina si sta caricando...
La pagina si sta caricando...
La pagina si sta caricando...
La pagina si sta caricando...
La pagina si sta caricando...
La pagina si sta caricando...
La pagina si sta caricando...
La pagina si sta caricando...
La pagina si sta caricando...
La pagina si sta caricando...
La pagina si sta caricando...
La pagina si sta caricando...
La pagina si sta caricando...
La pagina si sta caricando...
La pagina si sta caricando...
La pagina si sta caricando...
La pagina si sta caricando...
La pagina si sta caricando...
La pagina si sta caricando...
La pagina si sta caricando...
La pagina si sta caricando...
La pagina si sta caricando...
La pagina si sta caricando...
La pagina si sta caricando...
La pagina si sta caricando...
La pagina si sta caricando...
La pagina si sta caricando...
La pagina si sta caricando...
La pagina si sta caricando...
La pagina si sta caricando...
La pagina si sta caricando...
La pagina si sta caricando...
La pagina si sta caricando...
La pagina si sta caricando...
La pagina si sta caricando...
La pagina si sta caricando...
La pagina si sta caricando...
La pagina si sta caricando...
La pagina si sta caricando...
La pagina si sta caricando...
La pagina si sta caricando...
La pagina si sta caricando...
La pagina si sta caricando...
La pagina si sta caricando...
La pagina si sta caricando...
La pagina si sta caricando...
La pagina si sta caricando...
La pagina si sta caricando...
La pagina si sta caricando...
La pagina si sta caricando...
La pagina si sta caricando...
La pagina si sta caricando...
La pagina si sta caricando...
La pagina si sta caricando...
La pagina si sta caricando...
La pagina si sta caricando...
La pagina si sta caricando...
La pagina si sta caricando...
La pagina si sta caricando...
La pagina si sta caricando...
La pagina si sta caricando...
La pagina si sta caricando...
La pagina si sta caricando...
La pagina si sta caricando...
La pagina si sta caricando...
La pagina si sta caricando...
La pagina si sta caricando...
La pagina si sta caricando...
La pagina si sta caricando...
La pagina si sta caricando...
La pagina si sta caricando...
La pagina si sta caricando...
La pagina si sta caricando...
La pagina si sta caricando...
La pagina si sta caricando...
La pagina si sta caricando...
La pagina si sta caricando...
La pagina si sta caricando...
La pagina si sta caricando...
La pagina si sta caricando...
La pagina si sta caricando...
La pagina si sta caricando...
La pagina si sta caricando...
La pagina si sta caricando...
La pagina si sta caricando...
-
 1
1
-
 2
2
-
 3
3
-
 4
4
-
 5
5
-
 6
6
-
 7
7
-
 8
8
-
 9
9
-
 10
10
-
 11
11
-
 12
12
-
 13
13
-
 14
14
-
 15
15
-
 16
16
-
 17
17
-
 18
18
-
 19
19
-
 20
20
-
 21
21
-
 22
22
-
 23
23
-
 24
24
-
 25
25
-
 26
26
-
 27
27
-
 28
28
-
 29
29
-
 30
30
-
 31
31
-
 32
32
-
 33
33
-
 34
34
-
 35
35
-
 36
36
-
 37
37
-
 38
38
-
 39
39
-
 40
40
-
 41
41
-
 42
42
-
 43
43
-
 44
44
-
 45
45
-
 46
46
-
 47
47
-
 48
48
-
 49
49
-
 50
50
-
 51
51
-
 52
52
-
 53
53
-
 54
54
-
 55
55
-
 56
56
-
 57
57
-
 58
58
-
 59
59
-
 60
60
-
 61
61
-
 62
62
-
 63
63
-
 64
64
-
 65
65
-
 66
66
-
 67
67
-
 68
68
-
 69
69
-
 70
70
-
 71
71
-
 72
72
-
 73
73
-
 74
74
-
 75
75
-
 76
76
-
 77
77
-
 78
78
-
 79
79
-
 80
80
-
 81
81
-
 82
82
-
 83
83
-
 84
84
-
 85
85
-
 86
86
-
 87
87
-
 88
88
-
 89
89
-
 90
90
-
 91
91
-
 92
92
-
 93
93
-
 94
94
-
 95
95
-
 96
96
-
 97
97
-
 98
98
-
 99
99
-
 100
100
-
 101
101
-
 102
102
-
 103
103
-
 104
104
-
 105
105
-
 106
106
-
 107
107
-
 108
108
-
 109
109
-
 110
110
-
 111
111
-
 112
112
-
 113
113
-
 114
114
-
 115
115
-
 116
116
-
 117
117
-
 118
118
-
 119
119
-
 120
120
-
 121
121
-
 122
122
-
 123
123
-
 124
124
-
 125
125
-
 126
126
-
 127
127
-
 128
128
-
 129
129
-
 130
130
-
 131
131
-
 132
132
-
 133
133
-
 134
134
-
 135
135
-
 136
136
-
 137
137
-
 138
138
-
 139
139
-
 140
140
-
 141
141
-
 142
142
-
 143
143
-
 144
144
-
 145
145
-
 146
146
-
 147
147
-
 148
148
-
 149
149
-
 150
150
-
 151
151
-
 152
152
-
 153
153
-
 154
154
-
 155
155
-
 156
156
-
 157
157
-
 158
158
-
 159
159
-
 160
160
-
 161
161
-
 162
162
-
 163
163
-
 164
164
-
 165
165
-
 166
166
-
 167
167
-
 168
168
-
 169
169
-
 170
170
-
 171
171
-
 172
172
-
 173
173
-
 174
174
-
 175
175
-
 176
176
-
 177
177
-
 178
178
-
 179
179
-
 180
180
-
 181
181
-
 182
182
-
 183
183
-
 184
184
-
 185
185
-
 186
186
-
 187
187
-
 188
188
-
 189
189
-
 190
190
-
 191
191
-
 192
192
-
 193
193
-
 194
194
-
 195
195
-
 196
196
-
 197
197
-
 198
198
-
 199
199
-
 200
200
-
 201
201
-
 202
202
-
 203
203
-
 204
204
-
 205
205
-
 206
206
-
 207
207
-
 208
208
-
 209
209
-
 210
210
-
 211
211
-
 212
212
-
 213
213
-
 214
214
-
 215
215
-
 216
216
-
 217
217
-
 218
218
-
 219
219
-
 220
220
-
 221
221
-
 222
222
-
 223
223
-
 224
224
-
 225
225
-
 226
226
-
 227
227
-
 228
228
-
 229
229
-
 230
230
-
 231
231
-
 232
232
-
 233
233


Candy CCC 60X Manuale utente
- Tipo
- Manuale utente
Documenti correlati
Altri documenti
-
Haier HADG9CS46BWIFI Manuale utente
-
Haier HDSV985B Decorative Hood Manuale utente
-
Hoover HFT160NX Manuale utente
-
ROSIERES RDSV985 PN Manuale del proprietario
-
Hoover HBVS685TX Manuale utente
-
-
-
-
Inspire PECAN Manuale utente