i-box i-box Blinky Kids Alarm Clock and Sleep Trainer Manuale utente
- Categoria
- Sveglie
- Tipo
- Manuale utente
Questo manuale è adatto anche per

EN Kids’ Alarm Clock & Sleep Trainer
DE Wecker und Schlaftrainer für Kinder
ES Reloj despertador para niños y entrenador del sueño
FR Réveil et dispositif d’aide au sommeil pour les enfants
IT Sveglia e sleep trainer per bambini
NL Wekker en slaaptrainer voor kinderen

02 | Blinky
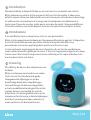
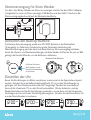
EN Introduction
Introducing Blinky, the all-in-one children’s sleep trainer.
Blinky is designed for children and parents. Packed with features that will help your
child learn good sleeping habits and enable you to get that much needed extra sleep.
The nightlight, soothing sounds and friendly smiley face immediately sets the scene for
bedtime, whilst the nap timer, pre-set alarm and sleep trainer function can be used to
train your little one about when to go to sleep and when to get up and out of bed.
DE Einführung
Wir präsentieren Blinky, den Allround-Schlaftrainer für Kinder.
Blinky ist für Kinder und ihre Eltern gedacht. Seine zahlreichen Funktionen helfen Ihrem
Kind, gesunde Schlafgewohnheiten zu entwickeln, und verschaffen Ihnen die dringend
benötigte Extraportion Schlaf.
Das Nachtlicht, beruhigende Klänge und das lächelnde Gesicht stimmen Ihr Kind
auf den Nachtschlaf ein. Mit dem Schlaftimer, dem voreingestellten Alarm und der
Schlaftrainerfunktion können Sie ihm beibringen, wann es schlafen gehen soll und
wann es Zeit zum Aufstehen und Hinlegen ist.
ES Introducción
Presentamos Blinky, el entrenador del sueño infantil todo en uno.
Blinky ha sido diseñado para niños y padres. Ofrece varias funciones que ayudarán a su
hijo a aprender buenos hábitos de sueño y le permitirán a usted conseguir ese sueño
extra tan necesario.
La luz nocturna, los sonidos relajantes y la simpática carita sonriente preparan
inmediatamente el terreno para la hora de dormir, mientras que el temporizador de la
siesta, la alarma preestablecida y la función de entrenador del sueño pueden utilizarse
para habituar a su pequeño sobre cuándo debe ir a dormir y cuándo debe levantarse y
salir de la cama.

Blinky | 03
NL Invoering
Dit is Blinky, de alles-in-één slaaptrainer voor
kinderen.
Blinky is ontworpen voor kinderen en ouders.
Hij zit vol met functies die je kind goede
slaapgewoonten bijbrengen en jou dat
broodnodige beetje extra slaap bezorgen.
Het nachtlampje, de kalmerende geluiden
en het vriendelijke lachende gezichtje zetten
meteen de toon voor bedtijd. En met de
dutjestimer, het vooringestelde alarm en de
slaaptrainerfunctie kun je je kleintje bijbrengen
wanneer hij moet gaan slapen, wanneer hij
moet opstaan en uit bed moet komen.
FR Introduction
Découvrez Blinky, le dispositif d’aide au sommeil tout-en-un destiné aux enfants.
Blinky s’adresse aux enfants et à leurs parents. Riche en fonctionnalités, il aidera votre
enfant à acquérir de bonnes habitudes de sommeil et vous permettra de dormir davantage.
La veilleuse, les sons apaisants et le visage souriant préparent immédiatement le
terrain pour l’heure du coucher, tandis que le minuteur de sieste, l’alarme prédéfinie et
la fonction d’aide au sommeil indiquent à votre enfant quand se coucher et se lever.
IT Introduzione
È arrivato Blinky, il primo sleep trainer tutto-in-uno per bambini.
Blinky è stato appositamente ideato per il benessere di bambini e genitori. Il dispositivo
è ricco di funzionalità pensate per aiutare i bimbi ad acquisire abitudini sane,
permettendo a mamma e papà di godersi qualche ora di sonno in più.
La luce notturna è accompagnata da suoni rilassanti e da una faccina sorridente per
creare subito l’atmosfera giusta per la nanna. Il timer, la sveglia preconfigurata e lo sleep
trainer sono tutte funzioni che possono essere utilizzate per far capire al bimbo che è
ora di andare a letto o di alzarsi.

04 | Blinky
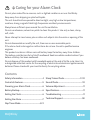
EN
Caring for your
Alarm Clock
Do not place naked flame sources, such as lighted candles on or near the Blinky.
Keep away from dripping or splashed liquids.
The unit should not be exposed to direct sunlight, very high or low temperatures,
moisture, strong magnetic fields high frequencies and dusty environments.
Always leave sufficient space around the unit for ventilation.
Do not use abrasives, solvents or polish to clean this product. Use only a clean, damp,
soft, cloth.
Never attempt to insert wires, pins or other such objects into the vents or opening of the
unit.
Do not disassemble or modify the unit, there are no user serviceable parts.
If the alarm clock is damaged or malfunctions do not use. Consult a qualified service
engineer.
This product contains a Lithium coin cell battery keep the battery away from children.
The battery could be harmful or fatal if swallowed. Seek immediate medical advice if you
believe a battery has been swallowed.
Do not dispose of this product with household waste at the end of its life cycle; take it to
a designated collection centre for the recycling of electrical and electronic appliances with
batteries. Please check with your Local Authority for recycling advice.
Contents
Safety information .......................................... 4
Controls & features ...........................................5
Powering your Alarm Clock .......................... 6
Battery Backup.................................................. 6
Setting the Clock .............................................. 6
Setting the Alarm ..............................................7
Nap Timer Mode ...........................................8-9
Sleep Trainer Mode ...................................9-10
Sound Mode .....................................................10
Volume Adjustment ........................................11
Specifications ....................................................11
Troubleshooting ...............................................11
Technical Support ..........................................58

Blinky | 05
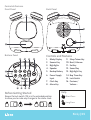
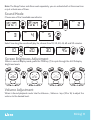
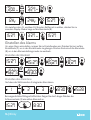
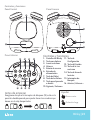
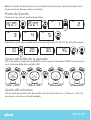
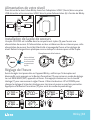
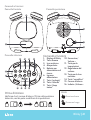
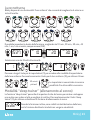
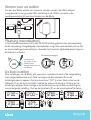
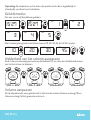
Front Panel
Controls & Features
Bottom Panel
Back Panel
Controls and Features
1. Blinky Display
2. Snooze Key
3. Nightlights
4. Speaker
5. Backup Battery
6. Power Supply
Input
7. Clock Key
8. Alarm Key
9. Sleep Trainer Key
10. Next / Volume +
11. Set Key
12. Sound Key
13. Nightlight Key
14. Nap Timer Key
15. Lock Switch
16. Previous /
Volume -
Before Getting Started
Ensure the lock switch (15) is in the unlocked position
to allow you to make any changes to the alarm clock.
1
2
3
4
5
6
12
7
13 14 1615
8 9 10 11
Help
Short Press
Long Press

06 | Blinky
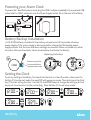
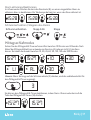
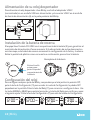
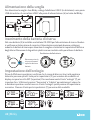
Powering your Alarm Clock
To power the i-box Blinky alarm clock, plug the USB C adaptor (supplied) into a powered USB
socket and the USB C connector into the Power Supply Socket (6) on the back of the Blinky.
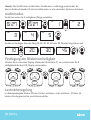
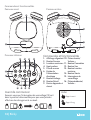
Battery Backup Installation
1 x CR-2032 battery is installed in the battery compartment (5) to provide a backup
power supply. If the mains supply is disconnected or interrupted this backup power
supply ensures that the time and alarm settings are saved but does not power any other
functions. Remove the plastic tab as shown below to activate the battery.
Replacing the battery
Remove screw first
to remove battery
compartment cover
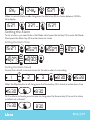
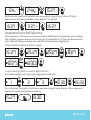
Setting the Clock
To set any setting on the Blinky, first check that the lock is in the off position, then press the
Set Key (11) to enter set mode; the word SET will appear on screen. Then short press the Clock
key (7) to start setting the time. Use the UP and DOWN keys to change the setting and Clock
key to set it and move on to the next setting. Press Set Key (11) to exit setup mode.
12:00 12:00 12:00 3:00
3:00 3:27
SET SET SET
SET SET
AM AM AM PM
PM PM
C
R
2
0
3
2
3
V
O
L
T
S
L
I
T
H
I
U
M
B
A
T
T
E
R
Y
C
R
2
0
3
2
3
V
O
L
T
S
L
I
T
H
I
U
M
B
A
T
T
E
R
Y

Blinky | 07
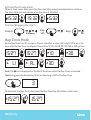
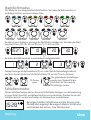
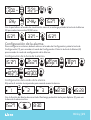
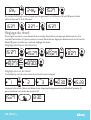
Setting the Alarm
To set an alarm, you need to be in Set Mode, short press the Set key (11) to enter Set Mode.
Short press the Alarm key (8) to enter alarm set mode.
Setting the Alarm Time
Setting the Alarm Sound
Choose from 5 built-in sounds to use for the alarm when it is sounding.
12H 24H
SET SET
PM
15:27
15:27 3:27 15:27
15:27 15:27 8:27
8:27
1 2 3
8:30
8:30 15:28
15:27
SET
SET SET SET
SET
SET SET SET
SET
SET
When in normal display mode, long press the Alarm key (8) to choose between 12/24hr
time display.
When the Nap function is off. Long press the Snooze key (2) to check an active alarm time.
8:30
15:30
8:30
15:30
Or if no alarm is showing as active you can long press the Snooze key (2) to see if an alarm
is set but not activated.

08 | Blinky
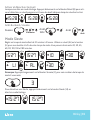
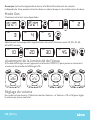
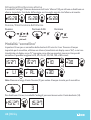
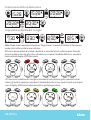
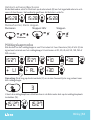
Nap Timer Mode
Set the Nap Timer from 10 minutes to 3 hours. Use either an alarm (AL) or light (LI) to act as the
alarm after the Nap Timer has elapsed. Choose from 10, 30, 45, 60, 90, 120, 150 or 180 minutes.
Note: Long press the Snooze key (2) to see how long is left for the Nap Timer.
To deactivate the Nap Timer, short press the Nap Timer key (14) while in clock mode.
15:27
15:27 15:27
15:27 10 30
30
3
Li Al
SET SET SET
SET
SET SET
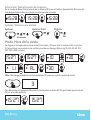
Activate/Deactivate Alarm
When in clock mode. Short press the Alarm key (8) to activate and deactivate a set alarm.
The alarm clock icon will indicate when the alarm is activated.
15:32 15:3215:32
Snooze / Stopping the Alarm
Note: The icon is displayed on the left of the screen when the Nap Timer is activated.
➡
➡
10 minutes
Snooze Stop
24h Stop
➡
➡
Off

Blinky | 09
Nightlight Mode
The Blinky has a built-in Nightlight feature, choose from 4 solid colours and a blue cycle.
You can also set how long the nightlight will stay on for; choose from 10 / 20 / 30 / 45 / 60
90 minutes or ON (continously until switched off).
Choose the brightness, select from 3 different levels.
Short press the Set key (11) to exit Nightlight setting mode. Short press the Nightlight key (13) to
activate the timer.
The saved settings will become the
default for the nightlight until the
settings are changed again.
30 minutes later
15:27 10 20 30
SET SET SET SET
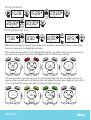
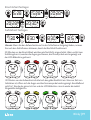
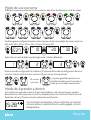
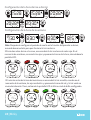
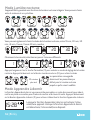
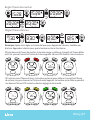
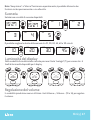
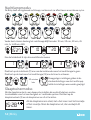
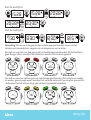
Sleep Trainer Mode
The sleep trainer function allows you to set up sleep cycle to help with developing a routine
for bedtime and waking up in the morning. Short press the Sleep Trainer key (9) to activate
or deactivate the trainer function.
When the sleep trainer is on, the sun/moon icon will show;
When the sleep trainer is off, the sun/moon icon will
disappear.
15:28
1 2 3
SET SET SET

10 | Blinky
30 minutes before the wake up time, the yellow Nightlight will turn on; When it’s time to
wake up, the eyes will open and the sun icon will appear, and the green light will turn on for
1 hour, and the LCD screen will return to last set brightness level.
30 minutes before bedtime, the red Nightlight will turn on. When it’s time to go to bed, the
eyes will close and the moon icon will appear, and the LCD screen will dim.
Note: After setting the Sleep Trainer wake up time period, remember to turn on the sleep
trainer to make sure the Nightlight will work.
15:2815:28 20:28
20:28 20:30
SET
Setting Bedtime
7:30 8:30 8:30 8:15
Setting Wake Up Time
19:59 20:00 20:30
20:30
7:59
8:00 8:30 9:30

Blinky | 11
Note: The Sleep Trainer and Alarm work separately, you can activate both at the same time
or just activate one of them.
Sound Mode
Choose one of the 5 available soundtracks.
Screen Brightness Adjustment
When in normal display mode, press the TIME key (7) to cycle through the 4 LCD display
brightness levels.
15:27 15:27 1 2
3 4 5
SET SET SET
SET SET SET
Volume Adjustment
When in Sound playback mode. Use the Volume + / Volume - keys (10 or 16) to adjust the
volume to the desired level.
Select how long the sounds will play for, choose from 10, 20, 30, 45, 60 and 90 minutes.
10 20 30 45
SET SET SET SET
20:30
20:30
20:30
20:30

12 | Blinky
Troubleshooting
Problem Solutions
No sound
Check if the volume is turned down. Increase the volume.
The alarm
clock does not
turn on
Check power supply connections.
Check mains socket is switched on.
After a power
cut, time and
alarm settings
don’t reset
No backup battery fitted - Insert CR2032 battery
Backup battery incorrectly fitted - insert properly see diagram
Waste electrical and electronic products should not be disposed of with
household waste. Please recycle where facilities exist. Check with your Local
Authority for recycling advice.
Specifications
Power Input 5V 1A
Audio Output 5W
Backup Battery CR2032
Technical support
For further help, advice, information or live chat visit: www.iboxstyle.com/support
Disclaimer
Updates to Firmware and/or hardware components are made regularly. Therefore
some of the instructions, specifications and pictures in this documentation may
differ slightly from your particular situation. All items described in this guide are for
illustration purposes only and may not apply to your particular situation. No legal right
or entitlements may be obtained from the description made in this manual.

Blinky | 13
DE
Pflege Ihres Weckers
Stellen Sie keine offenen Flammenquellen, wie z. B. brennende Kerzen, auf oder in die
Nähe des Blinky.
Von tropfenden oder spritzenden Flüssigkeiten fernhalten.
Das Gerät sollte nicht direktem Sonnenlicht, sehr hohen oder niedrigen Temperaturen,
Feuchtigkeit, starken Magnetfeldern, hohen Frequenzen und staubigen Umgebungen
ausgesetzt werden.
Lassen Sie immer ausreichend Platz um das Gerät herum zur Belüftung.
Verwenden Sie keine Scheuermittel, Lösungsmittel oder Polituren, um dieses Produkt zu
reinigen. Verwenden Sie nur ein sauberes, feuchtes, weiches Tuch.
Versuchen Sie niemals, Drähte, Stifte oder ähnliche Gegenstände in die Lüftungsschlitze
oder Öffnungen des Geräts einzuführen.
Zerlegen oder modifizieren Sie das Gerät nicht, es gibt keine vom Benutzer zu wartenden Teile.
Wenn der Wecker beschädigt ist oder Funktionsstörungen aufweist, verwenden Sie ihn
nicht. Wenden Sie sich an einen qualifizierten Servicetechniker.
Dieses Produkt enthält eine Lithium-Knopfzellenbatterie. Halten Sie die Batterie von
Kindern fern. Der Akku kann beim Verschlucken gesundheitsschädlich oder tödlich sein.
Suchen Sie sofort einen Arzt auf, wenn Sie glauben, dass eine Batterie verschluckt wurde.
Entsorgen Sie dieses Produkt am Ende seines Lebenszyklus nicht mit dem Hausmüll;
Bringen Sie es zu einer ausgewiesenen Sammelstelle für das Recycling von elektrischen
und elektronischen Geräten mit Batterien. Bitte erkundigen Sie sich bei Ihrer örtlichen
Behörde nach Recyclingempfehlungen.
Inhalt
Sicherheitshinweise .......................................13
Bedienelemente & Funktionen ..................14
Stromversorgung Ihres Weckers ...............15
Batteriesicherung ............................................ 15
Einstellen der Uhr ...........................................15
Alarm einstellen ...............................................16
Nickerchenzeitmodus .............................17-18
Schlaftrainermodus ................................ 18-19
Tonmodus ..........................................................19
Lautstärkeregelung ....................................... 20
Spezifikationen ................................................ 21
Fehlerbehebung ..............................................21
Technischer Support ..................................... 58

14 | Blinky
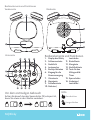
Vorderseite
Bedienelemente und Funktionen
Unterseite
Rückseite
Bedienelemente und Funktionen
1. Display des Blinky
2. Schlummertaste
3. Nachtlicht
4. Lautsprecher
5. Backup-Batterien
6. Eingang für die
Stromversorgung
7. Uhrentaste
8. Alarmtaste
9. Schlaflerntaste
10. Nächster /
Lautstärke +
11. Einstelltaste
12. Klangtaste
13. Nachtlichttaste
14. Taste für den
Mittagsschlaf-
Timer
15. Sperrschalter
16. Vorheriger /
Lautstärke –
Vor dem erstmaligen Gebrauch
Achten Sie darauf, dass der Sperrschalter (15) entsperrt ist,
bevor Sie etwas an dem Wecker verändern.
1
2
3
4
5
6
12
7
13 14 1615
8 9 10 11
Hilfe
Kurz drücken
Lange drücken

Blinky | 15
Stromversorgung für Ihren Wecker
Um den i-box Blinky-Wecker mit Strom zu versorgen, stecken Sie den USB-C-Adapter
(mitgeliefert) in eine mit Strom versorgte USB-Buchse und den USB-C-Stecker in die
Stromversorgungsbuchse (6) auf der Rückseite des Blinky.
Aktivieren der Backup-Batterie
Zur Backup-Stromversorgung wurde eine CR-2032-Batterie in das Batteriefach
(5) eingelegt. Im Falle einer Unterbrechung oder fehlenden Verbindung der
Netzstromversorgung wird das Gerät mit dieser Backup-Stromversorgung betrieben,
damit die Uhrzeit- und Weckereinstellungen erhalten bleiben. Entfernen Sie, wie im Bild
gezeigt, die Kunststofflasche, um die Batterie zu aktivieren.
Austausch der Batterie
Entfernen Sie zuerst
die Schraube, um die
Batteriefachabdeckung
zu entfernen
Einstellen der Uhr
Bevor Sie Einstellungen am Blinky vornehmen, muss zunächst die Sperrtaste entsperrt
werden. Drücken Sie anschließend die Einstelltaste (11), um in den Einstellmodus zu
gelangen. Auf dem Display wird das Wort SET angezeigt. Drücken Sie anschließend
kurz auf die Uhrentaste (7), um die Uhrzeit einzustellen. Mit der Aufwärts- und der
Abwärtstaste können Sie die Einstellungen verändern, um sie dann mit der Uhrentaste
festzulegen und zur nächsten Einstellung überzugehen. Drücken Sie die Einstelltaste (11),
um den Einstellmodus zu verlassen.
12:00 12:00 12:00 3:00
SET SET SET
AM AM AM PM
C
R
2
0
3
2
3
V
O
L
T
S
L
I
T
H
I
U
M
B
A
T
T
E
R
Y
C
R
2
0
3
2
3
V
O
L
T
S
L
I
T
H
I
U
M
B
A
T
T
E
R
Y

16 | Blinky
Einstellen des Alarms
Um einen Alarm einzustellen, müssen Sie im Einstellmodus sein. Drücken Sie kurz auf die
Einstelltaste (11), um in den Einstellmodus zu gelangen. Drücken Sie kurz auf die Alarmtaste
(8), um in den Alarmeinstellungsmodus zu wechseln.
Einstellen der Weckzeit
Einstellen des Alarmtons
Sie haben die Wahl zwischen 5 integrierten Alarmtönen.
12H 24H
SET SET
PM
15:27
15:27 3:27 15:27
15:27 15:27 8:27
8:27
1 2 3
8:30
8:30 15:28
15:27
15:27 8:30
SET
SET SET SET
SET
SET SET SET
SET
SET
Um zwischen dem 12- und dem 24-Stunden-Zeitformat zu wählen, drücken Sie im
normalen Display-Modus lange auf die Alarmtaste (8).
Bei ausgeschalteter Mittagsschlaffunktion: Zeigen Sie durch langes Drücken der
Schlummertaste (2) eine aktive Alarmzeit an.
3:00 3:27
SET SET
PM PM

Blinky | 17
Mittagsschlafmodus
Setzen Sie den Mittagsschlaf-Timer auf einen Wert zwischen 10 Minuten und 3 Stunden. Nach
Ablauf der Mittagsschlafzeit kann entweder ein Alarmton (AL) oder ein Licht (LI) als Alarm
dienen. Sie haben die Auswahl zwischen 10, 30, 45, 60, 90, 120, 150 oder 180 Minuten.
Hinweis: Wenn Sie lange auf die Schlummertaste (2) drücken, wird die verbleibende Zeit für
den Mittagsschlaf-Timer angezeigt.
Sie können den Mittagsschlaf-Timer deaktivieren, indem Sie im Uhrenmodus kurz auf die
Taste des Mittagsschlaf-Timers (14) drücken.
15:27
15:27 15:27
15:27 10 30
30
3
Li Al
SET SET SET
SET
SET SET
Alarm aktivieren/deaktivieren
Im Uhrenmodus: Drücken Sie kurz die Alarmtaste (8), um einen eingestellten Alarm zu
aktivieren bzw. zu deaktivieren. Ein Weckersymbol zeigt an, wenn der Alarm aktiviert ist.
15:28 15:2815:28
Schlummerfunktion / Stoppen des Alarms
Schlummerfunktion Stopp
Stopp 24hr
➡
Aus
➡
➡
10 minuten
➡

18 | Blinky
Nachtlichtmodus
Der Blinky hat eine integrierte Nachtlichtfunktion. Sie haben die Wahl zwischen 4
einfarbigen Lichtern und einem blauen Kreis.
Sie können auch festlegen, wie lange das Nachtlicht an bleiben soll. Sie haben die Wahl
zwischen 10 min, 20 min, 30 min, 45 min, 1 h, 1 h 30 min, EIN.
Sie haben die Wahl zwischen 3 verschiedenen Helligkeitsstufen.
Drücken Sie lange auf die Einstelltaste (11), um in den Nachtlichteinstellungsmodus zu
wechseln. Drücken Sie kurz auf die Nachtlichttaste (13), um den Timer zu aktivieren.
Die gespeicherten Einstellungen
werden zum Standard für das
Nachtlicht, bis Sie erneut die
Einstellungen ändern.
30 Minuten
später
15:27 10 20 30
SET SET SET SET
Schlaflernmodus
Mit der Schlaflernfunktion können Sie einen Schlafzyklus festlegen, um die Gewöhnung
an einen festen Einschlaf- und Aufwachrhythmus zu unterstützen. Drücken Sie kurz die
Schlaflerntaste (9), um die Lernfunktion zu aktivieren bzw. zu deaktivieren.
Bei eingeschaltetem Schlaftrainer wird das Sonnen- bzw.
Mondsymbol angezeigt. Bei ausgeschaltetem Schlaftrainer
verschwindet das Sonnen- bzw. Mondsymbol
15:28
1 2 3
SET SET SET

Blinky | 19
30 Minuten vor der Aufwachzeit schaltet sich das gelbe Nachtlicht ein. Wenn es Zeit zum
Aufstehen ist, öffnen sich die Augen und das Sonnensymbol wird angezeigt. Anschließend
geht für 1 Stunde das grüne Licht an und der LCD-Bildschirm nimmt wieder die zuletzt
eingestellte Helligkeit an.
30 Minuten vor der Einschlafzeit wird das rote Nachtlicht eingeschaltet. Wenn es Zeit zum
Schlafengehen ist, werden die Augen geschlossen, das Mondsymbol wird angezeigt und
der LCD-Bildschirm gedimmt.
Hinweis: Wenn Sie den Aufwachzeitraum für den Schlaftrainer festgelegt haben, müssen
Sie noch den Schlaftrainer aktivieren, damit das Nachtlicht funktioniert.
15:2815:28 20:28
20:28 20:30
SET
Einschlafzeit festlegen
7:30 8:30 8:30 8:15
Aufstehzeit festlegen
19:59 20:00 20:30
20:30
7:59
8:00 8:30 9:30

20 | Blinky
Hinweis: Der Schlaftrainer und der Alarm funktionieren unabhängig voneinander. Sie
können beide auf dieselbe Uhrzeit einstellen oder nur eine der beiden Optionen aktivieren.
Audiomodus
Sie können einen der 5 verfügbaren Klänge auswählen.
Festlegung der Bildschirmhelligkeit
Drücken Sie im normalen Display-Modus die Uhrzeittaste (7), um nacheinander die 4
Helligkeitsstufen des LCD-Displays anzuwählen.
15:27 15:27 1 2
3 4 5
SET SET SET
SET SET SET
Lautstärkeregelung
Im Audiowiedergabe-Modus: Mit den Tasten Lautstärke + und Lautstärke – (10 bzw. 16)
können Sie die gewünschte Lautstärke einstellen.
Sie können festlegen, dass der Klang 10, 20, 30, 45, 60 oder 90 Minuten lang ertönen soll.
10 20 30 45
SET SET SET SET
20:30
20:30
20:30
20:30
La pagina sta caricando ...
La pagina sta caricando ...
La pagina sta caricando ...
La pagina sta caricando ...
La pagina sta caricando ...
La pagina sta caricando ...
La pagina sta caricando ...
La pagina sta caricando ...
La pagina sta caricando ...
La pagina sta caricando ...
La pagina sta caricando ...
La pagina sta caricando ...
La pagina sta caricando ...
La pagina sta caricando ...
La pagina sta caricando ...
La pagina sta caricando ...
La pagina sta caricando ...
La pagina sta caricando ...
La pagina sta caricando ...
La pagina sta caricando ...
La pagina sta caricando ...
La pagina sta caricando ...
La pagina sta caricando ...
La pagina sta caricando ...
La pagina sta caricando ...
La pagina sta caricando ...
La pagina sta caricando ...
La pagina sta caricando ...
La pagina sta caricando ...
La pagina sta caricando ...
La pagina sta caricando ...
La pagina sta caricando ...
La pagina sta caricando ...
La pagina sta caricando ...
La pagina sta caricando ...
La pagina sta caricando ...
La pagina sta caricando ...
La pagina sta caricando ...
La pagina sta caricando ...
La pagina sta caricando ...
-
 1
1
-
 2
2
-
 3
3
-
 4
4
-
 5
5
-
 6
6
-
 7
7
-
 8
8
-
 9
9
-
 10
10
-
 11
11
-
 12
12
-
 13
13
-
 14
14
-
 15
15
-
 16
16
-
 17
17
-
 18
18
-
 19
19
-
 20
20
-
 21
21
-
 22
22
-
 23
23
-
 24
24
-
 25
25
-
 26
26
-
 27
27
-
 28
28
-
 29
29
-
 30
30
-
 31
31
-
 32
32
-
 33
33
-
 34
34
-
 35
35
-
 36
36
-
 37
37
-
 38
38
-
 39
39
-
 40
40
-
 41
41
-
 42
42
-
 43
43
-
 44
44
-
 45
45
-
 46
46
-
 47
47
-
 48
48
-
 49
49
-
 50
50
-
 51
51
-
 52
52
-
 53
53
-
 54
54
-
 55
55
-
 56
56
-
 57
57
-
 58
58
-
 59
59
-
 60
60


i-box i-box Blinky Kids Alarm Clock and Sleep Trainer Manuale utente
- Categoria
- Sveglie
- Tipo
- Manuale utente
- Questo manuale è adatto anche per
in altre lingue
- français: i-box i-box Blinky Kids Alarm Clock and Sleep Trainer Manuel utilisateur
- español: i-box i-box Blinky Kids Alarm Clock and Sleep Trainer Manual de usuario
- Deutsch: i-box i-box Blinky Kids Alarm Clock and Sleep Trainer Benutzerhandbuch
- Nederlands: i-box i-box Blinky Kids Alarm Clock and Sleep Trainer Handleiding
Altri documenti
-
TFA Projection alarm clock radio with USB charging function Manuale utente
-
-
-
PURE TWILIGHT Manuale del proprietario
-
Lexibook RP500UNI Projecteur Nintendo Mario Kart Manuale del proprietario
-
-
-
-
 Thermo Fisher Scientific KingFisher Apex Dx Purification Istruzioni per l'uso
