Camera E1 User Manual
Bedienungsanleitung für Kamera E1
Caméra E1 Manuel d’utilisation
Manual de instrucciones para Cámara E1
Camera E1 Manuale di Istruzioni
Камера E1 Руководство по эксплуатации
스마트�카메라 E1 사용자�매뉴얼
Instrukcja obsługi Kamera E1
スマートカメラE 1 取扱説明書
Uživatelský manuál kamery E1
Používateľská príručka kamery E1
E1 kamera használati útmutatója
智能攝像機 E1用户使用手冊
· 01
· 11
· 20
. 29
. 37
. 45
. 53
. 59
. 67
. 73
. 81
. 89
. 97

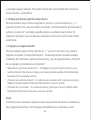
Production Introduction
Camera E1 is an intelligent product that supports Wi-Fi 6 and Bluetooth 5.2. It
supports 2K (2304×1296p) resolution with pan & tilt, and other functions such as
video intercom, human tracking, Micro SD card recording, NAS storage, and privacy
zone coverage. In addition, its rich features can be used for automation applications
to realize the functions such as home guard and smart control. It also supports
HomeKit Secure Video.
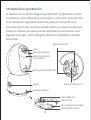
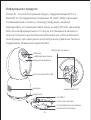
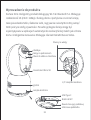
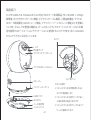
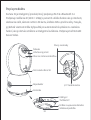
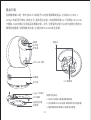
Description of button:
1.Hold down the Set button for 5
seconds to reset the camera's
network.
2.Quickly press the Set button 10
times to restore the camera to
its factory settings.
3.Press the Set button once to
turn off the alarm when the
camera is sounding an alert.
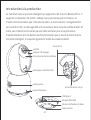
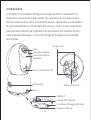
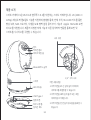
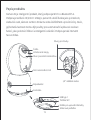
1/4 "Screw Hole
Screw Holes
Indicator Light
Microphone
Lens
Infrared Light
Speaker
Micro SD Card Slot
USB C Power Port
Silicone Pad
Base Mounting Slot
SET Button
SET
01

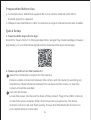
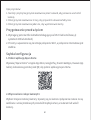
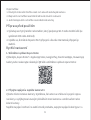
Preparation Before Use
Quick Setup
1. A smartphone or tablet that supports Wi-Fi or a cellular network (with iOS or
Android system) is required.
2. Please ensure that there is a Wi-Fi connection and your internet connection is stable.
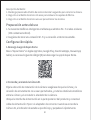
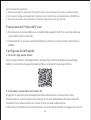
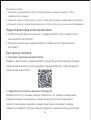
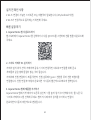
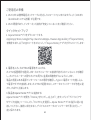
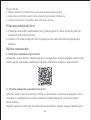
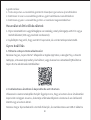
Search for "Aqara Home" in the Apple App Store, Google Play, Xiaomi GetApps, Huawei
App Gallery, or scan the following QR code to download the Aqara Home app:
Select the Installation Location for the Camera
Ensure a stable connection between the camera and the router by avoiding any
interference. Metal obstacles between the camera and the router, or near the
camera, should be avoided.
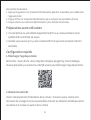
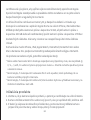
Connect the Power
Locate the power interface at the back of the product. Plug in the USB-C Cable to
connect the power adapter. When the Camera E1 is powered on, the status
indicator will turn red and flash quickly. Ensure that the Bluetooth function on
your mobile phone is activated.
2. Power up and turn on the Camera E1
1. Download the Aqara Home App
1
2
02

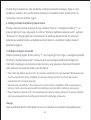
Please open the Aqara Home app, tap “Home” and then tap “+” in the top right
corner to enter the “Add Device (Accessory)” page, select “Camera E1”, and add it
according to instructions in the Aqara Home app. Aer a successful connection, the
status indicator of the device will turn blue and keep the light constant.
3. Add the product to the Aqara Home App
Open the Apple Home app, click “+” on the upper right corner, and then enter the
“Add Accessory” page. Scan or manually enter the HomeKit Setup Code at the
bottom of the camera to bind the camera to HomeKit.
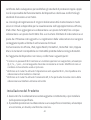
Troubleshooting Adding the Camera to HomeKit:
* “Failed to add accessory”. Due to multiple adding failures, the error information of the iOS
cache cannot be removed. Please restart the iOS device and reset the camera;
* “Accessory already added”. Aer restarting the iOS device and resetting the camera, you
can manually enter the HomeKit setup code and add it again;
* “Accessory not found”. Please wait for 3 minutes aer resetting the camera. You can
manually enter the HomeKit setup code and add it again.
4. Connect to Apple HomeKit
* The Wi-Fi name or password contains an unsupported special character, such as, @, #, %,
-, $, etc., resulting in a failure to connect to the router. Please change it to a commonly
used character and try again.
* If the camera cannot recognize the QR code generated by the mobile phone. Please make
sure that the screen size of the mobile phone is not less than 4.7 inches, and make sure
that you don't use the backlight of the camera to shoot the QR code.
If the device addition fails, please confirm the following points:
03

Product Installation
1. Please make sure the camera is added successfully, and then install it onto the wall.
2. You can place the camera on a horizontal surface, such as a desk, table, bookcase,
and so on.
3. There is a package of screw accessories inside the packaging, which you can use to
fix the camera to the wall surface you want to fix.
4. There is a base accessory in the package, which can be used to support the wall
mount with a 1/4" screw size for the camera installation. Firstly, remove the 3M
tape on the base accessory, then fix the accessory to the bottom of the camera
according to the structure holes and apply pressure on the contact area between
the base accessory and the 3M adhesive at the bottom of the camera to make the
3M adhesive stick firmly. At this point, the camera can be installed on the wall
mount through the base accessory. Please note that the wall mount is not provided
in the package and you need to purchase it separately.
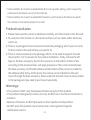
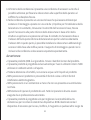
Warnings:
• This product is NOT a toy. Please keep children away from this product.
• This product is designed for indoor use only. Do NOT use in humid environments or
outdoors.
• Beware of moisture, do NOT spill water or other liquids onto the product.
• Do NOT place this product near a heat source or strong electromagnetic
interference sources.
* Check whether the router has enabled the Wi-Fi anti-squatter setting, which causes the
camera to be unable to connect to the Internet.
* Check whether the router has enabled AP isolation, which leads to the failure to search
the camera on the mobile phone in the LAN.
04

The Bluetooth® word mark and logos are registered
trademarks owned by Bluetooth SIG, Inc. and any
use of such marks by Lumi United Technology Co.,
Ltd. is under license. Other trademarks and trade
names are those of their respective owners.
• Do NOT place it in an enclosure unless there is normal ventilation.
• Do NOT attempt to repair this product by yourself. All repairs should be performed
by an authorized professional.
• This product is only suitable for improving the convenience of your home life and
reminding you about the status of your devices. It should NOT be used as security
equipment for homes, buildings, warehouses, or any other places. If a user violates
the product use instructions, the manufacturer will NOT be liable for any risks and
property losses.
• The design of this product is suitable for wall installation, In order to prevent falling
off and possibly causing personal injury, we recommend that the installation of the
device should be less than 2 meters.
• Please make sure the installation position is within the coverage range of the Wi-Fi
and there is noobstacle around the device.
• This product does not come with a power adapter by default. Please purchase a
separate adapter from a regular source.
05

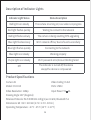
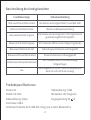
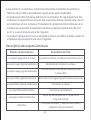
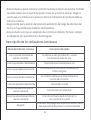
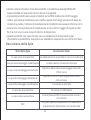
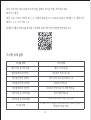
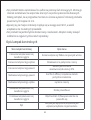
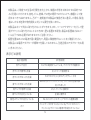
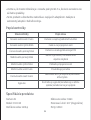
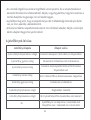
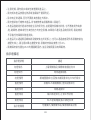
Description of Indicator Lights
Indicator Light Status
Red light flashes quickly
Red light is on steady
Red light flashes slowly
Blue light flashes slowly
Status Description
The camera is turning on/ Live video is in progress
Waiting to connect to the network
The camera is being resetting/OTA upgrading
Wi-Fi network offline/ Device found successfully
Blue light flashes quickly Connecting to the network
Blue light is on steady Working properly
Purple light is on steady Wi-Fi password error/Account binding failed
Off The indicator is turned off/the device
sleeps/the device is not powered
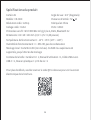
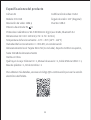
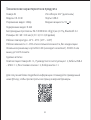
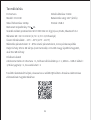
Product Specifications
Camera E1
Model: CH-C01E
Video Resolution: 1296p
Video Coding: H.264
Ports: USB-C
Input Power: 5V 2A
Viewing Angle: 101°(diagonal)
Wireless Protocols: Wi-Fi IEEE 802.11 b/g/n/ax 2.4 GHz, Bluetooth 5.2
Dimensions: 69 × 69 × 104 mm (2.72 × 2.72 × 4.09 in.)
Operating Temperature: -10 °C ~45 °C (14 °F ~113 °F)
06

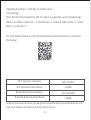
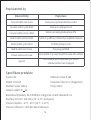
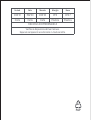
Wi-Fi Operation Frequency
Wi-Fi Maximum Output Power
Bluetooth Operation Frequency
Bluetooth Maximum Output Power
2412-2472MHz
≤20dBm
2402-2480 MHz
≤13dBm
Under normal use of condition, this equipment should be kept a separation distance of at
least 20cm between the antenna and the body of the user.
Operating Humidity: 0 ~ 85% RH, no condensation
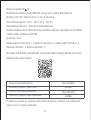
Local Storage:
Micro SD card (not included). CLASS 4 or above is supported, up to 512 GB storage
What is in the Box: Camera E1 × 1, User Manual × 1, USB-A to USB-C Cable × 1, Plastic
Base × 1, Screw Kit × 1
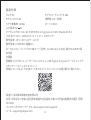
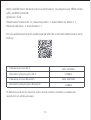
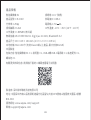
For more details, please scan the QR code below to view the electronic version of
the manual
07

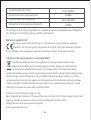
Use of the Works with Apple badge means that an accessory has been designed to
work specifically with the technology identified in the badge and has been certified
by the developer to meet Apple performance standards. Apple is not responsible for
the operation of this device or its compliance with safety and regulatory standards.
A 10-day recording history from your Camera E1 is securely stored in iCloud and
available to view in the Apple Home app on your iPhone, iPad, or Mac. You can add
one camera to a 50GB plan, up to five cameras to a 200GB plan, or up to an unlimited
number of cameras to a 2TB plan at no additional cost. Camera recordings don’t
count against your iCloud storage limit.
Apple, Apple Watch, HomeKit, HomePod, HomePod mini, Siri, iPad, iPad Air, and
iPhone are trademarks of Apple Inc., registered in the U.S. and other countries.
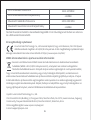
Notice
Hereby, Lumi United Technology Co., Ltd declares that the radio equipment type Camera
E1, CH-C01E is in compliance with Directive 2014/53/EU. The full text of the EU declaration
of conformity is available at the following internet address: https://www.aqara.com/DoC/
All products bearing this symbol are waste electrical and electronic equipment (WEEE as in
directive 2012/19/EU) which should not be mixed with unsorted household waste. Instead,
you should protect human health and the environment by handing over your waste
equipment to a designated collection point for the recycling of waste electrical and electronic
equipment, appointed by the government or local authorities. Correct disposal and recycling will
help prevent potential negative consequences to the environment and human health. Please
EU Declaration of Conformity
WEEE Disposal and Recycling Information
08

Note: This equipment has been tested and found to comply with the limits for a Class B digital
device, pursuant to part 15 of the FCC Rules. These limits are designed to provide reasonable
protection against harmful interference in a residential installation. This equipment generates,
uses and can radiate radio frequency energy and, if not installed and used in accordance with the
instructions, may cause harmful interference to radio communications. However, there is no
guarantee that interference will not occur in a particular installation. If this equipment does cause
harmful interference to radio or television reception, which can be determined by turning the
equipment off and on, the user is encouraged to try to correct the interference by one or more of
the following measures:
—Reorient or relocate the receiving antenna.
—Increase the separation between the equipment and receiver.
—Connect the equipment into an outlet on a circuit different from that to which the receiver is
connected.
—Consult the dealer or an experienced radio/TV technician for help.
FCC ID:2AKIT-CHC01E
Federal Communications Commission (FCC) compliance statement:
1.This device complies with part 15 of the FCC Rules. Operation is subject to the following two
conditions:
(1) This device may not cause harmful interference, and
(2) this device must accept any interference received, including interference that may cause
undesired operation.
2.Changes or modifications not expressly approved by the party responsible for compliance could
void the user's authority to operate the equipment.
contact the installer or local authorities for more information about the location as well as terms
and conditions of such collection points.
09

Manufacturer: Lumi United Technology Co., Ltd.
Address: Room 801-804, Building 1, Chongwen Park, Nanshan iPark, No. 3370, Liuxian Avenue,
Fuguang Community, Taoyuan Residential District, Nanshan District, Shenzhen, China
Online Customer Service: www.aqara.com/support
Email: [email protected]om
RF Exposure statement:
IC:22635-CHC01E
This equipment complies with FCC radiation exposure limits set forth for an uncontrolled
environment. This equipment should be installed and operated with minimum distance of 20 cm
between the radiator and your body. This transmitter must not be co-located or operating in
conjunction with any other antenna or transmitter.
IC NOTICE TO CANADIAN USERS
This device contains licence-exempt transmitter(s)/receiver(s) that comply with Innovation, Science
and Economic Development Canada’s licence-exempt RSS(s). Operation is subject to the following
two conditions:
(1) This device may not cause interference.
(2) This device must accept any interference, including interference that may cause undesired
operation of the device.
This Class B digital apparatus complies with Canadian ICES 003.
This device complies with RSS 247 of Industry Canada. Operation is subject to the condition that
this device does not cause harmful interference.
This equipment complies with IC radiation exposure limits set forth for an uncontrolled
environment.
This equipment should be installed and operated with minimum distance of 20 cm between the
radiator and your body.
This transmitter must not be co-located or operating in conjunction with any other antenna or
transmitter.
10

Produkt Einführung
Die Kamera E1 ist ein intelligentes Produkt, das Wi-Fi 6 und Bluetooth 5.2
unterstützt. Sie verfügt über eine 2K-Auflösung (2304 × 1296p) mit PTZ-Funktionen
sowie weitere Funktionen wie Video-Gegensprechanlage, Personenverfolgung,
Aufzeichnung auf Micro-SD-Karte, NAS-Speicherung und Abdeckung für
Privatsphärezonen. Darüber hinaus können ihre vielfältigen Funktionen für
Automatisierungsanwendungen genutzt werden, um Funktionen wie
Heimsicherung und intelligente Steuerung zu realisieren. Die Kamera unterstützt
auch HomeKit Secure Video.
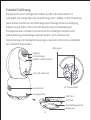
1/4" Kupfermutter
Bohrungen
Anzeigeleuchte
Mikrofon-Aufnahmeloch
Objektiv
Infrarotlampen
Lautsprecher
Micro-SD-Kartenslot
USB Typ-C
Silikonpad
Basisbefestigungsrille
SET-Taste
SET
11

Vorbereitung vor der Verwendung
Schnelles Setup
1. Ein Smartphone oder Tablet, das Wi-Fi oder ein Mobilfunknetz (mit iOS- oder
Android-System) unterstützt, ist erforderlich.
2. Bitte stellen Sie sicher, dass eine Wi-Fi-Verbindung besteht und Ihre
Internetverbindung stabil ist.
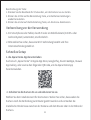
Suche nach „Aqara Home“ im Apple App Store, Google Play, Xiaomi GetApps, Huawei
App Gallery, oder scanne den folgenden QR-Code, um die Aqara Home App
herunterzuladen.
Wählen Sie den Installationsort für die Kamera: Stellen Sie sicher, dass weder die
Kamera noch die Verbindung zum Router gestört werden und vermeiden Sie
metallische Hindernisse zwischen der Kamera und dem Router oder in der Nähe der
Kamera.
2. Schalten Sie die Kamera E1 an und aktivieren Sie sie.
Beschreibung der Taste:
1. Drücken Sie die Resettaste für 5 Sekunden, um die Kamera neu zu starten.
2. Klicken Sie 10 Mal auf die Rückstellung-Taste, um die Werkseinstellungen
wiederherzustellen.
3. Klicken Sie einmal auf die Rückstellung-Taste, um Alarme zu deaktivieren.
1. die Aqara Home App herunterladen
12

Öffnen Sie die Aqara Home app, tippen Sie auf „Home“ und dann auf „+“ in der
oberen rechten Ecke, um die Seite „Gerät hinzufügen (Zubehör)“ aufzurufen, wählen
Sie „Kamera E1“ und fügen Sie es gemäß der Anleitung in der Aqara Home app hinzu.
Nach erfolgreicher Verbindung wird die Statusanzeige des Geräts sie wird blau und
und bleibt konstant beleuchtet.
3. Das Produkt zur Aqara Home App hinzufügen
Öffnen Sie die Apple Home App, klicken Sie auf das „+“ Symbol in der oberen rechten
Ecke und gelangen Sie zur Seite „Zubehör hinzufügen“. Scannen oder geben Sie den
HomeKit Setup-Code am unteren Rand der Kamera manuell ein, um die Kamera mit
HomeKit zu verbinden.
Falls die Kamera nicht erfolgreich zu HomeKit hinzugefügt wird:
* „Zubehör konnte nicht hinzugefügt werden“. Aufgrund mehrerer Fehlversuche beim
Hinzufügen kann die Fehlerinformation im iOS-Cache nicht entfernt werden. Bitte starten
Sie das iOS-Gerät neu und setzen Sie die Kamera zurück.
* „Zubehör bereits hinzugefügt“. Nachdem Sie das iOS-Gerät neu gestartet und die Kamera
zurückgesetzt haben, können Sie den HomeKit-Setup-Code manuell eingeben und die
Kamera erneut hinzufügen.
* „Zubehör nicht gefunden“. Bitte warten Sie 3 Minuten, nachdem Sie die Kamera
zurückgesetzt haben. Sie können den HomeKit-Setup-Code manuell eingeben und die
Kamera erneut hinzufügen.
4. Verbinden mit Apple HomeKit
Finden Sie den Stromanschluss auf der Rückseite des Produkts und stecken Sie das
Typ-C-Netzkabel an, um es mit dem Netzteil zu verbinden. Wenn die Kamera E1
eingeschaltet wird, leuchtet die Statusanzeige rot und blinkt schnell.
13

Die Verwendung des „Works with Apple“ Badges bedeutet, dass das Zubehör speziell
für die Technologie entwickelt wurde, die durch das Badge identifiziert wird, und
vom Entwickler zertifiziert wurde, um den Leistungsstandards von Apple zu
entsprechen. Apple ist nicht verantwortlich für den Betrieb dieses Geräts oder dessen
Einhaltung von Sicherheits- und Regulierungsstandards.
Ein 10-tägiger Aufzeichnungsverlauf von Ihrer Kamera E1 wird sicher in iCloud
gespeichert und kann in der Apple Home appauf Ihrem iPhone, iPad oder Mac
angesehen werden. Sie können eine Kamera zu einem 50-GB-Plan hinzufügen, bis zu
fünf Kameras zu einem 200-GB-Plan oder eine unbegrenzte Anzahl von Kameras zu
einem 2-TB-Plan ohne zusätzliche Kosten. Die Kameraaufnahmen werden nicht auf
Ihr iCloud-Speicherlimit angerechnet.
Die Kommunikation zwischen iPhone, iPad, Apple Watch, HomePod, HomePod mini
oder Mac und der mit HomeKit kompatiblen Kamera E1 erfolgt über die
HomeKit-Technologie und ist sicher.
Notiz
* Der Name oder das Passwort des WLANs enthält Sonderzeichen, die nicht unterstützt
werden, wie z. B. @, #, %, -, $, usw., was zu einer fehlgeschlagenen Verbindung mit dem
Router führt. Ändern Sie diese bitte in ein gebräuchliches Zeichen und versuchen Sie es
erneut.
* Überprüfen Sie, ob der Router die Einstellung „Wi-Fi-Anti-Squatting“ aktiviert hat,
wodurch die Kamera keine Verbindung zum Internet herstellen kann.
* Überprüfen Sie, ob der Router die AP-Isolierung aktiviert hat, was dazu führt, dass das
Handy die Kamera im LAN nicht finden kann.
Falls das Hinzufügen des Geräts fehlschlägt, überprüfen Sie bitte die folgenden Punkte:
14

Installation des Produkts
1. Stellen Sie bitte sicher, dass die Kamera erfolgreich hinzugefügt wurde, und
installieren Sie sie dann an dem vorgesehenen Ort.
2. Sie können die Kamera auf einer horizontalen Oberfläche platzieren, wie einem
Schreibtisch, einem Tisch, einem Bücherregal usw.
3. In der Verpackung befindet sich ein Paket mit Schraubenzubehör, mit dem Sie die
Kamera an der gewünschten Wand- oder Deckenoberfläche befestigen können.
4. In der Verpackung befindet sich auch ein Basiszubehör, das mit einer Schrauben-
größe von 1/4" verwendet werden kann, um die Kamera an der Wandhalterung zu
installieren. Entfernen Sie zuerst das 3M-Klebeband am Basiszubehör und
befestigen Sie es dann entsprechend den Struktur-Löchern an der Unterseite der
Kamera. Drücken Sie auf die Kontaktfläche zwischen dem Basiszubehör und dem
3M-Klebeband an der Unterseite der Kamera, um das 3M-Klebeband fest haen zu
lassen. Anschließend kann die Kamera durch das Anbringen des Basiszubehörs an
der Wandhalterung installiert werden. Bitte beachten Sie, dass die Wandhalterung
nicht in der Verpackung enthalten ist und separat erworben werden muss.
Warnungen
• Dieses Produkt ist KEIN Spielzeug. Bitte halten Sie Kinder von diesem Produkt fern.
• Dieses Produkt ist ausschließlich für den Innenbereich vorgesehen. Verwenden Sie
es NICHT in feuchter Umgebung oder im Freien.
• Achten Sie auf Feuchtigkeit und verschütten Sie KEIN Wasser oder andere
Flüssigkeiten auf das Produkt.
• Stellen Sie dieses Produkt NICHT in der Nähe einer Wärmequelle oder von starken
elektromagnetischen Störquellen auf.
15

• Platzieren Sie es NICHT in einem Gehäuse, es sei denn, es gibt eine normale
Belüung.
• Versuchen Sie NICHT, dieses Produkt selbst zu reparieren. Alle Reparaturen sollten
von einem autorisierten Fachmann durchgeführt werden.
• Dieses Produkt dient nur dazu, die Bequemlichkeit Ihres häuslichen Lebens zu
verbessern und Sie über den Status Ihrer Geräte zu informieren. Es sollte NICHT als
Sicherheitsausrüstung für Häuser, Gebäude, Lagerhäuser oder andere Orte
verwendet werden. Wenn ein Benutzer die Produktanweisungen missachtet, haet
der Hersteller NICHT für etwaige Risiken und Sachschäden.verwendet werden. Wenn
ein Benutzer die Produktanweisungen missachtet, haet der Hersteller NICHT für
etwaige Risiken und Sachschäden.
• The design of this product is suitable for wall installation, In order to prevent falling
off and possibly causing personal injury, we recommend that the installation of the
device should be less than 2 meters.
• Please make sure the installation position is within the coverage range of the Wi-Fi
and there is noobstacle around the device.
• This product does not come with a power adapter by default. Please purchase a
separate adapter from a regular source.
• Dieses Produkt kann durch Befestigungsschrauben an der Decke installiert werden.
Es kann auch durch Basiszubehör an einer Wandhalterung angebracht werden. Bitte
beachten Sie, dass bei einer Wandmontage die Installationshöhe des Produkts
weniger als 2 m betragen sollte.
• Stellen Sie sicher, dass die Installationsposition im Abdeckungsbereich des Wi-Fi liegt
und keine Hindernisse in der Nähe des Geräts vorhanden sind.
• Dieses Produkt wird standardmäßig ohne Netzteil geliefert. Bitte kaufen Sie ein
separates Netzteil von einer regulären Quelle.
16

Beschreibung der Anzeigeleuchten
Leuchtenanzeige
Rote Leuchte blinkt schnell
Rote Leuchte leuchtet konstant
Rote Leuchte blinkt langsam
Blaue Leuchte blinkt langsam
Statusbeschreibung
Die Kamera wird eingeschaltet / Live-Video läu
Wartet auf Netzwerkverbindung
Die Kamera wird zurückgesetzt / OTA-Upgrade wird
gerade durchgeführtdurchgeführt
Wi-Fi Netzwerk offline/ Gerät erfolgreich gefunden
Blaue Leuchte blinkt schnell
Blaue Leuchte leuchtet constant Kamera funktioniert ordnungsgemäß
Verbindung zum Netzwerk wird hergestellt
Violette Leuchte leuchtet konstant Wi-Fi Passwort falsch / Kontoanbindung
fehlgeschlagen
Aus Die Anzeigeleuchte ist aus / Gerät im Ruhezustand /
Gerät ist nicht mit Strom versorgt
Produktspezifikationen
Kamera E1
Modell: CH-C01E
Videoauflösung: 1296 p
Videokodierung: H.264
Blickwinkel: 101°(diagonal)
Eingangsleistung: 5V2A
Anschlüsse: USB-C
Drahtlose Protokolle: Wi-Fi IEEE 802.11 b/g/n/ax 2.4 GHz, Bluetooth 5.2
17
La pagina si sta caricando...
La pagina si sta caricando...
La pagina si sta caricando...
La pagina si sta caricando...
La pagina si sta caricando...
La pagina si sta caricando...
La pagina si sta caricando...
La pagina si sta caricando...
La pagina si sta caricando...
La pagina si sta caricando...
La pagina si sta caricando...
La pagina si sta caricando...
La pagina si sta caricando...
La pagina si sta caricando...
La pagina si sta caricando...
La pagina si sta caricando...
La pagina si sta caricando...
La pagina si sta caricando...
La pagina si sta caricando...
La pagina si sta caricando...
La pagina si sta caricando...
La pagina si sta caricando...
La pagina si sta caricando...
La pagina si sta caricando...
La pagina si sta caricando...
La pagina si sta caricando...
La pagina si sta caricando...
La pagina si sta caricando...
La pagina si sta caricando...
La pagina si sta caricando...
La pagina si sta caricando...
La pagina si sta caricando...
La pagina si sta caricando...
La pagina si sta caricando...
La pagina si sta caricando...
La pagina si sta caricando...
La pagina si sta caricando...
La pagina si sta caricando...
La pagina si sta caricando...
La pagina si sta caricando...
La pagina si sta caricando...
La pagina si sta caricando...
La pagina si sta caricando...
La pagina si sta caricando...
La pagina si sta caricando...
La pagina si sta caricando...
La pagina si sta caricando...
La pagina si sta caricando...
La pagina si sta caricando...
La pagina si sta caricando...
La pagina si sta caricando...
La pagina si sta caricando...
La pagina si sta caricando...
La pagina si sta caricando...
La pagina si sta caricando...
La pagina si sta caricando...
La pagina si sta caricando...
La pagina si sta caricando...
La pagina si sta caricando...
La pagina si sta caricando...
La pagina si sta caricando...
La pagina si sta caricando...
La pagina si sta caricando...
La pagina si sta caricando...
La pagina si sta caricando...
La pagina si sta caricando...
La pagina si sta caricando...
La pagina si sta caricando...
La pagina si sta caricando...
La pagina si sta caricando...
La pagina si sta caricando...
La pagina si sta caricando...
La pagina si sta caricando...
La pagina si sta caricando...
La pagina si sta caricando...
La pagina si sta caricando...
La pagina si sta caricando...
La pagina si sta caricando...
La pagina si sta caricando...
La pagina si sta caricando...
La pagina si sta caricando...
La pagina si sta caricando...
La pagina si sta caricando...
La pagina si sta caricando...
La pagina si sta caricando...
La pagina si sta caricando...
La pagina si sta caricando...
-
 1
1
-
 2
2
-
 3
3
-
 4
4
-
 5
5
-
 6
6
-
 7
7
-
 8
8
-
 9
9
-
 10
10
-
 11
11
-
 12
12
-
 13
13
-
 14
14
-
 15
15
-
 16
16
-
 17
17
-
 18
18
-
 19
19
-
 20
20
-
 21
21
-
 22
22
-
 23
23
-
 24
24
-
 25
25
-
 26
26
-
 27
27
-
 28
28
-
 29
29
-
 30
30
-
 31
31
-
 32
32
-
 33
33
-
 34
34
-
 35
35
-
 36
36
-
 37
37
-
 38
38
-
 39
39
-
 40
40
-
 41
41
-
 42
42
-
 43
43
-
 44
44
-
 45
45
-
 46
46
-
 47
47
-
 48
48
-
 49
49
-
 50
50
-
 51
51
-
 52
52
-
 53
53
-
 54
54
-
 55
55
-
 56
56
-
 57
57
-
 58
58
-
 59
59
-
 60
60
-
 61
61
-
 62
62
-
 63
63
-
 64
64
-
 65
65
-
 66
66
-
 67
67
-
 68
68
-
 69
69
-
 70
70
-
 71
71
-
 72
72
-
 73
73
-
 74
74
-
 75
75
-
 76
76
-
 77
77
-
 78
78
-
 79
79
-
 80
80
-
 81
81
-
 82
82
-
 83
83
-
 84
84
-
 85
85
-
 86
86
-
 87
87
-
 88
88
-
 89
89
-
 90
90
-
 91
91
-
 92
92
-
 93
93
-
 94
94
-
 95
95
-
 96
96
-
 97
97
-
 98
98
-
 99
99
-
 100
100
-
 101
101
-
 102
102
-
 103
103
-
 104
104
-
 105
105
-
 106
106
-
 107
107


in altre lingue
- français: Aqara E1 Le manuel du propriétaire
- español: Aqara E1 El manual del propietario
- Deutsch: Aqara E1 Bedienungsanleitung
- slovenčina: Aqara E1 Návod na obsluhu
- polski: Aqara E1 Instrukcja obsługi
- 日本語: Aqara E1 取扱説明書