Hoover HH64BFT Manuale utente
- Categoria
- Piani cottura
- Tipo
- Manuale utente
Questo manuale è adatto anche per

PROPERTY OF
CL N° REV. DATE
SPECIFICATION
1/1
MODIFY DESCRIPTION
MODIFIED BY
BASE CODE
TREATMENT
MATERIAL
DATE SIGNATURE
DRAWN
CHECKED
FOR
WEIGHT SCALE
SIZE
NAME
(LOCAL LANGUAGE)
PART CODE
SHEET
REPLACE No ORIGIN CL No Class Specification
FR
35
RELEASE LEVEL
WITHOUT OUR WRITTEN CONSENT IS FORBIDDEN
ALL RIGHTS RESERVED, THE REPRODUCTION OF ANY PART
OF EU DIRECTIVE 2002/95/CE + AMENDMENTS
MATERIALS IN COMPLIANCE WITH REQUIREMENTS
A4
------------
31.05.2018
USER MANUAL VC BAS POW MAN HOV 3
CL 51726
42827540
31.05.2018
C.FİDANCI
A.KARADUMAN
KULLANIM KILAVUZU VC BAS POW MAN HOV 3
HOOVER HOB
GENERAL TOLERANCE
ISO 2768 - m
-
-
SC 000-000
PRODUCTION RELEASED
------------
-
A
B
C
D
E
F

CANDY HOOVER GROUP S.R.L. • Via Privata Eden Fumagalli • 20047 Brugherio Milano Italy
HOBS
USER INSTRUCTIONS
GB
PIANI COTTURA
ISTRUZIONI D’USO E DI INSTALLAZIONE
IT
VARNÉ DESKY
NAVOD POU ITŽĺ
CZ

02
INDICE
IT
ISTRUZIONI DI SICUREZZA
1. Avvertenze generali
2. Salvaguardia dell'ambiente
3.Installazione
4. Collegamento elettrico
5. Consigli sui recipienti di cottura per il piano
6. Uso
7. Pulizia e manutenzione
8. Risoluzione del problema
9. Manutenzione aggiuntiva
10. Garanzie
............................. ........11....
..................................................12
.......................................12
.. ............. ........................12.......... ..... ..........
..... .........................................13
..............15
. ................................................................ ...........15
. .......................................... 17
....... ................................... 17
. .......................................... 18
18.................. .................................................
OBSAH
CZ
BEZPEČNOSTNÍ OPATŘENÍ
1. Všeobecná upozornění
2. Ochrana životního prostředí
3.Instalace
4. Elektrické připojení
5. uDoporučení ohledně nádobí pro varnou desk
6. Použití
7. Čištění a údržba
8. Řešení problémů
9. Následná péče
............................. ........19...
.............................................20
......................................20
............. ...............................20............... ..........
. ...............................................21....
..........23
. ..........................................................23.............
. ........................................25...............
....... ......................................25..........
. ........................................25.................
CONTENT GB
SAFETY INSTRUCTIONS
1. General arningsw
2. Protection of the environment
3. Installation
4. Electrical conne ionct
5. Hob cookware advice
6. Use
7. C and maintenanceleaning
8. Problem solving
Aftercare9.
.............................................03
.......................................................04
....................................04
. ............. ..............04. ........................... ..........
............. ................................. 5.... 0
................................................07
. ................................................07...........................
.....................09...................
................................. ..............09..........
.............................. ..............09........................

We recommend you keep the instructions for
installation and use for later reference, and before
installing the hob, note its serial number in case
you need to get help from the after sales service.
WARNING: the appliance and its accessible parts
become hot during use. Care should be taken to
avoid touching heating elements. Children under
8 years of age must be kept away from the
appliance unless they are continuously
supervised.
WARNING: use only hob guards designed by the
Manufacturer of the cooking appliance or
indicated by the Manufacturer of the appliance in
the instructions for use as suitable or hob guards
incorporated in the appliance. The use of
inappropriate guards can cause accidents.
WARNING: unattended cooking on a hob with fat
or oil can be dangerous and may result in fire.
NEVER try to extinguish a fire with water, but
switch off the appliance and then cover flame e.g.
with a lid or a fire blanket.
WARNING: danger of fire: do not store items on
the cooking surfaces.
WARNING: if the surface is cracked, do not touch
the glass and switch off the appliance to avoid the
possibility of electric shock.
This appliance can be used by children aged from
8 years and above and people with reduced
physical, sensory or mental capabilities or lack of
experience and knowledge if they have been
given supervision or instruction concerning use of
the appliance in a safe way and understand the
hazards involved. Children should be supervised
to ensure that they do not play with the appliance.
Cleaning and user maintenance shall not be
made by children without supervision.
CAUTION: the cooking process must be
supervised. A short term cooking process has to
be supervised continuously.
It is strongly recommended to keep children away
from the cooking zones while they are in operation
or when they are switched off, so long as the
residual heat indicator is on, in order to prevent
the risks of serious burns.
This appliance is not intended to be operated by
means of an external timer or separate remote
control system.
If present do not to stare into halogen lamp hob
elements.
Connect a plug to the supply cable that is able to
bear the voltage, current and load indicated on the
tag and having the earth contact. The socket must
be suitable for the load indicated on the tag and
must be having the earth contact connected and
in operation. The earth conductor is yellow-green
in color. This operation should be carried out by a
SAFETY INSTRUCTIONS
suitably qualified professional. In case of
incompatibility between the socket and the
appliance plug, ask a qualified electrician to
substitute the socket with another suitable type.
The plug and the socket must be conformed to
the current norms of the installation country.
Connection to the power source can also be
made by placing an omnipolar breaker between
the appliance and the power source that can bear
the maximum connected load and that is in line
with current legislation.
The yellow-green earth cable should not be
interrupted by the breaker. The socket or
omnipolar breaker used for the connection
should be easily accessible when the appliance is
installed.
The disconnection may be achieved by having
the plug accessible or by incorporating a switch in
the fixed wiring in accordance with the wiring
rules.
If the supply cord is damaged, it must be replaced
by Manufacturer, its service agent or similarly
qualified people in order to avoid a hazard. The
earth conductor (yellow-green) must be longer
than 10 mm on the terminal block side. The
internal conductors section should be
appropriate to the power absorbed by the hob
(indicated on the tag). The type of power cable
must be HO5V2V2-F.
Do not put metallic objects such as knives, forks,
spoons or lids on the hob. They could heat up.
Aluminum foil and plastic pans must not be
placed on heating zones.
After every use, some cleaning of the hob is
necessary to prevent the build-up of dirt and
grease. If left, this is recooked when the hob is
used and burns giving off smoke and unpleasant
smells, not to mention the risks of fire
propagation.
Never use a steam or high pressure spray to
clean the appliance.
Do not touch the heat zones during operation or
for a while after use.
Never cook food directly on the glass ceramic
hob.
Always use the appropriate cookware.Always
place the pan in the center of the unit that you are
cooking on.
Do not place anything on control panel.
Do not use the hob as a working surface.
Do not use the surface as a cutting board.
Do not store heavy items above the hob. If they
drop onto the hob, they may cause damage.
Do not use the hob for storage of any items.
Do not slide cookware across the hob.
03 GB

Leave a distance of at least 55
mm between the hob and the
back wall and of at least 150
mm between the hob and the
vertical furniture or walls in the
lateral side. If a furniture is
installed above the hob, the
minimum distance required is
700 mm.
When installing a hood above
the hob, please consult the
installation requirements
specified for the hood but, in
any case, the distance between
the hob and the hood must not
be lower than 700 mm.
PRODUCT CODE T
Identification Plate (located under the hob's bottom casing)
1. GENERAL WARNINGS
By placing the mark on this appliance we are assuring
compliance to all European Safety, Health and Environment
requirements which are applicable for this product category.
2. PROTECTION OF THE ENVIRONMENT
This appliance is marked according to European
Directive 2012/19/EU on Waste Electrical and
Electronic Equipment (WEEE).
WEEE contains both polluting substances (which
can cause negative consequences for the
environment) and basic components which can be
reused.It is important to have WEEE subjected to
specific treatments, in order to remove and dispose
properly all pollutants and recover and recycle all
materials.
Individuals can play an important role in ensuring that the WEEE
does not become an environmental issue; it is essential to follow
some basic rules:
• WEEE shall not be threatened as household waste.
• WEEE shall be handled over to the relevant collection points
managed by the municipality or by registered companies. In many
Countries, for large WEEE, home collection could be present.
• In many Countries, when you buy a new appliance, the old one
may be returned to the retailer who has to collect it free of charge on
a one-to-one basis, as long as the appliance is of equivalent
typology and has the same functions as the supplied one.
3 INSTALLATION.
Installing a domestic appliance it is a complicated operation which, if
not carried out correctly, can seriously have impact on safety of goods,
properties or people. For this reason, it should be carried out by a
professionally qualified person in accordance with technical
regulations.
In the event that this advice it is ignored and installation is carried out
by an unqualified person, the Manufacturer declines all responsibility
for any technical failure of the appliance whether or not it results in
damage of goods or properties or in injury of people or animals.
After having removed the packaging please be sure that the appliance
it is not damaged, otherwise contact the Retailer or ManufacturerAfter
Sales Service.
Make sure that the furniture in which the appliance will be fitted and all
other furniture in the nearby are made with materi
ls which can withstand high temperatures (min 100 °C).
In addition, all decorative laminates should be fixed with high-resistance
glue.
Appliance can be installed in a Built-in furniture in “Standard” or “Flush”
mode.
700 mm
55 mm
150 mm
490 mm
+ 2
- 0
560 mm
+ 2
- 0
Min. 70 mm
Standard installation
perimeter
Note: Inner perimeter dimensions are same with standard installation
703 mm (70 cm hob)
+2
-0
523 mm
+ 2
- 0
593 mm (60 cm hob)
+2
-0
Slot depth: 5 mm
Flush installation
perimeter
Worktop thickness should be between 25 and 45 mm.
If the bottom part of the hob is adjacent to an area normally accessible
for handling or cleaning operations, a separator it must be put 0 mm2
below the bottom part of the hob.
min 20 mm
When installing an oven under the hob, separator must not be put and
the minimum distance between the bottom part of the hob and the
oven must not be lower than 10 mm. Do not install not cooled oven
under this hob and install the oven following its own installation
requirements.
10 mm
min
04 GB

6
6
5
5
3
1
2
4
5
5
6
6
1
2
366
6
4
5
5
5
6
6
5
5
3
1
2
5
5
6
6
1
2
3
6
6
6
5
5
5
FLUSH INSTALLATION
After checking that the position of
the hob is correct fill the gap
between the worktop and the hob
with silicone adhesive. Flatten the
silicone layer with a scraper or
with wet finger damped with water
and soap before it forms.
Do not use the hob until the
silicone layer it is completely dry.
A watertight seal gasket is
supplied with the hob. Fit
the seal gasket around the
bottom hob as described
and make sure that it is
properly fitted to avoid any
leakage into the supporting
furniture.
4. ELECTRICAL CONNECTION
Bottom
Normal Fixing:
- Get the fixing clips from accessory bag
and screw them into the position shown
on bottom box. (Do not tighten the
screws to block clips, they should move
freely)
- Insert the hob in center
position of cut out.
- Turn the clips and tighten
them fully.
Quick Fixing: (Depending on model)
Get four springs form accesory bag and
screw them onto bottom box as shown
in figure.
Center and insert the hob.
Press the sides of hob until it
is supported around its
entire perimeter.
1-3
2-4
5
6
7
LAYOUT
According to model
1."+"
2 "."-
3. TIMER
4.Additional cooking zone led
5. Cooking zone programming indicator
6. Selection of the zone
7. Bridge
A
B
CD
A
B
C
A
B
CD
A
B
C
A
C
B
C
AB
D
A
B
C
D
05 GB

"Installation must conform to the standards & directives."
Manufacturer declines all responsibility for any damage that
might be caused by unsuitable or unreasonable use.
WARNING: Manufacturer cannot be held responsible for any incident
or its consequences that may arise during the use of an appliance not
linked to the earth, or linked to an earth whose continuity is defective.
Before any electrical operation, please check the supply tension
shown on the electricity meter, the adjustment of the circuit- breaker,
the continuity of the connection to earth to the installation and that the
fuse is suitable.
The electrical connection to the installation should be made according
to the rated power of the Appliance; this should be made via an Omni
pole cut-out switch.
If the appliance has a socket outlet, it must be installed so that the
socket outlet is accessible.
The yellow/green wire of the power supply cable must be connected to
the earth of both power supply and appliance terminals.
For any questions regarding power supply cord refer to After Sales
Service or a qualified technician.
If the hob is fitted with power supply cord, this shall be connected only
to a power supply of 220-240 V between phase and neutral.
It is however possible to connect the hob to:
Three Phase 220-240 V3
Three Phase 380-415 V2N
To proceed to the new connection, please follow below instructions:
Before making the connection, make sure that the installation is
protected by a suitable fuse, and that it is fitted with wires of a large
enough section to supply the appliance normally.
Turn over the hob, glass side against the working top, taking care to
protect the glass.
Open the cover in the following sequence:
231
- unscrew the cable clamp "1";
- find the two tabs located on the sides;
- put the blade of a flat screw-driver in front of each tab "2" e
"3", push in and press;
- remove the cover.
To release the power supply cord:
- Remove the screws retaining the terminal block which
contains the shunt bars and the conductors of the supply cord;
- Pull out the supply cord.
Operations to be carried out to make a new connection:
- Choose the power supply cable in accordance with the
recommendations in the table;
- Pass the power supply cable into the clamp;
- Strip the end of each conductor of the supply cord on a 10 mm length,
by taking in account the requested length of the cord for the
connection to the terminal block;
-According to the installation and with the help of shunt bars which you
should have recovered in the first operation, fix the conductor as
shown on the chart;
- Fix the cover;
- Screw the cable clamp.
N=Neutral T=Earth
Monophase 220-240 V~
Two phases 220-240 V2~
Three phases 220-240 V3~ Three phases 380-415 V2N~
Ph = Phase
Connection to the terminals on the terminal block
ATTENTION:
If it should be necessary to replace the power supply cord, connect the
wire in accordance with following colors/codes:
LAY OUT
"1-6"
LAY OUT
"7"
MONOPHASE or TWO PHASES 220-240 V
~
Cable
HO5V2V2F
Cable
HO5V2V2F
Cable
HO5V2V2F
3x2,5 mm
2
3x4 mm
2
4x1,5 mm
2
4x1,5 mm
2
4x1,5 mm
2
4x1,5 mm
2
THREE PHASES 220-240 V3~
THREE PHASES 380-415 V2N~
Note: make sure the terminal board screws are tight.
Operations to be carried out to make a new connection:
- Choose the power supply cable in accordance with the
recommendations in the table;
- Pass the power supply cable into the clamp;
- Strip the end of each conductor of the supply
cord on a 10 mm length, by taking in account
the requested length of the cord for the
connection to the terminal block;
-According to the installation and with the help
of shunt bars which you should have
recovered in the first operation, fix the
conductor as shown on the chart;
- Fix the cover;
- Screw the cable clamp.
06 GB

07 GB
6. USE
5. HOB COOKWARE ADVICE
Using good quality cookware is critical for setting
the best performance from your hob.
• Always use good quality cookware with perfectly flat and thick
bases : using this type of cookware will prevent hot spots that cause
food to stick. Thick metal pots and pans will provide an even
distribution of heat.
• when filling pansEnsure that the base of the pot or pan is dry :
with liquid or using one that has been stored in the refrigerator, ensure
that the base of the pan is completely dry before placing it on the hob.
This will help to avoid staining the hob.
• Use pans whose diameter is wide enough to completely cover
the surface unit : the size of the pan should be no smaller than the
heating area. If it is slightly wider the energy will be used at its
maximum efficiency.
THE CHOICE OF COOKWARE - The following information will help
you to choose cookware which will give good performance.
Stainless Steel : highly recommended. Especially good with a
sandwich clad base. The sandwich base combines the benefits of
stainless steel (appearance, durability and stability) with the
advantages of aluminium or copper (heat conduction, even heat
distribution).
Aluminium : heavy weight recommended. Good conductivity.
Aluminium residues sometimes appear as scratches on the hob, but
can be removed if cleaned immediately.
Because of its low melting point, thin aluminium should not be used.
Cast Iron : usable, but not recommended. Poor performance. May
scratch the surface.
Copper Bottom / stoneware: heavy weight recommended. Good
performance, but copper may leave residues which can appear as
scratches. The residues can be removed, as long as the hob is
cleaned immediately. However, do not let these pots boil
dry. Overheated metal can bond to glass hobs. An overheated copper
pot will leave a residue that will permanently stain the hob.
Porcelain/enamel : Good perfomance only with a thiny smooth, flat
base.
Glass-ceramic : not recommended. Poor performance. May scratch
the surface.
1) If any cooking stage is in position 0, this display will switch OFF
automatically after 10 seconds and the zone OFF sequence will
sound.
2) If there is residual heat indication in the display which is OFF, "H" will
be displayed.
3) Even lock function is active you can switch OFF a zone.
4) If only one heater is active and this one is switched off, 4 Short beep
will be heard indicating all cook top is Off.
Switch ON/OFF a heater zone
To switch ON a heater Touch any heater´s zone during 400 msec.
Long beep will be heard and "0" value will appear in target zone digit,
indicating power level.
1) If any cooking stage is in position 0, this display will switch OFF
automatically after 10 seconds and the zone OFF sequence will
sound.
2) If there is residual heat indication in the display which is ON but in 0
power, "0" will appear changing over.
3) If lock function is active you cannot switch ON a zone.
To switch OFF a heater Touch any heater´s zone during 1,2 sec. 3
Short beeps will be heard and nothing or "H" value will appear in
target zone digit if residual heat exists. Zone will be OFF.
Through the "Power management" function, the user can set the
maximum power that can be reached by the hob. Power management
function is only available during first 30 seconds after switch on the
hob. There is even the possibility to repeat this setting switching off
and on the power plug. By setting the desired maximum power, the
hob automatically adjusts the distribution in the various cooking zones
so that this limit is never exceeded; with the added advantage of being
able to simultaneously manage all the zones without overload
problems. The customer can set the maximum power of hob between
2.5 kW and the maximum related power of the hob (this can change
according to the model) (for example if the maximum power of the hob
is 7.2 kW. The maximum power level for setting is between 2.5kW and
7.2kW)At the time of purchase, the hob is set to maximum power. After
connecting the appliance to the electrical power, within 30 seconds
you can set the power level based on the points shown below:
1.- Switch on hob.
2.- Let touch control finish its initialization process.
3.- Before pass 30 seconds touch during 5 seconds ‘ key.
P
How to choose power management level
4.-After this moment, this message will appear on display.
5.- Using ‘Plus’ and ‘Minus’ keys Power management value can be
adjusted. In this example case between 6500 and 2500w. When
required value is selected, touch at the same time ‘Plus’ & ‘Minus’ keys
during 5 seconds.
6.- When this process is finished, a long beep is heard and a reset is
produced. Start-up process will be generated again.
7.- After start-up process, in timer display ECO power management
will be showed.
After that, touch control won´t allow any combination which
can exceed this Eco limit.
P
6
5
00

Child Lock option
This action will be done when ‘+’ & ‘-‘keys were touched at the same
time.
Then, any time when a key will be touched, displays will show "L"
during 2sec. heating remains at the same state.
To deactivate Child Lock, follow the same process explained before.
Then Short beep will be heard and displays will show "n" letter. Hob will
remain unlocked.
Note: An automatic child lock will produce in 15 minutes after total
Switch OFF of the hob.
Selecting a zone
When zone is already ON a lower lighting intensity for the not selected
zones that are ON is produced.
If only one zone is ON, this zone is already selected by default, without
needing to short press (150 msec) over selection key.
Increase / Decrease power level
With a short press on ‘+’ or ‘-‘ keys, Increase or decrease power in the
selected zones digit: 0-1-2-3...9-P
1. For Long Presses in + or - keys, power level increases /decreases
continuously. With a fast increase, power stops at level 9, and for a
higher power another short press is needed on the + key. No beep
sound is heard with fast increase / decrease.
2. Once arrived to P power level, pressing + key again does not
change power level to 0.Once arrived to 0 power level, pressing - key
again does not change power level to P.
3. With a zone ON at 0 power level, if the zone is hot, 0 will blink
alternatively. After 10 seconds, 0 will disappear an ‘H’ letter will appear
fixed on display.
4. When a heater is selected and ‘+’ & ‘-‘keys are touched at the same
time, power level will go to ‘0’ but heater will maintain selected during
10 seconds. If heater was temporized, timer will go to Off. This action
can only be developed in several cases depending touch control
configuration.The following examples are for information only.
Personal experience should then let you adapt these settings to your
taste and habits.
To switch ON double extension ring, associated main zone must be
already ON and Indicating power level must be higher than 0.
8.1- Double zone ON
1st Short Press on extension key Switches ON extension ring. LED
over extension key turns ON if Extension ring is ON.
2nd Short Press on extension key Switches OFF extension ring.
Short beep each press on extension key.
8.2- Triple zone ON
1st Short Press on extension key Switches ON 1st extension ring. 1
LED over extension key turns ON if 1st extension ring is ON (left LED
in case of triple zone, middle and only LED in case of double zone) 2nd
Short Press on extension key Switches ON 2nd extension ring.
Double / Triple zones
Bridge function
The bridge can be enabled only when both heaters are off. One heater
of the bridge has been selected, to activate bridge function touch
bridge key.
Abeep sounds and the zone LED is switched on if the zone is enabled.
Both bridge heaters will be selected at the same time.
Once the heaters selected, if the power level is not the desired power
level, by the + - keys.
Both bridge heater displays will show same power level.
The function will finish:
- If the bridge key is touched in setting mode
- If user selects power level “0”
Overflow security
Something (an object or a liquid) is pressing any key during more than
5s. 2 Short Beep + 1 Long beep every 30s while the key is pressed.
Cook-top will turn Off. This symbol will maintain blinking while the
matter persist.
Timer
Timer function can be activated with its own key.
Select the zone to be timed. Power level of the zone greater than 0.
Static is displayed in the zone being timed . "0 0" in the digits
reserved for the timer.
1) With "+" or "-" keys, timer time can be chosen. No Beeps at time
change.
2) Pressing continuously timer key, the timer is cancelled (goes to 00).
3) If timer "+" or "-" keys is maintained pressed there is quick setting.
4) When setting timer time, it is possible to go from "00" to "99" with "-"
key, and from "99" to "00" with "+" key.
5) Maximum time 99 minutes.
6) When the time is elapsed and the hob is beeping, press any key and
the alarm and digit sequence will end.
7) It is possible to adjust the timer time while the timer is previously
running.
8) Power of timed zone can be modified without consequences on the
timer programming.
9) Last minute will be displayed by seconds (For Variants only visible if
we enter the timer programming while the last minute of the
countdown)
10) Pressing the Timer key without any selected zone and when no
zone is being timed, does nothing.
11) Pressing the Timer key without any selected zone and when many
zones are being timed, the time shown in time digits changes in a
rotatory way, and shows the time whose power display has the
decimal point ON.
12) Alternatively Power (5s) and (0,5s) is displayed in the zone being
timed.
Remaining time is displayed in the digits reserved for the timer. If
multiple zones are timed, the smallest remaining time is displayed,
and the decimal point is displayed in the corresponding zone.
2 LEDs over extension key turn ON if 1st and 2nd extension rings are
ON 3rd Short Press on extension key. Switches OFF 1st and 2nd
extension rings.
Short beep each press on extension key.
Residual Heat Indicator (In radiant heaters-> calculated)
The same indicators can be used for “residual heat” indication as well.
A time table must be defined on this purpose: Rest Heat time=f (power
level, working time).
While a temperature on the cook top glass surface is above
65 Cb(theory value), this condition will be shown in the associated
o
display, by means of an “H”.
To generate a temperature above 65 C a heating element has to be in
o
operation for certain time, this time depends on the power level. Once
this time has expired, the residual heat warning will be shown when
the heating element is switched off.
08 GB

09 GB
Automatic Safety Off
If the power level is not changed during a preset time, the
corresponding heater turns off automatically.
The maximum time a heater can stay on, depends on the selected
cooking level.
Power level
Max. time on (hours)
1
2
3
4
5
6
7
8
9
P
10
5
5
4
3
2
2
2
2
2
NOTE: while an overheating situation should occur during the
operation of the highest power levels, the Hob control will
automatically adjust the power level in order to protect the hob from
overheating.
7. CLEANING AND MAINTENANCE
. Before carrying out any maintenance work on the hob, allow it to
cool down.
. Only products, (creams and scrapers) specifically designed for
aglass ceramic surfaces should be used. They are obtainable from
hardware stores.
. Avoid spillages, as anything which falls on to the hob surface will
quickly burn and will make cleaning more difficult.
. It is advisable to keep away from the hob all substances which are
liable to melt, such as plastic items, sugar, or sugar-based products.
.MAINTENANCE:
- Place a few drops of the specialised cleaning product on the hob
surface.
- Rub any stubborn stains with a soft cloth or with slightly damp
kitchen paper.
- Wipe with a soft cloth or dry kitchen paper until the surface is clean.
If there are still some stubborn stains:
- Place a few more drops of specialised cleaning fluid on the surface.
- Scrape with a scraper, holding it at an angle of 30° to the hob, until
the stains disappear.
- Wipe with a soft cloth or dry kitchen paper until the surface is clean.
- Repeat the operation if necessary.
AFEW HINTS:
Frequent cleaning leaves a protective layer which is essential to
prevent scratches and wear. Make sure that the surface is clean
before using the hob again. To remove marks left by water, use a few
drops of white vinegar or lemon juice. Then wipe with absorbent paper
and a few drops of specialised cleaning fluid.
The glass ceramic surface will withstand scraping from flat-bottomed
cooking vessels, however, it is always better to lift them when moving
them from one zone to another.
NB:
Do not use a sponge which is too wet.
Never use a knife or a screwdriver.
A scraper with a razor blade will not damage the surface, as long
as it is kept at an angle of 30°.
Never leave a scraper with a razor blade within the reach of
children.
Never use abrasive products or scouring powders.
. The metal surround : to safely clean the metal surround wash with
soap and water, rinse, then dry with a soft cloth.
30° Maxi
Any change in the colour of the glass-ceramic surface does
not affect its operation or the stability of the surface. Such
discolorations are mostly a result of burnt food residues or
use of cookware made of materials such as aluminium or
copper; these stains are difficult to remove.
8. PROBLEM SOLVING
The cooking zones do not simmer or only fry gently
Only use flat-bottomed pans. If light is visible between the pan and the
hob, the zone is not transmitting heat correctly.
The pan bottom should fully cover the diameter of the selected zone.
The cooking is too slow
Unsuitable pans are being used. Only use flatbottomed utensils, that
are heavy and have a diameter at least the same
as the cooking zone.
Small scratches or abrasions on the hob's glass surface
Incorrect cleaning or rough-bottomed pans are used; particles like
grains of sand or salt get between the hob and the bottom of the pan.
Refer to the "CLEANING" section; make sure that pan bottoms are
clean before use and only use smooth bottomed pans. Scratches can
be lessened only the cleaning is done correctly.
Metal marks
Do not slide aluminium pans on the hob. Refer to the cleaning
recommendations.
You use the correct materials, but the stains persist.
Use a razor blade and follow the "CLEANING" section.
Dark stains
Use a razor blade and follow the "CLEANING" section.
Light surfaces on the hob
Marks from an aluminium or copper pan, but also mineral, water or
food deposits; they can be removed using the cream cleaner.
Caramelisation or melted plastic on the hob.
Refer to the "CLEANING" section.
The hob does not operate or certain zones don't work
The shunts are not positioned correctly on the terminal board.
Have a check made that the connection is done he control panel is
locked. Unlock the hob.
The hob does not cut off.
The control panel is locked. Unlock the hob.
Frequency of on/off operations for cooking zones
The on-off cycles vary according to the required heat level:
- low level: short operating time,
- high level: long operating time.
The cooktop is not working.
Check the condition of the fuses / circuit breakers at your
location.Check to see if you are experiencing a power failure.
The cooktop has turned itself off.
The main switch (ON/OFF key) was accidentally touched or there is
any object above any key. Turn the unit on again without any object
about the keyboard. Enter your settings again.
Display F and numbers
If and numbers appears in the display, your unit has detected a fault.F
The following table list actions you can take to correct the problem.
9. AFTERCARE
Before calling out a Service Engineer please check the
following:
— that the plug is correctly inserted and fused;
If the fault cannot be identified switch off the appliance — do not
tamper with it — call the Aftercare Service Centre. The appliance is
supplied with a guarantee certificate that ensures that it will be
repaired free of charge at the Service Centre.

Heater display Fault Action
F0
Fc
Ft
FE
Fb
FU / FJ
FA
FC / Fd
Fr
If error has occurred disconnected and connect again the cooktop to the power supply. If error persist,
call after-sales service. If error appears suddenly in a normal operation, call after-sales service.
Touch control software error.
Wait until temperature goes down. Cook-top will automatically recovered when temperature
reaches a normal value.
Touch control zone is too hot
and has turned off all the
heaters.
Wait until temperature goes down. If message persist when temperature reaches an environment
value, call after-sales service.
Touch control temperature
sensor can be damaged.
Wait until temperature goes down. If message persist when temperature reaches an environment
value, call after-sales service.
Touch control temperature
sensor can be damaged.
See if cook-top is mounted correctly. Be sure that keys touch correctly the glass surface.
Excessive sensitivity
on any key.
This error is a keyboard auto-check. It disappears when autocheck return to secure value. If error
persist, call after-sale service.
Security keyboard error
This error is a software auto-check. It disappears when auto-check return to secure value. If error
persist, call after-sale service.
Security software error
This error is a software auto-check. It disappears when auto-check return to secure value. If error
persist, call after-sale service.
Security software error
Any relay driver can have any problemn. Remove cook-top from the power supply, wait a minute
and switch on again. If error persist, call after-sale service.
Relays security error
10 GB

11 IT
Si consiglia di conservare le istruzioni di uso e
montaggio per riferimento successivo e, prima di
montare il piano di cottura, annotare il suo
numero di serie per richiedere assistenza al
Servizio post-vendita.
AVVERTENZA: l'elettrodomestico e le sue parti
accessibili diventano calde durante l'uso.
Prestare attenzione ad evitare qualsiasi contatto
con le resistenze di riscaldamento. Mantenere
lontani dall'elettrodomestico i bambini di età
inferiore agli 8 anni, a meno che non siano
continuamente supervisionati.
AVVERTENZA: utilizzare unicamente protezioni
per piani di cottura progettate dal produttore della
cucina o indicate dal produttore
dell'elettrodomestico nelle istruzioni d'uso come
adatte, o ancora protezioni incorporate
nell'elettrodomestico. L'utilizzo di protezioni non
adatte può provocare incidenti.
AVVERTENZA: la cottura senza sorveglianza su
un piano di cottura in presenza di grasso o olio
nella pentola può essere pericolosa, con rischio
di incendi. NON cercare MAI di spegnere un
incendio con acqua, bensì spegnere
l'elettrodomestico e coprire la fiamma con un
coperchio o una coperta antifiamma.
AVVERTENZA: pericolo di incendio: non
appoggiare nulla sulle superfici di cottura.
AVVERTENZA: se la superficie è crepata, non
toccare la vetroceramica e spegnere
l'elettrodomestico per evitare la possibilità di
elettrocuzioni.
L'elettrodomestico può essere utilizzato da
bambini di età superiore a 8 anni e da persone
con ridotte capacità fisiche, sensoriali o mentali,
oppure prive di esperienza e conoscenza, se
supervisionate o istruite riguardo all'uso
dell'elettrodomestico in sicurezza, e se
comprendono i rischi che derivano dall'uso dello
stesso. I bambini dovrebbero essere
supervisionati per assicurarsi che non giochino
con l'elettrodomestico. La pulizia e la
manutenzione da parte dell'utente non possono
essere effettuate da bambini senza supervisione.
ATTENZIONE: il processo di cottura deve essere
supervisionato. Un processo di cottura di breve
termine deve essere supervisionato in continuo.
Si consiglia vivamente di tenere i bambini a
distanza dalle zone di cottura quando queste
sono in funzione o quando sono spente, per tutto
il tempo durante il quale l'indicatore di calore
residuo rimane attivo, per evitare il rischio di
ustioni gravi.
Questo elettrodomestico non è concepito per
funzionare con temporizzatori esterni o con
sistemi di comando a distanza separati.
Se è presente, non guardare direttamente gli
elementi riscaldati della lampada alogena.
Collegare al cavo di alimentazione una spina
dimensionata per la tensione, la corrente e la
potenza indicate nella targhetta e dotata del
contatto di terra. La presa deve essere
dimensionata per la potenza indicata sulla
targhetta e deve avere il contatto di terra
collegato e funzionante. Il conduttore di terra è
giallo-verde. Questa operazione deve essere
ISTRUZIONI DI SICUREZZA
eseguita solo da un tecnico adeguatamente
addestrato. In caso di incompatibilità tra presa e
spina dell'elettrodomestico, richiedere ad un
tecnico specializzato di sostituire la presa con
un'altra di tipo compatibile. La spina e la presa
devono essere conformi alle normative attuali del
paese di installazione.
Il collegamento alla rete di alimentazione può
essere effettuato anche collocando un
interruttore automatico onnipolare tra
l'elettrodomestico e la rete di alimentazione, in
grado di supportare il carico massimo collegato,
in linea con la legislazione corrente.
Il cavo di terra giallo-verde non deve essere
interrotto dall'interruttore automatico. La presa o
l'interruttore automatico onnipolare utilizzati per il
collegamento devono essere facilmente
accessibili al momento del montaggio
dell'elettrodomestico.
La disconnessione può essere eseguita con la
spina accessibile o aggiungendo un interruttore
sul cablaggio fisso, nel rispetto delle normative
relative ai cablaggi.
Se il cavo di alimentazione dell'elettrodomestico
dovesse essere danneggiato, farlo sostituire dal
produttore, dal suo servizio tecnico o da tecnici
qualificati, per evitare rischi. Il conduttore di terra
(giallo-verde) deve essere più lungo di 10 mm sul
lato della morsettiera. La sezione dei conduttori
interni deve essere adatta alla potenza assorbita
dal piano di cottura (come indicato sulla
targhetta). Il cavo di alimentazione deve essere di
tipo HO5V2V2-F.
Non appoggiare sul piano di cottura oggetti
metallici come coltelli, forchette, cucchiai o
coperchi. Potrebbero scaldarsi eccessivamente.
Non appoggiare sulle zone riscaldanti pellicole di
alluminio e padelle in plastica.
Dopo ogni utilizzo è necessario pulire il piano di
cottura per evitare l'accumulo di sporcizia e
grasso. Se ci sono accumuli di questo tipo
vengono cotti nuovamente quando il piano di
cottura viene acceso, creando fumo e odori
sgradevoli per non parlare del rischio di
propagazione di incendi.
Non utilizzare mai un getto di vapore o ad alta
pressione per la pulizia dell'elettrodomestico.
Non toccare le zone riscaldanti durante il
funzionamento o per un breve periodo dopo l'uso.
Non cuocere mai gli alimenti direttamente sul
piano di cottura in vetroceramica.
Utilizzare sempre i recipienti di cottura adatti.
Mettere sempre la pentola al centro del gruppo
sul quale si sta effettuando la cottura. Non
appoggiare nulla sul pannello di comando.
Mai utilizzare il piano di cottura come superficie di
lavoro.
Mai utilizzare il piano di cottura come tagliere.
Non appoggiare oggetti pesanti al di sopra del
piano di cottura. Se cadono sul piano possono
danneggiarlo.
Non utilizzare il piano di cottura per riporvi
oggetti.
Non fare scivolare i recipienti sul piano di cottura.

Lasciare una distanza pari a
almeno 55 mm tra il piano di
cottura e il muro posteriore e di
almeno 150 mm tra il piano di
cottura e il mobile verticale o le
pareti sul lato. Qualora venga
installato un pensile sopra il
piano cottura, la distanza
minima richiesta è pari a 700
mm.
Quando si installa una cappa
al di sopra del piano di
cottura, consultare i requisiti di
montaggio specifici per la
cappa, ma, in ogni caso, la
distanza tra cappa e piano di
cottura non deve essere
inferiore a 700 mm.
CODICE PRODOTTO T
Targhetta di identificazione (posta sotto il carter inferiore del piano di
cottura)
1. AVVERTENZE GENERALI
Apponendo il marchio su questo elettrodomestico confermiamo
la conformità a tutti i requisiti di legge europei di sicurezza, salute e
tutela ambientale applicabili a questa categoria di prodotti.
2. SALVAGUARDIA DELL'AMBIENTE
Questo elettrodomestico dispone di contrassegno ai
sensi della direttiva europea 2012/19/UE in materia di
rifiuti di apparecchiature elettriche ed elettroniche
(RAEE).
I RAEE contengono sostanze inquinanti (che
possono causare conseguenze negative per
l'ambiente) e i componenti principali che possono
essere riutilizzati. È importante che i RAEE siano
sottoposti a trattamenti specifici in modo da togliere e smaltire in
modo corretto gli inquinanti nonché recuperare e riciclare tutti i
materiali.
Spetta ai singoli individui garantire che i RAEE non diventino un
problema a livello ambientale. Esistono alcune regole specifiche da
rispettare:
• i RAEE non devono essere trattati come rifiuti domestici.
• i RAEE devono essere affidati agli speciali centri di raccolta
gestiti dai comuni o da società autorizzate. In molti stati è
disponibile anche un servizio di raccolta porta a porta per i RAEE.
In molti stati, nel caso di acquisto di nuovi elettrodomestici, quelli
vecchi possono essere affidati al venditore che li deve ritirare
gratuitamente in numero corrispondente agli elettrodomestici
acquistati, a condizione che i singoli elettrodomestici siano di tipo
simile e con le stesse funzioni di quelli acquistati.
Il montaggio di un elettrodomestico può essere un'operazione
complicata che, se non viene effettuata correttamente, può
minacciare gravemente la sicurezza di prodotti, proprietà o persone.
Per questa ragione tale attività deve essere intrapresa da un tecnico
professionalmente qualificato che la effettuerà in accordo con le
normative tecniche in vigore.
Nel caso in cui questa precauzione non venga rispettata e il
montaggio sia effettuato da un tecnico non qualificato, il produttore
declina tutte le responsabilità per guasti tecnici dell'elettrodomestico
che possano causare o meno danni alle cose o ai beni o lesioni alle
persone o agli animali.
Dopo avere tolto l'imballaggio, accertarsi che l'elettrodomestico non
sia danneggiato; in caso contrario contattare il rivenditore o il servizio
di assistenza post vendita del produttore.
Accertarsi che il mobile nel quale verrà inserito l'elettrodomestico e
tutti gli altri arredi nelle vicinanze siano di un materiale in grado di
resistere a temperature elevate (minimo 100°C).
Inoltre, tutti i laminati decorativi devono essere fissati con colla ad alta
resistenza.
L'elettrodomestico può essere installato in un mobile ad incasso in
modalità "standard" o "a filo".
700 mm
55 mm
150 mm
490 mm
+ 2
- 0
560 mm
+ 2
- 0
Min. 70 mm
Perimetro per
installazione a filo
Nota: Le dimensioni del perimetro interno sono le stesse
dell'installazione standard
703 mm (70 cm hob)
+2
-0
523 mm
+ 2
- 0
593 mm (60 cm hob)
+2
-0
Profondità incavo 5 mm
Perimetro per
installazione a filo
Lo spessore del piano di lavoro deve essere compreso tra 25 e 45 mm.
Se la parte inferiore del piano di cottura è adiacente ad un'area
normalmente accessibile durante la cottura o la pulizia, inserire un
separatore 20 mm sotto alla base del piano di cottura.
min 20 mm
3- INSTALLAZIONE
Quando si installa un forno al di sotto del piano di cottura, non è
necessario inserire un separatore e la distanza minima tra la parte
inferiore del piano di cottura ed il forno non deve essere inferiore a
10 mm. Non montare un forno non raffreddato al di sotto di questo
piano di cottura e installare il forno seguendo i relativi requisiti di
montaggio.
10 mm
min
12 IT

13 IT
INSTALLAZIONEA FILO
Dopo avere verificato che la
posizione del piano di cottura è
corretta, riempire lo spazio fra
piano di lavoro e piano di cottura
con adesivo siliconico. Appiattire
lo strato di silicone con un
raschiatore o bagnando le dita in
acqua e sapone prima che
indurisca.Non utilizzare il piano di
cottura fino a quando lo strato di
silicone non è perfettamente
asciutto.
Fissaggio normale:
- Utilizzare le fascette di
fissaggio presenti nel sacchetto
degli accessori ed avvitarle nella
posizione indicata sulla scatola
inferiore. (Non serrare le viti per
bloccare completamente le
fascette, dovrebbero muoversi
liberamente)
- Inserire il piano di cottura nella
posizione centrale dell'intaglio.
- Ruotare le fascette e serrarle
a fondo.
Fissaggio rapido: (A seconda del
modello)
Prelevare quattro molle dal sacchetto
accessori ed avvitarle sulla scatola
inferiore come illustrato in figura.
Centrare ed inserire il
piano di cottura.
Premere i lati del piano di
cottura fino a quando non
risulta supportato sull'intero
perimetro.
4. COLLEGAMENTO ELETTRICO
DISPOSIZIONE 1 DISPOSIZIONE 2 DISPOSIZIONE 3 DISPOSIZIONE 4
DISPOSIZIONE 5 DISPOSIZIONE 6 DISPOSIZIONE 7
DISPOSIZIONE
DISPOSIZIONE
DISPOSIZIONE
DISPOSIZIONE
DISPOSIZIONE
DISPOSIZIONE
DISPOSIZIONE
Il piano di cottura viene
fornito con una guarnizione
di tenuta. Montare la
guarnizione di tenuta
intorno alla parte inferiore
del piano di cottura ed
assicurarsi che sia inserita
correttamente per evitare
perdite sui mobili di
supporto sottostanti.
Parte inferiore
1-3
2-4
5
6
DISPOSIZIONE
Aseconda del modello
1. "+"
2. "-"
3. TIMER
4. LED zona di cottura aggiuntiva
5. Indicatore programmi zona di cottura
6. Selezione della zona
7. Bridge
A
B
CD
A
B
C
A
B
CD
A
B
C
A
C
B
C
AB
D
A
B
C
D
6
6
5
5
3
1
2
4
5
5
6
6
1
2
366
6
4
5
5
5
6
6
5
5
3
1
2
5
5
6
6
1
2
3
6
6
6
5
5
5
7

"Il montaggio deve essere conforme alle direttive e agli
standard." Il produttore declina qualsiasi responsabilità per
danni che potrebbero essere causati da utilizzo inappropriato o
irragionevole.
AVVERTENZA: Il Produttore non può essere ritenuto responsabile di
qualsiasi incidente o delle relative conseguenze che potessero
insorgere durante l'utilizzo di un elettrodomestico privo di messa a
terra, oppure collegato ad una terra avente una continuità difettosa.
Prima di qualsiasi funzionamento elettrico, controllare sempre la
tensione di alimentazione riportata sul contatore, la regolazione del
sezionatore, la continuità del collegamento a terra rispetto
all'impianto; verificare anche che il fusibile sia appropriato.
Il collegamento elettrico all'impianto deve essere effettuato
rispettando la potenza nominale dell'elettrodomestico; ciò deve
essere effettuato tramite un sezionatore multipolare.
Se l'elettrodomestico ha un'uscita a presa, deve essere installato in
modo che tale uscita sia accessibile.
Il cavo giallo/verde del cavo di alimentazione elettrica deve essere
collegato alla terra dell'alimentazione elettrica ed ai morsetti
dell'elettrodomestico.
Per qualsiasi domanda relativa al cavo di alimentazione elettrica
rivolgersi al Servizio di Assistenza post-venditaoauntecnico
qualificato.
Se il piano di cottura è dotato di un cavo di alimentazione,
collegarlo solo ad un'alimentazione con tensione di 220-240 V tra la
fase e il neutro.
È comunque sempre possibile collegare il piano di cottura a:
Trifase 220-240 V3
Trifase 380-415 V2N
Per procedere al nuovo collegamento, rispettare le istruzioni che
seguono:
Prima di effettuare il collegamento accertarsi che l'impianto sia
protetto da un fusibile appropriato e che sia dotato di cavi aventi una
sezione sufficientemente grande per alimentare normalmente
l'elettrodomestico.
Capovolgere il piano di cottura, con la vetroceramica rivolta verso il
piano di lavoro, prestando attenzione a proteggere la vetroceramica.
231
- svitare la fascetta per cavi "1";
- individuare le due linguette sui lati;
- mettere la punta di un cacciavite piatto davanti alle linguette "2" e
"3", spingere all'interno e premere;
- togliere il coperchio.
Per staccare il cavo di alimentazione elettrica:
- Togliere le viti che fissano la morsettiera che contiene le
derivazioni e i conduttori del cavo di alimentazione;
- Tirare verso l'esterno il cavo di alimentazione.
Operazioni da effettuare per un nuovo collegamento:
- Scegliere il cavo di alimentazione in accordo con le indicazioni
della tabella;
- Passare il cavo di alimentazione elettrica nella fascetta;
- Spelare l'estremità di ogni conduttore del cavo di alimentazione
per circa 10 mm, tenendo in considerazione la lunghezza richiesta
del cavo per il collegamento alla morsettiera;
- Secondo il tipo di montaggio, utilizzare le deviazioni recuperate
nella prima operazione, fissare il conduttore come indicato sulla
tabella;
- Bloccare il coperchio;
- Avvitare la fascetta per cavi.
Nota: accertarsi che le viti della morsettiera siano
completamente avvitate.
Aprire il coperchio nella seguente sequenza:
Operazioni da effettuare per un nuovo collegamento:
- Scegliere il cavo di alimentazione in accordo con le indicazioni
della tabella;
- Passare il cavo di alimentazione elettrica nella fascetta;
- Spelare l'estremità di ogni conduttore del cavo di alimentazione
per circa 10 mm, tenendo in considerazione la lunghezza richiesta
del cavo per il collegamento alla morsettiera;
- A seconda del tipo di montaggio,
utilizzare le deviazioni recuperate nella
prima operazione, fissare il conduttore
come indicato sulla tabella;
- Bloccare il coperchio;
- Avvitare la fascetta per cavi.
DERIVAZIONE
N = Neutro T = Terra
Ph = Fase
ATTENZIONE:
nel caso in cui fosse necessario sostituire il cavo di alimentazione,
collegare i fili in accordo con i seguenti colori/codici:
DISPOSIZIONE
"1-6"
DISPOSIZIONE
"7"
MONOFASE O BIFASES 220-240 V
~
Cavo
HO5V2V2F
Cavo
HO5V2V2F
Cavo
HO5V2V2F
3x2,5 mm
2
3x4 mm
2
4x1,5 mm
2
4x1,5 mm
2
4x1,5 mm
2
4x1,5 mm
2
TRIFASE 220-240 V3~
TRIFASE 380-415 V2N~
BLU
MARRONE
GIALLO VERDE
Neutro
Fase
Terra
( )
Collegamento ai morsetti della morsettiera
Monofase 220-240 V~ Bifase 220-240 V2~
Trifase 220-240 V3~ Trifase 380-415 V2N~
14 IT

15 IT
6. USO
Come accendere/spegnere una zona di riscaldamento
Per accendere una zona di riscaldamento toccare una qualsiasi zona
di riscaldamento per 400 msec. Si sentirà un bip prolungato ed il
valore "0" verrà visualizzato nella cifra della zona di destinazione,
indicando il livello di potenza.
1) Se una qualsiasi fase di cottura è in posizione 0, il display si
spegne automaticamente dopo 10 secondi e la sequenza di
spegnimento zona emette un segnale acustico.
2) Se c'è un'indicazione di calore residuo sul display acceso ma con
potenza pari a 0, lo "0" viene acceso in commutazione.
3) Se la funzione di blocco è attiva non è possibile accendere una
zona.
Per spegnere una zona di riscaldamento toccare una qualsiasi zona di
riscaldamento per un periodo di 1,2 sec. Si avvertiranno tre brevi bip
nella cifra della zona di destinazione e non verrà visualizzato nulla
oppure "H" se è presente calore residuo. La zona sarà spenta.
1) Se una qualsiasi fase di cottura è in posizione 0, il display si
spegne automaticamente dopo 10 secondi e la sequenza di
spegnimento zona emette un segnale acustico.
2) Se c'è un'indicazione di calore residuo sul display spento, verrà
visualizzato "H".
5. CONSIGLI SUI RECIPIENTI DI COTTURA
PER IL PIANO
L'utilizzo di recipienti di cottura appropriati è di fondamentale
importanza per ottenere le migliori prestazioni dal piano di cottura.
• Utilizzare sempre recipienti di cottura di buona qualità con
basi perfettamente piane e spesse: l'utilizzo di questo tipo di
recipienti di cottura evita la formazione di punti più caldi nei quali si
attacca il cibo. Padelle e pentole spesse in metallo garantiscono una
distribuzione regolare del calore.
• Accertarsi che la base della pentola o della padella sia
asciutta: quando si introduce liquido nelle padelle o se ne utilizza una
che era stata riposta in frigorifero, accertarsi che la base della padella
sia completamente asciutta prima di appoggiarla sul piano di cottura.
In questo modo si evita di macchiare il piano di cottura.
• Utilizzare pentole di diametro sufficientemente largo per
coprire completamente la superficie: le dimensioni della pentola
non devono essere inferiori alla zona di riscaldamento. Con una
pentola leggermente più grande l'energia viene utilizzata alla
massima efficienza.
SCELTA DEI RECIPIENTI DI COTTURA - Le informazioni riportate
qui di seguito facilitano la scelta dei recipienti di cottura adatti per
fornire prestazioni ottimali.
Acciaio inossidabile: vivamente consigliato. Particolarmente
efficace se dotato di una base con strato doppio placcato. La base
doppia abbina i vantaggi dell'acciaio inossidabile (aspetto, durata e
stabilità) con i vantaggi di alluminio e rame (conduzione di calore,
distribuzione uniforme del calore).
Alluminio: si consiglia di tipo pesante. Buona conduttività. A volte i
residui di alluminio si presentano come graffi sul piano di cottura, ma si
eliminano se si pulisce immediatamente il piano.
Si sconsiglia l'utilizzo di alluminio sottile a causa del suo basso punto
di fusione.
Ghisa: utilizzabile, ma non consigliata. Scarse prestazioni. Può
graffiare la superficie.
Terracotta / fondo in rame: si consiglia di tipo pesante. Buone
prestazioni, ma il rame può lasciare residui che si possono presentare
come graffi. I residui si possono eliminare se il piano di cottura viene
pulito immediatamente. È però importante non dimenticare i recipienti
vuoti sul fornello acceso. Il metallo surriscaldato può legarsi al piano di
cottura in vetroceramica. Un recipiente di cottura in rame
surriscaldato lascia residui che macchiano permanentemente il piano
di cottura.
Porcellana/smalto: Buone prestazioni solo con una base piana,
sottile e liscia.
Vetroceramica: sconsigliata. Scarse prestazioni. Può graffiare la
superficie.
La funzione di gestione della potenza consente all'utente di impostare
la potenza massima che può raggiungere il piano cottura.
La funzione gestione della potenza è disponibile solo entro 30 secondi
dall'accensione del piano cottura. È possibile, comunque, ripetere
questa impostazione scollegando e ricollegando il cavo di
alimentazione. Impostando la massima potenza desiderata, il piano
cottura regola automaticamente la distribuzione delle varie zone di
cottura in modo da non superare mai tale limite, con l'ulteriore
vantaggio di poter gestire contemporaneamente tutte le zone senza
problemi di sovraccarico. Per il piano cottura il cliente può impostare
una potenza massima compresa tra 2,5 kW e la massima potenza del
piano cottura, che varia in base al modello; se la massima potenza del
piano cottura è 7,2 kW, ad esempio, il livello di impostazione possibile
è compreso tra 2,5 e 7,2 kW. Al momento dell'acquisto, il piano cottura
è impostato sulla massima potenza. Dopo il collegamento
dell'elettrodomestico alla rete elettrica, entro 30 secondi è possibile
impostare il livello di potenza in base ai punti sopra indicati:
P
Scelta del livello di gestione della potenza
1.- Accendere il piano cottura.
2.- Attendere che il controllo tattile termini il processo di
inizializzazione.
3.- Toccare entro 0 secondi il tasto meno per 5 secondi.3
P
6
5
00
4 - Aquesto punto, il display visualizza il messaggio seguente.
5 - Utilizzando i tasti più (+) e meno (–) del timer, è possibile regolare il
valore di gestione della potenza, che in questo esempio è compresa
tra 6500 W e 2500 W. Quando viene selezionato il valore richiesto,
toccare contemporaneamente più (+) e meno (–) del timeri tasti per 5
secondi.
6 - Al termine di questa procedura, viene emesso un lungo segnale
acustico, il sistema si azzera e la procedura ricomincia.
7 - Dopo la procedura di avvio, il display del timer visualizza la
gestione della potenza ECO.
Come risultato, il controllo tattile non consentirà alcuna
combinazione che superi questo limite ECO.

3) Se la funzione di blocco è attiva è possibile spegnere una zona.
4) Se è attiva solo una zona di riscaldamento e anche questa viene
spenta, si avvertono 4 brevi bip per indicare che il piano di cottura è
spento.
Selezione di una zona
Quando una zona è già accesa, si ottiene un'intensità luminosa
inferiore per le zone selezionate che sono accese.
Premendo brevemente i pulsanti '+' o '-' si aumenta o diminuisce la
potenza nella cifra delle zone selezionate: 0-1-2-3...9-P
1. Premendo a lungo i pulsanti "+" o "-" il livello di potenza aumenta /
diminuisce in continuo. Con un aumento rapido, la potenza si
interrompe al livello 9 e per potenza superiore è necessario premere
ulteriormente il tasto "+". Non si attiva alcun bip con aumento /
diminuzione rapidi.
2. Una volta raggiunto il livello di potenza P, premendo nuovamente
"+" il livello di potenza non cambia a 0. Una volta arrivato al livello di
potenza 0, premendo nuovamente "-" il livello di potenza non passa a
P.
3. Con una zona accesa a livello di potenza 0, se la zona è calda, lo 0
lampeggerà alternativamente. Dopo 10 secondi, lo 0 scompare e sul
display viene visualizzata la lettera "H" in continuo.
Questa azione avviene quando i pulsanti "+" e "-" sono premuti in
contemporanea.
Quindi, ogni volta che viene premuto un pulsante, il display visualizza
"L" per due secondi. Il riscaldamento rimane nelle stesse condizioni.
Per disattivare la sicurezza bambini, seguire lo stesso processo sopra
indicato. Quindi viene emesso un breve bip e il display visualizza "n". Il
piano di cottura si sblocca.
Nota: Una sicurezza bambini automatica si attiva per 15 minuti dopo lo
spegnimento completo del piano di cottura. Questa funzione si attiva
automaticamente ma è necessario programmarla in precedenza.
Fare riferimento al punto Impostazioni Utente.
Se è accesa solo una zona, questa zona viene selezionata di default,
senza necessità di dover premere il pulsante di selezione per un
breve periodo (150 msec).
Aumento/diminuzione del livello di potenza
Opzione Sicurezza Bambini
Per accendere l'anello di estensione doppio, la zona associata deve
essere già accesa e l'indicazione di livello di potenza deve essere
superiore a 0.
8.1- Zona a doppio riscaldamento accesa
La prima breve pressione sul pulsante dell'estensione accende
l'anello di estensione. Il LED sul pulsante di estensione si accende se
l'anello di estensione è acceso.
La seconda breve pressione sul pulsante dell'estensione spegne
l'anello di estensione. Si avverte un breve bip ogni volta che si
preme il pulsante di estensione.
Zone a doppio / triplo riscaldamento
8.2- Zona a triplo riscaldamento accesa
La prima breve pressione sul pulsante dell'estensione accende il
primo anello di estensione. 1 LED sul pulsante di estensione si
accende quando il primo anello di estensione è acceso (il LED a
sinistra nel caso di triplo riscaldamento, quello centrale e l'unico LED
nel caso di zona doppia)
La seconda breve pressione sul pulsante dell'estensione accende il
secondo anello di estensione. 2 LED sull'anello di estensione si
accendono se il primo e il secondo anello di estensione sono accesi
La terza breve pressione sul pulsante dell'estensione spegne il primo
e il secondo anello di estensione Si avverte un breve bip ogni volta
che si preme il pulsante di estensione.
Funzione bridge
La funzione bridge può essere abilitata unicamente quando entrambe
le zone di riscaldamento sono spente. Una zona di riscaldamento del
bridge è stata selezionata; per attivare la funzione bridge sfiorare il
pulsante bridge.
Si avverte un bip e il LED della zona si accende se la zona è abilitata.
Entrambe le zone di riscaldamento della funzione bridge sono
selezionate contemporaneamente.
Quando le zone di riscaldamento sono selezionate, se il livello di
potenza non è quello desiderato, utilizzare i pulsanti "+" e "-".
Entrambi i display della zona di cottura con funzione bridge mostrano
lo stesso livello di potenza. La funzione finisce:
- Se in modalità impostazione viene sfiorato il pulsante bridge
- Se l'utente seleziona il livello di potenza "0"
Sicurezza contro le fuoriuscite
Qualcosa (un oggetto o un liquido) sta mantenendo premuto un
qualsiasi pulsante per più di 5 secondi. 2 bip veloci + 1 bip lungo
ogni 30 secondi mentre viene premuto il pulsante. Il piano di
cottura si spegne Questo simbolo continua a lampeggiare per.
tutto il tempo in cui questa situazione persiste.
Timer
La funzione timer può essere attivata tramite il relativo pulsante o
sfiorando allo stesso tempo i pulsanti "+" e "-".
In entrambi i casi, la zona di riscaldamento deve essere selezionata
ed il relativo livello di potenza deve essere superiore a 0.
Selezionare la zona da temporizzare. Il livello di potenza della zona è
superiore a 0. viene visualizzato fisso nella zona da temporizzare.
"0 0" nelle cifre riservate al timer.
1) Con i pulsanti "+" o "-" è possibile selezionare il tempo del timer.
Ogni volta che il tempo varia non si avverte alcun bip.
2) Premendo contemporaneamente i timer il timer si azzerapulsanti
(visualizzazione 00).
3) Se i pulsanti timer "+" o "-" sono mantenuti premuti durante un
tempo da determinare, si ha un'impostazione rapida.
4) Durante l'impostazione del tempo del timer, è possibile passare
da "00" a "99" con il pulsante "-" e da "99" a "00" con il pulsante "+".
5) Il tempo massimo corrisponde a 99 minuti.
6) Quando il tempo è trascorso e il piano di cottura emette dei bip,
premere un qualsiasi pulsante per terminare la sequenza di
inserimento e l'allarme.
7) È possibile regolare il tempo del timer quando il timer era già in
funzione.
8) La potenza delle zone temporizzate può essere modificata senza
conseguenza sulla programmazione del timer.
9) L'ultimo minuto verrà visualizzato in secondi (per alcune varianti
visibile solo accedendo alla programmazione del timer durante il
conto alla rovescia dell'ultimo minuto)
10) Premendo il pulsante timer senza avere selezionato alcuna
zona e quando non ci sono zone temporizzate, non accade nulla.
11) Premendo il pulsante timer senza avere selezionato alcuna
zona e quando molte sono soggette a temporizzazione, il tempo
visualizzato nella cifra del tempo varia in modo rotatorio, indicando il
tempo il cui display di potenza ha la virgola decimale accesa.
12) Nella zona soggetta a temporizzazione viene visualizzato in
alternanza potenza (5 s) e (0,5 s).
Il tempo rimanente è visualizzato nelle cifre riservate al timer. Se
molte zone sono temporizzate, il tempo più basso rimanente e la
virgola decimale è visualizzata nella zona corrispondente.
16 IT

17 IT
Indicatore del calore residuo
(in zone di riscaldamento radianti -> calcolato)
Gli stessi indicatori possono essere utilizzati anche per l'indicazione
del "calore residuo". È necessario stabilire una tabella oraria a tale
proposito: Tempo di calore rimanente = F (livello di potenza, tempo di
lavoro).
Quando la temperatura sulla superficie in vetroresina del piano di
cottura è superiore a 65°C (valore teorico), questa condizione viene
visualizzata sul relativo display, tramite la lettera "H".
Per ottenere una temperatura superiore a 65°C una zona di
riscaldamento deve essere in funzione per un certo periodo di tempo,
che dipende dal livello di potenza. Una volta trascorso questo tempo,
la segnalazione di calore residuo viene visualizzata quando la zona di
riscaldamento viene spenta.
Spegnimento automatico di sicurezza
Se il livello di potenza non è variato per un tempo preimpostato, la
corrispondente zona di riscaldamento si spegne in automatico.
Il tempo massimo durante il quale una zona di riscaldamento può
restare accesa dipende dal livello di cottura selezionato.
Livello
di potenza
Tempo massimo
di attivazione (ore)
1
2
3
4
5
6
7
8
9
P
10
5
5
4
3
2
2
2
2
2
NOTA: se si verifica una situazione di surriscaldamento durante il
funzionamento dei massimi livelli di potenza, il comando del piano di
cottura regola automaticamente il livello di potenza per proteggere il
piano di cottura dai surriscaldamenti.
7. PULIZIA E MANUTENZIONE
Prima di effettuare qualsiasi attività di manutenzione sul piano di
cottura, lasciarlo raffreddare.
• Utilizzare unicamente prodotti (paste detergenti e raschietti)
progettati specificatamente per superfici in vetroceramica. Sono
reperibili normalmente in commercio.
• Evitare sgocciolamenti, in quanto qualsiasi sostanza che cade sulla
superficie del piano di cottura brucia rapidamente e ne rende più
difficile la pulizia.
• Si consiglia di tenere lontano dal piano di cottura tutte le sostanze
che possono sciogliersi, quali oggetti in plastica, zucchero o prodotti a
base di zucchero.
MANUTENZIONE:
- Versare alcune gocce del detergente specifico sulla superficie del
piano di cottura.
- Sfregare le eventuali macchie più persistenti con un panno morbido
o carta da cucina leggermente inumidita.
- Asciugare con un panno morbido o carta da cucina asciutta fino alla
completa pulizia della superficie.
Se ci sono ancora macchie persistenti:
- Versare altre gocce di detergente specifico sulla superficie del piano
di cottura.
- Raschiare utilizzando un raschietto, mantenendolo ad un angolo di
30° rispetto al piano di cottura, fino a quando la macchia non
scompare.
- Asciugare con un panno morbido o carta da cucina asciutta fino alla
completa pulizia della superficie.
- Ripetere l'operazione se necessario.
ALCUNI SUGGERIMENTI:
Una pulizia frequente lascia uno strato protettivo che è fondamentale
per evitare graffi e usura. Prima di utilizzare nuovamente il piano di
cottura accertarsi che la superficie sia pulita. Per togliere segni lasciati
dall'acqua, utilizzare alcune gocce di aceto di vino bianco o di succo di
limone. Quindi asciugare con carta assorbente e alcune gocce di
detergente specifico.
La superficie in vetroceramica resiste ai graffi causati da recipienti di
cottura a fondo piatto, tuttavia si consiglia sempre di sollevarli quando
si spostano da una zona all'altra.
30° Maxi
Qualsiasi variazione di colore della superficie in
vetroceramica non influenza il relativo funzionamento o la
stabilità della superficie. Tali scolorimenti sono
principalmente dovuti a residui di alimenti combusti o
dall'utilizzo di recipienti di cottura in materiali quali alluminio
o rame; questi tipi di macchie sono difficili da eliminare.
N.B.:
Non utilizzare mai una spugna troppo bagnata.
Non utilizzare mai un coltello o un cacciavite.
Un raschietto con lametta non danneggia la superficie, a patto
che venga mantenuto ad un angolo di 30°.
Non lasciare mai un raschietto con lametta alla portata dei
bambini.
Non utilizzare mai prodotti abrasivi o detergenti in polvere.
Cornice metallica: per pulire in modo sicuro la cornice metallica,
lavare con acqua e sapone, risciacquare e quindi asciugare con un
panno morbido.
8. RISOLUZIONE DEL PROBLEMA
Le zone di cottura non cuociono a fuoco lento oppure friggono
solo a bassa temperatura
Utilizzare solo recipienti di cottura a fondo piatto. Se tra il recipiente di
cottura ed il piano di cottura si intravede dello spazio, la zona non sta
trasmettendo correttamente il calore.
Il fondo del recipiente di cottura deve coprire completamente il
diametro della zona selezionata.
La cottura è troppo lenta
Si stanno utilizzando recipienti di cottura inadatti. Utilizzare solo
recipienti a fondo piatto, pesanti ed aventi un diametro che
corrisponda almeno alla zona di cottura.
Piccoli graffi o abrasioni sulla superficie in vetroceramica del
piano di cottura
Pulizia non corretta o utilizzo di recipienti di cottura a fondo ruvido;
particelle simili a granelli di sabbia o sale tra il piano di cottura e il fondo
del recipiente. Fare riferimento alla sezione "PULIZIA"; accertarsi che
i recipienti siano puliti prima de ll'uso e utilizzare solo recipienti
di cottura a fondo liscio. I graffi si possono ridurre solo se la pulizia
Graffi metallici
Non fare scivolare i recipienti di cottura sul piano di cottura. Fare
riferimento ai suggerimenti per la pulizia.
Si utilizzano i materiali appositi, ma le macchie sono ancora presenti.
Utilizzare una lametta e seguire quanto indicato nella sezione
"PULIZIA".
Macchie scure
Utilizzare una lametta e seguire quanto indicato nella sezione
"PULIZIA".
Superfici chiare sul piano di cottura
Segni lasciati da recipienti in alluminio o rame, ma anche depositi di
minerali, acqua o alimenti; possono essere ripuliti utilizzando la pasta
detergente.
Formazione di caramello o plastica fusa sul piano di cottura.
Fare riferimento alla sezione "PULIZIA".
Il piano di cottura non funziona o alcune zone non funzionano
Le deviazioni non sono posizionate correttamente sulla morsettiera.
Verificare se il collegamento è corretto e se il pannello di comando è
bloccato. Sbloccare il piano di cottura.
Il piano di cottura non si blocca.
Il pannello comandi è bloccato. Sbloccare il piano di cottura.
Frequenza delle operazioni di accensione/spegnimento delle
zone di cottura
Il cicli di accensione/spegnimento variano a seconda del livello di
calore richiesto:
- livello basso: tempo di funzionamento breve,
- livello alto: tempo di funzionamento lungo.
Il piano di cottura non funziona.
Controllare le condizioni dei fusibili / interruttori automatici
dell'abitazione. Verificare se si tratta di una mancata alimentazione.

18 IT
F0
Fc
Ft
FE
Fb
FU / FJ
FA
FC / Fd
Fr
Se si è verificato un errore, scollegare e ricollegare il piano di cottura all'alimentazione elettrica. Se
l'errore persiste, contattare l'assistenza post-vendita. Se un errore si verifica improvvisamente durante il
normale funzionamento, contattare l'assistenza post-vendita.
Errore software comando
sfioramento.
Attendere che la temperatura scenda. Il piano di cottura si ripristina automaticamente quando la
temperatura raggiunge un valore normale.
La zona comandi a sfioramento
è troppo calda ed ha spento
tutte le zone di riscaldamento.
Attendere che la temperatura scenda. Se il messaggio persiste quando la temperatura raggiunge quella
ambientale, contattare l'assistenza post-vendita.
Attendere che la temperatura scenda. Se il messaggio persiste quando la temperatura raggiunge quella
ambientale, contattare l'assistenza post-vendita.
Il sensore temperatura di
comando a sfioramento può
essere danneggiato.
Verificare che il piano di cottura sia montato correttamente. Accertarsi che i pulsanti tocchino
correttamente la superficie in vetroresina.
Pulsante eccessivamente
sensibile.
Questo errore è un controllo automatico della tastiera. Scompare quando il controllo automatico ritorna ad
un valore di sicurezza. Se l'errore persiste, contattare l'assistenza post-vendita.
Errore sicurezza tastiera
Questo errore è un controllo automatico del software. Scompare quando il controllo automatico ritorna ad
un valore di sicurezza. Se l'errore persiste, contattare l'assistenza post-vendita.
Errore sicurezza tastiera
Questo errore è un controllo automatico del software. Scompare quando il controllo automatico ritorna ad
un valore di sicurezza. Se l'errore persiste, contattare l'assistenza post-vendita.
Errore sicurezza tastiera
Qualsiasi driver dei relè può presentare dei problemi. Togliere il piano di cottura dall'alimentazione,
attendere un minuto e riaccendere. Se l'errore persiste, contattare l'assistenza post-vendita.
Errore di sicurezza relè
Anomalia Azione
Display della zona
di riscaldamento
Il sensore temperatura di
comando a sfiorame nto può+
essere danneggiato.
9. MANUTENZIONE AGGIUNTIVA
Prima di rivolgersi ad un tecnico dell'Assistenza controllare
quanto segue:
— che la spina sia inserita correttamente e dotata di fusibili;
Se non è possibile identificare il guasto spegnere l'elettrodomestico
— non manometterlo — e chiamare il Centro di Assistenza Tecnica
post-vendita. L'elettrodomestico è fornito con un certificato di
garanzia che garantisce la riparazione gratuita presso il Centro di
Assistenza.
Il piano di cottura si è spento.
L'interruttore principale (pulsante accensione/spegnimento) è stato
sfiorato involontariamente o ci sono oggetti su un qualsiasi pulsante.
Riaccendere l'elettrodomestico senza appoggiare nulla sui pulsanti.
Inserire nuovamente le impostazioni.
Display con F e numeri
Se la lettera F e dei numeri compaiono sul display, l'elettrodomestico
ha rilevato un'anomalia. La seguente tabella elenca i provvedimenti
correttivi che si possono adottare per correggere il problema. viene
effettuata correttamente.
10. GARANZIE
Il prodotto è garantito, oltre che ai sensi di legge, alle condizioni e nei
termini riportati sul certificato di garanzia convenzionale inserito nel
prodotto. Il certificato dovrà essere conservato e mostrato al nostro
Centro di Assistenza Tecnica Autorizzato, in caso di necessità,
insieme allo scontrino comprovante l’acquisto dell’elettrodomestico.
Puoi consultare le condizioni di garanzia anche sul nostro sito
internet.
Per ottenere assistenza compila l’apposito form on-line oppure
contattaci al numero che trovi indicato nella pagina di assistenza del
nostro sito internet.

Doporučujeme vám, abyste si uchovali pokyny
pro instalaci a použití pro pozdější potřebu, a před
instalací varné desky si poznamenejte její sériové
číslo pro případ, že byste potřebovali pomoc
poprodejního servisu.
UPOZORNĚNÍ: Spotřebič a jeho přístupné části
se během používání zahřívají na vysokou teplotu.
Dávejte pozor, abyste se nedotkli topných článků.
Děti do 8 let věku musejí být mimo dosah
spotřebiče, pokud nejsou pod neustálým
dohledem.
UPOZORNĚNÍ: Používejte pouze ochrannou
zábranu varné desky navrženou výrobcem
varného spotřebiče nebo zábranu, kterou
výrobce spotřebiče označí v návodu k použití za
vhodnou, nebo zábranu zabudovanou do
spotřebiče. Použití nevhodných ochranných
zábran může způsobit nehody.
UPOZORNĚNÍ: Vaření bez dozoru na varné
desce s tukem nebo olejem může být
nebezpečné a způsobit požár. Nikdy se
nepokoušejte uhasit požár vodou; vypněte
spotřebič, a potom zakryjte plamen např.
pokličkou nebo protipožární dekou.
UPOZORNĚNÍ: Nebezpečí požáru: na varném
povrchu nic neskladujte.
UPOZORNĚNÍ:Pokud je povrch prasklý,
nedotýkejte se skla a spotřebič vypněte, aby
nedošlo k úrazu elektrickým proudem.
Tento spotřebič smějí používat děti starší 8 let a
osoby se sníženými fyzickými, smyslovými nebo
duševními schopnostmi nebo bez patřičných
zkušeností a znalostí, pokud jsou pod dohledem
osoby odpovědné za jejich bezpečnost, případně
byly poučené o bezpečném používání spotřebiče
a rozumějí možným nebezpečím. Děti by měly být
dohledem, aby se zajistilo, že si se spotřebičem
nebudou hrát. Děti nesmějí bez dozoru dospělých
spotřebič čistit, ani provádět činnosti údržby.
POZOR: Vaření musí probíhat pod dohledem. Na
krátký proces vaření je nutné dohlížet neustále.
Důrazně doporučujeme, aby se děti
nepřibližovaly k varným zónám v době, kdy jsou v
provozu nebo jsou vypnuté, ale indikátor
zbytkového tepla svítí, aby se zabránilo riziku
vážných popálenin.
Tento spotřebič není určen k používání pomocí
externího časovače nebo samostatného
dálkového ovládání.
Je-li jimi varná deska vybavena, nedívejte se po
delší dobu na prvky varné desky s halogenovými
žárovkami
Připojte zástrčku k napájecímu kabelu, který je
schopen vydržet napětí, proud a zátěž uvedené
na štítku a který je opatřen uzemňovacím
kontaktem. Zásuvka musí být vhodná pro zatížení
uvedené na štítku a musí mít zapojený a funkční
uzemňovací kontakt. Uzemňovací vodič má
BEZPEČNOSTNÍ OPATŘENÍ
19 CZ
žlutozelenou barvu. Tuto operaci by měl provádět
odborník s vhodnou kvalifikací. V případě
neslučitelnosti mezi zásuvkou a zástrčkou
spotřebičů požádejte kvalifikovaného elektrikáře,
aby zásuvku nahradil jiným vhodným typem.
Zástrčka i zásuvka musejí odpovídat platným
normám země instalace.
Připojení k napájecímu zdroji lze provést také tak,
že mezi spotřebičem a zdrojem energie, který
zvládne maximální připojenou zátěž a který je v
souladu se stávajícími právními předpisy, je
umístěn omnipolární vypínač.
Žlutozelený uzemňovací kabel by neměl být
přerušen vypínačem. Zásuvka nebo omnipolární
vypínač používaný pro připojení by měl být při
instalaci spotřebiče snadno přístupný.
Odpojení lze zajistit přístupnou zástrčkou nebo
začleněním spínače v pevném zapojení v
souladu s pravidly elektroinstalace.
Je-li napájecí kabel poškozen, musí jej vyměnit
výrobce, jeho autorizovaný servis nebo podobně
kvalifikované osoby, aby nedošlo ke vzniku
nebezpečných situací. Zemnící vodič
(žlutozelený) musí být na straně svorkovnice
delší než 10 mm. Vnitřní část vodičů by měla
odpovídat výkonu absorbovanému varnou
deskou (uvedeno na štítku). Typ napájecího
kabelu musí být HO5V2V2-F.
Na varnou desku nepokládejte žádné kovové
předměty jako nože, vidličky, lžíce nebo pokličky.
Mohly by se zahřát na velmi vysokou teplotu.
Na zóny ohřevu se nesmějí umisťovat hliníkové
fólie ani plastové nádoby.
Po každém použití je nutné varnou desku vyčistit,
aby se zabránilo hromadění nečistot a mastnoty.
Pokud se tyto nečistoty a mastnota na varné
desce ponechají, jsou při jejím používání znovu
zahřívány a spalovány za vzniku kouře a
nepříjemných zápachů, nemluvě o riziku šíření
požáru.
K čištění spotřebiče nikdy nepoužívejte páru ani
vysokotlaký postřik.
Nedotýkejte se tepelných zón během provozu a
po nějakou dobu po použití
Jídlo nepřipravujte nikdy přímo na
sklokeramické varné desce.
Vždy používejte odpovídající nádobí.
Nádobu vždy umístěte do středu jednotky, na
které vaříte. Nic nepokládejte na ovládací panel.
Varnou desku nepoužívejte jako pracovní
plochu.
Povrch desky nepoužívejte jako krájecí prkénko.
Nad varnou deskou neukládejte těžké předměty.
Pokud by na desky spadly, mohly by způsobit
její poškození.
Na varnou desku neodkládejte žádné předměty.
Nádobí po varné desce neposunujte.
La pagina sta caricando ...
La pagina sta caricando ...
La pagina sta caricando ...
La pagina sta caricando ...
La pagina sta caricando ...
La pagina sta caricando ...
La pagina sta caricando ...
La pagina sta caricando ...
-
 1
1
-
 2
2
-
 3
3
-
 4
4
-
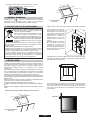 5
5
-
 6
6
-
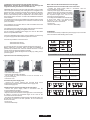 7
7
-
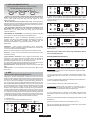 8
8
-
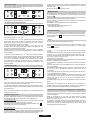 9
9
-
 10
10
-
 11
11
-
 12
12
-
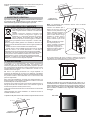 13
13
-
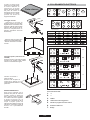 14
14
-
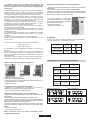 15
15
-
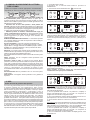 16
16
-
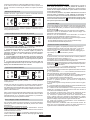 17
17
-
 18
18
-
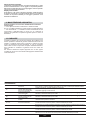 19
19
-
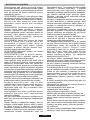 20
20
-
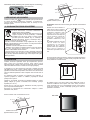 21
21
-
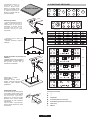 22
22
-
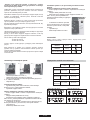 23
23
-
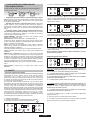 24
24
-
 25
25
-
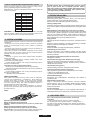 26
26
-
 27
27
-
 28
28


Hoover HH64BFT Manuale utente
- Categoria
- Piani cottura
- Tipo
- Manuale utente
- Questo manuale è adatto anche per
Documenti correlati
Altri documenti
-
Candy CH64CCB Manuale utente
-
Candy CH64CCB/S Manuale utente
-
-
-
Electrolux EHE30200X Manuale utente
-
-
-
-
-
Whirlpool ETPS 8460/IN Guida utente