
Instruction Manual
Manuel d’utilisation
Bedienungsanleitung
Gebruikershandleiding
Manual de Utilización
Manuale d’uso
BW1890
Beer cooler
Tireuse à bière
Bierkühler
Bierkoeler
Dispensador de cerveza
Spillatore birra fredda


ENGLISH
Please read the instruction manual carefully before installing and operating,
and keep it for future reference.
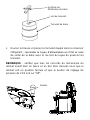
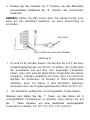
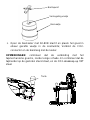
INTRODUCTION
This is a household beer cooler, equipped with a CO2 cartridge
pressure system to keep the beer fresh. It brings the beer to the
best temperature for cold storage (0 to 4℃) within 19-21 hours.
The beer cooler will keep the 5L Keg cool for an almost indefinite
period. We do, however, suggest that you initially cool your beer
keg for at least 12 hours in your refrigerator before placing it into the
beer cooler.
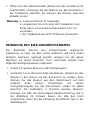
IMPORTANT SAFETY INSTRUCTION
We have provided many important safety messages in the
instruction manual for the beer cooler. Before use it,
please read and obey all safety rules and operating
instructions; and put the instruction manual in a safe place
for future reference.
SAFETY INSTRUCTION
1. Before use it, check whether the power cord is well
connected or not; if not, please don’t use it, and call
service center.
2. If the supply cord is damaged, it must be replaced by
the manufacturer or its service agent or a similarly
qualified person in order to avoid a hazard.
3. Before use it, check whether the plug conform with the
socket or not; if not, please don’t use it, and call service
center.

4. Do not connect or disconnect the electric plug when
your hands are wet.
5. Place the beer cooler on a dry and horizontal surface.
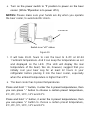
6. To ensure proper ventilation for the beer cooler, make
sure the beer cooler is at least 5 inches / 10cm away
on either side so as to allow correct ventilation on the
appliance.
7. Never put the beer cooler under the sunlight.
8. Never cover the beer cooler when it is operating by
some other object.
9. The beer cooler must be installed in an area protected
from the elements, such wind, rain, water spray or
drips.
10. Before proceeding with cleaning and maintenance
operation, make sure the power line of the unit is
disconnected. Failure to do so can result in electric
shock or death.
11. Do not immerse the beer cooler or power plug in the
water or other liquid.
12. Do not use coarse cloth, abrasive stuff to clear the beer
cooler.
13. Do not take beer keg out from the beer cooler if the
beer is not drunk out completely.
14. Do not take the CO2 cartridge off before the inside
CO2 use out.
15. Do not use the CO2 cartridge if the room temperature
is over 120F. Failure to do so can result in explosion or
death.

16. The cartridge that have not been used must not place
over 120F, or in the wet place. Do not strike, destroy or
discard etc.
17. Never allow children to operate, play with or crawl
inside the beer cooler.
18. This appliance can be used by children aged from 8
years and above and persons with reduced physical,
sensory or mental capabilities or lack of experience
and knowledge if they have been given supervision or
instruction concerning use of the appliance in a safe
way and understand the hazards involved. Children
shall not play with the appliance. Cleaning and user
maintenance shall not be made by children without
supervision.
19. Children should be supervised to ensure that they do
not play with the appliance.
20. Warning: Do not store explosive substances such as
aerosol cans with a flammable propellant in this
appliance.
21. The device must not be used if it has been dropped, it
obvious signs of damage are visible or if it has leaks.
22. This appliance is intended to be used in household and
similar applications such as :
- staff kitchen areas in shops, offices and other
working environments;
- farm houses and by clients in hotels, motels and
other residential type environments;
- bed and breakfast type environments;
- catering and similar non-retail applications

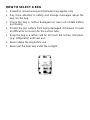
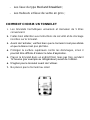
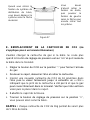
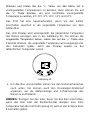
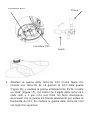
HOW TO SELECT A KEG
1. Sealed 5L universal keg and Heineken keg applies only
2. Pay close attention to safety and storage messages about the
keg / on the keg.
3. Check the keg is neither damaged nor beer out-of-date before
purchasing.
4. Protect the top surface from being damaged. Otherwise it could
be difficult of accession for the suction tube.
5. Keep the keg in a rather cold for 12 hours but not too cold place
(e.g. refrigerator) until next use.
6. Never shake the keg before use
7. Never put the beer keg under the sunlight

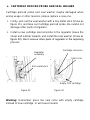
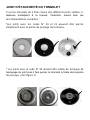
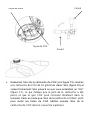
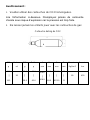
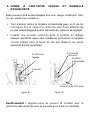
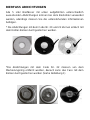
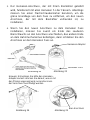
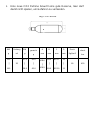
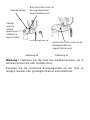
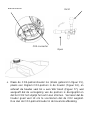
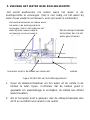
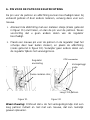
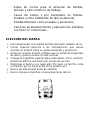
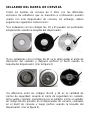
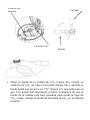
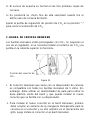
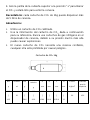
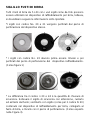
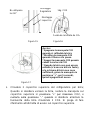
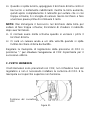
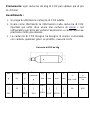
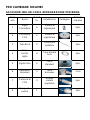
BEER KEG SEALANT
All 5 Liter beer keg with the below various appearance sealants can
apply to the beer cooler, however, you should follow the information
as below:
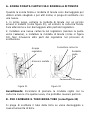
*The sealants with code No. 20 and 21 can be pierced simply by
the cooler piercing pin.
*The sealants with code No. 22 need to be removed off the marking
ring from the sealant and pierce the keg by cooler piercing pin.
(Show as figure 1)

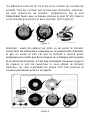
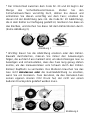
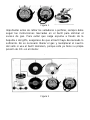
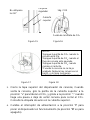
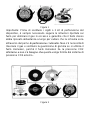
*The difference between code No 23 and 24 is the safety clasp
quantity. Pull up the safety clasp carefully, turn around and take it
out from the keg; replaced it by the sealant (like code No 20
sealant) provided in the beer cooler, attach it to the beer keg, and
pierce it by cooler piercing pin. (Show as Figure 3).
Figure 1
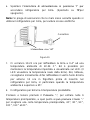
Important: Before replacing the sealants or piercing the cooler kit,
you must always follow the instructions marked on the keg to
eliminate the excess gas and ensure that the keg has rested long
enough to avoid foam coming out through the cooler piercing pin
/tap faucet. And it is no need to release the gas and replace the
seal rubber if you use Heineken keg, because Heineken keg has its
own CO2 pressure inside, and no need to be provided from outer
CO2 pressure system.
Figure 2

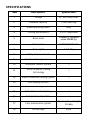
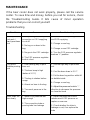
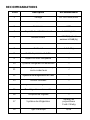
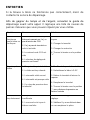
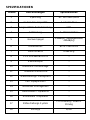
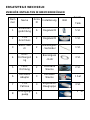
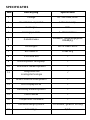
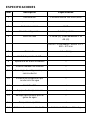
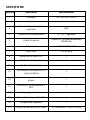
SPECIFICATIONS
Item
Descriptions
Specification
1
Voltage
AC 220-240V/50Hz
2
Available capacity
5 liter beer keg
3
Rated operating power
65W
4
Cooling performance
2~12℃ adjustable
5
Noise level
≤38dB(A); (ambient
noise ≤25dB(A))
6
Dimensions
W272*D480*H470
7
Net weight
6.4±0.5Kg
8
CO2 pressure out unit
√
9
Stainless steel appearance
√
10
Aluminum radiator system
√
11
Semi-conductor cooling
technology
√
12
Water conduction cooling system
√
13
LED display function
√
14
Manual drainage outfit
√
15
Detachable water drip tray
√
16
Temperature adjustable
√
17
Cool preservation system
PU insulation / Weight
310±5g
18
Climate type
N/SN

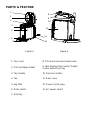
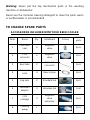
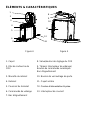
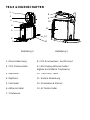
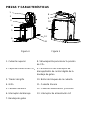
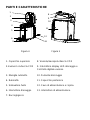
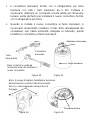
PARTS & FEATURE
Figure 4 Figure 5
1. Top cover
8. CO2 pressure relief valve/ knob
2. CO2 cartridge sheath
9. LED display Drain switch/ Digital
control button Drip tray
3. Tap handle
10. Door lock button
4. Tap
11. Rear cover
5. keg lifter
12. Power cord & plug
6. Drain switch
13. AC power switch
7. Drip tray
1
2
3
4
5
6
8
9
10
11
13
7
12

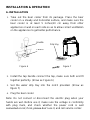
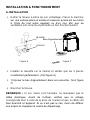
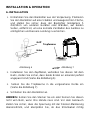
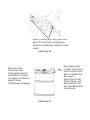
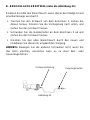
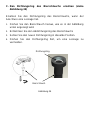
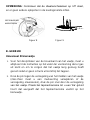
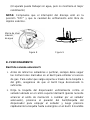
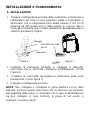
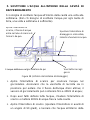
INSTALLATION & OPERATION
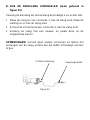
A. INSTALLATION
1. Take out the beer cooler from its package. Place the beer
cooler on a steady and horizontal surface, and make sure the
beer cooler is at least 5 inches/10 cm away from other
appliances or wall on each side so as to allow correct ventilation
on the appliances to get better performance.
Figure 6 Figure 7
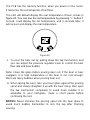
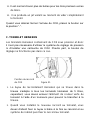
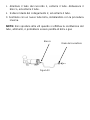
2. Install the tap handle connect the tap, make sure both end fit
together perfectly. (Show as Figure 6)
3. Set the water drip tray into the notch provided. (Show as
figure 7)
4. Plug the beer cooler.
Note: Do not connect or disconnect the electric plug when your
hands are wet. Before use it, make sure the voltage is conformity
with plug mark, and check whether the power cord is well
connected or not; if not, please don’t use it, and call service center.
Drip tray
Handle
Faucet

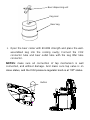
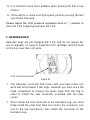
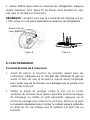
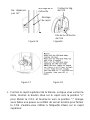
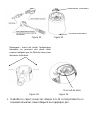
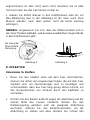
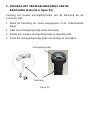
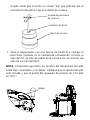
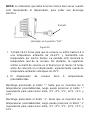
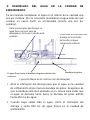
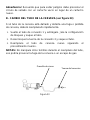
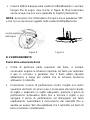
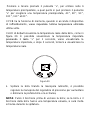
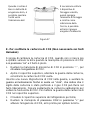
5. Put 800ml water into the cooling cavity or pour the water to the
max mark (Show as figure 8) (It can work without water, but it
can’t display the best performance).
Note: Make sure the drain switch is at “Off” position, and no extra
objects in the cooling cavity.
Figure 8 Figure 9
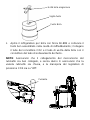
B. OPERATION
Universal 5L beer keg
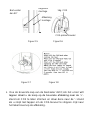
1. Before piercing the plug on the top of the keg, you must always
follow the instructions marked on the keg to eliminate the
excess gas and ensure that the keg has rested long enough to
avoid foam coming out through the tap faucet.
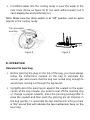
2. Uprightly direct the piercing pin against the sealant on the upper
center of the keg (maybe you need to tear off the marking ring
or change a proper sealant), press the piercing pin/keg lifter to
poke the sealant and then push the piercing pin all immerse in
the keg quickly. To assemble the tap mechanism until you hear
a “Ka” sound that will indicate the tap mechanism fixes on the
beer keg.
The max water
level line

3. Open the beer cooler with 60-80N strength and place the well-
assembled keg into the cooling cavity; Connect the CO2
connector tube and beer outlet tube with the keg lifter tube
connector.
NOTES: make sure all connection of tap mechanism is well
connected, and without damage. And make sure tap valve is on
close status, and the CO2 pressure regulator knob is at “Off” status.
Beer dispensing unit
Keg seal
Beer keg
Button

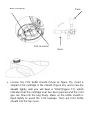
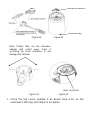
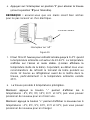
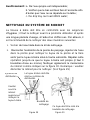
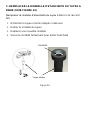
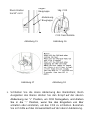
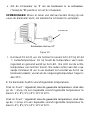
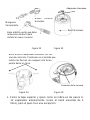
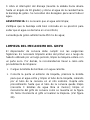
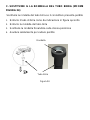
4. Loosen the CO2 bottle sheath (Show as figure 15), insert a
16gram CO2 cartridge in the sheath (Figure 16), and screw the
sheath tightly until you will hear a “Click”(Figure 17), which
indicates that the cartridge seal has been pierced and the CO2
gas can flow into the keg freely. Make us the bottle sheath is
fixed tightly to avoid the CO2 leakage. Then put CO2 bottle
sheath into the top cover.
Beer connector
CO2 connector
Close
关Close
Open

Figure 15 Figure16
Figure 17 Figure 18
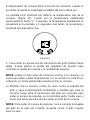
5. Close the top cover of the beer cooler; When pouring out the
beer, the turn the knob on the top cover to “+” position to
release the CO2, and turn it to “-“position when pause or stop
pouring beer to close the CO2. Please refer to the notice label
on the top cover.
16gCO2
CO2 bottle
sheath
CO2 bottle sheath
Regulator
assembly
Cover
assembly
Do not
excess 90°
16g CO2

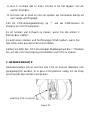
6. Turn on the power switch to “I” position to power on the beer
cooler. (While “0”position is to power off it).
NOTES: Please make sure your hands are dry when you operate
the beer cooler, to avoid electric shock.
Figure 19
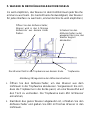
7. It will take 19-21 hours to cool the beer to 0-4℃ at 22-24
℃ambient temperature. And it can keep the temperature as set
and displayed on the LED. (The LED will display the real
temperature of the beer). We do, however, suggest that you
initially cool your beer keg for at least 12 hours in your
refrigerator before placing it into the beer cooler, especially
when the ambient temperature is higher than 25℃.
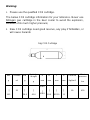
8. The beer cooler has 6 preset temperatures.
Press and hold “-” button, it enter the 6 preset temperatures, then
you can press “-” button to choose a certain preset temperature,
4℃, 8℃, 9℃, 10℃, 11℃ and 12℃.
Press and hold “+” button, it enter the 6 preset temperatures, then
you can press “+” button to choose a certain preset temperature,
4℃, 8℃, 9℃, 10℃, 11℃ and 12℃.
Switch is on “off ” status
Connector

The PCB has the memory function, when you power on the cooler,
it memories the set temperate of last time.
The LED will default display the real temperature of beer, shows in
figure 20. You can see the set temperature by pressing “+” button 1
second, it will display the set temperature, and 3 seconds later, it
will recover and display the real temperature.
Figure 20
9. To pour the beer out by pulling down the tap mechanism, and
you can adjust the pressure regulator knob to control the beer
flow rate and beer bubble;
Note: Clean the glass before pouring beer out; if the beer or beer
cup/glass is in high temperature or the beer is not cool enough,
there are many bubbles when pouring beer out;
10. When taping the beer, lean your beer glass against the pouring
spout and slowly straighten it up with the beer rising, then open
the tap mechanism completely to avoid much bubble; It is
advisable to pour half-glass, make a short pause before
continuing the rest.
NOTES: Never immerse the pouring spout into the beer glass to
avoid much bubble; Remember to lock the tap after finishing
pouring.

11. It is normal to have more bubbles when pouring the first 3 cup
of beer.
12. There will be a sharp and high-speed jet when pouring the last
cup of beer from keg.
Please adjust the CO2 pressure regulation knob to “-” position to
close the CO2 supplying and save the CO2.
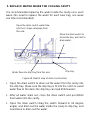
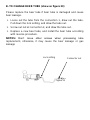
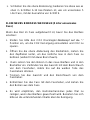
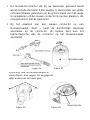
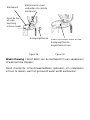
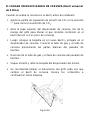
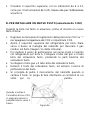
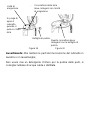
C. HEINEKEN KEG
Heineken kegs are pre-charged with CO2, and do not require the
use of regulator, no need to install the CO2 cartridge. And the knob
on the top cover does not work.
Figure 21
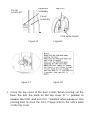
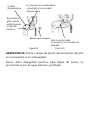
1. The Heineken connector that comes with your beer cooler can
work with all Heineken 5 liter kegs. However you must use a flat
head screwdriver to remove the green base from the keg in
order to install the new connector, provided with the beer
cooler.
2. When install the new connector to the Heineken keg, you must
firstly install the clear beer tube one end to the connector, one
end to the tap mechanism, then install the connector to the
Heineken keg.
CO2 connector position

Figure 22 Figure 23
Figure 24 Figure 25
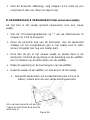
3. Close the top cover; operate it as above step 6-12, as the
universal 5 liter keg, but step 9 is exception.
Heineken Adaptor
Heineken keg
Beer
connector
Note: Please take out the Heineken
adaptor with collect ways, Press it
according the arrow indication, or will
damage the fastener
Beer connector

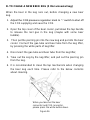
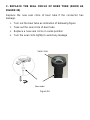
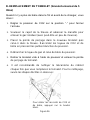
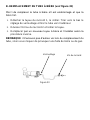
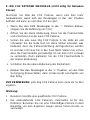
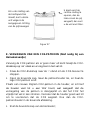
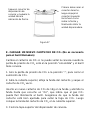
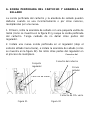
D. TO CHAGE A NEW BEER KEG (5 liter universal keg)
When the beer in the keg runs out, before changing a new beer
keg.
1. Adjust the CO2 pressure regulation knob to “-“ switch to shut off
the CO2 supplying and save the CO2.
2. Open the top cover of the beer cooler, pull down the tap handle
to release the rest gas in the keg (maybe with some beer
bubble).
3. Then put the piercing pin into the new keg and put into the beer
cooler. Connect the gas-tube and beer tube from the keg lifter,
by pressing the white parts of keg lifter.
4. Disconnect the gas-tube and beer tube from the keg lifter,
5. Take out the keg by the keg lifter, and pull out the piercing pin
from the keg.
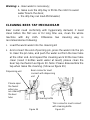
6. It is recommended to clean the tap mechanism when changing
the beer keg each time. Please refer to the below contents
about cleaning.
Figure 26
When you take out the beer
connector and CO2 connector,
please press the white button down.
La pagina si sta caricando...
La pagina si sta caricando...
La pagina si sta caricando...
La pagina si sta caricando...
La pagina si sta caricando...
La pagina si sta caricando...
La pagina si sta caricando...
La pagina si sta caricando...
La pagina si sta caricando...
La pagina si sta caricando...
La pagina si sta caricando...
La pagina si sta caricando...
La pagina si sta caricando...
La pagina si sta caricando...
La pagina si sta caricando...
La pagina si sta caricando...
La pagina si sta caricando...
La pagina si sta caricando...
La pagina si sta caricando...
La pagina si sta caricando...
La pagina si sta caricando...
La pagina si sta caricando...
La pagina si sta caricando...
La pagina si sta caricando...
La pagina si sta caricando...
La pagina si sta caricando...
La pagina si sta caricando...
La pagina si sta caricando...
La pagina si sta caricando...
La pagina si sta caricando...
La pagina si sta caricando...
La pagina si sta caricando...
La pagina si sta caricando...
La pagina si sta caricando...
La pagina si sta caricando...
La pagina si sta caricando...
La pagina si sta caricando...
La pagina si sta caricando...
La pagina si sta caricando...
La pagina si sta caricando...
La pagina si sta caricando...
La pagina si sta caricando...
La pagina si sta caricando...
La pagina si sta caricando...
La pagina si sta caricando...
La pagina si sta caricando...
La pagina si sta caricando...
La pagina si sta caricando...
La pagina si sta caricando...
La pagina si sta caricando...
La pagina si sta caricando...
La pagina si sta caricando...
La pagina si sta caricando...
La pagina si sta caricando...
La pagina si sta caricando...
La pagina si sta caricando...
La pagina si sta caricando...
La pagina si sta caricando...
La pagina si sta caricando...
La pagina si sta caricando...
La pagina si sta caricando...
La pagina si sta caricando...
La pagina si sta caricando...
La pagina si sta caricando...
La pagina si sta caricando...
La pagina si sta caricando...
La pagina si sta caricando...
La pagina si sta caricando...
La pagina si sta caricando...
La pagina si sta caricando...
La pagina si sta caricando...
La pagina si sta caricando...
La pagina si sta caricando...
La pagina si sta caricando...
La pagina si sta caricando...
La pagina si sta caricando...
La pagina si sta caricando...
La pagina si sta caricando...
La pagina si sta caricando...
La pagina si sta caricando...
La pagina si sta caricando...
La pagina si sta caricando...
La pagina si sta caricando...
La pagina si sta caricando...
La pagina si sta caricando...
La pagina si sta caricando...
La pagina si sta caricando...
La pagina si sta caricando...
La pagina si sta caricando...
La pagina si sta caricando...
La pagina si sta caricando...
La pagina si sta caricando...
La pagina si sta caricando...
La pagina si sta caricando...
La pagina si sta caricando...
La pagina si sta caricando...
La pagina si sta caricando...
La pagina si sta caricando...
La pagina si sta caricando...
La pagina si sta caricando...
La pagina si sta caricando...
La pagina si sta caricando...
La pagina si sta caricando...
La pagina si sta caricando...
La pagina si sta caricando...
La pagina si sta caricando...
La pagina si sta caricando...
La pagina si sta caricando...
La pagina si sta caricando...
La pagina si sta caricando...
La pagina si sta caricando...
La pagina si sta caricando...
La pagina si sta caricando...
La pagina si sta caricando...
La pagina si sta caricando...
La pagina si sta caricando...
La pagina si sta caricando...
La pagina si sta caricando...
La pagina si sta caricando...
La pagina si sta caricando...
La pagina si sta caricando...
La pagina si sta caricando...
La pagina si sta caricando...
La pagina si sta caricando...
La pagina si sta caricando...
La pagina si sta caricando...
La pagina si sta caricando...
La pagina si sta caricando...
La pagina si sta caricando...
La pagina si sta caricando...
La pagina si sta caricando...
La pagina si sta caricando...
La pagina si sta caricando...
La pagina si sta caricando...
La pagina si sta caricando...
La pagina si sta caricando...
La pagina si sta caricando...
La pagina si sta caricando...
La pagina si sta caricando...
La pagina si sta caricando...
La pagina si sta caricando...
La pagina si sta caricando...
La pagina si sta caricando...
La pagina si sta caricando...
La pagina si sta caricando...
La pagina si sta caricando...
La pagina si sta caricando...
La pagina si sta caricando...
La pagina si sta caricando...
La pagina si sta caricando...
La pagina si sta caricando...
La pagina si sta caricando...
La pagina si sta caricando...
La pagina si sta caricando...
La pagina si sta caricando...
La pagina si sta caricando...
-
 1
1
-
 2
2
-
 3
3
-
 4
4
-
 5
5
-
 6
6
-
 7
7
-
 8
8
-
 9
9
-
 10
10
-
 11
11
-
 12
12
-
 13
13
-
 14
14
-
 15
15
-
 16
16
-
 17
17
-
 18
18
-
 19
19
-
 20
20
-
 21
21
-
 22
22
-
 23
23
-
 24
24
-
 25
25
-
 26
26
-
 27
27
-
 28
28
-
 29
29
-
 30
30
-
 31
31
-
 32
32
-
 33
33
-
 34
34
-
 35
35
-
 36
36
-
 37
37
-
 38
38
-
 39
39
-
 40
40
-
 41
41
-
 42
42
-
 43
43
-
 44
44
-
 45
45
-
 46
46
-
 47
47
-
 48
48
-
 49
49
-
 50
50
-
 51
51
-
 52
52
-
 53
53
-
 54
54
-
 55
55
-
 56
56
-
 57
57
-
 58
58
-
 59
59
-
 60
60
-
 61
61
-
 62
62
-
 63
63
-
 64
64
-
 65
65
-
 66
66
-
 67
67
-
 68
68
-
 69
69
-
 70
70
-
 71
71
-
 72
72
-
 73
73
-
 74
74
-
 75
75
-
 76
76
-
 77
77
-
 78
78
-
 79
79
-
 80
80
-
 81
81
-
 82
82
-
 83
83
-
 84
84
-
 85
85
-
 86
86
-
 87
87
-
 88
88
-
 89
89
-
 90
90
-
 91
91
-
 92
92
-
 93
93
-
 94
94
-
 95
95
-
 96
96
-
 97
97
-
 98
98
-
 99
99
-
 100
100
-
 101
101
-
 102
102
-
 103
103
-
 104
104
-
 105
105
-
 106
106
-
 107
107
-
 108
108
-
 109
109
-
 110
110
-
 111
111
-
 112
112
-
 113
113
-
 114
114
-
 115
115
-
 116
116
-
 117
117
-
 118
118
-
 119
119
-
 120
120
-
 121
121
-
 122
122
-
 123
123
-
 124
124
-
 125
125
-
 126
126
-
 127
127
-
 128
128
-
 129
129
-
 130
130
-
 131
131
-
 132
132
-
 133
133
-
 134
134
-
 135
135
-
 136
136
-
 137
137
-
 138
138
-
 139
139
-
 140
140
-
 141
141
-
 142
142
-
 143
143
-
 144
144
-
 145
145
-
 146
146
-
 147
147
-
 148
148
-
 149
149
-
 150
150
-
 151
151
-
 152
152
-
 153
153
-
 154
154
-
 155
155
-
 156
156
-
 157
157
-
 158
158
-
 159
159
-
 160
160
-
 161
161
-
 162
162
-
 163
163
-
 164
164
-
 165
165
-
 166
166
-
 167
167
-
 168
168
-
 169
169
-
 170
170
-
 171
171
-
 172
172
-
 173
173
-
 174
174
-
 175
175
-
 176
176


in altre lingue
- English: H.Koenig BW1890 User manual
- français: H.Koenig BW1890 Manuel utilisateur
- español: H.Koenig BW1890 Manual de usuario
- Deutsch: H.Koenig BW1890 Benutzerhandbuch
- Nederlands: H.Koenig BW1890 Handleiding
Documenti correlati
Altri documenti
-
Hkoenig BW1778 Manuale utente
-
Klarstein 10033689 Manuale del proprietario
-
-
Fagor PRES-05 Manuale del proprietario
-
Philips HD3720/25 Product Datasheet
-
-
Philips HD3620/25P1 Manuale utente
-
-
Philips PERFECT DRAFT HD3720/25 Manuale utente
-
Krups YY4130FD BEERTENDER SILVER Manuale del proprietario