
I
D
F
GB
E
KOR
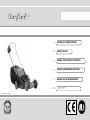
OWNER’S MANUAL
MANUALE USO E MANUTENZIONE
BETRIEBS- UND WARTUNGSANLEITUNG
MANUEL D’UTILISATION ET D’ENTRETIEN
MANUAL DE USO Y MANTENIMIENTO
Pubbl. 66120062 - Feb/2018

2
I
INTRODUZIONE
ISTRUZIONI ORIGINALI
Per un corretto impiego del rasaerba e per evitare incidenti, non iniziare il lavoro senza aver
letto questo manuale con la massima attenzione. Su questo manuale sono indicate le
spiegazioni di funzionamento dei vari componenti e le istruzioni per i necessari controlli e
per la manutenzione.
N.B. Le descrizioni e le illustrazioni contenute nel presente manuale si intendono non
rigorosamente impegnative. La Ditta si riserva il diritto di apportare eventuali
modiche senza impegnarsi ad aggiornare di volta in volta questo manuale.
GB
INTRODUCTION
TRANSLATION OF ORIGINAL INSTRUCTIONS
To correctly use the lawnmower and prevent accidents, do not start work without having
rst carefully read this manual. You will nd explanations concerning the operation of the
various parts plus instructions for necessary checks and relative maintenance.
Note: Illustrations and specications in this manual may vary according to Country
requirements and are subject to change without notice by the manufacturer.
F
INTRODUCTION
TRADUCTION DES INSTRUCTIONS ORIGINALES
Pour un emploi correct de la tondeuse et pour éviter les accidents, ne commencez pas le
travail sans avoir d’abord lu attentivement le manuel. Vous trouverez les descriptions du
fonctionnement des divers composants et les instructions pour les contrôles nécessaires et
pour l’entretien.
N.B. Les descriptions et les illustrations contenues dans ce manuel n’engagent pas
rigoureusement le constructeur. La société se réserve le droit d’apporter d’éventuelles
modications sans devoir mettre à jour à chaque f
ois le manuel.
D
EINLEITUNG
ÜBERSETZUNG DER ORIGINALANLEITUNGEN
Lesen Sie diese Broschüre vor Arbeitsbeginn aufmerksam durch, um mit dem Rasenmäher
richtig umgehen zu können und Unfälle zu vermeiden. In dieser Bedienungsanleitung
nden Sie die Erklärung der Funktionsweise der verschiedenen Bauteile und Hinweise zu
den anfallenden Kontroll- und Wartungsarbeiten.
Anm.: Die in dieser Broschüre enthaltenen Beschreibungen und Abbildungen sind
unverbindlich. Der Hersteller behält sich das Recht vor, eventuelle Veränderungen
vorzunehmen, ohne jeweils vorher eine Anpassung der vorliegenden
Bedienungsanleitung vorzunehmen.
E
INTRODUCCION
TRADUCCIÓN DE LAS INSTRUCCIONES ORIGINALES
Para una correcta utilización del cortacesped y para evitar accidentes, no empiece a trabajar
sin haber leído atentamente este manual. Ud. encontrará las explicaciones de
funcionamiento de los diferentes componentes y las instruccciones para el control y
mantenimiento de la motosierra.
P.D. Las descripciones contenidas en el presente manual no se consideran
rigurosamente obligatorias. La empresa se reserva el derecho de aportar eventuales
modicaciones sin obligarse a poner al día este manual.
KOR
PREKLAD PÔVODNÝCH POKYNOV
올바른 사용과 사고예방을 위해 사용자 설명서를 숙지 하십시오.
필요한 점검 및 유지 보수에 대한 여러 부분의 설명을 찾을 수 있습니다.
설명서의 그림 및 사양은 각 나라의 요구에 따라 다를 수 있으며 제조업체에서는
예고 없이 변경 될 수 있습니다.
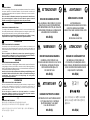
ATTENZIONE!!! ACHTUNG!!!
RISCHIO DI DANNO UDITIVO
NELLE NORMALI CONDIZIONI DI UTILIZZO,
QUESTA MACCHINA PUÒ COMPORTARE
PER L’OPERATORE ADDETTO, UN LIVELLO DI
ESPOSIZIONE PERSONALE E GIORNALIERO
A RUMORE PARI O SUPERIORE A
85 dB(A)
HÖRSCHADEN - RISIKO
UNTER NORMALEN
NWENDUNGSBEDIGUNGEN KANN DIESES
GERÄT DIE BEDIENUNGSPERSON
EINEM TÄGLICHEN GERÄUSCHPEGEL VON
85 dB(A)
ODER MEHR AUSSETZEN
WARNING!!! ATENCION!!!
RISK OF DAMAGING HEARING
IN NORMAL CONDITIONS OF USE,
THIS MACHINE MAY INVOLVE A DAILY LEVEL
OF PERSONAL EXPOSURE TO NOISE
FOR THE OPERATOR EQUAL TO
OR GREATER THAN
85 dB(A)
RIESGO DE DAÑO AUDITIVO
EN NORMALES CONDICIONES DE
UTILIZACIÓN, ESTA MAQUINA PUEDE
TOLERAR, PARA EL OPERADOR ENCARGADO, UN
NIVEL DE EXPOSICÍON DIARIO A RUIDO
EQUIVALENTE O SUPERIOR A
85 dB(A)
ATTENTION!!!
경고!!!
DANGER D’ATTEINTE A L’OUIE
L’OPERATEUR UTILISANT NORMALEMENT
CETTE MACHINE PEUTS S’EXPOSER
QUOTIDIENNEMENT A UN BRUIT
EGAL OU DEPASSANT
85 dB(A)
청력 손상 위험
상시 기계 사용 시 보통의 사용자에
들리는 소음은 아래의 데시벨 이상
들립니다.
85 dB(A)

3
I
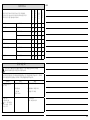
INDICE
D
INHALT
INTRODUZIONE ________________ 2
SPIEGAZIONE SIMBOLI E
AVVERTENZE DI SICUREZZA _______ 4
COMPONENTI DEL RASAERBA _____ 6
NORME DI SICUREZZA ________ 10-16
ASSEMBLAGGIO ________________ 18
AVVIAMENTO __________________ 20
UTILIZZO ______________________ 22
ARRESTO MOTORE ______________ 24
RIMESSAGGIO-TRASPORTO _______ 28
MANUTENZIONE ________________ 30
DATI TECNICI ___________________ 36
DICHIARAZIONE DI CONFORMITÀ __ 38
TABELLA DI MANUTENZIONE ______ 40
RISOLUZIONE DEI PROBLEMI ______ 42
CERTIFICATO DI GARANZIA _______ 45
ENLEITUNG ____________________ 2
ERLAUTERUNG DER SYMBOLE UND
SICHERHEITSHINWEISE ___________ 4
BAUTEILE DES RASENMÄHERS _____ 6
SICHERHEITSVORKERUNGEN ___ 13-17
MONTAGE _____________________ 19
STARTEN ______________________ 21
GEBRAUCH ____________________ 23
MOTOR ABSTELLEN _____________ 25
LÄNGERUNG-TRANSPORT ________ 29
WARTUNG _____________________ 31
TECHNISCHE DATEN _____________ 36
KONFORMITATS-ERKLARUNG _____ 38
WARTUNGSTABELLE _____________ 40
STÖRUNGSBEHEBUNG ___________ 42
GARANTIE-ZERTIFICAT ___________ 46
GB
CONTENTS
E
INDICE
INTRODUCTION ________________ 2
EXPLANATION OF SYMBOLS AND
SAFETY WARNINGS ______________ 4
LAWNMOWER COMPONENTS _____ 6
SAFETY PRECAUTION _________ 11-16
ASSEMBLY _____________________ 18
STARTING _____________________ 20
USE __________________________ 22
ENGINE STOPPING ______________ 24
STORAGE-TRANSPORTATION ______ 28
MAINTENANCE _________________ 30
TECHNICAL DATA _______________ 36
DECLARA
TION OF CONFORMITY ___ 38
MAINTENANCE CHART ___________ 40
TROUBLE SHOOTING CHART ______ 42
WARRANTY CERTIFICATE _________ 45
INTRODUCCION ________________ 2
EXPLICACION SIMBOLOS Y
ADVERTENCIÂS DE SEGURIDAD ___ 4
COMPONENTES DE EL CORTACESPED
_ 6
NORMAS DE SEGURIDAD ______ 14-17
MONTAJE _____________________ 19
PUESTA EN MARCHA ____________ 21
UTILIZACION ___________________ 23
PARADA MOTOR ________________ 25
ALMACENAJE-TRANSPORTE ______ 29
MANTENIMIENTO _______________ 31
DATOS TECNICOS _______________ 36
DECLARACION DE CONFORMIDAD _ 38
TABLA DE MANTENIMIENTO ______ 41
RESOLUCIÓN DE PROBLEMAS _____ 43
CERTIFICADO DE GARANTIA ______ 46
F
INDEX
KOR
목차
INTRODUCTION ________________ 2
EXPLICATION DES SYMBOLES ET
REGLES DE SECURITE ____________ 4
COMPOSANTS DE LA TONDEUSE ___ 6
NORMES DE SECURITE ________ 12-16
ASSEMBLAGE __________________ 18
MISE EN MARCHE _______________ 20
UTILISATION ___________________ 22
ARRET MOTEUR ________________ 24
REMISSAGE-TRANSPORTE ________ 28
ENTRETIEN ____________________ 30
DONNEES TECHNIQUES __________ 36
DECLARATION DE CONFORMITÉ ___ 38
TABLEAU D'ENTRETIEN ___________ 40
RÉSOLUTION DES PROBLÈMES ____ 42
CERTIFICAT DE GARANTIE ________ 45
지침 _______________________ 2
기호 설명과
안전 지침 ________________ 4
잔디깎기 구성 _____________ 5 - 6
안전 수칙 ________________ 7-11
조립 _________________ 12 - 13
시작 _____________________ 14
사용 ________________ 16 - 17
기계 정지 _________________ 18
보관 이동 _______________ 19 - 20
유지 보수 ________________ 21 - 22
기술 정보 ________________
24 - 25
규정 준수 ________________
26 - 27
유지관리 표 _________________
23
문제해결 표 _________________ 23

4
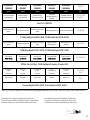
I
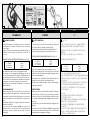
1 - Leggere il libretto uso e manutenzione prima di utilizzare questa
macchina.
2 - ATTENZIONE! - Non lasciare avvicinare nessuno durante il lavoro.
Fare attenzione alla proiezione di oggetti.
3 - Tenere il cavo di alimentazione lontano dai dispositivi di taglio.
4 - Attenzione alle lame taglienti. Togliere la spina dalla presa
prima di ogni manutenzione o se il cavo è danneggiato.
GB
1 - Read operator’s instruction book before operating this machine.
2 - WARNING! - Do not let an
ybody approach to the working area.
Be careful of thrown objects
3 - Keep supply exible cord away from cutting means.
4 - Beware of sharp blades. Remove plug from mains before any
maintenance or if cord is damaged.
F
1 - Lire le manuel avant d’utiliser cette machine.
2 - ATTENTION! - Ne laisser s’approcher personne durant le travail.
Faire attention aux objets qui pourraient être projetés.
3 - Écarter le cordon d'alimentation des dispositifs de coupe.
4 - Attention aux l
ames. Débrancher la tondeuse avant toute
intervention ou si le câble est endommagé.
D
1 - Betriebsanleitung vor der Inbetriebsnahme lesen.
2 - ACHTUNG! - Das Annähern von Unbefugten an die Maschine
während der Arbeit ist untersagt: Gefahr projezierter
Gegenstände.
3 - Bringen Sie das Stromkabel nicht mit den Schnittvorrichtungen in
Berührung.
4 - Schnittgefahr durch scharfe Messer. Ziehen Sie vor jedem
Wartungseingri bzw. bei beschädigtem Kabel unbedingt den
Stecker heraus.
E
1 - Antes de utilisar esta maquina, leer el manual de instrucci
ones.
2 - ¡ATENCIÓN! - No permitir que nadie se acerque durante el trabajo.
Prestar atención a la proyección de objetos.
3 - Mantener el cable de alimentación lejos de los dispositivos de
corte.
4 - Atención al lo de las cuchillas. Desconectar la clavija de la
toma de corriente si el cable está dañado o para realizar
mantenimiento.
KOR
1 -
2 - 경고
! - 작업 중 주변에 사람의 접근을 조심하십시오.
이물질이 튀어 상해의 위험이 있습니다.
3 - 전선이 날에서 항상 멀리 떨어지게 하십시오.
4 - 날카로운 날에 주의 하십시오
. 기계 정비 전 또는 코드에
이상이 있을 경우 플러그를 뽑아 주십시오,
I SPIEGAZIONE SIMBOLI E AVVERTENZE DI SICUREZZA D ERLÄUTERUNG DER SYMBOLE-UND SICHERHEITSHINWEISE
GB EXPLANATION OF SYMBOLS AND SAFETY WARNINGS E EXPLICACION SIMBOLOS Y ADVERTENCIAS DE SEGURIDAD
F EXPLICATION DES SYMBOLES ET REGLES DE SECURITE KOR 기호 설명과 안전 주의

5
I SPIEGAZIONE SIMBOLI E AVVERTENZE DI SICUREZZA D ERLÄUTERUNG DER SYMBOLE-UND SICHERHEITSHINWEISE
GB EXPLANATION OF SYMBOLS AND SAFETY WARNINGS E EXPLICACION SIMBOLOS Y ADVERTENCIAS DE SEGURIDAD
F EXPLICATION DES SYMBOLES ET REGLES DE SECURITE KOR 기호 설명과 안전 주의
I
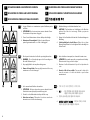
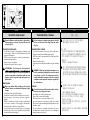
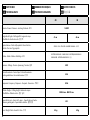
5 - Tipo di macchina: RASAERBA ELETTRICO.
6 - Dispositivo a doppio isolamento
7 - Marchio e modello macchina.
8 - Dati Tecnici.
9 - Livello di potenza acustica garantita
10 - Numero di serie.
11 - Marchio CE di conformità.
12 - Anno di fabbricazione
GB
5 - Type of machine: ELECTRIC LAWNMOWER.
6 - Double insulation device
7 - Machine brand and model
8 - Specications
9 - Guaranteed sound power level
10 - Serial number
11 - CE conformity marking
12 - Year of manufacture
F
5 - Type de machine : TONDEUSE ÉLECTRIQUE.
6 - Dispositif à double isolation
7 - Marque et modèle de la machine
8 - Données techniques
9 - Niveau de puissance acoustique garanti.
10 - Numéro de série
11 - Label CE de conformité
12 - Année de construction
D
5 - Gerät: ELEKTRO-RASENMÄHER.
6 - Vorrichtung mit doppelter Isolierung
7 - Marke und Maschinenmodell
8 - Technische Daten
9 - Garantierter akustischer Schalleistungspegel.
10 - Seriennummer
11 - CE-Zeichen
12 - Baujahr
E
5 - Tipo de máquina: CORTACÉSPED ELÉCTRICO.
6 - Dispositivo de doble aislamiento
7 - Marca y modelo de la máquina
8 - Datos técnicos
9 - Nivel de potencia acústica garantizado.
10 - Número de serie
11 - Marcha CE de conformidad
12 - Año de fabricación
KOR
5 - 기계 종류: 잔디 깎기
6 - 이중 절연 장치
7 - 상표 및 모델
8 - 무게 제원
9 - 소음 수치
10 - 일련 번호
11 - CE 준수
12 - 생산년도

6
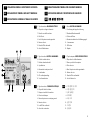
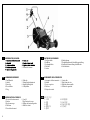
BAUTEILE DES RASENMÄHERS
1 - Ein/Ausschalter 6 - Kabelsicherung
2 - Griholm 7 - Drehgri zur zentralen Schnitthöheneinstellung
3 - Grasfangbehälter 8 - Knopf zur Höhenverstellung des Griholms
4 - Deektor 9 - Sicherheitstaste
5 - Stecker
COMPONENTES DE EL CORTACESPED
1 - Interruptor de funcionamiento 6 - Sujeta cable
2 - Manillar 7 - Regul. altura de corte
3 - Cesto recogedora 8 - Regulador altura manillar
4 - Deector 9 - Pulsador de seguridad
5 - Clavija de conexiòn
COMPONENTI DEL RASAERBA
9 - Pulsante di sicurezza
LAWNMOWER COMPONENTS
1 - On/O switch 6 - Cable clip
2 - Handle 7 - Cutting height adjustment
3 - Grass box 8 - Height adjusting knob
4 - Rear decetor 9 - Safety button
5 - Plug
COMPOSANTS DE LA TONDEUSE
1 - Bouton de fonctionnement 6 - Serre fìl
2 - Guidon 7 - Régl. fauteur dei coupe
3 - Bac de ramassage 8 - Réglage de hauteur du guidon
4 - Déecteur 9 - Bouton de sûreté
5 - Prise de branchement
F
I
GB
D
E
KOR 잔디 깎기 구성
1 -
스위치
6 -
케이블 클립
2 -
핸들
7 -
높낮이 조절
3 - 풀통 8 -
높낮이 조절 핸들
4 - 풀통 덮게 9 - 안전 버튼
5 -
플러그

7
Italiano English KOR
INFORMAZIONE AGLI UTENTI USER INFORMATION 사용자 정보
Ai sensi delle Direttive 2011/65/CE e 2012/19/CE,
relative alla riduzione dell'uso di sostanze
pericolose nelle apparecchiature elettriche ed
elettroniche, nonché allo smaltimento dei riuti
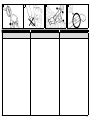
Il simbolo del cassonetto barrato ripor tato
sull’apparecchiatura indica che il prodotto alla ne della
propria vita utile deve essere raccolto separatamente
dagli altri riuti.
L’utente dovrà, pertanto, conferire l’apparecchiatura
giunta a ne vita agli idonei centri di raccolta
dierenziata dei riuti elettronici ed elettrici, oppure
riconsegnarla al rivenditore al momento dell’acquisto di
una nuova appar
ecchiatura di tipo equivalente, in
ragione di uno a uno.
L’adeguata raccolta dierenziata per l’avvio successivo
dell’apparecchiatura dismessa al riciclaggio, al
trattamento e allo smaltimento ambientalmente
compatibile contribuisce ad evitare possibili eetti
negativi sull’ambiente e sulla salute e favorisce il riciclo
dei materiali di cui è composta l’apparecchiatura.
Lo smaltimento abusivo del prodotto da parte
dell’utente comporta l’applicazione delle sanzioni
previste dalla legislazione nazionale.
In accordance with Directives 2011/65/CE and
2012/19/CE on the reduction of hazardous
substances in electrical and electronic equipment
(ROHS) and the disposal of waste from such
equipment (WEEE)
When the symbol depicting a crossed-out refuse bin
appears on equipment, this means that it must be
collected separately from other waste at the end of its
working life.
When the equipment is no longer serviceable,
accordingly, it should be taken by the user to a special
sorted collection centre for electrical and electronic
waste, or if purchasing a new product of similar type,
returned to the dealer o
n a one-for-one basis
(takeback scheme).
Proper sorted collection ensures that the discarded
equipment can be sent subsequently for eco-friendly
recycling, treatment and disposal; this helps to avoid
any possible negative impact on the environment and
on health, besides enabling the reclamation of materials
used in manufacturing the equipment.
Unauthorized dumping of waste is irresponsible, and
punishable under statutory regulations.
전기 및 전자 장비 유해 물질의 감소(ROHS)
와 같은 장비에서 발생하는 폐기물의 처분은
(WEEE)2011/65/CE, 2012/19/CE의
지침에 따라야 합니다.
X표시된 쓰레기통을 나타내는 기호는
기계의 수명이 다해 처분 할 때 꼭 분리해서 처리
하셔야 하는 표시 입니다.
기계가 더 이상 수리 할 수 없는 경우, 전기 및
전자 공급을 위한 특별 수거 센터로 주의해서
처리 하십시오. 이와 유사한 유형의 새 제품을
구입 하는 경우 대리점에 처분을 의뢰 하십시오.
적절한 분리 수거는 기계의 재료를 재 사용
가능하게 하여 환경과 건강을 보호 하는데
도움이 됩니다.
폐기물의 무책임한 무단 투기는 법적 규정에 따라
처벌 될 수 있습니다.

8
1 2 3 4
KOR
안전 수칙
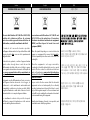
경고
기계를 올바르게 사용하면 쉽고 편리한
공구가 될 수 있지만 안전 수칙과 잘못 된
사용법으로 이용하면 위험한 물건이 될 수 있습니다
경고
전기 공급 시스템은 매우 낮은 강도의 전자기 필드를
생성합니다. 이 필드는 특정 심장 박동을 방해 할 수
있습니다. 심각, 치명적인 부상의 위험을 줄이기 위해,
맥박 조정기를 가진 사람은 기계 사용하기 전에 의사
또는 맥박 조정기 제조업체에 문의 해야 합니다.
경고
각 나라의 규정에 따라 사용을 제한 할 수 있습니다.
1. 기계에 부착된 라벨을 주의 깊게 숙지 하십시오.
(4 페이지)
2. 작업구역 근처에 구경 하는 사람, 어린이, 동물들이
오지 않게 하십시오.(그림1)
3. 경험이 없거나, 어린이 또는 기계를 다둘 힘이 없는
작업자의 사용을 금지 합니다. 음주, 약물 등을 취한
사람의 경우에도 같습니다.(그림2)
4.
엔진 작동 중에 손, 발을 몸체(데크)에 넣지 마십시오.
(그림3)
5.
6.
사용 전 기계의 적절한 사용과 제어 등을 숙지 하고
특히 긴급히 정지하는 방법을 숙지 하십시오.
7. 모든 너트, 볼트와 나사가 단단히 조여져 있는지
확인 하십시오.(그림4)
8.
기계의 안전 장비들이 장착되어 있고 제대로 작동
하는지 점검 후 기계 사용을 하십시오.
9. 기계를 보관하기 전에 엔진을 정지하고 모든 회전
부품이 정지 됐는지 확인 하십시오.
10. 절대 풀통 덮개를 올리고 사용하지 마십시오.
(그림5)
11. 작업자가 기계를 놓을 때는 엔진을 정지하고
평지에 놓아 주십시오.
12.
현지 규정의 조건에 따라 사용자의 사용 연령을 제한
할 수 있습니다.
13.
소유자 또는 사용자는 사고, 타인의 재산 손해에 대한
책임이 있습니다.
14.
항상 엔진을 정지하고 플러그를 분리 할 경우:
기계를 놓을 때, 날 또는 데크의 이물질을 청소 할 때,
풀통을 교체 할 때, 기계 수리 할 때, 장애물을 친 이후
비 정상적인 진동이 있을 때(즉시 확인), 미치는 영향
에 따라 손상 가능 여부를 확인하고 수리를 한 이후
기계를 사용 하십시오.(그림6)
15. 올바른(정품)의 날만 사용 하십시오.(그림7)
16.
기계를 작동하기 전에 항상 날의 볼트, 조립상태 마모
또는 손상을 확인 하십시오.
17. 라벨은 식별 가능한 상태로 유지 하십시오. 손상 또는
변질의 경우 즉시 대체 하십시오.
4페이지 참조
18. 설명서에 명기 된 것과 다른 용도로 기계를
사용하지 마십시오.
19. 항상 유지 보수 작업에 대한 제조 업체의 지침을
따르십시오.
20. 잘못 조립된 기계나 심하게 손상된 기계를
사용하지 마십시오. 안전장치의 제거, 손상을
금지 합니다.
21. 일상적인 유지 보수가 아닌 작업은 전문가에게 문의
하십시오.
22. 기계의 수명이 다 했을 경우 취급점이나
재활용업체에 폐기 하십시오.
23. 기계의 작동 및 안전 사용에 익숙한 사람만
사용하십시오.
다른 사용자들에게는 사용 전 사용설명서를 숙지
하게 하십시오.
24. 본 설명서에 표시된 작업을 제외한 모든 작업은
전문가에 의해 수행 되어야 합니다.
25.
설명서를 항상 보관 사용 전 참조 하십시오.
26. 이 기기는 신체적 감소, 감각적 또는 정신 능력이나
경험과 지기의 부족한 사람(어린이 포함)을 대상으로
하지 않습니다.
안전을 책임지는 사람으로 감독이나 제품의 사용에
관한 지츰을 제공 한 경우는 제외합니다.
어린이가 사용하지 않게 하십시오.

9
5 6 7
KOR
안전 수칙

10
1 2 3 4
Size 41 p.n. 001001079A
Size 42 p.n. 001001080A
Size 43 p.n. 001001081A
Size 44 p.n. 001001082A
Size 45 p.n. 001001083A
Size 41 p.n. 001000975C
Size 42 p.n. 001000976C
Size 43 p.n. 001000977C
Size 44 p.n. 001000978C
Size 45 p.n. 001000979C
Italiano English KOR
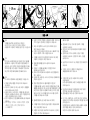
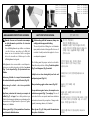
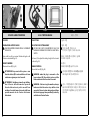
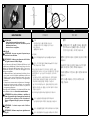
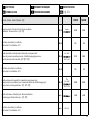
ABBIGLIAMENTO PROTETTIVO DI SICUREZZA SAFETY PROTECTIVE CLOTHING 안전 보호 의류
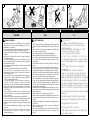
Quando si lavora con il rasaerba usare sempre
un abbigliamento protettivo di sicurezza
omologato.
L’uso dell’abbigliamento protettivo non elimina
i rischi di lesione, ma riduce gli eetti del
danno in caso di incidente. Fatevi consigliare
dal vostro rivenditore di ducia per la scelta
dell’abbigliamento adeguato.
L’abbigliamento deve essere adatto e non d’impaccio.
Indossare un abito aderente protettivo. La giacca
(Fig. 1) e la salopette (Fig. 2) di protezione sono
l’ideale.
Indossare gli stivali o le scarpe di sicurezza munite
di suole antisdrucciolo e puntali d’acciaio (Fig. 3-4).
Indossare gli occhiali o
la visiera protettivi
(Fig. 5-6)!
Applicare protezioni dai rumori; per esempio le
cue (Fig. 7) o i tappi. L’uso delle protezioni per
l’udito richiede maggior attenzione e prudenza, perché
la percezione di segnali acustici di pericolo (grida,
allarmi, ecc.) è limitata.
Calzare guanti (Fig. 8) che permettano il massimo
assorbimento delle vibrazione.
While working with the lawnmover, always use
safety protective approved clothing.
The use of protective clothing does not eliminate
injury risks, but reduces the injury eects in case of
accident. Consult your trusted supplier to choose
an adequate equipment.
The clothing must be proper and not an obstacle.
Wear adherent protective clothing. Protective jackets
(Fig. 1) and dungarees (Fig. 2) are ideal.
Safety boots or shoes having skid-proof sole and
anti-piercing insert (Fig. 3-4).
Wear protective goggles or face screens (Fig. 5-6)!
Use protections against noises; for example noise
reduction ear guards (Fig. 7) or earplugs. The use of
protections for the ear reques
ts much more attention
and caution, because the perception of danger audio
signals (screamings, alarms, etc.) is limited.
Wear gloves (Fig. 8) that permit the maximum
absorption of vibrations.
잔디 깎는 작업 중에는
항상 안전 장비를 착용하십시오.
보호장비의 사용은 부상 위험을 제거하지만,
사고의 경우 부상의 영향을 감소하지 않습니다.
신뢰할 수 있는 공급업체에 적절한 장비를
선택 하십시오.
안전 복은 걸림이 없는 것이여야 합니다.
그림1과 그림2의 안전 복과 같은 것을
사용 하십시오.
미끄럼 방지와 견고한 안전화를 사용하십시오.
(그림3,4)
고글 또는 안전 보호망 사용
(그림5,6)
소음에 대한 보호를 귀마개(그림7)를
사용 하십시오.
귀마개를 사용하는 동안 음성신호(소리침, 알람)
의 인식에 한계가 있기 때문에 사용 시 더 많은
관심과 주의를 필요로 합니다.
진동 방지를 위해 안전 장갑을 착용 하십시오.
(그림8)

11
5 6 7 8
p.n. 001000939A
p.n. 001000940A
p.n. 001000835p.n. 3155027R

12
1 2 3 4
Italiano English KOR
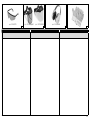
ASSEMBLAGGIO ASSEMBLY 조립
MONTAGGIO MANUBRIO (Fig. 1-2-3)
- Sollevare il manubrio come mostra la Fig. 1. Serrare i
pomelli (A, Fig. 3) dopo avere posizionato il manubrio
(B) e deciso l’altezza dello stesso, scegliendo una
delle due posizioni (C, Fig. 2).
- Fissare l’interruttore sul manubrio con le viti (A)
(Fig. 4) tenendo la spina rivolta verso l’operatore.
ALTEZZA DEL MANUBRIO (Fig. 3)
Svitare i pomelli (A) ed alzare o abbasare il manubrio
(B).
CESTO RIGIDO:
- Assemblare il cesto per mezzo degli appositi agganci
e viti (Fig. 7).
- Alzare il deettore (A) e posizionare il cesto nella
parte superiore della carcassa (Fig. 8).
OPZIONALE
SACCO RACCOGLIERBA (Fig. 5)
Inlare il telaio (A) nel sacco (B). Fissare i bordi del sacco
aiutandosi con una punta o un cacciavite
.
POSIZIONAMENTO DEL SACCO (Fig. 6)
Alzare il deettore (A) e posizionare il sacco nella parte
superiore della carcassa.
FIXING HANDLE (Fig. 1-2-3)
- Lift the handle as in Fig. 1. Tighten the knobs
(A, Fig. 3) after positioning the handle (B) at the
correct height. Choose one of the two positions
(C, Fig. 2).
- Attach the switch onto the handlebar using screws
(A) (Fig. 4), keeping the plug turned toward the
operator.
HANDLE HEIGHT ADJUSTMENT (Fig. 3)
Unscrew knobs (A) and lift or lower the handle (B).
RIGID BOX:
- Assemble the box using in hooks and screws (Fig. 7).
- Raise the deector (A) and position the basket in the
upper part of the body (Fig. 8).
OPTIONAL
GRASS CATCHER (Fig. 5)
Side the frame (A) into the bag (B). Secure the edges of
the bag with the aid of a screwd
river or other pointed
tool.
POSITIONING OF GRASS CATCHER (Fig. 6)
Raise the deector (A) and position the bag in the
upper part of the body.
핸들 조립 (그림1-2-3)
- 그림1과 같이 핸들을 들어 주십시오.
핸들(B)의 위치를 양쪽이 같게 하고 플라스틱
너트(A 그림3)를 조여 주십시오. 사용자에 맞게
위치(2개의 구멍)를 맞추어 주십시오.(C그림2)
- 스크류(A, 그림4)를 이용 스위치의 플러그를
사용자 방향으로 장착 하십시오.
핸들 높이 조절(그림3)
플라스틱 너트(A)를 풀러 위쪽 또는 아래 쪽으로
핸들(B) 높이를 조정 하십시오.
풀통 조립:
- 스크류를 이용 풀통을 조립 하십시오.(그림7)
- 플통덮개(A)를 들어 화살표의 부분을 맞추어
풀통을 장착 하십시오.(그림8)

13
7 8

14
9 10 11
Italiano English KOR
AVVIAMENTO STARTING 시작
NORME DI SICUREZZA
- Avviare il rasaerba in un'area sgombra, dove non ci sia erba alta.
Ispezionate l'area da tagliare e ripulitela da sassi, ossi, pezzi di
legno e simili.
- Leggere le norme di sicurezza elencate in questo libretto (Pag. 10).
- Prima di avviare il motore, assicurarsi che la lama non sia
bloccata.
LUNGHEZZE CONSIGLIATE PER CAVI DI PROLUNGA (230 V) (Fig. 11).
Lunghezza
0 ÷ 20 metri
20 ÷ 50 metri
50 ÷ 100 metri
Sezione minima del conduttore
1 mm
2
1.5 mm
2
4 mm
2
Non utilizzare il rasaerba se i cavi sono danneggiati o usurati.
Non collegare un cavo danneggiato all’alimentazione; non toccare
un cavo danneggiato prima di scollegarlo dall’alimentazione; un
cavo danneggiato può causare contatti con le parti sotto tensione.
Tenere lontano il cavo d’alimentazione dalle lame; la lame possono
danneggiare i cavi e causare contatti con parti sotto tensione.
Avviare il motore come descritto nelle istruzioni e con i piedi ben
distanti dalla lama.
AVVIAMENTO MOTORE
Prima di far partire il motore controllare che la tensione e la
frequenza indicate sulla targhetta (Fig. 10) applicata al rasaerba
corrispondano a quelle della rete di allacciamento e che la presa sia
dotata di un sal
vavita con corrente d’intervento non superiore ai 30
mA.
Per eettuare l’avviamento, spingere il pulsante di sicurezza A e
azionare la leva B (Fig. 9).
I motori elettrici dei rasaerba 1600 W sono dotati di un
salvamotore nel caso di sovraccarico; nel caso questo dispositivo
intervenga, attendere qualche minuto prima di ripetere
l’avviamento.
SAFETY PRECAUTIONS
- Start the engine in an open area, not on high grass. Remove all
stones, sticks, wires etc. from the area to be mowed.
- Carefully read the Safety Rules listed in this Manual (Pag. 11).
- Before starting the engine, make sure the blade is free to turn.
EXTENSIONS CABLES RECOMMENDED LENGHT (230 V) (Fig. 11).
Lenght
0 ÷ 20 meters
20 ÷ 50 meters
50 ÷ 100 meters
Minimum conductor section
1 mm
2
1.5 mm
2
4 mm
2
Don't use the lawnmower if the cords are damaged or worn.
Don't connect a damaged cord to the supply or touch a damaged
cord before it is disconnected from the supply. A damaged cord can
lead to contact with live parts.
Keep extension cords away from the blades. The blades can cause
damage to the cords and lead to contact with live parts.
Start the engine carefully according to instructions and with feet
well away from the blade.
START THE ENGINE
Check the motor before starting to make sure that the voltage and
frequency shown on the plate (Fig. 10) attached to the machine
correspond to those of the electrical hookup, and that the socket
has a ground fault int
erruptor with a tripping current of not more
than 30 mA.
To start the motor, press the safety button (A) and engage the lever
(B) (Fig. 9).
The electric motors of the lawnmovers 1600 W is equipped with
an overload cutout. If this switch is tripped due to an overload, wait
a few minutes before attempting to start again.
- 높은 잔디가 없는 빈 공간에서 엔진 시동을 시작합니다.
잔디깎는 영역에 돌, 막대기, 철사 등을 제거 하십시오.
- 본 설명서에 나와 있는 안전 수칙을 주의 깊게 읽으십시오.
(8페이지)
-
엔진 시동 전 날이 회전 할 수 있는지 확인 하십시오.
연장 케이블 권장 길이(230V) 그림 11
길이
0 ÷ 20
20 ÷ 50
50 ÷ 100
최소 전선 두께
1 mm
2
1.5 mm
2
4 mm
2
코드가 손상이 되었을 경우 사용하지 마십시오.
손상된 코드를 연결하지 마시고, 전원이 공급된 상태에서 손상된
코드를 만지지 마십시오. 전원코드가 손상되어 충전부에 접촉
될 수 있습니다.
항상 연장 코드가 잔디깎기 날에서 멀리 떨어 지게 하십시오.
날이 코드를 손상시켜 충전부에 접촉 될 수 있습니다.
엔진 시작 전 지시 사항을 따라 주시고 발은 항상 날에서
멀리 하여 주십시오.
엔진 시동
시동 전 전압 및 주파수가 플레이트의 라벨과 같은지
확인 하십시오.(그림10)
전압이 원활하게 공급하고 소켓에 전류 누전의 방해가 없는지
30mA 트리핑 이상 넘지 않아야 합니다.
모터의 작동은 안전 버튼(A)를 누르고 레버(B)(그림9)를
당겨 주십시오.
잔디깎기의 전기 모터는 1600W 이상의 과부하 차단을 가지고
있습니다. 이 스위치는 과부하로 인해 서게 되면 몇 분 정도
기다리고 다시 시작 할 수 있습니다.

15
NOTE:

16
17 18 19 20
Italiano English KOR
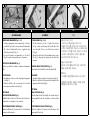
UTILIZZO USE 사용
NORME DI SICUREZZA
- Non usate mai il rasaerba su erba bagnata o su altre superci
sdrucciolevoli; tenere saldamente l'impugnatura (Fig. 17);
camminate, non correte mai.
- Su terreni in pendenza, si taglia trasversalmente, mai in salita o in
discesa netta; non tagliate su pendenze troppo forti (Fig. 18).
- Tagliate soltanto alla luce del giorno o con una forte illuminazione
articiale
- Assicurarsi che il deettore posteriore sia sempre posizionato
correttamente (Fig. 19).
- Se si urta un oggetto, fermate il motore e rendersi ben conto dei
danni subiti dal rasaerba; non ripartite mai senza avere riparato
tali eventuali danni (Fig. 20).
- Non inclinate il rasaerba all'avviamento: la lama esposta potrebbe
causa
re dei danni.
- Non mettersi mai davanti al rasaerba con il motore avviato.
- Fermate il motore se dovete attraversare un sentiero, un
camminamento e simile e quando si trasporta il rasaerba da
un’area di taglio all’altra.
- Fermare il motore e staccare la spina dalla presa di corrente prima
di togliere il sacco, quando si pulisce il foro di scarico dell’erba e
se il cavo si danneggia durante l’uso.
- Si raccomanda l’utilizzo di cavi di prolunga al neoprene o
comunque a doppio isolamento con spine di sicurezza
predisposte per uso esterno. Esaminare prima di ogni utilizzo le
spine di allacciamento ed il cavo di prolunga e sostituiteli se
dannegg
iati. Le spine di allacciamento devono essere a tenuta
d’acqua (Fig. 21).
- Il cavo di collegamento elettrico deve essere collocato in modo
da evitare che persone o veicoli possano danneggiarlo mettendo
loro e voi in pericolo.
- Mantenere sempre una posizione stabile sui pendii (Fig. 23).
- Usare estrema attenzione quando si cambia direzione sui pendii
e quando si trasporta il rasaerba da un’area di taglio all’altra.
- Assicurarsi che siano utilizzati solo dispositivi di taglio originali
(Fig. 24).
- Usare estrema cautela nell’invertire la direzione o tirare il rasaerba
verso di sé.
- Non toccare le lame prima di scollegare la macchina
dall’alimentazione e prima che le lame siano ferme
completamente (Fig. 22).
SAFETY PRECAUTIONS
- Do not mow on wet grass or other slippery surfaces; keep a rm
hold on the handle and walk behind the mower (Fig. 17), never
run.
- Do not mow up or down a slope, but always across it; if the slope
is too steep, do not mow (Fig. 18).
- Mow only in daylight or under strong articial lighting.
- Always check that rear deector is properly in place (Fig. 19).
- If you strike an object, stop the engine and check for any damage;
do not restart the engine before carrying out the necessary
repairs (Fig. 20).
- Do not tilt the mower when starting: the blade could cause
injuries.
- Never stand in front of the mower when the engine is running.
- Stop the engine when crossing paths, drives and when
transporting the lawnmover to and from the a
rea to be mowed.
- Stop the motor and disconnect the plug from the mains both
before removing the bag, before cleaning the hole where the
grass comes out and if the cable is damaged during use.
- We recommended that you use extension cables in neoprene or,
in any case, those having double insulation, with safety plugs for
outdoor use. Check the plugs and extension cable before each
use and replace them immediately if damaged. The electrical
plugs must be watertight (Fig. 21).
- The electrical connection cable must be situated in such a way as
to prevent people or vehicles from damaging it, which is a safety
risk for them and you.
- Always maintain a secure footing on slopes (Fig. 23).
- Exer
cise extreme caution when changing direction on slopes and
when transporting the lawnmover to and from the area to be
mowed.
- Ensure that only replacement cutting means of the right type are
used (Fig. 24).
- Exercise extreme caution when reversing or pulling the
lawnmower towards you.
- Not to touch the blades before the machine is disconnected from
the supply and the blades have come to a complete stop
(Fig. 22).
-
젖은 풀밭이나 미끄러운 표면에서 작업하지 마십시오.
(그림17) 핸들을 꼭 잡고 기계 뒤쪽에서 작업 하십시오.
절대 뛰지 아십시오.
- 경사진 곳에서 위 아래로 작업하지 마십시오. 가파른
경사에서도 작업 하지 마십시오.(그림18)
-
낮 시간 또는 조명이 밝은 곳에서 작업 하십시오.
-
- 만약 이물질을 쳤다면 바로 엔진을 끄고 손상이 있는지 확인
하십시오. 필요한 수리를 하신 후 엔진 시동을 걸어 주십시오.
(그림20)
- 사용 전 기계를 기울이지 마십시오: 날 손상 원인이
될 수 있습니다.
- 엔진 작동 중일 때에는 기계 앞에 서 있지 마십시오.
- 길가를 건너 가거나 운반하는 경우 엔진을 정지 하십시오.
- 다음의 경우 모터를 정지 하시고 플러그를 뽑아 주십시오:
풀통을 비울 때, 풀 배출구를 청소할 때, 전선이 손상 되었을 때
- 네오 확장 케이블 사용을 추천하며 또는 옥외 사용을 위한
안전 플러그와 이중절연 제품 사용을 권장합니다. 사용 전
플러그와 연장 케이블을 점검하시고 손상된 경우 즉시 교체
하십시오. 전기 플러그는 방수 제품이어야 합니다.(그림21)
- 전기 연결 케이블은 사람과 자동차의 안전 위험으로부터 예방을
해야 합니다.
- 항상 경사면에서는 발판이 안전한지 확인 하십시오(그림23)
-
경사면에서 작업 시 방향 전환 할 때 각별한 주의를 하십시오.
- 정풀 날을 확인 사용 하십시오(그림4)
- 후진 또는 당길 때 특히 주의 하십시오.
- 기계를 전원에서 분리 날이 완전히 정지 하기 전까지 날을
만지지 마십시오.(그림22)

17
21 22 23 24

18
25 26
Italiano English KOR
UTILIZZO - ARRESTO MOTORE USE - STOPPING ENGINE 사용 - 정지
UTILIZZO
REGOLAZIONE ALTEZZA TAGLIO
SOLO CON MOTORE FERMO E PRESA DI CORRENTE
DISINSERITA.
Agire sulla leva (A) per variare l’altezza di taglio nella
posizione desiderata (Fig. 25).
ARRESTO MOTORE
Rilasciare la leva (B) (Fig. 26).
ATTENZIONE: Dopo aver tolto la spina o aver
rilasciato la leva (B) il motore elettrico e la lama
continuano a girare per circa 3 secondi.
ATTENZIONE – Vericare, prima di ogni utilizzo,
che il rilascio della leva motore provochi
l’arresto del motore in pochi secondi. Fare
vericare il corretto tempo di arresto della lama
periodicamente da un Centro Assistenza
Autorizzato.
USE CUTTING
ADJUSTING THE CUTTING HEIGHT
DO THIS ONLY WITH THE MOTOR OFF AND THE
MACHINE DISCONNECTED FROM THE ELECTRICAL
SUPPLY.
Use lever (A) to adjust the cutting height to the desired
position (Fig. 25).
ENGINE STOPPING
Release the lever (B) (Fig. 26).
WARNING: when the plug is removed or the
lever released (B), the electric motor and the
blade continue to turn for about 3 seconds.
WARNING – Before using the machine, always
make sure that the motor stops within a few
seconds of the motor lever being released. Have
the blade stoppage time periodically tested by
an Authorised Service Centre.
풀 높이 조절
풀 높이 조절
항상 모터를 정지하시고
전기선이 연결이 안되게 하십시오.
레버(A, 그림25)를 사용 원하는 높이에
위치하게 하십시오.
모터 정지
레버(B)(그림26)를 놓아 주십시오.
경고: 플러그를 뽑거나 레버(B)를 놓았을 때
모터와 날이 3초 정도 회전 합니다.
경고 - 기계를 사용하기 전에 항상 모터는 레버가
놓아지고 빠르게 중지 되었는지 확인 하십시오.
주기적으로 취급점에서 날이 잘 멈추는지 확인
하십시오.
40

19
Italiano English KOR
UTILIZZO USE
ATTENZIONE:
- Non usare il rasaerba se le maglie del sacco
raccoglierba sono rotte o intasate di erba.
- Arrestare sempre il motore prima di togliere il
sacco raccoglierba.
NOTA
- Se l'altezza dell'erba da falciare é eccessiva, eettuare
due passaggi: il primo all'altezza massima, il secondo
all'altezza desiderata.
- Falciare il prato a "chiocciola" dall'esterno verso
l'interno (Fig. 40, pag. 25).
USI PROIBITI
- Il rasaerba deve essere utilizzato solamente per il
taglio di superci erbose in giardini o parchi.
- Il rasaerba non deve essere utilizzato per il taglio di
altri materiali, in particolare per materiali che si
trovano al di sopra del livello del terreno, per i quali
sia nec
essario sollevare il rasaerba stesso.
- Il rasaerba non deve essere utilizzato per triturare
rami, o materiali più consistenti dell’erba.
- Il rasaerba non deve essere utilizzato per aspirare o
raccogliere dal terreno materiali consistenti,
polverosi, riuti di ogni genere, sabbia o ghiaia.
- Il rasaerba non deve essere utilizzato per spianare
rilievi o asperità del terreno; la lama non deve mai
toccare il terreno stesso.
- Il rasaerba non deve essere utilizzato per trasportare,
spingere o trainare altri oggetti, carrelli o simili.
- È proibito applicare alla presa di forza del rasearba
utensili o applicazioni che non siano quelli indicati
dal costruttore
.
WARNING:
- Do not use the mower if the bag is worn or
clogged with grass.
- Stop the engine before taking the grass bag
out.
NOTE
- If the grass is too high make two cuts: the rst one at
maximum height; the second at the desired height.
- Mow the lawn in a spiral from the edge to the centre
(Fig. 40, pag. 25).
PROHIBITED USES
- The lawnmower must only be used for cutting grassy
areas in gardens or parks.
- The lawnmower must not be used for cutting other
materials, particularly materials above ground level
that require the lawnmower to be raised above the
ground.
- The lawnmower must not be used to shred branches,
nor materials thicker than grass.
- The lawnmower m
ust not be used to vacuum or
collect dense material, dust, refuse of any kind, sand
or gravel from the ground.
- The lawnmower must not be used to atten uneven
or bumpy terrain; the blade must never come into
contact with the ground.
- The lawnmower must never be used to transport,
push or tow trailers or other similar objects.
- It is prohibited to t implements or accessories other
than those supplied by the manufacturer.
경고 :
- 풀통이 손상 되거나 풀에 막혀 있을 때는
사용 하지 마십시오.
- 풀통을 비울 때에는 모터를 정지 하십시오.
주의
- 풀이 너무 높을 때에는 2번의 작업으로 깎아
주십시오. 첫 작업은 제일 높게; 두 번째 작업은
사용자의 원하는 높이에 맞게 작업 하십시오.
- 잔디깎기 작업은 가장자리에서 시작 나선형으로
작업 하십시오.(그림40, 18페이지)
금지된 사용
-
잔디깎는 기계는 풀만 깎는 정원이나 공원에서의
잔디깎기에만 사용하십시오.
-
다른 재질의 절단에 잔디깎기를 이용하지
마십시오.
- 풀보다 두꺼운 물질을 절단 하는데 사용하지
마십시오.
- 모든 종류의 모래, 자갈 먼지등을 청소하거나
수집하는데 사용하지 마십시오.
- 고르지 않은 지형을 평평하게 하는 곳에 사용하지
마십시오. 날이 바닥에 닿지 않게 하십시오.
- 밀거나 견인 또는 기타 유사한 개체를 수송하는데
사용하지 마십시오.
- 제조업체가 제공하는 이외의 유사 부속품은
사용하지 마십시오.

20
41
Italiano English KOR
TRASPORTO - RIMESSAGGIO TRANSPORTATION - STORAGE 이동 - 보관
Prima di eettuare qualsiasi pulizia o riparazione,
fermare il motore e staccare la spina della presa di
corrente (Fig. 41).
TRASPORTO - RIMESSAGGIO
- Per facilitare trasporto e rimessaggio, il manubrio può
essere piegato: svitare i pomelli ed abbassare la parte
superiore del manubrio.
NOTA: prestare attenzione ad evitare pizzicamenti o
stiramenti del cavo elettrico.
- Togliere il sacco raccoglierba.
- Trasportare il rasaerba a motore spento.
ATTENZIONE – Per il trasporto del rasaerba su
veicolo tramite cinghie. Il rasaerba va trasportato in
posizione orizzontale, assicurandosi inoltre che non
vengano violate le vigenti norme di trasporto per
tali macchine.
RIMESSAGGIO
Dopo ogni utilizzo della macchina, pulire la parte
inferiore evitando, assolutamente, l’impiego di getti
d’acqua.
- Controllare il buon stato della macchina.
- Controllare che tutti i bulloni ed i dadi siano ben serrati.
- Applicare grasso od olio motore alle parti soggette a
ruggine.
- Mettere il rasaerba in un luogo asciutto, possibilmente
con fondo di cemento. Per proteggerlo dall'umidità,
potete metterlo su delle assi o su una lamiera.
- Le procedure di messa in servizio dopo un rimessaggio
invernale sono le stesse che si eettuano durante l’avvio
normale della macchina (pag.20).
Before cleaning or carrying out any repairs, stop the
motor and disconnect the plug from the mains
(Fig. 41).
TRASPORTATION - STORAGE
- To facilitate transport and storage, the handle can be
folded: release knob and fold the upper handle.
NOTE: be careful to prevent pinching or stretching of the
electric cables.
- Remove the grass catcher.
- Only transport the lawnmower with the engine switched
o.
WARNING - When transporting the lawnmower on a
vehicle, ensure that it is rmly and securely fastened
using straps or belts. The lawnmower must be
transported in the horizontal position, also ensuring
compliance with applicable transport regulations
for such machines.
STORAGE
Clean the bottom part of the machine after each use,
but never do so using jets of water.
- Check the good condition of the mower.
- Keep all nuts, screws and bolts tight.
- Put some grease or oil on parts subject to rust.
- Store the mower in a dry place, possibly on a cement
oor; protect against humidity by putting under it some
boards or a plate.
- The procedures for returning the machine to service
following winter storage are the same as for starting up
during everyday use (page 20).
경고 - 청소 또는 수리 하기 전 모터를 정지,
플러그를 뽑아 주십시오.(그림41)
이동 - 보관
- 운송 및 보관을 용이하게 하기 위해 핸들을 접을 수
있습니다. 손잡이를 해제하고 핸들을 접어 주십시오.
주의: 케이블이 끼거나 꼬임에 주의 하십시오.
- 풀통 분리
- 기계 운반 시 모터를 정지 하십시오.
경고 - 차량으로 운반 할 때 줄, 벨트등을 이용 확실히
고정 하십시오. 적용 가능한 운송 규정을 준수하시고
수평 위치로 운송 하십시오. 도로에서 이동 시 엔진을
중지 하시고 자동차, 트랙터 등으로 견인 하지 마십시오.
보관
매 사용 후 기계 하단 부분을 청소 하십시오.
물 청소는 하지 마십시오.
- 기계의 상태를 확인 하십시오.
- 너트, 스크류, 볼트의 조임 상태를 확인 하십시오.
- 녹이 생기는 부분에는 구리스 또는 오일을
공급하여 주십시오.
- 건조한 곳에 기계를 보관, 시멘트 바닥, 습기가 없는
곳에 놓아 주십시오.
- 겨울 동안 보관하고 다시 사용 할 때에는 18페이지를
참조 하십시오.
La pagina si sta caricando...
La pagina si sta caricando...
La pagina si sta caricando...
La pagina si sta caricando...
La pagina si sta caricando...
La pagina si sta caricando...
La pagina si sta caricando...
La pagina si sta caricando...
-
 1
1
-
 2
2
-
 3
3
-
 4
4
-
 5
5
-
 6
6
-
 7
7
-
 8
8
-
 9
9
-
 10
10
-
 11
11
-
 12
12
-
 13
13
-
 14
14
-
 15
15
-
 16
16
-
 17
17
-
 18
18
-
 19
19
-
 20
20
-
 21
21
-
 22
22
-
 23
23
-
 24
24
-
 25
25
-
 26
26
-
 27
27
-
 28
28


Efco Comfort plus Series Manuale del proprietario
- Categoria
- Tosa erba
- Tipo
- Manuale del proprietario
Documenti correlati
-
Efco LR 38 P Li-Ion Manuale del proprietario
-
Efco LRi 40 P Manuale del proprietario
-
Efco PR 40 S Manuale del proprietario
-
Efco Gi 48 T Manuale del proprietario
-
Efco MAX 48 TBX ALLROAD ALUMINIUM Manuale del proprietario
-
Efco OLEO-MAC comfort plus Serie Manuale del proprietario
-
Efco G 44 PK COMFORT OLD Manuale del proprietario
-
Efco LR 53 VK ALLROAD PLUS 4 Manuale del proprietario
-
Efco LR 48 TKE COMFORT PLUS Manuale del proprietario
-
Efco AR 53 TK ALUMINIUM PRO Manuale del proprietario