
ES MANUAL DE UTILIZACIÓN
EN GUIDE TO INSTALLATION
FR GUIDE D’UTILISATION
PT MANUAL DE UTILIZAÇÃO
DE BEDIENUNGSANLEITUNG
IT MANUALE DI ISTRUZIONI
HU HASZNÁLATI ÚTMUTATÓ
SK SPRIEVODCA INŠTALÁCIOU
CZ NÁVOD K POUŽITÍ
PL INSTRUKCJA OBSŁUGI
DK INSTALLATIONSVEJLEDNING
NL GEBRUIKERSHANDLEIDING
SV BRUKSANVISNING
РУС РУКОВОДСТВО ПО ЭКСПЛУАТАЦИИ
Campana extractora decorativa
Cooker Hood
Hotte décorative
Exaustor decorativo
Dekorative Dunstabzugshaube
Cappa aspirante decorativa
Páraelszívó
Dekoračný extračný zvon
Extrakční dekorativní zvon
Dekoracyjny okap kuchenny
Dekorativ emhætte
Decoratieve afzuigkap
Dekorativ Spiskåpa
ДЕКОРАТИВНАЯ КУПОЛЬНАЯ КУХОННАЯ ВЫТЯЖКА

2
ES
EN
FR
PT
DE
IT
HU
SK
CZ
PL
DK
NL
SV
РУС
2
13
23
33
43
53
63
73
83
93
103
113
123
133

3
ESÍNDICE
1 / A LA ATENCIÓN DEL USUARIO
• Consignas de seguridad ______________________________________ 4
• Conservación del medio ambiente _____________________________ 5
• Descripción del aparato ______________________________________ 6
2 / INSTALACIÓN DE SU APARATO
• Protección medioambiental ___________________________________ 7
3 / USO DE SU APARATO
• Para usar su campana de cocina ______________________________ 9
4 / CUIDADO Y LIMPIEZA DE SU APARATO
• Cambio y limpieza de los ltros anti-grasa ______________________ 10
• Sustitución de la bombilla ____________________________________ 10
• Instalación de la salida T-SHARP ______________________________ 10
• Mantenimiento de su aparato _________________________________ 11
5 / ANOMALÍAS DE FUNCIONAMIENTO ______________________________ 12
6 / SERVICIO TÉCNICO _____________________________________________ 12

4
1 / A LA ATENCIÓN DEL USUARIOES
Importante
Conserve este manual con el aparato. Si debe vender o ceder el aparato a otra perso-
na, asegúrese de que el manual de utilización va con él. Por favor, lea estos consejos antes
de instalar y utilizar el aparato. Han sido redactados pensando en su seguridad y la de los
demás.
Atención
Si la cocina calienta con un aparato conectado a una chimenea (por ejemplo, una es-
tufa), se debe instalar la campana en versión reciclaje. No utilice la campana sin los fi ltros
modulares.
Hay que prever una ventilación adecuada cuando se utilice una campana extractora de
cocina al mismo tiempo que otros aparatos que funcionen con gas u otro combustible.
• CONSIGNAS DE SEGURIDAD
— Este aparato ha sido diseñado para ser
utilizado por particulares en sus domicilios.
— Este aparato debe ser utilizado por adul-
tos. Tenga cuidado de que los niños no lo
toquen y lo utilicen como un juguete. Ase-
gúrese de que no manipulen los mandos del
aparato.
— Cuando reciba el aparato, desembálelo o
hágalo desembalar inmediatamente. Com-
pruebe su aspecto general. Si tiene reservas
que señalar, hágalo por escrito en el albarán
de entrega y quédese con un ejemplar.
— Su aparato está destinado a un uso do-
méstico normal. No lo utilice con nes co-
merciales o industriales o con otros nes
que no sean aquellos para los que ha sido
diseñado.
— No modi que o intente modi car las ca-
racterísticas del aparato. Podría suponer un
peligro par usted.
— Las reparaciones deben ser realizadas
exclusivamente por un especialista autori-
zado.
— Desconecte siempre la campana extrac-
tora antes de limpiarla o realizar el mante-
nimiento.
— Ventile adecuadamente la habitación si
la campana funciona al mismo tiempo que
otros aparatos alimentados con una fuente
de energía que no sea la electricidad. Ello
es para que la campana no aspire los gases
de combustión.
— No se puede ambear alimentos o tener
encendidos los fuegos de gas sin ningún
recipiente bajo la campana (las llamas aspi-
radas podrían deteriorar el aparato).
— Cuando esté friendo debajo del aparato,
deberá vigilarlo constantemente. Los acei-
tes y grasas calentadas hasta una alta tem-
peratura pueden coger fuego.
— Respete la frecuencia de limpieza y cam-
bio de los ltros. La acumulación de depósi-
tos de grasa podría provocar un incendio.
— No puede funcionar encima de un fuego
a base de combustible (madera, carbón...).
— No utilice aparatos de vapor o a alta pre-
sión para limpiar el aparato (exigencias re-
lativas a la seguridad eléctrica).
— Con el objetivo de mejorar siempre nues-
tros productos, nos reservamos el derecho
de aplicar modi caciones a sus caracterís-
ticas técnicas, funcionales o estéticas, pro-
vocadas por los avances técnicos.
— Para que pueda encontrar fácilmente las
referencias de su aparato, le aconsejamos
que las anote en la página “Servicio Técni-
co y Servicio al Consumidor”. (Esta página
también le explica dónde encontrarlas en el
aparato).
- Este aparato no está previsto para ser uti-
lizado por personas (incluyendo niños) con
las capacidades físicas, sensoriales o men-
tales reducidas, o por personas desprovis-
tas de experiencia o conocimientos, salvo
si, a través de una pesona responsable de
su seguridad, cuentan con vigilancia o tie-
nen instrucciones previas sobre la utiliza-
ción del aparato.

5
1 / A LA ATENCIÓN DEL USUARIO ES
Atención
La instalación está reservada a los instaladores y técnicos cualifi cados.
Atención
Antes de utilizar por primera vez el fi ltro modular, retire la película protectora.
• PROTECCIÓN DEL MEDIO AMBIENTE
— Los materiales utilizados para el embalaje de este aparato son reciclables. Participe en
su reciclaje y contribuya así a conservar el medio ambiente tirándolos a los contenedores
municipales previstos para ellos.
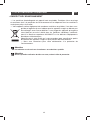
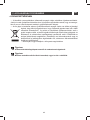
— Su aparato también contiene materiales reciclables, por lo que está marcado con este
logotipo que le indica que los aparatos desechados no deben mezclarse con
otros residuos. Actuando así, el reciclaje de los aparatos que organiza su
fabricante se efectuará en las mejores condiciones posibles, de acuerdo con
la directiva europea 2002/96/CE sobre los residuos de equipos eléctricos y
electrónicos. Consulte en su ayuntamiento o a su vendedor para conocer
dónde se encuentran los puntos de recogida de aparatos desechados más
cercanos a su domicilio.
— Le damos las gracias por su colaboración en la protección del medio am-
biente.

6
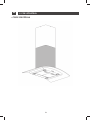
1 / A LA ATENCIÓN DEL USUARIOES
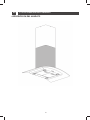
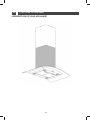
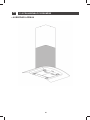
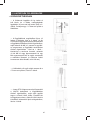
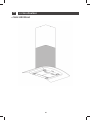
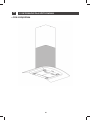
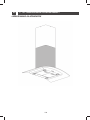
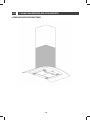
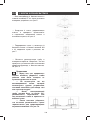
• DESCRIPCIÓN DEL APARATO

7
2 / INSTALACIÓN DE SU APARATO ES
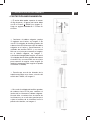
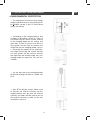
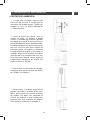
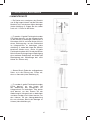
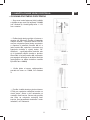
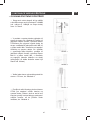
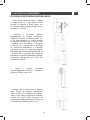
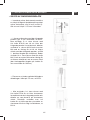
• PROTECCIÓN MEDIOAMBIENTAL
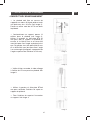
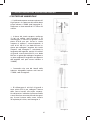
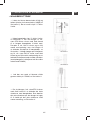
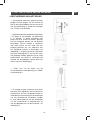
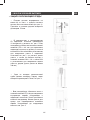
— El techo debe poder soportar al menos
40 Kg de peso y el grosor del techo debe
ser de al menos
30MM (ver Imagen 2).
Haga un agujero redondo de 1*170mm en
el techo.
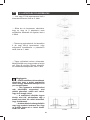
— Conforme al tablero colgante, perfore
12 agujeros en el techo, ver Imagen 2. Se
usarán 12 unidades de tornillos grandes de
cabeza chata ST6*40mm para jar el tablero
colgante en el techo y, posteriormente, 8
unidades de tornillos M4*10 y una tuerca
M4 con una junta para conectar el angular
en el tablero colgante, ver Imagen 1,
calculando la longitud del angular, así como
16 unidades de tornillos grandes de cabeza
chata M4*10 y una tuerca M4 con una junta
para conectar el angular a otro angular (la
longitud superpuesta del angular no puede
ser inferior a 100MM)
— Permita que uno de los laterales de la
tubería extensible vaya afuera a través del
ori cio de 170MM, ver Imagen 3.
— Se usarán 4 unidades de tornillos grandes
de cabeza chata ST4*8 para conectar el
interior de la chimenea al tablero colgante.
Uno de ellos se colocará en el exterior de
la chimenea y se usarán dos ganchos para
sujetar el exterior de la chimenea hasta la
próxima instalación, ver Imagen 4.
Imagen 3
Imagen 4
Imagen 1
Imagen 2

8
2 / INSTALACIÓN DE SU APARATOES
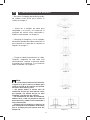
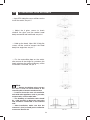
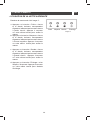
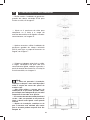
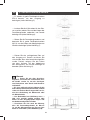
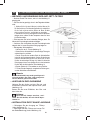
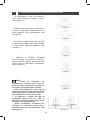
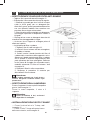
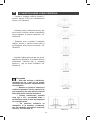
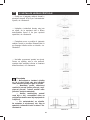
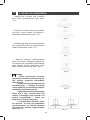
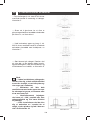
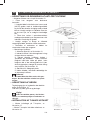
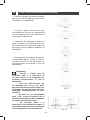
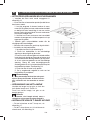
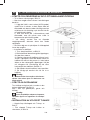
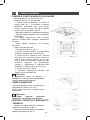
Nota
— Antes de proceder con la instalación,
asegúrese de que la zona está limpia para
evitar la succión de los trocitos que quedan
de virutas de madera y polvo.
— No puede utilizar el mismo tubo de
ventilación de aire que otro aparato como,
por ejemplo, una tubería de gas, un tubo
templado o un tubo de aire caliente.
— El acodamiento del tubo de ventilación
deberá ser de ≤ 120°, en paralelo o sobre el
punto de inicio y deberá estar conectado a
una pared exterior.
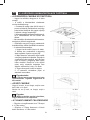
— Después de la instalación, asegúrese de
que el extractor está nivelado a fi n de evitar
que se acumule grasa en la parte fi nal. Ver
Imagen 10.
—Se usarán 4 unidades de tornillos grandes
de cabeza chata ST4*8 para instalar la
salida, ver Imagen 5.
— Ajuste los 4 tornillos de vidrio para
comprobar si el cristal y el cuerpo de la
campana de cocina están conectados y
jados correctamente, ver Imagen 6.
— Sostenga la campana y use 6 unidades
de tornillos grandes de cabeza chata M4*10
para conectar el cuerpo de la campana al
angular, ver Imagen 7.
— Ponga la tubería extensible en la salida.
Después, asegúrese de que todo está
correctamente, coloque el gancho desde
el exterior de la chimenea y la instalación
habrá nalizado, ver Imagen 9.
Imagen 10
Imagen 5
Imagen 6
Imagen 7
Imagen 8
Imagen 9

9
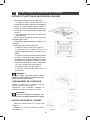
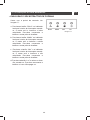
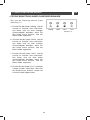
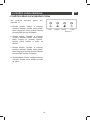
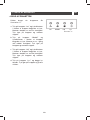
• PARA USAR SU CAMPANA DE COCINA
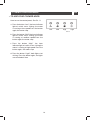
Cómo usar el panel de control. Ver Imagen 11.
a. Pulse el botón “Baja” y el indicador
luminoso interior del interruptor comenzará
a brillar. El motor está funcionando a baja
velocidad. Pulse nuevamente el botón y
el motor se detendrá.
b. Pulse el botón “Media” y el indicador
luminoso interior del interruptor
comenzará a brillar. El motor está
funcionando a velocidad media. Pulse
nuevamente el botón y el motor se
detendrá.
c. Pulse el botón “Alta” y el indicador
luminoso interior del interruptor comenzará
a brillar. El motor está funcionando a alta
velocidad. Pulse nuevamente el botón y
el motor de detendrá.
d. Pulse el botón “Luz” y ambas luces
comenzarán a brillar. Pulse el botón
nuevamente y las luces se apagarán.
Imagen 11
3 / USO DE SU APARATO ES
Baja
Alta Luz
Media

10
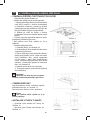
4 / CUIDADO Y LIMPIEZA DE SU APARATOES
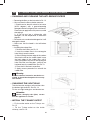
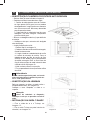
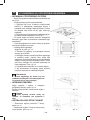
• CAMBIO Y LIMPIEZA DE LOS FILTROS ANTI-GRASA
• SUSTITUCIÓN DE LA BOMBILLA
• INSTALACIÓN DE LA SALIDA
T-SHARP
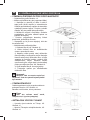
— Quite los ltros tal y como se indica en la Imagen 12
— Puede limpiar el ltro tal y como se describe a
continuación:
1. Póngalo a remojo durante unos 3 minutos en agua
caliente (40-50 grados) con un detergente quita grasa
y luego cepíllelo suavemente con un cepillo suave.
Por favor, no aplique demasiada presión para evitar
daños.
2. Puede introducirlo en el lavavajillas con detergente,
pero debe con gurar la temperatura alrededor de los
60 grados.
— Por favor, no use un detergente abrasivo ya que dañaría
la campana.
— Asegúrese de que la campana está desconectada
antes de limpiarla.
— Instalación el ltro de carbón:
1. Quite el ltro Al, ver Imagen 12.
2. Inserte el ltro de carbón en el ori cio rectangular,
jándolo sobre el motor.
3. Después, inserte el borde frontal del ltro de carbón
en la ranura de la campana de cocina. Baje el borde
posterior del ltro de carbón hasta que se encaje en su
sitio en la parte posterior del ori cio rectangular. Eleve
las dos barras de jación hasta que estén de modo
horizontal sobre el ltro de carbón. Ver Imagen 13.
4. Vuelva a colocar el ltro Al. en su posición.
5. Realice el procedimiento inverso para desinstalar
el ltro de carbón.
Extraiga el soporte y el cristal y luego extraiga
la bombilla estropeada, Ver Imagen 14.
Fije la nueva bombilla, el cristal y el soporte.
— Fije la salida de aire y la T-sharp, ver
Imagen 15.
— Fije la salida T-sharp en la parte interior
de la chimenea, ver Imagen 16.
Advertencia
El carbón vegetal no puede lavarse o
reciclarse. Deberá cambiarlo al menos cada
cuatro meses.
Atención
Antes de cambiar las luces, asegúre-
se de que el aparato está desconectado.
Imagen 14
Imagen 16Imagen 15
Imagen 12
Imagen 13

11
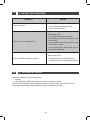
• MANTENIMIENTO DE SU APARATO
Para preservar su aparato, le recomendamos que use productos de limpieza de la marca
Clearit.
La experiencia profesional
al servicio de las personas
Clearit le ofrece productos y soluciones profesionales diseñadas para el cuidado diario de
sus aparatos domésticos y cocinas.
Puede encontrar estos productos en su minorista habitual, junto con una completa línea de
accesorios y consumibles.
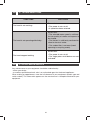
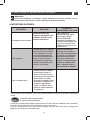
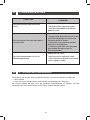
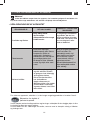
MANTENIMIENTO QUÉ HACER
PRODUCTOS / ACCESORIOS
QUE SE DEBEN USAR
Parte superior (superfi cie)
y accesorios
Cartucho de fi ltro
Filtro de carbón activado
Nunca use estropajos
metálicos, productos
abrasivos o cepillos
demasiado duros.
Este fi ltro retiene vapores
grasos y polvo. Este
componente juega un papel
importante para garantizar
la efi cacia de su campana.
En el caso de manchas
resistentes, use una crema
no abrasiva y aclárela
posteriormente con agua
limpia.
Este fi ltro retiene olores
y debe cambiarse al
menos una vez al año,
dependiendo del nivel de
uso. Deberá pedir estos
fi ltros a su distribuidor
(indicando la referencia
que se muestra en la placa
de identifi cación que se
encuentra en el interior de la
campana) y anote la fecha
de sustitución del fi ltro.
Para limpiar el cuerpo y
el orifi cio de encendido,
deberá usar productos de
limpieza de uso doméstico
diluidos en agua y luego
aclarar usando agua limpia,
secando posteriormente
con un trapo suave.
Utilice un producto de
limpieza de uso doméstico
y luego aclárelo con
abundante agua y séquelo.
Estos fi ltros se pueden
limpiar en posición vertical
en su lavavajillas.
(No permita que entren en
contacto con platos sucios
o platería).
Advertencia
Antes de realizar cualquier trabajo, el suministro eléctrico de la campana debe estar
desconectado, bien desenchufándola o usando un disyuntor.
4 / CUIDADO Y LIMPIEZA DE SU APARATO ES

12
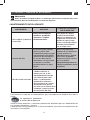
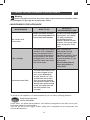
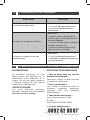
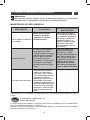
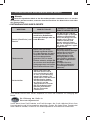
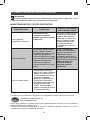
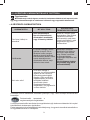
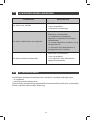
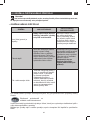
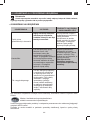
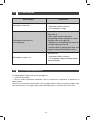
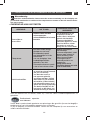
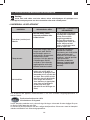
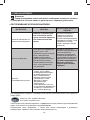
5 / ANOMALIAS DE FUNCIONAMIENTOES
SINTOMAS SOLUCIONES
La campana no funciona...
El rendimiento de la campana
es insufi ciente...
La campana se ha parado
mientras estaba functionando.
Compruebe que :
• no hay un corte de corriente.
• se ha seleccionado una velocidad.
Compruebe que :
• la velocidad del motor que ha
seleccionado es sufi ciente para la
cantidad de humo y el vapor de agua
producido.
• la cocina esta sufi cientemente
ventilada para que pueda entrar aire.
• el fi ltro de carbono no esta gastado
(campana en version reciclaje).
Compruebe que :
• no hay un corte de corriente.
• no se ha activado el dispositivo de
corte omnipolar.
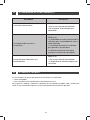
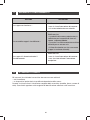
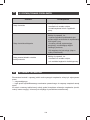
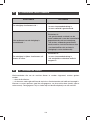
6 / SERVICIO TÉCNICOES
Las intervenciones que requiera la máquina deberán ser efectuadas:
— por el revendedor,
— o por cualquier profesional cuali cado depositario de la marca.
Al llamar, mencione la referencia completa de la máquina (modelo, tipo y número de serie).
Estos datos guran en la placa de identi cación situada en la máquina.

13
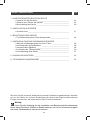
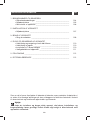
ENTABLE OF CONTENTS
1 / NOTICES TO THE USER
• Safety recommendations _____________________________________ 14
• Environmental protection _____________________________________ 15
• Description of your appliance _________________________________ 16
2 / INSTALLING YOUR APPLIANCE
• Environmental protection _____________________________________ 17
3 / USING YOUR APPLIANCE
• To use your cooker hood _____________________________________ 19
4 / CARING FOR AND CLEANING YOUR APPLIANCE
• Changing and cleaning the anti-grease lters ___________________ 20
• Changing the light bulb _______________________________________ 20
• Install the T-Sharp outelt ______________________________________ 20
• Maintaining your appliance ___________________________________ 21
5 / TROUBLESHOOTING ___________________________________________ 22
6 / AFTER-SALES SERVICE _________________________________________ 22
As part of our commitment to constantly improving our products, we reserve the right
to make changes to them based on technical advances to their technical and functional
features and appearance.
Warning:
Before installing and using your appliance, please carefully read this Guide
to Installation and Use, which will allow you to quickly familiarise yourself with its
operation.

14
1 / NOTICES TO THE USEREN
Attention
Keep this user guide with your appliance. If the appliance is ever sold or transferred to
another person, ensure that the new owner receives the user guide. Please become familiar
with these recommendations before installing and using your oven. They were written for
your safety and the safety of others.
Warning
In the case of a kitchen heated by a device connected to a chimney (a stove, for exam-
ple) the “recycling” version of the hood should be installed. Do not use the hood without
metal fi lters.
Suitable ventilation should be provided in the room when the hood is used at the same time
as appliances operated by gas or another combustible fuel.
• SAFETY RECOMMENDATIONS
— This oven was designed for use by priva-
te persons in their homes.
— This appliance is to be used by adults.
Make sure that children do not touch and
that they do not treat it as a toy. Make sure
that they do not touch the appliance’s con-
trol panel.
— When you receive the appliance, unpack
or have it unpacked immediately. Give it an
overall general inspection. Make note of any
concerns or reservations on the delivery slip
and make sure to keep a copy of this form.
— Your appliance is intended for standard
household use. Do not use it for commercial
or industrial purposes or for any other pur-
pose than that for which it was designed.
— Do not modify or attempt to modify any
of the characteristics of this appliance. This
would be dangerous to your safety.
— Repairs must only be carried out by an
approved specialist.
— Always unplug the hood before cleaning
it or performing other maintenance acts.
— Provide adequate ventilation for the room
in the case of simultaneous use of the hood
and other appliances powered by an energy
source other than electricity. This will pre-
vent the hood from aspirating the combus-
tion gases.
— You should never “ ambé” dishes under
the hood or operate gas rings under the
hood without placing cookware on them
(the ames sucked up into the hood can da-
mage the appliance).
— When frying food under the appliance,
you must carefully monitor the preparation
at all times.
Oils and grease brought to very high tempe-
ratures can catch re.
— Respect the recommended frequency of
cleanings and lter replacements. The ac-
cumulation of grease deposits may cause
a re.
— The hood should never be used over a
combustible fuel burning stove (wood, coal,
etc.).
— Never use steam or high-pressure de-
vices to clean your appliance (requirement
imposed by electrical safety).
— With a view to constantly improving our
products, we reserve the right to modify
their technical, functional or aesthetic cha-
racteristics, making any changes to their
features considered necessary or desirable
in view of technical progress.
— In order to easily locate the reference
information for your appliance, we recom-
mend that you note these data on the “Af-
ter-Sales Service Department and Customer
Relations” page. (This page also explains to
you where to nd this information on your
appliance.)
- This appliance is not intended to be used
by persons (including children) with redu-
ced physical, sensory or mental abilities, or
persons lacking experience or awareness,
unless using it with the help of a person re-
ponsible for their safety, or under supervi-
sion and with prior instruction in its use.

15
1 / NOTICES TO THE USER EN
Warning
Installation should only be performed by installers and qualifi ed technicians.
Warning
Remove the protective fi lm from the cartridge fi lter before use.
• ENVIRONMENTAL PROTECTION
— This appliance’s packaging material is recyclable. Help recycle it and protect the environ-
ment by dropping it off in the municipal receptacles provided for this purpose.
— Your appliance also contains a great amount of recyclable material. It is marked with
this label to indicate the used appliances that should not be mixed with other
waste. This way, the appliance recycling organised by your manufacturer will
be done under the best possible conditions, in compliance with European
Directive 2002/96/EC on Waste Electrical and Electronic Equipment. Contact
your town hall or your retailer for the used appliance collection points closest
to your home.
— We thank you doing your part to protect the environment.

16
1 / NOTICES TO THE USEREN
• DESCRIPTION OF YOUR APPLIANCE

17
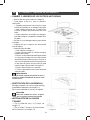
2 / INSTALLING YOUR APPLIANCE EN
• ENVIRONMENTAL PROTECTION
— The ceiling must can bear at least 40kgs
weight, and the thickness of the ceiling must
be
30MM, see pic 2, drill 1*170mm round
hole in the ceiling.
— According to the hanging board, drill
12 holes in the ceiling, see pic 2, 12pcs of
ST6*40mm big at screws will be used to
x the hanging board on the ceiling, and
then 8pcs of M4*10 screws and M4 nut
with gasket will be used to connect the
angle iron into the hanging board, see pic
1, calculated the length of the angle iron,
and 16pcs M4*10 big at screws and M4
nut with gasket will be used to connect
the angle iron and another angle iron ( the
overlap length of angle iron can not less
100MM)
— Let the one side of the extensible pipe
go outside through the hole of 170MM, see
pic 3.
— 4pcs ST4*8 big at screws will be used
to connect the internal chimney into the
hanging board, then put one the external
chimney, two hooks will be used to put up
the external chimney in order to the next
installation, see pic 4.
Pic 3
Pic 4
Pic 1
Pic 2

18
2 / INSTALLING YOUR APPLIANCEEN
Note
— Before installation, please ensure
the area is clean to avoid suction of the
remaining bits of broken wood and dust.
— It cannot share the same air ventilation
tube with other appliance such as gas tube,
warmer tube, and hot wind tube.
— The bending of ventilation tube should
be ≤ 120°, parallel or above the start point
and should be connected to the external
wall.
— After installation, make sure that the
extractor is level to avoid grease collection
at one end. See Pic 10.
— 4pcs ST4*8 big at screws will be used to
install the outlet, see pic 5.
— Adjust the 4 glass screws to check
whether the glass and the cooker hood
body connected well and xed, see pic 6.
— Hold up the hood, 16pcs M4*10 big at
screws will be used to connect the hood
body into angle iron, see pic 7.
— Put the extensible pipe on the outlet;
after ensure all the things ok, put down the
hook, take from the external chimney, all the
installation is nished, see pic 9.
Pic 10
Pic 5
Pic 6
Pic 7
Pic 8
Pic 9

19
• TO USE YOUR COOKER HOOD
How to use the control panel, See Pic 11.
a. Press the button “Low”,the inner indicator
light of switch starts shining, the motor
is running at low speed.Press the button
again,the motor stop.
b. Press the button “Mid”,the inner indicator
light of switch starts shining, the motor
is running at medium speed.Press the
button again,the motor stop.
c. Press the button “High” ,the inner
indicator light of switch starts shining,the
motor is running at high speed. Press the
button again, the motor stop.
d. Press the button “Light”, both lights start
shining .Press the button again ,the lights
are switched off then
Pic 11
3 / USING YOUR APPLIANCE EN
Low
High Light
Mid

20
4 / CARING FOR AND CLEANING YOUR APPLIANCEEN
• CHANGING AND CLEANING THE ANTI-GREASE FILTERS
• CHANGING THE LIGHT BULB
• INSTALL THE T-SHARP OUTELT
— Removing the lters as the instruction in Pic. 12
— You can clean the lter as below measure:
1. Soak them for about 3 minute in hot water
(40-50 degrees) with a grease-loosening
detergent then brush it gently with a soft brush.
Please do not apply too much pressure, avoid
damaging it.
2. It can be put into a dishwasher with
detergent, set the temperature at around 60
degrees.
— Please do not use abrasive detergent for it will
damage the hood;
— Make sure that the hood is shut off before
cleaning;
— Installing the carbon lter:
1. Remove the Al lter, see Pic.12
2. Insert the carbon lter in the rectangular
hole, tting it over the motor.
3. After inserting the front edge of the carbon
lter into the slot on the cooker hood. Lower
the back edge of the carbon lter, until it
clicks into place at the rear of the rectangular
hole. Raise the two xing bars, until they are
horizontal over the carbon lter. See Pic 13
4. Place the Al. lter back to position.
5. Apply reverse procedure to uninstall the
carbon lter.
Take the bracket and glass off and then take
the broken light bulb off, See Pic 14.
Fix the new light bulb,glass and bracket on.
— Fix the outlet outlet on the T-sharp, see
Pic 15.
— Fix the T-sharp outlet on the inside
chimney, see Pic 16.
Warning
the charcoal cannot be washed or re-
cycled. It should be changed at least every
four months.
Attention
Before changing the lights, ensure
that the appliance is not live.
Pic 14
Pic 16Pic 15
Pic 12
Pic 13
La pagina si sta caricando...
La pagina si sta caricando...
La pagina si sta caricando...
La pagina si sta caricando...
La pagina si sta caricando...
La pagina si sta caricando...
La pagina si sta caricando...
La pagina si sta caricando...
La pagina si sta caricando...
La pagina si sta caricando...
La pagina si sta caricando...
La pagina si sta caricando...
La pagina si sta caricando...
La pagina si sta caricando...
La pagina si sta caricando...
La pagina si sta caricando...
La pagina si sta caricando...
La pagina si sta caricando...
La pagina si sta caricando...
La pagina si sta caricando...
La pagina si sta caricando...
La pagina si sta caricando...
La pagina si sta caricando...
La pagina si sta caricando...
La pagina si sta caricando...
La pagina si sta caricando...
La pagina si sta caricando...
La pagina si sta caricando...
La pagina si sta caricando...
La pagina si sta caricando...
La pagina si sta caricando...
La pagina si sta caricando...
La pagina si sta caricando...
La pagina si sta caricando...
La pagina si sta caricando...
La pagina si sta caricando...
La pagina si sta caricando...
La pagina si sta caricando...
La pagina si sta caricando...
La pagina si sta caricando...
La pagina si sta caricando...
La pagina si sta caricando...
La pagina si sta caricando...
La pagina si sta caricando...
La pagina si sta caricando...
La pagina si sta caricando...
La pagina si sta caricando...
La pagina si sta caricando...
La pagina si sta caricando...
La pagina si sta caricando...
La pagina si sta caricando...
La pagina si sta caricando...
La pagina si sta caricando...
La pagina si sta caricando...
La pagina si sta caricando...
La pagina si sta caricando...
La pagina si sta caricando...
La pagina si sta caricando...
La pagina si sta caricando...
La pagina si sta caricando...
La pagina si sta caricando...
La pagina si sta caricando...
La pagina si sta caricando...
La pagina si sta caricando...
La pagina si sta caricando...
La pagina si sta caricando...
La pagina si sta caricando...
La pagina si sta caricando...
La pagina si sta caricando...
La pagina si sta caricando...
La pagina si sta caricando...
La pagina si sta caricando...
La pagina si sta caricando...
La pagina si sta caricando...
La pagina si sta caricando...
La pagina si sta caricando...
La pagina si sta caricando...
La pagina si sta caricando...
La pagina si sta caricando...
La pagina si sta caricando...
La pagina si sta caricando...
La pagina si sta caricando...
La pagina si sta caricando...
La pagina si sta caricando...
La pagina si sta caricando...
La pagina si sta caricando...
La pagina si sta caricando...
La pagina si sta caricando...
La pagina si sta caricando...
La pagina si sta caricando...
La pagina si sta caricando...
La pagina si sta caricando...
La pagina si sta caricando...
La pagina si sta caricando...
La pagina si sta caricando...
La pagina si sta caricando...
La pagina si sta caricando...
La pagina si sta caricando...
La pagina si sta caricando...
La pagina si sta caricando...
La pagina si sta caricando...
La pagina si sta caricando...
La pagina si sta caricando...
La pagina si sta caricando...
La pagina si sta caricando...
La pagina si sta caricando...
La pagina si sta caricando...
La pagina si sta caricando...
La pagina si sta caricando...
La pagina si sta caricando...
La pagina si sta caricando...
La pagina si sta caricando...
La pagina si sta caricando...
La pagina si sta caricando...
La pagina si sta caricando...
La pagina si sta caricando...
La pagina si sta caricando...
La pagina si sta caricando...
La pagina si sta caricando...
La pagina si sta caricando...
La pagina si sta caricando...
La pagina si sta caricando...
La pagina si sta caricando...
La pagina si sta caricando...
-
 1
1
-
 2
2
-
 3
3
-
 4
4
-
 5
5
-
 6
6
-
 7
7
-
 8
8
-
 9
9
-
 10
10
-
 11
11
-
 12
12
-
 13
13
-
 14
14
-
 15
15
-
 16
16
-
 17
17
-
 18
18
-
 19
19
-
 20
20
-
 21
21
-
 22
22
-
 23
23
-
 24
24
-
 25
25
-
 26
26
-
 27
27
-
 28
28
-
 29
29
-
 30
30
-
 31
31
-
 32
32
-
 33
33
-
 34
34
-
 35
35
-
 36
36
-
 37
37
-
 38
38
-
 39
39
-
 40
40
-
 41
41
-
 42
42
-
 43
43
-
 44
44
-
 45
45
-
 46
46
-
 47
47
-
 48
48
-
 49
49
-
 50
50
-
 51
51
-
 52
52
-
 53
53
-
 54
54
-
 55
55
-
 56
56
-
 57
57
-
 58
58
-
 59
59
-
 60
60
-
 61
61
-
 62
62
-
 63
63
-
 64
64
-
 65
65
-
 66
66
-
 67
67
-
 68
68
-
 69
69
-
 70
70
-
 71
71
-
 72
72
-
 73
73
-
 74
74
-
 75
75
-
 76
76
-
 77
77
-
 78
78
-
 79
79
-
 80
80
-
 81
81
-
 82
82
-
 83
83
-
 84
84
-
 85
85
-
 86
86
-
 87
87
-
 88
88
-
 89
89
-
 90
90
-
 91
91
-
 92
92
-
 93
93
-
 94
94
-
 95
95
-
 96
96
-
 97
97
-
 98
98
-
 99
99
-
 100
100
-
 101
101
-
 102
102
-
 103
103
-
 104
104
-
 105
105
-
 106
106
-
 107
107
-
 108
108
-
 109
109
-
 110
110
-
 111
111
-
 112
112
-
 113
113
-
 114
114
-
 115
115
-
 116
116
-
 117
117
-
 118
118
-
 119
119
-
 120
120
-
 121
121
-
 122
122
-
 123
123
-
 124
124
-
 125
125
-
 126
126
-
 127
127
-
 128
128
-
 129
129
-
 130
130
-
 131
131
-
 132
132
-
 133
133
-
 134
134
-
 135
135
-
 136
136
-
 137
137
-
 138
138
-
 139
139
-
 140
140
-
 141
141
-
 142
142
-
 143
143
-
 144
144


Fagor 9CFV92X Manuale del proprietario
- Categoria
- Cappe da cucina
- Tipo
- Manuale del proprietario
in altre lingue
- français: Fagor 9CFV92X Le manuel du propriétaire
- Deutsch: Fagor 9CFV92X Bedienungsanleitung
- Nederlands: Fagor 9CFV92X de handleiding
- português: Fagor 9CFV92X Manual do proprietário
- slovenčina: Fagor 9CFV92X Návod na obsluhu
- dansk: Fagor 9CFV92X Brugervejledning
- polski: Fagor 9CFV92X Instrukcja obsługi