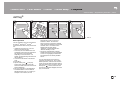
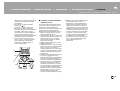
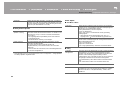
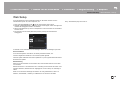
Pioneer VSX-832 Manuale del proprietario
- Categoria
- Ricevitori AV
- Tipo
- Manuale del proprietario


2
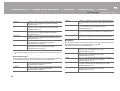
Before Start
Table of Contents
Before Start ............................................................2
What's in the box .....................................................3
Part Names ............................................................4
Part Names .............................................................4
Install ......................................................................8
Installation procedure ..............................................8
Step1: Speaker Layout ............................................9
Step2: Connect the Speakers ...............................14
Step3: Connect the TV & AV Components ............15
Initial Setup ..........................................................20
Initial Setup with Auto Start-up Wizard ..................20
Playback ..............................................................22
AV Component Playback ......................................22
BLUETOOTH
®
Playback ......................................23
Internet Radio .......................................................24
Spotify ...................................................................26
AirPlay
®
.................................................................27
USB Storage Device .............................................28
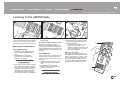
Listening To the AM/FM Radio ..............................29
Music Server .........................................................32
Supplementary information for player functions ....34
Listening Mode ......................................................35
Advanced Setup ..................................................44
System Setup ........................................................44
MCACC .................................................................55
Network/Bluetooth .................................................58
AV Adjust ..............................................................61
Web Setup ............................................................63
Firmware Update ..................................................64
Supplementary Information ...............................67
Supplementary Information ...................................67
Others ..................................................................68
Troubleshooting ....................................................68
General Specifications ..........................................73
Reference Information ..........................................75
> Before Start > Part Names > Install > Initial Setup > Playback
Advanced Setup | Supplementary Information | Others

3
En
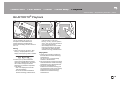
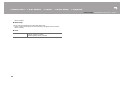
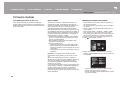
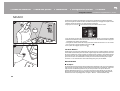
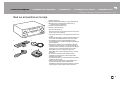
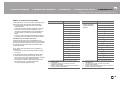
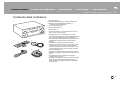
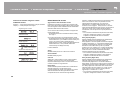
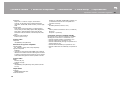
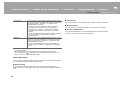
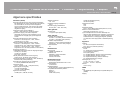
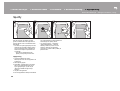
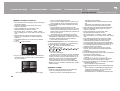
What's in the box
1. Main unit (1)
2. Remote controller (RC-957R) (1), batteries (AAA/R03)
(2)
3. Speaker setup microphone (1)
0 Used during Initial Setup.
4. Indoor FM antenna (1)
5. AM loop antenna (1)
0 Quick Start Guide (1)
* This document is an online instruction manual. It is not
included as an accessory.
0 Connect speakers with 4 ≠ to 16 ≠ impedance.
0 The power cord must be connected only after all other
cable connections are completed.
0 We will not accept responsibility for damage arising from
the connection of equipment manufactured by other
companies.
0 Functionality may be introduced by firmware updates
and service providers may cease services, meaning that
some network services and content may become
unavailable in the future. Furthermore, available services
may vary depending on your area of residence.
0 Details on the firmware update will be posted on our
website and through other means at a later date.
0 Specifications and appearance are subject to change
without prior notice.
0 We plan to provide support for the Dolby Atmos audio
format through firmware updates for this product. Refer
to our website for more information.
> Before Start > Part Names > Install > Initial Setup > Playback
Advanced Setup | Supplementary Information | Others
1
32
54

4
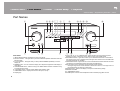
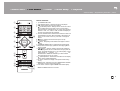
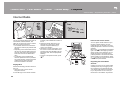
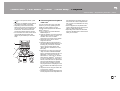
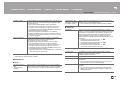
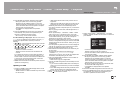
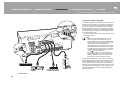
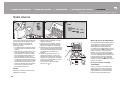
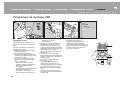
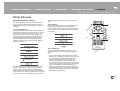
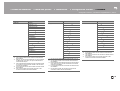
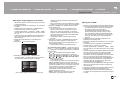
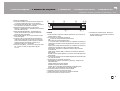
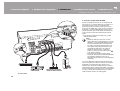
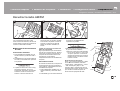
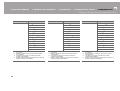
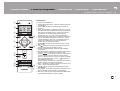
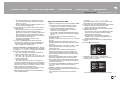
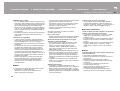
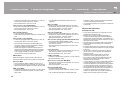
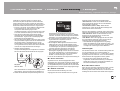
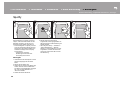
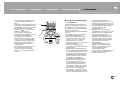
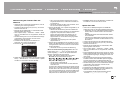
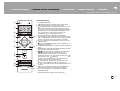
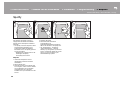
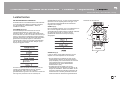
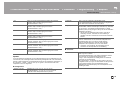
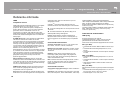
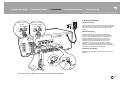
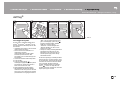
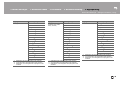
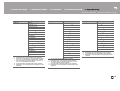
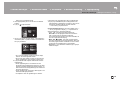
Par t N ames
Part Names
Front Panel
1. INPUT SELECTOR dial: Switches the input to be played.
2. MCACC indicator: This lights when you have enabled the speaker calibration made with
MCACC (P20).
3. FL OFF indicator: This lights when you have pressed DIMMER repeatedly to turn the
display off.
4. DIMMER button: You can switch the display off or adjust the brightness of the display in
three steps.
5. TUNING MODE button: Switches tuning to an AM/FM station between automatic tuning
and manual tuning (P29).
6. +FAVORITE button: Used to register AM/FM radio stations (P30).
7. HOME MENU button: Displays the Home screen (P44, 55, 58).
8. Display (P5)
9. Cursors ( / / / ), ENTER button: Select the item with the cursors and press
ENTER to confirm. Use them to tune to stations when using TUNER (P29).
10.
NETWORK indicator: Lights when "NET" input is selected and the unit is connected to
the network. If the unit is in standby mode, this lights when functions such as HDMI CEC
and network standby are enabled.
11.
WIRELESS indicator: Lights when the unit is connected to the wireless network and when
connected to a BLUETOOTH wireless technology enabled device.
12.
Remote control sensor: Receives signals from the remote controller.
0 The signal range of the remote controller is within about 16y/5 m, at an angle of 20° on
the perpendicular axis and 30° to either side.
13.
RETURN button: Returns the display to the previous state during setting.
14.
MASTER VOLUME
15.
Í STANDBY/ON button
16.
PHONES jack: Connect stereo headphones with a standard plug (Ø1/4z/6.3 mm
> Before Start >Part Names > Install > Initial Setup > Playback
Advanced Setup | Supplementary Information | Others

5
> Before Start >Part Names > Install > Initial Setup > Playback
Advanced Setup | Supplementary Information | Others
En
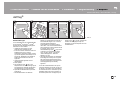
diameter).
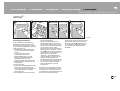
17.
MCACC SETUP MIC jack: Connect the supplied
speaker setup microphone.
18.
Listening mode buttons: Press "AUTO/DIRECT",
"SURROUND" or "STEREO" to switch the listening
mode(P35).
19.
SOUND RETRIEVER button: Turn on or off Sound
Retriever which improves the quality of compressed
audio.
20.
PURE DIRECT button: Used to switch to the Pure
Direct mode (P35).
21.
USB jack: A USB storage device is connected so that
music files stored in it can be played. You can also
supply power (5 V/500 mA) to USB devices with a USB
cable.
22.
AUX INPUT jack: Connect a video camera, etc., using
a stereo mini plug cable (Ø1/8z/3.5 mm).
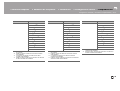
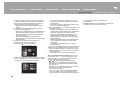
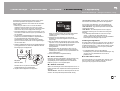
Display
1. This may light when performing operations with the "NET" or "USB"
input selector.
2. Lights in the following conditions.
: When connected via BLUETOOTH
: When connected by Wi-Fi
NET: When "NET" is selected with the input selector and the unit is
connected to the network. It will flash if the connection to the network is
not correct.
USB: When "USB" is selected with the input selector and the unit is
connected by USB and the USB device is selected. Flashes if the USB
is not properly connected.
HDMI: HDMI signals are input and the HDMI input selector is selected.
DIGITAL: Digital signals are input and the digital input selector is
selected.
3. Lights according to the type of input digital audio signals and the
listening mode.
4. Lights in the following conditions.
RDS (European, Australian and Asian models): Receiving RDS
broadcasting.
TUNED: Receiving AM/FM radio.
STEREO: Receiving FM stereo.
SLEEP: Sleep timer has been set (P52).
AUTO STBY: Auto Standby has been set (P52).
5. Lights when headphones are connected.
6. Flashes when muting is on.
7. Displays various information of the input signals.
8. Lights while adjusting the volume.
9. Speaker/Channel display: Displays the output channel that
corresponds to the selected listening mode.

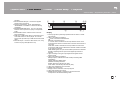
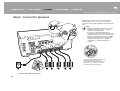
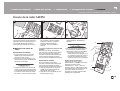
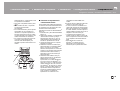
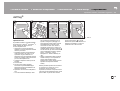
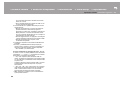
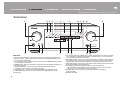
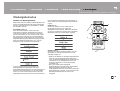
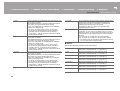
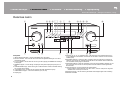
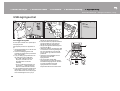
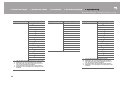
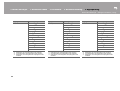
6
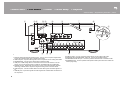
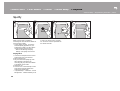
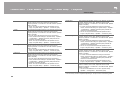
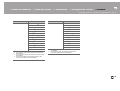
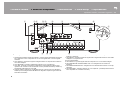
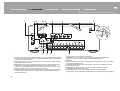
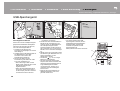
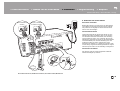
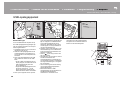
Rear Panel
1. DIGITAL AUDIO IN OPTICAL/COAXIAL jacks: Input TV or AV component digital audio
signals with a digital optical cable or digital coaxial cable.
2. VIDEO IN jacks: Input the video signals of an AV component with an analog video cable.
3. NETWORK jack: Connect to the network with an Ethernet cable.
4. USB jack: A USB storage device is connected so that music files stored in it can be
played. You can also supply power (5 V/500 mA) to USB devices with a USB cable.
5. Wireless antenna: Raise for Wi-Fi connection or when using a BLUETOOTH wireless
technology enabled device. Adjust their angles according to the connection status.
6. HDMI OUT jack: Connect a HDMI cable to transfer video signals and audio signals to a
TV.
7. HDMI IN jacks: Input video signals and audio signals with a HDMI cable connected to an
AV component.
8. Power cord
9. AUDIO IN jacks: Input AV component audio signals with an analog audio cable.
10.
ANTENNA AM LOOP/FM UNBAL 75≠ jacks: Connect the supplied antenna.
11.
SUBWOOFER PRE OUT jack: Connect a powered subwoofer with a subwoofer cable.
12.
SPEAKERS jacks: Connect speakers with speaker cables. (North American models are
banana plug ready.)
> Before Start >Part Names > Install > Initial Setup > Playback
Advanced Setup | Supplementary Information | Others
180°
90°

7
En
> Before Start >Part Names > Install > Initial Setup > Playback
Advanced Setup | Supplementary Information | Others
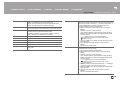
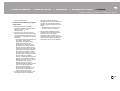
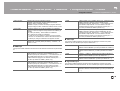
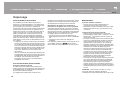
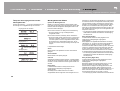
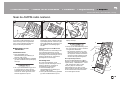
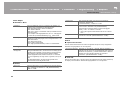
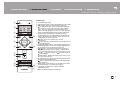
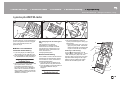
Remote Controller
1. Í STANDBY/ON button
2. Input selector buttons: Switches the input to be played.
3. 21 buttons: Select the input to be played.
4. (AV ADJUST) button: Settings such as "Tone" and "Level"
can be made quickly during play on the TV screen (P61).
Note that there is no display on the TV screen when the input
selector is "CD", "TV", "AM", or "FM", so follow the display on
the main unit while doing the operations.
5. Cursors, ENTER button: Select the item with the cursors and
press ENTER to confirm. When the folder or file lists are not
shown on one screen on the TV, press / to change the
screen.
6. button: Displays the Home screen (P44, 55, 58).
7. Volume buttons
8. button: Temporarily mutes audio. Press again to cancel
muting.
9. LISTENING MODE buttons: Select listening modes (P35).
10.
Play buttons: Used for play operations when playing Music
Server or USB.
11.
button: Used for repeat or random play operations
when playing Music Server or USB. Each time you press the
button, the mode switches from (1-track repeat), to
(folder repeat), to (random).
CLEAR button: Deletes all characters you have entered
when entering text on the TV screen.
12.
(STATUS) button: Switches the information on the display
and is used to operate RDS (P30).
13.
button: Returns the display to the previous state during
setting.
14.
MODE button: Switches tuning to an AM/FM station between
automatic tuning and manual tuning (P29).
15.
+Fav button: Used to register AM/FM radio stations (P30).
0 MAIN and ZONE buttons are not used.

8
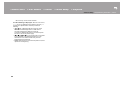
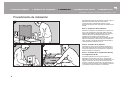
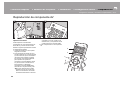
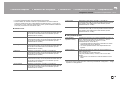
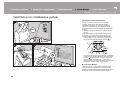
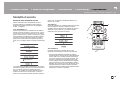
Install
Installation procedure
This unit can be used in a number of ways, depending on
the layout of the speakers you are installing, and the
connections made to external devices. Read the following
to help make the installation process smoother.
Step1: Speaker Layout
Select the speaker layout that suits the types of speakers
you have and the conditions they will be used in from the
choices presented on pages P9 to P12, then install the
speakers by referring to the illustrations and explanations
on the relevant page. Speaker layouts include systems that
use surround speakers and systems that use height
speakers. Also refer to the combinations available in
"Speaker combinations" on P13.
Step2: Connect the Speakers
Refer to P14 to connect the speaker system to this unit.
The connection process will be smoother if you refer to the
illustrations and explanations and prepare the required
cables beforehand.
Step3: Connect the TV & AV Components
Refer to P15 to P19 to connect your external devices such
as your TV, Blu-ray Disc Player, and also supplied
accessories such as the antennas. The connection process
will be smoother if you refer to the illustrations and
explanations, confirm the connection types on the external
devices, and prepare the required cables beforehand.
> Before Start > Part Names >Install > Initial Setup > Playback
Advanced Setup | Supplementary Information | Others
1
2 3

9
En
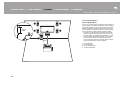
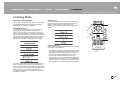
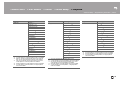
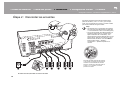
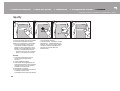
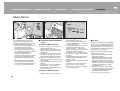
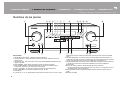
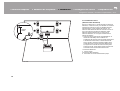
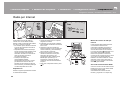
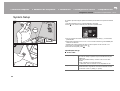
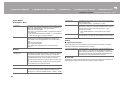
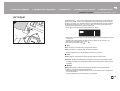
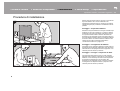
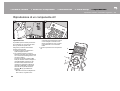
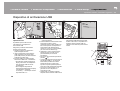
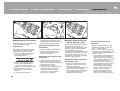
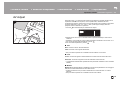
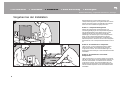
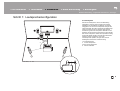
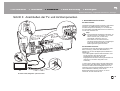
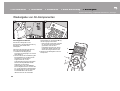
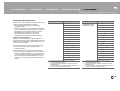
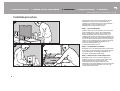
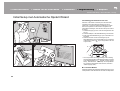
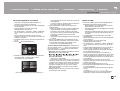
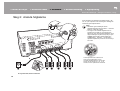
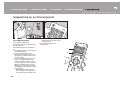
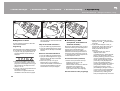
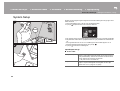
Step1: Speaker Layout
5.1 Channel System
Front speakers output front stereo sound and the center
speaker outputs sounds emanating from the center of the
screen, such as dialog and vocals. Surround speakers
create the sound field at the rear. The powered subwoofer
reproduces bass sounds and enriches the sound field. The
optimal positioning for front speakers is at ear height, and
for surround speakers it is just above ear height. The center
speaker should be set up at an angle to face the listening
position. Placing the powered subwoofer between the
center speaker and a front speaker gives you a natural
sound even when playing music.
1,2 Front Speakers
3 Center Speaker
4,5 Surround Speakers
6 Powered Subwoofer
> Before Start > Part Names >Install > Initial Setup > Playback
Advanced Setup | Supplementary Information | Others
1
2
¢1: 22e to 30e, ¢2: 120e

10
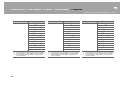
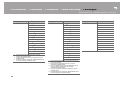
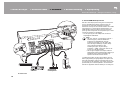
3.1.2 Channel System-1
(Front High Speakers)
This is a 3.1-channel system consisting of front speakers, a
center speaker, and a powered subwoofer, with the addition
of front high speakers, a type of height speaker. Front high
speakers should be situated at least 3y/0.9 m higher than
the front speakers. They should also be put directly above
the front speakers, angled to face the listening position.
0 We plan to provide support for the Dolby Atmos audio
format through firmware updates for this unit. After this
firmware update, by installing height speakers, you can
select the Dolby Atmos listening mode, which realizes
the most up-to-date 3D sound including overhead
sounds, when the input format is Dolby Atmos. Visit our
website for details about firmware updates.
1,2 Front Speakers
3 Center Speaker
4,5 Front High Speakers
6 Powered Subwoofer
> Before Start > Part Names >Install > Initial Setup > Playback
Advanced Setup | Supplementary Information | Others
1
3´ (0.9 m)
or more
¢1: 22e to 30e

11
En
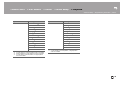
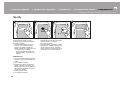
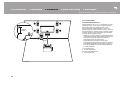
3.1.2 Channel System-2
(Ceiling Speakers)
This is a 3.1-channel system consisting of front speakers, a
center speaker, and a powered subwoofer, with the addition
of top middle speakers, a type of height speaker. Fit top
middle speakers on the ceiling directly above the listening
position. The distance between each pair should match the
distance between the two front speakers.
0 We plan to provide support for the Dolby Atmos audio
format through firmware updates for this unit. After this
firmware update, by installing height speakers, you can
select the Dolby Atmos listening mode, which realizes
the most up-to-date 3D sound including overhead
sounds, when the input format is Dolby Atmos. Visit our
website for details about firmware updates.
0 Dolby Laboratories recommends placing this type of
height speakers to obtain the best Dolby Atmos effect.
1,2 Front Speakers
3 Center Speaker
4,5 Top Middle Speakers
6 Powered Subwoofer
> Before Start > Part Names >Install > Initial Setup > Playback
Advanced Setup | Supplementary Information | Others
1
¢1: 65e to 100e

12
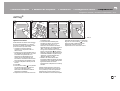
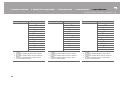
3.1.2 Channel System-3
(Dolby Enabled Speakers (Dolby Speakers))
This is a 3.1-channel system consisting of front speakers, a
center speaker, and a powered subwoofer, with the addition
of Dolby enabled speakers (front), a type of height speaker.
Dolby enabled speakers are special speakers designed to
face the ceiling so that sound is heard after bouncing off the
ceiling so that sound appears to be coming from overhead.
Place Dolby enabled speakers (front) above the front
speakers.
0 We plan to provide support for the Dolby Atmos audio
format through firmware updates for this unit. After this
firmware update, by installing height speakers, you can
select the Dolby Atmos listening mode, which realizes
the most up-to-date 3D sound including overhead
sounds, when the input format is Dolby Atmos. Visit our
website for details about firmware updates.
1,2 Front Speakers
3 Center Speaker
4,5 Dolby Enabled Speakers (Front)
6 Powered Subwoofer
> Before Start > Part Names >Install > Initial Setup > Playback
Advanced Setup | Supplementary Information | Others
1
¢1: 22e to 30e


14
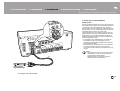
Step2: Connect the Speakers
Make correct connection between the unit's jacks and
speaker's jacks (+ to + and - to -) for each channel. If
connection is wrong, reverse phase may make bass output
poor.
Connect the speaker cable so the wires do not
protrude from the speaker jacks. If the
exposed wires of the speakers touch the rear
panel or the + and - wires touch each other,
the protection circuit will be activated.
> Before Start > Part Names >Install > Initial Setup > Playback
Advanced Setup | Supplementary Information | Others
a
b
1/2˝
(12 mm)
a Speaker cable, b Subwoofer cable
Setup
0 Settings for the speaker configuration you have
connected need to be made in "1. Full Auto
MCACC" in Initial Setup (P20).
0 If any of the connected speakers have an
impedance of 4 ≠ or more to less than 6 ≠, after
completing Initial Setup, you need to make some
settings in the System Setup menu. Press on
the remote controller, and in the Home menu
displayed set "System Setup" - "Speaker" -
"Configuration" - "Speaker Impedance" to
"4ohms".

15
En
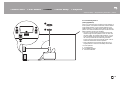
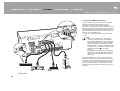
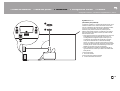
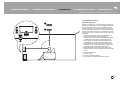
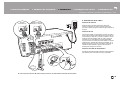
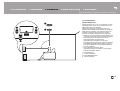
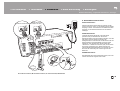
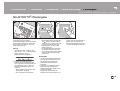
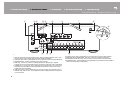
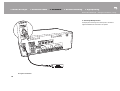
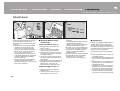
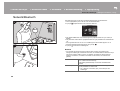
Step3: Connect the TV & AV Components
1. Connect the TV
To ARC TV
For a TV that supports the ARC (Audio Return Channel)
feature (*), use an HDMI cable and connect according to
illustration "a". Choose an HDMI IN jack on the TV that
supports ARC when connecting.
To Non-ARC TV
For a TV that does not support the ARC (Audio Return
Channel) feature (*), connect both the HDMI cable in
illustration "a" and the digital optical cable in "b".
0 Connection with a digital optical cable is not necessary if
you will watch TV through a device such as a cable set-
top box (that is, not use a tuner built into the TV) that you
have connected to the input jack on this unit.
(*) ARC feature: This feature transfers TV audio signals via
HDMI cable so that you can play the audio from the TV
through this unit. Connection to an ARC compatible TV is
complete with one HDMI cable. Refer to the instruction
manual for your TV to see if it supports ARC.
> Before Start > Part Names >Install > Initial Setup > Playback
Advanced Setup | Supplementary Information | Others
TV
a
b
a HDMI cable, b Digital optical cable
Setup
0 Settings are required to use the ARC function.
For "4. Audio Return Channel" (P21) in Initial
Setup, select "Yes".
0 Refer to the instruction manual for the TV for TV
connections and instructions regarding settings
for CEC features and audio output.

16
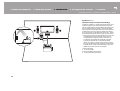
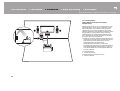
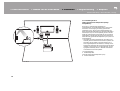
2. Connect the HDMI AV Component
This is an example of connection with an AV component
that has an HDMI jack. With connection to an AV
component that conforms with the CEC (Consumer
Electronics Control) standard, you can use features such as
the HDMI CEC feature (*) that links with the input selector,
and the HDMI Standby Through feature which allows you to
play video and audio from AV components on the TV even
when this unit is in standby mode.
0 To play 4K or 1080p video, use the high speed HDMI
cable.
(*) HDMI CEC feature: You can control features such as
linking input switching with the input selector and players
conforming to the CEC standard, switching audio to output
it from the TV or from this unit, and adjusting the volume
using the remote controller of a CEC-compliant TV, and
automatically switching this unit to standby when the TV is
turned off.
> Before Start > Part Names >Install > Initial Setup > Playback
Advanced Setup | Supplementary Information | Others
BD/DVD
GAME
a
Cable/Satellite set-top
box
Streaming media
player
a HDMI cable
Setup
0 When "Yes" is selected for "4. Audio Return
Channel" in Initial Setup (P21), the HDMI CEC
function and HDMI Standby Through function are
automatically enabled. If "No, Skip" is selected,
settings are required in the System Setup menu
after Initial Setup is complete. Settings are made
in "System Setup" - "Hardware" - "HDMI" in Home
displayed by pressing on the remote
controller.
0 To enjoy digital surround sound including Dolby
Digital, audio output should be set to "Bitstream
output" on the connected Blu-ray Disc player or
other device.

17
En
3. Connect the Non-HDMI AV Component
This is an example of connection with an AV component
that does not have an HDMI jack. Select the cables to make
the connections to the AV component to match the jacks it
has. When video input connection is to the CBL/SAT jack,
the audio input connection should also be to the CBL/SAT
jacks, and so on, so that you connect the video input jacks
to the jacks with the same name as the audio input jacks.
Note that video signals input to the VIDEO IN jack will be
converted to HDMI video signals and then output from the
HDMI OUT jack.
0 To enjoy digital surround playback, such as Dolby Digital,
the audio signals need to pass through a connection via
digital coaxial cable or digital optical cable.
0 It is possible to change assignment of the input jacks you
see in the illustration at left, so you can also connect to
any jack other than CBL/SAT (P45, 46).
> Before Start > Part Names >Install > Initial Setup > Playback
Advanced Setup | Supplementary Information | Others
a
Cable/Satellite
set-top box
a Analog audio/video cable
Setup
0 To enjoy digital surround sound including Dolby
Digital, audio output should be set to "Bitstream
output" on the connected Cable/Satellite set-top
box or other device.


19
En
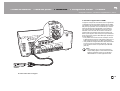
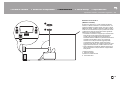
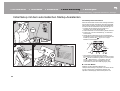
5. Connect Other Cables
Antenna Hookup
Move the antenna around while playing the radio to find the
position with the best reception. Use a thumb tack or similar
to attach the FM indoor antenna to a wall.
Network Hookup
Connect this unit to the network using wired LAN or Wi-Fi
(wireless LAN). You can enjoy Network Functions such as
internet radio by connecting to the network. If you connect
by wired LAN, connect to the router with an Ethernet cable
to the NETWORK port as shown in the illustration. To
connect by Wi-Fi, after selecting "Wireless" in "3. Network
Connection" (P21) in Initial Setup, select the desired setting
method and follow the onscreen instructions to configure
the connection.
Power Cord Hookup
The power cord must be connected only after all other
connections are completed.
> Before Start > Part Names >Install > Initial Setup > Playback
Advanced Setup | Supplementary Information | Others
b
c
d
aa
(North American models)
(European, Australian
and Asian models)
a FM indoor antenna, b AM indoor antenna, c Ethernet cable, d Power cord

20
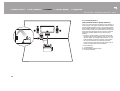
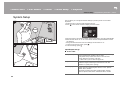
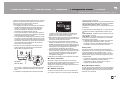
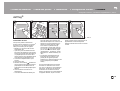
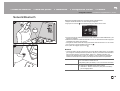
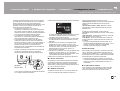
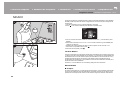
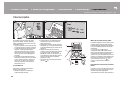
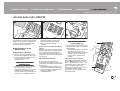
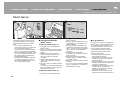
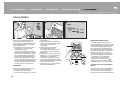
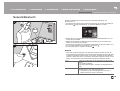
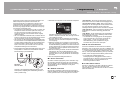
Initial Setup
Initial Setup with Auto Start-up Wizard
Initial Setup starts automatically
When you turn the unit on for the first time after purchasing
it, Initial Setup is automatically shown on the TV to enable
you to make settings required for startup using simple
operations following onscreen guidance.
1. Switch the input on the TV to that assigned to the unit.
2. Put batteries into the remote controller of this unit.
3. Press Í on the remote controller to turn the unit on.
4. Select the item with the cursors of the remote controller
and press ENTER (a) to confirm your selection. To return
to the previous screen, press (b).
0 If you terminate the procedure partway through or want
to change a setting made during Initial Setup, press
on the remote controller, and from Home select "System
Setup" - "Miscellaneous" - "Initial Setup", and press
ENTER. To select the language displayed again, change
"OSD Language" (P44).
∫ 1. Full Auto MCACC
Place the supplied speaker setup microphone in the
listening position, measure the test tones emitted by the
speakers, then the unit automatically sets the optimum
volume level for each speaker, the crossover frequencies,
and the distance from the listening position. This also
automatically adjusts the equalizers for the speakers and
enables correction of distortion caused by the acoustic
> Before Start > Part Names > Install > Initial Setup > Playback
Advanced Setup | Supplementary Information | Others
1
2 3
TV
INPUT
a
b
La pagina si sta caricando...
La pagina si sta caricando...
La pagina si sta caricando...
La pagina si sta caricando...
La pagina si sta caricando...
La pagina si sta caricando...
La pagina si sta caricando...
La pagina si sta caricando...
La pagina si sta caricando...
La pagina si sta caricando...
La pagina si sta caricando...
La pagina si sta caricando...
La pagina si sta caricando...
La pagina si sta caricando...
La pagina si sta caricando...
La pagina si sta caricando...
La pagina si sta caricando...
La pagina si sta caricando...
La pagina si sta caricando...
La pagina si sta caricando...
La pagina si sta caricando...
La pagina si sta caricando...
La pagina si sta caricando...
La pagina si sta caricando...
La pagina si sta caricando...
La pagina si sta caricando...
La pagina si sta caricando...
La pagina si sta caricando...
La pagina si sta caricando...
La pagina si sta caricando...
La pagina si sta caricando...
La pagina si sta caricando...
La pagina si sta caricando...
La pagina si sta caricando...
La pagina si sta caricando...
La pagina si sta caricando...
La pagina si sta caricando...
La pagina si sta caricando...
La pagina si sta caricando...
La pagina si sta caricando...
La pagina si sta caricando...
La pagina si sta caricando...
La pagina si sta caricando...
La pagina si sta caricando...
La pagina si sta caricando...
La pagina si sta caricando...
La pagina si sta caricando...
La pagina si sta caricando...
La pagina si sta caricando...
La pagina si sta caricando...
La pagina si sta caricando...
La pagina si sta caricando...
La pagina si sta caricando...
La pagina si sta caricando...
La pagina si sta caricando...
La pagina si sta caricando...
La pagina si sta caricando...
La pagina si sta caricando...
La pagina si sta caricando...
La pagina si sta caricando...
La pagina si sta caricando...
La pagina si sta caricando...
La pagina si sta caricando...
La pagina si sta caricando...
La pagina si sta caricando...
La pagina si sta caricando...
La pagina si sta caricando...
La pagina si sta caricando...
La pagina si sta caricando...
La pagina si sta caricando...
La pagina si sta caricando...
La pagina si sta caricando...
La pagina si sta caricando...
La pagina si sta caricando...
La pagina si sta caricando...
La pagina si sta caricando...
La pagina si sta caricando...
La pagina si sta caricando...
La pagina si sta caricando...
La pagina si sta caricando...
La pagina si sta caricando...
La pagina si sta caricando...
La pagina si sta caricando...
La pagina si sta caricando...
La pagina si sta caricando...
La pagina si sta caricando...
La pagina si sta caricando...
La pagina si sta caricando...
La pagina si sta caricando...
La pagina si sta caricando...
La pagina si sta caricando...
La pagina si sta caricando...
La pagina si sta caricando...
La pagina si sta caricando...
La pagina si sta caricando...
La pagina si sta caricando...
La pagina si sta caricando...
La pagina si sta caricando...
La pagina si sta caricando...
La pagina si sta caricando...
La pagina si sta caricando...
La pagina si sta caricando...
La pagina si sta caricando...
La pagina si sta caricando...
La pagina si sta caricando...
La pagina si sta caricando...
La pagina si sta caricando...
La pagina si sta caricando...
La pagina si sta caricando...
La pagina si sta caricando...
La pagina si sta caricando...
La pagina si sta caricando...
La pagina si sta caricando...
La pagina si sta caricando...
La pagina si sta caricando...
La pagina si sta caricando...
La pagina si sta caricando...
La pagina si sta caricando...
La pagina si sta caricando...
La pagina si sta caricando...
La pagina si sta caricando...
La pagina si sta caricando...
La pagina si sta caricando...
La pagina si sta caricando...
La pagina si sta caricando...
La pagina si sta caricando...
La pagina si sta caricando...
La pagina si sta caricando...
La pagina si sta caricando...
La pagina si sta caricando...
La pagina si sta caricando...
La pagina si sta caricando...
La pagina si sta caricando...
La pagina si sta caricando...
La pagina si sta caricando...
La pagina si sta caricando...
La pagina si sta caricando...
La pagina si sta caricando...
La pagina si sta caricando...
La pagina si sta caricando...
La pagina si sta caricando...
La pagina si sta caricando...
La pagina si sta caricando...
La pagina si sta caricando...
La pagina si sta caricando...
La pagina si sta caricando...
La pagina si sta caricando...
La pagina si sta caricando...
La pagina si sta caricando...
La pagina si sta caricando...
La pagina si sta caricando...
La pagina si sta caricando...
La pagina si sta caricando...
La pagina si sta caricando...
La pagina si sta caricando...
La pagina si sta caricando...
La pagina si sta caricando...
La pagina si sta caricando...
La pagina si sta caricando...
La pagina si sta caricando...
La pagina si sta caricando...
La pagina si sta caricando...
La pagina si sta caricando...
La pagina si sta caricando...
La pagina si sta caricando...
La pagina si sta caricando...
La pagina si sta caricando...
La pagina si sta caricando...
La pagina si sta caricando...
La pagina si sta caricando...
La pagina si sta caricando...
La pagina si sta caricando...
La pagina si sta caricando...
La pagina si sta caricando...
La pagina si sta caricando...
La pagina si sta caricando...
La pagina si sta caricando...
La pagina si sta caricando...
La pagina si sta caricando...
La pagina si sta caricando...
La pagina si sta caricando...
La pagina si sta caricando...
La pagina si sta caricando...
La pagina si sta caricando...
La pagina si sta caricando...
La pagina si sta caricando...
La pagina si sta caricando...
La pagina si sta caricando...
La pagina si sta caricando...
La pagina si sta caricando...
La pagina si sta caricando...
La pagina si sta caricando...
La pagina si sta caricando...
La pagina si sta caricando...
La pagina si sta caricando...
La pagina si sta caricando...
La pagina si sta caricando...
La pagina si sta caricando...
La pagina si sta caricando...
La pagina si sta caricando...
La pagina si sta caricando...
La pagina si sta caricando...
La pagina si sta caricando...
La pagina si sta caricando...
La pagina si sta caricando...
La pagina si sta caricando...
La pagina si sta caricando...
La pagina si sta caricando...
La pagina si sta caricando...
La pagina si sta caricando...
La pagina si sta caricando...
La pagina si sta caricando...
La pagina si sta caricando...
La pagina si sta caricando...
La pagina si sta caricando...
La pagina si sta caricando...
La pagina si sta caricando...
La pagina si sta caricando...
La pagina si sta caricando...
La pagina si sta caricando...
La pagina si sta caricando...
La pagina si sta caricando...
La pagina si sta caricando...
La pagina si sta caricando...
La pagina si sta caricando...
La pagina si sta caricando...
La pagina si sta caricando...
La pagina si sta caricando...
La pagina si sta caricando...
La pagina si sta caricando...
La pagina si sta caricando...
La pagina si sta caricando...
La pagina si sta caricando...
La pagina si sta caricando...
La pagina si sta caricando...
La pagina si sta caricando...
La pagina si sta caricando...
La pagina si sta caricando...
La pagina si sta caricando...
La pagina si sta caricando...
La pagina si sta caricando...
La pagina si sta caricando...
La pagina si sta caricando...
La pagina si sta caricando...
La pagina si sta caricando...
La pagina si sta caricando...
La pagina si sta caricando...
La pagina si sta caricando...
La pagina si sta caricando...
La pagina si sta caricando...
La pagina si sta caricando...
La pagina si sta caricando...
La pagina si sta caricando...
La pagina si sta caricando...
La pagina si sta caricando...
La pagina si sta caricando...
La pagina si sta caricando...
La pagina si sta caricando...
La pagina si sta caricando...
La pagina si sta caricando...
La pagina si sta caricando...
La pagina si sta caricando...
La pagina si sta caricando...
La pagina si sta caricando...
La pagina si sta caricando...
La pagina si sta caricando...
La pagina si sta caricando...
La pagina si sta caricando...
La pagina si sta caricando...
La pagina si sta caricando...
La pagina si sta caricando...
La pagina si sta caricando...
La pagina si sta caricando...
La pagina si sta caricando...
La pagina si sta caricando...
La pagina si sta caricando...
La pagina si sta caricando...
La pagina si sta caricando...
La pagina si sta caricando...
La pagina si sta caricando...
La pagina si sta caricando...
La pagina si sta caricando...
La pagina si sta caricando...
La pagina si sta caricando...
La pagina si sta caricando...
La pagina si sta caricando...
La pagina si sta caricando...
La pagina si sta caricando...
La pagina si sta caricando...
La pagina si sta caricando...
La pagina si sta caricando...
La pagina si sta caricando...
La pagina si sta caricando...
La pagina si sta caricando...
La pagina si sta caricando...
La pagina si sta caricando...
La pagina si sta caricando...
La pagina si sta caricando...
La pagina si sta caricando...
La pagina si sta caricando...
La pagina si sta caricando...
La pagina si sta caricando...
La pagina si sta caricando...
La pagina si sta caricando...
La pagina si sta caricando...
La pagina si sta caricando...
La pagina si sta caricando...
La pagina si sta caricando...
La pagina si sta caricando...
La pagina si sta caricando...
La pagina si sta caricando...
La pagina si sta caricando...
La pagina si sta caricando...
La pagina si sta caricando...
La pagina si sta caricando...
La pagina si sta caricando...
La pagina si sta caricando...
La pagina si sta caricando...
La pagina si sta caricando...
La pagina si sta caricando...
La pagina si sta caricando...
La pagina si sta caricando...
La pagina si sta caricando...
La pagina si sta caricando...
La pagina si sta caricando...
La pagina si sta caricando...
La pagina si sta caricando...
La pagina si sta caricando...
La pagina si sta caricando...
La pagina si sta caricando...
La pagina si sta caricando...
La pagina si sta caricando...
La pagina si sta caricando...
La pagina si sta caricando...
La pagina si sta caricando...
La pagina si sta caricando...
La pagina si sta caricando...
La pagina si sta caricando...
La pagina si sta caricando...
La pagina si sta caricando...
La pagina si sta caricando...
La pagina si sta caricando...
La pagina si sta caricando...
La pagina si sta caricando...
La pagina si sta caricando...
La pagina si sta caricando...
La pagina si sta caricando...
La pagina si sta caricando...
La pagina si sta caricando...
La pagina si sta caricando...
La pagina si sta caricando...
La pagina si sta caricando...
La pagina si sta caricando...
La pagina si sta caricando...
La pagina si sta caricando...
La pagina si sta caricando...
La pagina si sta caricando...
La pagina si sta caricando...
La pagina si sta caricando...
La pagina si sta caricando...
La pagina si sta caricando...
La pagina si sta caricando...
La pagina si sta caricando...
La pagina si sta caricando...
La pagina si sta caricando...
La pagina si sta caricando...
La pagina si sta caricando...
La pagina si sta caricando...
La pagina si sta caricando...
La pagina si sta caricando...
La pagina si sta caricando...
La pagina si sta caricando...
La pagina si sta caricando...
La pagina si sta caricando...
La pagina si sta caricando...
La pagina si sta caricando...
La pagina si sta caricando...
La pagina si sta caricando...
La pagina si sta caricando...
La pagina si sta caricando...
La pagina si sta caricando...
La pagina si sta caricando...
La pagina si sta caricando...
La pagina si sta caricando...
La pagina si sta caricando...
La pagina si sta caricando...
La pagina si sta caricando...
La pagina si sta caricando...
La pagina si sta caricando...
La pagina si sta caricando...
La pagina si sta caricando...
La pagina si sta caricando...
La pagina si sta caricando...
La pagina si sta caricando...
La pagina si sta caricando...
La pagina si sta caricando...
La pagina si sta caricando...
La pagina si sta caricando...
La pagina si sta caricando...
La pagina si sta caricando...
La pagina si sta caricando...
La pagina si sta caricando...
La pagina si sta caricando...
La pagina si sta caricando...
La pagina si sta caricando...
La pagina si sta caricando...
La pagina si sta caricando...
La pagina si sta caricando...
La pagina si sta caricando...
La pagina si sta caricando...
La pagina si sta caricando...
La pagina si sta caricando...
La pagina si sta caricando...
La pagina si sta caricando...
La pagina si sta caricando...
La pagina si sta caricando...
La pagina si sta caricando...
La pagina si sta caricando...
La pagina si sta caricando...
La pagina si sta caricando...
La pagina si sta caricando...
La pagina si sta caricando...
La pagina si sta caricando...
La pagina si sta caricando...
La pagina si sta caricando...
La pagina si sta caricando...
La pagina si sta caricando...
La pagina si sta caricando...
La pagina si sta caricando...
La pagina si sta caricando...
La pagina si sta caricando...
La pagina si sta caricando...
La pagina si sta caricando...
La pagina si sta caricando...
La pagina si sta caricando...
La pagina si sta caricando...
La pagina si sta caricando...
La pagina si sta caricando...
La pagina si sta caricando...
La pagina si sta caricando...
La pagina si sta caricando...
La pagina si sta caricando...
La pagina si sta caricando...
La pagina si sta caricando...
La pagina si sta caricando...
La pagina si sta caricando...
La pagina si sta caricando...
La pagina si sta caricando...
La pagina si sta caricando...
La pagina si sta caricando...
La pagina si sta caricando...
La pagina si sta caricando...
La pagina si sta caricando...
La pagina si sta caricando...
La pagina si sta caricando...
La pagina si sta caricando...
La pagina si sta caricando...
La pagina si sta caricando...
La pagina si sta caricando...
La pagina si sta caricando...
La pagina si sta caricando...
La pagina si sta caricando...
La pagina si sta caricando...
La pagina si sta caricando...
La pagina si sta caricando...
La pagina si sta caricando...
La pagina si sta caricando...
La pagina si sta caricando...
La pagina si sta caricando...
La pagina si sta caricando...
La pagina si sta caricando...
La pagina si sta caricando...
La pagina si sta caricando...
La pagina si sta caricando...
La pagina si sta caricando...
La pagina si sta caricando...
La pagina si sta caricando...
La pagina si sta caricando...
La pagina si sta caricando...
La pagina si sta caricando...
La pagina si sta caricando...
La pagina si sta caricando...
La pagina si sta caricando...
La pagina si sta caricando...
La pagina si sta caricando...
La pagina si sta caricando...
La pagina si sta caricando...
La pagina si sta caricando...
La pagina si sta caricando...
La pagina si sta caricando...
La pagina si sta caricando...
La pagina si sta caricando...
La pagina si sta caricando...
La pagina si sta caricando...
La pagina si sta caricando...
La pagina si sta caricando...
La pagina si sta caricando...
La pagina si sta caricando...
La pagina si sta caricando...
La pagina si sta caricando...
La pagina si sta caricando...
La pagina si sta caricando...
La pagina si sta caricando...
La pagina si sta caricando...
La pagina si sta caricando...
La pagina si sta caricando...
La pagina si sta caricando...
La pagina si sta caricando...
La pagina si sta caricando...
La pagina si sta caricando...
La pagina si sta caricando...
La pagina si sta caricando...
La pagina si sta caricando...
La pagina si sta caricando...
La pagina si sta caricando...
La pagina si sta caricando...
La pagina si sta caricando...
La pagina si sta caricando...
La pagina si sta caricando...
La pagina si sta caricando...
La pagina si sta caricando...
La pagina si sta caricando...
La pagina si sta caricando...
La pagina si sta caricando...
La pagina si sta caricando...
La pagina si sta caricando...
La pagina si sta caricando...
La pagina si sta caricando...
La pagina si sta caricando...
La pagina si sta caricando...
La pagina si sta caricando...
La pagina si sta caricando...
La pagina si sta caricando...
La pagina si sta caricando...
La pagina si sta caricando...
La pagina si sta caricando...
La pagina si sta caricando...
La pagina si sta caricando...
La pagina si sta caricando...
La pagina si sta caricando...
La pagina si sta caricando...
La pagina si sta caricando...
La pagina si sta caricando...
-
 1
1
-
 2
2
-
 3
3
-
 4
4
-
 5
5
-
 6
6
-
 7
7
-
 8
8
-
 9
9
-
 10
10
-
 11
11
-
 12
12
-
 13
13
-
 14
14
-
 15
15
-
 16
16
-
 17
17
-
 18
18
-
 19
19
-
 20
20
-
 21
21
-
 22
22
-
 23
23
-
 24
24
-
 25
25
-
 26
26
-
 27
27
-
 28
28
-
 29
29
-
 30
30
-
 31
31
-
 32
32
-
 33
33
-
 34
34
-
 35
35
-
 36
36
-
 37
37
-
 38
38
-
 39
39
-
 40
40
-
 41
41
-
 42
42
-
 43
43
-
 44
44
-
 45
45
-
 46
46
-
 47
47
-
 48
48
-
 49
49
-
 50
50
-
 51
51
-
 52
52
-
 53
53
-
 54
54
-
 55
55
-
 56
56
-
 57
57
-
 58
58
-
 59
59
-
 60
60
-
 61
61
-
 62
62
-
 63
63
-
 64
64
-
 65
65
-
 66
66
-
 67
67
-
 68
68
-
 69
69
-
 70
70
-
 71
71
-
 72
72
-
 73
73
-
 74
74
-
 75
75
-
 76
76
-
 77
77
-
 78
78
-
 79
79
-
 80
80
-
 81
81
-
 82
82
-
 83
83
-
 84
84
-
 85
85
-
 86
86
-
 87
87
-
 88
88
-
 89
89
-
 90
90
-
 91
91
-
 92
92
-
 93
93
-
 94
94
-
 95
95
-
 96
96
-
 97
97
-
 98
98
-
 99
99
-
 100
100
-
 101
101
-
 102
102
-
 103
103
-
 104
104
-
 105
105
-
 106
106
-
 107
107
-
 108
108
-
 109
109
-
 110
110
-
 111
111
-
 112
112
-
 113
113
-
 114
114
-
 115
115
-
 116
116
-
 117
117
-
 118
118
-
 119
119
-
 120
120
-
 121
121
-
 122
122
-
 123
123
-
 124
124
-
 125
125
-
 126
126
-
 127
127
-
 128
128
-
 129
129
-
 130
130
-
 131
131
-
 132
132
-
 133
133
-
 134
134
-
 135
135
-
 136
136
-
 137
137
-
 138
138
-
 139
139
-
 140
140
-
 141
141
-
 142
142
-
 143
143
-
 144
144
-
 145
145
-
 146
146
-
 147
147
-
 148
148
-
 149
149
-
 150
150
-
 151
151
-
 152
152
-
 153
153
-
 154
154
-
 155
155
-
 156
156
-
 157
157
-
 158
158
-
 159
159
-
 160
160
-
 161
161
-
 162
162
-
 163
163
-
 164
164
-
 165
165
-
 166
166
-
 167
167
-
 168
168
-
 169
169
-
 170
170
-
 171
171
-
 172
172
-
 173
173
-
 174
174
-
 175
175
-
 176
176
-
 177
177
-
 178
178
-
 179
179
-
 180
180
-
 181
181
-
 182
182
-
 183
183
-
 184
184
-
 185
185
-
 186
186
-
 187
187
-
 188
188
-
 189
189
-
 190
190
-
 191
191
-
 192
192
-
 193
193
-
 194
194
-
 195
195
-
 196
196
-
 197
197
-
 198
198
-
 199
199
-
 200
200
-
 201
201
-
 202
202
-
 203
203
-
 204
204
-
 205
205
-
 206
206
-
 207
207
-
 208
208
-
 209
209
-
 210
210
-
 211
211
-
 212
212
-
 213
213
-
 214
214
-
 215
215
-
 216
216
-
 217
217
-
 218
218
-
 219
219
-
 220
220
-
 221
221
-
 222
222
-
 223
223
-
 224
224
-
 225
225
-
 226
226
-
 227
227
-
 228
228
-
 229
229
-
 230
230
-
 231
231
-
 232
232
-
 233
233
-
 234
234
-
 235
235
-
 236
236
-
 237
237
-
 238
238
-
 239
239
-
 240
240
-
 241
241
-
 242
242
-
 243
243
-
 244
244
-
 245
245
-
 246
246
-
 247
247
-
 248
248
-
 249
249
-
 250
250
-
 251
251
-
 252
252
-
 253
253
-
 254
254
-
 255
255
-
 256
256
-
 257
257
-
 258
258
-
 259
259
-
 260
260
-
 261
261
-
 262
262
-
 263
263
-
 264
264
-
 265
265
-
 266
266
-
 267
267
-
 268
268
-
 269
269
-
 270
270
-
 271
271
-
 272
272
-
 273
273
-
 274
274
-
 275
275
-
 276
276
-
 277
277
-
 278
278
-
 279
279
-
 280
280
-
 281
281
-
 282
282
-
 283
283
-
 284
284
-
 285
285
-
 286
286
-
 287
287
-
 288
288
-
 289
289
-
 290
290
-
 291
291
-
 292
292
-
 293
293
-
 294
294
-
 295
295
-
 296
296
-
 297
297
-
 298
298
-
 299
299
-
 300
300
-
 301
301
-
 302
302
-
 303
303
-
 304
304
-
 305
305
-
 306
306
-
 307
307
-
 308
308
-
 309
309
-
 310
310
-
 311
311
-
 312
312
-
 313
313
-
 314
314
-
 315
315
-
 316
316
-
 317
317
-
 318
318
-
 319
319
-
 320
320
-
 321
321
-
 322
322
-
 323
323
-
 324
324
-
 325
325
-
 326
326
-
 327
327
-
 328
328
-
 329
329
-
 330
330
-
 331
331
-
 332
332
-
 333
333
-
 334
334
-
 335
335
-
 336
336
-
 337
337
-
 338
338
-
 339
339
-
 340
340
-
 341
341
-
 342
342
-
 343
343
-
 344
344
-
 345
345
-
 346
346
-
 347
347
-
 348
348
-
 349
349
-
 350
350
-
 351
351
-
 352
352
-
 353
353
-
 354
354
-
 355
355
-
 356
356
-
 357
357
-
 358
358
-
 359
359
-
 360
360
-
 361
361
-
 362
362
-
 363
363
-
 364
364
-
 365
365
-
 366
366
-
 367
367
-
 368
368
-
 369
369
-
 370
370
-
 371
371
-
 372
372
-
 373
373
-
 374
374
-
 375
375
-
 376
376
-
 377
377
-
 378
378
-
 379
379
-
 380
380
-
 381
381
-
 382
382
-
 383
383
-
 384
384
-
 385
385
-
 386
386
-
 387
387
-
 388
388
-
 389
389
-
 390
390
-
 391
391
-
 392
392
-
 393
393
-
 394
394
-
 395
395
-
 396
396
-
 397
397
-
 398
398
-
 399
399
-
 400
400
-
 401
401
-
 402
402
-
 403
403
-
 404
404
-
 405
405
-
 406
406
-
 407
407
-
 408
408
-
 409
409
-
 410
410
-
 411
411
-
 412
412
-
 413
413
-
 414
414
-
 415
415
-
 416
416
-
 417
417
-
 418
418
-
 419
419
-
 420
420
-
 421
421
-
 422
422
-
 423
423
-
 424
424
-
 425
425
-
 426
426
-
 427
427
-
 428
428
-
 429
429
-
 430
430
-
 431
431
-
 432
432
-
 433
433
-
 434
434
-
 435
435
-
 436
436
-
 437
437
-
 438
438
-
 439
439
-
 440
440
-
 441
441
-
 442
442
-
 443
443
-
 444
444
-
 445
445
-
 446
446
-
 447
447
-
 448
448
-
 449
449
-
 450
450
-
 451
451
-
 452
452
-
 453
453
-
 454
454
-
 455
455
-
 456
456
-
 457
457
-
 458
458
-
 459
459
-
 460
460
-
 461
461
-
 462
462
-
 463
463
-
 464
464
-
 465
465
-
 466
466
-
 467
467
-
 468
468
-
 469
469
-
 470
470
-
 471
471
-
 472
472
-
 473
473
-
 474
474
-
 475
475
-
 476
476
-
 477
477
-
 478
478
-
 479
479
-
 480
480
-
 481
481
-
 482
482
-
 483
483
-
 484
484
-
 485
485
-
 486
486
-
 487
487
-
 488
488
-
 489
489
-
 490
490
-
 491
491
-
 492
492
-
 493
493
-
 494
494
-
 495
495
-
 496
496
-
 497
497
-
 498
498
-
 499
499
-
 500
500
-
 501
501
-
 502
502
-
 503
503
-
 504
504
-
 505
505
-
 506
506
-
 507
507
-
 508
508
-
 509
509
-
 510
510
-
 511
511
-
 512
512
-
 513
513
-
 514
514
-
 515
515
-
 516
516
-
 517
517
-
 518
518
-
 519
519
-
 520
520
-
 521
521
-
 522
522
-
 523
523
-
 524
524
-
 525
525
-
 526
526
-
 527
527
-
 528
528
-
 529
529
-
 530
530
-
 531
531
-
 532
532
-
 533
533
-
 534
534
-
 535
535
-
 536
536
-
 537
537
-
 538
538
-
 539
539
-
 540
540
-
 541
541
-
 542
542
-
 543
543
-
 544
544
-
 545
545
-
 546
546
-
 547
547
-
 548
548
-
 549
549
-
 550
550
-
 551
551
-
 552
552
-
 553
553
-
 554
554
-
 555
555
-
 556
556
-
 557
557
-
 558
558
-
 559
559
-
 560
560
-
 561
561
-
 562
562
-
 563
563


Pioneer VSX-832 Manuale del proprietario
- Categoria
- Ricevitori AV
- Tipo
- Manuale del proprietario
in altre lingue
- français: Pioneer VSX-832 Le manuel du propriétaire
- español: Pioneer VSX-832 El manual del propietario
- Deutsch: Pioneer VSX-832 Bedienungsanleitung
- Nederlands: Pioneer VSX-832 de handleiding
- svenska: Pioneer VSX-832 Bruksanvisning
Documenti correlati
-
Pioneer VSX -832 av Manuale utente
-
Pioneer SX-S30DAB Manuale utente
-
-
-
Pioneer VSX-S520D Manuale del proprietario
-
-
-
Pioneer VSX-933 Manuale utente
-
Pioneer VSX-LX503 Manuale utente
-