
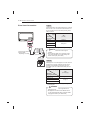
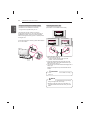
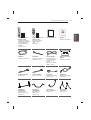
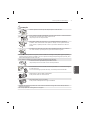
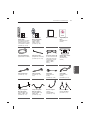
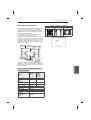
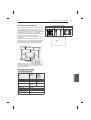
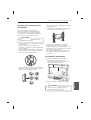
OWNER’S MANUAL
LED TV*
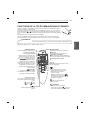
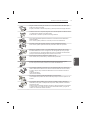
Click! User Guide
Please read this manual carefully before operating your set
and retain it for future reference.
P/NO : MFL68066604 (1408-REV04)
Printed in Korea
www.lg.com
*MFL68066604*
*
LG LED TVs are LCD TVs with
LED backlighting.
UB85** UB98**
UB93** UC97**
UB95**

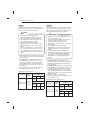
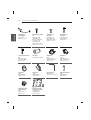
A-2
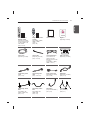
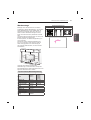
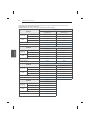
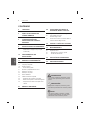
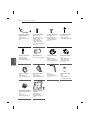
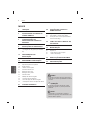
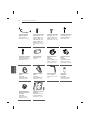
TABLE OF CONTENTS
TABLE OF CONTENTS
A-3 SETTING UP THE TV
A-3 Attaching the stand
A-8 Tidyng cables
A-10 Assembling the AV cover
A-10 MAKING CONNECTIONS
A-10 Antenna Connection
A-12 Satellite dish Connection
A-13 HDMI Connection
A-18 - ARC (Audio Return Channel)
A-19 DVI to HDMI Connection
A-21 Component Connection
A-23 Composite Connection
A-24 MHL Connection
A-27 Audio Connection
A-27 - Digital optical audio Connection
A-29 Headphone Connection
A-31 USB Connection
A-34 CI module Connection
A-36 Euro Scart Connection
LANGUAGE LIST
English
Deutsch
Français
Italiano
Español
Português
Nederlands
ǼȜȜȘȞȚțȐ
6ORYHQãþLQD
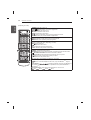
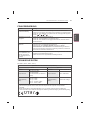
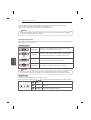
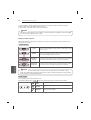
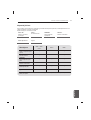
B-1 SPECIFICATIONS
COMMON
COMMON
LANGUAGE

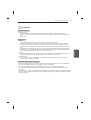
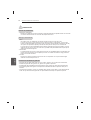
A-3
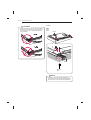
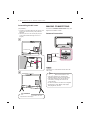
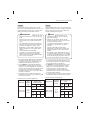
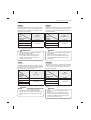
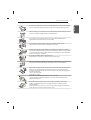
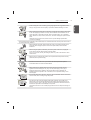
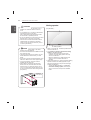
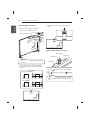
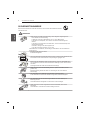
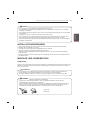
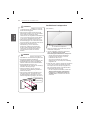
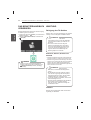
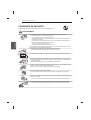
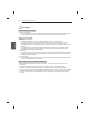
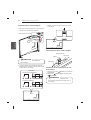
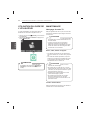
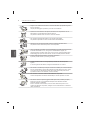
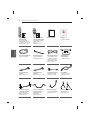
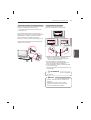
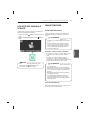
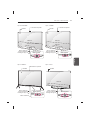
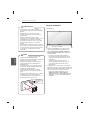
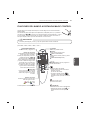
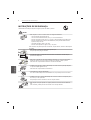
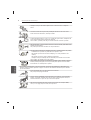
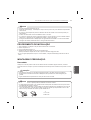
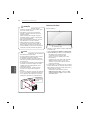
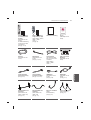
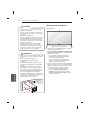
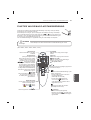
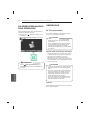
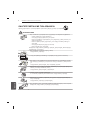
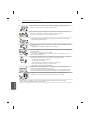
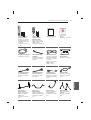
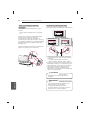
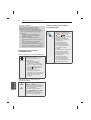
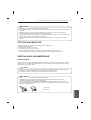
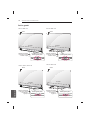
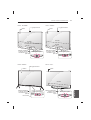
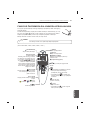
SETTING UP THE TV
SETTING UP THE TV
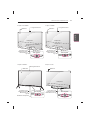
Image shown may differ from your TV.
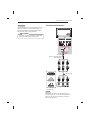
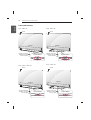
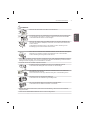
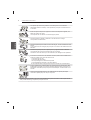
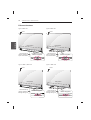
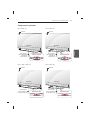
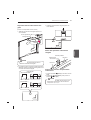
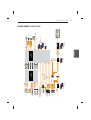
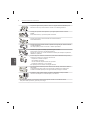
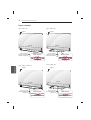
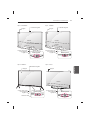
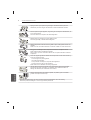
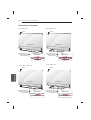
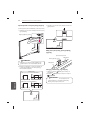
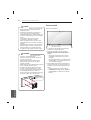
Attaching the stand
1
2
Stand Base
Stand Body (R)
Stand Body (L)
M4 x L20
4EA
UB85**-ZA, UB93**, UB95**-ZA
1
2
y
Be sure to check the Stand Body (L), (R), when
installing on the stand base.
NOTE
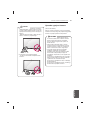
1 Attach the stand to the TV using the upper mounting
hole on the back of the TV.
2 Attach the stand to the TV using the lower
connection on the back of the TV.
3
M4 x L20
4EA

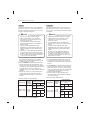
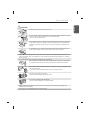
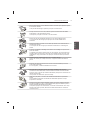
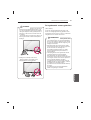
A-4
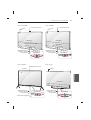
SETTING UP THE TV
1 Attach the stand to the TV using the upper mounting
hole on the back of the TV.
2 Attach the stand to the TV using the lower
connection on the back of the TV.
1
2
3
4
M4 x L20
4EA
UB85**-ZD, UB95**-ZB
y
Be sure to check the Stand Body (L), (R), when
installing on the stand base.
NOTE
1
Stand Body (L)
Stand Body (R)
Stand Base
2
4EA
M4 x L10

A-5
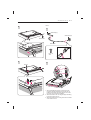
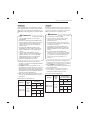
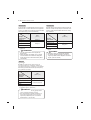
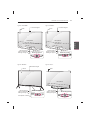
SETTING UP THE TV
Stand Base
1
65/79/84UB98**
2
(Only 65/79UB98**)
3
1
2
Wrench
1
1
2
Wrench
4EA
M6 x L52
1
4EA
(Insulation
Holder)
(Only 84UB98**)
4EA
M6 x L47
(Only 65UB98**)
M6 x L52
(Only 79UB98**)

A-6
SETTING UP THE TV
y
Make sure that the screws are inserted correctly
and fastened securely. (If they are not fastened
securely enough, the TV may tilt forward after
being installed.)
CAUTION
1
98UB98**
1
2
1
2
M6 x L47
6EA
Mold
Wrench
y
The stand screws are already attached at the
back of the TV. Please use these attached screw
to assemble the TV and stand. (Only 98UB98**)
NOTE

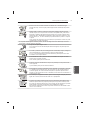
A-7
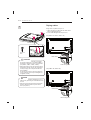
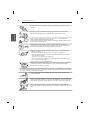
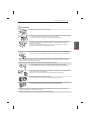
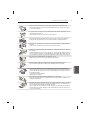
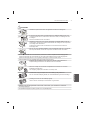
SETTING UP THE TV
2
3
Stand Base
1
UC97**
2
1
2
3
Stand Body (L)
Stand Body (R)
Stand Base
M4 x L10
4EA
1 When assembling the stand, lay the front screen
protective package included in the product box on
a table or flat surface and then place the TV screen
face down on the protective package.
2 Attach the stand to the TV using the upper mounting
hole on the back of the TV.
3 Attach the stand to the TV using the lower connection
on the back of the TV.
Wrench

A-8
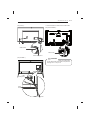
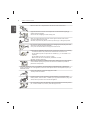
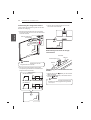
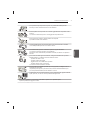
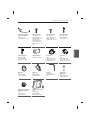
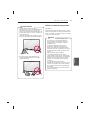
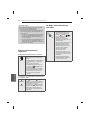
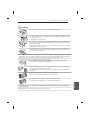
SETTING UP THE TV
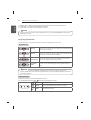
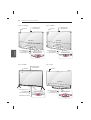
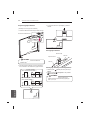
Tidying cables
Image shown may differ from your TV.
1 Gather and bind the cables with the Cable Holder
and the Cable Management.
2 Fix the Cable Management firmly to the TV.
(Only UB85**-ZA, UB93**, UB95**-ZA)
Cable Holder
Cable management
(Only UB85**-ZD, UB95**-ZB)
Cable Holder
Cable management
3
M4 x L20
4EA
y
When attaching the stand to the TV set, place
the screen facing down on a cushioned table or
flat surface to protect the screen from scratches.
(Only UB85**, UB93**, UB95**, UB98**)
y
Make sure that the screws are inserted correctly
and fastened securely. (If they are not fastened
securely enough, the TV may tilt forward after
being installed.)
Do not use too much force and over tighten the
screws; otherwise screw may be damaged and
not tighten correctly.
CAUTION
y
Remove the stand before installing the TV on a
wall mount by performing the stand attachment in
reverse.
y
Remove the protective film from the stand base
and then attach the stand body to the stand
base. (Only UC97**)
NOTE

A-9
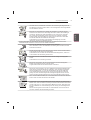
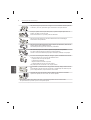
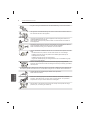
SETTING UP THE TV
(Only 65/79/84UB98**)
Cable Holder
1 Gather and bind the cables with the Cable Holder.
(Only UC97**)
Cable Holder
Cable management
(Only 98UB98**)
y
Do not move the TV by holding the cable holders,
as the cable holders may break, and injuries and
damage to the TV may occur.
CAUTION
Cable
Holder
Cable management
Cable
management

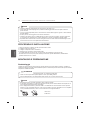
A-10
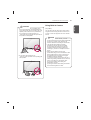
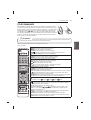
SETTING UP THE TV / MAKING CONNECTIONS
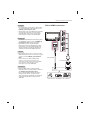
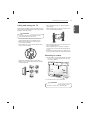
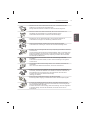
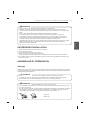
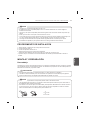
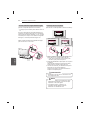
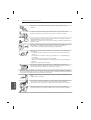
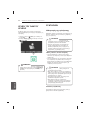
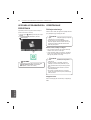
MAKING CONNECTIONS
This section on MAKING CONNECTIONS mainly uses
diagrams for the UB85** models.
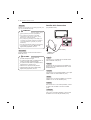
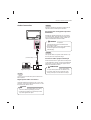
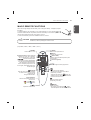
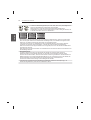
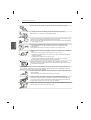
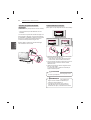
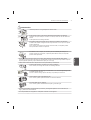
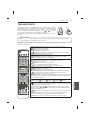
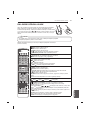
Antenna Connection
Wall Antenna Socket
IN
ANTENNA / CABLE
(*Not Provided)
English
Connect the TV to a wall antenna socket with an RF
FDEOH
y
Use a signal splitter to use more than 2 TVs.
y
If the image quality is poor, install a signal
amplifier properly to improve the image quality.
y
If the image quality is poor with an antenna
connected, try to realign the antenna in the
correct direction.
y
An antenna cable and converter are not supplied.
y
Supported DTV Audio: MPEG, Dolby Digital,
Dolby Digital Plus, HE-AAC
NOTE
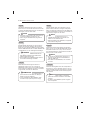
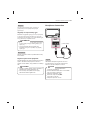
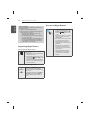
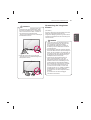
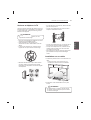
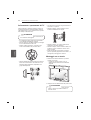
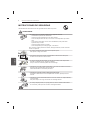
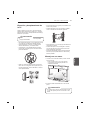
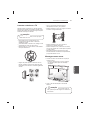
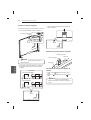
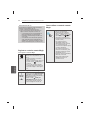
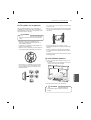
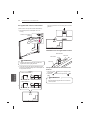
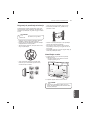
Assembling the AV cover
(Only 98UB98**)
1 Insert the cover holder attached to the AV port cover
into the hole of the main body of the product as
illustrated.
2 Attach the port cover onto the AV port part. (The
cover remains attached through the use of a
magnet.)
y
If you do not attach the cover holder, the cover
may fall off and cause injury.
CAUTION
AV Port Cover
Cover Holder
2
1

A-11
MAKING CONNECTIONS
Deutsch
6FKOLHHQ6LHGDV79*HUlWPLWHLQHP+).DEHO
an eine Wandantennenbuchse an.
y
Bei Verwendung von mehr als 2 TV-Geräten
verwenden Sie einen Signalsplitter.
y
Ist das Bild schlecht, installieren Sie einen
Signalverstärker, um die Bildqualität zu
verbessern.
y
Wenn die Bildqualität bei angeschlossener
Antenne schlecht ist, richten Sie die Antenne
richtig aus.
y
Antennenkabel und Wandler sind nicht im
Lieferumfang enthalten.
y
Unterstützter DTV-Ton: MPEG, Dolby Digital,
Dolby Digital Plus, HE-AAC
HINWEIS
Français
Connectez la TV à une prise d’antenne murale avec un
FkEOH5)
y
Utilisez un séparateur de signaux pour utiliser
plus de deux téléviseurs.
y
Si la qualité d’image est mauvaise, installez
correctement un amplificateur de signaux pour
l’améliorer.
y
Si vous utilisez une antenne et que la qualité
d’image est mauvaise, essayez de réaligner
l’antenne dans la bonne direction.
y
Le câble et le convertisseur d’antenne ne sont
pas fournis.
y
Technologies audio TNT prises en charge :
MPEG, Dolby Digital, Dolby Digital Plus, HE-AAC
REMARQUE
Italiano
Collegare il televisore all’antenna centralizzata con un
FDYR5)
y
Utilizzare uno sdoppiatore del segnale per usare
più di 2 televisori.
y
Se la qualità dell’immagine è scarsa, installare
correttamente un amplificatore del segnale per
migliorarla.
y
Se la qualità dell’immagine è scarsa con
un’antenna collegata, provare a riallineare
l’antenna nella direzione corretta.
y
Il cavo e il convertitore dell’antenna non sono in
dotazione.
y
Audio DTV supportato: MPEG, Dolby Digital,
Dolby Digital Plus, HE-AAC
NOTA
Español
Conecte la TV a una toma de pared de antena con un
FDEOH5)
y
Emplee un divisor de señal cuando desee utilizar
más de dos TV.
y
Si la imagen es de poca calidad, instale un
amplificador de señal correctamente para
mejorar la calidad de imagen.
y
Si la imagen es de poca calidad con una antena
conectada, intente volver a orientar la antena en
la dirección adecuada.
y
No se suministran el cable de antena ni el
conversor.
y
Audio DTV admitido: MPEG, Dolby Digital, Dolby
Digital Plus, HE-AAC
NOTA
Português
Ligue a TV a uma tomada de antena de parede com
XPFDER5)
y
Utilize um separador de sinal se quiser utilizar
mais de 2 TVs.
y
Se a qualidade de imagem for fraca, instale um
amplificador de sinal para melhorar a qualidade
de imagem.
y
Se a qualidade de imagem for fraca mesmo que
tenha uma antena ligada, tente orientar a antena
para a direcção correcta.
y
O cabo da antena e o conversor não são
fornecidos.
y
Áudio DTV suportado: MPEG, Dolby Digital,
Dolby Digital Plus, HE-AAC
NOTA
Nederlands
6OXLWGH79PHWEHKXOSYDQHHQ5)NDEHODDQRS
een antenneaansluiting op de muur.
y
Gebruik een signaalsplitter om meer dan twee
TV’s te gebruiken.
y
Als de beeldkwaliteit slecht is, installeert u
een signaalversterker om de beeldkwaliteit te
verbeteren.
y
Als de beeldkwaliteit slecht is terwijl een antenne
is aangesloten, probeert u de antenne in de juiste
richting te draaien.
y
Antennekabel en converter worden niet
meegeleverd.
y
Ondersteunde DTV-audio: MPEG, Dolby Digital,
Dolby Digital Plus, HE-AAC
OPMERKING

A-12
MAKING CONNECTIONS
Satellite dish Connection
(Only satellite models)
IN
13 / 18 V
700mA Max LNB IN
Satellite
Satellite Dish
(*Not Provided)
English
Connect the TV to a satellite dish to a satellite socket
ZLWKDVDWHOOLWH5)FDEOHȍ
Deutsch
Schließen Sie das TV-Gerät mit einem Satelliten-HF-
.DEHODQHLQH6DWHOOLWHQVFKVVHORGHUDQHLQH
Satellitenbuchse an.
Français
Connectez la TV à une parabole satellite ou à une prise
VDWHOOLWHjO¶DLGHG¶XQFkEOHVDWHOOLWH5)
Italiano
Collegare la TV a un’antenna satellitare e a una presa
VDWHOOLWDUHFRQXQFDYR5)VDWHOOLWDUH
Español
Para conectar la TV a una antena parabólica, enchufe
un cable de RF de satélite a una toma de satélite
Português
Ligue a TV a uma antena parabólica ou uma tomada
GHVDWpOLWHFRPXPFDER5)SDUDVDWpOLWH
ǼȜȜȘȞȚțȐ
ȈȣȞįȑıIJİIJȘȞIJȘȜİȩȡĮıȘıİȝȚĮȣʌȠįȠȤȒțİȡĮȓĮȢıIJȠȞ
IJȠȓȤȠȝİȑȞĮțĮȜȫįȚȠ5)
y
ȋȡȘıȚȝȠʌȠȚȒıIJİȑȞĮįȚĮȤȦȡȚıIJȒıȒȝĮIJȠȢȖȚĮIJȘ
ȤȡȒıȘʌİȡȚııȩIJİȡȦȞĮʌȩIJȘȜİȠȡȐıİȦȞ
y
ǹȞȘʌȠȚȩIJȘIJĮIJȘȢİȚțȩȞĮȢįİȞİȓȞĮȚțĮȜȒ
İȖțĮIJĮıIJȒıIJİȑȞĮȞİȞȚıȤȣIJȒıȒȝĮIJȠȢȖȚĮIJȘ
ȕİȜIJȓȦıȘIJȘȢʌȠȚȩIJȘIJĮȢİȚțȩȞĮȢ
y
ǹȞȘʌȠȚȩIJȘIJĮIJȘȢİȚțȩȞĮȢįİȞİȓȞĮȚțĮȜȒȝİIJȐ
IJȘıȪȞįİıȘIJȘȢțİȡĮȓĮȢįȠțȚȝȐıIJİȞĮĮȜȜȐȟİIJİ
IJȠȞʌȡȠıĮȞĮIJȠȜȚıȝȩIJȘȢțİȡĮȓĮȢıIJȘıȦıIJȒ
țĮIJİȪșȣȞıȘ
y
ǻİȞʌĮȡȑȤİIJĮȚțĮȜȫįȚȠțİȡĮȓĮȢțĮȚȝİIJĮIJȡȠʌȑĮȢ
y
ȊʌȠıIJȘȡȚȗȩȝİȞȠȢȒȤȠȢ'7903(*'ROE\
Digital, Dolby Digital Plus, HE-AAC
ȈǾȂǼǿȍȈǾ
6ORYHQãþLQD
7HOHYL]RUSULNOMXþLWHYVWHQVNRDQWHQVNRYWLþQLFRV
NDEORP5)
y
ýHåHOLWHXSRUDEOMDWLYHþNRWWHOHYL]RUMD
uporabite razcepnik za signal.
y
ýHMHNDNRYRVWVOLNHVODEDMRL]EROMãDMWHWDNRGD
XVWUH]QRQDPHVWLWHRMDþHYDOQLNVLJQDOD
y
ýHMHNDNRYRVWVOLNHVODEDLQXSRUDEOMDWHDQWHQR
usmerite anteno v ustrezno smer.
y
.DEHODQWHQHLQSUHWYRUQLNQLVWDSULORåHQD
y
Podprte oblike zvoka za DTV: MPEG, Dolby
Digital, Dolby Digital Plus, HE-AAC
OPOMBA

A-13
MAKING CONNECTIONS
Nederlands
Sluit de TV met behulp van een RF-satellietkabel (75
DDQRSHHQVDWHOOLHWVFKRWHO
ǼȜȜȘȞȚțȐ
ȈȣȞįȑıIJİIJȘȞIJȘȜİȩȡĮıȘıİȝȚĮįȠȡȣijȠȡȚțȒțİȡĮȓĮ
ȝȑıȦȝȚĮȢįȠȡȣijȠȡȚțȒȢȣʌȠįȠȤȒȢȝİįȠȡȣijȠȡȚțȩ
țĮȜȫįȚȠ
6ORYHQãþLQD
6NDEORP5)]DVDWHOLWSRYHåLWHWHOHYL]RUVVDWHOLWVNLP
NURåQLNRPSUHNYWLþQLFH]DVDWHOLW
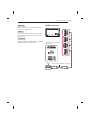
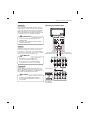
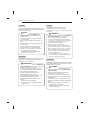
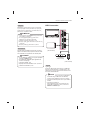
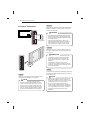
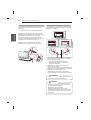
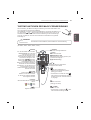
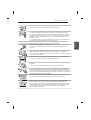
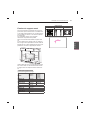
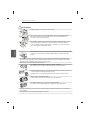
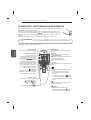
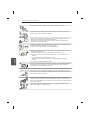
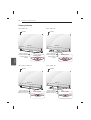
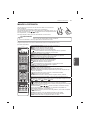
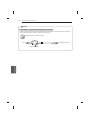
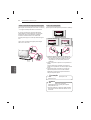
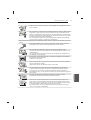
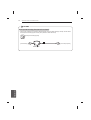
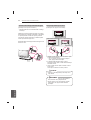
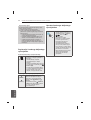
HDMI Connection
DVD / Blu-Ray / HD Cable Box
/ HD STB / PC
HDMI
2 3 1
4
/ DVI IN
(ARC)
(HDCP 2.2)
(MHL)
(10Bit)
(4K@60Hz)
(*Not Provided - Depending on model)

A-14
MAKING CONNECTIONS
Deutsch
Überträgt digitale Video- und Audiosignale von einem
externen Gerät an das TV-Gerät. Verbinden Sie das
externe Gerät, wie in der folgenden Abbildung gezeigt,
mithilfe des HDMI-Kabels mit dem TV-Gerät.
y
Für optimale Bildqualität wird empfohlen, den
HDMI-Anschluss des TV-Gerätes zu verwenden.
y
Verwenden Sie das neueste
Hochgeschwindigkeits-HDMI™-Kabel mit CEC-
Funktion (Customer Electronics Control).
y
High-Speed-HDMI™-Kabel sind für die
Übertragung von HD-Signalen bis zu 1080p und
höher getestet.
y
Unterstütztes HDMI-Audioformat: Dolby
Digital(32Khz, 44.1Khz, 48Khz), DTS(44.1Khz,
48Khz), PCM(32Khz, 44.1Khz, 48Khz, 96Khz,
192Khz)
y
Es wird empfohlen, das mitgelieferte HDMI-
Kabel (HDMI-Anschluss 3) zu verwenden. Wenn
Sie sich für ein handelsübliches HDMI-Kabel
entscheiden, verwenden Sie ein High-Speed-
HDMI-Kabel (3 m oder kürzer) (abhängig vom
Modell).
HINWEIS
1) Die HDMI-Spezifikationen können für jeden
Eingangsanschluss unterschiedlich sein. Überprüfen
Sie deshalb die Spezifikationen des Geräts, bevor
Sie es anschließen.
2) Der HDMI IN 3-Anschluss ist besonders geeignet für
die Spezifikationen, die für UHD-Video (4:4:4, 4:2:2)
mit 4K @ 50/60 Hz erforderlich sind. Jedoch wird,
je nach den Spezifikationen der externen Geräte,
Video oder Audio möglicherweise nicht unterstützt.
Verwenden Sie in einem solchen Fall einen anderen
HDMI IN-Anschluss.
3) Für mehr Informationen zu den HDMI-
Spezifikationen für jeden Eingang wenden Sie sich
an den Kundenservice.
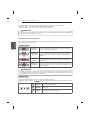
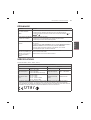
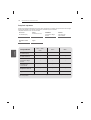
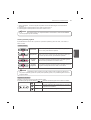
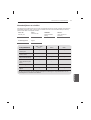
Unterstütztes Format: 4K @ 50/60 Hz
Auflösung
Bildrate
(Hz)
Farbtiefe/Chroma-
Abtastrate
8 bit 10 bit 12 bit
3840 x 2160p
4096 x 2160p
50.00
59.94
60.00
YCbCr
4:2:0
YCbCr 4:2:0
1
YCbCr 4:2:2
1
YCbCr
4:4:4
1
- -
RGB
4:4:4
1
- -
1: Wird nur bei einem HDMI IN 3-Anschluss unterstützt
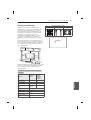
English
Transmits the digital video and audio signals from an
external device to the TV. Connect the external device
and the TV with the HDMI cable as shown.
y
It is recommended to use the TV with the HDMI
connection for the best image quality.
y
Use the latest High Speed HDMI™ Cable with
CEC (Customer Electronics Control) function.
y
High Speed HDMI™ Cables are tested to carry
an HD signal up to 1080p and higher.
y
Supported HDMI Audio format : Dolby
Digital(32Khz, 44.1Khz, 48Khz), DTS(44.1Khz,
48Khz), PCM(32Khz, 44.1Khz, 48Khz, 96Khz,
192Khz)
y
When you use HDMI port 3, it is recommended
that you use the cable provided. If you want to
use a regular HDMI cable, use one that is a high-
speed HDMI cable (3m or less). (Depending on
model)
NOTE
1) HDMI specifications may be different for each input
port, so make sure to check the device specifications
before connecting.
2) The HDMI IN 3 port is especially suitable for the
specifications to enjoy UHD Video (4:4:4, 4:2:2) of
4K @ 50/60 Hz. However, video or audio may not
be supported depending on the specifications of
the external equipment. In that case, use any other
HDMI IN port.
3) Contact customer service for more information on
the HDMI specifications of each input port.
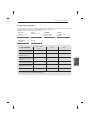
4K @ 50/60 Hz Support Format
Resolution
Frame
rate (Hz)
Colour Depth /
Chroma Sampling
8 bit 10 bit 12 bit
3840 x 2160p
4096 x 2160p
50.00
59.94
60.00
YCbCr
4:2:0
YCbCr 4:2:0
1
YCbCr 4:2:2
1
YCbCr
4:4:4
1
- -
RGB
4:4:4
1
- -
1: Only Supported at HDMI IN 3 Port

A-15
MAKING CONNECTIONS
Français
Permet de transmettre les signaux vidéo et audio
numériques d’un périphérique externe vers la TV. Con-
nectez le périphérique externe et la TV avec le câble
HDMI comme indiqué sur l’illustration suivante.
y
Pour obtenir une meilleure qualité d’image, il est
recommandé d’utiliser la TV avec une connexion
HDMI.
y
Utilisez le tout nouveau câble haut débit HDMI™
avec la fonction CEC (contrôles électroniques
client).
y
Les câbles HDMI™ haut débit sont testés pour
transporter un signal HD de 1080p ou supérieur.
y
Formats audio HDMI pris en charge : Dolby
Digital(32Khz, 44.1Khz, 48Khz), DTS(44.1Khz,
48Khz), PCM(32Khz, 44.1Khz, 48Khz, 96Khz,
192Khz)
y
Lors de l'utilisation d'un câble HDMI
(port HDMI 3), il est recommandé d'utiliser le
câble fourni. Si vous utilisez un câble HDMI
conventionnel, utilisez un câble HDMI haut débit
(max. 3 m) (selon le modèle).
REMARQUE
1) Les caractéristiques HDMI pouvant être différentes
pour chaque port de source d'entrée, nous vous
conseillons de consulter les caractéristiques du
périphérique avant d'effectuer la connexion.
2) Le port HDMI IN 3 est spécialement adapté aux
caractéristiques permettant de profiter de vidéos
UHD (4:4:4, 4:2:2) de 4K @ 50/60 Hz. Toutefois, les
fonctions vidéo ou audio peuvent ne pas être prises
en charge (cela dépend des caractéristiques de
l'équipement externe). Dans ce cas, veuillez utiliser
tout autre port HDMI IN.
3) Contactez le service clientèle pour obtenir plus
d'informations concernant les caractéristiques HDMI
de chaque port d'entrée.
Format de prise en charge 4K @ 50/60 Hz
Résolution
Fréqu-
ence
d'image
(Hz)
Profondeur de
couleur / Taux
d'échantillonnage
8 bit 10 bit 12 bit
3840 x 2160p
4096 x 2160p
50.00
59.94
60.00
YCbCr
4:2:0
YCbCr 4:2:0
1
YCbCr 4:2:2
1
YCbCr
4:4:4
1
- -
RGB
4:4:4
1
- -
1: Pris en charge uniquement par le port HDMI IN 3.
Italiano
Il segnale digitale audio e video viene trasmesso da un
dispositivo esterno al televisore. Collegare il dispositivo
esterno e il televisore mediante il cavo HDMI come
mostrato nell’illustrazione di seguito.
y
Si consiglia di utilizzare il televisore con il
collegamento HDMI per ottenere la migliore
qualità delle immagini.
y
Utilizzare un cavo HDMI™ ad alta velocità
dotato dei requisiti più recenti con funzione CEC
(Customer Electronics Control).
y
I cavi HDMI™ ad alta velocità sono testati per
trasmettere un segnale HD fino a 1080p e
superiore.
y
Formato audio HDMI supportato: Dolby
Digital(32Khz, 44.1Khz, 48Khz), DTS(44.1Khz,
48Khz), PCM(32Khz, 44.1Khz, 48Khz, 96Khz,
192Khz)
y
Se si utilizza un cavo HDMI (HDMI IN 3 porte), si
consiglia di utilizzare il cavo fornito. Se si utilizza
un normale cavo HDMI, utilizzare un cavo HDMI
ad alta velocità (lunghezza uguale o inferiore a 3
m) a seconda del modello.
(
in base al modello
)
NOTA
1) Le specifiche HDMI potrebbero differire per ogni
porta d'ingresso; pertanto, controllare le specifiche
del dispositivo prima del collegamento.
2) Le HDMI IN 3 sono particolarmente idonee per le
specifiche necessarie alla riproduzione di video
UHD (4:4:4, 4:2:2) da 4K @ 50/60 Hz. Tuttavia,
la riproduzione video o audio Potrebbe non
essere supportata a seconda delle specifiche
dell'apparecchiatura esterna. In tal caso, utilizzare
una porta HDMI IN differente.
3) Contattare il servizio clienti per ulteriori informazioni
sulle specifiche HDMI di ciascuna porta d'ingresso.
Formato supportato: 4K @ 50/60 Hz
Risoluzione
Frequenza
fotogram-
mi (Hz)
Intensità di colore/
Campionamento dei
colori
8 bit 10 bit 12 bit
3840 x 2160p
4096 x 2160p
50.00
59.94
60.00
YCbCr
4:2:0
YCbCr
4:2:0
1
YCbCr 4:2:2
1
YCbCr
4:4:4
1
- -
RGB
4:4:4
1
- -
1: Supportato solo sulla porta HDMI IN 3

A-16
MAKING CONNECTIONS
Português
Transmite os sinais digitais de vídeo e áudio de um
dispositivo externo para a TV. Ligue o dispositivo ex-
terno à TV com o cabo HDMI, conforme demonstrado
na ilustração.
y
Recomenda-se a utilização da TV com a ligação
HDMI para uma melhor qualidade de imagem.
y
Utilize o mais recente cabo HDMI™ de alta
velocidade com função CEC (Customer
Electronics Control).
y
Os cabos HDMI™ de alta velocidade foram
testados para executar um sinal HD até 1080p e
superior.
y
Formato de áudio HDMI suportado: Dolby
Digital(32Khz, 44.1Khz, 48Khz), DTS(44.1Khz,
48Khz), PCM(32Khz, 44.1Khz, 48Khz, 96Khz,
192Khz)
y
Se utilizar um cabo HDMI (porta HDMI IN 3),
recomenda-se a utilização do cabo fornecido.
Se utilizar um cabo HDMI comum, utilize um
cabo HDMI de alta velocidade (3 m ou menos).
(Dependendo do modelo)
NOTA
1) As especificações de HDMI poderão variar entre
as portas de entrada, pelo que deve verificar as
especificações do dispositivo antes de estabelecer
a ligação.
2) A porta HDMI IN 3 é especialmente adequada para
reprodução de vídeo UHD (4:4:4, 4:2:2) de 4K @
50/60 Hz. No entanto, o vídeo ou o áudio poderão
não ser suportados dependendo das especificações
do equipamento externo. Nesse caso, utilize
qualquer outra porta HDMI IN.
3) Contacte o apoio ao cliente para obter mais
informações sobre as especificações de HDMI de
cada porta de entrada.
Formato suportado: 4K @ 50/60 Hz
Resolução
Veloci-
dade de
frames
(Hz)
Profundidade de
cores/amostragem de
cores
8 bit 10 bit 12 bit
3840 x 2160p
4096 x 2160p
50.00
59.94
60.00
YCbCr
4:2:0
YCbCr 4:2:0
1
YCbCr 4:2:2
1
YCbCr
4:4:4
1
- -
RGB
4:4:4
1
- -
1: Suportado apenas na porta HDMI IN 3
Español
Transmite las señales de audio y vídeo digital de un
dispositivo externo a la TV. Use el cable HDMI para
conectar el dispositivo externo a la TV, tal y como se
muestra en la siguiente ilustración.
y
Se recomienda usar la conexión HDMI de la TV
para obtener la mejor calidad de imagen.
y
Utilice el cable HDMI™ de alta velocidad
más reciente con la función CEC (control de
electrónica de consumo).
y
Los cables HDMI™ de alta velocidad están
preparados para transportar una señal HD de
1080p o superior.
y
Formato de audio HDMI admitido: Dolby
Digital(32Khz, 44.1Khz, 48Khz), DTS(44.1Khz,
48Khz), PCM(32Khz, 44.1Khz, 48Khz, 96Khz,
192Khz)
y
Cuando use un cable HDMI (puerto HDMI IN 3),
se recomienda que use el cable proporcionado.
Si utiliza un cable HDMI convencional, asegúrese
de que se trata de un cable de alta velocidad (3 m
o menos). (En función del modelo)
NOTA
1) Las especificaciones de HDMI pueden ser diferentes
para cada puerto de entrada, por lo que debe
asegurarse de comprobar las especificaciones del
dispositivo antes de conectarlo.
2) El puerto HDMI IN 3 es especialmente adecuado
para las especificaciones para disfrutar de vídeo
UHD (4:4:4, 4:2:2) de 4K @ 50/60 Hz. No obstante,
es posible que, dependiendo de las especificaciones
del equipo externo, el vídeo o el audio no sea
compatible. En ese caso, utilice cualquier otro puerto
HDMI IN.
3) Póngase en contacto con el servicio de atención
al cliente para obtener más información sobre
las especificaciones de HDMI de cada puerto de
entrada.
Formato compatible con 4K @ 50/60 Hz
Resolución
Veloci-
dad de
fotogra-
mas (Hz)
Profundidad de color /
Muestreo de color
8 bit 10 bit 12 bit
3840 x 2160p
4096 x 2160p
50.00
59.94
60.00
YCbCr
4:2:0
YCbCr 4:2:0
1
YCbCr 4:2:2
1
YCbCr
4:4:4
1
- -
RGB
4:4:4
1
- -
1: Solo compatible en el puerto HDMI IN 3

A-17
MAKING CONNECTIONS
Nederlands
U kunt de digitale video- en audiosignalen vanaf een
extern apparaat naar de TV zenden. Sluit het externe
apparaat en de TV op elkaar aan met behulp van de
HDMI-kabel, zoals aangegeven in de volgende afbeeld-
ing.
y
Wij raden u aan de TV aan te sluiten door middel
van een HDMI-verbinding voor de hoogste
beeldkwaliteit.
y
Gebruik de nieuwste High Speed HDMI™-kabel
met CEC-functie (Customer Electronics Control).
y
HDMI™-kabels van het type High Speed zijn
getest op het verzenden van HD-signalen tot
1080p en hoger.
y
Ondersteunde HDMI-audio-indeling: Dolby
Digital(32Khz, 44.1Khz, 48Khz), DTS(44.1Khz,
48Khz), PCM(32Khz, 44.1Khz, 48Khz, 96Khz,
192Khz)
y
Als u een HDMI-kabel (HDMI IN 3-poorts)
gebruikt, raden we u aan om de meegeleverde
kabel te gebruiken. Als u een normale HDMI-
kabel gebruikt, dan dient u een High Speed
HDMI-kabel (niet langer dan 3 meter) te
gebruiken (afhankelijk van het model).
OPMERKING
1) HDMI-specificaties kunnen per ingangspoort
verschillen, controleer dus de apparaatspecificaties
voordat u het aansluit
2) De HDMI IN 3-poort is vooral geschikt voor de
specificaties om van UHD-video's (4:4:4, 4:2:2) van
4K @ 50/60 Hz te genieten. Video of audio wordt
echter mogelijk niet ondersteund afhankelijk van de
specificaties van de externe apparatuur. Gebruik in
dat geval een andere HDMI IN-poort.
3) Neem contact op met de klantenservice voor meer
informatie over de HDMI-specificaties van iedere
ingangspoort.
Ondersteuning voor 4K @ 50/60 Hz
Resolutie
Frames-
nelheid
(Hz)
Kleurdiepte / kleurbe-
monstering
8 bit 10 bit 12 bit
3840 x 2160p
4096 x 2160p
50.00
59.94
60.00
YCbCr
4:2:0
YCbCr 4:2:0
1
YCbCr 4:2:2
1
YCbCr
4:4:4
1
- -
RGB
4:4:4
1
- -
1: Alleen ondersteund met HDMI IN 3-poort
ǼȜȜȘȞȚțȐ
ȂİIJĮįȓįİȚIJĮȥȘijȚĮțȐıȒȝĮIJĮİȚțȩȞĮȢțĮȚȒȤȠȣĮʌȩ
ȝȚĮİȟȦIJİȡȚțȒıȣıțİȣȒıIJȘȞIJȘȜİȩȡĮıȘȈȣȞįȑıIJİIJȘȞ
İȟȦIJİȡȚțȒıȣıțİȣȒțĮȚIJȘȞIJȘȜİȩȡĮıȘȝİIJȠțĮȜȫįȚȠ
+'0,ȩʌȦȢijĮȓȞİIJĮȚıIJȘȞʌĮȡĮțȐIJȦİȚțȩȞĮ
y
īȚĮIJȘȕȑȜIJȚıIJȘʌȠȚȩIJȘIJĮİȚțȩȞĮȢȤȡȘıȚȝȠʌȠȚȒıIJİ
IJȘȞIJȘȜİȩȡĮıȘȝİıȪȞįİıȘ+'0,
y
ȋȡȘıȚȝȠʌȠȚȒıIJİIJȠțĮȜȫįȚȠ+'0,ȣȥȘȜȒȢ
IJĮȤȪIJȘIJĮȢȝİȜİȚIJȠȣȡȖȓĮ&(&&XVWRPHU
Electronics Control).
y
ȉĮțĮȜȫįȚĮ+'0,ȣȥȘȜȒȢIJĮȤȪIJȘIJĮȢȑȤȠȣȞ
İȜİȖȤșİȓȖȚĮIJȘȝİIJȐįȠıȘıȒȝĮIJȠȢ+'ĮȞȐȜȣıȘȢ
ȑȦȢSȒȣȥȘȜȩIJİȡȘȢ
y
ȊʌȠıIJȘȡȚȗȩȝİȞȘȝȠȡijȒȒȤȠȣ+'0,'ROE\
Digital(32Khz, 44.1Khz, 48Khz), DTS(44.1Khz,
48Khz), PCM(32Khz, 44.1Khz, 48Khz, 96Khz,
192Khz)
y
īȚĮȤȡȒıȘțĮȜȦįȓȠȣ+'0,+'0,SRUW
ıȣȞȚıIJȐIJĮȚȘȤȡȒıȘIJȠȣʌĮȡİȤȩȝİȞȠȣțĮȜȦįȓȠȣ
ǹȞȤȡȘıȚȝȠʌȠȚİȓIJİȑȞĮțĮȞȠȞȚțȩțĮȜȫįȚȠ+'0,
ȤȡȘıȚȝȠʌȠȚȒıIJİȑȞĮțĮȜȫįȚȠ+'0,ȣȥȘȜȒȢ
IJĮȤȪIJȘIJĮȢȝȑȤȡȚȝȑIJȡĮǹȞȐȜȠȖĮȝİIJȠ
ȝȠȞIJȑȜȠ
ȈǾȂǼǿȍȈǾ
ȅȚʌȡȠįȚĮȖȡĮijȑȢ+'0,ȝʌȠȡİȓȞĮįȚĮijȑȡȠȣȞȖȚĮ
țȐșİșȪȡĮİȚıȩįȠȣȠʌȩIJİijȡȠȞIJȓıIJİȞĮİȜȑȖȤİIJİIJȚȢ
ʌȡȠįȚĮȖȡĮijȑȢIJȘȢıȣıțİȣȒȢʌȡȚȞĮʌȩIJȘıȪȞįİıȘ
ǾșȪȡĮHDMI IN 3İȓȞĮȚțĮIJȐȜȜȘȜȘȖȚĮIJȚȢ
ʌȡȠįȚĮȖȡĮijȑȢʌĮȡĮțȠȜȠȪșȘıȘȢȕȓȞIJİȠ8+'
4:2:2), 4K @ 50/60 Hz.
ǼʌȚțȠȚȞȦȞȒıIJİȝİIJȘȞİȟȣʌȘȡȑIJȘıȘʌİȜĮIJȫȞ
ȖȚĮʌİȡȚııȩIJİȡİȢʌȜȘȡȠijȠȡȓİȢıȤİIJȚțȐȝİIJȚȢ
ʌȡȠįȚĮȖȡĮijȑȢ+'0,țȐșİșȪȡĮȢİȚıȩįȠȣ
ȊʌȠıIJȒȡȚȟȘȝȠȡijȒȢ.#+]
ǹȞȐȜȣıȘ
ȇȣșȝȩȢ
țĮȡȑ
(Hz)
ǺȐșȠȢȤȡȫȝĮIJȠȢ
ǻİȚȖȝĮIJȠȜȘȥȓĮ
ȤȡȦȝĮIJȚțȒȢįȚĮijȠȡȐȢ
8 bit 10 bit 12 bit
3840 x 2160p
4096 x 2160p
50.00
59.94
60.00
YCbCr
4:2:0
YCbCr 4:2:0
1
YCbCr 4:2:2
1
YCbCr
4:4:4
1
- -
RGB
4:4:4
1
- -
ȊʌȠıIJȘȡȓȗİIJĮȚȝȩȞȠıIJȘșȪȡĮHDMI IN 3

A-18
MAKING CONNECTIONS
ARC (Audio Return Channel)
English
y
An external audio device that supports SIMPLINK
and ARC must be connected using HDMI(4K @ 60
Hz)/DVI IN 2 (ARC) port.
y
When connected with a high-speed HDMI cable, the
external audio device that supports ARC outputs
optical SPDIF without additional optical audio cable
and supports the SIMPLINK function.
Deutsch
y
Ein externes Audiogerät, das SIMPLINK und ARC
unterstützt, muss über den HDMI(4K @ 60 Hz)/DVI
IN 2 (ARC) angeschlossen werden.
y
Wenn der Anschluss mit einem High-Speed-HDMI-
Kabel erfolgt, gibt das externe Audiogerät, das ARC
unterstützt, SPDIF ohne zusätzliches optisches
Audiokabel aus und unterstützt die SIMPLINK-
Funktion.
Français
y
Un périphérique audio externe qui prend en
charge les technologies SIMPLINK et ARC doit
être connecté au port HDMI(4K @ 60 Hz)/DVI IN 2
(ARC).
y
Si vous reliez un câble HDMI haut débit, le
périphérique audio externe qui prend en charge
les sorties ARC, prend également en charge la
sortie optique SPDIF sans câble audio optique
supplémentaire, ainsi que la fonction SIMPLINK.
Italiano
y
Per il collegamento di un dispositivo audio esterno
che supporta le funzionalità SIMPLINK e ARC,
usare la porta HDMI(4K @ 60 Hz)/DVI IN 2 (ARC).
y
Se si effettua il collegamento con un cavo HDMI
ad alta velocità, il dispositivo audio esterno che
supporta ARC trasmette il segnale SPDIF senza
il cavo ottico aggiuntivo e supporta la funzione
SIMPLINK.
Español
y
Hay que conectar un dispositivo de audio externo
que admita SIMPLINK y ARC utilizando el puerto
HDMI(4K @ 60 Hz)/DVI IN 2 (ARC).
y
Cuando esté conectado mediante un cable HDMI de
alta velocidad, el dispositivo de audio externo que
admite ARC emite el SPDIF óptico sin necesidad
de un cable óptico de audio adicional y admite la
función SIMPLINK.
6ORYHQãþLQD
3UHQDãDGLJLWDOQHYLGHRLQ]YRþQHVLJQDOHL]]XQDQMH
QDSUDYHQDWHOHYL]RU3RYHåLWH]XQDQMRQDSUDYRLQ
televizor s HDMI-kablom, kot je prikazano na naslednji
sliki.
y
=DQDMEROMãRNDNRYRVWVOLNHSULSRURþDPRXSRUDER
televizorja s HDMI-povezavo.
y
Uporabite najnovejši kabel HDMI™ za hitri
prenos s funkcijo CEC (Customer Electronics
Control).
y
Kabli HDMI™ za hitri prenos so preizkušeni, tako
GDODKNRSUHQDãDMRVLJQDOYLVRNHORþOMLYRVWLGR
SLQYHþ
y
Podprte oblike zvoka za HDMI: Dolby
Digital(32Khz, 44.1Khz, 48Khz), DTS(44.1Khz,
48Khz), PCM(32Khz, 44.1Khz, 48Khz, 96Khz,
192Khz)
y
ýHQDPHUDYDWHXSRUDELWLNDEHO+'0,YUDWD
+'0,,1SULSRURþDPRGDXSRUDELWHSULORåHQL
NDEHOýHERVWHXSRUDELOLQDYDGHQNDEHO+'0,
XSRUDELWHWDNHJD]DKLWULSUHQRVGROåLQHGRP
(Odvisno od modela.)
OPOMBA
1) Specifikacije HDMI posameznih vhodnih vrat se
ODKNRUD]OLNXMHMR]DWRMLKSUHYHULWHSUHGSULNOMXþLWYLMR
2) Vrata HDMI IN 3 so še posebej primerna za
VSHFLILNDFLMHVNDWHULPLERVWH]DUHVXåLYDOLYYLGHX
8+']ORþOMLYRVWMR.SUL+]
Vendar pa odvisno od specifikacij zunanje opreme
video ali zvok morda ne bo podprt. V tem primeru
uporabite katera koli druga vrata HDMI IN.
=DYHþLQIRUPDFLMRVSHFLILNDFLMDK+'0,SRVDPH]QLK
YKRGQLKYUDWVHREUQLWHQDRGGHOHN]DSRPRþ
uporabnikom.
3RGSUWHREOLNHORþOMLYRVWL.#+]
/RþOMLYRVW
Hitrost
VOLþLF
(Hz)
Barvna globina/
Y]RUþHQMHNURPLQDQFH
8 bit 10 bit 12 bit
3840 x 2160p
4096 x 2160p
50.00
59.94
60.00
YCbCr
4:2:0
YCbCr 4:2:0
1
YCbCr 4:2:2
1
YCbCr
4:4:4
1
- -
RGB
4:4:4
1
- -
1: Podprto samo na vratih HDMI IN 3.

A-19
MAKING CONNECTIONS
Português
y
É necessário ligar um dispositivo de áudio externo
que suporte SIMPLINK e ARC utilizando a porta
HDMI(4K @ 60 Hz)/DVI IN 2 (ARC).
y
Quando ligado a um cabo HDMI de alta velocidade,
o aparelho de áudio externo que suporta ARC
transmite SPDIF óptica sem um cabo de áudio
óptico adicional e suporta a função SIMPLINK.
Nederlands
y
Een extern audioapparaat dat ondersteuning biedt
voor SIMPLINK en ARC, moet op de HDMI(4K @
60 Hz)/DVI IN 2 (ARC) worden aangesloten.
y
Bij aansluiting met een High Speed HDMI-
kabel zorgt het externe audioapparaat met ARC-
ondersteuning ervoor dat optische SPDIF wordt
uitgevoerd zonder extra optische audiokabel, en
ondersteunt dit apparaat de SIMPLINK-functie.
ǼȜȜȘȞȚțȐ
y
ȂȚĮİȟȦIJİȡȚțȒıȣıțİȣȒȒȤȠȣȘȠʌȠȓĮȣʌȠıIJȘȡȓȗİȚ
6,03/,1.țĮȚ$5&ʌȡȑʌİȚȞĮıȣȞįİșİȓȝİIJȘȤȡȒıȘ
IJȘȢșȪȡĮȢİȚıȩįȠȣHDMI(4K @ 60 Hz)/DVI IN 2
(ARC).
y
ȀĮIJȐIJȘıȪȞįİıȘȝİțĮȜȫįȚȠ+'0,ȣȥȘȜȒȢ
IJĮȤȪIJȘIJĮȢȘİȟȦIJİȡȚțȒıȣıțİȣȒȒȤȠȣʌȠȣ
ȣʌȠıIJȘȡȓȗİȚIJȠ$5&ʌĮȡȑȤİȚȠʌIJȚțȩıȒȝĮ63',)
ȤȦȡȓȢʌȡȩıșİIJȠȠʌIJȚțȩțĮȜȫįȚȠȒȤȠȣțĮȚ
ȣʌȠıIJȘȡȓȗİȚIJȘȜİȚIJȠȣȡȖȓĮ6,03/,1.
6ORYHQãþLQD
y
=XQDQMD]YRþQDQDSUDYDNLSRGSLUDIXQNFLML
SIMPLINK in ARC, mora biti povezana z vhodnimi
vrati HDMI(4K @ 60 Hz)/DVI IN 2 (ARC).
y
ýHMRSRYHåHWHVNDEORP+'0,]DKLWULSUHQRV
]XQDQMD]YRþQDQDSUDYDNLSRGSLUDIXQNFLMR
$5&RGGDMDRSWLþQL]DSLV63',)EUH]GRGDWQHJD
RSWLþQHJD]YRþQHJDNDEODLQSRGSLUDIXQNFLMR
SIMPLINK.
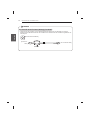
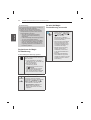
DVI to HDMI Connection
DVI OUT
AUDIO OUT
IN
AV2
2 3 1
4
(ARC)
(HDCP 2.2)
(MHL)
(10Bit)
/ DVI IN
(4K@60Hz)
(*Not Provided)
(*Not Provided)
DVD / Blu-Ray / HD Cable Box /
PC / HD STB

A-20
MAKING CONNECTIONS
Italiano
Il segnale digitale video viene trasmesso da un dis-
positivo esterno al televisore. Collegare il dispositivo
esterno e il televisore mediante il cavo DVI-HDMI come
mostrato nell’illustrazione di seguito. Per trasmettere un
segnale audio, collegare un cavo audio.
y
A seconda della scheda grafica in uso, la
modalità DOS potrebbe non funzionare se si
utilizza un cavo da HDMI a DVI.
y
Quando si utilizza il cavo HDMI/DVI, è supportata
solo l’interfaccia Single link.
NOTA
Español
Transmite la señal de vídeo digital de un dispositivo
externo a la TV. Use el cable DVI-HDMI para conectar
el dispositivo externo a la TV, tal y como se muestra
en la siguiente ilustración. Para transmitir una señal de
audio, conecte un cable de audio.
y
En función de la tarjeta gráfica, puede que no
funcione el modo DOS si se está utilizando un
cable de HDMI a DVI.
y
Si se utiliza un cable HDMI/DVI, solo se admite
un enlace.
NOTA
Português
Transmite o sinal digital de vídeo de um dispositivo ex-
terno para a TV. Ligue o dispositivo externo à TV com
o cabo DVI-HDMI, conforme demonstrado na seguinte
ilustração. Para transmitir um sinal de áudio, ligue um
cabo de áudio.
y
Dependendo da placa gráfica, o modo DOS
poderá não funcionar se utilizar um cabo HDMI
para DVI.
y
Ao utilizar o cabo HDMI/DVI, apenas a Ligação
única é suportada.
NOTA
English
Transmits the digital video signal from an external
device to the TV. Connect the external device and the
TV with the DVI-HDMI cable as shown. To transmit an
audio signal, connect an audio cable.
y
Depending on the graphics card, DOS mode may
not work if a HDMI to DVI Cable is in use.
y
When using the DVI/HDMI cable, single link is
supported.
NOTE
Deutsch
Überträgt digitale Videosignale von einem externen
Gerät an das TV-Gerät. Verbinden Sie das externe
Gerät, wie in der folgenden Abbildung gezeigt, mithilfe
des DVI-HDMI-Kabels mit dem TV-Gerät. Schließen Sie
ein Audiokabel an, um ein Audiosignal zu übertragen.
y
Abhängig von der Grafikkarte funktioniert der
DOS-Modus bei Einsatz eines HDMI-zu-DVI-
Kabels möglicherweise nicht.
y
Bei Verwendung des HDMI/DVI-Kabels wird nur
eine einfache Verbindung unterstützt.
HINWEIS
Français
Permet de transmettre les signaux vidéo d’un
périphérique externe vers la TV. Connectez le
périphérique externe et la TV avec le câble DVI-HDMI
comme indiqué sur l’illustration suivante. Pour émettre
un signal audio, raccordez un câble audio.
y
Selon la carte graphique, le mode DOS peut ne
pas fonctionner si vous utilisez un câble pour
établir la connexion HDMI-DVI.
y
Lors de l’utilisation du câble HDMI/DVI, seule
une liaison unique peut être prise en charge.
REMARQUE
La pagina si sta caricando...
La pagina si sta caricando...
La pagina si sta caricando...
La pagina si sta caricando...
La pagina si sta caricando...
La pagina si sta caricando...
La pagina si sta caricando...
La pagina si sta caricando...
La pagina si sta caricando...
La pagina si sta caricando...
La pagina si sta caricando...
La pagina si sta caricando...
La pagina si sta caricando...
La pagina si sta caricando...
La pagina si sta caricando...
La pagina si sta caricando...
La pagina si sta caricando...
La pagina si sta caricando...
La pagina si sta caricando...
La pagina si sta caricando...
La pagina si sta caricando...
La pagina si sta caricando...
La pagina si sta caricando...
La pagina si sta caricando...
La pagina si sta caricando...
La pagina si sta caricando...
La pagina si sta caricando...
La pagina si sta caricando...
La pagina si sta caricando...
La pagina si sta caricando...
La pagina si sta caricando...
La pagina si sta caricando...
La pagina si sta caricando...
La pagina si sta caricando...
La pagina si sta caricando...
La pagina si sta caricando...
La pagina si sta caricando...
La pagina si sta caricando...
La pagina si sta caricando...
La pagina si sta caricando...
La pagina si sta caricando...
La pagina si sta caricando...
La pagina si sta caricando...
La pagina si sta caricando...
La pagina si sta caricando...
La pagina si sta caricando...
La pagina si sta caricando...
La pagina si sta caricando...
La pagina si sta caricando...
La pagina si sta caricando...
La pagina si sta caricando...
La pagina si sta caricando...
La pagina si sta caricando...
La pagina si sta caricando...
La pagina si sta caricando...
La pagina si sta caricando...
La pagina si sta caricando...
La pagina si sta caricando...
La pagina si sta caricando...
La pagina si sta caricando...
La pagina si sta caricando...
La pagina si sta caricando...
La pagina si sta caricando...
La pagina si sta caricando...
La pagina si sta caricando...
La pagina si sta caricando...
La pagina si sta caricando...
La pagina si sta caricando...
La pagina si sta caricando...
La pagina si sta caricando...
La pagina si sta caricando...
La pagina si sta caricando...
La pagina si sta caricando...
La pagina si sta caricando...
La pagina si sta caricando...
La pagina si sta caricando...
La pagina si sta caricando...
La pagina si sta caricando...
La pagina si sta caricando...
La pagina si sta caricando...
La pagina si sta caricando...
La pagina si sta caricando...
La pagina si sta caricando...
La pagina si sta caricando...
La pagina si sta caricando...
La pagina si sta caricando...
La pagina si sta caricando...
La pagina si sta caricando...
La pagina si sta caricando...
La pagina si sta caricando...
La pagina si sta caricando...
La pagina si sta caricando...
La pagina si sta caricando...
La pagina si sta caricando...
La pagina si sta caricando...
La pagina si sta caricando...
La pagina si sta caricando...
La pagina si sta caricando...
La pagina si sta caricando...
La pagina si sta caricando...
La pagina si sta caricando...
La pagina si sta caricando...
La pagina si sta caricando...
La pagina si sta caricando...
La pagina si sta caricando...
La pagina si sta caricando...
La pagina si sta caricando...
La pagina si sta caricando...
La pagina si sta caricando...
La pagina si sta caricando...
La pagina si sta caricando...
La pagina si sta caricando...
La pagina si sta caricando...
La pagina si sta caricando...
La pagina si sta caricando...
La pagina si sta caricando...
La pagina si sta caricando...
La pagina si sta caricando...
La pagina si sta caricando...
La pagina si sta caricando...
La pagina si sta caricando...
La pagina si sta caricando...
La pagina si sta caricando...
La pagina si sta caricando...
La pagina si sta caricando...
La pagina si sta caricando...
La pagina si sta caricando...
La pagina si sta caricando...
La pagina si sta caricando...
La pagina si sta caricando...
La pagina si sta caricando...
La pagina si sta caricando...
La pagina si sta caricando...
La pagina si sta caricando...
La pagina si sta caricando...
La pagina si sta caricando...
La pagina si sta caricando...
La pagina si sta caricando...
La pagina si sta caricando...
La pagina si sta caricando...
La pagina si sta caricando...
La pagina si sta caricando...
La pagina si sta caricando...
La pagina si sta caricando...
La pagina si sta caricando...
La pagina si sta caricando...
La pagina si sta caricando...
La pagina si sta caricando...
La pagina si sta caricando...
La pagina si sta caricando...
La pagina si sta caricando...
La pagina si sta caricando...
La pagina si sta caricando...
La pagina si sta caricando...
La pagina si sta caricando...
La pagina si sta caricando...
La pagina si sta caricando...
La pagina si sta caricando...
La pagina si sta caricando...
La pagina si sta caricando...
La pagina si sta caricando...
La pagina si sta caricando...
La pagina si sta caricando...
La pagina si sta caricando...
La pagina si sta caricando...
La pagina si sta caricando...
La pagina si sta caricando...
La pagina si sta caricando...
La pagina si sta caricando...
La pagina si sta caricando...
La pagina si sta caricando...
La pagina si sta caricando...
La pagina si sta caricando...
La pagina si sta caricando...
La pagina si sta caricando...
La pagina si sta caricando...
La pagina si sta caricando...
La pagina si sta caricando...
La pagina si sta caricando...
La pagina si sta caricando...
La pagina si sta caricando...
La pagina si sta caricando...
La pagina si sta caricando...
La pagina si sta caricando...
La pagina si sta caricando...
La pagina si sta caricando...
La pagina si sta caricando...
La pagina si sta caricando...
La pagina si sta caricando...
La pagina si sta caricando...
La pagina si sta caricando...
La pagina si sta caricando...
La pagina si sta caricando...
La pagina si sta caricando...
La pagina si sta caricando...
La pagina si sta caricando...
La pagina si sta caricando...
La pagina si sta caricando...
La pagina si sta caricando...
La pagina si sta caricando...
La pagina si sta caricando...
La pagina si sta caricando...
La pagina si sta caricando...
La pagina si sta caricando...
La pagina si sta caricando...
La pagina si sta caricando...
La pagina si sta caricando...
La pagina si sta caricando...
La pagina si sta caricando...
La pagina si sta caricando...
La pagina si sta caricando...
La pagina si sta caricando...
La pagina si sta caricando...
La pagina si sta caricando...
La pagina si sta caricando...
La pagina si sta caricando...
La pagina si sta caricando...
La pagina si sta caricando...
La pagina si sta caricando...
La pagina si sta caricando...
La pagina si sta caricando...
La pagina si sta caricando...
La pagina si sta caricando...
La pagina si sta caricando...
La pagina si sta caricando...
La pagina si sta caricando...
La pagina si sta caricando...
La pagina si sta caricando...
La pagina si sta caricando...
La pagina si sta caricando...
La pagina si sta caricando...
La pagina si sta caricando...
La pagina si sta caricando...
La pagina si sta caricando...
La pagina si sta caricando...
La pagina si sta caricando...
La pagina si sta caricando...
La pagina si sta caricando...
La pagina si sta caricando...
La pagina si sta caricando...
La pagina si sta caricando...
La pagina si sta caricando...
La pagina si sta caricando...
La pagina si sta caricando...
La pagina si sta caricando...
La pagina si sta caricando...
La pagina si sta caricando...
La pagina si sta caricando...
La pagina si sta caricando...
La pagina si sta caricando...
La pagina si sta caricando...
La pagina si sta caricando...
La pagina si sta caricando...
La pagina si sta caricando...
La pagina si sta caricando...
La pagina si sta caricando...
La pagina si sta caricando...
La pagina si sta caricando...
La pagina si sta caricando...
La pagina si sta caricando...
La pagina si sta caricando...
La pagina si sta caricando...
La pagina si sta caricando...
La pagina si sta caricando...
La pagina si sta caricando...
La pagina si sta caricando...
La pagina si sta caricando...
La pagina si sta caricando...
La pagina si sta caricando...
La pagina si sta caricando...
La pagina si sta caricando...
La pagina si sta caricando...
La pagina si sta caricando...
La pagina si sta caricando...
La pagina si sta caricando...
La pagina si sta caricando...
La pagina si sta caricando...
La pagina si sta caricando...
La pagina si sta caricando...
La pagina si sta caricando...
La pagina si sta caricando...
La pagina si sta caricando...
La pagina si sta caricando...
La pagina si sta caricando...
La pagina si sta caricando...
La pagina si sta caricando...
La pagina si sta caricando...
La pagina si sta caricando...
La pagina si sta caricando...
La pagina si sta caricando...
La pagina si sta caricando...
La pagina si sta caricando...
La pagina si sta caricando...
La pagina si sta caricando...
La pagina si sta caricando...
La pagina si sta caricando...
La pagina si sta caricando...
La pagina si sta caricando...
La pagina si sta caricando...
La pagina si sta caricando...
La pagina si sta caricando...
La pagina si sta caricando...
La pagina si sta caricando...
La pagina si sta caricando...
La pagina si sta caricando...
La pagina si sta caricando...
La pagina si sta caricando...
La pagina si sta caricando...
La pagina si sta caricando...
La pagina si sta caricando...
La pagina si sta caricando...
La pagina si sta caricando...
La pagina si sta caricando...
La pagina si sta caricando...
La pagina si sta caricando...
La pagina si sta caricando...
La pagina si sta caricando...
La pagina si sta caricando...
La pagina si sta caricando...
La pagina si sta caricando...
La pagina si sta caricando...
La pagina si sta caricando...
La pagina si sta caricando...
La pagina si sta caricando...
La pagina si sta caricando...
La pagina si sta caricando...
La pagina si sta caricando...
La pagina si sta caricando...
La pagina si sta caricando...
La pagina si sta caricando...
La pagina si sta caricando...
La pagina si sta caricando...
La pagina si sta caricando...
La pagina si sta caricando...
La pagina si sta caricando...
La pagina si sta caricando...
La pagina si sta caricando...
La pagina si sta caricando...
La pagina si sta caricando...
La pagina si sta caricando...
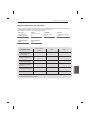
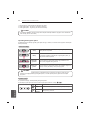
-
 1
1
-
 2
2
-
 3
3
-
 4
4
-
 5
5
-
 6
6
-
 7
7
-
 8
8
-
 9
9
-
 10
10
-
 11
11
-
 12
12
-
 13
13
-
 14
14
-
 15
15
-
 16
16
-
 17
17
-
 18
18
-
 19
19
-
 20
20
-
 21
21
-
 22
22
-
 23
23
-
 24
24
-
 25
25
-
 26
26
-
 27
27
-
 28
28
-
 29
29
-
 30
30
-
 31
31
-
 32
32
-
 33
33
-
 34
34
-
 35
35
-
 36
36
-
 37
37
-
 38
38
-
 39
39
-
 40
40
-
 41
41
-
 42
42
-
 43
43
-
 44
44
-
 45
45
-
 46
46
-
 47
47
-
 48
48
-
 49
49
-
 50
50
-
 51
51
-
 52
52
-
 53
53
-
 54
54
-
 55
55
-
 56
56
-
 57
57
-
 58
58
-
 59
59
-
 60
60
-
 61
61
-
 62
62
-
 63
63
-
 64
64
-
 65
65
-
 66
66
-
 67
67
-
 68
68
-
 69
69
-
 70
70
-
 71
71
-
 72
72
-
 73
73
-
 74
74
-
 75
75
-
 76
76
-
 77
77
-
 78
78
-
 79
79
-
 80
80
-
 81
81
-
 82
82
-
 83
83
-
 84
84
-
 85
85
-
 86
86
-
 87
87
-
 88
88
-
 89
89
-
 90
90
-
 91
91
-
 92
92
-
 93
93
-
 94
94
-
 95
95
-
 96
96
-
 97
97
-
 98
98
-
 99
99
-
 100
100
-
 101
101
-
 102
102
-
 103
103
-
 104
104
-
 105
105
-
 106
106
-
 107
107
-
 108
108
-
 109
109
-
 110
110
-
 111
111
-
 112
112
-
 113
113
-
 114
114
-
 115
115
-
 116
116
-
 117
117
-
 118
118
-
 119
119
-
 120
120
-
 121
121
-
 122
122
-
 123
123
-
 124
124
-
 125
125
-
 126
126
-
 127
127
-
 128
128
-
 129
129
-
 130
130
-
 131
131
-
 132
132
-
 133
133
-
 134
134
-
 135
135
-
 136
136
-
 137
137
-
 138
138
-
 139
139
-
 140
140
-
 141
141
-
 142
142
-
 143
143
-
 144
144
-
 145
145
-
 146
146
-
 147
147
-
 148
148
-
 149
149
-
 150
150
-
 151
151
-
 152
152
-
 153
153
-
 154
154
-
 155
155
-
 156
156
-
 157
157
-
 158
158
-
 159
159
-
 160
160
-
 161
161
-
 162
162
-
 163
163
-
 164
164
-
 165
165
-
 166
166
-
 167
167
-
 168
168
-
 169
169
-
 170
170
-
 171
171
-
 172
172
-
 173
173
-
 174
174
-
 175
175
-
 176
176
-
 177
177
-
 178
178
-
 179
179
-
 180
180
-
 181
181
-
 182
182
-
 183
183
-
 184
184
-
 185
185
-
 186
186
-
 187
187
-
 188
188
-
 189
189
-
 190
190
-
 191
191
-
 192
192
-
 193
193
-
 194
194
-
 195
195
-
 196
196
-
 197
197
-
 198
198
-
 199
199
-
 200
200
-
 201
201
-
 202
202
-
 203
203
-
 204
204
-
 205
205
-
 206
206
-
 207
207
-
 208
208
-
 209
209
-
 210
210
-
 211
211
-
 212
212
-
 213
213
-
 214
214
-
 215
215
-
 216
216
-
 217
217
-
 218
218
-
 219
219
-
 220
220
-
 221
221
-
 222
222
-
 223
223
-
 224
224
-
 225
225
-
 226
226
-
 227
227
-
 228
228
-
 229
229
-
 230
230
-
 231
231
-
 232
232
-
 233
233
-
 234
234
-
 235
235
-
 236
236
-
 237
237
-
 238
238
-
 239
239
-
 240
240
-
 241
241
-
 242
242
-
 243
243
-
 244
244
-
 245
245
-
 246
246
-
 247
247
-
 248
248
-
 249
249
-
 250
250
-
 251
251
-
 252
252
-
 253
253
-
 254
254
-
 255
255
-
 256
256
-
 257
257
-
 258
258
-
 259
259
-
 260
260
-
 261
261
-
 262
262
-
 263
263
-
 264
264
-
 265
265
-
 266
266
-
 267
267
-
 268
268
-
 269
269
-
 270
270
-
 271
271
-
 272
272
-
 273
273
-
 274
274
-
 275
275
-
 276
276
-
 277
277
-
 278
278
-
 279
279
-
 280
280
-
 281
281
-
 282
282
-
 283
283
-
 284
284
-
 285
285
-
 286
286
-
 287
287
-
 288
288
-
 289
289
-
 290
290
-
 291
291
-
 292
292
-
 293
293
-
 294
294
-
 295
295
-
 296
296
-
 297
297
-
 298
298
-
 299
299
-
 300
300
-
 301
301
-
 302
302
-
 303
303
-
 304
304
-
 305
305
-
 306
306
-
 307
307
-
 308
308
-
 309
309
-
 310
310
-
 311
311
-
 312
312
-
 313
313
-
 314
314
-
 315
315
-
 316
316
-
 317
317
-
 318
318
-
 319
319
-
 320
320
-
 321
321
-
 322
322
-
 323
323
-
 324
324
-
 325
325
-
 326
326
-
 327
327
-
 328
328
-
 329
329
-
 330
330
-
 331
331
-
 332
332
-
 333
333
-
 334
334
-
 335
335
-
 336
336
-
 337
337
-
 338
338
-
 339
339
-
 340
340
-
 341
341
-
 342
342
-
 343
343
-
 344
344
-
 345
345
-
 346
346
-
 347
347
-
 348
348
-
 349
349
-
 350
350
-
 351
351
-
 352
352
-
 353
353
-
 354
354
-
 355
355
-
 356
356
-
 357
357
-
 358
358
-
 359
359
-
 360
360


in altre lingue
- français: LG 65UC970V Manuel utilisateur
- español: LG 65UC970V Manual de usuario
- Deutsch: LG 65UC970V Benutzerhandbuch
- português: LG 65UC970V Manual do usuário
- Türkçe: LG 65UC970V Kullanım kılavuzu