
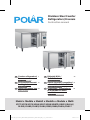
EN Counter refrigerators/
Freezers
Instruction manual
2DE Edelstahl-Kühl-/
Tiefkühltische
Bedienungsanleitung
26
NL RVS werkbanken met
koeling/vriezer
Handleiding
10 IT Banchi frigoriferi/congelatori
a banco in acciaio inossidabile
Manuale di istruzioni
34
FR
Tables réfrigérées inox
Mode d'emploi
18 ES Frigoríficos / Congeladores
de mostrador de acero
inoxidable
Manual de instrucciones
42
Model • Modèle • Modell • Modello • Modelo • Malli:
G377/G378/G379/G596/G597/G598/GD873/GD874/DL914/
DL915/GL182/GL183/GL184/G599/G600/DL916/DL917
Stainless Steel Counter
Refrigerators/Freezers
Instruction manual
G377-G379_G596-G600_GD873-GD874_DL914-DL917_GL182-GL184_ML_A5_v7_20230504.indb 1G377-G379_G596-G600_GD873-GD874_DL914-DL917_GL182-GL184_ML_A5_v7_20230504.indb 1 2023/5/4 15:072023/5/4 15:07

2
EN
Safety Instructions
• Position on a flat, stable surface.
• A service agent/qualified technician should carry out
installation and any repairs if required. Do not remove any
components or service panels on this product.
• Consult Local and National Standards to comply with the
following:
- Health and Safety at Work Legislation
- BS EN Codes of Practice
- Fire Precautions
- IEE Wiring Regulations
- Building Regulations
• DO NOT use jet/pressure washers to clean the appliance.
• DO NOT use the appliance outside.
• DO NOT use this appliance to store medical supplies.
• DO NOT stand or support yourself on the base, drawers or
doors.
• DO NOT allow oil or fat to come into contact with the plastic
components or door seal. Clean immediately if contact occurs.
• Bottles that contain a high percentage of alcohol must be
sealed and placed vertically in the refrigerator.
• Always carry, store and handle the appliance in a vertical
position and move by holding the base of the appliance.
• Always switch off and disconnect the power supply to the unit
before cleaning.
• Keep all packaging away from children. Dispose of the packaging
in accordance with the regulations of local authorities.
• If the power cord is damaged, it must be replaced by a POLAR
agent or a recommended qualified technician in order to avoid
a hazard.
• POLAR recommend that this product is connected to a circuit
protected by an appropriate RCD (Residual Current Device).
G377-G379_G596-G600_GD873-GD874_DL914-DL917_GL182-GL184_ML_A5_v7_20230504.indb 2G377-G379_G596-G600_GD873-GD874_DL914-DL917_GL182-GL184_ML_A5_v7_20230504.indb 2 2023/5/4 15:072023/5/4 15:07

3
EN
• This appliance is not intended for use by persons (including
children) with reduced physical, sensory or mental capabilities,
or lack of experience or knowledge, unless they have been
given supervision or instruction concerning the use of the
appliance by a person responsible for their safety.
• POLAR recommends that this appliance should be periodically
tested (at least annually) by a Competent Person. Testing
should include, but not be limited to: Visual Inspection,
Polarity Test, Earth Continuity, Insulation Continuity and
Functional Testing.
Caution: Risk of Fire
• Do not store explosive substances such as aerosol cans with a
flammable propellant in this appliance.
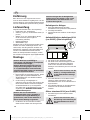
Warning: Keep all ventilation openings clear of
obstruction. Unit should not be boxed in without
adequate ventilation.
• Warning: Do not use mechanical devices or other means
to accelerate the defrosting process, other than those
recommended by the manufacturer.
• Warning: Do not damage the refrigerant circuit.
• Warning: Do not use electrical appliances inside the food
storage compartments of the appliance.
Product Description
G377 - POLAR 228 litre 2 Door Counter Refrigerator
G378 - POLAR 339 litre 3 Door Counter Refrigerator
G379 - POLAR 449 litre 4 Door Counter Refrigerator
G596 - POLAR 282 litre 2 Door Counter Refrigerator
G597 - POLAR 417 litre 3 Door Counter Refrigerator
G598 - POLAR 553 litre 4 Door Counter Refrigerator
GD873 - POLAR 282 litre 1 Door 2 Drawer Counter
Refrigerator
GD874 - POLAR 417 litre 2 Door 2 Drawer Counter
Refrigerator
DL914 - POLAR 282 litre 2 Door Counter Refrigerator
with upstand
DL915 - POLAR 417 litre 3 Door Counter Refrigerator
with upstand
GL182 - POLAR 3 door bakery counter fridge
with Granite worktop
GL183 - POLAR 2 door bakery counter
refrigerator
GL184 - POLAR 3 door bakery counter
refrigerator
G599 - POLAR 282 litre 2 Door Counter
Freezer
G600 - POLAR 417 litre 3 Door Counter
Freezer
DL916 - POLAR 282 litre 2 Door Counter
Freezer with upstand
DL917 - POLAR 417 litre 3 Door Counter
Freezer with upstand
G377-G379_G596-G600_GD873-GD874_DL914-DL917_GL182-GL184_ML_A5_v7_20230504.indb 3G377-G379_G596-G600_GD873-GD874_DL914-DL917_GL182-GL184_ML_A5_v7_20230504.indb 3 2023/5/4 15:072023/5/4 15:07

4
EN
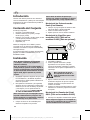
Introduction
Please take a few moments to carefully read
through this manual. Correct maintenance and
operation of this machine will provide the best
possible performance from your POLAR product.
Pack Contents
The following is included:
• POLAR Refrigerator or Freezer
• Shelf guide (2 per door) except GL182 (14 per
door)
• Shelf (1 per door) except GL182, GL183 and
GL184 (No shelves included)
• Instruction manual
• Spacer (x2)
POLAR prides itself on quality and service, ensuring
that at the time of unpacking the contents are
supplied fully functional and free of damage.
Should you find any damage as a result of transit,
please contact your POLAR dealer immediately.
Installation
Note: Not for use in vans or trailers, food
trucks or similar vehicles.
Note: If the unit has not been stored or
moved in an upright position, let it stand
upright for approximately 12 hours before
operation. If in doubt allow to stand.
1. Remove the appliance from the packaging.
Make sure that all protective plastic film and
coatings are thoroughly removed from all
surfaces.
2. To optimize performance and longevity, ensure
a minimum clearance of 2.5cm is maintained
between the unit and walls and other objects,
with a minimum 20cm clearance on the top.
NEVER LOCATE NEXT TO A HEAT SOURCE.
To avoid being pushed tight against
the wall accidentally and ensure good
ventilation, 2 spaces are supplied for
mounting on the rear.
3. Set the brakes on the castors to keep the
appliance in position OR
Level the appliance by adjusting the screw
feet.
Note: Before using the appliance for the
first time, clean the shelves and interior
with soapy water then dry well.
Fitting the Shelves
1. Place one set of shelf guides on either side of
the cabinet at the desired height.
2. Slide the shelf into place.
3. Repeat for the remaining shelves.
Attach Refrigerated Counter Top
G611 (for GL182 Only) (This is
optional)
1. Remove the appliance from the packaging.
2. Tip the appliance back and loosely attach the
three brackets to the underside of the counter
top, using suitable screws. Do not fully tighten
at this stage.
Note: Ensure the two ‘L’ shape
brackets are fitted to the
outside edges.
3. Lower the Counter Top unit onto the marble
sides. Ensure the side brackets are postponed
on the inside of the marble rim.
4. Push the side brackets flush with the marble
and tighten the bracket screws.
Fit Glass Panels G611 (for GL182
Only)
1. Screw the collars to the rim of the appliance.
Note: Ensure the hole in the
collar for the grub screw faces
inwards.
G377-G379_G596-G600_GD873-GD874_DL914-DL917_GL182-GL184_ML_A5_v7_20230504.indb 4G377-G379_G596-G600_GD873-GD874_DL914-DL917_GL182-GL184_ML_A5_v7_20230504.indb 4 2023/5/4 15:072023/5/4 15:07

5
EN
2. Slot the two side panels into the collars, with
the holes in the glass at the top.
Note: Ensure the screw hole
furthest from the edge of the
panel goes to the back of the
appliance.
3. Screw a grub screw into each collar to secure
the panels.
Note: Ensure the soft end of the
grub screw is the end making
contact with the glass.
Do not over-tighten the grub
screw as it will result in the
glass breaking.
4. Slot the rear panel into the collars, with the
holes in the glass at the top.
5. Screw a grub screw into each collar to secure
the panel.
6. Slot the plastic plugs into each of the holes.
7. Screw the brackets to the inside of each panel
using the bolt assemblies.
Note: Ensure the short end
of the bolt assembly is on the
outside of the panels.
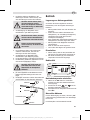
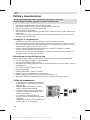
8. Place the top panel onto the brackets, ensuring
all holes line up.
9. Insert the plugs and attach the top panel to
the brackets with the bolt assembly.
Bracket
Glass Panel
Bolt Assembly
Plug
Bolt Assembly
Operation
Storing Food
To get the best results from your POLAR appliance,
follow these instructions:
• Only store foodstuffs in the appliance when it
has reached the correct operating temperature.
• Do not place uncovered hot food or liquids (like
acidic fluids) inside the appliance (as it can
damage the evaporator).
• Wrap or cover food where possible.
• Do not obstruct the fans inside the appliance.
• Avoid opening the doors for prolonged periods
of time.
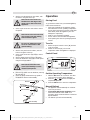
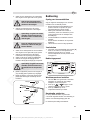
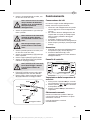
Turn On
1. Ensure the power switch is set to [O] and turn
on at the socket.
2. Switch on the Power [I]. The current
temperature within the appliance is displayed.
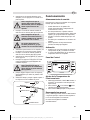
Control Panel
Set the Operating Temperature
1. Hold the SET button for 3 seconds. The value
of the current set point will be displayed.
2. Press the or buttons to display the
required temperature.
3. Press the SET button to store the temperature.
Manual Defrost
• The appliance will automatically run a defrost
cycle every six hours.
• To manually defrost the appliance: Press
and hold the defrost button "aux" for 2
seconds to begin a manual defrost. The defrost
light illuminates.
• The defrost cycle will end automatically.
G377-G379_G596-G600_GD873-GD874_DL914-DL917_GL182-GL184_ML_A5_v7_20230504.indb 5G377-G379_G596-G600_GD873-GD874_DL914-DL917_GL182-GL184_ML_A5_v7_20230504.indb 5 2023/5/4 15:072023/5/4 15:07

6
EN
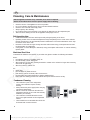
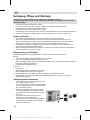
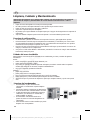
Cleaning, Care & Maintenance
Defrost appliance at least every 3 months, more often if required.
Switch off and disconnect from the power supply before cleaning.
• Clean the interior of the appliance as often as possible.
• Do not use abrasive cleaning agents. These can leave harmful residues.
• Clean the door seal with warm soapy water.
• Always wipe dry after cleaning.
• Do not allow water used in cleaning to run through the drain hole into the evaporation pan.
• Take care when cleaning the rear of the appliance. Sharp edges can cut.
Refrigerating tips:
• Condensation and ice will form with frequent and prolonged opening of the doors.
• Operating outside of the recommend temperature range and placing next to a heat source will also
increase the amount of ice and internal/external condensation. If external condensation occurs wipe
the surface down with a cloth.
• Excessive ice will result in longer running times that will increase energy consumption and increase
the deterioration of components.
• If the gasket or seal is damaged or deformed, energy consumption will increase. To restore efficiency,
replace gasket.
Stainless Steel Care
To maintain the stainless steel exterior of your Polar item, please consider the following information:
Never:
• Use abrasive Scourers or scrubbing pads, etc.
• Use Chlorinated or acidic detergents
• Allow anything e.g. food, dirt, cleaning chemicals to remain on the surface for longer than necessary,
clean them off right away.
• Allow the surface to remain wet.
Do:
• Clean often.
• Use soft Cloths or plastic Scourers.
• Rub with the grain of the metal, rather than across it.
• Use detergents and polish designed for cleaning Stainless Steel.
• Ensure that the cleaning products are washed off fully and that the steel is left dry.
Condenser Cleaning
• The condenser is part of the refrigeration
system. The condenser requires monthly
cleaning.
• Always disconnect power supply before carrying
out Routine Maintenance.
• Failure to clean the condenser will reduce the
performance and life of your Polar unit and may
invalidate your warranty.
• The condenser is located behind the service
door on the right-hand side of the refrigeration
cabinet.
• These models have a removable filter which can
be cleaned with a vacuum cleaner.
G377-G379_G596-G600_GD873-GD874_DL914-DL917_GL182-GL184_ML_A5_v7_20230504.indb 6G377-G379_G596-G600_GD873-GD874_DL914-DL917_GL182-GL184_ML_A5_v7_20230504.indb 6 2023/5/4 15:072023/5/4 15:07

7
EN
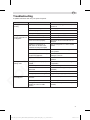
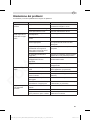
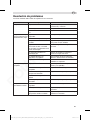
Troubleshooting
A qualified technician must carry out repairs if required.
Fault Probable Cause Solution
The appliance is not
working
The unit is not switched on Check the unit is plugged in correctly and
switched on
Plug or lead is damaged Replace plug or lead
Fuse in the plug has blown Replace the fuse
Mains power supply fault Check mains power supply
The appliance turns on,
but the temperature is
too high/low
Too much ice on the evaporator Defrost the appliance
Condenser blocked with dust Clean the Condenser
Doors are not shut properly Check doors are shut and seals are not
damaged
Appliance is located near a
heat source or air flow to the
condenser is being interrupted
Move the refrigerator to a more suitable
location
Ambient temperature is too high Increase ventilation or move appliance to a
cooler position
Unsuitable foodstuffs are being
stored in the appliance Remove any excessive hot foodstuffs or
blockages to the fan
Appliance is overloaded Reduce the amount of food stored in the
appliance
The appliance is
leaking water The appliance is not properly
levelled Adjust the screw feet to level the appliance
(if applicable)
The discharge outlet is blocked Clear the discharge outlet
Movement of water to the drain is
obstructed Clear the floor of the appliance (if
applicable)
The water container is damaged Consult a qualified Technician
The drip tray is overflowing Empty the drip tray (if applicable)
The appliance is
unusually loud The safety band has not been
removed Remove the safety band
Loose nut/screw Check and tighten all nuts and screws
The appliance has not been
installed in a level or stable
position
Check installation position and change if
necessary
G377-G379_G596-G600_GD873-GD874_DL914-DL917_GL182-GL184_ML_A5_v7_20230504.indb 7G377-G379_G596-G600_GD873-GD874_DL914-DL917_GL182-GL184_ML_A5_v7_20230504.indb 7 2023/5/4 15:072023/5/4 15:07

8
EN
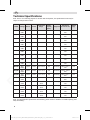
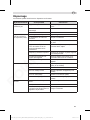
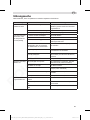
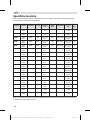
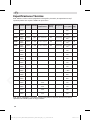
Technical Specifications
Note: Due to our continuing program of research and development, the specifications herein may be
subject to change without notice.
Model Voltage Power Current Temperature
Range
Net
usable
Capacity
(Litre)
Refrigerant Dimensions
H x W x D mm Weight
(kg)
G377 230V
50Hz 230W 1.6A -2°C to 8°C 155 R600a 80g 850 x 1360 x
600 88
G378 230V
50Hz 230W 1.6A -2°C to 8°C 231 R600a 80g 850 x 1795 x
600 125
G379 230V
50Hz 230W 1.6A -2°C to 8°C 312 R600a 80g 860 x 2230 x
600 143
G596 230V
50Hz 350W 1.95A -2°C to 10°C 190 R600a 95g 850 x 1360 x
700 98
G597 230V
50Hz 350W 1.95A -2°C to 10°C 291 R600a 95g 850 x 1790 x
700 134
G598 230V
50Hz 350W 1.95A -2°C to 10°C 393 R600a 95g 850 x 2230 x
700 153
GD873 230V
50Hz 350W 1.95A -2°C to 10°C 142 R600a 95g 850 x 1360 x
700 98
GD874 230V
50Hz 350W 1.95A -2°C to 10°C 242 R600a 95g 850 x 1790 x
700 134
DL914 230V
50Hz 350W 1.95A -2°C to 10°C 190 R600a 95g 960 x 1360 x
700 98
DL915 230V
50Hz 350W 1.95A -2°C to 10°C 291 R600a 95g 960 x 1790 x
700 134
GL182 230V
50Hz 350W 1.95A 2°C to 10°C 406 R600a 95g 1000 x 2020 x
800 320
GL183 230V
50Hz 350W 1.95A 2°C to 10°C 290 R600a 95g 860 x 1510 x
800 140
GL184 230V
50Hz 350W 1.95A 2°C to 10°C 444 R600a 95g 860 x 2020 x
800 152
G599 230V
50Hz 750W 3.5A -10°C to
-20°C 187 R290 90g 850 x 1360 x
700 103
G600 230V
50Hz 750W 3.5A -10°C to
-20°C 280 R290 90g 850 x 1795 x
700 136.5
DL916 230V
50Hz 750W 3.5A -10°C to
-20°C 187 R290 90g 960 x 1360 x
700 103
DL917 230V
50Hz 750W 3.5A -10°C to
-20°C 280 R290 90g 960 x 1795 x
700 136.5
Note: For optimal product performance and efficiency, please ensure to mind the net usable capacity (load
limit) when filling.
G377-G379_G596-G600_GD873-GD874_DL914-DL917_GL182-GL184_ML_A5_v7_20230504.indb 8G377-G379_G596-G600_GD873-GD874_DL914-DL917_GL182-GL184_ML_A5_v7_20230504.indb 8 2023/5/4 15:072023/5/4 15:07

9
EN
Electrical Wiring
POLAR appliances are supplied with a 3 pin BS1363 plug and lead.
The plug is to be connected to a suitable mains socket.
POLAR appliances are wired as follows:
• Live wire (coloured brown) to terminal marked L
• Neutral wire (coloured blue) to terminal marked N
• Earth wire (coloured green/yellow) to terminal marked E
This appliance must be earthed.
If in doubt consult a qualified electrician.
Electrical isolation points must be kept clear of any obstructions. In the event of any emergency
disconnection being required they must be readily accessible.
Disposal
EU regulations require refrigeration product to be disposed of by specialist companies who remove or
recycle all gasses, metal and plastic components.
Consult your local waste collection authority regarding disposal of your appliance. Local authorities are
not obliged to dispose of commercial refrigeration equipment but may be able to offer advice on how to
dispose of the equipment locally.
Alternatively call the POLAR helpline for details of national disposal companies within the EU.
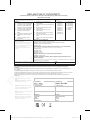
Compliance
The WEEE logo on this product or its documentation indicates that the product must
not be disposed of as household waste. To help prevent possible harm to human
health and/or the environment, the product must be disposed of in an approved and
environmentally safe recycling process. For further information on how to dispose of
this product correctly, contact the product supplier, or the local authority responsible for
waste disposal in your area.
POLAR parts have undergone strict product testing in order to comply with
regulatory standards and specifications set by international, independent,
and federal authorities.
POLAR products have been approved to carry the following symbol:
All rights reserved. No part of these instructions may be produced or transmitted in any form or by any means, electronic,
mechanical, photocopying, recording or otherwise, without the prior written permission of POLAR.
Every effort is made to ensure all details are correct at the time of going to press, however, POLAR reserve the right to
change specifications without notice.
G377-G379_G596-G600_GD873-GD874_DL914-DL917_GL182-GL184_ML_A5_v7_20230504.indb 9G377-G379_G596-G600_GD873-GD874_DL914-DL917_GL182-GL184_ML_A5_v7_20230504.indb 9 2023/5/4 15:072023/5/4 15:07

10
NL
Veiligheidstips
• Plaatsen op een vlakke en stabiele ondergrond.
• De installatie en eventuele reparaties dienen door een
servicemonteur/vakman uitgevoerd te worden. Verwijder geen
onderdelen of servicepanelen van dit product.
• Raadpleeg en volg de plaatselijke en nationale regelgeving op
m.b.t. tot het volgende:
- Wetgeving inzake gezondheid en veiligheid op het werk
- Nen-praktijkrichtlijnen
- Brandpreventie
- IEE-bedradingsvoorschriften
- Bouwvoorschriften
• Dit product NIET reinigen met spuit-/drukreinigers.
• Dit product NIET gebruiken voor de berging van medische
producten.
• NIET op het blad, de lades en de deuren staan of als
ondersteuning gebruiken.
• Laat olie of vet NIET in contact komen met plastic componenten
of deurafdichtingen. Onmiddellijk reinigen indien dit wel gebeurt.
• Uitsluitend geschikt voor gebruik binnenshuis.
• Flessen met een hoog alcoholpercentage moet goed worden
afgesloten en verticaal in de koelkast worden bewaard.
• Dit product altijd in een verticale positie vervoeren, opslaan en
gebruiken. Het product verplaatsen door aan de onderkant op
te tillen.
• Alvorens dit product te reinigen dient men altijd de
stroomvoorziening uit te schakelen.
• Laat verpakkingsmateriaal niet binnen handbereik van kinderen.
Verpakkingsmateriaal in overeenstemming met de regelgeving
van de plaatselijke overheden als afval laten verwerken.
• Indien de stroomkabel beschadigd raakt, dient men deze door
een POLAR technicus of een aanbevolen vaktechnicus te laten
vervangen om gevaarlijke situaties te verhinderen.
G377-G379_G596-G600_GD873-GD874_DL914-DL917_GL182-GL184_ML_A5_v7_20230504.indb 10G377-G379_G596-G600_GD873-GD874_DL914-DL917_GL182-GL184_ML_A5_v7_20230504.indb 10 2023/5/4 15:072023/5/4 15:07

11
NL
• Dit apparaat is niet bedoeld voor gebruik door personen met
lichamelijke, zintuiglijke of mentale beperkingen (inclusief
kinderen) of met gebrek aan ervaring of kennis, tenzij zij hierin
worden begeleid of zijn opegeleid in het gebruik van het apparaat
door een persoon, die verantwoordelijk is voor hun veiligheid.
• POLAR
beveelt aan dat dit apparaat periodiek (minstens
jaarlijks) door een bevoegde persoon wordt getest. Tests
moeten omvatten, maar zijn niet beperkt tot: visuele inspectie,
polariteit, aardings continuïteit (klasse I-apparatuur), isolatie
continuïteit en functionele test.
Voorzichtig: Risico bij open Vuur
• Bewaar geen explosieve stoffen zoals spuitbussen met een
ontvlambaar drijfgas in dit apparaat.
Waarschuwing:
Hou alle ventilatieopeningen vrij
van obstakels. De eenheid mag niet ingesloten
worden zonder geschikte ventilatie.
• Waarschuwing: mechanische apparaten of andere
middelen niet gebruiken om het ontdooien te versnellen, met
uitzondering van de door de fabrikant aanbevolen middelen.
• Waarschuwing: het koelcircuit niet beschadigen.
• Waarschuwing: Gebruik geen elektrische apparaten in de
bewaarruimten van het apparaat.
Productbeschrijving
G377 - POLAR 228 liter 2 deurs werkbank met koeling
G378 - POLAR 339 liter 3 deurs werkbank met koeling
G379 - POLAR 449 liter 4 deurs werkbank met koeling
G596 - POLAR 282 liter 2 deurs werkbank met koeling
G597 - POLAR 417 liter 3 deurs werkbank met koeling
G598 - POLAR 553 liter 4 deurs werkbank met koeling
GD873 - POLAR 282 liter 1 deurs werkbank met
koeling en 2 lades
GD874 - POLAR 417 liter 2 deurs werkbank met
koeling en 2 lades
DL914 - POLAR 282 liter 2 deurs werkbank met koeling
(met achteropstand)
DL915 - POLAR 417 liter 3 deurs werkbank
met koeling (met achteropstand)
GL182 - POLAR 3-deurs bakkerij-koelkast met
granieten werkblad
GL183 - POLAR 2-deurs patisserie counter
GL184 - POLAR 3-deurs patisserie counter
G599 - POLAR 282 liter 2-deurs werkbank met
vriezer
G600 - POLAR 417 liter 3 Deur Teller Vriezer
DL916 - POLAR 282 liter 2-deurs werkbank
met vriezer en achteropstand
DL917 - POLAR 417 liter 3-deur werkbank met
vriezer en achteropstand
G377-G379_G596-G600_GD873-GD874_DL914-DL917_GL182-GL184_ML_A5_v7_20230504.indb 11G377-G379_G596-G600_GD873-GD874_DL914-DL917_GL182-GL184_ML_A5_v7_20230504.indb 11 2023/5/4 15:072023/5/4 15:07

12
NL
Inleiding
Neem de tijd om deze handleiding aandachtig door
te lezen. Met het correcte gebruik en onderhoud
levert dit product van POLAR de beste resultaten op.
Verpakkingsinhoud
De verpakking bevat het volgende:
• POLAR koeling of vriezer
• Ladegeleider (2 per deur), behalve GL182 (14
per deur)
• Lades (1 per deur), behalve GL182, GL183 en
GL184 (geen platen meegeleverd)
• Handleiding
• Afstandshouder (x2)
POLAR is trots op de haar productkwaliteit en
dienstverlening en controleer de inhoud van de
verpakkingen, tijdens de verpakkingsfase, op
functioneren en schade.
Mocht uw product door transport zijn beschadigd,
neem dan onmiddellijk contact op met uw POLAR
dealer.
Installatie
Opmerking: Niet voor gebruik in
bestelwagens of aanhangwagens,
foodtrucks of soortgelijke voertuigen.
Opmerking: indien het apparaat niet in
een rechtopstaande positie is opgeslagen
of vervoerd, dient men het product 12 uur
vóór gebruik in de rechtopstaande positie
te plaatsen. Bij twijfel dient men het
product in een rechtopstaande positie te
plaatsen.
1. Haal het product uit de verpakking. Zorg ervoor
dat u de beschermingsfolie en -lagen van alle
oppervlakken heeft verwijderd.
2. Om de prestaties en levensduur te
optimaliseren, dient u ervoor te zorgen dat
er minimaal 2,5 cm afstand wordt gehouden
tussen de unit en muren en andere objecten,
met een minimale vrije ruimte van 20 cm aan
de bovenkant. PLAATS NOOIT NAAST EEN
WARMTEBRON.
Opmerking: Om te voorkomen, dat het
apparaat per ongeluk vast tegen de
muur wordt gedrukt en om voor een
goede ventilatie te zorgen, zijn er 2
afstandshouders meegeleverd voor de
bevestiging aan de achterzijde.
3. Zet de wielen op de rem om het product op
zijn plaats vast te zetten.
Opmerking: Voor het eerste gebruik van dit
product dient u de lades en de binnenzijde
met zeepwater te reinigen, en daarna goed
droogmaken met een droogdoek.
Het plaatsen van de lades
1. Plaats één set van de ladegeleiders aan beide
zijden van de kast en op de gewenste hoogte.
2. Schuif de lade op zijn plaats.
3. Herhaal deze handeling voor de overige lades.
Het bevestigen van de
opzetkoelvitrine (G611, uitsluitend
op GL182) (Dit is optioneel)
1. Haal het product uit de verpakking.
2. Kantel het product naar achteren en bevestig
de drie beugels met de juiste schroeven aan
de onderzijde van de opzetkoelvitrine. Draai ze
nog niet helemaal vast.
Opmerking: zorg dat de twee
‘L’-vormige beugels aan de
buitenranden worden bevestigd.
3. Laat de opzetkoelvitrine op de marmeren
zijkanten zakken. Zorg dat de beugels aan de
binnenkant van de marmeren rand komen.
4. Zorg dat de zijbeugels correct uitgelijnd zijn op
het marmer en draai de beugelschroeven aan.
Het plaatsen van de glaspanelen
G611 (uitsluitend GL182)
1. Schroef de tussendelen vast aan de rand van
het product.
Opmerking: zorg dat het gat in het
tussendeel voor de fixeerschroeven naar
binnen is gericht.
G377-G379_G596-G600_GD873-GD874_DL914-DL917_GL182-GL184_ML_A5_v7_20230504.indb 12G377-G379_G596-G600_GD873-GD874_DL914-DL917_GL182-GL184_ML_A5_v7_20230504.indb 12 2023/5/4 15:072023/5/4 15:07

13
NL
2. Schuif de twee zijpanelen in de tussendelen
met de gaten in het glas naar boven gericht.
Schroef een fixeerschroef in
elk van de tussendelen om de
panelen te bevestigen.
3. Schroef een fixeerschroef in elk van de
tussendelen om de panelen te bevestigen.
Opmerking: zorg dat het zachte
uiteinde van de fixeerschroef
het deel is dat in contact komt
met het glas.
Draai de imbusboutjes niet te
strak aan, anders zal het glas
kunnen breken.
4. Schuif de het achterpaneel in de tussendelen
met de gaten in het glas naar boven gericht.
5. Schroef een fixeerschroef in elk van de
tussendelen om het paneel te bevestigen.
6. Schuif in elk van de gaten één plastic plug.
7. Schroef de beugels met behulp van de
boutunits aan de binnenzijde van elk paneel.
Opmerking: zorg dat het kortste
uiteinde van het boutunit aan
de buitenkant van de panelen
zit.
8. Plaats het bovenste paneel in de beugels en
zorg dat alle gaten op elkaar zijn uitgelijnd.
9. Plaats de pluggen en bevestig het bovenste
paneel aan de beugels met behulp van de
boutunits.
Beugel
Glaspaneel
Boutunit
Plug
Boutunit
Bediening
Opslag van levensmiddelen
Volg de volgende aanwijzingen voor de beste
resultaten met uw POLAR product:
• Bewaar uitsluitend levensmiddelen in het
product wanneer het product de juiste
gebruikstemperatuur heeft gereikt.
• Plaats geen onbedekt heet voedsel of
vloeistoffen (zoals zure vloeistoffen) in het
toestel (aangezien dit de verdamper kan
beschadigen).
• Voedsel bedekken en inwikkelen wanneer
mogelijk.
• Niet de interne ventilatoren in het product
blokkeren.
• Laat de deuren niet al te lang openstaan.
Inschakelen
1. Controleer of stroomschakelaar in de positie [O]
staat en de steker in het stopcontact zit.
2. Schakel de stroom [I] in. De actuele
interne temperatuur van het product wordt
weergegeven.
Bedieningspaneel
Werktemperatuur instellen
1. Houd de SET toets gedurende 3 seconden
ingedrukt. De waarde van het huidige
instelpunt wordt weergegeven.
2. Druk op de of knoppen om de
vereiste temperatuur weer te geven.
3. Druk op de SET knop om de
temperatuurwaarde op te slaan.
Handmatig ontdooien
De knop “aux” indrukken en gedurende
2 seconden ingedrukt houden om ontdooiing te
starten. Het ontdooiingslampje gaat aan.
De ontdooicyclus eindigt automatisch.
G377-G379_G596-G600_GD873-GD874_DL914-DL917_GL182-GL184_ML_A5_v7_20230504.indb 13G377-G379_G596-G600_GD873-GD874_DL914-DL917_GL182-GL184_ML_A5_v7_20230504.indb 13 2023/5/4 15:072023/5/4 15:07

14
NL
Reiniging, zorg & onderhoud
Ontdooi en reinig uw apparaat ten minste om de 3 maanden, en vaker indien nodig.
Alvorens het apparaat te reinigen dient men de stroomvoorziening uit te schakelen.
• Reinig zo vaak mogelijk de binnenkant van het product.
• Gebruik géén schurende reinigingsmiddelen. Dergelijke middelen kunnen schadelijke resten
achterlaten.
• Reinig de deurdichting met warm zeepwater.
• Na reiniging altijd droogmaken.
• Het voor reiniging gebruikte water mag niet door het afvoergat naar de verdampingspan stromen.
• Ga voorzichtig te werk bij het reinigen van de achterzijde van het product. Scherpe randen kunnen
snijwonden veroorzaken.
Koeltips:
• Bij veelvuldig en langdurig openen van de deuren zal zich condens en ijs vormen.
• Gebruik buiten het aanbevolen temperatuurbereik en plaatsing naast een warmtebron zal ook de
hoeveelheid ijs en interne/externe condensatie doen toenemen. In geval van externe condensatie
kunt u het oppervlak afvegen met een doek.
• Te veel ijs leidt tot langere bedrijfstijden, waardoor het energieverbruik toeneemt en de onderdelen
slechter worden.
• Als de pakking of afdichting beschadigd of vervormd is, zal het energieverbruik toenemen. Vervang
de pakking om de efficiëntie te herstellen.
Verzorging van roestvrij staal
De volgende informatie betreft het onderhoud van de roestvrijstalen buitenkant van het Polar product.
Nooit:
• schurende blokjes of sponsjes etc. gebruiken;
• reinigingsmiddelen met chloor of zuur gebruiken;
• toelaten dat voedsel, vuil, chemische reinigingsmiddelen enz. langer dan nodig op het oppervlak
achterblijven - verwijder ze onmiddellijk;
• toelaten dat het oppervlak nat blijft.
Wel:
• vaak schoonmaken;
• zachte doeken en plastic sponsjes gebruiken;
• met de draad van het metaal mee wrijven, in plaats van tegen de draad in;
• reinigings- en poetsmiddelen gebruiken die speciaal voor roestvrij staal zijn bedoeld;
• ervoor zorgen dat de reinigingsproducten volledig worden afgespoeld en dat het staal droog achter
blijft.
Reiniging van condensor
• De condensor maakt deel uit van het
koelsysteem. De condensor moet maandelijks
worden schoongemaakt.
• Haal altijd eerst de stekker uit het stopcontact
voordat routine-onderhoud wordt uitgevoerd.
• Als de condensor niet wordt schoongemaakt,
heeft dit een nadelige invloed op de prestaties
en de levensduur van het Polar-product en kan
de garantie ongeldig maken.
• De condensor zit achter de onderhoudsdeur op
de rechterzijde van de koelkast.
• Deze modellen hebben een uitneembaar
filter dat met een stofzuiger kan worden
schoongemaakt.
G377-G379_G596-G600_GD873-GD874_DL914-DL917_GL182-GL184_ML_A5_v7_20230504.indb 14G377-G379_G596-G600_GD873-GD874_DL914-DL917_GL182-GL184_ML_A5_v7_20230504.indb 14 2023/5/4 15:072023/5/4 15:07

15
NL
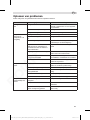
Oplossen van problemen
Indien nodig moet een gekwalificeerde technicus reparaties uitvoeren.
Probleem Mogelijke oorzaak Handeling
Het apparaat werkt
niet
Het apparaat staat uit Controleer of de stroomkabel van het
apparaat is aangesloten en of het apparaat
is ingeschakeld
Stekker en kabel zijn beschadigd Vervang stekker of kabel
Storing netvoeding Controleer netvoeding
Het product staat
aan maar de
temperatuur is te
hoog/laag
Teveel ijs in de verdamper Ontdooi het apparaat
Condensor wordt geblokkeerd door
stof Reinig de condensor
Deuren niet goed gesloten Controleer of de deuren goed dicht zijn en
of afdichtingen niet beschadigd zijn
Het product bevindt zich in de
nabijheid van een warmtebron of
de luchtstroom naar de condensor
wordt onderbroken
Verplaats de koelkast naar een geschiktere
locatie
Omgevingstemperatuur is te hoog Verbeter de ventilatie of verplaats het
product naar een koelere locatie
Ongeschikte levensmiddelen worden
in het product bewaard Verwijder alle overbodige warme
levensmiddelen of deblokkeer de ventilator
Het product wordt overbelast Verminder de hoeveelheid opgeslagen
voedsel in het product
Het product lekt
water Het product staat niet recht Pas de verstelbare poten aan om het
product te nivelleren (indien nodig)
De afvoeropening wordt geblokkeerd Maak de afvoeropening vrij van obstakels
De waterstroom naar de afvoer
wordt geblokkeerd Maak de vloer vrij van obstakels (indien
nodig)
De waterbak is beschadigd Raadpleeg een gekwalificeerde technicus
De lekbak stroomt over Leeg de lekbak (indien nodig)
Het product maakt
ongebruikelijk veel
lawaai
U heeft de veiligheidsband niet
verwijderd Verwijder de veiligheidsband
Moer/schroef los Alle moeren en schroeven controleren en
aandraaien
Het product is niet op een vlakke of
stabiele ondergrond geplaatst Controleer de positie en verander deze
indien nodig
G377-G379_G596-G600_GD873-GD874_DL914-DL917_GL182-GL184_ML_A5_v7_20230504.indb 15G377-G379_G596-G600_GD873-GD874_DL914-DL917_GL182-GL184_ML_A5_v7_20230504.indb 15 2023/5/4 15:072023/5/4 15:07

16
NL
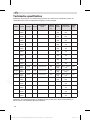
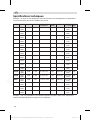
Technische specificaties
Opmerking: Als gevolg van ons voortdurende programma van onderzoek en ontwikkeling, kunnen de
specificaties hierin zonder voorafgaande kennisgeving worden gewijzigd.
Model Voltage Vermogen Stroom Temperatuur-
bereik
Net
bruikbare
capaciteit
(L)
Koel-
middel Afmetingen
h x b x d mm Gewicht
(Kg)
G377 230V
50Hz 230W 1,6A -2°C tot 8°C 155 R600a
80g 850 x 1360 x
600 88
G378 230V
50Hz 230W 1,6A -2°C tot 8°C 231 R600a
80g 850 x 1795 x
600 125
G379 230V
50Hz 230W 1,6A -2°C tot 8°C 312 R600a
80g 860 x 2230 x
600 143
G596 230V
50Hz 350W 1,95A -2°C tot 10°C 190 R600a
95g 850 x 1360 x
700 98
G597 230V
50Hz 350W 1,95A -2°C tot 10°C 291 R600a
95g 850 x 1790 x
700 134
G598 230V
50Hz 350W 1,95A -2°C tot 10°C 393 R600a
95g 850 x 2230 x
700 153
GD873 230V
50Hz 350W 1,95A -2°C tot 10°C 142 R600a
95g 850 x 1360 x
700 98
GD874 230V
50Hz 350W 1,95A -2°C tot 10°C 242 R600a
95g 850 x 1790 x
700 134
DL914 230V
50Hz 350W 1,95A -2°C tot 10°C 190 R600a
95g 960 x 1360 x
700 98
DL915 230V
50Hz 350W 1,95A -2°C tot 10°C 291 R600a
95g 960 x 1790 x
700 134
GL182 230V
50Hz 350W 1,95A 2°C tot 10°C 406 R600a
95g 1000 x 2020
x 800 320
GL183 230V
50Hz 350W 1,95A 2°C tot 10°C 290 R600a
95g 860 x 1510 x
800 140
GL184 230V
50Hz 350W 1,95A 2°C tot 10°C 444 R600a
95g 860 x 2020 x
800 152
G599 230V
50Hz 750W 3,5A -10°C tot -20°C 187 R290 90g 850 x 1360 x
700 103
G600 230V
50Hz 750W 3,5A -10°C tot -20°C 280 R290 90g 850 x 1795 x
700 136,5
DL916 230V
50Hz 750W 3,5A -10°C tot -20°C 187 R290 90g 960 x 1360 x
700 103
DL917 230V
50Hz 750W 3,5A -10°C tot -20°C 280 R290 90g 960 x 1795 x
700 136,5
Opmerking: Voor optimale prestaties en efficiëntie van het product dient u bij het vullen rekening te
houden met de netto bruikbare capaciteit (laadlimiet).
G377-G379_G596-G600_GD873-GD874_DL914-DL917_GL182-GL184_ML_A5_v7_20230504.indb 16G377-G379_G596-G600_GD873-GD874_DL914-DL917_GL182-GL184_ML_A5_v7_20230504.indb 16 2023/5/4 15:072023/5/4 15:07

17
NL
Elektrische bedrading
Men dient de stekker op een geschikt stopcontact aan te sluiten.
De bedrading van dit apparaat is als volgt:
• Stroomkabel (bruin) naar de aansluitklem gemarkeerd met L
• Neutraalkabel (blauw) naar de aansluitklem gemarkeerd met N
• Aardekabel (groen/geel) naar de aansluitklem gemarkeerd met E
Dit apparaat moet worden geaard.
Raadpleeg bij twijfel een vakkundige elektricien.
De elektrische isolatiepunten mogen niet worden geblokkeerd. In geval van een nooduitschakeling
moeten de isolatiepunten direct toegankelijk zijn.
Afvalverwerking
De EU-richtlijnen vereisen dat koelproducten door gespecialiseerde bedrijven wordt verwerkt die gassen,
metalen en plastic componenten verwijderen of recyclen.
Raadpleeg uw plaatselijke afvalverwerkingsbedrijf voor informatie over de verwerking van uw apparaat.
Plaatselijke overheden zijn niet verplicht om commerciële koelapparatuur als afval te verwerken maar
kunnen u wellicht informeren waar u het apparaat kunt afgeven.
U kunt ook de POLAR-helpdesk bellen voor informatie over landelijke afvalverwerkingsbedrijven in de EU.
Productconformiteit
Het WEEE-logo op dit product of bijbehorende documentatie geeft aan dat het product
niet onder huisvuil valt en als zodanig ook niet mag worden verwerkt. Ter preventie
van mogelijke gevaren voor de gezondheid van personen en/of voor het milieu,
dient men dit product in overeenstemming met het voorgeschreven en milieuveilige
recyclingproces als afval te verwerken. Raadpleeg uw productleverancier of uw plaatselijk
afvalverwerkingsbedrijf voor meer informatie over de juiste afvalverwerking van dit
product.
De onderdelen van POLAR producten hebben strenge producttesten ondergaan om te
voldoen aan wettelijke regels en specificaties die door internationale, onafhankelijke en
landelijke overheden worden voorgeschreven.
POLAR producten zijn goedgekeurd en voorzien van het volgende symbool:
Alle rechten voorbehouden. Het is verboden om deze handleiding, hetzij volledig of gedeeltelijk, elektronisch of mechanisch
te reproduceren, kopiëren, op opslagmedia op te slaan of op enigerlei wijze over te dragen, zonder voorafgaande
goedkeuring van POLAR.
Wij hebben er alles aan gedaan om er zeker van te zijn dat op publicatiedatum van de handleiding alle details correct zijn.
Polar behoudt zich echter het recht om zonder voorafgaande kennisgeving de specificaties te wijzigen.
G377-G379_G596-G600_GD873-GD874_DL914-DL917_GL182-GL184_ML_A5_v7_20230504.indb 17G377-G379_G596-G600_GD873-GD874_DL914-DL917_GL182-GL184_ML_A5_v7_20230504.indb 17 2023/5/4 15:072023/5/4 15:07

18
FR
Conseils de sécurité
• Placez l’appareil sur une surface plane, stable.
• L’installation et les éventuelles réparations doivent être
confiées à un dépanneur / technicien qualifié. Ne retirez aucun
composant ou cache de ce produit.
• Consultez les normes locales et nationales pour vous
conformer aux :
- lois sur l’hygiène et la sécurité au travail ;
- codes de bonnes pratiques BS EN ;
- précautions contre le risque d’incendie ;
- réglementations sur les branchements électriques IEE ;
- règlements sur la construction.
• NE PAS nettoyer cet appareil avec un nettoyeur à jet / à pression.
• NE PAS se servir de cet appareil pour stocker des médicaments.
• NE PAS se tenir debout sur le châssis, les tiroirs ou les portes
ou s’y accouder.
• NE PAS éclabousser les composants en plastique ou les joints
de porte d’huile ou de matières grasses. En cas d’éclaboussure,
nettoyez immédiatement la surface touchée.
• Cet appareil est réservé exclusivement à une utilisation à
l’intérieur.
• Les bouteilles qui contiennent un haut pourcentage d’alcool
doivent être bouchonnées et rangées à la verticale dans le
réfrigérateur.
• Veillez à toujours transporter, stocker et manipuler l’appareil à
la verticale et à le déplacer en tenant la base du châssis.
• N’oubliez jamais d’éteindre et de débrancher l’appareil avant
de procéder à son nettoyage.
• Gardez les emballages hors de portée des enfants.
Débarrassez-vous des emballages conformément aux
règlements des autorités locales.
• POLAR recommande de faire tester régulièrement cet appareil
(une fois par an au minimum) par une personne compétente.
Le test devrait inclure, entre autres : inspection visuelle, test
de polarité, la continuité de masse (équipement de classe I),
test d’isolation et test de fonctionnement.
G377-G379_G596-G600_GD873-GD874_DL914-DL917_GL182-GL184_ML_A5_v7_20230504.indb 18G377-G379_G596-G600_GD873-GD874_DL914-DL917_GL182-GL184_ML_A5_v7_20230504.indb 18 2023/5/4 15:072023/5/4 15:07

19
FR
• Un cordon d’alimentation endommagé doit être remplacé par
un agent POLAR ou un technicien qualifié recommandé, pour
éviter tout danger.
• Cet appareil n’a pas été conçu pour être utilisé par des
personnes (enfants inclus) à capacités physiques, sensorielles
ou mentales réduites ou ne disposant pas d’une expérience ou
de connaissances suffisantes, à moins que lesdites personnes
n’aient été formées ou instruites quant à son utilisation, par
une personne responsable de leur sécurité.
Attention : Risque d’ incendie
• Ne stockez pas de substances explosives telles que les
aérosols avec un propulseur inflammable dans cet appareil.
Attention : Évitez de bloquer toutes les ouvertires
d’aération. L’unité ne doit pas être mise dans un
box dans aération adéquate.
• Attention : Ne pas utiliser de dispositifs mécaniques ou
autres moyens pour accélérer le processus de dégivrage, autre
que le fabricant recommandé Ceux par.
• Attention : Ne pas endommager le circuit frigorifique.
• Attention : Ne pas utiliser d’appareils électriques à l’intérieur
des compartiments de stockage des aliments de l’appareil.
Description du produit
G377 - Table réfrigérée positive, deux portes 228 litres
G378 - Table réfrigérée positive, trois portes 339 litres
G379 - Table réfrigérée positive, quatre portes 449 litres
G596 - Table réfrigérée positive GN, deux portes 282
litres
G597 - Table réfrigérée positive GN, trois portes 417
litres
G598 - Table réfrigérée positive GN, quatre portes 553
litres
GD873 - Table réfrigérée positive, une porte, deux
tiroirs 282 litres
GD874 - Table réfrigérée positive, deux porte, deux
tiroirs 417 litres
DL914 - Table réfrigérée positive GN, deux portes avec
dosseret 282 litres
DL915 - Table réfrigérée positive GN, trois
portes avec dosseret 417 litres
GL182 - POLAR Réfrigérateur 3 portes pour
boulangerie avec plan de travail en granit
GL183 - Tour pâtissier, deux portes
GL184 - Tour pâtissier, trois portes
G599 - Table réfrigérée négative GN, deux
portes 282 litres
G600 - Table réfrigérée positive GN, trois
portes 417 litres
DL916 - Table réfrigérée négative GN, deux
portes avec dosseret 282 litres
DL917 - Table réfrigérée négative GN, trois
portes avec dosseret 417 litres
G377-G379_G596-G600_GD873-GD874_DL914-DL917_GL182-GL184_ML_A5_v7_20230504.indb 19G377-G379_G596-G600_GD873-GD874_DL914-DL917_GL182-GL184_ML_A5_v7_20230504.indb 19 2023/5/4 15:072023/5/4 15:07

20
FR
Introduction
Nous vous invitons à consacrer quelques instants à
la lecture attentive de ce mode d’emploi. L’entretien
et l’utilisation appropriés de cet appareil vous
permettront de tirer le meilleur de votre produit
POLAR.
Contenu de l’emballage
Les éléments suivants vous sont fournis de série :
• Meuble réfrigéré positif ou négatif
• Supports de clayettes (2 par porte) sauf GL182
(14 par porte)
• Clayettes (1 par porte) sauf GL182, GL183 et
GL184 (non fournies)
• Mode d’emploi
• Entretoise (x2)
POLAR attache une grande importance à la qualité
et au service et veille à fournir des produits en
parfait état opérationnel, parfaitement intacts
au moment de l’emballage. Nous vous prions de
contacter votre revendeur POLAR immédiatement
si vous constatez un dommage quelconque survenu
pendant le transport du produit.
Installation
Remarque : Ne pas utiliser dans des
camionnettes ou des semi-remorques,
dans des camions-restaurants ou véhicules
similaires.
Remarque : dans les cas où l’appareil a
été stocké ou déplacé autrement qu’à la
verticale, placez-le en position debout
pendant environ 12 heures avant de vous
en servir. En cas de doute, laissez l’appareil
se reposer.
1. Sortez l’appareil de l’emballage. Veillez à bien
retirer toute la pellicule et les revêtements de
protection de toutes les surfaces.
2. Pour optimiser les performances et la longévité,
assurez-vous qu’un dégagement minimum
de 2,5 cm est maintenu entre l’unité et les
murs et autres objets, avec un dégagement
minimum de 20 cm sur le dessus. NE JAMAIS
PLACER À PROXIMITÉ D’UNE SOURCE DE
CHALEUR.
Remarque : Pour éviter que le congélateur ne
soit accidentellement poussé contre le mur et
pour garantir une bonne ventilation, deux (2)
entretoises à monter à l’arrière sont fournis.
3. Bloquez les freins des roulettes de l’appareil,
pour l’empêcher de bouger.
Remarque : Avant d’utiliser l’appareil pour
la première fois, nettoyez les tablettes et
l’intérieur à l’eau savonneuse puis séchez
bien.
Installation des clayettes
1. Placez une paire de supports de clayettes de
part et d’autre de l’armoire, à la hauteur voulue.
2. Introduisez la clayette.
3. Répétez cette opération pour les autres clayettes.
Pose du plan de travail de comptoir
réfrigéré G611 (GL182 uniquement)
(Ceci est optionnel)
1. Sortez l’appareil de l’emballage.
2. Faites pivoter l’appareil vers l’arrière et
raccordez les trois pattes de fixation sous le
plan de travail, sans les serrer, à l’aide des vis
qui conviennent. Ne les serrez pas à fond pour
l’instant.
Remarque : Veillez à installer
les deux pattes de fixation en ‘L’
sur les bords extérieurs.
3. Posez le plan de travail sur les côtés en
marbre. Veillez à ce que les pattes de fixation
latérales soient reportées sur l’intérieur du bord
en marbre.
4. Poussez les pattes de fixation de niveau avec le
marbre et vissez les vis de patte de fixation.
Installation des parois de verre
G611 (GL182 uniquement)
1. Vissez les colliers sur le bord de l’appareil.
Remarque : Veillez à ce que le trou du
collier prévu pour la vis sans tête soit
tourné vers l’intérieur.
G377-G379_G596-G600_GD873-GD874_DL914-DL917_GL182-GL184_ML_A5_v7_20230504.indb 20G377-G379_G596-G600_GD873-GD874_DL914-DL917_GL182-GL184_ML_A5_v7_20230504.indb 20 2023/5/4 15:072023/5/4 15:07
La pagina si sta caricando...
La pagina si sta caricando...
La pagina si sta caricando...
La pagina si sta caricando...
La pagina si sta caricando...
La pagina si sta caricando...
La pagina si sta caricando...
La pagina si sta caricando...
La pagina si sta caricando...
La pagina si sta caricando...
La pagina si sta caricando...
La pagina si sta caricando...
La pagina si sta caricando...
La pagina si sta caricando...
La pagina si sta caricando...
La pagina si sta caricando...
La pagina si sta caricando...
La pagina si sta caricando...
La pagina si sta caricando...
La pagina si sta caricando...
La pagina si sta caricando...
La pagina si sta caricando...
La pagina si sta caricando...
La pagina si sta caricando...
La pagina si sta caricando...
La pagina si sta caricando...
La pagina si sta caricando...
La pagina si sta caricando...
La pagina si sta caricando...
La pagina si sta caricando...
La pagina si sta caricando...
La pagina si sta caricando...
-
 1
1
-
 2
2
-
 3
3
-
 4
4
-
 5
5
-
 6
6
-
 7
7
-
 8
8
-
 9
9
-
 10
10
-
 11
11
-
 12
12
-
 13
13
-
 14
14
-
 15
15
-
 16
16
-
 17
17
-
 18
18
-
 19
19
-
 20
20
-
 21
21
-
 22
22
-
 23
23
-
 24
24
-
 25
25
-
 26
26
-
 27
27
-
 28
28
-
 29
29
-
 30
30
-
 31
31
-
 32
32
-
 33
33
-
 34
34
-
 35
35
-
 36
36
-
 37
37
-
 38
38
-
 39
39
-
 40
40
-
 41
41
-
 42
42
-
 43
43
-
 44
44
-
 45
45
-
 46
46
-
 47
47
-
 48
48
-
 49
49
-
 50
50
-
 51
51
-
 52
52


in altre lingue
- français: Polar DL914 Manuel utilisateur
- español: Polar DL914 Manual de usuario
- Deutsch: Polar DL914 Benutzerhandbuch
- Nederlands: Polar DL914 Handleiding
Documenti correlati
-
Polar CX577 Manuale utente
-
-
-
-
Polar CD984 Manuale del proprietario
-
Polar FA855 Manuale utente
-
Polar CD229-A Manuale utente
-
Polar GE819 Manuale del proprietario
-
Polar U636-A Manuale utente
-

