Lindy 42798 Manuale utente
- Categoria
- Adattatori grafici USB
- Tipo
- Manuale utente

© LINDY ELECTRONICS LIMITED & LINDY-ELEKTRONIK GMBH - FIRST EDITION (June 2009)
USB 2.0 to DVI Adapter Classic
User Manual
English
LINDY No. 42798
www.lindy.com

User Manual English
2

User Manual English
3
Introduction
Thank you for purchasing the USB
2.0
DVI
Adapter Classic. It enables you to connect
an additional display device (CRT/LCD monitor, projector) to your desktop or notebook
PC. The connected display can act as mirrored or extended desktop (it can also be
used as the primary display) of the main display on your PC. The flexibility of USB 2.0
technology saves the need to open the computer and install a VGA graphics card.
System Requirements
•
Available USB 2.0 port
•
Minimum Requirement to use one (1) USB Display Adapter: Intel/AMD Single
Core 1.5GHz or higher processor, RAM: 512MB memory or higher
•
2~3 Displays - (additional USB display adapters): Intel/AMD Single Core
2.4GHz or higher processor, RAM: 1GB memory or higher
•
4~6 Displays (additional USB display adapters): Intel/AMD Dual Core 2.0GHz or
higher processor, RAM: 2GB memory or higher
•
Windows 2000 SP4 / Windows XP SP2 / Windows Vista
Package Contents
•
USB 2.0 to DVI Adapter
•
Driver CD
•
LINDY Manual
Features
•
USB 2.0 compliant
•
supports display resolution up to DVI : 1680 x 1050
•
Plug-and-Play USB connectivity
•
Display Modes: Primary, Extended, Mirror
•
Display Rotation: 0°, 90°, 180°, 270°
•
Identify Monitors
•
Multi-Display Control Panel
•
Short-cut to access Windows Display Setting

User Manual English
4
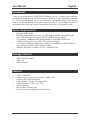
Resolution
USB-DVI
Refresh Rate
Frequency
800 * 600 16bit, 32bit
60Hz,75Hz
1024 *768 16bit, 32bit
60Hz,75Hz
1152 * 864 16bit, 32bit
60Hz
1280 * 720 16bit, 32bit
60Hz
1280 * 768 16bit, 32bit
60Hz
1280 * 800 16bit, 32bit
60Hz
1280* 960 16bit, 32bit
60Hz
1280 * 1024 16bit, 32bit
60Hz
1360 * 768 16bit, 32bit
60Hz
1400 * 1050 16bit, 32bit
60Hz
1440 * 900 16bit, 32bit
60Hz
1680 * 1050 16bit, 32bit
60Hz
Installation
Windows 2000/XP:
Installing the device driver enables your computer’s operating system to recognize the
USB
DVI
Adapter once it’s connected. Please check your operating system and refer to
the appropriate installation procedure to begin installing the device driver. Please make
sure the USB
DVI
Adapter is
unplugged
from your PC or Notebook before executing
the setup program. This section illustrates the simple device driver installation
procedure for computer running Windows 2000 / XP operating system.
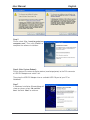
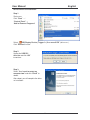
Step 1
Insert the Driver CD into the CD-ROM drive; the setup program should be launched
automatically. If setup program does not begin automatically, click Start, Run and
double click “
D:\Setup.exe
” (where D: is the path of your CD-ROM drive).

User Manual English
5
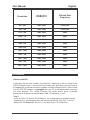
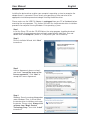
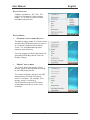
Step 2
Driver Installation Wizard, click “
Next
” to
continue.
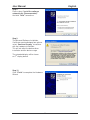
Step 3
License Agreement; please read it and
select
“I accept the terms of the
license agreement
.” Click “
Next
” to
accept the License Agreement.
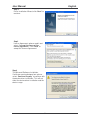
Step 4
The Microsoft Software Installation
Certificate warning dialogue box, please
select “
Continue Anyway
” to continue with
the device driver installation. This will not
affect the device driver installation and the
device usage.

User Manual English
6
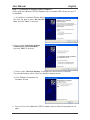
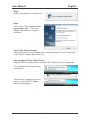
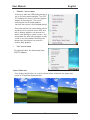
Step 5
Please select “
Yes, I want to restart my
computer now”.
Then, click “
Finish
” to
complete the software installation.
Step 6 (After System Reboot)
Please connect the external display device (monitor/projector) to the DVI connector
of USB
DVI
Adapter and switch it on.
Then plug the USB
DVI
Adapter into an available USB 2.0 port of your PC or
Notebook.
Step 7
A Hardware Installation Wizard dialog will
show up, please select “
No, not this
time
” and click “
Next
” to continue.

User Manual English
7
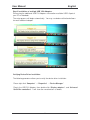
Step 8
Please select
“Install the software
automatically (Recommended)”.
And click
”Next”
to continue.
Step 9
The Microsoft Software Installation
Certificate warning dialogue box, please
select “
Continue Anyway
” to continue
with the hardware installation.
This will not affect the device driver
installation and the device usage.
The extended display will be shown
on 2
nd
display device.
Step 10
Click
“Finish
” to complete the Hardware
Wizard.

User Manual English
8
Step 11
Installation of multiple
USB
DVI
Adapters
Please plug the additional USB
DVI
Adapter into an available USB 2.0 port of your PC
or Notebook.
a. A Hardware Installation Wizard dialog
will show up, please select “
No, not this
time
” and click “
Next
” to continue.
b. Please select “
Install the software
automatically (Recommended)
”.
And click ”
Next
” to continue.
c. Please select “
Continue Anyway
” to complete the device driver installation.
The extended display will be shown on additional display device.
d. Click
“Finish
” to complete the
Hardware Wizard.
e. If you wish to install additional USB
DVI
Adapter, please follow the procedure
a~ d
again.

User Manual English
9
To make sure the USB DVI
Adapter works
correctly, please reboot the computer after
the installation.
After rebooting the computer, the USB
extended display will be shown on the
display device.
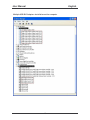
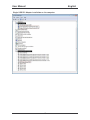
Verifying the device driver installation
The following procedure allows you to verify the device driver installation.
Please right click “
My Computer
”
“
Properties
”
“
Hardware
”
“
Device
Manager
”.
Plug-in the
USB DVI
Adapter, then double click “
Display adapters
” and “
Universal
Serial Bus controllers
”. It will show the new directions as below,
Single USB DVI Adapter installation on the computer

User Manual English
10
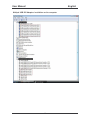
Multiple USB DVI Adapters installation on the computer

User Manual English
11
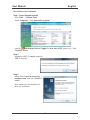
Device Driver Un-Installation
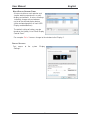
Step 1.
Start menu:
Click
“Start
”
“
“
Control
Panel
”
“
Add
or
Remove
Programs
”
Select “
USB Display Device (Trigger 1+) 9.xx.xxxx.0159”
(driver ver.).
Click “
Remove
” button.
Step 2.
Unplug the
USB
DVI
A
DAPTER
and click “
OK
”
to continue.
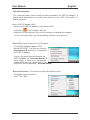
Step 3.
Select “
Yes, I want to restart my
computer now
” and click “
Finish
” to
reboot.
After reboot, you will complete the driver
un-installation.

User Manual English
12
Windows Vista
Installing the device driver enables your computer’s operating system to recognize the
adapter once it’s connected. Please check your operating system and refer to the
appropriate installation procedure to begin installing the device driver.
Please make sure the USB DVI Adapter is
unplugged
from your PC or Notebook before
executing the setup program. This section illustrates the simple device driver installation
procedure for computer running Windows Vista operating system.
Step 1
Insert the Driver CD into the CD-ROM drive; the setup program should be launched
automatically. If setup program does not begin automatically, click Start, Run and
double click “
D:\Setup.exe
” (where D: is the path of your CD-ROM drive).
Step 2
Driver Installation Wizard, click “
Next
”
to continue.
Step 3
License Agreement; please review it
and check “
I accept the terms of the
license agreement.
” Click “
Next
” to
accept the License Agreement.
Step 4
Windows Security warning dialogue box
under Windows Vista, it will not affect
the device driver installation and usage
the device. Please select “
Always trust
software from “Magic Control
Technology Corp.
”, then click “
Install
”
to continue.

User Manual English
13
Step 5
Setup is searching for installed features.
Step 6
Please select “
Yes, I want to restart
my computer now”.
Then, click
“
Finish
” to complete the software
installation.
Step 7
(After System Reboot)
Please connect the external display device (monitor/projector) to the DVI connector
of the USB DVI Adapter and switch it on.
Step 8 Hardware Driver Setup Process
Plug the USB DVI Adapter into an available USB 2.0 port of your PC or Notebook.
The hardware driver setup will begin
automatically.
After the driver is configured, you may
begin to use the USB DVI Adapter
with your display device.

User Manual English
14
Step
9
Installation of multiple
USB VGA Adapters
Please plug the additional USB DVI Adapters into another available USB 2.0 port of
your PC or Notebook.
The setup process will begin automatically. You may see below notification balloons
for each additional adapter.
Verifying Device Driver Installation
The following procedure allows you to verify the device driver installation.
Please right click “
Computer
”
“
Properties
”
“
Device Manager
”.
Plug-in the
USB DVI
Adapter, then double click “
Display adapters
”, and “
Universal
Serial Bus controllers
”. It will show the new directions as below,

User Manual English
15
Single USB DVI Adapter installation on the computer

User Manual English
16
Multiple USB DVI Adapters installation on the computer

User Manual English
17
Device Driver Un-Installation
Step 1 Access Program Uninstall
:
Click “
Start
”
“
Control Panel
”
Under “
Programs
”, click “
Uninstall a program
”
Look for “
USB Display Device (Trigger 1+) 9.xx.xxxx.0159”
(driver ver.) Click
“
Uninstall
” button.
Step 2
Unplug the
USB DVI
Adapter and click
“OK
” to continue.
Step 3
Select “
Yes, I want to restart my
computer now
” and click “
Finish
” to
reboot.
After reboot, you will complete the
driver un-installation.

User Manual English
18
Function Description
This section describes several friendly functions provided by the USB DVI
Adapter
.
A
display device described in this section means devices such as CRT, LCD monitor, TV
display, projector.
Access
USB DVI
Adapter Utility
Make sure the USB DVI Adapter is attached to the PC.
Look for this on your Windows Start bar.
Right-click this icon to access the variety of functions associated to the adapter.
The first view of the utility, you will notice below sections on the top menu.
D
ISPLAY
ID
–
Smart Display Device ID Detection
The USB DVI Adapter supports VESA
defined DDC/EDID. The utility can show the
display device ID
whenever it is attached to
the USB DVI Adapter.
If there is no display device attached to the
USB DVI Adapter, an “
Unknown Monitor
” ID
will be shown. In some cases, the attached
display device does not support EDID, in this
case the ID will also defined as “
Unknown Monitor
”.
D
ISPLAY
R
ESOLUTION
–
Fast Access to Display Resolution Setting
The default setting resolution is:
1024 * 768 * 32bit.

User Manual English
19
D
ISPLAY
R
OTATION
4 options available: 0°, 90°, 180°, 270°
under the Extended or Primary display
modes. It is a useful function for some
rotatable display devices.
D
ISPLAY
M
ODES
“E
XTENDED
”
DISPLAY MODE
(D
EFAULT
)
The default display mode; this feature allows
the attached USB display device to work as
an “Extended” display of the on-board
screen. The extended working space
improves work efficiency.
You may change the relative position of the
extended USB display device under the
Display Settings.
“M
IRROR
”
DISPLAY MODE
This feature allows the contents of the
primary screen to be displayed (mirroring)
on the USB display device.
The screen resolution setting on the USB
display device will follow the primary
screen’s resolution. For example, if the
primary screen’s resolution is
1024x768x32bit, and the USB Display
enabled device will be set at the same
resolution.

User Manual English
20
“P
RIMARY
”
DISPLAY MODE
A feature to allow the USB display device to
act as the main working display. The USB
DVI Adapter will work as the main graphics
adapter of the computer. The screen
connected to the on-board graphics
card will then work as the extended display.
Please be advised that some display utilities
and drivers that ship with certain AGP and
built-in display adapters may prevent this
option from working on some systems. You
may disable the other utility program usually
found in the same toolbar located on the
bottom right hand corner) to make this
function work properly.
“O
FF
”
DISPLAY MODE
This option disables the video output from
USB
DVI
Adapter.
I
DENTIFY
M
ONITORS
Easy display identification via a serial number will be showed on the upper right
corner of all attached display devices.
La pagina si sta caricando...
La pagina si sta caricando...
La pagina si sta caricando...
La pagina si sta caricando...
La pagina si sta caricando...
-
 1
1
-
 2
2
-
 3
3
-
 4
4
-
 5
5
-
 6
6
-
 7
7
-
 8
8
-
 9
9
-
 10
10
-
 11
11
-
 12
12
-
 13
13
-
 14
14
-
 15
15
-
 16
16
-
 17
17
-
 18
18
-
 19
19
-
 20
20
-
 21
21
-
 22
22
-
 23
23
-
 24
24
-
 25
25


Lindy 42798 Manuale utente
- Categoria
- Adattatori grafici USB
- Tipo
- Manuale utente
in altre lingue
- English: Lindy 42798 User manual
Documenti correlati
Altri documenti
-
MSI GP66 Leopard (Intel® 10th Gen) (GeForce 30 Series) Manuale del proprietario
-
Lenovo USB-to-DVI Monitor Adapter Manuale utente
-
EUROCOM Panther 5SE Manuale utente
-
Abit SILURO-FX-SERIES Manuale utente
-
ASROCK A780FULLDISPLAYPORT_858 Manuale del proprietario
-
ASROCK ALIVENF7G-FULLHD Manuale del proprietario