
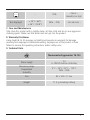
00186360
00186361
00136260
00136261
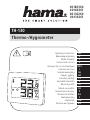
TH-130
Thermo-/Hygrometer
RUS
SK
P
S
FIN
BG
E
CZ
D
F
PL
H
GB
I
NL
GR
RO
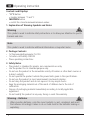
Operating Instructions
Bedienungsanleitung
Mode d‘emploi
Instrucciones de uso
Руководство по эксплуатации
Istruzioni per l‘uso
Gebruiksaanwijzing
Οδηγίες χρήσης
Instrukcja obsługi
Használati útmutató
Návod k použití
Návod na použitie
Manual de instruções
Manual de utilizare
Bruksanvisning
Käyttöohje
Работна инструкция

2
G Operating instruction
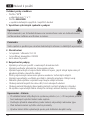
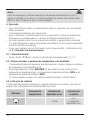
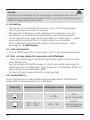
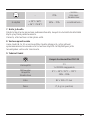
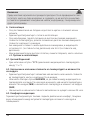
Controls and Displays
• °C/°F-button
= toggles between °C and °F
• MAX/MIN button
= recalls the stored maximum/minimum values
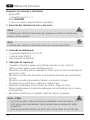
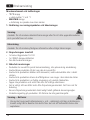
1. Explanation of Warning Symbols and Notes
Warning
This symbol is used to indicate safety instructions or to draw your attention to specific
hazards and risks.
Note
This symbol is used to indicate additional information or important notes.
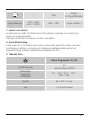
2. Package Contents
• 1x Thermometer/hygrometer TH-130
• 1x button cell battery CR2025
• These operating instructions
3. Safety Notes
• The product is intended for private, non-commercial use only.
• Use the product for its intended purpose only.
• Do not use the product in the immediate vicinity of heaters or other heat sources or
in direct sunlight.
• Do not operate the product outside the power limits given in the specifications.
• Do not use the product in moist environments and avoid splashes.
• Do not drop the product and do not expose it to any major shocks.
• Keep the packaging material out of the reach of children due to the risk of
suffocation.
• Dispose of packaging material immediately according to locally applicable
regulations.
• Do not modify the product in any way. Doing so voids the warranty.
Warning – Batteries
• When inserting batteries, note the correct polarity (+ and - markings) and insert
the batteries accordingly. Failure to do so could result in the batteries leaking or
exploding.

3
Warning – Batteries
• Only use batteries (or rechargeable batteries) that match the specified type.
• Before you insert the batteries, clean the battery contacts and the polar contacts.
• Do not allow children to change batteries without supervision.
• Do not mix old and new batteries or batteries of a different type or make.
• Remove the batteries from products that are not being used for an extended
period (unless these are being kept ready for an emergency).
• Do not short-circuit batteries.
• Do not charge batteries.
• Do not throw batteries in a fire.
• Keep batteries out of the reach of children.
• Never open, damage or swallow batteries or allow them to enter the environment.
They can contain toxic, environmentally harmful heavy metals.
• Immediately remove and dispose of dead batteries from the product.
• Avoid storing, charging or using batteries in extreme temperatures.
4. Getting Started
4.1. Inserting the batteries
• Pull the battery compartment out by the notch. Remove the contact breaker
• Gently push the battery compartment back into the housing until it clicks into place.
4.2. Replacing the batteries
• Pull the battery compartment out by the notch.
• Remove the spent battery and insert a new CR2025 button cell, observing polarity.
• Gently push the battery compartment back into the housing until it clicks into place.
5. Installation
• You can either stand the thermometer/hygrometer on an even surface using the
fold-out stand on the back of the device, or attach it to a wall using the opening on
the back of the device.
• Install an anchor, screw, nail, etc. in the wall of your choice.
Hang up the thermometer/hygrometer by the notch.

4
Warning
Before mounting, check that the wall you have chosen is suitable for the weight to be
mounted Also make sure that there are no electric, water, gas or other lines running
through the wall at the mounting site.
6. Operation
• After inserting a battery, all of the segments of the display will flash briefly.
• The thermometer/hygrometer is now ready for use.
• After calibration, the top half of the display shows the measured temperature value,
while the bottom half of the display shows the measured air humidity value.
• If the measured value is outside of the measuring range, LL.L (value lower than
minimum) or HH.H (value higher than maximum) will appear on the temperature
display.
• Once the elements on the display begin to dim, replace the batteries as described in
4. Getting Started.
6.1. Celsius / Fahrenheit
• Press the °C/°F button to switch between °C and °F for the temperature display.
6.2. Maximum and minimum temperature and humidity values
• The thermometer/hygrometer automatically stores the maximum and minimum
temperature and humidity values.
• Repeatedly press the MAX/MIN button to switch between the current temperature
and humidity, minimum temperature and humidity (MIN) and maximum temperature
and humidity (MAX).
• The maximum and minimum values are automatically deleted every 24 hours.
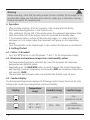
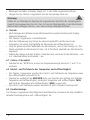
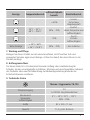
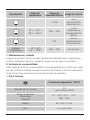
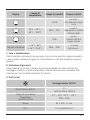
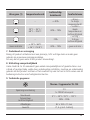
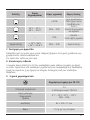
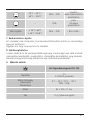
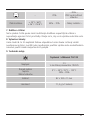
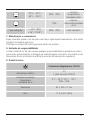
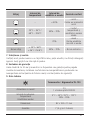
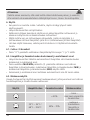
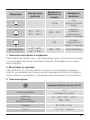
6.3. Comfort display
The thermometer/hygrometer displays the following comfort ranges based on the ratio
between the current room temperature and room humidity:
Display
Temperature
range
Humidity range Comfort range
– < 40%
– Dry –
Ambient air too dry
20°C – 26°C /
68°F – 78.8°F
40% – 70%
– Comfort –
Ideal temperature
and humidity

5
– 70%
– Moist –
Humidity too high
Not displayed
< 20°C / 68°F
> 26°C / 78.8°F
40% – 70% – No indicator –
7. Care and Maintenance
Only clean this product with a slightly damp, lint-free cloth and do not use aggressive
cleaning agents. Make sure that water does not get into the product.
8. Warranty Disclaimer
Hama GmbH & Co KG assumes no liability and provides no warranty for damage
resulting from improper installation/mounting, improper use of the product or from
failure to observe the operating instructions and/or safety notes.
9. Technical Data
Thermometer/hygrometer TH-130
Power supply
3 V
1x CR2025 button cell battery
Measuring range
Temperature
Humidity
0°C – 50°C / 32°F – 122°F
20% – 95%
Size 82 x 100 x 11 mm
Weight 71.4 g (including battery)

6
Bedienungselemente und Anzeigen
• °C/°F-Taste
= Wechsel zwischen °C und °F
• MAX/MIN-Taste
= Abruf der gespeicherten Höchst-/ Tiefstwerte
1. Erklärung von Warnsymbolen und Hinweisen
Warnung
Wird verwendet, um Sicherheitshinweise zu kennzeichnen oder um Aufmerksamkeit
auf besondere Gefahren und Risiken zu lenken.
Hinweis
Wird verwendet, um zusätzlich Informationen oder wichtige Hinweise zu
kennzeichnen.
2. Packungsinhalt
• 1x Thermo-/ Hygrometer TH-130
• 1x CR2025 Knopfzelle
• diese Bedienungsanleitung
3. Sicherheitshinweise
• Das Produkt ist für den privaten, nicht-gewerblichen Haushaltsgebrauch vorgesehen.
• Verwenden Sie das Produkt ausschließlich für den dazu vorgesehenen Zweck.
• Betreiben Sie das Produkt nicht in unmittelbarer Nähe der Heizung, anderer Hitzequellen
oder in direkter Sonneneinstrahlung.
• Betreiben Sie das Produkt nicht außerhalb seiner in den technischen Daten angegebenen
Leistungsgrenzen.
• Verwenden Sie das Produkt nicht in einer feuchten Umgebung und vermeiden Sie Spritzwasser.
• Lassen Sie das Produkt nicht fallen und setzen Sie es keinen heftigen Erschütterungen aus.
• Halten Sie Kinder unbedingt von dem Verpackungsmaterial fern, es besteht
Erstickungsgefahr.
• Entsorgen Sie das Verpackungsmaterial sofort gemäß den örtlich gültigen
Entsorgungsvorschriften.
• Nehmen Sie keine Veränderungen am Produkt vor. Dadurch verlieren sie jegliche
Gewährleistungsansprüche.
Warnung – Batterien
• Beachten Sie unbedingt die korrekte Polarität (Beschriftung + und -) der Batterien
und legen Sie diese entsprechend ein. Bei Nichtbeachtung besteht die Gefahr des
Auslaufens oder einer Explosion der Batterien.
D Bedienungsanleitung

7
Warnung – Batterien
• Verwenden Sie ausschließlich Akkus (oder Batterien), die dem angegebenen Typ
entsprechen.
• Reinigen Sie vor dem Einlegen der Batterien die Batteriekontakte und die
Gegenkontakte.
• Gestatten Sie Kindern nicht ohne Aufsicht das Wechseln von Batterien.
• Mischen Sie alte und neue Batterien nicht, sowie Batterien unterschiedlichen Typs
oder Herstellers.
• Entfernen Sie Batterien aus Produkten, die längere Zeit nicht benutzt werden
(außer diese werden für einen Notfall bereit gehalten).
• Schließen Sie die Batterien nicht kurz.
• Laden Sie Batterien nicht.
• Werfen Sie Batterien nicht ins Feuer.
• Bewahren Sie Batterien außerhalb der Reichweite von Kindern auf.
• Batterien nie öffnen, beschädigen, verschlucken oder in die Umwelt gelangen
lassen. Sie können giftige und umweltschädliche Schwermetalle enthalten.
• Entfernen und entsorgen Sie verbrauchte Batterien unverzüglich aus dem Produkt.
• Vermeiden Sie Lagerung, Laden und Benutzung bei extremen Temperaturen.
4. Inbetriebnahme
4.1. Batterien einlegen
• Ziehen Sie das Batteriefach an der Einkerbung heraus. Entfernen Sie den
Kontaktunterbrecher.
• Schieben Sie das Batteriefach mit leichtem Druck bis zum deutlichen Einrasten
(„Klick“) zurück in das Gehäuse.
4.2. Batterien wechseln
• Ziehen Sie das Batteriefach an der Einkerbung heraus.
• Entnehmen Sie die verbrauchte Batterie und legen eine neue CR2025 Knopfzelle
polrichtig ein. Schieben Sie das Batteriefach mit leichtem Druck bis zum deutlichen
Einrasten („Klick“) zurück in das Gehäuse.
5. Montage
• Sie können das Thermo-/ Hygrometer wahlweise mithilfe des ausklappbaren
Standfußes auf der Rückseite auf einer ebenen Fläche aufstellen oder es mithilfe der
Aussparung auf der Rückseite an einer Wand montieren.

8
• Befestigen Sie Dübel, Schraube, Nagel, etc. in der dafür vorgesehenen Wand.
• Hängen Sie das Thermo-/ Hygrometer mit der Aussparung daran ein.
Warnung
Prüfen Sie vor Montage die Eignung der vorgesehenen Wand für das anzubringende
Gewicht und vergewissern Sie sich, dass sich an der Montagestelle in der Wand keine
elektrischen Leitungen, Wasser-, Gas- oder sonstige Leitungen befinden.
6. Betrieb
• Nach Einlegen der Batterie/ einem Batteriewechsel werden kurzzeitig alle Display-
Segmente angezeigt.
• Das Thermo-/ Hygrometer ist betriebsbereit.
• Nach der Kalibrierung zeigt Ihnen die obere Displayhälfte die Messwerte der
Temperatur, die untere Displayhälfte die Messwerte der Luftfeuchtigkeit an.
• Liegt der gemessene Wert außerhalb des Messbereichs, wird in der Anzeige LL.L (für
Werte unterhalb des Messbereichs) bzw. HH.H (für Werte oberhalb des Messbereichs)
angezeigt.
• Sobald die Anzeige auf dem Display schwächer wird, wechseln Sie die Batterien – wie
in 4. Inbetriebnahme beschrieben – aus.
6.1. Celsius / Fahrenheit
• Drücken Sie die °C/°F-Taste, um bei der Temperaturanzeige zwischen °C und °F zu
wechseln.
6.2. Höchst- und Tiefstwerte der Temperatur und Luftfeuchtigkeit
• Das Thermo-/ Hygrometer speichert die Höchst- und Tiefstwerte der Temperatur sowie
der Luftfeuchtigkeit automatisch ab.
• Drücken Sie wiederholt die MAX/MIN-Taste, um zwischen der Anzeige von aktueller
Temperatur und Luftfeuchtigkeit, niedrigster Temperatur und Luftfeuchtigkeit (MIN)
und höchster Temperatur und Luftfeuchtigkeit (MAX) zu wechseln.
• Die Höchst- und Tiefstwerte werden automatisch alle 24 Stunden zurückgesetzt.
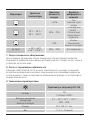
6.3. Komfortanzeige
Das Thermo-/ Hygrometer zeigt folgende Komfortbereiche, basierend auf dem Verhältnis
aktueller Raumtemperatur und –luftfeuchtigkeit, an:

9
Anzeige Temperaturbereich
Luftfeuchtigkeits-
bereich
Komfortbereich
– < 40%
– trocken –
Zu trockene
Umgebungsluft
20°C – 26°C /
68°F – 78.8°F
40% – 70%
– Komfort –
ideale Temperatur und
Luftfeuchtigkeit
– 70%
– feucht –
Zu hohe
Luftfeuchtigkeit
Keine Anzeige
< 20°C / 68°F
> 26°C / 78.8°F
40% – 70% – Kein Indikator –
7. Wartung und Pflege
Reinigen Sie dieses Produkt nur mit einem fusselfreien, leicht feuchten Tuch und
verwenden Sie keine aggressiven Reiniger. Achten Sie darauf, dass kein Wasser in das
Produkt eindringt.
8. Haftungsausschluss
Die Hama GmbH & Co KG übernimmt keinerlei Haftung oder Gewährleistung für
Schäden, die aus unsachgemäßer Installation, Montage und unsachgemäßem Gebrauch
des Produktes oder einer Nichtbeachtung der Bedienungsanleitung und/oder der
Sicherheitshinweise resultieren.
9. Technische Daten
Thermo-/ Hygrometer TH-130
Stromversorgung
3 V
1x CR2025 Knopfzellenbatterie
Messbereich
Temperatur
Luftfeuchtigkeit
0°C – 50°C / 32°F – 122°F
20% – 95%
Größe 82 x 100 x 11 mm
Gewicht 71,4 g (inkl. Batterie)

10
Éléments de commande et d'affichage
• Touche °C/°F
= commutation entre achage °C et °F
• Touche MAX/MIN
= consultation des valeurs maximale / minimale en mémoire
1. Explication des symboles d‘avertissement et des remarques
Avertissement
Ce symbole est utilisé pour indiquer des consignes de sécurité ou pour attirer votre
attention sur des dangers et risques particuliers.
Remarque
Ce symbole est utilisé pour indiquer des informations supplémentaires ou des
remarques importantes.
2. Contenu de l'emballage
• 1 thermomètre/hygromètre TH-130
• 1 pile bouton CR2025
• Mode d‘emploi
3. Sécurité
• Ce produit est destiné à une installation domestique non commerciale.
• Utilisez le produit exclusivement conformément à sa destination.
• N’utilisez pas le produit à proximité immédiate d‘un chauffage, d’autres sources de
chaleur ou exposé aux rayons directs du soleil.
• N‘utilisez pas le produit en dehors des limites de puissance indiquées dans les
caractéristiques techniques.
• N‘utilisez pas le produit dans un environnement humide et évitez toute projection d‘eau.
• Protégez le produit des secousses violentes et évitez tout choc ou toute chute.
• Tenez les emballages d‘appareils hors de portée des enfants, risque d‘étouffement.
• Recyclez les matériaux d’emballage conformément aux prescriptions locales en vigueur.
• N’apportez aucune modification à l’appareil. Des modifications vous feraient perdre
vos droits de garantie.
Avertissement – concernant les piles
• Respectez impérativement la polarité de la pile (marquage + et -) lors de l‘insertion
dans le boîtier ; risques d‘écoulement et d‘explosion des piles si tel n‘est pas
le cas.
F Mode d‘emploi

11
Avertissement – concernant les piles
• Utilisez exclusivement des batteries (ou des piles) du type indiqué.
• Avant d‘insérer les piles, nettoyez-en les contacts, ainsi que les contacts
d‘accouplement.
• N‘autorisez pas à des enfants de remplacer les piles d‘un appareil sans
surveillance.
• N’utilisez pas simultanément des piles usagées et des piles neuves ou des piles
de différents types.
• Retirez les piles des produits que vous ne comptez pas utiliser pendant un certain
temps (à l‘exception des produits d‘alarme en veille).
• Ne court-circuitez pas les piles.
• Ne tentez pas de recharger les piles.
• Ne jetez pas de piles au feu.
• C onservez les piles hors de portée des enfants.
• Ne tentez pas d‘ouvrir les piles, faites attention à ne pas les endommager, les
jeter dans l’environnement et à ce que des petits enfants ne les avalent pas. Les
piles sont susceptibles de contenir des métaux lourds toxiques et nocifs pour
l‘environnement.
• Retirez les piles usagées immédiatement du produit pour les recycler.
• Évitez un stockage, une charge ou une utilisation à des températures extrêmes.
4. Mise en service
4.1. Insertion de la pile
• Ouvrez le compartiment à pile au niveau de l’encoche. Retirez le film de protection.
• Replacez le compartiment à pile dans le boîtier en exerçant une légère pression (vous
devez entendre un “clic”).
4.2. Remplacement de la pile
• Ouvrez le compartiment à pile au niveau de l’encoche.
• Retirez la pile usagée et insérez une nouvelle pile bouton CR2025 en respectant les
indications de polarité. Replacez le compartiment à pile dans le boîtier en exerçant
une légère pression (vous devez entendre un “clic”).

12
5. Installation
• Vous pouvez placer le thermomètre/hygromètre sur une surface plane à l‘aide du
pied rabattable situé sur la face arrière ou l’installer à une paroi à l‘aide de la fente
également située sur la face arrière.
• Fixez cheville, vis, clou, etc. dans la paroi prévue pour recevoir l‘installation.
• Accrochez-y le thermomètre/hygromètre à l’aide de la fente.
Avertissement
Avant l‘installation, vérifiez que le mur prévu pour recevoir la station dispose d‘une
force portante susante et qu‘aucune conduite d‘électricité, d‘eau, de gaz ni aucune
autre conduite ne passe dans cette partie de la cloison.
6. Fonctionnement
• Après l’insertion de la pile / après un changement de pile, tous les segments de
l’écran apparaissent pendant un court instant.
• Votre thermomètre/hygromètre est alors prêt à fonctionner.
• Après le calibrage, la moitié supérieure de l’écran ache les mesures de température
et la moitié inférieure de l’écran ache les mesures de l’humidité de l’air.
• “LL.L” (pour une valeur inférieure à la plage de mesure) ou “HH.H” (pour une valeur
supérieure à la plage de mesure) apparaît en cas de valeurs en dehors de la plage
de mesure.
• Dès que l’achage de l’écran s’estompe, remplacez la pile – comme décrit au point
4. Mise en service.
6.1. Celsius / Fahrenheit
• Appuyez sur la touche °C/°F afin de sélectionner l‘achage en degrés Celsius ou
Fahrenheit.
6.2. Valeurs maximale et minimale de température et d'humidité de l'air
• Le thermomètre/hygromètre garde automatiquement en mémoire les valeurs
maximale et minimale de température et d‘humidité de l‘air.
• Appuyez plusieurs fois sur la touche MAX/ MIN (3) afin de passer de l’achage de
la température et de l’humidité de l’air actuelles à l’achage de la température et de
l’humidité de l’air minimale (MIN) ou maximale (MAX).
• Les valeurs maximale et minimale sont automatiquement réinitialisées toutes les
24 heures.
6.3. Affichage de confort
Le thermomètre/hygromètre ache les zones de confort suivantes, sur la base du rapport
entre la température et l’humidité de l’air ambiantes actuelles :

13
Achage
Plage de
température
Plage d’humidité
de l’air
Plage de confort
– < 40%
– sec –
air ambiant trop sec
20°C – 26°C /
68°F – 78.8°F
40 % – 70 %
– confort –
température et humidité
de l’air optimales
– > 70 %
– humide –
humidité de l’air trop
élevée
Keine Anzeige
< 20°C / 68°F
> 26°C / 78.8°F
40 % – 70 % – Aucun indicateur –
7. Soins et entretien
• Nettoyez la balance uniquement à l’aide d’un chiffon non fibreux légèrement
humide; évitez tout détergent agressif.
• Veillez à ce qu’aucun liquide ne pénètre dans le produit.
8. Exclusion de garantie
La société Hama GmbH & Co KG décline toute responsabilité en cas de dommages
provoqués par une installation, un montage ou une utilisation non conformes du produit
ou encore provoqués par un non respect des consignes du mode d‘emploi et/ou des
consignes de sécurité.
9. Caractéristiques techniques
Thermomètre/hygromètre TH-130
Alimentation en électricité
1,5 V
1 pile bouton CR2025
Plage de mesure
Température
Humidité de l‘air
0 °C – 50 °C / 32 °F – 122 °F
20 % – 95 %
Dimensions 82 x 100 x 11 mm
Poids 71,4 g (avec pile)

14
Elementos de manejo e indicadores
• Tecla °C/°F
= Conmutación entre °C y °F
• Tecla MAX/MIN
= Consulta de los valores máximos/mínimos almacenados
1. Explicación de los símbolos de aviso y de las indicaciones
Aviso
Se utiliza para caracterizar las indicaciones de seguridad o para llamar la atención
sobre peligros y riesgos especiales.
Nota
Se utiliza para caracterizar informaciones adicionales o indicaciones importantes.
2. Contenido del paquete
• 1x Termómetro/hifrómetro TH-120
• 1x pila de botón CR2025
• Estas instrucciones de manejo
3. Instrucciones de seguridad
• El producto es para el uso doméstico privado, no comercial.
• Emplee el producto exclusivamente para la función para la que fue diseñado.
• No opere el producto en las inmediaciones de la calefacción, de otras fuentes de
calor o bajo la radiación directa del sol.
• No opere el producto fuera de los límites de potencia indicados en los datos técnicos.
• No utilice el producto en entornos húmedos y evite el contacto con las salpicaduras
de agua.
• No deje caer el producto ni lo someta a sacudidas fuertes.
• Mantenga el material de embalaje fuera del alcance de los niños, existe peligro de
asfixia.
• Deseche el material de embalaje en conformidad con las disposiciones locales sobre
el desecho vigentes.
• No realice cambios en el aparato. Esto conllevaría la pérdida de todos los derechos
de la garantía
E Instrucciones de uso

15
Aviso – Pilas
• Observe siempre la correcta polaridad (inscripciones + y -) de las pilas y coloque
éstas de forma correspondiente. La no observación de lo anterior conlleva el riesgo
de derrame o explosión de las pilas.
• Utilice exclusivamente pilas recargables (o pilas) que sean del mismo tipo.
• Antes de colocar las pilas, limpie los contactos y los contra-contactos de éstas.
• No permita a los niños cambiar las pilas sin la supervisión de una persona adulta.
• No mezcle pilas viejas y nuevas, ni tampoco pilas de tipos o fabricantes diferentes.
• Saque las pilas de los productos que no se vayan a utilizar durante un periodo
prolongado de tiempo. (A no ser de que estén pensados para un caso de
emergencia).
• No cortocircuite las pilas.
• No cargue las pilas.
• No arroje las pilas al fuego.
• Mantenga las pilas fuera del alcance de los niños.
• Nunca abra, deteriore o ingiera pilas o pilas recargables ni las deseche en el
medioambiente. Pueden contener metales pesados tóxicos y dañinos para el
medioambiente.
• Retire y deseche de inmediato las pilas gastadas del producto.
• Evite el almacenamiento, la carga y el uso en condiciones de temperatura extrema.
4. Puesta en funcionamiento
4.1. Colocación de las pilas
• Extraiga el compartimento para pilas por las muescas. Retire el separador de
contacto.
• Vuelva a introducir el compartimento para pilas en la carcasa ejerciendo una suave
presión hasta que encaje de manera audible («clic»).
4.2. Cambio de pilas
• Extraiga el compartimento para pilas por las muescas.
• Retire la pila gastada y coloque una pila nueva tipo CR2025 prestando atención a la
polaridad correcta.
• Vuelva a introducir el compartimento para pilas en la carcasa ejerciendo una suave
presión hasta que encaje de manera audible («clic»).

16
5. Montaje
• Puede elegir entre colocar el termómetro/higrómetro sobre una superficie plana
utilizando el pie plegable situado en la parte posterior del mismo o instalarlo en la
pared mediante la abertura situada en la parte posterior.
• Fije el taco, el tornillo, el clavo, etc., en la pared prevista.
• Cuelgue del mismo el termómetro/higrómetro por su abertura.
Aviso
Es necesario que compruebe antes del montaje que la pared elegida puede soportar
el peso que se va a montar. Asimismo, asegúrese de que por el punto de montaje no
pasan cables eléctricos, tuberías de agua, gas o de cualquier otro tipo.
6. Funcionamiento
• Tras colocar la pila/un cambio de la pila se visualizan brevemente todos los
segmentos de la pantalla.
• El termómetro/higrómetro está listo para funcionar.
• Tras la calibración, la mitad superior de la pantalla le muestra los valores de medición
de la temperatura, mientras que la mitad inferior de la pantalla le muestra los valores
de medición de la humedad relativa del aire.
• Si el valor medido se encuentra fuera del rango de medición, en la pantalla se
muestra LL.L (para valores por debajo del rango de medición) o HH.H (para valores
por encima del rango de medición).
• Cambie las pilas en cuanto disminuya el contraste de la visualización en pantalla tal y
como se describe en 4. Puesta en funcionamiento.
6.1. Celsius/Fahrenheit
• Pulse la tecla °C/°F para conmutar entre °C y °F en la visualización de la
temperatura.
6.2. Valores máximos y mínimos de la temperatura y la humedad
• El termómetro/higrómetro almacena automáticamente los valores máximos y mínimos
de la temperatura y la humedad.
• Pulse repetidamente la tecla MAX/ MIN para conmutar entre la visualización de la
temperatura y la humedad actuales, la temperatura y la humedad mínimas (MIN) y la
temperatura y la humedad máximas (MAX).
• Los valores máximos y mínimos se resetean automáticamente cada 24 horas.
6.3. Visualización del confort
El termómetro/higrómetro muestra los siguientes rangos de confort higrotérmico,
basándose en la relación entre la temperatura ambiente y la humedad del aire actuales:

17
Visualización
Rango de
temperatura
Rango de
humedad del aire
Rango de confort
– < 40%
– seco –
Aire del entorno
demasiado seco
20°C – 26°C /
68°F – 78.8°F
40% – 70%
– confort –
Temperatura y
humedad del aire
óptimas
– 70%
– húmedo –
Humedad del aire
demasiado alta
Ninguna
visualización
< 20°C / 68°F
> 26°C / 78.8°F
40% – 70% – Sin indicador –
7. Mantenimiento y cuidado
Limpie este producto sólo con un paño ligeramente humedecido que no deje pelusas y
no utilice detergentes agresivos. Asegúrese de que no entre agua en el producto.
8. Exclusión de responsabilidad
Hama GmbH & Co KG no se responsabiliza ni concede garantía por los daños que surjan
por una instalación, montaje o manejo incorrectos del producto o por la no observación
de las instrucciones de manejo y/o de las instrucciones de seguridad.
9. Datos técnicos
Termómetro/higrómetro TH130
Alimentación de corriente
3 V
1 pila redonda CR2025
Rango de medición
Temperatura
Humedad
0°C – 50°C / 32°F – 122°F
20% – 95%
Tamaño 82 x 100 x 11 mm
Peso 71,4 g (incl. pila)

18
Органы управления и индикации
• Кнопка °C/°F
= выбор единицы измерения температуры (°C, °F)
• Кнопка MAX/MIN
= вызов сохраненных максимального и минимального значений
1. Предупредительные пиктограммы и инструкции
Внимание
Данным значком отмечены инструкции, несоблюдение которых может привести
к опасной ситуации.
Примечание
Дополнительная или важная информация.
2. Комплект поставки
• 1x Термометр и гигрометр TH-130
• 1x батарея CR2025
• Настоящая инструкция
3. Техника безопасности
• Изделие предназначено только для домашнего применения.
• Запрещается использовать не по назначению.
• Не эксплуатировать в непосредственной близости с нагревательными
приборами и беречь от прямых солнечных лучей
• Соблюдать технические характеристики.
• Беречь от влаги и брызг.
• Не ронять. Беречь от сильных ударов.
• Упаковку не давать детям: опасность асфиксии.
• Утилизировать упаковку в соответствии с местными нормами.
• Запрещается вносить изменения в конструкцию. В противном случае
гарантийные обязательства аннулируются.
Внимание. Техника безопасности
• Соблюдать полярность батарей (+ и -). Несоблюдение полярности может
стать причиной взрыва батарей.
• Разрешается применять аккумуляторы только указанного типа.
• Перед загрузкой батарей почистить контакты.
R Руководство по эксплуатации

19
Внимание. Техника безопасности
• Запрещается детям заменять батареи без присмотра взрослых.
• Не применять различные типы или новые и старые батареи вместе.
• В случае большого перерыв в эксплуатации удалить батареи из устройства
(кроме случаев, когда изделие применяется в качестве аварийного).
• Не закорачивать контакты батарей.
• Обычные батареи не заряжать.
• Батареи в огонь не бросать.
• Батареи хранить в безопасном месте и не давать детям.
• Не открывайте, не разбирайте, не глотайте и не утилизируйте батареи с
бытовым мусором. В батареях могут содержаться вредные тяжелые металлы.
• Израсходованные батареи немедленно удалять из прибора и утилизировать.
• Не подвергайте аккумулятор воздействию экстремальных температур при
хранении, зарядке и использовании.
4. Ввод в эксплуатацию
4.1. Загрузка батареи
• Извлеките отсек для батареи с помощью специально предусмотренной выемки.
Удалите изолирующую прокладку с контактов.
• Вновь вставьте в корпус отсек для батареи, слегка нажав на него до щелчка.
4.2. Замена батареи
• Извлеките отсек для батареи с помощью специально предусмотренной выемки.
• Извлеките использованную батарею и вставьте новую батарею CR2025 с
соблюдением полярности.
• Вновь вставьте в корпус отсек для батареи, слегка нажав на него до щелчка.
5. Монтаж
• Термометр можно установить на ровную поверхность с помощью складной
подставки, либо повесить на стене за предназначенное для этого отверстие на
задней панели.
• С помощью дюбеля закрепите шуруп на стене.
• Навесьте прибор за специально предусмотренную выемку в его корпусе.

20
Внимание
Убедитесь, что стена подходит для монтажа. В стене на месте монтажа не
должно быть электрической проводки, газопровода, водопровода и других
трубопроводов.
6. Эксплуатация
• После установки/замены батареи краткосрочно отображаются все сегменты
дисплея.
• Прибор готов к работе.
• После калибровки в верхней половине дисплея отображаются измеренные
значения температуры, а в нижней — измеренные значения влажности
воздуха.
• Если измеренное значение находится ниже диапазона измерения прибора,
то на дисплее отображается LL.L, а если выше диапазона измерения прибора
— HH.H.
• Если индикация на дисплее тускнеет, замените батарею (см. 4. Ввод в
эксплуатацию).
6.1. Единицы измерения температуры (Цельсий / Фаренгейт)
• Кнопкой °C/°F выберите единицу измерения температуры (°C или °F).
6.2. Максимальные и минимальные значения температуры и влажности
воздуха
• Зафиксированные максимальные и минимальные значения температуры, а
также влажности воздуха автоматически сохраняются в памяти прибора.
• Кнопкой MAX/ MIN переключите индикацию текущей температуры
и влажности, минимальной температуры и влажности (MIN), а также
максимальной температуры и влажности (MAX).
• Максимальные и минимальные значения автоматически удаляются через
каждые 24 часа.
6.3. Индикация комфортного климата
На основе отношения текущей температуры и влажности в помещении прибор
показывает следующие диапазоны комфортного климата:
La pagina si sta caricando...
La pagina si sta caricando...
La pagina si sta caricando...
La pagina si sta caricando...
La pagina si sta caricando...
La pagina si sta caricando...
La pagina si sta caricando...
La pagina si sta caricando...
La pagina si sta caricando...
La pagina si sta caricando...
La pagina si sta caricando...
La pagina si sta caricando...
La pagina si sta caricando...
La pagina si sta caricando...
La pagina si sta caricando...
La pagina si sta caricando...
La pagina si sta caricando...
La pagina si sta caricando...
La pagina si sta caricando...
La pagina si sta caricando...
La pagina si sta caricando...
La pagina si sta caricando...
La pagina si sta caricando...
La pagina si sta caricando...
La pagina si sta caricando...
La pagina si sta caricando...
La pagina si sta caricando...
La pagina si sta caricando...
La pagina si sta caricando...
La pagina si sta caricando...
La pagina si sta caricando...
La pagina si sta caricando...
La pagina si sta caricando...
La pagina si sta caricando...
La pagina si sta caricando...
La pagina si sta caricando...
La pagina si sta caricando...
La pagina si sta caricando...
La pagina si sta caricando...
La pagina si sta caricando...
La pagina si sta caricando...
La pagina si sta caricando...
La pagina si sta caricando...
La pagina si sta caricando...
La pagina si sta caricando...
La pagina si sta caricando...
La pagina si sta caricando...
La pagina si sta caricando...
La pagina si sta caricando...
La pagina si sta caricando...
-
 1
1
-
 2
2
-
 3
3
-
 4
4
-
 5
5
-
 6
6
-
 7
7
-
 8
8
-
 9
9
-
 10
10
-
 11
11
-
 12
12
-
 13
13
-
 14
14
-
 15
15
-
 16
16
-
 17
17
-
 18
18
-
 19
19
-
 20
20
-
 21
21
-
 22
22
-
 23
23
-
 24
24
-
 25
25
-
 26
26
-
 27
27
-
 28
28
-
 29
29
-
 30
30
-
 31
31
-
 32
32
-
 33
33
-
 34
34
-
 35
35
-
 36
36
-
 37
37
-
 38
38
-
 39
39
-
 40
40
-
 41
41
-
 42
42
-
 43
43
-
 44
44
-
 45
45
-
 46
46
-
 47
47
-
 48
48
-
 49
49
-
 50
50
-
 51
51
-
 52
52
-
 53
53
-
 54
54
-
 55
55
-
 56
56
-
 57
57
-
 58
58
-
 59
59
-
 60
60
-
 61
61
-
 62
62
-
 63
63
-
 64
64
-
 65
65
-
 66
66
-
 67
67
-
 68
68
-
 69
69
-
 70
70


Hama 00136261 Operating Instructions Manual
- Tipo
- Operating Instructions Manual
in altre lingue
- English: Hama 00136261
- français: Hama 00136261
- español: Hama 00136261
- Deutsch: Hama 00136261
- русский: Hama 00136261
- Nederlands: Hama 00136261
- português: Hama 00136261
- slovenčina: Hama 00136261
- čeština: Hama 00136261
- polski: Hama 00136261
- svenska: Hama 00136261
- suomi: Hama 00136261
- română: Hama 00136261
Documenti correlati
-
Hama TH-130 White (00136260) Manuale utente
-
Hama 00186361 Manuale del proprietario
-
Hama 00186363 Manuale utente
-
-
-
-
-
-
-
Hama 00186396 Window Thermometer Manuale del proprietario
Altri documenti
-
TFA Digital thermo-hygrometer Manuale utente
-
-
-
-
-