ROSIERES RBS93680/1 IN Manuale utente
- Categoria
- Cappe da cucina
- Tipo
- Manuale utente

FR Prescriptions de montage et mode d’emploi
IT Istruzioni di montaggio e d'uso
EN Instruction on mounting and use


8
FR - Prescriptions de montage et mode d’emploi
Suivre impérativement les instructions de cette notice. Le
constructeur décline toute responsabilité pour tous les
inconvénients, dommages ou incendies provoqués à l’appareil
et dûs à la non observation des instructions de la présente
notice. Cet appareil est destiné à être utilisé dans des
applications domestiques et analogues telles que : - des coins
cuisines réservés au personnel dans des magasins, bureaux
et autres environnements professionnels ; - des fermes ; -
l’utilisation par les clients des hôtels, motels et autres
environnements à caractère résidentiel ; - des
environnements du type chambre d’hôtes.
• Il est important de conserver ce livret pour pouvoir le
consulter à tout moment. En cas de vente, de cession ou
de déménagement, assurez-vous que la notice
d'utilisation l'accompagne.
• Veuillez lire attentivement les instructions, vous trouverez
des informations importantes sur l'installation, le mode
d'emploi et la sécurité.
• Ne pas effectuer des modifications électriques ou
mécaniques sur le produit ou sur les conduits
d’évacuation.
• Avant d'installer l'appareil, vérifiez qu’il n’y a aucun
composant endommagé. Sinon, contactez votre
revendeur et ne continuez pas l'installation.
Remarque : Les pièces portant le symbole "(*)" sont des
accessoires optionnels fournis uniquement avec certains
modèles ou des pièces non fournies, à acheter.
Attention
• Avant tout entretien ou nettoyage du
produit débranchez l'alimentation
électrique en retirant la fiche électrique
ou en coupant l'interrupteur général.
• Utilisez des gants de travail pour toute
opération de nettoyage ou d'entretien.
• Cet appareil peut être utilisé par des
enfants âgés d’au moins 8 ans et par des
personnes ayant des capacités
physiques, sensorielles ou mentales
réduites ou dénuées d’expériences ou de
connaissances, sauf si ces personnes
sont correctement surveillées ou si des
instructions relatives à l'utilisation
correcte de l'appareil permettant d'éviter
tout danger leur ont été communiquées.
• Les enfants ne doivent pas jouer avec
l’appareil.
• Le nettoyage et l’entretien par l’usager
ne doivent pas être effectués par des
enfants sans surveillance.
• La pièce doit avoir une aération
suffisante lorsque la hotte est utilisée
conjointement avec d'autres appareils
fonctionnant au gaz ou autres
combustibles.
• La hotte doit être régulièrement
nettoyée à la fois à l'intérieur et à
l'extérieur (AU MOINS UNE FOIS PAR
MOIS); cela devrait se faire en
conformité avec les instructions
d'entretien. Le non respect des
instructions expressément fournies
concernant le nettoyage de la hotte et
des filtres peut provoquer des risques
d'incendie.
• Ne pas flamber d’aliments sous la hotte.
• Pour le remplacement de la lampe,
utilisez uniquement le type de lampe
spécifié dans la section
remplacement/maintenance lampe dans
ce manuel.
L'utilisation d'une flamme nue est
dommageable pour les filtres et peut
causer un incendie, par conséquent, il
est déconseillé de l'utiliser.
La friture doit être faite avec soin afin de
s’assurer que l’huile surchauffée ne
prenne pas feu.
AVERTISSEMENT: Lorsque la table de
cuisson est en fonctionnement, les
parties accessibles de la hotte peuvent
devenir très chaudes.
• Ne pas brancher l'appareil au réseau
électrique avant que l'installation est

9
complètement terminée.
• En ce qui concerne les mesures techniques et de sécurité à
prendre pour l'évacuation des fumées, respectez strictement
les dispositions des règlements locales.
• L’air ne doit pas être envoyé dans un conduit utilisé pour
évacuer les fumées d’appareils utilisant du gaz ou un autre
combustible.
• Ne pas utiliser ou laisser la hotte sans les lampes
correctement montées, car un éventuel risque de choc
électrique est possible.
• N’utilisez jamais la hotte sans la grille montée correctement!
• La hotte ne doit JAMAIS être utilisée comme une surface
d'appui, sauf indication expresse.
• Utilisez uniquement les vis de fixation fournies avec le
produit pour l'installation, ou, si non fournies, acheter le type
correct de vis.
• Utilisez la longueur correcte pour les vis qui sont identifiées
dans le Guide d'installation.
• En cas de doute, consultez votre centre de service agréé ou
du personnel qualifié.
ATTENTION !
• Le défaut d'installer les vis et les dispositifs de fixation
conformément à ces instructions peut entraîner des
risques électriques.
• Ne pas mettre en marche au moyen d’un
programmateur, d’une minuterie, ou d’un système de
commande à distance séparé ou tout autre dispositif
qui met l’appareil sous tension automatiquement.
Cet appareil porte le symbole du recyclage conformément à la
Directive Européenne 2012/19/EC concernant les Déchets
d’Équipements Électriques et Électroniques (DEEE ou
WEEE).
En procédant correctement à la mise au rebut de cet appareil,
vous contribuerez à empêcher toute conséquence nuisible
pour l’environnement et la santé de l’homme.
Le symbole
présent sur l’appareil ou sur la
documentation qui l’accompagne indique que ce produit ne
peut en aucun cas être traité comme déchet ménager. Il doit
par conséquent être remis à un centre de collecte des déchets
chargé du recyclage des équipements électriques et
électroniques.
Pour la mise au rebut, respectez les normes relatives à
l’élimination des déchets en vigueur dans le pays
d’installation.
Pour obtenir de plus amples détails au sujet du traitement, de
la récupération et du recyclage de cet appareil, veuillez vous
adresser au bureau compétent de votre commune, à la
société de collecte des déchets ou directement à votre
revendeur.
Appareil conçu, testé et fabriqué conformément aux normes
suivantes :
• Sécurité : EN/IEC 60335-1; EN/IEC 60335-2-31, EN/IEC
62233.
• Performances : EN/IEC 61591; ISO 5167-1; ISO 5167-3;
ISO 5168; EN/IEC 60704-1; EN/IEC 60704-2-13; EN/IEC
60704-3; ISO 3741; EN 50564; IEC 62301.
• EMC: EN 55014-1; CISPR 14-1; EN 55014-2; CISPR 14-2;
EN/IEC 61000-3-2; EN/IEC 61000-3-3. Suggestions pour une
utilisation correcte afin de réduire l’impact environnemental :
Allumer la hotte à la vitesse minimum pendant la cuisson et la
laisser fonctionner pendant quelques minutes après la fin de
la cuisson. Augmenter la vitesse uniquement en présence
d’une grande quantité de fumée ou de vapeur et n’utiliser
la/les vitesse(s) accélérées que dans les cas extrêmes.
Remplacer le(s) filtre(s) au charbon lorsque cela est
nécessaire afin de maintenir une réduction efficace des
odeurs. Nettoyer le(s) filtres à graisse lorsque cela est
nécessaire afin de maintenir un filtrage efficace des graisses.
Utiliser un système de tuyauterie du diamètre maximum
indiqué dans ce manuel afin d’optimiser le rendement et de
minimiser le bruit.
En appliquant la marque
sur ce produit, nous
déclarons, sous notre responsabilité, le respect des exigences
européennes en matière de sécurité, santé et environnement
établies par la loi pour ce produit.
Utilisation
La hotte est réalisée de façon qu’elle puisse être utilisée en
version aspirante à évacuation extérieure, ou filtrante à
recyclage intérieur.
Version aspirante
Les vapeurs sont évacuées vers l'extérieur à travers un
conduit d'évacuation fixé à la bride de raccord qui se trouve
au-dessus de la hotte.
ATTENTION!
Le tuyau d’évacuation n’est pas fourni et doit être acheté à
part.
Le diamètre du tuyau d'évacuation doit être égal à celui de la
bride de raccord.
ATTENTION!
Si la hotte est équipée d'un filtre à charbon, ce dernier doit
être enlevé.
Relier la hotte aux tubes et trous d’évacuation de la paroi d’un
diamètre équivalent à la sortie de l’air (collier de raccord).
L’utilisation de tubes et des trous d'évacuation à paroi avec un
diamètre inférieur entraînera une diminution des
performances d’aspiration et une nette augmentation du bruit.
Nous déclinons toute responsabilité à cet égard.
! Utiliser un tuyau de la longueur strictement nécessaire.
! Les coudes du tuyau doivent être en nombre minime
(angle maxi du coude: 90°).
! Éviter les variations excessives de section du tuyau.

10
Version filtrante
L'air d'aspiration sera dégraissé et désodorisé avant d'être
renvoyé dans la pièce.
Pour utiliser la hotte dans cette version, vous devez installer
un système de filtrage supplémentaire basé sur charbon actif.
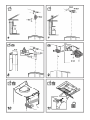
Installation
La distance minimum entre la superficie de support des
récipients sur le dispositif de cuisson et la partie la plus basse
de la hotte de cuisine ne doit pas être inférieure à 50cm dans
le cas de cuisinières électriques et de 65 cm dans le cas de
cuisinières à gaz ou mixtes.
Si les instructions d’installation du dispositif de cuisson au gaz
spécifient une plus grande distance, il faut en tenir compte.
Branchement électrique
La tension électrique doit correspondre à la tension reportée
sur la plaque signalétique située à l’intérieur de la hotte. Si
une prise est présente, branchez la hotte dans une prise
murale conforme aux normes en vigueur et placée dans une
zone accessible également après l’installation. Si aucune
prise n’est présente (raccordement direct au circuit
électrique), ou si la prise ne se trouve pas dans une zone
accessible également après l’installation, appliquez un
disjoncteur normalisé pour assurer de débrancher
complètement la hotte du circuit électrique en conditions de
catégorie surtension III, conformément aux règlementations
de montage.
ATTENTION!
Avant de rebrancher le circuit de la hotte à l’alimentation
électrique et d’en vérifier le fonctionnement correct, contrôlez
toujours que le câble d’alimentation soit monté correctement.
Attention! Si le câble d’alimentation est endommagé, il doit
être remplacé par le fabricant, son service après-vente ou des
personnes de qualification similaire afin d’éviter un danger.
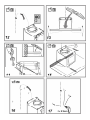
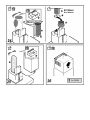
Montage
La hotte est équipée de chevilles de fixation convenant à la
plupart des parois/plafonds. Il est cependant nécessaire de
s’adresser à un technicien qualifié afin de s’assurer que le
matériel est approprié au type de paroi/plafond. La
paroi/plafond doit être suffisamment solide pour supporter le
poids de la hotte.
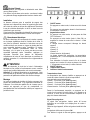
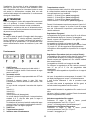
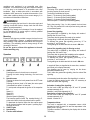
Fonctionnement
1 ON/OFF moteur
En appuyant sur cette touche, la hotte se met à la vitesse
1.
En appuyant sur cette touche durant le fonctionnement,
la hotte passe à l’état OFF.
2 Augmentation vitesse
En appuyant sur cette touche, la hotte passe de l’état
OFF à la vitesse 1.
En appuyant sur cette touche (hotte à l’état ON), on
augmente la vitesse du moteur de la vitesse 1 à celle
intensive.
A chaque vitesse correspond l’allumage du témoin
respectif.
Vitesse 1: 1
Vitesse 2: 2
Vitesse 3: 3
Vitesse intensive: 4 (clignotant)
La vitesse intensive est temporisée. La temporisation
standard est de 5’, à la fin de laquelle la hotte se place à
la vitesse 2.
Pour désactiver la fonction avant la fin de la durée,
appuyer sur la touche 2, la hotte se placera à la vitesse
1 ; en appuyant sur la touche 1, la hotte s’éteindra.
3 ON/OFF lumières
4 Temporisation vitesse
5 Indicateur état de fonctionnement
Temporisation vitesse
La temporisation des vitesses s’habilite en appuyant sur la
touche 4, la hotte s’éteint à la fin de la temporisation.
La temporisation est ainsi subdivisée:
Vitesse 1 - 20 minutes (1 fixe, point clignotant)
Vitesse 2 - 15 minutes (2 fixe, point clignotant)
Vitesse 3 - 10 minutes (3 fixe, point clignotant)
Vitesse intensive - 5 minutes (4 fixe, point clignotant)
Durant le fonctionnement temporisé, en appuyant sur la
touche 1 ou la touche 4, la hotte s’éteint, si l’on appuie sur la
touche 2, la hotte sort du fonctionnement temporisé et se
plaçe à la vitesse sélectionnée.
Signal filtre anti-graisse
Le signal filtre anti-graisse s’active après 80 heures
d’utilisation et est indiqué sur le display avec le numéro 1
clignotant.
Quand ce signal apparaît, le filtre anti-graisse installé doit être
lavé.
Le signal est visible avec la hotte en ON.
Pour éliminer le signal du filtre anti-graisse, appuyer sur la

11
touche “1” pendant plus de 3”, jusqu’à la coupure du signal.
L’élimination du signal est possible avec la hotte en ON.
Signal filtre charbon (uniquement pour version filtrante)
Le signal filtre charbon s’active après 320 heures d’utilisation
et est indiqué sur le display avec le numéro 2 clignotant.
Quand ce signal apparaît, le filtre au charbon installé doit être
remplacé.
Le signal est visible avec la hotte en ON.
Pour éliminer le signal du filtre au charbon, appuyer sur la
touche “1” pendant plus de 3”, jusqu’à la coupure du signal.
L’élimination du signal est possible avec la hotte en ON
Dans le cas de signal simultané des deux filtres, les numéros
1 et 2 clignoteront alternativement sur le display.
Le reset se fait en effectuant 2 fois la procédure décrite plus
haut.
La première fois, pour le reset du signal du filtre anti-graisse,
la deuxième pour le reset du filtre au charbon.
En modalité standard, le signal filtre au charbon n’est pas
actif.
Dans le cas où l’on utilise la hotte en version filtrante, il faut
habiliter le signal filtre au charbon.
Activation signal filtre au charbon:
Placer la hotte sur OFF et maintenir enfoncées en même
temps les touches “2” et “3” pendant 3”.
Les numéros 1 et 2 clignoteront alternativement pendant 2”.
Désactivation signal filtre au charbon:
Placer la hotte sur OFF et maintenir enfoncées en même
temps les touches “2” et “3” pendant 3”.
Le numéro 1 clignotera pendant 2”.
Alarme Température
La hotte est équipée d’un détecteur de température qui active
le moteur à la vitesse 3 au cas où la température dans la zone
display est trop élevée.
La condition d’alarme est indiquée par le display avec la lettre
"t" clignotante.
Cette condition perdure jusqu’à ce la température ne
descende sous le seuil d’alarme.
On peut sortir de cette modalité en appuyant sur la touche
“2”.
Toutes les 30”, le détecteur vérifie la température ambiante de
la zone display.
Entretien
Nettoyage
Pour le nettoyage, utiliser EXCLUSIVEMENT un chiffon
humidifié avec des détersifs liquides neutres. NE PAS
UTILISER D'OUTILS OU D'INSTRUMENTS POUR LE
NETTOYAGE ! Éviter l'usage de produits abrasifs, NE PAS
UTILISER D'ALCOOL!
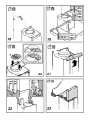
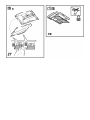
Filtre anti-gras
Fig. 11-28
Il retient les particules de graisse issues de la cuisson.
Le filtre doit être nettoyé une fois par mois (ou lorsque le
système d’indication de saturation des filtres – si prévu sur le
modèle possédé – indique cette nécessité) avec des
détergents non agressifs, à la main ou dans le lave-vaisselle à
faibles températures et cycle rapide.
Le lavage du filtre anti-graisse métallique au lave-vaisselle
peut en provoquer la décoloration. Toutefois, les
caractéristiques de filtrage ne seront en aucun cas modifiées.
Pour démonter le filtre anti-graisse, tirer la poignée de
décrochement à ressort.
Filtre à charbon actif (uniquement pour version
recyclage)
Fig. 27
Retient les odeurs désagréables de cuisson.
La saturation du charbon actif se constate aprés un emploi
plus ou mois long, selon le type de cuisiniére et de régularité
du nettoyage du filtre à graisses. En tout cas, il est nécessaire
de changer le filtre aprés, au maximum, quatre mois (ou
lorsque le système d’indication de saturation des filtres – si
prévu sur le modèle possédé – indique cette nécessité).
IL NE PEUT PAS être nettoyé ou régénéré.
Remplacement des lampes
La hotte est dotée d’un système d’éclairage basé sur la
technologie LED.
Les LEDS garantissent un éclairage optimal, une durée
jusqu’à 10 fois supérieures aux ampoules traditionnelles et
permettent une épargne de 90% en énergie électrique.
Pour le remplacement, s’adresser au service d’assistance
technique.

12
SERVICE ASSISTANCE CLIENTS
Avant appeler le service d'Assistance Technique
En cas de défaillance du produit, nous vous recommandons de vérifier l'insertion correcte de la fiche dans la prise.
Si la cause du dysfonctionnement ne peut pas être identifiée, coupez l'alimentation, ne le touchez pas et appelez le service
d'Assistance Technique.
NUMÉRO DE SÉRIE DU PRODUIT. Où se trouve-t-il ?
Il est important de communiquer au service d’assistance technique le sigle du produit ainsi que son numéro de série (16 caractères
commençant par le chiffre 3) que vous trouverez dans le certificat de garantie ou bien sur la plaque d’immatri-culation située à
l’intérieur de l’appareil.Vous éviterez ainsi que le technicien n’effectue des déplace-ments inutiles et économiserez par la même
occasion sur les frais correspondants.

13
IT - Istruzioni di montaggio e d'uso
Attenersi strettamente alle istruzioni riportate in questo
manuale. Si declina ogni responsabilità per eventuali
inconvenienti, danni o incendi provocati all'apparecchio
derivati dall'inosservanza delle istruzioni riportate in questo
manuale. La cappa è concepita per l'aspirazione dei fumi e
vapori della cottura ed è destinata al solo uso domestico.
• E' importante conservare tutti i manuali che
accompagnano il prodotto per poterli consultare in ogni
momento. In caso di vendita, di cessione o di trasloco,
assicurarsi che restino insieme al prodotto.
• Leggere attentamente le istruzioni: ci sono importanti
informazioni sull'installazione, sull'uso e sulla sicurezza.
• Non effettuare variazioni elettriche o meccaniche sul
prodotto o sulle condotte di scarico.
• Verificare l'integrità della cappa prima di procedere con
l’installazione. In caso contrario contattare il rivenditore e
non proseguire con l'installazione.
Nota: I particolari contrassegnati con il simbolo "(*)" sono
accessori opzionali forniti solo in alcuni modelli o particolari
non forniti, da acquistare.
Avvertenze
• Prima di qualsiasi operazione di pulizia
o manutenzione, disinserire la cappa
dalla rete elettrica togliendo la spina o
staccando l’interruttore generale
dell’abitazione.
• Per tutte le operazioni di installazione e
manutenzione utilizzare guanti da lavoro.
• L’apparecchio può essere utilizzato da
bambini di età non inferiore a 8 anni e da
persone con ridotte capacità fisiche,
sensoriali o mentali, o prive di esperienza
o della necessaria conoscenza, purchè
sotto sorveglianza oppure dopo che le
stesse abbiano ricevuto istruzioni relative
all’uso sicuro dell’apparecchio e alla
comprensione dei pericoli ad esso
inerenti.
• I bambini devono essere controllati
affinché non giochino con l’apparecchio.
• La pulizia e la manutenzione non deve
essere effettuata da bambini senza
sorveglianza.
• Il locale deve disporre di sufficiente
ventilazione, quando la cappa da cucina
viene utilizzata contemporaneamente ad
altri apparecchi a combustione di gas o
altri combustibili.
• La cappa va frequentemente pulita sia
internamente che esternamente
(ALMENO UNA VOLTA AL MESE),
rispettare comunque quanto
espressamente indicato nelle istruzioni di
manutenzione. L’inosservanza delle
norme di pulizia della cappa e della
sostituzione e pulizia dei filtri comporta
rischi di incendi.
• E’ severamente vietato fare cibi alla
fiamma sotto la cappa.
• Per la sostituzione della lampada
utilizzare solo il tipo lampada indicato
nella sezione manutenzione /sostituzione
lampada di questo manuale.
L’impiego di fiamma libera è dannoso ai
filtri e può dar luogo ad incendi, pertanto
deve essere evitato in ogni caso.
La frittura deve essere fatta sotto
controllo onde evitare che l’olio
surriscaldato prenda fuoco.
ATTENZIONE: Quando il piano di cottura
è in funzione le parti accessibili della
cappa possono diventare calde.
• Non collegare l’apparecchio alla rete
elettrica finche l’installazione non è
totalmente completata.
• Per quanto riguarda le misure tecniche e di sicurezza da
adottare per lo scarico dei fumi attenersi strettamente a
quanto previsto dai regolamenti delle autorità locali
competenti.
• L’aria aspirata non deve essere convogliata in un condotto
usato per lo scarico dei fumi prodotti da apparecchi a
combustione di gas o di altri combustibili.
• Non utilizzare o lasciare la cappa priva di lampade

14
correttamente montate per possibile rischio di scossa elettrica.
• Mai utilizzare la cappa senza griglia correttamente montata!
• La cappa non va MAI utilizzata come piano di appoggio a
meno che non sia espressamente indicato.
• Utilizzare solo le viti di fissaggio in dotazione con il prodotto
per l'installazione o, se non in dotazione, acquistare il tipo di
viti corretto.
• Utilizzare la lunghezza corretta per le viti che sono identificati
nella Guida all'installazione.
• In caso di dubbio, consultare il centro di assistenza
autorizzato o personale qualificato similare.
ATTENZIONE!
• La mancata installazione di viti e dispositivi di
fissaggio in conformità di queste istruzioni può
comportare rischi di natura elettrica.
• Non utilizzare con un programmatore, timer,
telecomando separato o qualsiasi altro dispositivo che
si attiva automaticamente.
Questo apparecchio è contrassegnato in conformità alla
Direttiva Europea 2012/19/EC, Waste Electrical and Electronic
Equipment (WEEE). Assicurandosi che questo prodotto sia
smaltito in modo corretto, l'utente contribuisce a prevenire le
potenziali conseguenze negative per l'ambiente e la salute.
Il simbolo
sul prodotto o sulla documentazione di
accompagnamento indica che questo prodotto non deve
essere trattato come rifiuto domestico ma deve essere
consegnato presso l'idoneo punto di raccolta per il riciclaggio
di apparecchiature elettriche ed elettroniche. Disfarsene
seguendo le normative locali per lo smaltimento dei rifiuti. Per
ulteriori informazioni sul trattamento, recupero e riciclaggio di
questo prodotto, contattare l'idoneo ufficio locale, il servizio di
raccolta dei rifiuti domestici o il negozio presso il quale il
prodotto è stato acquistato.
Apparecchiatura progettata, testata e realizzata nel rispetto
delle norme sulla:
• Sicurezza: EN/IEC 60335-1; EN/IEC 60335-2-31, EN/IEC
62233.
• Prestazione: EN/IEC 61591; ISO 5167-1; ISO 5167-3; ISO
5168; EN/IEC 60704-1; EN/IEC 60704-2-13; EN/IEC 60704-3;
ISO 3741; EN 50564; IEC 62301.
• EMC: EN 55014-1; CISPR 14-1; EN 55014-2; CISPR 14-2;
EN/IEC 61000-3-2; EN/IEC 61000-3-3. Suggerimenti per un
corretto utilizzo al fine di ridurre l’impatto ambientale: Quando
iniziate a cucinare, accendere la cappa alla velocità minima,
lasciandola accesa per alcuni minuti anche dopo il termine
della cottura. Aumentare la velocità solo in caso di grandi
quantità di fumo e vapore, utilizzando la funzione booster solo
in casi estremi. Per mantenere ben efficiente il sistema di
riduzione degli odori, sostituire, quando è necessario, il/i filtro/i
carbone. Per mantenere ben efficiente il filtro del grasso,
pulirlo in caso di necessità. Per ottimizzare l’efficienza e
minimizzare i rumori, utilizzare il diametro massimo del
sistema di canalizzazione indicato in questo manuale.
Applicando la marcatura
isu questo prodotto,
dichiariamo, sotto la nostra responsabilità, la conformità ai
requisiti Europei di sicurezza, salute ed ambiente stabiliti dalla
legge per questo prodotto.
Utilizzazione
La cappa è realizzata per essere utilizzata in versione
aspirante ad evacuazione esterna o filtrante a ricircolo interno.
Versione aspirante
I vapori vengono evacuati verso l’esterno tramite un tubo di
scarico fissato alla flangia di raccordo.
ATTENZIONE!
Il tubo di evacuazione non è fornito e va acquistato.
Il diametro del tubo di scarico deve essere equivalente al
diametro dell'anello di connessione.
ATTENZIONE!
Se la cappa è provvista di filtro/i a carbone, questo/i
deve/devono essere rimosso/i.
Collegare la cappa a tubi e fori di scarico a parete con
diametro equivalente all'uscita d'aria (flangia di raccordo).
L'utilizzo di tubi e fori di scarico a parete con diametro
inferiore determinerà una diminuizione delle prestazioni di
aspirazione ed un drastico aumento della rumorosità.
Si declina perciò ogni responsabilità in merito.
! Usare un condotto lungo il minimo indispensabile.
! Usare un condotto con minor numero di curve possibile
(angolo massimo della curva: 90°).
! Evitare cambiamenti drastici di sezione del condotto.
Versione filtrante
L’aria aspirata verrà sgrassata e deodorata prima di essere
riconvogliata nella stanza. Per utilizzare la cappa in questa
versione è necessario installare un sistema di filtraggio
aggiuntivo a base di carboni attivi.
Installazione
La distanza minima fra la superficie di supporto dei recipienti
sul dispositivo di cottura e la parte più bassa della cappa da
cucina deve essere non inferiore a 50 cm in caso di cucine
elettriche e di 65 cmin caso di cucine a gas o miste.
Se le istruzioni di installazione del dispositivo di cottura a gas
specificano una distanza maggiore, bisogna tenerne conto.
Collegamento Elettrico
La tensione di rete deve corrispondere alla tensione riportata
sull’etichetta caratteristiche situata all’interno della cappa. Se
provvista di spina allacciare la cappa ad una presa conforme
alle norme vigenti posta in zona accessibile anche dopo

15
l’installazione. Se sprovvista di spina (collegamento diretto
alla rete) o la spina non è posta in zona accessibile, anche
dopo installazione, applicare un interruttore bipolare a norma
che assicuri la disconnessione completa della rete nelle
condizioni della categoria di sovratensione III, conformemente
alle regole di installazione.
ATTENZIONE!
Prima di ricollegare il circuito della cappa all’alimentazione di
rete e di verificarne il corretto funzionamento, controllare
sempre che il cavo di rete sia stato montato correttamente.
Attenzione! La sostituzione del cavo di alimentazione deve
essere effettuata dal servizio assistenza tecnica autorizzato o
da persona con qualifica similare.
Montaggio
La cappa è dotata di tasselli di fissaggio adatti alla maggior
parte di pareti/soffitti. E’ tuttavia necessario interpellare un
tecnico qualificato per accertarVi sull’idoneità dei materiali a
seconda del tipo di parete/soffitto. La/il parete/soffitto deve
essere sufficientemente robusto da sostenere il peso della
cappa.
Funzionamento
1 ON/OFF motore
Premendo il pulsante la cappa si avvia alla velocità 1.
Premendo il pulsante durante il funzionamento la cappa
passa in stato OFF.
2 Incremento velocità
Premendo il pulsante la cappa passa dallo stato OFF alla
velocità 1.
Premendo il pulsante (cappa in stato ON) viene
incrementata la velocità del motore dalla velocità 1 alla
intensiva.
Ad ogni velocità corrisponde l’accensione del rispettivo
led.
Velocità 1: 1
Velocità 2: 2
Velocità 3: 3
Velocità intensiva: 4 (lampeggiante)
La velocità intensiva è temporizzata. La temporizzazione
standard è di 5’, alla fine della quale la cappa si
posiziona alla velocità 2.
Per disattivare la funzione prima dello scadere del tempo
premere il tasto 2, la cappa si posizionerà alla velocità 1,
premendo il tasto 1 la cappa si spegnerà.
3 ON/OFF luci
4 Temporizzazione velocità
5 Indicatore stato di funzionamento
Temporizzazione velocità
La temporizzazione delle velocità si abilita premendo il tasto
4, a temporizzazione scaduta la cappa si spegne.
La temporizzazione è così suddivisa:
Velocità 1 - 20 minuti (1 fisso, punto lampeggiante)
Velocità 2 - 15 minuti (2 fisso, punto lampeggiante)
Velocità 3 - 10 minuti (3 fisso, punto lampeggiante)
Velocità intensiva - 5 minuti (4 fisso, punto lampeggiante)
Durante il funzionamento temporizzato premendo il tasto 1 o il
tasto 4 la cappa si spegne, se si preme il tasto 2 la cappa
esce dal funzionamento temporizzato posizionandosi alla
velocità selezionata.
Segnalazione filtro grassi
La segnalazione filtro grassi avviene dopo 80 ore di utilizzo e
viene indicata dal display con il numero 1 lampeggiante.
Quando compare tale segnalazione il filtro grassi installato
necessita di essere lavato.
La segnalazione è visibile con la cappa in stato ON.
Per eliminare la segnalazione del filtro grassi, premere il tasto
“1” per più di 3”, fino allo spegnimento della segnalazione.
L’eliminazione della segnalazione è possibile con la cappa in
stato ON.
Segnalazione filtro carbone (solo per versione filtrante)
La segnalazione filtro carbone avviene dopo 320 ore di utilizzo
e viene indicata dal display con il numero 2 lampeggiante.
Quando compare tale segnalazione il filtro carbone installato
deve essere sostituito.
La segnalazione è visibile con la cappa in stato ON.
Per eliminare la segnalazione del filtro carbone, premere il
tasto “1” per più di 3”, fino allo spegnimento della
segnalazione.
L’eliminazione della segnalazione è possibile con la cappa in
stato ON.
Nel caso di segnalazione contemporanea di entrambi i filtri,
sul display lampeggeranno i numeri 1 e 2 alternativamente.
Il reset avviene effettuando 2 volte la procedera sopra
descritta.
La prima volta resetta la segnalazione del filtro grassi, la
seconda resetta la segnalazione del filtro carboni.
Nella modalità standard la segnalazione filtro carboni non è
attiva.
Nel caso si utilizzi la cappa in versione filtrante è necessario
abilitare la segnalazione filtro carboni.
Attivazione segnalazione filtro carboni:
Posizionare la cappa in OFF
e tenere premuti
contemporaneamente i tasti “2” e “3” per 3”.
I numeri 1 e 2 lampeggeranno alternativamente per 2”.
Disattivazione segnalazione filtro carboni:
Posizionare la cappa in OFF e tenere premuti
contemporaneamente i tasti “2” e “3” per 3”.
Il numero 1 lampeggerà per 2”.

16
Allarme Temperatura
La cappa è equipaggiata con un sensore di temperatura che
attiva il motore alla velocità 3 nel caso in cui la temperatura
nella zona display sia troppo elevata.
La condizione di allarme viene indicata dal display con la
lettera "t" lampeggiante.
Questa condizione permane fino a quando la temperatura non
scende al di sotto della soglia di allarme.
Si può uscire da questa modalità premendo il tasto “2”.
Ogni 30” il sensore verifica la temperatura ambiente della
zona display.
Manutenzione
Pulizia
Per la pulizia usare ESCLUSIVAMENTE un panno inumidito
con detersivi liquidi neutri. NON UTILIZZARE UTENSILI O
STRUMENTI PER LA PULIZIA!
Evitare l’uso di prodotti contenenti abrasivi. NON UTILIZZARE
ALCOOL!
Filtro antigrasso
Fig. 11-28
Trattiene le particelle di grasso derivanti dalla cottura.
Deve essere pulito una volta al mese (o quando il sistema di
indicazione di saturazione dei filtri - se previsto sul modello in
possesso- indica questa necessità), con detergenti non
aggressivi, manualmente oppure in lavastoviglie a basse
temperature ed a ciclo breve.
Con il lavaggio in lavastoviglie il filtro antigrasso metallico può
scolorirsi ma le sue caratteristiche di filtraggio non cambiano
assolutamente.
Per smontare il filtro grassi tirare la maniglia di sgancio a
molla.
Filtro ai carboni attivi (Solo per Versione Filtrante)
Fig. 27
Trattiene gli odori sgradevoli derivanti dalla cottura.
La saturazione del filtro carbone si verifica dopo un uso più o
meno prolungato a seconda del tipo di cucina e della
regolarità della pulizia del filtro grassi. In ogni caso è
necessario sostituire la cartuccia al massimo ogni quattro
mesi (o quando il sistema di indicazione di saturazione dei filtri
- se previsto sul modello in possesso- indica questa
necessità).
NON può essere lavato o rigenerato
Sostituzione Lampade
La cappa è dotata di un sistema di illuminazione basato sulla
tecnologia LED.
I LED garantiscono una illuminazione ottimale, una durata fino
a 10 volte maggiore delle lampade tradizionali e consentono
di risparmiare il 90% di energia elettrica.
Per la sostituzione rivolgersi al servizio assistenza tecnica.
SERVIZIO ASSISTENZA CLIENTI
Prima di chiamare il servizio di Assistenza Tecnica
In caso di mancato funzionamento del prodotto vi consigliamo di verificare il buon inserimento della spina nella presa di corrente.
Nel caso non si individui la causa di mal funzionamento, spegnere l’apparecchio non manometterlo e chiamare il Servizio di
Assistenza Tecnica.
MATRICOLA DEL PRODOTTO. Dove si trova?
È importante che comunichi al Servizio Assistenza Tecnica Autorizzato la sigla del prodotto ed il numero di matricola (16 caratteri
che iniziano con la cifra 3) che troverà sul certificato di garanzia oppure sulla targa matricola. In questo modo Lei potrà contribuire ad
evitare trasferte inutili del tecnico, risparmiando oltretutto i relativi costi.

17
EN - Instruction on mounting and use
Closely follow the instructions set out in this manual. All
responsibility, for any eventual inconveniences, damages or
fires caused by not complying with the instructions in this
manual, is declined. This appliance is intended to be used in
household and similar application such as: - staff kitchen
areas in shop, offices and other working environments; - farm
houses; - by clients in hotels, motels and other residential type
environments; - bed and breakfast type environments.
• It is important to conserve this booklet for consultation at
any moment. In the case of sale, cession or move, make
sure it is together with the product.
• Read the instructions carefully: there is important
information about installation, use and safety.
• Do not carry out electrical or mechanical variations on the
product or on the discharge conduits.
• Before proceeding with the installation of the appliance
verify that there are no damaged all components.
Otherwise contact your dealer and do not proceed with
the installation.
Note: The parts marked with the symbol "(*)" are optional
accessories supplied only with some models or otherwise not
supplied, but available for purchase.
Caution
• Before any cleaning or maintenance
operation, disconnect hood from the
mains by removing the plug or
disconnecting the mains electrical supply.
• Always wear work gloves for all
installation and maintenance operations.
• This appliance can be used by children
aged from 8 years and above and
persons with reduced physical, sensory
or mental capabilities or lack of
experience and knowledge if they have
been given supervision or instruction
concerning use of the appliance in a safe
way and understand the hazards
involved.
• Children shall not be allowed to tamper
with the controls or play with the
appliance.
• Cleaning and user maintenance shall
not be made by children without
supervision.
• The premises where the appliance is
installed must be sufficiently ventilated,
when the kitchen hood is used together
with other gas combustion devices or
other fuels.
• The hood must be regularly cleaned on
both the inside and outside (AT LEAST
ONCE A MONTH).
• This must be completed in accordance
with the maintenance instructions
provided. Failure to follow the instructions
provided regarding the cleaning of the
hood and filters will lead to the risk of
fires.
• Do not flambé under the range hood.
• For lamp replacement use only lamp
type indicated in the
Maintenance/Replacing lamps section of
this manual.
The use of exposed flames is detrimental
to the filters and may cause a fire risk,
and must therefore be avoided in all
circumstances.
Any frying must be done with care in
order to make sure that the oil does not
overheat and ignite.
CAUTION: Accessible parts of the hood
may become hot when used with cooking
appliances.
• Do not connect the appliance to the mains
until the installation is fully complete.
• With regards to the technical and safety measures to be
adopted for fume discharging it is important to closely follow
the regulations provided by the local authorities.
• The air must not be discharged into a flue that is used for
exhausting fumes from appliance burning gas or other fuels.
• Do not use or leave the hood without the lamp correctly
mounted due to the possible risk of electric shocks.
• Never use the hood without effectively mounted grids.
• The hood must NEVER be used as a support surface unless
specifically indicated.

18
• Use only the fixing screws supplied with the product for
installation or, if not supplied, purchase the correct screws
type.
• Use the correct length for the screws which are identified in
the Installation Guide.
• In case of doubt, consult an authorized service assistance
center or similar qualified person.
WARNING!
• Failure to install the screws or fixing device in
accordance with these instructions may result in
electrical hazards.
• Do not use with a programmer, timer, separate remote
control system or any other device that switches on
automatically.
• This appliance is marked according to the European
directive 2012/19/EC on Waste Electrical and Electronic
Equipment (WEEE).
• By ensuring this product is disposed of correctly, you will
help prevent potential negative consequences for the
environment and human health, which could otherwise be
caused by inappropriate waste handling of this product.
• The symbol
on the product, or on the documents
accompanying the product, indicates that this appliance may
not be treated as household waste. Instead it should be taken
to the appropriate collection point for the recycling of electrical
and electronic equipment. Disposal must be carried out in
accordance with local environmental regulations for waste
disposal.
• For further detailed information regarding the process,
collection and recycling of this product, please contact the
appropriate department of your local authorities or the local
department for household waste or the shop where you
purchased this product.
Appliance designed, tested and manufactured according to:
• Safety: EN/IEC 60335-1; EN/IEC 60335-2-31, EN/IEC
62233.
• Performance: EN/IEC 61591; ISO 5167-1; ISO 5167-3; ISO
5168; EN/IEC 60704-1; EN/IEC 60704-2-13; EN/IEC 60704-3;
ISO 3741; EN 50564; IEC 62301.
• EMC: EN 55014-1; CISPR 14-1; EN 55014-2; CISPR 14-2;
EN/IEC 61000-3-2; EN/IEC 61000-3-3. Suggestions for a
correct use in order to reduce the environmental impact:
Switch ON the hood at minimum speed when you start
cooking and kept it running for few minutes after cooking is
finished. Increase the speed only in case of large amount of
smoke and vapor and use boost speed(s) only in extreme
situations. Replace the charcoal filter(s) when necessary to
maintain a good odor reduction efficiency. Clean the grease
filter(s) when necessary to maintain a good grease filter
efficiency. Use the maximum diameter of the ducting system
indicated in this manual to optimize efficiency and minimize
noise.
By placing the
marking on this product, we declare,
on our own responsability, compliance to all of European
safety, health and environmental requirements stated in the
legislation for this product.
Use
The hood is designed to be used either for exhausting or filter
version.
Extraction version
In this case the fumes are conveyed outside of the building by
means of a special pipe connected with the connection ring
located on top of the hood.
CAUTION!
The exhausting pipe is not supplied and must be purchased
apart.
Diameter of the exhausting pipe must be equal to that of the
connection ring.
CAUTION!
If the hood is supplied with active charcoal filter, then it must
be removed.
Connect the hood and discharge holes on the walls with a
diameter equivalent to the air outlet (connection flange).
Using the tubes and discharge holes on walls with smaller
dimensions will cause a diminution of the suction performance
and a drastic increase in noise.
Any responsibility in the matter is therefore declined.
! Use a duct of the minimum indispensable length.
! Use a duct with as few elbows as possible (maximum
elbow angle: 90°).
! Avoid drastic changes in the duct cross-section.
Filtration version
The aspirated air will be degreased and deodorised before
being fed back into the room.
In order to use the hood in this version, you have to install a
system of additional filtering based on activated charcoal.
Installation
The minimum distance between the supporting surface for the
cooking equipment on the hob and the lowest part of the
range hood must be not less than 50cm from electric cookers
and 65cm from gas or mixed cookers.
If the instructions for installation for the gas hob specify a
greater distance, this must be adhered to.
Electrical connection
The mains power supply must correspond to the rating
indicated on the plate situated inside the hood. If provided with
a plug connect the hood to a socket in compliance with current

19
regulations and positioned in an accessible area, after
installation. If it not fitted with a plug (direct mains connection)
or if the plug is not located in an accessible area, after
installation, apply a double pole switch in accordance with
standards which assures the complete disconnection of the
mains under conditions relating to over-current category III, in
accordance with installation instructions.
WARNING!
Before re-connecting the hood circuit to the mains supply and
checking the efficient function, always check that the mains
cable is correctly assembled.
Warning! If the supply cord is damaged, it must be replaced
by the manufacturer, its service agent or similarly qualified
persons in order to avoid hazard.
Mounting
Expansion wall plugs are provided to secure the hood to most
types of walls/ceilings. However, a qualified technician must
verify suitability of the materials in accordance with the type of
wall/ceiling. The wall/ceiling must be strong enough to take
the weight of the hood.
Do not tile, grout or silicone this appliance to the wall.
Surface mounting only.
Operation
1 ON/OFF motor
Pressing the button, the hood turns on at speed 1.
Pressing the button during functioning, the hood turns
OFF.
2 Speed Increase
Pressing the button the hood passes from the OFF state
to speed 1.
Pressing the button (hood in ON state) the motor speed
is increased from speed 1 to intensive.
To each speed corresponds the ignition of the respective
led.
Speed 1: 1
Speed 2: 2
Speed 3: 3
Intensive Speed: 4 (flashing)
The intensive speed is timed. The standard timing is 5’,
at the end of which the hood positions itself to speed 2.
To deactivate the function before the time expires press
key 2, the hood positions itself to speed 1, pressing key 1
the hood will turn off.
3 ON/OFF lights
4 Speed timing
5 Function state indicator
Speed Timing
The timing of the speed is enabled by pressing key 4, once
the timing expires the hood turns off.
The timing is subdivided as follows:
Speed 1 - 20 minutes (1 fixed, flashing point)
Speed 2 - 15 minutes (2 fixed, flashing point)
Speed 3 - 10 minutes (3 fixed, flashing point)
Intensive Speed - 5 minutes (4 fixed, flashing point)
During time-running, if key 1 or 4 is pressed, the hood turns
off; if key 2 is pressed, the hood stops time-running and sets
to the selected speed.
Grease filter signalling
The grease filter is signalled by the display with number 1
flashing after 80 hours of use.
This means that the grease filter needs to be washed.
The signalling is visible with the hood in ON state.
To eliminate the grease filter signalling, press key “1” for
more than 3”, until it turns off.
The signalling can be eliminated with the hood in ON state.
Carbon filter signalling (only for filtering version)
The carbon filter is signalled by the display with number 2
flashing after 320 hours of use.
This means that the grease filter installed must be replaced.
The signalling is visible with the hood in ON state.
To eliminate the carbon filter signalling, press key “1” for
more than 3”, until it turns off.
The signalling can be eliminated with the hood in ON state.
In case both filters are signalled at the same time, numbers 1
and 2 flash on the display alternately.
The signalling can be reset by carrying out the above-
described procedure twice.
First it resets the grease filter signalling, then the carbon filter
signalling.
In the standard mode the carbon filter signalling is not active.
In case the filtering version hood is used, it is necessary to
enable the carbon filter signalling.
Activation of carbon filter signalling:
Set the hood to OFF and keep keys “2” and “3” pressed
contemporaneously for 3”.
Numbers 1 and 2 flash alternately for 2”.
Deactivation of carbon filter signalling:
Set the hood to OFF and keep keys “2” and “3” pressed
contemporaneously for 3”.
Number 1 flashes for 2”.
Temperature Alarm
The hood is equipped with a temperature sensor which
activates the motor at speed 3 in case the temperature in the
display zone is too high.
The alarm condition is indicated by the display with the letter
"t" flashing.

20
This condition remains as such until the temperature falls
below the alarm threshold.
This mode can be quit by pressing key “2”.
Every 30” the sensor checks the ambient temperature of the
display zone.
Maintenance
Cleaning
Clean using ONLY the cloth dampened with neutral liquid
detergent. DO NOT CLEAN WITH TOOLS OR
INSTRUMENTS. Do not use abrasive products. DO NOT USE
ALCOHOL!
Grease filter
Fig. 11-28
Traps cooking grease particles.
This must be cleaned once a month (or when the filter
saturation indication system – if envisaged on the model in
possession – indicates this necessity) using non aggressive
detergents, either by hand or in the dishwasher, which must
be set to a low temperature and a short cycle.
When washed in a dishwasher, the grease filter may discolor
slightly, but this does not affect its filtering capacity.
To remove the grease filter, pull the spring release handle.
Charcoal filter (filter version only)
Fig. 27
It absorbs unpleasant odors caused by cooking.
The saturation of the charcoal filter occurs after more or less
prolonged use, depending on the type of cooking and the
regularity of cleaning of the grease filter.
In any case it is necessary to replace the cartridge at least
every four mounths (or when the filter saturation indication
system – if envisaged on the model in possession – indicates
this necessity).The charcoal filter may NOT be washed or
regenerated.
Replacing lamps
The hood is equipped with a lighting system based on LED
technology.
The LEDs guarantee an optimum lighting, a duration up to 10
times as long as the traditional lamps and allow to save 90%
electrical energy.
For replacement, contact the technical service.
CUSTOMER ASSISTANCE SERVICE
Before calling the Technical Service Department
In case of failed operation of the product, we suggest you to check the correct insertion of the plug into the socket.
If the cause of the malfunction cannot be identified, turn off the power, do not tamper with it and call the Technical Service
Department.
PRODUCT SERIAL NUMBER. Where can I find it?
It is important you to inform the Assistance Service of your product code and its serial number (a 16 character code which begins
with the number 3); this can be found on the guarantee certificate or on the data plate located on the appliance.
It will help to avoid wasted journeys to technicians, thereby (and most significantly) saving the corresponding callout charges.
La pagina si sta caricando...
La pagina si sta caricando...
La pagina si sta caricando...
La pagina si sta caricando...
-
 1
1
-
 2
2
-
 3
3
-
 4
4
-
 5
5
-
 6
6
-
 7
7
-
 8
8
-
 9
9
-
 10
10
-
 11
11
-
 12
12
-
 13
13
-
 14
14
-
 15
15
-
 16
16
-
 17
17
-
 18
18
-
 19
19
-
 20
20
-
 21
21
-
 22
22
-
 23
23
-
 24
24


ROSIERES RBS93680/1 IN Manuale utente
- Categoria
- Cappe da cucina
- Tipo
- Manuale utente
Documenti correlati
Altri documenti
-
HOTPOINT/ARISTON HAH 65 F LB X Guida utente
-
-
Hotpoint-Ariston HAH 65 F LB X Manuale utente
-
-
HOTPOINT/ARISTON HHBS 6.8F LT W Guida utente
-
-
Whirlpool IHVP 6.4 LL K Guida utente
-
Smeg KBT1200XE Manuale utente
-
Hoover HBS93680/1X Manuale utente
-