Lindy 42797 Manuale utente
- Categoria
- Docking station per HDD / SSD
- Tipo
- Manuale utente

HDD Docking & Clone Station
User Manual English
Benutzerhandbuch Deutsch
Manuel Utilisateur Français
Manuale d’uso Italiano
LINDY No. 42797
www.lindy.com
© LINDY ELECTRONICS LIMITED & LINDY-ELEKTRONIK GMBH - SIXTH EDITION (April 2011)
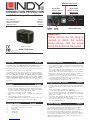
RED LED: Powered on
BLUE LED 1 BLUE LED 2
Source / Master Target / Second
HDD Activity HDD Activity
Important!
Please ensure the DC Plug is
inserted to match the outline
shown above, with the arrow
facing the bottom of the socket
Tested to Comply with FCC Standards
For Home and Office Use!
POWER
switch DUPLICATE button
DC/IN
Socket
Overview English
The LINDY USB & eSATA HDD Docking & Clone Station can be used
as both a dual HDD SATA docking station and a HDD cloning station.
The HDD Cloning function should be used standalone and creates a bit
by bit clone of the source HDD onto the target HDD.
The HDD Docking function can be used when connected via USB 2.0 or
eSATA, allowing easy data transfer between the computer and HDDs.
For correct operation via eSATA, an eSATA II 3Gbps port with full
support for the port multiplier function and the latest available
drivers is mandatory! When transferring large volumes of data it is
recommended that the eSATA connection is used due to the superior
transfer rate.
Features English
• Connects 2 SATA HDD/SSDs to a computer using a single connector
• Accepts 1.8/2.5/3.5” HDD/SSDs with 22 pin SATA combo interface.
For Micro and Slim SATA and IDE drives, adapters and adapter
cables are available from LINDY separately (No.33500).
• Computer connection either via USB or eSATA
• SATA II/1.0a 1.5/3.0Gbps Interface, compatible with SATA 6Gb/s
drives
• USB 2.0 High Speed Interface, Plug and Play
• Compatible with Windows 2000/XP/Server 200x/Vista/7, OS X 9.2+,
Linux up to date versions (drivers included, native support)
Package Contents English
1x SATA Docking & Cloning Station with 3.3V support for SSDs
1x Power Supply 100-240VAC / 5V & 12V DC
1x Power Cord
1x USB cable A/B
1x eSATA cable
1x This Manual
Installation and Use English
• Connect the power supply, as shown on the first page on this manual
• If you want to clone HDDs we suggest not to connect the Docking
Station to your computer
• For normal docking station operation connect the Docking Station to
your computer either by USB or eSATA cable
• Add the HDDs to the docking station and press the power switch ON
• Wait until the drivers are loaded by the operating system – you
should then see the drives in the file manager program
• HDDs may need to be partitioned / formatted using your operating
system disk management utility before you can access them.
• Before unplugging HDDs make sure data transfer processes are
completed and that the activity light is not lit.
Using the CLONE function English
• Install the source and target HDDs into the labelled appropriately bay
• The target HDD must be of equal or larger capacity than the source
HDD
• Make sure target HDD is empty and not partitioned
• Press the power switch ON. The centre LED will light up red
• Press the DUPLICATE button. The centre LED will begin flashing red
• Wait 5 seconds until the flashing stops and press the DUPLICATE
button again to confirm
• The activity LEDs will light up blue during the whole duplication
process. Do not switch OFF or unplug the HDDs!
• When the duplication process is completed all LEDs will go out and
the Clone Station will switch off.
Trouble Shooting English
If you are experiencing problems with eSATA please make sure to use
fully compatible eSATA II ports with full support for the port multiplier
function and having installed the most up to date drivers!
Please also switch on the docking station only after the system has fully
booted up and follow the installation procedure as described above.
In case this does not work your operating system, drivers and computer
may not support the eSATA hot plug function correctly. In this case try to
update your hardware drivers or to boot with the docking station and
HDD connected and switched on.

Einführung Deutsch
Die LINDY USB & eSATA HDD Docking & Clone Station kann sowohl
als Dual HDD Docking Station wie auch als Clone Station zum bitweisen
kopieren (klonen) von Festplatten verwendet werden. Zum klonen sollte
die Docking Station nicht an einen Rechner angeschlossen sein.
Der Anschluss an einen Rechner kann über USB 2.0 oder über eSATA
erfolgen (nicht gleichzeitig verwendbar). Für die korrekte Funktion über
eSATA sind mindestens eSATA II Ports mit voller Unterstützung der
Port Multiplier Funktion und die aktuellsten Treiber unverzichtbar!
Wenn sehr große Datenmengen übertragen werden sollen empfehlen wir
den Anschluss über eSATA.
Eigenschaften Deutsch
• Einfacher Anschluss von Festplatten über nur ein Kabel: Festplatte
einfach nur in Docking Station einstecken
• Für 2,5/3,5“ HDDs/SSDs mit 22 poligem SATA Kombianschluss
• Zum Anschluss von Micro und Slim SATA sowie IDE Devices sind
von LINDY entsprechende Adapter und Adapterkabel verfügbar
(Micro SATA Adapter Art.-Nr. 33500, weitere Angaben und IDE-
Adapterkabel siehe Website)
• Rechneranschluss über USB 2.0 oder eSATA II
• Unterstützt SATA II/1.0a 3,0/1,5GBit/s. und SATA 6GBit/s. Laufwerke
• Interface USB 2.0 High Speed, Plug and Play
• Kompatibel zu Windows 2000/XP/Server 200x/Vista/7, OS X 9.2+,
Linux up to date Versionen (Treiber enthalten, nativer Support)
Lieferumfang Deutsch
1x SATA Docking & Clone Station mit 3.3V Support für SSDs
1x Netzteil 100-240VAC / 5V & 12V DC
1x Stromanschlusskabel
1x USB Kabel A/B
1x eSATA Kabel
1x Diese Anleitung
Installation und Betrieb Deutsch
• Schließen Sie das Netzteil richtig herum an wie auf S.2 gezeigt!
• Wenn Sie Festplatten klonen wollen sollte die Docking Station nicht
an einen Rechner angeschlossen sein, siehe nächster Abschnitt
• Zum normalen Betrieb schließen Sie die Docking Station über das
USB- oder eSATA-Kabel an, dann stecken Sie die Festplatten in die
Docking Station und schalten am POWER Schalter ein
• Warten Sie bis das Betriebssystem die Treiber vollständig geladen
und die Laufwerke angemeldet hat – danach sollten Sie auf die
Laufwerke aus Ihrem Dateimanager zugreifen können
• HDDs müssen partitioniert bzw. formatiert sein, verwenden Sie
hierzu ggf. die Management Utilities Ihres Betriebssystems
• Bevor Sie Festplatten entfernen stellen Sie sicher, dass alle
Dateitransfers komplett abgeschlossen sind
Die CLONE Funktion Deutsch
• Die Clone Funktion erzeugt 1:1 Kopien einer Festplatte
• Die Ziel-Festplatte muss leer und nicht partitioniert ein
• Stecken Sie Quell- und Ziel-Festplatte in die mit Source und Target
bezeichneten Ports der Docking Station ein (nicht verwechseln!)
• Schalten Sie die Docking Station am Einschalter ein. Die rot
leuchtende LED in der Mitte zeigt den Bereitschaftszustand an.
• Drücken Sie den Duplicate Schalter. Die rote LED beginnt zu blinken.
• Warten Sie etwa 5 Sekunden bis sie aufhört zu blinken und drücken
Sie den Duplicate Schalter erneut. Nun erlischt die rote LED und
zwei blaue LEDs zeigen an dass der Clone-Prozess beginnt.
• Die blauen LEDs leuchten während des gesamten Clone-Prozesses
und alle LEDs erlöschen nach Abschluss. Entfernen Sie die
Festplatten zwischenzeitlich nicht!
Fehlerbeseitigung Deutsch
Für den korrekten eSATA Betrieb sind mindestens eSATA II/3Gbps Ports
mit voller Unterstützung der Port Multiplier Funktion und die aktuellsten
Treiber unverzichtbar! Die Docking Station sollte beim Bootvorgang nicht
eingeschaltet sein, beachten Sie die Installationshinweise weiter oben!
Falls das nicht funktioniert unterstützen Ihr Betriebssystem und die
Hardware Treiber eSATA Hot Plug nicht korrekt. Installieren Sie die
aktuellsten Treiber und/oder versuchen Sie mit angeschlossener und
eingeschalteter Dockingstation mit HDD zu booten.
Introduction Français
Le HDD Docking & Clone Station USB & eSATA de LINDY peut être
utilisé en dual (double) disques HDD SATA ou comme station de clonage
(duplication) de votre disque HDD SATA.La fonction clone doit être
utilisée de façon “ standalone” à savoir non connecté à un pc.La
connexion du HDD Docking & Clone Station peut se faire de deux
manières : par le port USB 2 ou par le port eSATA (la transmission de
grands volumes de données est plus rapide par un port eSATA entre le
pc et un disque HDD). Pour une bonne utilisation via eSATA assurez-
vous de l’entière compatibilité avec la version eSATA II / 3Gbit/s de
votre disque et pc + le support de la fonction Port Multiplier.
Descriptif technique Français
• Connecte 2 disques SATA HDD/SSDs à un ordinateur par un simple
connecteur
• Accepte les disques 2.5/3.5” HDD/SSDs avec 22 pin SATA combo
interface.
• Compatible Micro / Slim SATA, IDE; les adaptateurs et câbles sont
disponibles séparément chez votre revendeur LINDY.
(adaptateur Micro SATA N° Art. 33500, pour les adaptateurs IDE,
regardez sur notre site web)
• Connexion au pc par USB ou par eSATA II
• Utilise des disques SATA II/1.0a 1.5/3.0Gbit/s et 6Gbits/s
• Utilise USB 2.0 High Speed, Plug and Play
• Compatible Windows 2000/XP/Server 200x/Vista/7, OS X 9.2+, Linux
Linux (pilotes intégrés nativement)
Contenu du packaging Français
1x Docking Station SATA & sauvegarde, avec support 3.3V pour les
disques SSDs
1x Alimentation 100-240VAC / 5V & 12V DC
1x Câble d’alimentation
1x Câble USB de type A/B
1x Câble eSATA
1x le manuel d’utilisation et d’installation
Installation et utilisation Français
• Connectez l’alimentation come indiqué sur la page 2!
• Si vous souhaitez cloner vos HDDs nous vous suggérons de ne pas
connecter votre Docking Station à votre ordinateur
• Pour une utilisation normale connectez le Docking Station à votre
ordinateur soit par le câble USB ou soit par le câble eSATA
• Connectez vos disques HDDs au docking station et pressez le
bouton d’alimentation sur ON
• Veuillez patienter et vous assurez, lors du démarrage de votre
système d”exploitation que les pilotes (drivers) ont bien été chargé
• Les disques HDDs doivent être partitionnés/formatés avant toute
utilisation.
• Avant de pouvoir déconnecter vos disques HDDs, assurez vous que
le transfert de données s’est bien terminé et que les LEDs
(bleu = activité) sont bien éteints.
Utilisation de la fonction clone Français
• La fonction clonage permet de dupliquer 1:1 vos disques HDDs
• Le disque dur cible doit être vierge et non partitionné
• Le disque cible doit avoir une taille supérieure ou égale à la capacité
du disque source
• Pressez le bouton d’alimentation sur ON. Le LED central s’allumera
de façon continue en rouge
• Pressez le bouton Duplicate. Le LED central commencera une
séquence de flash rouge
• Patientez 5 secondes le temps que les flashs rouges s’arrêtent puis
pressez à nouveau le bouton Duplicate pour confirmer
• Durant l’ensemble du processus de duplication, les LEDs s’allument
de couleur bleu. Attention : durant ce processus ne pas couper
l’alimentation ou ne pas débrancher votre disque HDD !
• La duplication terminée, les leds (lumière bleu) s’éteignent.
Erreur ou problème d’installation Français
Si vous êtes amené à rencontrer des problèmes avec eSATA assurez-
vous de l’entière compatibilité avec la version eSATA II / 3 Gbit/s/Port
Multiplier. Veuillez également s'assurer que vous ayez allumé votre pc et
que le système d’exploitation soient démarrés avant de démarrer le HDD
Docking & Clone Station LINDY puis suivre la procédure d’installation
comme décrite au-dessus. Dans le cas où cela ne fonctionne pas
correctement veuillez mettre à jour vos pilotes (drivers)

Informazioni Italiano
Questa HDD Docking & Clone Station USB & eSATA può essere
utilizzata sia come docking station per due HDD SATA sia come cloning
station per HDD.
La funzione HDD Cloning consente di creare un clone esatto dell’Hard
Disk sorgente, riproducendolo bit dopo bit sul secondo Hard Disk.
Per utilizzarlo come docking station basta collegarlo via USB 2.0 o
eSATA per trasferire dati tra il computer e gli HDD. Se si utilizza la
connessione eSATA è necessario avere una porta eSATA II da
3Gbps con la funzione port multiplier e i driver più aggiornati! Se
trasferite un volume di dati importante vi consigliamo di utilizzare la
connessione eSATA che ha una velocità di trasferimento dati superiore.
Caratteristiche Italiano
• Connette 2 HDD SATA ad un computer da un solo connettore
• Compatibile con HDD/SSD 1.8/2.5/3.5” da 22 pin SATA. Per drive
Micro e Slim SATA e IDE potete utilizzare adattatori acquistabili
separatamente sul sito www.lindy.com (Art. 33500)
• Collegamento al Computer via USB o eSATA
• Supporto SATA II/1.0a 1.5/3.0Gbps, supporta drive SATA da 6Gb/s
• Compatibile con USB 2.0 High Speed, Plug and Play
• Compatibile con Windows 2000/XP/Server 200x/Vista/7, OS X 9.2+,
Linux (driver inclusi, native support)
Contenuto della confezione Italiano
1x Docking & Cloning Station SATA con supporto 3.3V per SSD
1x Alimentatore 100-240VAC / 5V & 12V DC
1x Cavo di alimentazione
1x Cavo USB A/B
1x Cavo eSATA
1x Questo manuale
Installazione e utilizzo Italiano
• Collegare l’alimentatore nella direzione come indicato a pagina 2!
• Se volete clonare un HDD vi consigliamo di non collegare la Docking
Station al computer
• Per utilizzarlo come docking station basta collegarlo al computer
tramite l’interfaccia USB o eSATA
• Inserire gli HDD nella docking station e premere il tasto di
accensione
• Aspettare che i driver vengano caricati dal sistema operativo – potete
vedere i driver nel file manager
• Gli HDD dovranno essere partizionati / formattati prima di potervi
accedere
• Prima di scollegare gli HDD assicuratevi di aver terminato il processo
di trasferimento dati e che il LED activity non sia acceso
Funzione CLONE Italiano
• Inserite gli HDD negli alloggiamenti appropriati
• Assicuratevi che l’HDD target sia vuoto e non partizionato
• L’HDD clonato dovrà essere della stessa capacità o di capacità
superiore rispetto all’HDD da clonare
• Premete il tasto di accensione. Il LED rosso centrale si illuminerà
• Premete il tasto DUPLICATE. Il LED rosso centrale inizierà a
lampeggiare
• Aspettate 5 secondi fino a quando smetterà di lampeggiare e
premete nuovamente il tasto DUPLICATE per conferma
• I LED blu activity si illumineranno durante l’intero processo di
duplicazione. Non spegnete o scollegate gli HDD!
• Al termine del processo di duplicazione i LED blu e la Clone Station
si spegneranno
Risoluzione problemi Italiano
Se incontrate problemi utilizzando l’interfaccia eSATA assicuratevi di
utilizzare porte eSATA II con funzione port multiplier e di aver installato i
driver più aggiornati!
Assicuratevi anche di accendere la docking station solo dopo che il
sistema ha completato il processo di accensione e boot up, quindi
seguite la procedura di installazione come descritto qui sopra. Se questo
non dovesse accadere il vostro sistema operativo potrebbe non
supportare la funzione eSATA hot plug. In questo caso provate ad
aggiornare i driver del vostro hardware oppure provate ad avviare il
computer con la docking station e gli HDD già collegati e accesi.
Technological Change Remark
The provided information is subject to technological development and
change. Therefore product features and design may be adapted and vary
slightly.
CE/FCC & Warranty Statement
FCC Warning
This device complies with part 15 of the FCC Rules. Operation is subject to the following
two conditions:
1. This device may not cause harmful interference, and
2. This device must accept any interference received, including interference that may
cause undesired operation.
CE Statement, EMC Compatibilty
This device complies with EN Standards EN55022 and EN55024 according to the relevant
EC EMC Directive. It must be used with shielded cables only to maintain EMC
compatibility.
Dieses Produkt entspricht den einschlägigen EMV Richtlinien der EU und darf nur
zusammen mit abgeschirmten Kabeln verwendet werden.
LINDY Herstellergarantie
LINDY gewährt für dieses Produkt über die gesetzliche Regelung hinaus eine zweijährige
Herstellergarantie ab Kaufdatum. Die detaillierten Bedingungen dieser Garantie finden Sie
auf der LINDY Website aufgelistet bei den AGBs.
Recycling Information
WEEE (Waste of Electrical and Electronic Equipment),
Recycling of Electronic Products
United Kingdom
In 2006 the European Union introduced regulations (WEEE) for the collection and
recycling of all waste electrical and electronic equipment. It is no longer allowable to
simply throw away electrical and electronic equipment. Instead, these products must enter
the recycling process.
Each individual EU member state has implemented the WEEE regulations into national
law in slightly different ways. Please follow your national law when you want to dispose of
any electrical or electronic products.
More details can be obtained from your national WEEE recycling agency.
Germany
Die Europäische Union hat mit der WEEE Direktive umfassende Regelungen für die
Verschrottung und das Recycling von Elektro- und Elektronikprodukten geschaffen. Diese
wurden im Elektro- und Elektronikgerätegesetz – ElektroG in deutsches Recht umgesetzt.
Dieses Gesetz verbietet das Entsorgen von entsprechenden, auch alten, Elektro- und
Elektronikgeräten über die Hausmülltonne! Diese Geräte müssen den lokalen
Sammelsystemen bzw. örtlichen Sammelstellen zugeführt werden! Dort werden sie
kostenlos entgegen genommen. Die Kosten für den weiteren Recyclingprozess übernimmt
die Gesamtheit der Gerätehersteller.
France
En 2006, l'union Européenne a introduit la nouvelle réglementation (DEEE) pour le
recyclage de tout équipement électrique et électronique.
Chaque Etat membre de l’Union Européenne a mis en application la nouvelle
réglementation DEEE de manières légèrement différentes. Veuillez suivre le décret
d’application correspondant à l’élimination des déchets électriques ou électroniques de
votre pays.
Italy
Nel 2006 l’unione europea ha introdotto regolamentazioni (WEEE) per la raccolta e il
riciclo di apparecchi elettrici ed elettronici. Non è più consentito semplicemente gettare
queste apparecchiature, devono essere riciclate.
Ogni stato membro dell’ EU ha tramutato le direttive WEEE in leggi statali in varie misure.
Fare riferimento alle leggi del proprio Stato quando si dispone di un apparecchio elettrico
o elettronico.
Per ulteriori dettagli fare riferimento alla direttiva WEEE sul riciclaggio del proprio Stato.
LINDY No. 42797
www.lindy.com
6
th
Edition April 2011
-
 1
1
-
 2
2
-
 3
3


Lindy 42797 Manuale utente
- Categoria
- Docking station per HDD / SSD
- Tipo
- Manuale utente
in altre lingue
- English: Lindy 42797 User manual
- français: Lindy 42797 Manuel utilisateur
- Deutsch: Lindy 42797 Benutzerhandbuch