Philips EP0820/00 Manuale utente
- Categoria
- Macchine da caffè
- Tipo
- Manuale utente
Questo manuale è adatto anche per

Fully automatic
espresso machine
1200 series
2200 series
3200 series
Fully automatic
espresso machine
800 series
EN USER MANUAL
DA BRUGERVEJLEDNING
DE BENUTZERHANDBUCH
ES MANUAL DEL USUARIO
FR MODE D’EMPLOI
IT MANUALE UTENTE
NL GEBRUIKSAANWIJZING
NO BRUKERHÅNDBOK
PT MANUAL DO UTILIZADOR
FI KÄYTTÖOPAS
SV ANVÄNDARHANDBOK
EL ΕΓΧΕΙΡΙΔΙΟΧΡΉΣΉΣ
HE שומישךירדמ
www.philips.com/coffee-care
www.philips.com/coee-care


Steam
My Coffee Choice
A2A1 A3 A4
A14
A6 A8A7
A9
A12
A13
A10
A11
A5
A17
A15
A
B1 B2 B3 B4 B5
B8B9
B7B6
B
A19A18
A16
A21 A22 A23

A17A18 A16 A14 A23 A21 A15 A9 A4 A12
C

English
5
English
English
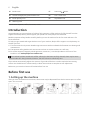
Contents
Machine overview (Fig. A) __________________________________________________________________ 5
Control panel (Fig. B) ______________________________________________________________________ 5
Introduction _____________________________________________________________________________ 6
Before first use ___________________________________________________________________________ 6
Brewing drinks ___________________________________________________________________________ 7
Adjusting machine settings_________________________________________________________________ 9
Removing and inserting the brew group _____________________________________________________ 10
Cleaning and maintenance_________________________________________________________________ 11
AquaClean water filter ____________________________________________________________________ 13
Setting the water hardness ________________________________________________________________ 14
Descaling procedure (30 min.) ______________________________________________________________ 15
Ordering accessories ______________________________________________________________________ 16
Warning icons ____________________________________________________________________________ 16
Troubleshooting __________________________________________________________________________ 17
Technical specifications ____________________________________________________________________ 17
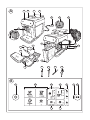
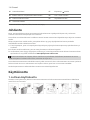
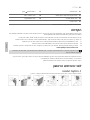
Machine overview (Fig. A)
A1 Control panel A10 Service door
A2 Cup holder A11 Data label with type number
A3 Pre-ground coffee compartment A12 Water tank
A4 Lid of bean hopper A13 Hot water spout
A5 Adjustable coffee spout A14 Coffee grounds container
A6 Mains plug A15 Front panel of coffee grounds container
A7 Grind setting knob A16 Drip tray cover
A8 Coffee bean hopper A17 Drip tray
A9 Brew group A18 'Drip tray full' indicator
Accessories
A19 Grease tube A22 Water hardness test strip
A21 Measuring scoop A23 Classic milk frother
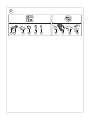
Control panel (Fig. B)
Refer to figure B for an overview of all buttons and icons. Below you find the description.
B1 On/off button B6 Start light

6English
B2 Drink icons* B7 Start/stop button
B3 Aroma strength/pre-ground coffee icon B8 Calc / Clean icon
B4 Drink quantity icon B9 AquaClean icon
B5 Warning icons
* Drink icons: espresso, coffee, hot water, steam
Introduction
Congratulations on your purchase of a Philips fully automatic coffee machine! To fully benefit from the
support that Philips offers, please register your product at www.philips.com/welcome.
Read the separate safety booklet carefully before you use the machine for the first time and save it for
future reference.
To help you get started and to get the best out of your machine, Philips offers support in multiple ways. In
the box you find:
1This user manual with picture-based usage instructions and more detailed information on cleaning and
maintenance.
2The separate safety booklet with instructions on how to use the machine in a safe way.
3For online support (frequently asked questions, movies etc.), scan the QR code on the cover of this
booklet or visit www.philips.com/coffee-care
This machine has been tested with coffee. Although it has been carefully cleaned, there may be some
coffee residues left. We guarantee, however, that the machine is absolutely new.
The machine automatically adjusts the amount of ground coffee that is used to make the best-tasting
coffee. You should brew 5 coffees initially to allow the machine to complete its self-adjustment.
Make sure you rinse the classic milk frother before first use.
Before first use
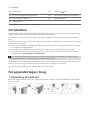
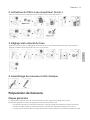
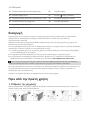
1. Setting up the machine
After you have switched on the machine, some water may be dispensed from the hot water spout or coffee
spout. This is normal.

7
English
English
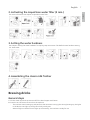
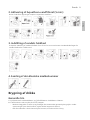
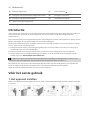
2. Activating the AquaClean water filter (5 min.)
For more information see chapter 'AquaClean water filter'.
3. Setting the water hardness
See chapter 'Setting the water hardness' for step-by-step instructions. The default water hardness setting
is 4: hard water.
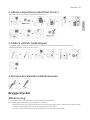
4. Assembling the classic milk frother
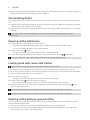
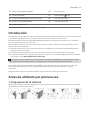
Brewing drinks
General steps
1Fill the water tank with tap water and fill the bean hopper with beans.
2Press the on/off button to switch on the machine.
-The machine starts heating up and performs the automatic rinsing cycle. During heating up, the lights
in the drinks icons light up and go out slowly one by one.
-When all lights in the drink icons light up continuously, the machine is ready for use.

8English
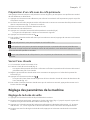
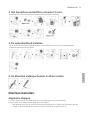
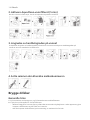
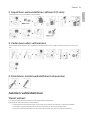
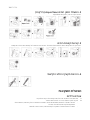
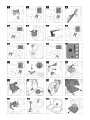
3Place a cup under the coffee dispensing spout. Slide the coffee dispensing spout up or down to adjust its
height to the size of the cup or glass you are using (Fig. 1).
Personalizing drinks
This machine allows you to adjust the settings of a drink to your own preference. After selecting a drink you
can:
1Adjust the aroma strength by tapping the aroma strength icon (Fig. 2). There are 3 strengths, the lowest
is the mildest and the highest is the strongest.
2Adjust the drink quantity by tapping the drink quantity icon (Fig. 3). There are 3 quantities: low, medium
and high.
You can also adjust the coffee temperature to your own preference (see 'Adjusting the coffee
temperature').
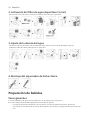
Brewing coffee with beans
1To brew a coffee, tap the drink icon of your choice.
-The aroma strength and quantity lights go on and show the previously selected setting.
-You can now adjust the drink to your preferred taste.
2Press the start/stop button.
-The light in the drink icon flashes while the drink is being dispensed.
3To stop dispensing coffee before the machine is finished, press the start/stop button again.
To brew 2 coffees at the same time, tap the drink icon twice. The 2x light lights up.
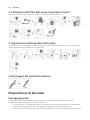
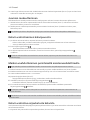
Frothing milk with classic milk frother
Always use milk coming directly from the fridge for the best foam quality.
1Tilt the black silicone handle on the machine to the left and slide the milk frother onto it (Fig. 4).
2Fill a milk jug with with approx. 100 ml milk for cappuccino and approx. 150 ml milk for latte macchiato.
3Insert the milk frother approx. 1 cm into the milk.
4Tap the steam icon (Fig. 5).
-The light in the steam icon goes on and the start light starts pulsing.
5Press the start/stop button to froth the milk (Fig. 6).
-The machine starts heating up, steam is forced into the milk and the milk is frothed.
6When the milk foam in the milk jug has reached the required volume, press the start/stop button
again to stop frothing milk.
Never froth milk longer than 90 seconds. The frothing automatically stops after 90 seconds.
You do not have to move the milk jug during milk frothing to get the best milk froth quality.
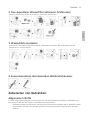
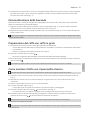
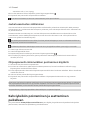
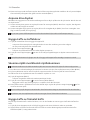
Brewing coffee with pre-ground coffee
You can choose to use pre-ground coffee instead of beans, for example if you prefer a different coffee
variety or decaffeinated coffee.
1Press the on/off button to switch on the machine and wait until it is ready for use.
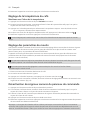
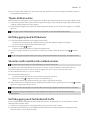
2Open the lid of the pre-ground coffee compartment and pour one leveled measuring scoop of pre-
ground coffee into it (Fig. 7). Then close the lid.

9
English
English
3Place a cup under the coffee dispensing spout.
4Select a single drink.
5Press the aroma strength icon for 3 seconds (Fig. 8).
-The pre-ground coffee light goes on and the start light starts pulsing.
6Press the start/stop button.
7To stop dispensing coffee before the machine is finished, press the start/stop button again.
With pre-ground coffee you can only brew one coffee at a time.
Pre-ground coffee is not a setting that is saved as a previous selected strength setting. Each time you
want to use pre-ground coffee, you need to press the aroma strength icon for 3 seconds.
When you select pre-ground coffee, you cannot select a different aroma strength.
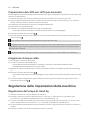
Dispensing hot water
1If attached, remove the milk frother.
2Tap the hot water icon (Fig. 9).
-The drink quantity lights go on and show the previous selected drink setting for hot water.
3Adjust the hot water quantity to your preference by tapping the drink quantity icon (Fig. 3).
4Press the start/stop button.
-The light in the hot water icon flashes and hot water is dispensed from the hot water spout (Fig. 10).
5To stop dispensing hot water before the machine is finished, press the start/stop button again.
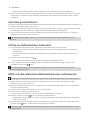
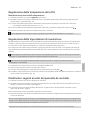
Adjusting machine settings
Adjusting the stand-by time
1Press the on/off button to switch off the machine.
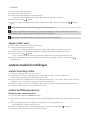
2When the machine is switched off: press and hold the Calc / Clean icon (Fig. 11) until the Calc / Clean
light and the Aroma strength lights go on (Fig. 12).
3Tap the Aroma strength icon to select the required stand-by time: 15, 30, 60 or 180 minutes. Respectively
1, 2, 3 or 4 lights of the Aroma strength icon light up.
4When you have finished setting the stand-by time, press the start/stop button. The machine switches off.
5Press the on/off button to switch on the machine again.
Adjusting the coffee temperature
Machines without temperature icon
1Press the on/off button to switch off the machine.
2When the machine is switched off: press and hold the coffee quantity icon until the lights in this icon go
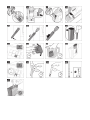
on (Fig. 13).
3Tap the quantity icon to select the required temperature: normal, high or max.
-Respectively 1, 2 or 3 lights are on.
4When you have finished setting the coffee temperature, press the start/stop button.
5Press the on/off button to switch on the machine again.
If you do not switch off the machine yourself, it will switch off automatically after some time.

10 English
Adjusting grinder settings
You can change the coffee strength with the grind setting knob inside the bean container. The lower the
grind setting, the finer the coffee beans are ground and the stronger the coffee. There are 12 different grind
settings you can choose from.
The machine has been set up to get the best taste out of your coffee beans. Therefore we advise you not to
adjust the grind setting until you have brewed 100-150 cups (approx. 1 month of use).
You can only adjust the grind settings when the machine is grinding coffee beans. You need to brew 2 to
3 drinks before you can taste the full difference.
Do not turn the grind setting knob more than one notch at a time to prevent damage to the grinder.
1Place a cup under the coffee dispensing spout.
2Open the lid of the coffee bean hopper.
3Tap the espresso icon and then press the start/stop button.
4When the grinder starts grinding, press down the grind setting knob and turn it to the left or right. (Fig.
14)
Deactivate the beeps of the control panel
1Press the on/off button to switch off the machine.
2When the machine is switched off, tap and hold the coffee icon until the light in the icon goes on. The
start light starts flashing.
3Tap the coffee icon again to deactivate the beeps of the control panel. The light in the coffee icon goes
out.
4Press the start/stop button to confirm your choice.
5Press the on/off button to switch on the machine again. The beeps of the control panel have now been
deactivated.
Note: If the light in the coffee icon does not go on after tapping and holding the icon, this means that the
beeps of the control panel already have been deactivated. To activate them again, tap the icon again and
confirm by pressing the start/stop button.
The beeps in the on/off button and in the start/stop button cannot be deactivated.
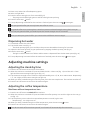
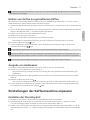
Removing and inserting the brew group
Go to www.philips.com/coffee-care for detailed video instructions on how to remove, insert and clean the
brew group.
Removing the brew group from the machine
1Switch off the machine.
2Remove the water tank and open the service door (Fig. 15).
3Press the PUSH handle (Fig. 16) and pull at the grip of the brew group to remove it from the machine
(Fig. 17).
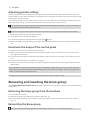
Reinserting the brew group
Before you slide the brew group back into the machine, make sure it is in the correct position.

11
English
English
1Check if the brew group is in the correct position. The arrow on the yellow cylinder on the side of the
brew group has to be aligned with the black arrow and N (Fig. 18).
-If they are not aligned, push down the lever until it is in contact with the base of the brew group (Fig.
19).
2Slide the brew group back into the machine along the guiding rails on the sides (Fig. 20) until it locks into
position with a click (Fig. 21). Do not press the PUSH button.
3Close the service door and place back the water tank.
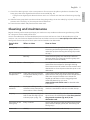
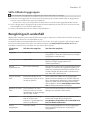
Cleaning and maintenance
Regular cleaning and maintenance keeps your machine in top condition and ensures good-tasting coffee
for a long time with a steady coffee flow.
Consult the table below for a detailed description on when and how to clean all detachable parts of the
machine. You can find more detailed information and video instructions on www.philips.com/coffee-care.
See figure D for an overview of which parts can be cleaned in the dishwasher.
Detachable
parts When to clean How to clean
Brew group Weekly Remove the brew group from the machine (see
'Removing and inserting the brew group'). Rinse it
under the tap (see 'Cleaning the brew group under
the tap').
Monthly Clean the brew group with the Philips coffee oil
remover tablet (see 'Cleaning the brew group with
the coffee oil remover tablets').
Classic milk frother After every use First dispense hot water with the milk frother
attached to the machine for thorough cleaning.
Then remove the milk frother from the machine and
disassemble it. Clean all parts under the tap or in the
dishwasher.
Pre-ground coffee
compartment
Check the pre-ground coffee
compartment weekly to see if
it is clogged.
Unplug the machine and remove the brew group.
Open the lid of the pre-ground coffee compartment
and insert the spoon handle into it. Move the
handle up and down until the clogged ground
coffee falls down (Fig. 22). Go to
www.philips.com/coffee-care for detailed video
instructions.
Coffee grounds
container
Empty the coffee grounds
container when prompted by
the machine. Clean it weekly.
Remove the coffee grounds container while the
machine is switched on and rinse it under the tap.
Drip tray Empty the drip tray daily or as
soon as the red 'drip tray full'
indicator pops up (Fig. 23).
Remove the drip tray (Fig. 24) and rinse it under the
tap or clean it in the dishwasher. The front panel of
the grounds container (fig. A15) is not
dishwasher-safe.
Lubrication of the
brew group
Every 2 months Consult the lubrication table and lubricate the brew
group with the Philips grease (see 'Lubricating the
brew group').
Water tank Weekly Rinse the water tank under the tap.

12 English
Cleaning the brew group
Regular cleaning of the brew group prevents coffee residues from clogging up the internal circuits. Visit
www.philips.com/coffee-care for support videos on how to remove, insert and clean the brew group.
Cleaning the brew group under the tap
1Remove the brew group (see 'Removing and inserting the brew group').
2Rinse the brew group thoroughly with water. Carefully clean the upper filter (Fig. 25) of the brew group.
3Let the brew group air-dry before you place it back. Do not dry the brew group with a cloth to prevent
fibers from collecting inside the brew group.
Cleaning the brew group with the coffee oil remover tablets
Only use Philips coffee oil remover tablets.
1Put a cup under the coffee spout. Fill the water tank with fresh water.
2Put a coffee oil remover tablet in the pre-ground coffee compartment.
3Tap the coffee icon and then press the aroma strength icon for 3 seconds to select the pre-ground coffee
function (Fig. 2).
4Do not add pre-ground coffee. Press the the start/stop button to start the brewing cycle. When half a
cup of water has been brewed, unplug the machine.
5Let the coffee oil remover solution act for at least 15 minutes.
6Insert the mains plug back into a wall socket and switch on the machine to complete the brewing cycle.
Empty the cup.
7Remove the water tank and open the service door. Remove the brew group (see 'Removing the brew
group from the machine') and rinse it thoroughly under the tap.
8Reinsert the brew group and water tank and place a cup under the coffee spout.
9Tap the coffee icon and then press the aroma strength icon for 3 seconds to select the pre-ground coffee
function (Fig. 2). Do not add pre-ground coffee. Press the start/stop button to start the brewing cycle.
Repeat this twice. Empty the cup.
Lubricating the brew group
Lubricate the brew group every 2 months, to ensure that the moving parts continue to move smoothly.
1Apply a thin layer of grease on the piston (grey part) of the brew group (Fig. 26).
2Apply a thin layer of grease around the shaft (grey part) in the bottom of the brew group (Fig. 27).
3Apply a thin layer of grease to the rails on both sides (Fig. 28).
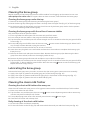
Cleaning the classic milk frother
Cleaning the classic milk frother after every use
Clean the milk frother each time you use it for hygiene reasons and to avoid the build-up of milk residues.
1Place a cup under the milk frother.
2Tap the steam icon and then press the start/stop button to start dispensing steam and to remove any
milk that may be left inside the milk frother.
3To stop dispensing steam after a few seconds, press the start/stop button again.
4Clean the milk frother with a damp cloth.
Daily cleaning of the classic milk frother
1Let the milk frother cool down completely.
2Tilt the milk frother to the left (Fig. 29) and remove both the metal part and the silicone part (Fig. 30).

13
English
English
3Disassemble the two parts (Fig. 31) and rinse them with fresh water or clean them in the dishwasher.
Make sure that the small hole on the metal tube (Fig. 32) is completely clean and not clogged by milk
residues.
4Reassemble the two milk frother parts and reattach the milk frother to the machine.
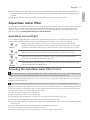
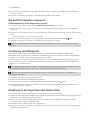
AquaClean water filter
Your machine is AquaClean enabled. You can place the AquaClean water filter in the water tank to preserve
the taste of your coffee. It also diminishes the need for descaling by reducing limescale build-up in your
machine. You can purchase an AquaClean water filter from your local retailer, from authorized service
centers or online at www.philips.com/parts-and-accessories.
AquaClean icon and light
Your machine is equipped with an AquaClean water filter light (Fig. 33) to indicate the status of the filter.
Use the table below to see what actions are required when the light is on or when it is flashing.
When you use the machine for the first time, the AquaClean light starts flashing
orange. This indicates that you can start using the AquaClean water filter. If you do not
activate an AquaClean water filter, the light will switch off automatically after a while.
Once you have installed the filter and activated it with the AquaClean icon, the
AquaClean light turns blue to confirm that the AquaClean water filter is active.
When the filter is exhausted, the AquaClean light starts flashing orange again to
remind you to replace the filter with a new one.
When the orange AquaClean light is off, you can still activate an AquaClean filter, you
will need to descale the machine first.
Activating the AquaClean water filter (5 min.)
The machine does not automatically detect that a filter has been placed in the water tank. Therefore you
need to activate each new AquaClean water filter that you install with the AquaClean icon.
When the orange AquaClean light is off, you can still activate an AquaClean water filter, but you will need
to descale the machine first.
Your machine has to be completely limescale-free before you start to use the AquaClean water filter.
Before activating the AquaClean water filter, it has to be prepared by soaking it in water as described below.
If you don't do this, air might be drawn into the machine instead of water, which makes a lot of noise and
prevents the machine from being able to brew coffee.
1Make sure that the machine is switched on.
2Shake the filter for about 5 seconds (Fig. 34).
3Immerse the filter upside down in a jug with cold water and shake/press it (Fig. 35).
4The filter is now prepared for use and can be inserted into the water tank.
5Insert the filter vertically onto the filter connection in the water tank. Press it down to the lowest possible
point (Fig. 36).
6Fill the water tank with fresh water and place it back into the machine.
7Place a bowl under the hot water spout/milk frother.
8Press the AquaClean icon for 3 seconds (Fig. 37). The start light starts to pulse.

14 English
9Press the start/stop button to start the activation process.
10 Hot water will be dispensed from the hot water spout/milk frother (3 min.).
11 When the activation process is finished, the blue AquaClean light goes on to confirm that the AquaClean
water filter has been activated correctly.
Replacing the AquaClean water filter (5 min.)
After 95 liters of water have flowed through the filter, the filter will cease to work. The AquaClean light
turns orange and starts to flash to remind you to replace the filter. As long as it flashes, you can replace the
filter without having to descale the machine first. If you do not replace the AquaClean water filter, the
orange light will go out eventually. In that case you can still replace the filter but you first need to descale
the machine.
When the orange AquaClean light flashes:
1Take out the old AquaClean water filter.
2Install a new filter and activate it as described in chapter 'Activating the AquaClean water filter (5 min.)'.
Replace the AquaClean water filter at least every 3 months, even if the machine does not yet indicate that
replacement is required.
Deactivating the AquaClean reminder
If you do not want to use Philips AquaClean water filters anymore, you can always deactivate the AquaClean
reminders (AquaClean light flashing orange):
1Press the on/off button to switch off the machine.
2When the machine is switched off, press and hold the AquaClean icon until the light in this icon goes on.
The start light starts flashing.
3Tap the AquaClean icon again to deactivate the reminders. The light in the AquaClean icon goes off.
4Press the start/stop button to confirm your choice.
5Press the on/off button to switch on the machine again. The AquaClean reminders are now deactivated.
Note: The activation of a new AquaClean filter will automatically re-activate the AquaClean reminders.
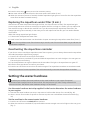
Setting the water hardness
We advise you to adjust the water hardness to the water hardness in your region for optimal
performance and a longer lifetime of the machine. This also prevents you from having to descale the
machine too often. The default water hardness setting is 4: hard water.
Use the water hardness test strip supplied in the box to determine the water hardness
in your region:
1Immerse the water hardness test strip in tap water or hold it under the tap for 1 second (Fig. 38).
2Wait 1 minute. The number of squares on the test strip that turn red indicate the water hardness (Fig.
39).
Set the machine to the correct water hardness:
1Press the on/off button to switch off the machine.
2When the machine is switched off, tap and hold the aroma strength icon until all lights in the icon go on
(Fig. 2).

15
English
English
3Tap the aroma strength icon 1, 2, 3 or 4 times. The number of lights that are on should be the same as
the number of red squares on the test strip (Fig. 40). When there are no red squares on the test strip (so
all squares are green) please select 1 light.
4When you have set the correct water hardness, press the start/stop button.
Since you only set the water hardness once, the aroma strength function is used to select the water
hardness. This does not affect the aroma strength of the drinks you make afterwards.
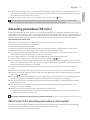
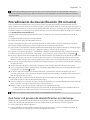
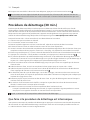
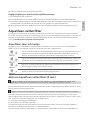
Descaling procedure (30 min.)
Please use Philips descaler only. Under no circumstances should you use a descaler based on sulfuric acid,
hydrochloric acid, sulfamic or acetic acid (vinegar) as this may damage the water circuit in your machine and
not dissolve the limescale properly. Not using the Philips descaler will void your warranty. Failure to descale
the appliance will also void your warranty. You can buy Philips descaling solution in the online shop at
www.philips.com/coffee-care.
When the Calc / Clean light is on continuously, you need to descale the machine.
1Make sure that the machine is switched on.
2If attached remove the milk frother.
3Remove the drip tray and the coffee grounds container, empty them and put them back into place.
4Remove the water tank and empty it. Then remove the AquaClean water filter.
5Pour the whole bottle of Philips descaler in the water tank and then fill it with water up to the Calc /
Clean indication (Fig. 41). Then place it back into the machine.
6Place a large container (1.5 l) under the coffee dispensing spout and the water spout.
7Press the Calc / Clean icon for 3 sec. and then press the start/stop button.
8The first phase of the descaling procedure starts. The descaling procedure lasts approx. 30 minutes and
consists of a descaling cycle and a rinsing cycle. During the descaling cycle the Calc / Clean light flashes to
show that the descaling phase is in progress.
9Let the machine dispense the descaling solution until the display reminds you that the water tank is
empty.
10 Empty the water tank, rinse it and then refill it with fresh water up to the Calc / Clean indication.
11 Empty the container and place it back under the coffee dispensing spout and the water spout. Press the
start/stop button again.
12 The second phase of the descaling cycle, the rinsing phase, starts and lasts 3 minutes. During this phase
the lights on the control panel go on and off to show that the rinsing phase is in progress.
13 Wait until the machine stops dispensing water. The descaling procedure is finished when the machine
stops dispensing water.
14 The machine will now heat up again. When the lights in the drink icons light up continuously, the
machine is ready for use again.
15 Install and activate a new AquaClean water filter in the water tank.
-When the descaling procedure is finished, the AquaClean light flashes for a while to remind you to
install a new AquaClean water filter.
Tip: Using the AquaClean filter reduces the need for descaling!
What to do if the descaling procedure is interrupted
You can exit the descaling procedure by pressing the on/off button on the control panel. If the descaling
procedure is interrupted before it is completely finished, do the following:
1Empty and rinse the water tank thoroughly.

16 English
2Fill the water tank with fresh water up to the Calc / Clean level indication and switch the machine back
on. The machine will heat up and perform an automatic rinsing cycle.
3Before brewing any drinks, perform a manual rinsing cycle. To perform a manual rinsing cycle, first
dispense half a water tank of hot water by repeatedly tapping the hot water icon (Fig. 9) and then brew
2 cups of pre-ground coffee without adding ground coffee.
If the descaling procedure was not completed, the machine will require another descaling procedure as
soon as possible.
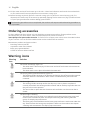
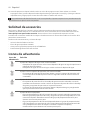
Ordering accessories
To clean and descale the machine, only use the Philips maintenance products. These products can be
purchased from your local retailer, from the authorized service centers or online at
www.philips.com/parts-and-accessories. To find a full list of spare parts online, enter the model number
of your machine. You can find the model number on the inside of the service door.
Maintenance products and type numbers:
-Descaling solution CA6700
-AquaClean water filter CA6903
-Brew group grease HD5061
-Coffee oil remover tablets CA6704
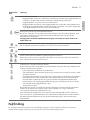
Warning icons
Warning
icon Solution
The 'water tank empty' light is on
-The water tank is almost empty. Fill the water tank with fresh water to the maximum
level indication.
-The water tank is not in place. Place back the water tank.
The 'empty coffee grounds container' light is on
-The coffee grounds container is full. Remove and empty the coffee grounds container
while the machine is switched on. Wait at least 5 seconds before you reinsert the
container.
The alarm light is on
-The coffee grounds container and/or the drip tray is not in place or not placed
correctly. Place back the coffee grounds container and/or the drip tray and make sure
they are in the correct position.
-The service door is open. Remove the water tank and make sure the service door is
closed.
The alarm light is flashing
-The brew group is not in place or not placed correctly. Remove the brew group and
make sure it is locked into place. See chapter 'Removing and inserting the brew
group' for step-by-step instructions.
-The brew group is blocked. Remove the brew group and rinse it with water under the
tap. Then lubricate the brew group and place it back into the machine. See chapter
'Cleaning and maintenance' for step-by-step instructions.

17
English
English
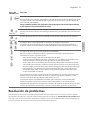
Warning
icon Solution
The alarm light is on and the start light flashes.
Some air is trapped inside the machine. To release the air from the machine, fill the water
tank with water, place a cup under the classic milk frother and press the flashing
start/stop button.
Be careful: small jets of hot water will be dispensed from the classic milk frother to
release the air.
AquaClean light is flashing: place or replace the AquaClean water filter and activate it. See
chapter 'AquaClean water filter' for step-by-step instructions.
Descaling light is on continuously: Descale the machine.
The lights in the drink icons light up and go out one by one.
The machine is heating up and/or trying to release the air that was drawn into the
machine. Wait until all drink lights light up continuously.
The lights of all warning icons are flashing.
Reset the machine by unplugging it and plugging it back in. Before switching the machine
back on, follow these steps:
-Remove the AquaClean water filter from the water tank.
-Place back the water tank. Push it into the machine as far as possible to make sure it is
in the right position.
-Open the lid of the pre-ground coffee compartment and check if this is clogged with
coffee powder. To clean it, insert a spoon handle into the pre-ground coffee
compartment and move the handle up and down until the clogged ground coffee
falls down (Fig. 22). Remove the brew group and remove all ground coffee that has
fallen down. Place back the clean brew group.
-Switch the machine back on.
If the problem is solved the AquaClean filter was not prepared well. Prepare the
AquaClean filter before placing it back by following steps 1 and 2 in chapter 'Activating
the AquaClean water filter (5 min).
If the lights continue to flash, the machine could be overheated. Switch the machine off,
wait 30 minutes and switch it on again. If the lights are still flashing, contact the
Consumer Care Center in your country. For contact details, see the international warranty
leaflet.
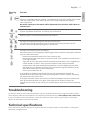
Troubleshooting
To help you solve the most common problems that you could encounter when using the machine, Philips
offers support videos and a complete list of frequently asked questions on www.philips.com/coffee-care.
If you are unable to solve the problem, contact the Consumer Care Center in your country. The contact
details can be found on the warranty leaflet.
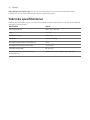
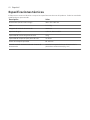
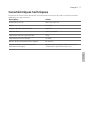
Technical specifications
The manufacturer reserves the right to improve the technical specifications of the product. All the preset
quantities are approximate.

18 English
Description Value
Size (w x h x d) 246 x 372 x 433 mm
Weight 7 - 7.5 kg
Power cord length 1000 mm
Water tank 1.8 litres, removable
Coffee bean hopper capacity 275 g
Coffee grounds container capacity 12 pucks
Adjustable spout height 85-145 mm
Nominal voltage - Power rating - Power supply See data label on inside of service door (fig. A11)

Dansk
19
Dansk
Dansk
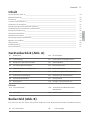
Indhold
Oversigt over maskinen (fig. A) _____________________________________________________________ 19
Kontrolpanel (fig. B) _______________________________________________________________________ 19
Introduktion _____________________________________________________________________________ 20
Før apparatet tages i brug__________________________________________________________________ 20
Brygning af drikke_________________________________________________________________________ 21
Justering af maskinens indstillinger__________________________________________________________ 23
Udtagning og isætning af bryggeenheden ___________________________________________________ 24
Rengøring og vedligeholdelse ______________________________________________________________ 25
AquaClean-vandfilter _____________________________________________________________________ 27
Indstilling af vandets hårdhed ______________________________________________________________ 28
Afkalkning (30 min.)_______________________________________________________________________ 29
Bestilling af tilbehør _______________________________________________________________________ 30
Advarselsikoner___________________________________________________________________________ 30
Fejlfinding _______________________________________________________________________________ 31
Tekniske specifikationer ___________________________________________________________________ 32
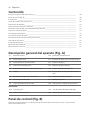
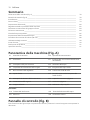
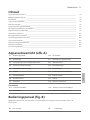
Oversigt over maskinen (fig. A)
A1 Betjeningspanel A10 Låge
A2 Kopholder A11 Dataskilt med typenummer
A3 Formalet kafferum A12 Vandtank
A4 Låg til beholderen til kaffebønner A13 Varmtvandsrør
A5 Justerbart kaffeudløb A14 Kaffegrumsbeholder
A6 Stik A15 Frontpanel til kaffegrumsbeholder
A7 Knap til formalingsindstilling A16 Dæksel til drypbakke
A8 Beholder til kaffebønner A17 Drypbakke
A9 Bryggeenheden A18 Indikator for "Fyldt drypbakke"
Tilbehør
A19 Smøringsrør A22 Teststrimmel til måling af vandets
hårdhedsgrad
A21 Måleske A23 Classic-mælkeskummer
Kontrolpanel (fig. B)
Se figur B for at få en oversigt over alle knapper og ikoner. Du finder beskrivelsen nedenfor.
B1 On/off-knap B6 Startindikator

20 Dansk
B2 Drink-ikoner* B7 Start/stop knap
B3 Ikon for aromastyrke/formalet kaffe B8 Ikon for Calc/Clean (kalk/rengøring)
B4 Ikon for drink-mængde B9 AquaClean-ikon
B5 Advarselsikoner
* Drink-ikoner: espresso, kaffe, varmt vand, damp
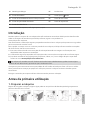
Introduktion
Tillykke med dit køb af en fuldautomatisk Philips-kaffemaskine! For at få fuldt udbytte af den støtte, Philips
tilbyder, skal du registrere dit produkt på www.philips.com/welcome.
Læs den separate garantifolder grundigt, før du bruger maskinen for første gang, og gem den til senere
brug.
For at du kan komme i gang og få mest muligt ud af din maskine, tilbyder Philips support på flere forskellige
måder. I æsken finder du:
1Denne brugervejledning med billedbaserede anvendelsesinstruktioner og mere detaljerede oplysninger
om rengøring og vedligeholdelse.
2Det separate sikkerhedshæfte med vejledning til, hvordan maskinen bruges på en sikker måde.
3Du kan få onlinesupport (ofte stillede spørgsmål, film osv.) ved at scanne QR-koden på dette hæftes
omslag eller gå til www.philips.com/coffee-care
Denne maskine er blevet testet med kaffe. Selvom maskinen er blevet omhyggeligt rengjort, kan der
være kafferester tilbage. Vi kan dog garantere, at maskinen er helt ny.
Maskinen justerer automatisk den mængde formalet kaffe, der bruges til at brygge den mest velsmagende
kaffe. Du skal først brygge 5 kopper kaffe for at lade maskinen udføre sin selvjustering.
Skyl den klassiske mælkeskummer, før den tages i brug første gang.
Før apparatet tages i brug
1. Opsætning af maskinen
Når du har tændt maskinen, bliver der muligvis dispenseret vand fra varmtvandsudløbet eller kaffeudløbet.
Dette er normalt.
La pagina si sta caricando...
La pagina si sta caricando...
La pagina si sta caricando...
La pagina si sta caricando...
La pagina si sta caricando...
La pagina si sta caricando...
La pagina si sta caricando...
La pagina si sta caricando...
La pagina si sta caricando...
La pagina si sta caricando...
La pagina si sta caricando...
La pagina si sta caricando...
La pagina si sta caricando...
La pagina si sta caricando...
La pagina si sta caricando...
La pagina si sta caricando...
La pagina si sta caricando...
La pagina si sta caricando...
La pagina si sta caricando...
La pagina si sta caricando...
La pagina si sta caricando...
La pagina si sta caricando...
La pagina si sta caricando...
La pagina si sta caricando...
La pagina si sta caricando...
La pagina si sta caricando...
La pagina si sta caricando...
La pagina si sta caricando...
La pagina si sta caricando...
La pagina si sta caricando...
La pagina si sta caricando...
La pagina si sta caricando...
La pagina si sta caricando...
La pagina si sta caricando...
La pagina si sta caricando...
La pagina si sta caricando...
La pagina si sta caricando...
La pagina si sta caricando...
La pagina si sta caricando...
La pagina si sta caricando...
La pagina si sta caricando...
La pagina si sta caricando...
La pagina si sta caricando...
La pagina si sta caricando...
La pagina si sta caricando...
La pagina si sta caricando...
La pagina si sta caricando...
La pagina si sta caricando...
La pagina si sta caricando...
La pagina si sta caricando...
La pagina si sta caricando...
La pagina si sta caricando...
La pagina si sta caricando...
La pagina si sta caricando...
La pagina si sta caricando...
La pagina si sta caricando...
La pagina si sta caricando...
La pagina si sta caricando...
La pagina si sta caricando...
La pagina si sta caricando...
La pagina si sta caricando...
La pagina si sta caricando...
La pagina si sta caricando...
La pagina si sta caricando...
La pagina si sta caricando...
La pagina si sta caricando...
La pagina si sta caricando...
La pagina si sta caricando...
La pagina si sta caricando...
La pagina si sta caricando...
La pagina si sta caricando...
La pagina si sta caricando...
La pagina si sta caricando...
La pagina si sta caricando...
La pagina si sta caricando...
La pagina si sta caricando...
La pagina si sta caricando...
La pagina si sta caricando...
La pagina si sta caricando...
La pagina si sta caricando...
La pagina si sta caricando...
La pagina si sta caricando...
La pagina si sta caricando...
La pagina si sta caricando...
La pagina si sta caricando...
La pagina si sta caricando...
La pagina si sta caricando...
La pagina si sta caricando...
La pagina si sta caricando...
La pagina si sta caricando...
La pagina si sta caricando...
La pagina si sta caricando...
La pagina si sta caricando...
La pagina si sta caricando...
La pagina si sta caricando...
La pagina si sta caricando...
La pagina si sta caricando...
La pagina si sta caricando...
La pagina si sta caricando...
La pagina si sta caricando...
La pagina si sta caricando...
La pagina si sta caricando...
La pagina si sta caricando...
La pagina si sta caricando...
La pagina si sta caricando...
La pagina si sta caricando...
La pagina si sta caricando...
La pagina si sta caricando...
La pagina si sta caricando...
La pagina si sta caricando...
La pagina si sta caricando...
La pagina si sta caricando...
La pagina si sta caricando...
La pagina si sta caricando...
La pagina si sta caricando...
La pagina si sta caricando...
La pagina si sta caricando...
La pagina si sta caricando...
La pagina si sta caricando...
La pagina si sta caricando...
La pagina si sta caricando...
La pagina si sta caricando...
La pagina si sta caricando...
La pagina si sta caricando...
La pagina si sta caricando...
La pagina si sta caricando...
La pagina si sta caricando...
La pagina si sta caricando...
La pagina si sta caricando...
La pagina si sta caricando...
La pagina si sta caricando...
La pagina si sta caricando...
La pagina si sta caricando...
La pagina si sta caricando...
La pagina si sta caricando...
La pagina si sta caricando...
La pagina si sta caricando...
La pagina si sta caricando...
La pagina si sta caricando...
La pagina si sta caricando...
La pagina si sta caricando...
La pagina si sta caricando...
La pagina si sta caricando...
La pagina si sta caricando...
La pagina si sta caricando...
La pagina si sta caricando...
La pagina si sta caricando...
La pagina si sta caricando...
La pagina si sta caricando...
La pagina si sta caricando...
La pagina si sta caricando...
La pagina si sta caricando...
La pagina si sta caricando...
La pagina si sta caricando...
La pagina si sta caricando...
La pagina si sta caricando...
La pagina si sta caricando...
La pagina si sta caricando...
La pagina si sta caricando...
La pagina si sta caricando...
La pagina si sta caricando...
La pagina si sta caricando...
La pagina si sta caricando...
La pagina si sta caricando...
La pagina si sta caricando...
La pagina si sta caricando...
La pagina si sta caricando...
La pagina si sta caricando...
La pagina si sta caricando...
La pagina si sta caricando...
La pagina si sta caricando...
La pagina si sta caricando...
La pagina si sta caricando...
La pagina si sta caricando...
La pagina si sta caricando...
La pagina si sta caricando...
La pagina si sta caricando...
La pagina si sta caricando...
La pagina si sta caricando...
La pagina si sta caricando...
La pagina si sta caricando...
La pagina si sta caricando...
-
 1
1
-
 2
2
-
 3
3
-
 4
4
-
 5
5
-
 6
6
-
 7
7
-
 8
8
-
 9
9
-
 10
10
-
 11
11
-
 12
12
-
 13
13
-
 14
14
-
 15
15
-
 16
16
-
 17
17
-
 18
18
-
 19
19
-
 20
20
-
 21
21
-
 22
22
-
 23
23
-
 24
24
-
 25
25
-
 26
26
-
 27
27
-
 28
28
-
 29
29
-
 30
30
-
 31
31
-
 32
32
-
 33
33
-
 34
34
-
 35
35
-
 36
36
-
 37
37
-
 38
38
-
 39
39
-
 40
40
-
 41
41
-
 42
42
-
 43
43
-
 44
44
-
 45
45
-
 46
46
-
 47
47
-
 48
48
-
 49
49
-
 50
50
-
 51
51
-
 52
52
-
 53
53
-
 54
54
-
 55
55
-
 56
56
-
 57
57
-
 58
58
-
 59
59
-
 60
60
-
 61
61
-
 62
62
-
 63
63
-
 64
64
-
 65
65
-
 66
66
-
 67
67
-
 68
68
-
 69
69
-
 70
70
-
 71
71
-
 72
72
-
 73
73
-
 74
74
-
 75
75
-
 76
76
-
 77
77
-
 78
78
-
 79
79
-
 80
80
-
 81
81
-
 82
82
-
 83
83
-
 84
84
-
 85
85
-
 86
86
-
 87
87
-
 88
88
-
 89
89
-
 90
90
-
 91
91
-
 92
92
-
 93
93
-
 94
94
-
 95
95
-
 96
96
-
 97
97
-
 98
98
-
 99
99
-
 100
100
-
 101
101
-
 102
102
-
 103
103
-
 104
104
-
 105
105
-
 106
106
-
 107
107
-
 108
108
-
 109
109
-
 110
110
-
 111
111
-
 112
112
-
 113
113
-
 114
114
-
 115
115
-
 116
116
-
 117
117
-
 118
118
-
 119
119
-
 120
120
-
 121
121
-
 122
122
-
 123
123
-
 124
124
-
 125
125
-
 126
126
-
 127
127
-
 128
128
-
 129
129
-
 130
130
-
 131
131
-
 132
132
-
 133
133
-
 134
134
-
 135
135
-
 136
136
-
 137
137
-
 138
138
-
 139
139
-
 140
140
-
 141
141
-
 142
142
-
 143
143
-
 144
144
-
 145
145
-
 146
146
-
 147
147
-
 148
148
-
 149
149
-
 150
150
-
 151
151
-
 152
152
-
 153
153
-
 154
154
-
 155
155
-
 156
156
-
 157
157
-
 158
158
-
 159
159
-
 160
160
-
 161
161
-
 162
162
-
 163
163
-
 164
164
-
 165
165
-
 166
166
-
 167
167
-
 168
168
-
 169
169
-
 170
170
-
 171
171
-
 172
172
-
 173
173
-
 174
174
-
 175
175
-
 176
176
-
 177
177
-
 178
178
-
 179
179
-
 180
180
-
 181
181
-
 182
182
-
 183
183
-
 184
184
-
 185
185
-
 186
186
-
 187
187
-
 188
188
-
 189
189
-
 190
190
-
 191
191
-
 192
192
-
 193
193
-
 194
194
-
 195
195
-
 196
196
-
 197
197
-
 198
198
-
 199
199
-
 200
200
-
 201
201
-
 202
202


Philips EP0820/00 Manuale utente
- Categoria
- Macchine da caffè
- Tipo
- Manuale utente
- Questo manuale è adatto anche per
in altre lingue
- français: Philips EP0820/00 Manuel utilisateur
- español: Philips EP0820/00 Manual de usuario
- Deutsch: Philips EP0820/00 Benutzerhandbuch
- Nederlands: Philips EP0820/00 Handleiding
- português: Philips EP0820/00 Manual do usuário
- dansk: Philips EP0820/00 Brugermanual
- svenska: Philips EP0820/00 Användarmanual
