Electrolux Ultra Silencer Manuale utente
- Categoria
- Aspirapolvere
- Tipo
- Manuale utente
Questo manuale è adatto anche per

2193042-03.indd 1 12/6/07 4:34:48 PM

English
Thank you for having chosen an Electrolux Ultra Silencer
vacuum cleaner. These Operating Instructions cover all Ultra
Silencer models. This means that with your specific model,
some accessories may not be included. In order to ensure the
best results, always use original Electrolux accessories. They
have been designed especially for your vacuum cleaner.
Accessories and safety precautions 6
Before starting 8
Getting the best results 10
Replacing the dust bag, s-bag® 12
Replacing the motor filter and exhaust filter 12
Cleaning the hose and nozzle 14
Troubleshooting and consumer information 16
Deutsch
Vielen Dank, dass Sie sich für den Electrolux Ultra Silencer-
Staubsauger entschieden haben. Diese Bedienungsanleitung gilt
für alle Ultra Silencer-Modelle. Das bedeutet, dass Ihr Modell
u. U. bestimmte Zubehörteile nicht enthält.Verwenden Sie zur
Gewährleistung optimaler Ergebnisse stets Electrolux-Original-
zubehörteile. Diese wurden speziell für Ihren Staubsauger
entwickelt.
Zubehör und Sicherheitsvorkehrungen 7
Vorbereitungen 9
Bestmögliche Resultate erzielen 11
Austausch des Staubbeutels s-bag® 13
Austauschen des Motorfilters und Abluftfilters 13
Reinigung des Schlauches und der Düsen 15
Fehlersuche undVerbraucherinformationen 17
Français
Merci d'avoir choisi l'aspirateur Ultra Silencer d'Electrolux. Ces
instructions d'utilisation portent sur l'ensemble des modèles
Ultra Silencer. Cela signifie qu'il est possible que certains
accessoires ne soient pas fournis pour le modèle que vous avez
en votre possession. Afin d'obtenir des performances optimales,
toujours utiliser des accessoires originaux Electrolux. Il ont été
spécialement conçus pour votre aspirateur.
Accessoires et précautions de sécurité 7
Avant de commencer 9
Comment obtenir les meilleurs résultats 11
Remplacer le sac à poussière s-bag® 13
Remplacer le filtre moteur et le filtre de ventilation 13
Nettoyer le flexible et les brosses 15
Gestion des pannes et informations consommateur 17
Español
Gracias por elegir una aspiradora Electorolux Ultra Silencer.
Este manual de instrucciones cubre todos los modelos Ultra
Silencer, con lo que puede que su modelo no incluya algunos
accesorios. Para lograr el mejor resultado, utilice única-
mente los accesorios originales de Electrolux que han sido
diseñados específicamente para su aspiradora.
Accesorios y advertencias de seguridad 7
Introducción 9
Logro de los mejores resultados 11
Cambiar la bolsa s-bag® 13
Cambiar el filtro del motor y el del escape 13
Limpieza del tubo elástico y de la boquilla 15
Solución de problemas e información al consumidor 17
Italiano
Grazie per aver scelto un aspirapolvere Electrolux Ultra Silen-
cer. Queste Istruzioni per l'uso sono valide per tutti i modelli
Ultra Silencer. Questo significa che per il modello specifico
acquistato alcuni accessori potrebbero non essere inclusi. Per
ottenere sempre i migliori risultati, utilizzare esclusivamente
accessori originali Elecrolux, pensati in modo specifico per
questo aspirapolvere.
Accessori e norme di sicurezza 18
Prima di cominciare 20
Per ottenere i migliori risultati 22
Sostituzione del sacchetto raccoglipolvere s-bag® 24
Sostituzione del filtro del motore
e del microfiltro antiallergico 24
Pulizia di flessibile e bocchetta 26
Ricerca dei guasti e informazioni per l'utente 28
Português
Obrigado por escolher um aspirador Electrolux Ultra Silencer.
Estas Instruções de Funcionamento cobrem todos os modelos
Ultra Silencer. Isto significa que o seu modelo em particular
pode não incluir alguns dos acessórios. Para obter os melhores
resultados, utilize sempre acessórios Electrolux originais. Estes
foram especialmente concebidos para o seu aspirador.
Acessórios e precauções de segurança 19
Antes de começar 21
Obter os melhores resultados 23
Substituição do saco de pó, s-bag® 25
Substituição do filtro do motor e do filtro de escape 25
Limpeza da mangueira e do bocal 27
Resolução de problemas e informação ao consumidor 29
Nederlands
Dank u dat u gekozen hebt voor een Ultra Silencer van
Electrolux. Deze gebruiksaanwijzingen gelden voor alle Ultra
Silencer-modellen. Dit kan betekenen dat uw model over bepa-
alde accessoires niet beschikt. Gebruik voor de beste resultaten
altijd originele Electrolux-accessoires. Deze zijn speciaal voor
uw stofzuiger ontworpen.
Accessoires en veiligheidsinstructies 19
Voordat u begint 21
Voor het beste resultaat 23
Vervangen van de stofzak/s-bag® 25
Vervangen van motorfilter en uitlaatfilter 25
Reinigen van de zuigbuis en het mondstuk 27
Problemen oplossen en klanteninformatie 29
Dansk
Tak, fordi De har valgt en Electrolux Ultra Silencer-støvsuger.
Denne brugervejledning gælder for alle modeller af Ultra Silen-
cer. Det betyder, at noget tilbehør eventuelt ikke er inkluderet
i den model, De har valgt. Brug altid originalt Electrolux-
tilbehør for at opnå det bedste resultat. Tilbehøret er designet
specielt til Deres støvsuger.
Tilbehør og sikkerhedsforanstaltninger 19
Inden start 21
Hvordan man opnår de bedste resultater 23
Udskiftning af støvsugerposen s-bag® 25
Udskiftning af motorfilter og udsugningsfilter 25
Rengøring af slange og mundstykke 27
Fejlfinding og forbrugerinformation 29
Svenska
Tack för att du valt en Electrolux Ultra Silencer dammsugare.
Den här manualen gäller för alla modeller av Ultra Silencer,
vilket innebär att vissa tillbehör som beskrivs kanske inte ingår
i just din modell.
Tillbehör och säkerhet 30
Innan du börjar 32
För bästa städresultat 34
Byte av dammpåse s-bag® 36
Byte av motor- och utblåsfilter 36
Rengöring av slang och munstycke 38
Felsökning och konsumentinformation 40
3
2193042-03.indd 3 12/6/07 4:34:48 PM

7
11
8
5
10
4a 4b
321
6
9
English
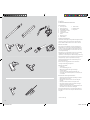
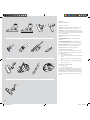
ACCESSORIES AND SAFETY PRECAUTIONS
Accessories
1 Telescopic tube*
2 Extension tube (2)*
3
Hosehandle + hose
4 Carpet/hard floor nozzle
5 Crevice nozzle
6 Combination nozzle/
brush
7 Dust bag, s-bag®
8 Power nozzle*
9 Turbo nozzle*
10 Parquet nozzle*
11 Easy clean*
Safety precautions
Ultra Silencer should only be used by adults and only for normal
vacuuming in a domestic environment. The vacuum cleaner
features double insulation and does not need to be earthed.
Never vacuum:
If the supply cord is damaged, it must be replaced by the
manufacturer, its service agent or similarly qualified person
in order to avoid a hazard. Never use the vacuum cleaner if
the cable is damaged. Damage to the machine’s cable is not
covered by the warranty.
This appliance is not intended for use by persons (including
children) with reduced physical, sensory or mental
capabilities, or lack of experience and knowledge, unless they
have been given supervision or instruction concerning use of
the appliance by a person responsible for their safety.
Children should be supervised to ensure that they do not
play with the appliance.
Please remove the plug from the socket outlet before
cleaning or maintaining the appliance.
Never vacuum:
In wet areas.•
Close to flammable gases etc.•
When housing shows visible signs of damage.•
On sharp objects.•
On hot or cold cinders, lighted cigarette butts, etc.•
On fine dust, for instance from plaster, concrete, flour, hot •
or cold ashes.
Electrical cable precautions:
• Adamagedcableshouldonlybereplacedbyanauthori-
sed Electrolux service centre.
• Damagetothemachine’scableisnotcoveredbythe
warranty.
• Neverpullorliftthevacuumcleanerbythecable.
• Disconnecttheplugfromthemainsbeforecleaningor
maintenance of the vacuum cleaner.
• Regularlycheckthatthecableisnotdamaged.Neveruse
the vacuum cleaner if the cable is damaged.
All servicing and repairs must be carried out by an authorised
Electrolux service centre. Be sure to keep the vacuum cleaner in
a dry place.
*Certain models only
6
2193042-03.indd 6 4/23/08 8:36:59 AM

6b
11b
87
109
4 5
11a
6a
3
1a
A
A
B
B
C
D
2b1
English
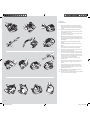
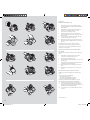
BEFORE STARTING
1a Ensurethatthemachine’scarryinghandleisfolded
down.Thenopenthefrontcoveronthemachineand
check that the dust bag, s-bag®, and the motor filter are
inplace.
1b Foldupthecarryinghandleuntilitclicksintoplace.
Then open the back lid on the machine and check that
theexhaustfilterisinplace.
2 Insert the hose until the catches click to engage (press
thecatchestoreleasethehose).
3 Attach the extension tubes or telescopic tube (certain
models only) to the hose handle and hard floor nozzle
bypushingandtwistingtogether.(Twistandpullapart
todismantle.)
4
Insert the hose into the hose handle until the
catches
click to engage (press the catches to release the
hose).
5 Extendtheelectriccableandconnectittothemains.
Thevacuumcleanerisfittedwithacablewinder.
6a Press the foot pedal to rewind the cable (take hold of
theplugtopreventitstrikingyou).
6b Press the small button on the pedal to activate Autore-
verse(oncertainmodelsonly).Thelengthofthecable
willnowbecontinuallyadjustedtorequirements.Press
thewholepedaltode-activateAutoreverse.Thecable
isnowfixed,asonanormalcablewinder.
7 Press the On/Off button with the foot to start the
vacuumcleaner.
8 Adjustsuctionpowerusingthesuctioncontrolonthe
vacuum cleaner or the suction control on the hose
handle.
9 A practical parking position (and at the same time a
backsavingfeature)whenyoupauseduringcleaning.
10 A parking position which makes it easy to carry and
storethevacuumcleaner.
11a Whenyouwanttocarrythevacuumcleaner,liftthe
carryinghandleuntilitclicksintoplace.
11b You can also carry the vacuum cleaner using the handle
onthelowerfrontedgeofthemachine.
8
2193042-03.indd 8 12/6/07 4:34:51 PM

8765
4321
13
1211109
English
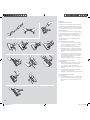
GETTING THE BEST RESULTS
Use the nozzles as follows:
Carpets: Use the carpet/hard floor nozzle with the lever in
position(1).Reducesuctionpowerforsmallcarpets.
Hard floors: Use the carpet/hard floor nozzle with the lever
inposition(2).Ifyouhaveacarpet/hardfloornozzlewithtwo
pedals – press the pedal on the right (3) to vacuum up animal
hair,etc.moreeffectively.
Wooden floors: Use the parquet nozzle (certain models
only,4).
Upholstered furniture: Use the combination nozzle as
shownin(5).
Curtains, lightweight fabrics, etc.: Use the combination
nozzleasshownin(5).Reducesuctionpowerifnecessary.
Frames, bookshelves, etc.: Use the combination nozzle as
shownin(6)orEasyclean(7–certainmodelsonly).
Crevices, corners, etc.: Usethecrevicenozzle(8).
Using the power nozzle
(Requires an Ultra Silencer equipped with a power socket. The
power nozzle is delivered only with certain models, or could be
bought as an accessory.)
9 Attachthenozzletothetube.
10 Connect the power nozzle to the socket on the vacuum
cleaner.
11 Use the clips to secure the cable along the tubes and
hose.
12 The power nozzle starts operating when the vacuum
cleanerisswitchedon.
Using the turbo nozzle
(certain models only)
13 Attachthenozzletothetube.
Note: Do not use the power or turbo nozzle on skin rugs, rugs
with long fringes or a pile depth exceeding 15 mm. To avoid
damaging the carpet, do not keep the nozzle stationary whilst
the brush is rotating. Do not pass the nozzle across electric cab-
les, and be sure to switch off the vacuum cleaner immediately
after use.
10
2193042-03.indd 10 12/6/07 4:34:53 PM

11
76
8
9
3121 14
5a
10
5b4
321
A
B
English
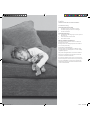
REPLACING THE DUST BAG, S-bag®
1 The dust bag, s-bag® must be replaced latest when
theindicatorwindowiscompletelyred.Readwiththe
nozzleliftedup.
2 Folddownthecarryinghandle.Pressthecatcheson
thehose,removethehoseandopenthecover.
3 Liftouttheinsertholdingthes-bag®.
4 Pull the cardboard to remove the s-bag® from the
insert.Thisautomaticallysealsthes-bag®andprevents
dustleakingout.
5 a Insert a new s-bag® by pushing the cardboard right
intotheendofthegrooveintheinsert.
5 b Attach the insert by placing it on the back pegs in the
bagcompartment.Thenfolddowntheinsertandclose
thecover.
Note. Replace the s-bag® even if it is not full (it could be
obstructed). Also replace after vacuuming carpet-cleaning
powder. Be sure to use only an original Electrolux dust bags,
s-bag® Classic or s-bag® Clinic.
Replacement of the motor filter (Ref.
No. EF54)
should be done with every 5th replacement of the dust bag,
s-bag®
6 Folddownthecarryinghandle.Pressthecatches,
removethehoseandopenthefrontcover.
7 Liftouttheinsertholdingthes-bag®.
8 Pull the motor filter holder upwards until it comes away
fromthegroove.
9 Carefully pull the old, dirty filter out of the filter holder
andreplaceitwithanewmotorfilter.
10 Reattach the filter holder containing the new motor
filter.
11 Replace the insert holding the s-bag® and then close
thecover.
Replacement of the exhaust filter
should be done with every 5th replacement of the dust bag,
s-bag®
Therearethreetypesofexhaustfilter:
• Microfilter*(Ref.No.EF17)
• HepaH12*nonwashable(Ref.No.EFH12)
• HepaH12*washable(Ref.No.EFH12W)
The filters must always be replaced with new ones and
cannot be washed (except the Hepa H12* washable)
12 Foldupthecarryinghandleuntilitclicksintoplace.
13 Place your thumbs on the back edge of the lid and
then open the lid by pulling the handle backwards and
upwardswithyourindex/middlefinger.
14 Liftoutthefilter.Insertanewfilterandreplacethelid
asshown.
*Certain models only
12
2193042-03.indd 12 12/6/07 4:34:55 PM

2111
13
0198
321
7654
English
CLEANING THE HOSE AND NOZZLE
The vacuum cleaner stops automatically if the nozzle, tube,
hoseorfiltersands-bag®becomesblocked.Insuchcases,
disconnectfrommainsandallowtocoolfor20-30minutes.
Clearblockageand/orreplacefiltersands-bag®andrestart.
Tubes and hoses
1Useacleaningstriporsimilartoclearthetubesandhose.
2 It may also be possible to remove the obstruction in the
hosebysqueezingit.However,becarefulincasethe
obstruction is caused by glass or needles caught inside
thehose.
Note: The warranty does not cover any damage to the hose
caused by cleaning it.
Cleaning the floor nozzle
3 To avoid deterioration of suction power, frequently
cleanthecarpet/hardfloornozzle.Theeasiestwayto
cleanitisbyusingthehosehandle.
4 Presseachwheel-hubanddrawawaythewheels.
5 Removedust-balls,hairorotherobjectsthatmaybe
entangled.Usethecrevicenozzletocleanthewheel
axles.Replacethewheelsbypressingthemontothe
axles.
6 Largerobjectscanbeaccessedbyremovingthecon-
nection hose (press the small catches located on each
side and simultaneously draw the connection tube
outwardsinanuprightposition).
7 Removetheobject(s)andreplacetheconnectionhose.
Cleaning the power nozzle
(certain models only)
8 Disconnect from the mains, and remove entangled
threadsetc.bysnippingthemawaywithscissors.
9 Useascrewdrivertoremovethenozzlecover.
10 Remove the brush cylinder and bearings, then clean as
necessary.
11 To clean the wheels, gently lever them from their
mountingsandcleanasnecessary.
12 Replacethecoverandmakesureitissecurelyfastened.
Cleaning the turbo nozzle
(certain models only)
13 Disconnect the nozzle from the vacuum cleaner tube
andremoveentangledthreads,etc.bysnippingthem
awaywithscissors.Usethehosehandletocleanthe
nozzle.
14
2193042-03.indd 14 12/6/07 4:34:57 PM

English
TROUBLESHOOTING AND CONSUMER INFORMATION
Troubleshooting
The vacuum cleaner does not start
1 Checkthatthecableisconnectedtothemains.
2 Checkthattheplugandcablearenotdamaged.
3 Checkforablownfuse.
The vacuum cleaner stops
1C heckwhetherthedustbag,s-bag®isfull.Ifso,replaceit
withanewone.
2 Is the nozzle, tube or hose blocked?
3 Are the filters blocked?
Water has entered the vacuum cleaner
It will be necessary to replace the motor at an authorised
Electroluxservicecentre.
Damage to the motor caused by the penetration of water is
notcoveredbythewarranty.
Consumer information
Electrolux decline all responsibility for all damages arising
from any improper use of the appliance or in cases of tampe-
ringwiththeappliance.
Thisproductisdesignedwiththeenvironmentinmind.All
plasticpartsaremarkedforrecyclingpurposes.Fordetails
seeourwebsite:www.electrolux.com
If you have any comments on the cleaner or the Instructions
forUsebookletpleasee-mailusat:[email protected]
If you can´t find dustbags or accessories to your Electrolux
vacuumcleaner,pleasevisitourwebsiteatwww.electrolux.
co.ukorcall08706055055.
2193042-03.indd 16 12/6/07 4:34:58 PM

90
English
The symbol on the product or on its packag-
ing indicates that this product may not be treated as
householdwaste.Insteaditshallbehandedovertothe
applicable collection point for the recycling of electrical
andelectronicequipment.Byensuringthisproductis
disposed of correctly, you will help prevent potential nega-
tive consequences for the environment and human health,
which could otherwise be caused by inappropriate waste
handlingofthisproduct.Formoredetailedinformation
about recycling of this product, please contact your local
city office, your household waste disposal service or the
shopwhereyoupurchasedtheproduct.
Français
Le symbole sur le produit ou son emballage indique
queceproduitnepeutêtretraitécommedéchetménager.
Il doit plutôt être remis au point de ramassage concerné,
se chargeant du recyclage du matériel électrique et
électronique.Envousassurantqueceproduitestéliminé
correctement, vous favorisez la prévention des conséquen-
cesnégativespourl’environnementetlasantéhumaine
qui,sinon,seraientlerésultatd’untraitementinapproprié
desdéchetsdeceproduit.Pourobtenirplusdedétails
sur le recyclage de ce produit, veuillez prendre contact
avec le bureau municipal de votre région, votre service
d’éliminationdesdéchetsménagersoulemagasinoùvous
avezachetéleproduit.
Deutsch
Das Symbol auf dem Produkt oder seiner Ver-
packung weist darauf hin, dass dieses Produkt nicht als
normaler Haushaltsabfall zu behandeln ist, sondern an
einem Sammelpunkt für das Recycling von elektrischen
undelektronischenGerätenabgegebenwerdenmuss.
Durch Ihren Beitrag zum korrekten Entsorgen dieses
Produkts schützen Sie die Umwelt und die Gesundheit
IhrerMitmenschen.UmweltundGesundheitwerden
durchfalschesEntsorgengefährdet.WeitereInformationen
über das Recycling dieses Produkts erhalten Sie von Ihrem
Rathaus, Ihrer Müllabfuhr oder dem Geschäft, in dem Sie
dasProduktgekaufthaben.
Português
O símbolo no produto ou na embalagem indica que
esteprodutonãopodesertratadocomolixodoméstico.
Em vez disso, deve ser entregue ao centro de recolha
selectiva para a reciclagem de equipamento eléctrico e
electrónico.Aogarantirumaeliminaçãoadequadadeste
produto,iráajudaraevitareventuaisconsequênciasnega-
tivas para o meio ambiente e para a saúde pública, que, de
outra forma, poderiam ser provocadas por um tratamento
incorrectodoproduto.Paraobterinformaçõesmaispor-
menorizadas sobre a reciclagem deste produto, contacte
os serviços municipalizados locais, o centro de recolha
selectivadasuaáreaderesidênciaouoestabelecimento
ondeadquiriuoproduto.
Español
El símbolo enelproductooensuembalajeindica
que este producto no se puede tratar como desperdicios
normalesdelhogar.Esteproductosedebeentregaral
punto de recolección de equipos eléctricos y electrónicos
parareciclaje.Alasegurarsedequeesteproductose
desechecorrectamente,ustedayudaráaevitarposibles
consecuencias negativas para el ambiente y la salud
pública, lo cual podría ocurrir si este producto no se
manipuladeformaadecuada.Paraobtenerinformación
másdetalladasobreelreciclajedeesteproducto,póngase
en contacto con la administración de su ciudad, con su
servicio de desechos del hogar o con la tienda donde
compróelproducto.
Italiano
Il simbolo sul prodotto o sulla confezione indica che
il prodotto non deve essere considerato come un normale
rifiuto domestico, ma deve essere portato nel punto di
raccolta appropriato per il riciclaggio di apparecchiature
elettricheedelettroniche.Provvedendoasmaltirequesto
prodotto in modo appropriato, si contribuisce a evitare
potenzialiconseguenzenegativeperl’ambienteeper
la salute, che potrebbero derivare da uno smaltimento
inadeguatodelprodotto.Perinformazionipiùdettagliate
sulriciclaggiodiquestoprodotto,contattarel’ufficioco-
munale, il servizio locale di smaltimento rifiuti o il negozio
incuièstatoacquistatoilprodotto.
2193042-03.indd 90 12/6/07 4:36:02 PM

2193042-03Sharemoreofourthinkingatwww.electrolux.com
2193042-03.indd 96 12/6/07 4:36:06 PM
-
 1
1
-
 2
2
-
 3
3
-
 4
4
-
 5
5
-
 6
6
-
 7
7
-
 8
8
-
 9
9
-
 10
10


Electrolux Ultra Silencer Manuale utente
- Categoria
- Aspirapolvere
- Tipo
- Manuale utente
- Questo manuale è adatto anche per