Rancilio KRYO 65 Manuale utente
- Categoria
- Accessori per la preparazione del caffè
- Tipo
- Manuale utente
Questo manuale è adatto anche per

User Manual
KRYO 65 OD
Mode d’emploi
Bedienungsanleitung
Manuale d’uso
Manual do utilizador
Manual de instrucciones
KRYO 65

3
Dear customer
First of all, we thank you for choosing RANCILIO.
We are confident that the product you have
purchased will meet all your expectations. The
product you are about to use is the outcome of
extensive research and development. It is the most
efficient, user-friendly and well designed machine of
its kind.
This manual outlines the correct use and
maintenance and will help you to get the best results
from your machine. We hope you will find our
explanations clear and we may continue to earn your
business in the future.
Verehrte Kundin, verehrter Kunde
Wir danken Ihnen, dass Sie sich für RANCILIO
entschieden haben.
Wir sind überzeugt, dass das Produkt, das Sie erworben
haben, alle Ihre Erwartungen erfüllen wird. Dieses
Produkt ist das Ergebnis sorgfältiger Forschung und
Entwicklung. Wir legen besonderen Wert auf
Leistungsfähigkeit, Benutzerfreundlichkeit und Design.
Die Bedienungsanleitung wird Ihnen helfen Ihre
Kaffeemaschine ordnungsgemäss zu bedienen, zu
verstehen und das beste Ergebnis zu erzielen. Wir
hoffen, unsere Erklärungen sind klar und verständlich
und wir dürfen Sie auch in Zukunft zu unseren
geschätzten Kunden zahlen.
Chère cliente, cher client
Tout d’abord merci d’avoir choisi RANCILIO.
Nous avons l’assurance que le produit que vous venez
d’acheter vous donnera entière satisfaction, tout
comme tous nos autres produits sont conçus pour le
faire. Le produit que vous allez utiliser est
l’aboutissement de minutieux travaux de recherche et
d’essais. Nous garantit que l’équipement fourni offre
une fonctionnalité, une sécurité et une satisfaction
maximales par rapport aux produits actuellement sur le
marché, à la fois en termes de design et de
performances.
Ce livret d’instructions qui explique comment utiliser et
entretenir correctement votre produit vous aidera à
obtenir les meilleurs résultats d’utilisation possibles.
Nous espérons que nos explications sont faciles à
comprendre et que vous resterez l’un de nos fidèles
clients à l’avenir.
Gentile cliente
Grazie per averci accordato la Sua fiducia.
Siamo sicuri che il prodotto che Lei ha acquistato
risponderà in pieno alle Sue aspettative. Il prodotto
che Lei si accinge ad usare è il risultato di
approfonditi studi e meticolose sperimentazioni ed è
quanto di più funzionale, sicuro ed apprezzabile,
anche sotto il profilo del design, si possa trovare sul
mercato.
Questo manuale per il corretto uso e manutenzione
La aiuterà a sfruttare al meglio la sua macchina.
Sperando che trovi chiare le nostre spiegazioni, ci
auguriamo di poterLa sempre annoverare tra i nostri
clienti.
Estimado cliente
Ante todo, queremos agradecerle por haber elegido
RANCILIO.
Estamos seguros de que el producto que ha adquirido
cumplirá con todas sus expectativas. El producto que
está a punto de utilizar es el resultado de extensas
actividades de investigación y desarrollo. Es la que
ofrece el mejor rendimiento, es la más fácil de usar y la
mejor diseñada de su clase.
Este manual de instrucciones, en el que se explica la
manera correcta de utilizar y mantener su producto, le
ayudara a obtener los mejores resultados. Esperamos
que nuestras explicaciones le parezcan claras y fáciles
de comprender y que siga siendo en el futuro uno de
nuestros fieles clientes.
Caro cliente
Em primeiro lugar, obrigado por seleccionar a RANCILIO.
Estamos confiantes de que o produto que adquiriu ira
dar resposta a todas as suas expectativas. O produto
que esta prestes a utilizar e o resultado de uma
investigacao e desenvolvimento extensivos. Trata-se da
máquina mais eficiente, facil de utilizar e bem
concebida do seu genero.
Este manual descreve a utilizacao e manutencao
correctas e ira ajuda-lo a obter os melhores resultados
da sua máquina. Esperamos que considere as nossas
explicacoes claras e que possamos continuar a contar
com a sua empresa no futuro.

6
Fig. 1a FIg. 1b
Fig. 2
1 4
Mod. 2
F.n. 5
3 ~
P
Pin 6
8
9
10
11 Hz
12 13
Fig. 3

7
Fig. 4

8
ENGLISH
KRYO 65/ST
KRYO 65/AT
Coffee doser grinder
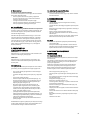
1. DESCRIPTION
KRYO 65/ST
Manual-switch operated coffee grinder
KRYO 65/AT
Automatic coffee grinder with optional manual-switch operation
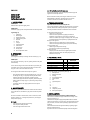
Legend (Fig. 1a)
1. Hopper lid
2. Bean hopper
3. Adjustment knob
4. Hopper locking slide
5. Doser lid
6. Doser
7. Tamper
8. Filter holder fork
9. Main switch
10. Grounds tray
11. Dosing lever
12. Doser adjustment knob
2. OPERATION
KRYO 65/ST
Grind coffee as needed by switching the main switch (Fig. 1-9)
KRYO 65/AT
Press the main switch (Fig. 1-9). The grinding will then take place
automatically.
You are advised to grind the amount of coffee required for your
immediate needs, since leaving ground coffee unused for too
long can result in loss of freshness and flavor.
Do not regrind coffee which has already been ground.
- Place the filter holder in the filter holder fork (Fig. 1-8), pull
the dosing lever (Fig. 1a-11) firmly towards you and release,
repeating the action for each dose of coffee required.
- Level out the coffee contained in the filter, position the filter
holder under the tamper (Fig. 1a-7) and raise gently to tamp
the coffee;
- Check that there are no coffee grounds on the rim of the
filter holder.
3. MAINTENANCE
Maintenance operations should be carried out with the machine
turned off and cold, and with the plug removed from the power
source.
Do not use metallic or abrasive tools, such as steel wool, metal
brushes, needles, etc., or detergents (alcohol etc.), but simply a
damp cloth or sponge.
3.1. Daily
- Clean the housing and the grounds tray.
- Clean the filter holder fork area.
- Clean the coffee outlet with a brush.
3.2. Periodically or after intense use
Empty the bean hopper, and clean it of oily residues left by the
coffee with a mild soap solution.
Waste materials used for processing or maintenance, if not
biodegradable or pollutant, should be placed in separate
containers and taken to suitable collection centers.
4. TROUBLESHOOTING
Inspection that can be carried out by the user
For any type of problem or difficulty not specified here, unplug the
machine, refrain from making attempts to repair or inspect the
machine yourself and contact an authorized service technician.
A) The machine does not turn on:
- Check that it is plugged in;
- Check that there is power being supply and that the
automatic circuit breaker or main switch is turned on;
- Check the condition of the plug and supply cable, and if they
are damaged have them replaced by a qualified technician.
B) Coffee is not ground:
- Check that there are coffee beans in the bean hopper;
- Check that the hopper locking slide is open (lever inwards)
C) Long grinding time
- Check the grind adjustment setting;
- Have the burrs replaced by qualified staff.
D) Dose size varies:
- Carefully clean the doser and the coffee dispenser outlet
- Check that the dosing lever can move freely and is not
obstructed in any way.
5. TECHNICAL DATA
Versions
KRYO 65/ST
KRYO 65/AT
Machine size
mm
L.220 - D.385 - H.575
Net weight of machine
kg
13
Production
kg/h
7-9
Bean hopper capacity
g
1300
Dose adjustment
g
5-10
Identification details, specifications plate (Fig. 3)
1. Manufacturer
2. Model and version
3. Voltage
4. EC Conformity mark
5. Serial number
6. Pin
7. Total absorption
8. - -
9. - -
10. - -
11. Frequency
12. Conformity marks
13. Date of manufacture
6. INSTALLATION
Installation must be performed by a qualified technician.
The machine is delivered ready for installation according to the
data on the plate Fig. 3.
Check that the main power supply is compatible with the machine.
Check that the machine, the accessories, the supply cable and the
plug are intact, and in the event of damage, inform the retailer
promptly.
The machines have been designed and built for grinding coffee
beans for professional use.
Any other use is to be considered improper and thus dangerous.

9
6.1 Motor rotation
To be carried out by a qualified technician.
For machines with 3-phase electrical supply, the correct rotation
of the motor should be checked.
- Start the grinder and check that grinding is performed
correctly. If this fails to occur, it means that the motor is
rotating in the wrong direction.
- Turn off the machine and the main power supply.
- Invert the two phase conductors, reassemble the machine
and try to perform the grinding operation again.
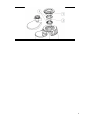
6.2. Burr calibration
To be performed during installation and after burr replacement
The dosing grinders are tested with a random grind setting, and
will need to be readjusted. This operation should be carried out
with the bean hopper empty.
Hold down the adjustment unlock button (Fig. 2-1) and at the
same time slowly turn the adjustment knob (Fig. 2-3) counter-
clockwise until the burrs brush against each other (when they
come into contact, the sound of metallic friction can be heard),
turn the numbered ring (Fig. 2-2) so that the starting point 0 is
frontal; move the adjustment knob (Fig. 2-3) in the opposite
direction (clockwise).
7. FIRST START-UP
7.1. Description of commands
KRYO 65/ST
Main switch (Fig. 1-9) with two positions; when switched on, the
machine is on and coffee grinding begins.
KRYO 65/AT
Main switch (Fig. 1-9) with two positions; in position (I), the
machine is on and will automatically shut-off when the doser
has been filled.
7.2. Grind setting
The coffee grinder is tested by the manufacturer with a medium
grind setting. The setting depends on the type of coffee used.
- Place a small quantity of coffee beans in the bean hopper
and close the lid;
- Check that the hopper locking slide is open (Fig. 1-4) pushed
in)
- Grind a small quantity of coffee:
- Position the filter holder on the filter holder fork (Fig. 1-8),
then pull the dosing lever (Fig. 1a-11) to dispense a dose of
ground coffee (this operation should be performed after
adjusting the grind setting See 7.3);
- Brew some coffee, checking the dispensing time, the
appearance of the coffee and its taste, considering that
excessively course grounds produce light coloured coffee
without a crema, while grounds that are too fine result in
strong, dark coffee without a crema.
- If the coffee does not respond to your desired requirements,
adjust grind fineness by pressing the ring block button (Fig. 2-1)
and turning the regulation knob (Fig. 2-3) counter-clockwise for
a finer grind or clockwise for a coarser grind.
- Repeat the operation until you have obtained the desired
quality of coffee.
Recalibration of the grind is typically only necessary after a change
in coffee. Minor adjustments may be required throughout use to
accommodate for changes in freshness of the beans.
7.3. Adjusting the ground coffee dose
The doses can be adjusted as follows:
- Turn the knob below the doser (Fig. 1a-12) counter-clockwise
to increase the dose.
8. DECOMMISSIONING
8.1. Temporary
- Close the hopper and grind the coffee beans remaining
between the burrs.
- Turn off the switch and unplug the appliance from the power
source;
- Remove the ground coffee and any coffee beans remaining in
the bean hopper.
- Perform cleaning and maintenance operations;
- Coil up the supply cable and attach it to the machine using
adhesive tape;
- Cover the machine and place it in a dry place, sheltered from
bad weather and to which you have exclusive access.
8.2. Final
In addition to the operations of temporary decommissioning:
- Cut the power cable,
- Pack up the machine using cardboard or similar materials
and hand it over to specialized operators (authorized waste
disposal collectors or dealers in second-hand goods)
9. INFORMATION FOR SERVICE
TECHNICIANS
9.1. Replacement of burrs
Although manufactured in tempered steel, the burrs are subject
to wear and tear.
Their lifespan is influenced by the amount of coffee ground, its
hardness and degree of roasting, as well as the quantity and
purity of the coffee beans.
Small stones and various impurities have a marked abrasive
action which significantly reduces the lifespan of the burrs.
When grinding time becomes noticeably longer or the grind
becomes irregular, the burrs should be replaced as follows:
- Pull the hopper locking slide (Fig. 1–4);
- Start the grinder to grind the coffee remaining between the
burrs;
- Once grinding has finished, turn off the machine and unplug
from the power source;
- Empty the bean hopper (Fig. 1–2);
- Remove the regulation knob (Fig. 1–3);
- Turn the upper burr-holder (Fig. 4–1) counter-clockwise until
the head emerges completely;
- Unscrew the screws (Fig. 4–2) and remove the burrs (Fig. 4–3)
from the burr-holder:
- Carefully clean the burr supports, the burr-holder thread and
its housing;
- Position the new burrs in their holders and block them firmly
in place;
- Reassemble the machine, performing the previous steps in
reverse.
- Calibrate the new burrs.

10
KRYO 65 OD
Coffee grinder on demand
1. DESCRIPTION
KRYO 65 OD
Automatic on demand coffee grinder
Legend (Fig. 1b)
1. Hopper lid
2. Bean hopper
3. Adjustment knob
4. Hopper locking slide
5. Protection lid
6. Filter holder button
7. Coffee outlet
8. Filter holder fork
9. Main switch
10. Grounds tray
11. Display
12. Single dose button
13. Double dose button
14. Customized dose button
2. OPERATION
Press the main switch (Fig. 1-9). The grinding will take place in
two modes.
The modes and how to activate are configured in the software
and can be changed by the user if needed.
Do not regrind coffee which has already been ground.
2.1. Automatic mode
In the “Automatic” mode the grinder continues to grind until the
pre-programmed dose has been dispensed. If grinding is stopped
during dispensing the dose has been cancelled.
Activation by filter holder:
- Select the dose of coffee requested - single, double or
customized dose (Fig. 1b-12 to 14). The LED of the selected
dose button will be illuminated. The customized dose button
has no LED. The selected dose will be shown in the display.
- Place the filter holder in the filter holder fork (Fig. 1-8) by
pressing the filter holder button (Fig. 1b-6) once.
- The grinder runs the predefined time and stops automatically.
- To cancel before, press the selected button again on the
keypad. The grinding cannot be continued.
- Level out the coffee contained in the filter and tamp the coffee
with the tamper;
- Check that there are no coffee grounds on the rim of the
filter holder.
- Alternatively and if selected in the menu the dose can be
selected with the filter holder.
- Place the filter holder in the filter holder fork (Fig. 1-8) by
pushing the filter holder button (Fig. 1b-6) once for a single
dose and twice for a double dose. The selected dose will be
shown in the display and the LED on the button of the
selected dose will be illuminated. In this mode no customized
dose is available.
- The grinder runs the predefined time and stops automatically.
- To cancel before, press any button on the keypad. The grinding
cannot be continued.
- Level out the coffee contained in the filter and tamp the coffee
with the tamper;
- Check that there are no coffee grounds on the rim of the
filter holder.
Activation by keypad:
- Place the filter holder in the filter holder fork (Fig. 1-8).
- Select the dose of coffee requested - single, double or
customized dose (Fig. 1b-12 to 14). The LED of the selected
dose glows. The customized dose button has no LED.
The selected dose will also be shown in the display.
- The grinder runs the predefined time and stops automatically.
- To cancel before, press the selected button again on the
keypad. The grinding cannot be continued.
- Level out the coffee contained in the filter and tamp the coffee
with the tamper;
- Check that there are no coffee grounds on the rim of the
filter holder.
2.2. On Demand mode
In the “On demand” mode the grinding may be paused during
dispensing and restarted.
Activation by filter holder:
- Select the dose of coffee requested - single, double or custom-
ized dose (Fig. 1b-12 to 14). The LED of the selected dose button
will be illuminated. The customized dose button has no LED.
The selected dose will also be shown in the display
- Place the filter holder in the filter holder fork (Fig. 1-8) and
press it to the filter holder button (Fig. 1b-6).
- The grinder runs the predefined time and stops automatically.
- To pause the grinding before its finished dispensing, release
the filter holder button, reactivate the dispensing by pressing
and holding the filter holder button.
- To cancel before its finished dispensing, release the filter
holder button, than press any button on the keypad.
- Level out the coffee contained in the filter and tamp the
coffee with the tamper;
- Check that there are no coffee grounds on the rim of the
filter holder.
Activation by keypad:
- Place the filter holder in the filter holder fork (Fig. 1-8).
- Select the dose of coffee requested - single, double or
customized dose (Fig. 1b-12 to 14). The LED of the selected
dose glows. The customized dose button has no LED.
The selected dose will also be shown in the display
- The grinder runs the predefined time and stops automatically.
- To interrupt before its finished grinding, press the same
button of the keypad. The LED blinks now. The grinding can
be continued by pressing the same button again.
The grinding will be stopped with any other button and
cannot be continued.
- Level out the coffee contained in the filter and tamp the
coffee with the tamper;
- Check that there are no coffee grounds on the rim of the
filter holder.
3. MAINTENANCE
Maintenance operations should be carried out with the machine
turned off and cold, and with the plug removed from the power
source.
Do not use metallic or abrasive tools, such as steel wool, metal
brushes, needles, etc., or detergents (alcohol etc.), but simply a
damp cloth or sponge.
3.1. Daily
- Clean the housing and the grounds tray.
- Clean the filter holder fork area.
- Clean the coffee outlet with a brush.

11
3.2. Periodically or after intense use
Empty the bean hopper, and clean it of oily residues left by the
coffee with a mild soap solution.
Waste materials used for processing or maintenance, if not
biodegradable or pollutant, should be placed in separate
containers and taken to suitable collection centers.
3.3. Burr replacement
KRYO 65 OD has an integrated counter, which informs the user
after the predefined amount of coffee is grinded, that the burrs
have to be replaced.
This alert can be activated by the service technician during the
commissioning. We recommend activating the alarm.
The burr replacement has to be done by a qualified service
technician only.
Please get in contact with your local sales organization.
4. TROUBLESHOOTING
Inspection that can be carried out by the user
For any type of problem or difficulty not specified here, unplug the
machine, refrain from making attempts to repair or inspect the
machine yourself and contact an authorized service technician.
A) The machine does not turn on:
- Check that it is plugged in;
- Check that there is power being supply and that the automatic
circuit breaker or main switch is turned on;
- Check the condition of the plug and supply cable, and if they
are damaged have them replaced by a qualified technician.
B) Coffee is not ground:
- Check that there are coffee beans in the bean hopper;
- Check that the hopper locking slide is open (lever inwards)
C) Long grinding time
- Check the grind setting;
- Have the burrs replaced by qualified staff.
5. TECHNICAL DATA
Version
KRYO 65 OD
Machine size
mm
L.220 - D.356 - H.575
Net weight of machine
kg
13
Production
g/s
3.5
Bean hopper capacity
g
1300
Identification details, specifications plate (Fig. 3)
1. Manufacturer
2. Model and version
3. Voltage
4. EC Conformity mark
5. Serial number
6. Pin
7. Total absorption
8. - -
9. - -
10. - -
11. Frequency
12. Conformity marks
13. Date of manufacture
6. INSTALLATION
Installation must be performed by a qualified technician.
The machine is delivered ready for installation according to the
data on the plate Fig. 3.
Check that the main power supply is compatible with the machine.
Check that the machine, the accessories, the supply cable and the
plug are intact, and in the event of damage, inform the retailer
promptly.
The machines have been designed and built for grinding coffee
beans for professional use.
Any other use is to be considered improper and thus dangerous.
6.1. Burr calibration
To be performed during installation and after burr replacement
The grinders are tested with a medium grind setting, and need to
be readjusted. This operation should be carried out with the bean
hopper empty.
Remove the protection lid (Fig. 1b-5), hold down the adjustment
unlock button (Fig. 2-1) and at the same time slowly turn the
adjustment knob (Fig. 2-3) counter-clockwise until the burrs
brush against each other (when they come into contact, the
sound of metallic friction can be heard). Release the button, turn
the numbered ring (Fig. 2-2) so that the starting point 0 is
frontal; move the adjustment knob (Fig. 2-3) in the opposite
direction (clockwise).
7. FIRST START-UP
7.1. Description of commands
Main switch (Fig. 1-9) with two positions; when switched on, the
machine is ready for coffee grinding.
7.2. First startup
KRYO 65 OD has a startup menu to select the personal
preferences of the operator, when switched on for the first time.
Operator has to choose the language, the mode and the way to
activate the grinding. After choosing the preferences, the display
will show a message “Do Calibration”. The calibration has to be
done with the procedure shown in the software structure under
Counter/Burrs/Calibration.
This message will be shown after each preparation up to the
time, the calibration has been done.
7.3. Grind setting
The grinders are tested by the manufacturer with a medium grind
setting. The setting depends on the type of coffee used.
- Place a small quantity of coffee beans in the bean hopper
and close the lid;
- Check that the hopper locking slide is open (Fig. 1–4)
- Position the filter holder on the filter holder fork (Fig. 1-8)
and grind coffee;
- Brew some coffee, checking the dispensing time, the
appearance of the coffee and its taste, considering that
excessively course grounds produce light coloured coffee
without a crema, while grounds that are too fine result in
strong, dark coffee without a crema.
- If the coffee does not respond to your desired requirements,
adjust grind fineness by pressing the ring block button (Fig. 2-1)
and turning the regulation knob (Fig. 2-3) counter-clockwise for
a finer grind or clockwise for a coarser grind.
- Repeat the operation until you have obtained the desired
quality of coffee.
Recalibration of the grind is typically only necessary after a change
in coffee. Minor adjustments may be required throughout use to
accommodate for changes in freshness of the beans.
8. DECOMMISSIONING
8.1. Temporary
- Close the hopper and grind the coffee beans remaining between
the burrs.

12
- Turn off the switch and unplug the appliance from the power
source;
- Remove any coffee beans remaining in the bean hopper.
- Perform cleaning and maintenance operations;
- Coil up the supply cable and attach it to the machine using
adhesive tape;
- Cover the machine and place it in a dry place, sheltered from
bad weather and to which you have exclusive access.
8.2. Final
In addition to the operations of temporary decommissioning:
- Cut the power cable,
- Pack up the machine using cardboard or similar materials
and hand it over to specialized operators (authorized waste
disposal collectors or dealers in second-hand goods)
9. INFORMATION FOR SERVICE
TECHNICIANS
9.1. Replacement of burrs
Although manufactured in tempered steel, the burrs are subject
to wear and tear.
Their lifespan is influenced by the amount of coffee ground, its
hardness and degree of roasting, as well as the quantity and
purity of the coffee beans.
Small stones and various impurities have a marked abrasive
action which significantly reduces the lifespan of the burrs.
When grinding time becomes noticeably longer or the grind
becomes irregular, the burrs should be replaced as follows:
- Pull the hopper locking slide (Fig. 1–4);
- Start the grinder to grind the coffee remaining between the
burrs;
- Once grinding has finished, turn off the machine and unplug
from the power source;
- Empty the bean hopper (Fig. 1–2);
- Remove the regulation knob (Fig. 1–3);
- Turn the upper burr-holder (Fig. 4–1) counter-clockwise until
the head emerges completely;
- Unscrew the screws (Fig. 4–2) and remove the burrs (Fig. 4–3)
from the burr-holder:
- Carefully clean the burr supports, the burr-holder thread and
its housing;
- Position the new burrs in their holders and block them firmly
in place;
- Reassemble the machine, performing the previous steps in
reverse.
- Calibrate the new burrs.
9.2 Technician menu
Must be performed by a qualified technician.
The access to the technician menu is given by switching off the
grinder. Switch on the main switch (Fig. 1-9) while pressing the
confirmation button.
10. SOFTWARE
KRYO 65 OD has three menus to operate with.
10.1 Use of Buttons
To configure the KRYO 65 OD the dose buttons will be used with
an additional function.
The single dose button (Fig. 1b-12) will be used as “-“button, the
double dose button (Fig. 1b-13) as “+”button and both buttons to
browse through the menu. The customized dose button (Fig. 1b-14)
is used as confirmation or ESC-button depending on the menu
accessed.
10.2 Dosing menu
In the dosing menu the amount of coffee dispensed by one button
can be changed.
- Press the selected button for 3 seconds
- Change the value of the specific button
- Confirm the change with the confirmation button
10.3 Barista menu
The “Barista Menu” can be opened by pressing the confirmation
button (Fig. 1-14) for 5 seconds.
Any additional information is given in the software tree below.
10.4 Technician menu
Must be performed by a qualified technician.
The parameters with the grey background are only accessible for
the service technician
The access to this menu is given in another chapter of the manual.

13
Software
Dosing
Single
Time to grind the single dose in seconds
Double
Time to grind the double dose in seconds
Customized
Time to grind the customized dose in seconds
ESC
Leave the menu
Mode
Automatic
Sets the grinder in the “Automatic” mode, the grinding cannot be paused during dispensing
On Demand
Sets the grinder in the “On Demand” mode, the grinding can be paused during dispensing
ESC
Leave the menu
Start dose
by keyboard
The grinding will be started by pressing the requested button
by filter holder
The grinding will be started by the filter holder when touching the filter holder button.
Preselection
The preselection is only available in the Automatic mode.
With “Yes” the dose selection will be done by the keypad;
“No” means the dose selection will be done by pushing the filter holder to the filter holder button once for a single dose or two times for a double dose.
A customized dose is not available with preselection.
ESC
Leave the menu
Language
English, Deutsch …
Select the language – Italiano, English, Deutsch, Français, Espanol or Portugues and confirm
ESC
Leave the menu
Counters
Total
Single
Displays the total number of single dose prepared. Not resettable
Double
Displays the total number of double dose prepared. Not resettable
Customized
Displays the total number of customized dose prepared. Not resettable
ESC
Leave the menu
Counter
Single
Displays the number of single dose prepared since the last reset
Double
Displays the number of double dose prepared since the last reset
Customized
Displays the number of customized dose prepared since the last reset
Reset
Resets all dose counters
ESC
Leave the menu
Burrs
Calibration
The adjustment of the grinder is done with this submenu and starts with the confirmation
Grinding
Starts to grind coffee for a defined time. The coffee must be scaled. Take three samples and calculate the average.
Weight
The amount of scaled coffee will be adjusted here and confirmed
Alarm
Amount of coffee in kg when the burrs have to be changed. With “0” the alarm is disabled
Counter
Shows the amount of coffee grinded in kg
Reset
Resets the burr counter
ESC
Leave the menu
ESC
Leave the menu
ESC
Leave the menu
-
 1
1
-
 2
2
-
 3
3
-
 4
4
-
 5
5
-
 6
6
-
 7
7
-
 8
8
-
 9
9
-
 10
10


Rancilio KRYO 65 Manuale utente
- Categoria
- Accessori per la preparazione del caffè
- Tipo
- Manuale utente
- Questo manuale è adatto anche per
in altre lingue
- English: Rancilio KRYO 65 User manual
Documenti correlati
Altri documenti
-
Bartscher 370213 Scheda dati
-
La Marzocco VULCANO Manuale utente
-
Sage BES878 Barista Pro Espresso Machine Manuale del proprietario
-
Sage BCG600 - the Dose Control Pro Manuale del proprietario
-
-
Sage the Barista Touch BES880 Manuale del proprietario
-
-
-
Eureka MYTHOS 220 User Handbook Manual