Roadstar PCD-435NCD Manuale utente
- Categoria
- Lettore CD
- Tipo
- Manuale utente


INDEX
English Page 1
Deutsch Seite 5
Français Page 9
Italiano Pagina 13
Español Página 17
Portugues Pagina 21
Čeština Strana 25
Slovenský Strana 29
Svenska Sida 33
Your new unit was manufactured and assem-
bled under strict ROADSTAR quality control.
Thank-you for purchasing our product for your
music enjoyment. Before operating the unit,
please read this instruction manual carefully.
Keep it also handy for further future referen-
ces.
Votre nouvel appareil a été fabriqué et monté
en étant soumis aux nombreaux tests ROA-
DSTAR. Nous espérons que cet appareil vous
donnera entière satisfaction. Avant de vous
adonner à ces activités, veuillez lire attentive-
ment ce manuel d’instructions. Conservez-le à
portée de main à fin de référence ultérieure.
Vuestro nuevo sistema ha sido construido se-
gún las normas estrictas de control de calidad
ROADSTAR. Le felicitamos y le damos las
gracias por su elección de este aparado. Por
favor leer el manual antes de poner en funcio-
namiento el equipo y guardar esta documen-
tación en case de que se necesite nuevamen-
te.
Ihr neues Gerät wurde unter Beachtung der
strengen ROADSTAR Qualitätsvorschriften ge-
fertigt. Wir danken Ihnen für den Kauf unseres
Produktes und wünschen Ihnen optimalen Hör-
genuss. Bitte lesen Sie diese Bedienungsanlei-
tung durch, und heben Sie sie auf, um jederzeit
darin nachschlagen zu können.
Il vostro nuovo apparecchio é stato prodotto ed
assemblato sotto lo stretto controllo di qualità
ROADSTAR. Vi ringraziamo di aver acquistato
un nostro prodotto per il vostro piacere
d’ascolto. Prima di procedere all'utilizzo dell'ap-
parecchio, leggete attentamente il manuale
d’istruzioni e tenetelo sempre a portata di mano
per futuri riferimenti.
Seu novo aparelho foi construido e montado sob
o estrito controle de qualidade da ROADSTAR.
Agradecemos por ter comprado nosso produto
para a sua diversão. Antes de usar esta unidade
é necessário ler com atençâo este manual de
instruções pare que possa ser usada apropria-
damente; mantenha o manual ao seu alcance
para outras informações.

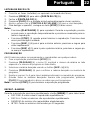
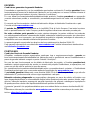
PCD-435NCD
1 2 3 4
5
6
7
8
9
10 11 12 13 14

1 English
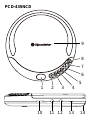
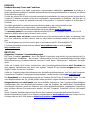
LOCATIONS OF CONTROLS
1. LCD DISPLAY
2. PLAY/PAUSE
3. STOP
4. SKIP -
5. SKIP +
6. PROGRAM
7. MODE
8. OPEN
9. CD DOOR
10. VOLUME KNOB
11. HEADPHONES OUT
12. DC INPUT JACK
13. BATTERY COMPARTMENT
POWER SUPPLY
Use with regular batteries
1. Open the battery compartment door, located on the bottom of the unit, by sliding
the door and lift it up. (Do not remove the battery door);
2. Insert 2 x 1.5V /UM-3/AA size alkaline batteries, following the correct polarity, as
indicated in the battery compartment;
3. Close the battery compartment door.
Notes: If the symbol “LOW BATTERY“ appears in the display, batteries are weak and
ought to be replaced.
Use with AC/DC adaptor (not included)
1. Insert the DC plug, at the end of the AC/DC adaptor cord, into the DC 5 V INPUT
socket (12) located on the back of the unit;
2. Connect the AC/DC adaptor into a 100-240V ~ 50-60 Hz AC power outlet.
Notes:
If the AC adaptor is connected when regular batteries are installed, the power
supply automatically switches to the AC power source.
Use only the supplied AC/DC adaptor. Using other types of adaptor may da-
mage the unit.
Make sure that the AC/DC adaptor matches with your household voltage befo-
re connecting it into the wall outlet.
When not using AC power, disconnect the AC/DC adaptor from the wall outlet.
Do not touch the AC/DC adaptor with wet hands.
AUTO POWER-OFF
When the unit is stopped for approximately 30 seconds, the Auto Power Off function
will activated and turn the unit off automatically.

2
English
CD OPERATION
1. Connect your earphones into the [HEADPHONES SOCKET] (11);
2. Press [OPEN] (8) to open the [CD DOOR] (9) and place a CD with the label up in
the CD compartment;
3. Close the [CD DOOR] (9);
4. Press [PLAY] (2). Focus search is performed and playback will start automati-
cally from the first track;
5. Adjust the volume with the [VOLUME KNOB] (10) to the desired level;
6. To turn the unit off, press the [STOP] button (3) twice.
Note:
Press [PLAY-PAUSE] (2) to play. When it plays, press to stop playback tempo-
rarily and press again to resume playback.
Press [STOP] (3) when you want to finish playback. Press twice to switch OFF
the unit.
Press [SKIP -] (4) to go to the previous track, press & hold to go back fast.
Press [SKIP +] (5) to go to the next track, press & hold to go fast forward.
PROGRAMMING
Up to 20 tacks can be programmed and play in any order.
1. Stop the playback by pressing [STOP] (3);
2. Press [PROGRAM] (6), the display (1) will show the number of the track
on the left side and the number of program on the right side.
3. Select desired track by using [SKIP -/+] buttons (4/5);
4. Press [PROGRAM] (6) to confirm desired track into the program mem-
ory;
5. Repeat step 3 and 4 to enter additional tracks into the program memory.
6. When all the desired tracks have been programmed, press [PLAY] (2) to play the
disc in the order you have programmed.
Note: Press [STOP] (3) to terminate programmed play.
REPEAT - RANDOM MODE
During playback, press repeatedly the [MODE] (7) to select:
REP-ONE: The current track is played repeatedly.
REP-ALL: All tracks are played repeatedly.
RANDOM: Tracks are played randomly.
INTRO: All tracks are played for 10 seconds.

3 English
MAINTENANCE
Cleaning the unit
Wipe the outside surface of the unit with a soft cloth moistened with water and mild
soap.
Handling CDs
Your CD player has been especially designed for the reproduction of compact discs be-
aring the CD mark. No other discs should be loaded into the player.
Always place the disc in tray with the label facing up.
Although compact discs are impervious to wear during play, damage to the surface of
a disc through improper handling will result in playback irregularities.
To preserve your compact discs, please handle them with care.
Although minute dust particles and fingerprints should have no effect on playback, you
should keep the serface of the recorded side of your discs clean by wiping the disc with
a clean, dry, lint-free soft cloth with straight movements from the centre outwards.
Never use record cleaners, record sprays, antistatic sprays, liquids nor chemical based
liquids to clean the surface of a disc. They may in fact irreparably damage the disc's
plastic surface.
Always return the disc to its protective plastic case when not using it. Avoid exposing
discs to direct sunlight, excessive temperatures or high humidity for extended periods
of time. Do not write on the label side of the disc with a ball/point pen as this may
scratch the disc.
IMPORTANT
Since movement of the CD mechanism and the sensitive circuitry may cause interfe-
rence to a radio tuner nearby switch this unit off while operating other radio devices.
This product utilizes a laser:
Danger - Invisible laser radiation when opened and interlock failed or defeated. Avoid
direct exposure to the beam.
Caution - Use of controls, adjustments, or procedures not listed in this manual may
result in hazardous radiation exposure.

4
English
This marking shown on the product or its literature, indicates that it should not be disposed with o-
ther household wastes at the end of its working life. To prevent possible harm to the environment or
human health from uncontrolled waste disposal, please separate this from other types of wastes
and recycle it responsibly to promote the sustainable reuse of material resources. Household users
should contact the retailer where they purchased this product, or their local government office, for
details of where and how they can take this item for environmentally safe recycling. Business users
should contact their supplier and check the terms and conditions of the purchase contract. This pro-
duct should not be mixed with other commercial wastes for disposal.
CORRECT DISPOSAL OF THIS PRODUCT
(Waste Electrical & Electronic Equipment)
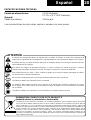
WARNINGS
The exclamation point within the triangle is a warning sign alerting the user of important instruc-
tions accompanying the product.
The lightening flash with arrowhead symbol within the triangle is a warning sign alerting the user
of “dangerous voltage” inside the unit.
To reduce the risk of electric shock, do not remove the cover. No user serviceable parts inside
the unit. Refer all servicing to qualified personnel.
This unit operates on 230V ~ 50Hz. If the unit is not used for a long period of time, remove the
plug from the AC mains.
Ensure all connections are properly made before operating the unit.
This unit must not be exposed to moisture or rain.
This unit should be positioned so that it is properly ventilated. Avoid placing it, for example, close
to curtains, on the carpet or in a built-in installation such as a bookcase.
Do not expose this unit to direct sunlight or heat radiating sources.
TECHNICAL SPECIFICATIONS
Power Supply: DC 5V (Adaptor).
DC 3V = (2 x “LR6” Batteries).
General
Headphones Out: 3.5mm jack plug.
Specifications and the design are subject to possible modifications without notice due
to improvement.

5 Deutsch
ORT DER BEDIENELEMENTE
1. LCD DISPLAY (LCD ANZEIGE)
2. PLAY/PAUSE
3. STOP
4. SKIP -
5. SKIP +
6. PROGRAM
7. MODE
8. OPEN (CD FACH ÖFFNEN)
9. CD DOOR (CD-LAUFWERK)
10. VOLUME KNOB (LAUTSTÄRKEREGLER)
11. HEADPHONES OUT (KOPFHÖRERAUSGANG)
12. DC INPUT JACK (DC BUCHSE)
13. BATTERY COMPARTMENT (BATTERIEFACH)
STROMVERSORGUNG
Betrieb mit normalen Batterien
1. Öffnen Sie den Batteriefachdeckel, der sich auf der unteren Seite des Gerätes be-
findet, indem Sie ihn schieben und anheben. (Entfernen Sie den Batteriedeckel
nicht.);
2. SetzenSie 2x1.5V-Alkaline-BatterienGrößeUM-3/AAentsprechendderrichtigen, in-
dem Batteriefach angezeigten, Polarität ein;
3. Schließen Sie den Batteriefachdeckel.
Hinweis: Wenn das Symbol “LOW BATTERY“ auf dem Display erscheint, sind die
Batterien schwach und sollten ersetzt werden.
Betrieb mit einem AC/DC-Adapter (nicht einbezogen)
1. Stecken Sie den DC-Stecker am Ende des AC/DC-Adapters (5V) in die DC-
EINGANGS Buchse (12), die sich auf der Rückseite des Gerätes befindet;
2. Schließen Sie den AC/DC-Adapter an eine AC-Steckdose mit 100-240V ~ 50-60
Hz an.
HINWEISE:
Wenn normale Batterien im Gerät sind und der AC-Adapter angeschlossen wird,
wird automatisch auf die AC-Stromquelle umgeschaltet.
Verwenden Sie nur den mitgelieferten AC/DC-Adapter. Andere Adapter-Typen kön-
nten das Gerät beschädigen.
Vergewissern Sie sich, daß die Betriebsspannung des AC/DC-Adapters mit der örtli-
chen Netzspannung übereinstimmt, bevor Sie ihn in die Wandsteckdose stecken.
Wenn Sie das Gerät nicht mit Wechselstrom (AC) betreiben, trennen Sie den AC/
DC-Adapter von der Wandsteckdose ab.
Berühren Sie den AC/DC-Adapter nicht mit feuchten Händen.
AUTOMATISCHES AUSSCHALTEN
Wenn das Gerät ca. 30 Sekunden lang stoppt, wird die Automatische Ausschalt-
Funktion aktiviert und das Gerät wird automatisch ausgeschaltet.

6
Deutsch
WIEDERGABE EINER CD
1. Schließen Sie die Ohrhörer (mitgeliefert) oder wenn Sie möchten Kopfhörer, an
die Hörerbuchse an;
2. Drücken Sie die Taste [OPEN] (8), um das [CD LAUFWERK] (9) zu öffnen. Legen
Sie eine CD mit dem Etikett nach oben zeigend ein;
3. Schließen Sie das [CD LAUFWERK] (9);
4. Drücken Sie die Taste [PLAY] (2). Die CD Wiedergabe startet automatisch mit
dem ersten Titel;
5. Ändern Sie die Lautst. mit den [LAUTSTÄRKE REGLER] (10) auf die gewün-
schte Pegel;
6. Um das Gerät auszuschalten, drücken Sie zweimal die [STOP]-Taste (3).
Hinweis:
Drücken Sie die Taste [PLAY-PAUSE] (2) für die Wiedergabe. Drücken Sie
zum vorübergehenden Anhalten während der Wiedergabe auf diese Taste,
und drücken Sie die Taste erneut, um die Wiedergabe fortzusetzen.
Drücken Sie die Taste [STOP] (3), um die Wiedergabe zu beenden. Drücken
Sie diese Taste zweimal, um das Gerät auszuschalten.
Drücken Sie die Taste [SKIP -] (4), um zum vorherigen Track zu wechseln,
und halten Sie diese Taste gedrückt, um zurückzuspulen.
Drücken Sie die Taste [SKIP +] (5), um zum nächsten Track zu wechseln, und
halten Sie diese Taste gedrückt, um vorzuspulen.
PROGRAMMIERUNG
Bis zu 20 Titel können programmiert und in beliebiger Reihenfolge abgespielt werden:
1. Drücken Sie die Taste [STOP] (3) um die Wiedergabe zu stoppen ;
2. Drücken Sie die Taste [PROGRAM] (6). Das Display (1) zeigt „P01“;
3. Drücken Sie die Taste [SKIP -/ +] (4/5) um den gewünschten Titel zu wählen;
4. Drücken Sie erneut die Taste [PROGRAM] (6), um den gewünschten Titel im
Programmspeicher zu speichern ;
5. Wiederholen Sie Schritte 3 und 4, um weitere Titel in den Programmspeicher ein-
zugeben;
6. Wenn alle gewünschten Titel programmiert wurden, drücken Sie die Taste
[PLAY] (2), um die CD in der von Ihnen programmierten Reihenfolge abzuspie-
len.
Hinweis: Drücken Sie die Taste [STOP] (3), um die programmierte Wiedergabe zu
beenden.
WIEDERGABE-MODUS
Drücken Sie während der Wiedergabe wiederholt [MODE] (7), um Folgendes auszu-
auszuwählen:
Repeat-One: Der aktuelle Titel wird wiederholt abgespielt.
Repeat-All: Alle Titel werden wiederholt.
Random: Die Titel werden in zufälliger Reihenfolge abgespielt.
Intro: Alle Titel werden 10 sekunden lang abgespielt.

7 Deutsch
WARTUNG
Reinigen des Gerätes
Wischen Sie das Gerätegehäuse mit einem weichen Tuch ab, das mit einer milden
Seifenwasserlösung angefeuchtet ist.
Umgang mit den CDs
Ihr CD-Spieler wurde speziell entwickelt, um Compact Discs mit der Marke CD wieder-
wiederzugeben. Es sollten keine anderen Discs ins Gerät eingelegt werden.
Legen Sie die Disc immer mit der beschrifteten Seite nach oben ein.
Auch wenn die Compact Discs während der Wiedergabe keiner Abnutzung unterliegen,
könnten durch unsachgemäßen Umgang hervorgerufene Schäden zu einer unregel-
mäßigen Wiedergabequalität führen.
Um den guten Zustand Ihrer Compact Discs zu bewahren, gehen Sie bitte sorgfältig mit
ihnen um. Obwohl kleinste Staubteilchen und Fingerabdrücke keinen Einfluß auf die
Wiedergabe haben, sollten Sie die bespielte Oberfläche Ihrer Discs sauber halten. Wi-
schen Sie die Disc mit einem sauberen, trockenen, fusselfreien und weichen Tuch ab,
wobei Sie mit geraden Bewegungen von der Mitte nach außen vorgehen.
Verwenden Sie niemals Plattenreiniger, Plattensprays, Antistatik-Sprays, Flüssigkei-
ten oder chemische Flüssigkeiten, um die Oberfläche der Disc zu reinigen. Der Pla-
stiküberzug könnte ernsthaft beschädigt werden.
WICHTIG
Die Bewegung des CD-Mechanismus und der empfindliche Stromkreis können
Störungen bei einem nahestehenden Radio oder Tuner hervorrufen. Schalten Sie die-
ses Gerät aus, wenn Sie andere Radios verwenden.
Dieses Gerät verwendet einen Laser:
Gefahr - Unsichtbare Laserstrahlung beim Öffnen und wenn das Schließsystem ver-
sagt oder beschädigt ist. Vermeiden Sie es, sich der direkten Strahlung auszusetzen.
Vorsicht - Die Benutzung von Bedienelementen, das Vornehmen von Regulierungen
oder Einstellungen, die nicht in dieser Bedienungsanleitung aufgeführt sind, könnten
Sie einer gefährlichen Strahlung aussetzen.

8
Deutsch
TECHNISCHE DATEN
Stromversorgung: DC 5V (Adapter).
DC 3V = (2 x “LR6” Batterie).
Allgemeine
Kopfhörer: 3.5mm jack buchse.
Ausführung und Spezifikationen unterliegen unangekündigten Änderungen.
Die Kennzeichnung auf dem Produkt bzw. auf der dazugehörigen Literatur gibt an, dass es nach seiner Leben-
sdauer nicht zusammen mit dem normalen HaushaltsmüIl entsorgt werden darf. Entsorgen Sie dieses Gerat
bitte getrennt von anderen Abfallen, um der Umwelt bzw. der menschl i chen Gesundhei t ni cht durch unkontrol
l i erte Mül l besei ti gung zu schaden. Recycel n Si e das Gerät, um di e nachhaltige Wiederverwertung von
stofflichen Ressourcen zu fördern. Private Nutzer sollten den Händler, bei dem das Produkt gekauft wurde, oder
die zuständigen Behörden kontaktieren, um in Erfahrung zu bringen, wie sie das Gerät auf umweltfreundliche
Weise recyceln können. Gewerbliche Nutzer sollten sich an Ihren Lieferanten wenden und die Bedingungen des
Verkaufsvertrags konsultieren. Dieses Produkt darf nicht zusammen mit anderem Gewerbemüll entsorgt wer-
den.
KORREKTE ENTSORGUNG DIESES PRODUKTS
(Elektromüll)
SICHERHEITSHINWEISE
Das Ausrufszeichen im Dreieck weist den Benutzer auf wichtige Bedienungs- und Wartungsan-
weisungen (Service) in diesem Handbuch hin, die unbedingt zu befolgen sind.
Um die Gefahr elektrischer Schläge auszuschliessen, Gehäuse auf keinen Fall abnehmen.
Im Innem befinden sich keine vom Benutzer selbst instandsetz-baren Teile. Reparaturen dürfen
nur von einer autorisierten Fachwerkstatt durchgeführt werden.
Dieses Gerät ist für 230V ~ 50Hz Netzspannung ausgelegt. Bei längerer Nichtbenutzung des Ge-
räts ziehen Sie den Stecker aus der Steckdose.
Setzen Sie das Gerät weder Feuchtigkeit noch Regen aus.
Schalten Sie das System erst dann ein, wenn Sie alle Verbindungen genau geprüft haben.
Stellen Sie das Gerät so auf, dass immer eine ungestörte Frischluftzufuhr sichergestellt ist. Es ist
zum beispiel keinesfalls auf Teppiche und in der Nähe von Gardinen zu stellen oder in Bücherre-
gale einzubauen.
Setzen Sie das Gerät weder direkter Sonneneinstrahlung noch Wärmequellen aus.

9 Français
EMPLACEMENT DES COMMANDES
1. LCD DISPLAY (AFFICHAGE LCD)
2. PLAY/PAUSE
3. STOP
4. SKIP -
5. SKIP +
6. PROGRAM
7. MODE
8. OPEN (OUVRIR COMPARTIMENT CD)
9. CD DOOR (COMPARTIMENT CD)
10. VOLUME KNOB (COMMANDE VOLUME)
11. HEADPHONES OUT (SORTIE ÉCOUTEURS)
12. DC INPUT JACK (FICHE DC)
13. BATTERY COMPARTMENT (COMPARTIMENT DES PILES)
ALIMENTATION
Fonctionnement de l’appareil sur piles normales
1. Pour ouvrir le compartiment des piles, placé en dessous de l’appareil, faire glisser
le couvercle et le tirer ensuite vers le haut.(Ne pas ôter le couvercle de son siège);
2. Insérer 2 piles alcalines du type 1,5 V UM-3/AA en respectant la polarité correcte,
comme indiqué dans le compartiment des piles;
3. Fermer le couvercle du compartiment des piles
Remarques: Si le symbole “LOW BATTERY“ apparaît sur l’afficheur, les batteries
sont épuisées et devraient êtres changées.
Fonctionnement avec l’adaptateur de secteur CA/CC (pas fourni avec le lecteur)
1. Brancher la fiche CC se trouvant à la fin du cordon d’alimentation de l’adaptateur
CA/CC (230V/5V), à la prise d’ALIMENTATION EXTERNE CC (12), placée au dos
de l’appareil;
2. Brancher l’adaptateur de secteur CA/CC à une prise murale CA de 100-240V ~ 50
-60 Hz.
Remarques:
Si l’adaptateur de secteur CA est branché quand il y a déjà des piles dans l’appareil,
son alimentation est automatiquement fournie par le réseau.
N’utiliser que l’adaptateur CA/CC fourni avec le lecteur. L’utilisation d’autres types
d’adaptateurs de secteur pourrait endommager l’appareil.
Avant de le brancher à la prise murale, vérifier que la tension de l’adaptateur de
secteur CA/CC corresponde à celle du réseau.
En cas d’inutilisation de l’appareil sur le réseau, débrancher l’adaptateur CA/CC de
la prise murale.
Ne pas toucher l’adaptateur de secteur CA/CC avec les mains mouillées.
FONCTION D’ARRÊT AUTOMATIQUE
Quand l’appareil est arrêté (mode d’attente - standby) pendant 30 secondes environ,
la fonction d’Arrêt Automatique s’active pour éteindre automatiquement l’appareil.

10
Français
FONCTIONNEMENT DU CD
1. Brancher les écouteurs fournis avec le lecteur à la Prise de Casques (11);
2. Appuyez sur le bouton [OPEN] (8) pour ouvrir la [PORTE DU CD] (9) et placer un
disque CD avec l'étiquette vers le haut dans le compartiment CD;
3. Fermer la [PORTE DU CD] (9);
4. Appuyer sur [PLAY] (2). La recherche de focalisation est réalisée et la lecture dé-
marre automatiquement à partir de la première piste;
5. Réglez le volume avec le [COMMANDE VOLUME] (10) au niveau souhaité;
6. Pour éteindre l’appareil, appuyer deuy fois sur la touche [STOP] (3).
Remarque:
Appuyer sur le bouton [PLAY-PAUSE] (2) pour lancer la lecture. Lors de la
lecture, appuyer pour arrêter temporairement la lecture et appuyer à nouveau
pour reprendre la lecture.
Appuyer sur le bouton [STOP] (3) pour terminer la lecture. Appuyez deux fois
pour éteindre l’appareil.
Appuyer sur le bouton [SKIP -] (4) pour revenir à la piste précédente, appuyer
et maintenir pour revenir rapidement en arrière.
Appuyer sur le bouton [SKIP +] (5) pour passer à la piste suivante, appuyer et
maintenir pour avancer rapidement.
PROGRAMMATION
Il est possible de programmer jusqu’à 20 pistes pour la lecture d’un CD dans un ordre
quelconque.
1. Arrêter la lecture en appuyant sur [STOP] (3);
2. Appuyer sur [PROGRAM] (6), l'écran (1) affichera "P01";
3. Sélectionner la piste désirée en utilisant les boutons [SKIP -/ +] (4/5);
4. Appuyer de nouveau sur [PROGRAM] (6) pour confirmer la piste désirée dans la
mémoire de programme;
5. Répéter les étapes 3 et 4 pour entrer des pistes supplément. dans la mémoire;
6. Lorsque toutes les pistes désirées ont été programmées, appuyer sur [PLAY] (2)
pour lire le disque dans l'ordre programmé.
Remarque: Appuyez sur le bouton [STOP] (3) pour terminer la lecture programmée.
MODE REPEAT
Pendant la lecture, appuyez plusieurs fois [MODE] (7) pour sélectionner:
Repeat-One: La piste en cours est lu en boucle.
Repeat-All: Toutes les pistes seront lues en continu.
Random: Les pistes sont lues de manière aléatoire.
Intro: Toutes les pistes sont lues pendant 10 secondes.

11 Français
ENTRETIEN
Nettoyage de l’appareil.
Nettoyer la surface externe de l’appareil à l’aide d’un chiffon doux et humidifié avec de
l’eau et avec du détergent délicat.
Entretien des disques compacts
Votre lecteur CD a été spécifiquement conçu pour la lecture de disques compacts avec
la marque “CD”. Ne pas insérer dans l’appareil des types différents de CD.
Toujours insérer le CD avec l’étiquette vers le haut.
Même si pendant la lecture les CD ne s’abîment pas, une utilisation incorrecte des di-
sques pourrait en endommager la surface et engendrer une lecture irrégulière.
Afin de préserver l’intégrité des CD il est conseillable de les manipuler avec soin.
Même si normalement la poussière et les traces de doigts n’affectent pas la qualité du
son, il est conseillable de nettoyer la surface enregistrée de vos disques à l’aide d’un chif-
fon doux, sans poils, sec et propre. Toujours passer le chiffon en partant du centre vers
l’extérieur du CD.
Lors du nettoyage du disque, ne jamais utiliser les produits disponibles pour le nettoya-
ges des disques standards, de sprays pour disques ou de sprays anti-statiques, de liqui-
des chimiques ou tout autre produit chimique. Ces produits peuvent en effet endom-
mager irréparablement le plastique de protection de la surface des CD.
IMPORTANT
Comme le mouvement du mécanisme du lecteur CD et des circuits sensibles peut in-
terférer avec d’autres syntoniseurs radio à proximité, débrancher cet appareil en cas
d’utilisation d’autres dispositifs.
Cet appareil utilise un faisceau laser:
DANGER - Lorsqu’on ouvre le couvercle en cas de défaillance ou de cassure du di-
spositif de synchronisation, des radiations laser invisibles se produisent. éviter donc
l’exposition directe aux faisceaux laser.
AVERTISSEMENT - L’utilisation des touches de commande, les rectifications ou les
procédures autres que celles spécifiées dans le mode d’emploi présent peuvent en-
traîner une dangereuse exposition au radiations.

12
Français
CARACTERISTIQUES TECHNIQUES
Source d’énergie: DC 5V (Adapter).
DC 3V = (2 x “LR6” Batterie).
Général
Sortie écouteur: Prise 3.5mm jack.
Les spécifications peuvent êtres modifiées sans avis préalable.
Ce symbole sur le produit ou sa documentation indique qu'il ne doit pas être éliminé en fin de vie avec
les autres déchets ménagers. L' élimination incontrôlée des déchetspouvant porter préjudice a l'environ-
nement ou a la santé humaine, veuillez le séparer des autres types de déchets et le recycler defaçon
responsable. Vous favoriserez ainsi la réutilisation durable desressources matérielles. Les particuliers
sont invites a contacter le distributeur leur ayant vendu le produit ou a se renseigner auprès de leur mai-
rie pour savoir ou et comment ils peuvent se débarrasser de ce produit afin qu'il soit recycle en respec-
tant l'environnement. Les entreprises sont invitées a contacter leurs fournisseurs et aconsulter les condi-
tions de leur contrat de vente. Ce produit ne doit pas être éliminé avec les autres déchets commerciaux.
COMMENT ÉLIMINER CE PRODUIT
(déchets d'équipements électriques et électroniques)
ATTENTION
Le symbole “point d’exclamation” à l’intérieur d’un triangle avertit l’utilisateur que d’importantes instruc-
tions d’utilisation et de maintenance sont contenues dans le mode d’emploi.
Le symbole “éclair” à l’intérieur d’un triangle sert à avertir l’utilisateur de la présence du courant à
l’intérieur du l’appareil qui pourrait constituer un risque.
Afin de minimiser les risques, ne pas ouvrir le boîtier ni ôter le dos de l’appareil. En case de panne, faites
appel aux techniciens qualifiés pour les réparations. L’appareil ne renferme aucune pièce reparable par
l’utilisateur.
Cet appareil a été conçu pour une tension d’alimentation de 230V ~ 50Hz. Débranchez la prise de cou-
rant quand on prévoit de ne pas utiliser l’appareil pendant un certain temps.
Mettez l’appareil sous tension seulement après avoir vérifié que tous les raccordements soient corrects.
L’unité ne doit pas être exposée à l’humidité ou à la pluie.
L’appareil doit être gardé dans un endroit suffisamment ventilé. Ne le gardez jamais par exemple près
des rideaux, sur un tapis ou dans des meubles, tels qu’une bibliothèque.
L’unité ne doit pas être exposée à la lumière directe du soleil ou à des sources de chaleur.

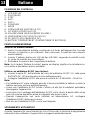
13 Italiano
POSIZIONE DEI CONTROLLI
1. LCD DISPLAY
2. PLAY/PAUSE
3. STOP
4. SKIP -
5. SKIP +
6. PROGRAM
7. MODE
8. OPEN (APRIRE SPORTELLO CD)
9. CD DOOR (SPORTELLO CD)
10. VOLUME KNOB (REGOLAZIONE VOLUME)
11. HEADPHONES OUT (USCITA CUFFIE)
12. DC INPUT JACK (INGRESSO DC)
13. BATTERY COMPARTMENT (COMPARTIMENTO BATTERIE)
FONTI DI ALIMENTAZIONE
Utilizzo con Batterie Normali
1. Aprire il compartimento batteria, posizionato sul fondo dell’apparecchio, facendo
scorrere il coperchio e poi sollevarlo. (Non rimuovere il coperchio del comparti-
mento batteria);
2. Inserire 2 batterie alcaline da 1.5V del tipo UM-3/AA, seguendo le polarità corret-
te, come sta indicato nel vano batterie;
3. Richiudere il coperchio del compartimento batterie.
Nota: Se il simbolo “Batterie Scariche“ appare nel display, significa che le batterie so-
no scariche e dovrebbero essere sostituite.
Utilizzo con adattatore AC/DC (non incluso)
1. Inserire la spina DC, del terminale del cavo del adattatore AC/DC 5 V, nella presa
ENTRATA DC (12) posizionata sul retro dell’apparecchio;
2. Collegare l’adattatore AC/DC alla presa di corrente AC di 100-240V ~ 50-60 Hz.
Note:
Se l’adattatore AC viene collegato quando si trovano installate le batterie normali, le
batterie verranno escluse automaticamente.
Usare solo l’adattatore AC/DC fornito. L’utilizzo di altri tipi di adattatori potrebbero
danneggiare l’apparecchio.
Assicurarsi che il voltaggio dell’adattatore AC/DC sia lo stesso di quello della vostra
presa di corrente domestica prima di collegarlo alla presa a muro.
Quando l’apparecchio non verrà utilizzato ad alimentazione AC, scollegare
l’adattatore AC/DC dalla presa a muro.
Non toccare l’adattatore AC/DC con le mani bagnate.
SPEGNIMENTO AUTOMATICO
Quando l’apparecchio viene fermato per circa 30 secondi, la funzione di spegnimento
automatico viene attivata e l’apparecchio si spegnerà automaticamente.

14
Italiano
RIPRODUZIONE DI UN COMPACT DISC
1. Collegare le cuffie (incluse) o gli auricolari opzionali alla presa Cuffie;
2. Aprire il [CARRELLO DEL CD] (9) con il tasto [OPEN] (8) e inserire un CD con la
pellicola rivolta verso l’alto;
3. Chiudere il [CARRELLO DEL CD] (9);
4. Premere il tasto [PLAY] (2). Il disco viene caricato e la riproduzione inizierà auto-
maticamente dal primo brano;
5. Regolare il volume con il tasto [VOLUME KNOB] (10) fino al livello desiderato;
6. Per spegnere l’apparecchio manualmente premere due volte il tasto [STOP] (3).
Nota:
Premi il tasto [PLAY-PAUSE] (2) per riproduzione. Quando è in riproduzione,
premi per interrompere temporaneamente la riproduzione e premi nuovamente
per riprendere.
Premi il tasto [STOP] (3) Quando vuoi interrompere la riproduzione. Premere
due volte questo tasto per spegnere l’apparecchio.
Premi il tasto [SKIP -] (4) per tornare al brano precedente, tieni premuto per
tornare indietro veloce.
Premi il tasto [SKIP +] (5) per passare al brano successivo, tieni premuto per
avanzare velocemente.
PROGRAMMAZIONE DI UN CD
È possibile programmare fino a 20 tracce per la riproduzione in qualsiasi ordine di un
CD.
1. Arrestare la riproduzione con il tasto [STOP] (3);
2. Premere il tasto [PROGRAM] (6), “P01” comparirà sul display LCD (1);
3. Selezionare la traccia desiderata premendo i tasti [SKIP -/ +] (4/5);
4. Premere il tasto [PROGRAM] (6) per memorizzare la traccia;
5. Ripetere i punti 3 e 4 per memorizzare tracce addizionali nella memoria;
6. Quando tutte le tracce desiderate sono state programmate, premere il tasto
[PLAY] (2) per riprodurre il disco nell’ordine assegnato.
Nota: Premere il tasto [STOP] (3) per cancellare la programmazione.
MODALITÀ RIPETIZIONE
Durante la riproduzione, premere ripetutamente [MODE] (7) per selezionare:
Repeat-One: La traccia corrente sarà riprodotta continuamente.
Repeat-All: Tutte le tracce saranno riprodotte continuamente.
Random: Le tracce sono riprodotte in modo casuale.
Intro: Tutte le tracce sono riprodotte per 10 secondi.

15 Italiano
MANUTENZIONE
Pulizia dell’apparecchio
Pulire la superficie esterna dell’apparecchio con un panno morbido inumidito con ac-
qua e sapone delicato.
Manipolazione dei CD
Il vostro lettore CD è stato specificamente progettato per la riproduzione di compact
discs che portano il marchio CD. Altri tipi di disco non dovranno essere inseriti nel let-
tore.
Posizionare sempre il CD nel compartimento con l’etichetta rivolta verso l’alto.
Sebbene i compact discs non possono logorarsi durante la lettura, danni alla superfi-
cie del disco dovuti a una manipolazione inadeguata potrebbero causare irregolarità
durante la lettura.
Per preservare i vostri compact disc, raccomandiamo di maneggiarli con cura.
Sebbene le minuscole particelle di polvere o le impronte digitali non provocheranno al-
cun effetto sulla lettura, raccomandiamo di mantenere la superficie del lato registrato dei
vostri dischi pulita, usando per la pulizia un panno morbido non peloso, pulito e asciutto
effettuando movimenti in linea retta dal centro verso l’esterno.
Non usare mai prodotti per la pulizia dei dischi, spray per dischi, spray antistatici, né
liquidi né prodotti chimici, questi potrebbero danneggiare irreparabilmente la superfi-
cie plastica del disco.
IMPORTANTE
Dato che il movimento del meccanismo del CD ed il circuito delicato possono causare
interferenza su una sintonizzazione radio vicina; spegnere questo apparecchio men-
tre si sta utilizzando l’altro dispositivo radio.
Questo prodotto utilizza un laser:
Pericolo - Radiazione laser invisibile quando viene aperto e il dispositivo di sincro-
nizzazione si arresta o fallisce. Evitare l’esposizione diretta ai raggi.
Attenzione - L’uso dei controlli, regolazioni o procedure non elencate in questo manu-
ale potrebbero causare un’esposizione rischiosa a radiazioni.

16
Italiano
SPECIFICHE TECNICHE
Alimentazione: DC 5V (Adattatore).
DC 3V = (2 batterie “LR6”).
Generali
Uscita cuffie: 3.5mm jack.
Le specifiche e il design sono soggetti a possibili modifiche senza preavviso a causa
di miglioramenti.
II marchio riportato sul prodotto e sulla sua documentazione indica che il prodotto non deve essere smaltito
can altri rifiuti domestici al termine del ciclo di vita. Per evitare eventuali danni all'ambiente o alla salute
causati dall'inopportuno smaltimento dei rifiuti, si invita l'utente a separare questo prodotto da altri tipi di
rifiuti e di riciclarlo in maniera responsabile per favorire il riutilizzo sostenibile delle risorse materiali. Gli u-
tenti domestici sono invitati a contattare il rivenditore presso il quale e stato acquistato il prodotto a l'ufficio
locale preposto per tutte le informazioni relative alla raccolta differenziata e al riciclaggio per questo tipo di
prodotto. Gli utenti aziendali sono invitati a contattare il proprio fornitore e verificare i termini e le condizioni
del contratto di acquisto. Questo prodotto non deve essere smaltito unitamente ad altri rifiuti commerciali.
CORRETTO SMALTIMENTO DEL PRODOTTO
(rifiuti elettrici ed elettronici)
ATTENZIONE
Il punto esclamativo all’interno di un triangolo avverte l’utente che il libretto d’istruzioni contiene delle
importanti istruzioni per l’uso e la manutenzione.
Il simbolo del fulmine all’interno di un triangolo avverte l’utente della presenza di una pericolosa tensio-
ne all’interno dell’apparecchio.
Per ridurre i rischi di scosse elettriche, non aprire l’apparecchio. L’apparecchio non contiene parti ripa-
rabili dall’utente. In caso di guasto fare appello a tecnici qualificati per le riparazioni.
Questo apparecchio è stato progettato per funzionare a 230V ~ 50Hz. Se non si intende utilizzare
l’apparecchio per un lungo periodo di tempo, rimuovere la spina dalla presa di corrente.
Utilizzare l’apparecchio solo dopo aver verificato che tutte le connessioni siano state eseguite corretta-
mente.
Non esporre l’apparecchio alla pioggia o all’umidità.
Posizionare l’apparecchio in un luogo sufficientemente ventilato. Evitare di sistemarlo vicino a tende,
sul tappeto o all’interno di un mobile quale, ad esempio, una libreria.
Non esporre l’apparecchio alla luce diretta del sole o a fonti di calore.

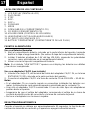
17 Español
LOCALIZACIÓN DE LOS CONTROLES
1. LCD DISPLAY (PANTALLA LCD)
2. PLAY-PAUSE
3. STOP
4. SKIP -
5. SKIP +
6. PROGRAM
7. MODE
8. OPEN (ABRIR EL COMPARTIMENTO CD)
9. CD DOOR (COMPARTIMENTO CD)
10. VOLUME KNOB (CONTROL DE VOLUMEN)
11. HEADPHONES OUT (SALIDA AURICULARES)
12. DC INPUT JACK (ENCHUFE CC)
13. BATTERY COMPARTMENT (COMPARTIMENTO DE LAS PILAS)
FUENTES ALIMENTACIÓN
Uso con Baterías Normales
1. Abrir el compartimento batería, colocado en la parte inferior del aparato, haciendo
deslizar la tapa e luego levantarla. (No extraer la tapa del compartimento batería);
2. Instalar 2 baterías alcalinas de 1.5V del tipo UM-3/AA, siguiendo las polaridades
correctas, como está indicado en el compartimento batería;
3. Volver a cerrar la tapa del compartimento batería.
Nota: Si el símbolo “LOW BATTERY“ aparece en el display, las baterías son débiles
y han de ser reemplazado.
Uso con adaptador CA/CD (non incluido)
1. Introducir la clavija CD, del terminal del cable del adaptador CA/CC 5V, en la toma
ENTRADA CD (12) colocada en la parte posterior del aparato;
2. Conectar el adaptador CA/CD a la toma de corriente CA de 100-240V ~ 50-60 Hz.
Notas:
Si el adaptador CA se conecta cuando se encuentran instaladas las baterías nor-
males, la alimentación será automáticamente suministrada por la corriente CA.
Usar sólo el adaptador CA/CD suministrado. El uso de otros tipos de adaptadores
podrían dañar el aparato.
Asegurarse de que el voltaje del adaptador corresponda al voltaje de su toma de
corriente doméstica antes de conectarlo a la toma de corriente de pared.
No tocar el adaptador con la manos mojadas.
DESACTIVACIÓN AUTOMATICA
Cuando el aparato se detiene por aproximadamente 30 segundos, la función de de-
sactivación automática se activará y el aparato se apagará automáticamente.
La pagina sta caricando ...
La pagina sta caricando ...
La pagina sta caricando ...
La pagina sta caricando ...
La pagina sta caricando ...
La pagina sta caricando ...
La pagina sta caricando ...
La pagina sta caricando ...
La pagina sta caricando ...
La pagina sta caricando ...
La pagina sta caricando ...
La pagina sta caricando ...
La pagina sta caricando ...
La pagina sta caricando ...
La pagina sta caricando ...
La pagina sta caricando ...
La pagina sta caricando ...
La pagina sta caricando ...
La pagina sta caricando ...
La pagina sta caricando ...
La pagina sta caricando ...
La pagina sta caricando ...
La pagina sta caricando ...
La pagina sta caricando ...
La pagina sta caricando ...
La pagina sta caricando ...
-
 1
1
-
 2
2
-
 3
3
-
 4
4
-
 5
5
-
 6
6
-
 7
7
-
 8
8
-
 9
9
-
 10
10
-
 11
11
-
 12
12
-
 13
13
-
 14
14
-
 15
15
-
 16
16
-
 17
17
-
 18
18
-
 19
19
-
 20
20
-
 21
21
-
 22
22
-
 23
23
-
 24
24
-
 25
25
-
 26
26
-
 27
27
-
 28
28
-
 29
29
-
 30
30
-
 31
31
-
 32
32
-
 33
33
-
 34
34
-
 35
35
-
 36
36
-
 37
37
-
 38
38
-
 39
39
-
 40
40
-
 41
41
-
 42
42
-
 43
43
-
 44
44
-
 45
45
-
 46
46


Roadstar PCD-435NCD Manuale utente
- Categoria
- Lettore CD
- Tipo
- Manuale utente
in altre lingue
- français: Roadstar PCD-435NCD Manuel utilisateur
- español: Roadstar PCD-435NCD Manual de usuario
- Deutsch: Roadstar PCD-435NCD Benutzerhandbuch
- português: Roadstar PCD-435NCD Manual do usuário
- slovenčina: Roadstar PCD-435NCD Používateľská príručka
Documenti correlati
-
Roadstar PCD-435CD Manuale utente
-
Roadstar CDR-4200CD/BK Manuale del proprietario
-
Roadstar CDR-4550U/RD Manuale del proprietario
-
Roadstar CDR-4208MP/SL Manuale del proprietario
-
Roadstar CDR-485US/BK Manuale del proprietario
-
Roadstar CDR-265U Manuale del proprietario
-
Roadstar CDR-4200MP Manuale del proprietario
-
Roadstar CDR-4500U Manuale utente