
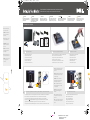
Verify the contents of the box
Dell™ 2209WA Flat Panel Monitor
1
Connect the monitor using ONLY ONE of the following cables: the Blue VGA cable or the White DVI cable
4
Connect the USB cable to the computer
5
2
Remove the cover and place the monitor on it
(A) 080829: First version. (
第3,5項待翻釋)
080924: revised the back paper.
080930: translation ok.
NOTE: The white DVI cable may
not ship with your monitor.
REMARQUE : Le câble DVI blanc
peut ne pas être expédié avec
votre moniteur.
NOTA:
es posible que su monitor
no incluya el cable DVI blanco
OBSERVAÇÃO: O cabo branco
DVI pode não ser enviado com
seu monitor.
HINWEIS: Das weiße DVI-Kabel
wird eventuell nicht mit Ihrem
Monitor geliefert.
NOTA
: il cavo DVI bianco può non
essere in dotazione allo schermo.
UWAGA
: Kabel DVI może nie
być dostarczany wraz z
monitorem.
NOTE: It is recommended that you connect the
monitor using the White DVI cable for better
performance.
HINWEIS: Wir empfehlen, den Monitor über das
weiße DVI-Kabel anzuschließen; so erzielen Sie
eine bessere Leistung.
REMARQUE : Nous vous recommandons
d’utiliser le câble DVI avec le moniteur pour
obtenir de meilleures performances.
NOTA
: se recomienda conectar el monitor
utilizando el cable DVI blanco para conseguir
un mejor rendimiento.
OBS.: É recomendável que ligue o monitor
usando o cabo DVI Branco para uma melhor
performance.
NOTA
: si consiglia di collegare il monitor usando
il cavo DVI bianco, per ottenere una prestazione
migliore.
Setup Ihres Monitors | Installation de votre moniteur | Instalación de su monitor |
Ustawianie monitora | Instalação do monitor | Impostazione del monitor
PRECAUCIÓN:
Antes de configurar y utilizar su equipo
Dell™, consulte las instrucciones de
seguridad que se entregan con el mismo.
CAUTION:
Before setting up your Dell™ monitor,
see the safety instructions that ship
with your monitor.
CUIDADO:
Antes de você ajustar e operar seu computador
Dell™, veja as instruções de segurança
que são enviadas com seu monitor.
ATTENZIONE:
Prima di installare ed usare il computer
Dell™, leggere le istruzioni di sicurezza
fornite in dotazione al monitor.
VORSICHT:
Bevor Sie Ihren Dell™-Computer einrichten
und in Betrieb nehmen, beachten Sie bitte
die Sicherheitsanweisungen, die mit Ihrem
Computer mitgeliefert werden.
ATTENTION :
Avant de configurer et d'utiliser votre
ordinateur Dell™, consultez les précautions
de sécurité livrées avec votre moniteur.
OSTRZEZENIE:
Przed ustawieniem i uruchomieniem komputera
Dell™, sprawdz instrukcje bezpieczenstwa
dostarczone razem z monitorem.
Überprüfen Sie den Lieferumfang
Vérifiez le contenu de la boîte
Verifique los contenidos de la caja
Sprawdz zawartosc opakowania
Verifique o conteúdo da caixa
Verificare il contenuto della scatola
Nehmen Sie die Abdeckung ab, und stellen Sie den Monitor darauf
Enlevez le cache et placez le moniteur dessus
Extraiga la cubierta y coloque el monitor sobre ella
Zdejmij pokrywe i ustaw na niej monitor
Retire a cobertura e coloque o monitor sobre a mesma
Rimuovere la copertura e collocarvi spora il monitor
3
Attach the base to the stand
Befestigen Sie die Unterseite am Ständer
Fixez l'embase sur le support
Coloque la base en el soporte
POdłacz podstawe do wspornika
Prenda a base no suporte
Attaccare la base al supporto
Schließen Sie den Monitor nur mit einem der folgenden Kabel an: dem blauen VGA-Kabel und dem weißen DVI-Kabel
Branchez le moniteur en utilisant UN SEUL des câbles suivants : le câble VGA bleu ou le câble DVI blanc
Conecte el monitor utilizando SÓLO UNO de los siguientes cables: el cable VGA azul o el cable DVI blanco
Podacz monitor uzywajac WYŁACZNIE JEDNEGO z nastepujacych kabli: Niebieski kabel VGA lub biały kabel DVI
Ligue o monitor usando APENAS UM dos seguintes cabos: o cabo Azul VGA ou o cabo Branco DVI
Collegare il monitor usando SOLO UNO dei seguenti cavi: il cavo VGA di colore blu oppure il cavo DVI di colore bianco
UWAGA: Dla uzyskania lepszej wydajnosci
zaleca sie, aby monitor podłaczyć białym
kablem DVI.
Verbinden Sie das weiße USB-Kabel mit dem Computer
Relier le câble USB à l'ordinateur
Conecte el cable USB al equipo
Podłacz kabel USB do komputera
Conecte o cabo USB ao computador
Collegare il cavo USB al computer
C
M
Y
CM
MY
CY
CMY
K
DELL-INL-2209WA-QSG (WF-A)-080930.pdf 2008/9/30 上午 10:44:46DELL-INL-2209WA-QSG (WF-A)-080930.pdf 2008/9/30 上午 10:44:46

w w w . d e l l . c o m | s u p p o r t . d e l l . c o m
Information in this document is subject to
change without notice.
© 2008 Dell Inc. All rights reserved.
Reproduction of these materials in any manner
whatsoever without the written permission of
Dell Inc. is strictly forbidden.
Dell and the DELL logo are trademarks of Dell Inc..
Dell disclaims proprietary interest in the marks and
names of others.
October 2008
Les informations contenues dans ce document
sont sujettes à modifications sans préavis.
©2008 Dell Inc. tous droits réservés.
La reproduction de ces contenus de quelque
façon sans la permission écrite de
Dell Inc. est strictement interdite.
Dell et le logo DELL sont des marques déposées de
Dell Inc.. Dell renonce à tout intérêt de propriété dans
les marques et noms des autres.
Oktober2008
La información de este documento se encuentra
sujeta a cambios sin aviso previo.
©2008 Dell Inc. Todos los derechos reservados.
La reproducción de dichos materiales sin permiso
por escrito de Dell Inc. queda terminantemente
prohibida.
Dell descarga todo interés de propiedad sobre
las marcas y nombres de otras empresas.
Octobre 2008
As informações neste documento estão sujeitas a alteração
sem aviso.
©2008 Dell Inc. Todo os direitos reservados.
A reprodução destes materiais em qualquer maneira sem
a permissão escrita da Dell Inc. é estritamente proibida.
Dell e o logotipo DELL são marcas comerciais da Dell Inc..
A Dell nega qualquer interesse de propriedade em marcas
e nomes de terceiros.
Octubre 2008
Änderung der Informationen in diesem Dokument
jederzeit vorbehalten.
© 2008 Dell Inc. Alle Rechte vorbehalten.
Die Reproduzierung dieser Materialien unter irgendeiner
Form ohre die schriftliche Erlaubnis von Dell Inc.
ist strengstens verboten.
Dell und das DELL Logo sind Warenzeichen von Dell Inc..
Dell hat keine Eigentumsrechte über Marken und
Namen anderer Inhaber.
PaYdziernik 2008
Le informazioni di questo documento sono soggette
a cambiamenti senza preavviso.
©2008 Dell Inc. Tutti i diritti sono riservati..
Qualsiasi tipo di riproduzione di questi materiali, senza
l’autorizzazione scritta della Dell Inc. è severamente proibita.
Dell ed il logo DELL sono marchi di fabbrica registrati
della Dell Inc.. Dell nega ogni interesse di proprietà in
marchi e nomi diversi dal proprio.
Outubro 2008
Informacje zawarte w niniejszym dokumencie
podlegają zmianom bez uprzedzenia.
©2008 Dell Inc. Wszystkie prawa zatrzeżone.
Powielanie tych materiałów w jakikolwiek sposób
bez pisemnej zgody Dell Inc. jest surowo zabronione.
Dell i logo DELL sa zastrzeżonymi znakami towarowymi
Dell Inc.. Firma Dell zaprzecza zainteresowaniu prawami
własności do marek i nazw należących do innych.
Ottobre 2008
NOTE: For more information see the User’s
Guide in the Drivers and Documentation
media that ships with your monitor.
6
7
Printed in China.
Printed on recycled paper.
HINWEIS: Weitere Informationen finden Sie
im Benutzerhandbuch im Medium "Treiber
und Dokumentation", das mit Ihrem Monitor
mitgeliefert wird.
REMARQUE : Pour plus d'informations consultez
le Guide Utilisateur sur le support Pilotes et
documentation livré avec votre moniteur.
NOTA: para más información, consulte el
Manual del usuario en el medio de Documentación
y controladores que incluye su monitor.
UWAGA: W celu uzyskania dalszych informacji,
patrz Podrecznik uzytkownika na nosniku
Drivers and Documentation (Sterowniki i
Dokumentacja) dostarczonym z monitorem.
OBSERVAÇÃO.: Para mais informações veja
Guia do Usuário na mídia Drivers e
Documentação que é enviada junto ao seu monitor.
NOTA: Per altre informazioni, fare riferimento
alla Guida all’uso, del supporto Drivers and
User Documentation (Driver e Documentazione)
fornito in dotazione al monitor.
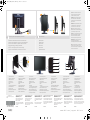
Monitor anpassen
Régler le moniteur
Ajuste el monitor
Ustaw monitor
Ajuste o monitor
Regolazione del monitor
Adjust the monitor
4°
21°
100±5mm
1
2
3
4
5
6
7
11
10
9
8
1. USB downstream ports
2. Regulatory and PPID Label
3. Brightness & Contrast
4. Automatic adjust
5. Input source Select
6. Menu
7. Power (with power light indicator)
8. Stand Release Button
9. Security Lock Slot
10. Dell Soundbar mounting brackets
11. Cable management slot
1. USB Downstream Ports
2. Regulierungs- und PPID-Etikett
3. Helligkeit&Kontrast
4. Auto-Einstellung
5. Eingangsquellenauswahl
6. Menü
7. Ein/Aus (mit Betriebsanzeige)
8. Gestell-Freigabe-Schalter
9. Sicherheitsschloss-Schlitz
10. Dell Soundbar Schraubbefestigungen
11. Schlitz zur Kabelverwaltung
1. Ports USB en aval
2. Étiquette réglementaire et PPID
3. Luminosité et Contraste
4. Réglage automatique
5. Choix de la source d'entrée
6. Menu
7. Alimentation
(avec témoin lumineux d'alimentation)
8. Bouton de dégagement du support
9. Fente de verrouillage de sécurité
10. Supports de montage Dell Soundbar
11. Fente de gestion des câbles
1. Puertos de descarga USB
2. Etiqueta administrativa y de PPID
3. Brillo y Contraste
4. Ajuste automático
5. Selección de fuente de entrada
6. Menú
7. Encendido
(con indicador luminoso de encendido)
8. Botón de liberación del soporte
9. Ranura de bloqueo de seguridad
10. Abrazaderas de montaje para Dell Soundbar
11. Ranura de gestión de cable
1. Portas USB de downstream
2. Etiqueta PPID e Regulatória
3. Brilho e Contraste
4. Ajuste automático
5. Selecionar fonte de entrada
6. Menu
7. Liga/desliga
(com luz indicadora de funcionamento)
8. Botão de Libertação da Base
9. Ranhura de Bloqueio de Segurança
10. Suportes de montagem do Dell Soundbar
11. Slot de gerenciamento do cabo
1. Porte USB downstream
2. Etichetta normativa e PPID
3. Luminosità e Contrasto
4. Regolazione automatica
5. Selezione sorgente in ingresso
6. Menu
7. Tasto d’alimentazione
(con indicatore luminoso)
8. Tasto di sblocco supporto
9. Fessura per blocco di sicurezza
10. Staffe di montaggio Dell Soundbar
11. Alloggio per la gestione dei cavi
1. Porty USB pobierania
2. Etykieta z przepisami i PPID
3. Jasnosc i Kontrast
4. Automatyczna regulacja
5. Wybór zródła wejscia
6. Menu
7. Zasilanie (ze wskaznikiem zasilania)
8. Przycisk zwalniania podstawy
9. Gniazdo zabezpieczenia
10. Wsporniki montazowe panela Dell Soundbar
11. Gniazdo zarzadzania kablami
(DELL P/N:N246H Rev.A00)
506280008210R(A)XX
Connect the power cable and press the power button
Schließen Sie das Netzkabel an, und drücken Sie den Netzschalter.
Branchez le câble d'alimentation et appuyez sur le bouton d'alimentation
Conecte el cable de alimentación y presione el botón de encendido
Podłacz kabel zasilajacy i nacisnij przycisk zasilania
Conecte o cabo de energia e pressione o botão de energia
Collegare il cavo d'alimentazione e premere il tasto d’accensione
C
M
Y
CM
MY
CY
CMY
K
DELL-INL-2209WA-QSG (WB-A)-081009.pdf 2008/10/9 下午 04:56:18DELL-INL-2209WA-QSG (WB-A)-081009.pdf 2008/10/9 下午 04:56:18
-
 1
1
-
 2
2


in altre lingue
- English: Dell 2209WA Quick start guide
- français: Dell 2209WA Guide de démarrage rapide
- español: Dell 2209WA Guía de inicio rápido
- Deutsch: Dell 2209WA Schnellstartanleitung
- português: Dell 2209WA Guia rápido
- polski: Dell 2209WA Skrócona instrukcja obsługi