
THIS INSTRUCTION BOOKLET CONTAINS IMPORTANT SAFETY INFORMATION. PLEASE READ AND KEEP FOR FUTURE REFERENCE.
EN DE FR ES IT PL
USER'S MANUAL/HANDBUCH
/MANUEL DE L'UTILISATEUR/MANUAL DEL USUARIO
HW67015/HW67016
Children's Small House / Kinderspielzelt / Maison pour Enfant /
Casita de Juegos para Niños / Casetta da Principessa per Bambini /
Domek dla dzieci

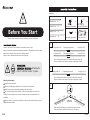
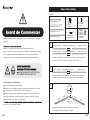
Before You Start
Warning for Assembly
Assembled only by adults
Remove all Packaging, separate and count all parts and hardware.
Read through each step carefully and follow the proper order.
We recommend that, where possible, all items are assembled near the area in
which they will be placed in use, to avoid moving the product unnecessarily once
assembled.
Ensure a secure surface during installation, and place the product always on a flat,
steady and stable surface.
Caution: The Product is not suitable for the children under 3 years
Danger: Keep all small parts and packaging materials for this product away from babies
and children, otherwise they may pose a choking hazard.
Danger: Lack of attachment may cause a risk of tipping.
-Small parts.
Not for children under 3 years.
0-3
Please read all instructions carefully and keep it for future reference.
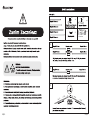
Accessories
1
2
Length 45 cm ×7
Long pipe 45 cm Long pipe 55 cmConnecting pipe sleeve
Long pipe 45 cm Long pipe 70 cmConnecting pipe sleeve
Long pipe 45 cm Long pipe 55 cmConnecting pipe sleeve
Length 55 cm ×2
Length 70 cm ×9
Length 80 cm ×4
Right-angle pipe sleeve Big triangle pipe sleeve
House cloth coverConnecting pipe sleeve
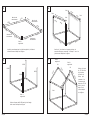
Use a connecting pipe sleeve to connect a 45 CM pipe with a 55
CM pipe as shown in the picture, forming 2 longer pipes in total.
Use a connecting pipe sleeve to connect a 45 CM pipe with a 70
CM pipe as shown in the picture, forming 5 longer pipes in total.
Install and connect the pipes connected in steps 1 and step
2 with a right-angle pipe sleeve as shown in the picture.
3
Connecting pipe sleeve
Connecting pipe sleeve
Right-angle
pipe sleeve
×6
×7 ×1
×4
02/EN 03/EN
90°
45CM 55CM
45CM 70CM
90°135°

04/EN 05/EN
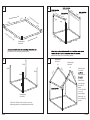
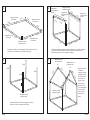
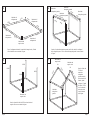
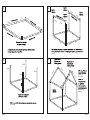
Insert 4 pieces of 80 CM pipes into the right-angle pipe
sleeve as shown in the figure.
4
Right-angle
pipe sleeve
After connecting by the right-angle pipe sleeves,
the bottom is installed as shown in the figure.
5
6
7
80CM
80CM
80CM
80CM
45CM 70CM
45CM 55CM
45CM
45CM
45CM
45CM
45CM
70CM
70CM
55CM
70CM
55CM
45CM 70CM
Connecting
pipe sleeve
Connecting
pipe sleeve
Connecting
pipe sleeve
Connecting
pipe sleeve
Right-angle
pipe sleeve
90°
90°
70CM
70CM
70CM
70CM
Right-angle
pipe sleeve
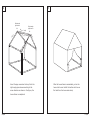
Insert the big triangle pipe sleeve into the 4 upright pipes, and connect
the pipes connected in step 2 with the big triangle pipe sleeves as shown
in the figure.
Right-angle
pipe sleeve Right-angle
pipe sleeve
Big triangle
pipe sleeve
Insert the 70
CM pipe into the
big triangle pipe
sleeve according
to the arrow
direction, and
then connect
the 2 pieces of
70 CM pipes
with the
right-angle pipe
sleeve as shown
in the figure.

06/EN 07/EN
8 9
90°
90°
70CM
45CM 70CM
70CM
Connecting
pipe sleeve
Right-angle
pipe sleeve Right-angle
pipe sleeve
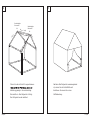
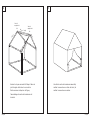
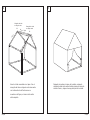
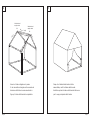
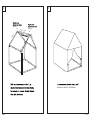
Insert the pipe connected in step 2 into the
right-angle pipe sleeve according to the
arrow direction as shown in the figure, the
house frame is completed.
After the house frame is assembled, put on the
house cloth cover. Install the bottom cloth cover
first and then the house main body.

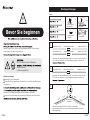
Bevor Sie beginnen
Hinweis zur Montage
Montage nur durch Erwachsene
Entfernen Sie alle Verpackungen, Überprüfen Sie, ob alle Teile und Zubehörteile
vorhanden sind.
montieren, um unnötige Bewegungen nach der Montage zu vermeiden.
Achten Sie bei der Montage auf einen sicheren Untergrund und stellen Sie den
Warnung: Halten Sie alle Kleinteile und Verpackungsmaterialien, die verschluckt
werden können, von Babys und Kindern fern.
0-3
Nicht für Kinder unter 36 Monaten
werden können.
( Erstickungsgefahr!)
02/DE
Montageanleitungen
Zubehör
1
2
Langes Rohr 45 cm Langes Rohr 55 cmVerbindungsrohrmuffe
Langes Rohr 45 cm Langes Rohr 70 cmVerbindungsrohrmuffe
Langes Rohr 45 cm Langes Rohr 55 cmVerbindungsrohrmuffe
Rechtwinklige
Rohrmuffe Rohrmuffe
Zeltstoffhülle
Verbindungsro
hrmuffe
Verwenden Sie eine Verbindungsrohrmuffe, um ein 45-cm-Rohr mit einem
55-cm-Rohr zu verbinden, wie in der Abbildung gezeigt, und bilden Sie
Verwenden Sie eine Verbindungsrohrmuffe, um ein 45-cm-Rohr mit einem
70-cm-Rohr zu verbinden, wie in der Abbildung gezeigt, und bilden Sie
Montieren und verbinden Sie die in Schritt 1 und Schritt 2
angeschlossenen Rohre mit einer rechtwinkligen Rohrmuffe, wie in der
Abbildung gezeigt.
3
Verbindungsrohrmuffe
Verbindungsrohrmuffe
Rechtwinklige
Rohrmuffe
×6
×7 ×1
×4
03/DE
90°
45CM 55CM
45CM 70CM
90°135°

04/DE 05/DE
Führen Sie 4 Stücke von 80-cm-Rohren wie in der
Abbildung gezeigt in die rechtwinklige Rohrmuffe ein.
4
der Boden wie in der Abbildung gezeigt montiert.
5
6
7
80CM
80CM
80CM
80CM
45CM 70CM
45CM 55CM
45CM
45CM
45CM
45CM
45CM
70CM
70CM
55CM
70CM
55CM
45CM 70CM
Verbindungsrohrmuffe
Verbindungsrohrmuffe
Verbindungsrohrmuffe
Verbindungsrohrmuffe
Verbindungsrohrmuffe
Verbindungsrohrmuffe
Rechtwinklige
Rohrmuffe
Rechtwinklige
Rohrmuffe
Rechtwinklige
Rohrmuffe Rechtwinklige
Rohrmuffe
90°
90°
70CM
70CM
70CM
70CM
Rohrmuffe
Rohrmuffe
Rohrmuffe
Rohrmuffe
Rohrmuffe
Dreiecksrohrmuffen, wie in der Abbildung gezeigt.
Führen Sie das
70-cm-Rohr
Pfeilrichtung in
dreieckige
Rohrmuffe ein
und verbinden
Sie dann die
beiden
70-cm-Rohrstück
e mit der
rechtwinkligen
Rohrmuffe, wie
in der Abbildung
gezeigt.

06/DE 07/DE
8 9
Verbindungsrohrmuffe
Rechtwinklige
Rohrmuffe Rechtwinklige
Rohrmuffe
90°
90°
70CM
45CM 70CM
70CM
Führen Sie das in Schritt 2 angeschlossene
Abbildung gezeigt in die rechtwinklige
Rohrmuffe ein. Das Zeltgerüst ist fertig.
Das Zeltgerüst wurde installiert.
Nachdem Das Zeltgerüst zusammengebaut
ist, setzen Sie die Zeltstoffhülle auf.
Installieren Sie zuerst die untere
Stoffabdeckung.

Avertissement pour l’Assemblage
Construction seulement par des adultes
Retirez tous les emballages, séparez et comptez toutes les pièces et le matériel.
Lisez attentivement chaque étape et suivez l’ordre correct.
Nous recommandons que, dans la mesure du possible, tous les articles soient
assemblés à proximité de la zone dans laquelle ils seront utilisés, afin d’éviter de
déplacer inutilement le produit une fois assemblé.
produit sur une surface plane et stable.
Attention : Le produit ne convient pas aux enfants de moins de 3 ans.
Danger : Gardez toutes les petites pièces et les matériaux d’emballage de ce produit
hors de la portée des bébés et des enfants pour éviter un risque d’étouffement.
Danger : Le manque de la fixation pourrait entraîner un risque de basculement.
Veuillez lire attentivement toutes les instructions et les conserver pour la référence
ultérieure.
0-3
Les petites pièces.Ne convient pas
aux enfants de moins de 3 ans.
Étapes d’Assemblage
Accessoire :
1
2
Longueur de 45 cm x 7
Longueur de 55 cm x 2
Longueur de 70 cm x 9
Longueur de 80 cm x 4
Longueur de 45 cm Longueur de 55 cmManchon de raccordement
Longueur de 45 cm Longueur de 70 cmManchon de raccordement
Longueur de 45 cm Longueur de 55 cmManchon de raccordement
Joint à
angle droit Joint
Couverture
de maison
Manchon de
raccordement
Utilisez un manchon de raccordement pour relier un tuyau de 45 CM à un
tuyau de 55 CM comme indiqué sur la figure, formez 2 tuyaux.
Utilisez un manchon de raccordement pour relier un tuyau de 45 CM à un
tuyau de 70 CM comme indiqué sur la figure, formez 5 tuyaux au total.
Assemblez les tuyaux raccordés aux étapes 1 et 2 avec un
joint à angle droit comme indiqué sur la figure.
3
Manchon de raccordement
Manchon de raccordement
Joint à
angle droit
×6
×7 ×1
×4
90°
45CM 55CM
45CM 70CM
90°135°
03/FR02/FR

04/FR 05/FR
Insérez 4 tuyaux de 80 CM dans le joint à angle
droit comme indiqué sur la figure.
4
Après le raccordement par les joints à angle droit, le fond est
assemblé comme indiqué sur la figure.
5
6
7
80CM
80CM
80CM
80CM
45CM 70CM
45CM 55CM
45CM
45CM
45CM
45CM
45CM
70CM
70CM
55CM
70CM
55CM
45CM 70CM
Manchon de raccordement
Manchon de raccordement
Joint à
angle droit
Joint à
angle droit
Joint à
angle droit Joint à
angle droit
90°
90°
70CM
70CM
70CM
70CM
Joint
Joint
Joint
Joint
Joint
Insérez le joint dans les 4 tuyaux verticaux, et
raccordez les tuyaux raccordés à l’étape 2 avec les
joints comme indiqué sur la figure.
Insérez le tuyau
de 70 CM dans
le joint
selon
le sens de la
flèche, puis
connectez les
2 morceaux de
tuyaux de 70 CM
avec le
joint à
angle droit
comme indiqué
sur la figure.
Manchon de
raccordement Manchon de
raccordement
Manchon de
raccordement
Manchon de
raccordement

06/FR 07/FR
8 9
Manchon de raccordement
Joint à
angle droit Joint à
angle droit
90°
90°
70CM
45CM 70CM
70CM
Insérez le tuyau raccordé à l’étape 2 dans le
joint à angle droit selon le sens de la
flèche comme indiqué sur la figure,
l’assemblage du cadre de la maison est
terminé.
Une fois le cadre de la maison assemblé,
mettez la couverture en tissu du fond, et
mettez la couverture au cadre.

Antes de Empezar
El producto solo puede ser ensamblado por adultos.
Lea detenidamente cada paso y siga el orden correcto.
Recomendamos que, siempre que sea posible, todos los elementos se monten cerca
de la zona en la que se van a utilizar, para evitar mover el producto innecesariamente
una vez montado.
sobre una superficie plana, firme y estable.
Precaución: El producto no es adecuado para los niños menores de 3 años.
Peligro: Mantenga todas las piezas pequeñas y los materiales de empaque de este
producto fuera del alcance de los bebés y los niños, ya que, de lo contrario, pueden
suponer un peligro de asfixia.
Lea atentamente todas las instrucciones y consérvelas para futuras consultas.
0-3
- Piezas pequeñas.
No es adecuado para los niños menores de 3 años.
Accesorios:
1
2
Longitud de 45 cm × 7
Longitud de 55 cm × 2
Longitud de 70 cm × 9
Longitud de 80 cm × 4
Tubo largo de 45 cm Tubo largo de 55 cmManguito de tubo de conexión
Tubo largo de 45 cm Tubo largo de 70 cmManguito de tubo de conexión
Tubo largo de 45 cm Tubo largo de 55 cmManguito de tubo de conexión
Manguito de tubo
en ángulo recto Manguito de tubo
triangular grande
Funda de tela
de casita
Manguito de tubo
de conexión
Utilice un manguito de tubo de conexión para conectar un tubo de 45 CM con
un tubo de 55 CM como se muestra en la imagen, formando 2 tubos más
largos en total.
Utilice un manguito de tubo de conexión para conectar un tubo de 45 CM
con un tubo de 70 CM como se muestra en la imagen, formando 5 tubos
más largos en total.
Instale y conecte los tubos conectados en los pasos 1 y 2 con un manguito
de tubo en ángulo recto como se muestra en la imagen.
3
Manguito de tubo de conexión
Manguito de tubo de conexión
Manguito de
tubo en
ángulo recto
×6
×7 ×1
×4
90°
45CM 55CM
45CM 70CM
90°135°
03/ES02/ES

04/ES 05/ES
Inserte 4 tubos de 80 CM en el manguito de tubo en
ángulo recto como se muestra en la figura.
4
Después de conectar con los manguitos de tubo en ángulo recto, la
parte inferior se instala como se muestra en la figura.
5
6
7
80CM
80CM
80CM
80CM
45CM 70CM
45CM 55CM
45CM
45CM
45CM
45CM
45CM
70CM
70CM
55CM
70CM
55CM
45CM 70CM
Manguito de tubo de conexión
Manguito de tubo de conexión
Manguito de tubo
en ángulo recto
Manguito de tubo
en ángulo recto
Manguito de tubo
en ángulo recto Manguito de tubo
en ángulo recto
90°
90°
70CM
70CM
70CM
70CM
Manguito de
tubo triangular
grande Manguito de
tubo triangular
grande
Manguito de
tubo triangular
grande
Manguito de tubo
triangular grande
Manguito de tubo
triangular grande
Inserte los manguitos de tubo triangulares grandes en los 4 tubos verticales,
y conecte los tubos conectados en el paso 2 con los manguitos de tubo
triangulares grandes como se muestra en la figura.
Inserte el tubo de
70 CM en el
manguito de tubo
triangular grande
de acuerdo con la
dirección de la
flecha, y luego
conecte los 2
tubos de 70 CM
con el manguito de
tubo en ángulo
recto como se
muestra en la
figura.
Manguito de tubo
de conexión
Manguito de tubo
de conexión Manguito de tubo
de conexión
Manguito de tubo
de conexión

06/ES 07/ES
8 9
Manguito de tubo de conexión
Manguito de tubo
en ángulo recto Manguito de tubo
en ángulo recto
90°
90°
70CM
45CM 70CM
70CM
Inserte el tubo conectado en el paso 2 en el
manguito de tubo en ángulo recto de acuerdo
con la dirección de la flecha como se
muestra en la figura, el marco de la casita
está completo.
Después de montar el marco de la casita, coloque la
cubierta de tela de la casita. Instale primero la cubierta
de tela inferior y luego el cuerpo principal de la casita.

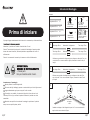
Prima di iniziare
Avvertenza per il montaggio
Questo prodotto è montato dagli adulti.
Rimuovere tutti gli imballaggi, separare e contare tutte le parti e tutti gli accessori.
Leggere attentamente ogni passo e seguire l'ordine corretto.
Si consiglia, ove possibile, di montare tutti gli articoli vicino alla zona in cui
verranno posti in uso, per evitare di spostare inutilmente il prodotto una volta
assemblato.
Garantire una superficie sicura durante il montaggio e posizionare il prodotto
sempre su una superficie piana, stabile.
Si prega di leggere attentamente tutte le istruzioni e conservarle per riferimento futuro.
Attenzione: Il prodotto non è adatto ai bambini sotto i 3 anni.
Pericolo: Tenere tutte le piccole parti e i materiali di imballaggio di questo prodotto
lontano da neonati e bambini, altrimenti potrebbero rappresentare un rischio di
soffocamento.
Pericolo: La mancanza di accessorio può causare un rischio di ribaltamento.
0-3
- Piccole parti.
Non per i bambini sotto i 3 anni.
02/IT
Istruzioni di Montaggio
Accessori
1
2
Lunghezza 45 cm ×7
Lunghezza 55 cm ×2
Lunghezza 70 cm ×9
Lunghezza 80 cm ×4
Tubo lungo 45 cm Tubo lungo 55 cmManicotto di collegamento
Tubo lungo 45 cm Tubo lungo 70 cmManicotto di collegamento
Tubo lungo 45 cm Tubo lungo 55 cmManicotto di collegamento
Manicotto ad
angolo retto
Manicotto
triangolare grande
Fodera in tessuto
per la tenda
Manicotto di
collegamento
Utilizzare un manicotto di collegamento per collegare un tubo da 45 cm con
un tubo da 55 cm come mostrato in figura, formando in totale 2 tubi più
lunghi.
Utilizzare un manicotto di collegamento per collegare un tubo da 45 cm
con un tubo da 70 cm come mostrato in figura, formando in totale 5 tubi
più lunghi.
Installare e collegare i tubi collegati nei passi 1 e 2 con un manicotto ad
angolo retto come mostrato in figura.
3
Manicotto di collegamento
Manicotto di collegamento
Manicotto
ad angolo
retto
×6
×7 ×1
×4
90°
45CM 55CM
45CM 70CM
90°135°
03/IT

04/IT 05/IT
Inserire 4 pezzi di tubi da 80 CM nel manicotto ad
angolo retto come mostrato in figura.
4
Dopo il collegamento tramite i manicotti ad angolo retto, il fondo
viene installato come mostrato in figura.
5
6
7
80CM
80CM
80CM
80CM
45CM 70CM
45CM 55CM
45CM
45CM
45CM
45CM
45CM
70CM
70CM
55CM
70CM
55CM
45CM 70CM
Manicotto di collegamento
Manicotto di collegamento
Manicotto ad
angolo retto
Manicotto ad
angolo retto
Manicotto ad
angolo retto Manicotto ad
angolo retto
90°
90°
70CM
70CM
70CM
70CM
Manicotto
triangolare grande
Manicotto
triangolare
grande
Manicotto
triangolare grande
Manicotto
triangolare grande
Manicotto
triangolare grande
Inserire il manicotto triangolare grande nei 4 tubi verticali e collegare i
tubi collegati al passo 2 con i manicotti triangolari grandi come mostrato
in figura.
Inserire il tubo da
70 CM nel
manicotto
triangolare
grande secondo
la direzione della
freccia, quindi
collegare i 2 pezzi
di tubi da 70 CM
con il manicotto
ad angolo retto
come mostrato
nella figura.
Manicotto di
collegamento
Manicotto di
collegamento
Manicotto di
collegamento
Manicotto di
collegamento

06/IT 07/IT
8 9
Manicotto di collegamento
Manicotto ad
angolo retto Manicotto ad
angolo retto
90°
90°
70CM
45CM 70CM
70CM
Inserire il tubo collegato nel passo
2 nel manicotto ad angolo retto secondo la
direzione della freccia come mostrato in
figura, il telaio della tenda è completato.
Dopo che il telaio della tenda è stato
assemblato, metti la fodera della tenda.
Installare prima la fodera della tenda inferiore e
poi il corpo principale della tenda.

0-3
02/PL
1
2
Pokrowiec
3
prostym)
×6
×7 ×1
×4
90°
45CM 55CM
45CM 70CM
90°135°
03/PL

04/PL 05/PL
na rysunku.
4
5
6
7
80CM
80CM
80CM
80CM
45CM 70CM
45CM 55CM
45CM
45CM
45CM
45CM
45CM
70CM
70CM
55CM
70CM
55CM
45CM 70CM
90°
90°
70CM
70CM
70CM
70CM
rysunku.
zgodnie z
kierunkiem
pokazano na
rysunku.

06/PL 07/PL
8 9
prostym) prostym)
90°
90°
70CM
45CM 70CM
70CM
pokrowiec z tkaniny na szkielecie.
-
 1
1
-
 2
2
-
 3
3
-
 4
4
-
 5
5
-
 6
6
-
 7
7
-
 8
8
-
 9
9
-
 10
10
-
 11
11
-
 12
12
-
 13
13
-
 14
14
-
 15
15
-
 16
16
-
 17
17
-
 18
18
-
 19
19


in altre lingue
- français: Costway HW67015 Manuel utilisateur
- español: Costway HW67015 Manual de usuario
- Deutsch: Costway HW67015 Benutzerhandbuch
Altri documenti
-
Dovre TAI55M Manuale del proprietario
-
 Taski Steam SDV8 Istruzioni per l'uso
-
Nilfisk SDV4500 EU-UK Manuale del proprietario
-
3M DBI-SALA®Confined Space Adjustable Barrel Mount Sleeve Davit Base 8512285, 1 EA Istruzioni per l'uso
-
Bard Retro Instructions For Use Manual
-
Candy CFT620W Manuale del proprietario
-
Hitachi RAC-18WSA Manuale utente
-
Hitachi CR 13 VA Manuale del proprietario
-
Goal Zero Venture 75 Guida utente
-
Goal Zero Venture 35 Manuale utente
