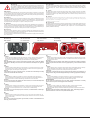
Jamara 405050 Istruzioni per l'uso
- Categoria
- Giocattoli telecomandati
- Tipo
- Istruzioni per l'uso

No. 405050
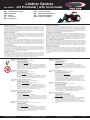
Lindner Geotrac
mit Frontlader | with front loader
7/22
Frequency bands: 2,4 GHz Frequency range: 2405 ~ 2475 MHz EIRP: < 1 mW (max. power transmitted)
DE - Gebrauchsanleitung
GB - Instruction
FR - Notice
IT - Istruzione
ES - Instrucción
CZ - Návodkpoužití
PL -Instrukcjaużytkowania
NL -Gebruiksaanwijzing
SK -Návodnapoužitie
DE - AllgemeineHinweise
JAMARA e.K. übernimmt keine Haftung für Schäden, die an dem Produkt selbst oder durch dieses
entstehen, sofern diese auf falsche Bedienung oder Handhabungsfehler zurückzuführen sind. Der
Kunde allein trägt die volle Verantwortung für die richtige Bedienung und Handhabung; dies umfasst
insbesondere die Montage, den Ladevorgang, die Verwendung bis hin zur Wahl des Einsatzberei-
ches. Bitte beachten Sie hierzu die Bedienungs- und Gebrauchsanleitung, diese enthält wichtige
Informationen und Warnhinweise.
GB - General information
JAMARA e.K. is not liable for any damage caused to the product itself or through this, provided this
is due to improper operation or handling errors. The Customer alone bears the full responsibility for
the proper use and handling, including without limitation, the assembly, the charging process, the
use and choice of the operation area. Please refer to the operating and user instructions, it contains
important information and warnings.
FR - Remarques générales
La société JAMARA e.K. n’est pas responsable de dommages, que ce soit au niveau du modèle
ou causé par celui-ci, résultant d’une utilisation non appropriée. Seul le client est responsable con-
cernant la mise en oeuvre et l’utilisation conforme du matériel; cela va de l’assemblage, en passant
par la charge des accus et allant jusqu’au domaine d’utilisation. Pour cela, veillez lire attentivement
la notice d’assemblage et d’utilisation, celle-ci contient d’importantes informations ainsi que les con-
signes de sécurités.
IT - Informazioni generali
JAMARA e.K. non e´responsabile per danni, sostenute al prodotto stesso o attraverso questo, do-
vuti ad una gestione non corretta del articolo. Solo il cliente si assume la piena responsabilità per
la manutenzione e l´utilizzo corretto dello stesso; questo include il montaggio, la ricarica, l´utilizzo,
contengono informazioni e avvertimenti molto importanti.
ES - Información general
JAMARA e.K. no se hace responsable de los daños causados al producto en sí o por medio de
esto, a menos que esto se debe al mal funcionamiento o errores de manejo. El cliente solo tiene la
responsabilidad completa para el uso y manejo adecuado, incluyendo, sin limitaciones, el montaje,
el proceso de carga, el uso de hasta la elección de la zona de aplicación. Por favor, consulte las
instrucciones de uso y funcionamiento, contiene información y avisos importantes.
CZ-Vyloučeníodpovědnosti
PL -Wykluczenieodpowiedzialności
-
NL - Uitsluiting van de aansprakelijkheid
ervan indien deze schade voortvloeit van onjuiste bediening of foutief gebruik van het product. De
het omvat met name de montage, het ladingproces, het gebruik en de keuze van het toepassings-
gebied. Wij vragen gaarne kennis te nemen van de bedienings- en gebruiksaanwijzing die cruciale
gegevens en waarschuwing omvat.
SK-Vylúčeniezodpovednosti
-
upozornenia.
DE - Geeignet für Kinder ab 6 Jahren.
Achtung: - Für Kinder unter 36 Monaten nicht geeignet.
ERSTICKUNGSGEFAHR!
- Enthält verschluckbare Kleinteile.
Von Kleinkindern unbedingt fernhalten.
- Dieses Modell ist nicht dafür bestimmt, durch Personen (einschließlich
Kinder) mit eingeschränkten physischen, sensorischen oder geistigen
Fähigkeiten oder mangels Erfahrung und/oder mangels Wissen benutzt zu
werden, es sei denn, sie werden durch eine für ihre Sicherheit zuständi-
ge Person beaufsichtigt, wie das Gerät zu benutzen ist.
GB - Suitable for children over 6 years.
Warning: - Not suitable for children under 36 months.
RISK OF SUFFOCATION!
- Contains small parts which can be swallowed.
Keep away necessarily from children.
- This device is not intended for use by individuals (Including children) with
reduced physical sensory, mental abilities, lack of experience and / or
knowledge, unless they are supervised in how the device is to be used.
FR - Adapté pour des enfants à partir de 6 ans.
Attention: - Ne convient pas aux enfants de moins de 36 mois.
DANGER D‘ETOUFFEMENT!
- Contient de petites pièces facilement avalables.
Garder lion nécessairement enfants.
-
(également des enfants) présentant des défaillances physiques, sensitives
ou mentales, cela s’applique aussi aux personnes n’ayant pas ou peu
d’expériences hormis si celle-ci est accompagnée par une personne
responsable et concernant la manipulation de cet appareil.
IT - Consigliato per bambini superiori ai 6 anni.
Attenzione: - Non adattato ai bambini inferioti ai 36 mesi.
PERICOLO DI SOFFOCAMENTO!
- Contiene pezzi piccoli.
Tenere lontano assolutamente dei bambini.
- Questo prodotto non è destinato a essere utilizzato da persone (bambini
oppure mancanza di esperienza e/o di conoscenza. A meno che, siano
sorvegliate da una persona responsabile della loro sicurezza su come usare
il prodotto in modo corretto.
ES-Aptoparaniñosmayoresde6años.
Atención: - No es recomendable para los niños menores de 36 meses.
RIESGO DE ASFIXIA!
- Contiene piezas pequeñas.
Mantenga necesariamente lejosde los niños.
- Este dispositivo no debe ser utilizado por personas(incluidos niños) con
discapacidad física, habilidades sensoriales o mentales o la falta de
experiencia y / o conocimientos, porque son responsables de su propia
seguridad persona de supervisión sobre cómo se utiliza el dispositivo.
CZ -Určenoprodětiod6 let.
Varování:
NEBEZPEČÍUDUŠENÍ!
PL-Wolnoużywaćosobomod6 lat.
Uwaga:
ISTNIEJERYZYKOUDŁAWIENIA!
trzymane z dala!
NL - Geschikt voor kinderen vanaf 6 jaar.
Let op: - Niet geschikt voor kinderen onder de 36 maanden.
VERSTIKKINGSGEVAAR!
- Bevat kleine onderdelen.
Het mag onder geen beding aan kleine kinderen gegeven worden.
- Dit model mag niet gebruikt worden door kinderen en personen met een
beperkte mentale capaciteit of met gebrek aan kennis, tenzij zij onder
toezicht van een voor hun veiligheid instaande persoon staan of tenzij zij
instructies kregen, hoe het model gebruikt dient te worden.
SK-Vhodnépreosobyod6rokov!
Pozor: -
NEBEZPEČENSTVOZADUSENIA!
-
-

2
DE - Konformitätserklärung
Hiermit erklärt JAMARA e.K., dass das Produkt‚ „Lindner Geotrac mit Frontlader,
No. 405050“ den Richtlinien 2014/53/EU, 2011/65/EU und 2009/48/EG entspricht.
Der vollständige Text der EU-Konformitätserklärung ist unter der folgenden
www.jamara-shop.com/Konformitaet
GB-CerticateofConformity
Hereby JAMARA e.K. declares that the product „Lindner Geotrac mit Frontlader,
No. 405050“ complies with Directive 2014/53/EU, 2011/65/EU and 2009/48/EC.
The full text of the EU Declaration of Conformity is available at the following Internet
www.jamara-shop.com/Conformity
FR - Déclaration de conformité
Par la présente, JAMARA e.K. déclare que le produit „Lindner Geotrac mit Frontlader,
No. 405050“ est conforme à la Directive 2014/53/UE, 2011/65/UE et 2009/48/CE.
Le texte intégral de la déclaration de conformité CE est disponible via l‘adresse Internet
www.jamara-shop.com/Conformity
IT - Dichiarazione di conformità
Con la presente JAMARA e.K. dichiara che il prodotto „Lindner Geotrac mit Frontlader,
No. 405050“ è conforme alla Direttiva 2014/53/UE, 2011/65/UE e 2009/48/CE.
Il testo integrale della dichiarazione di conformità UE è disponibile al seguente indirizzo
www.jamara-shop.com/Conformity
ES - Declaración de conformidad
Por la presente JAMARA e.K. declara que el producto „Lindner Geotrac mit Frontlader,
No. 405050“ cumplen con las Directivas 2014/53/UE, 2011/65/UE y 2009/48/CE.
www.jamara-shop.com/Conformity
CZ-Osvědčeníoshodě
, No. 405050“
2011/65/EU a 2009/48/ES.
www.jamara-shop.com/Conformity
PL-Deklaracjazgodności
No. 405050“ jest zgodny z dyrektywami 2014/53/UE, 2011/65/UE i 2009/48/WE.
-
www.jamara-shop.com/Conformity
NL - Conformiteitsverklaring
No. 405050“ aan de richtlijnen 2014/53/EU, 2011/65/EU en 2009/48/EG voldoen.
De volledige tekst van de EU-conformiteitsverklaring is beschikbaar op het volgende
www.jamara-shop.com/Conformity
SK-Vyhlásenieozhode
No. 405050“ je v súlade so smernicami 2014/53/EÚ, 2011/65/EÚ a 2009/48/ES.
www.jamara-shop.com/Conformity
DE
Achtung!
Vor dem Betrieb: Erst Modell und dann den Sender einschalten.
dazu gehörenden Sender einschalten. Dann das nächste Fahrzeug und den dazu
einschalten da sonst mehrere Fahrzeuge auf den selben Sender reagieren könnten.
Bei Beendigung: Erst das Modell und dann den Sender ausschalten.
Sowohl die maximale Sichtweite als auch die max. Reichweite Ihres Modells hängen von
vielen Faktoren wie Witterung, Einsatzort und vorhandenen Störfrequenzen ab. Führen Sie
deshalb vor jedem Einsatz mit einer zweiten Person, die das Modell während des Tests
während des Betriebs bei einem Signalausfall wie z.B. bei leeren Senderbatterien oder
ausgeschaltetem bzw. ausgefallenem Sender verhält.
GB
Attention!
Before operating:
appropriate transmitter. Do not switch on several models or transmitters at the same time
as multiple models could react to the same transmitter.
Whennisished:
max. range of your model will depend on many factors such as weather, location and
interfering frequencies. Therefore, before each use perform a range test with a second
person securely holding the model and also check how the model reacts if there is a
signal failure e.g. when empty transmitter batteries are installed.
FR
Attention!
Avant l’utilisation
l’engin et ensuite l’émetteur convenable. Puis un autre engin et l’émetteur convenable et
puisque plus d’un véhicule pourront réagir à la commande d’un émetteur.
Après utilisation:
ainsi que la portée maximale dépendent de plusieurs facteurs tels que le temps, le lieu
d’utilisation et les présentes fréquences perturbatrices. Pour cela, avant chaque usage,
due par exemple à des piles usées ou à un émetteur éteint.
IT
Attenzione!
Prima dell‘uso: Accendete prima il modello e poi la trasmittente.
contemporaneamente, altrimenti i vari veicoli possono rispondere alla stessa radio.
Dopo l‘uso: Spegnere prima il modello e poi la trasmittente.
massima del vostro modello dipendono da molti fattori, come il tempo, disturbo di
frequenza e il luogo di utilizzo. Eseguire un test prima di ogni utilizzo del modello con una
reagisce il modello durante la perdita del segnale causato per esempio da una batterie
scarica oppure la radio spenta.
ES
¡Atención!
Antes del uso: Encender primero el modelo, y después la emisora.
asociada. A continuación, el siguiente vehículo y la emisora asociada, etc. No encender
responder a la misma emisora.
Después del uso: Apagar primero el modelo, y después la emisora.
frecuencia de interferencia y el lugar de utilización. Realice una prueba antes de cada uso
puede comprobar cómo el modelo reacciona durante la pérdida de señal causada por
ejemplo por una batería descargada o la emisora apagada.
CZ
Varování!
Přizapínání:
Přivypínání:
PL
Uwaga!
Przed uruchomieniem:
Pozakończeniu:
NL
Let op!
In het begin: eerst het model en dan de zender inschakelen.
de toegewezen zender. Vervolgens het volgende voertuig en de aan hem toegewezen
zender. Nooit meerdere voertuigen of zenders tegelijk aanzetten omdat meerdere
voertuigen mogen met dezelfde zender werken.
Bij beëindiging: eerst het model en dan de zender uitschakelen.
de max. afstand van het model zijn afhankelijk van vele factoren zoals het weer, de
werkingsplaats en storende frequenties. Daarom dient, voor elk gebruik, een afstandtest
met een andere persoon te worden uitgevoerd die het voertuig op een veilige manier
vasthoudt. Hier wordt het functioneren van het model bij ontbrekend signaal tijdens de
werking gecontroleerd als bv. bij lege batterijen van de zender of bij een defecte zender
of bij een zender die uit staat.
DE - Bitte lesen Sie die komplette Bedienungsanleitung und Sicherheitshinweise sorg-
fältig durch bevor Sie das Modell in Betrieb nehmen.
Achtung!Warnhinweise/Sicherheitshinweiseunbedingtkomplettlesen.
DiesedienenIhrerSicherheitundkönnenUnfälle/Verletzungenvermeiden.
GB - Read the complete instructions and security instructions carefully before using
the model.
Caution!Pleasefullyandcarefullyreadwarnings/safetyinstructions.These
areforourownsecurityandcanavoidaccidents/injuries.
FR - Veuillez lire attentivement et entièrement la notice et les consignes de sécurités
avant tout utilisation de ce produit!
Attention! La mise en garde et les consignes de sécurités sont à lire
entièrement pour votre sécurité et éviter tout accidents et blessures.
IT - Vi preghiamo di leggere attentamente la istruzione completa e Istruzioni per la
sicurezza prima di usare il modello.
Attenzione!Leggerecompletamenteleavvertenze/istruzionidisicurezza,
questisonoperlavostrasicurezzapuòprevenireincidenti/infortuni.
ES - Lea atentamente la instruccion completa y seguridad antes de poner el modelo
en funcionamiento
Atención!Leercompletamentelasnotasdeadvertencia/instruccionesde
seguridadestossonparasuseguridadypuedeevitaraccidentes/lesiones.
CZ -
Upozornění!Varování/bezpečnostnípokynymusíbýtpřečtenyvplném
rozsahu!Sloužívašíbezpečnostiamohouzabránitnehodám/zraněním.
PL -
Uwaga!Ostrzeżenia/instrukcjebezpieczeństwamuszązostaćprzeczytane
wcałości!SłużąonePaństwabezpieczeństwuimogązapobiecwypadkom/
urazom.
NL - Lees de volledige instructies en veiligingheidsinstructies zorgvuldig door voordat
u het model in gebruik neemt.
Letop!Waarschuwingen/veiligheidsinstructiemoetenvolledigworden
gelezen!Zezorgenvooruwveiligheidenkunnenongevallen/letsels
voorkomen.
SK -
Upozornenie!Varovania/bezpečnostnépokynysamusiaprečítaťvcelom
rozsahu!SlúžianaVašubezpečnosťamôžuzabrániťnehodám/zraneniam.

3
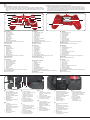
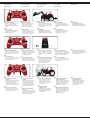
DE - Funktionen
1. Ein/Aus Starten
2. Hupe und Sound
3. Vorwärts/Rückwärts
4. Links/rechts
5. Demofunktion
6. Power LED
7. Ein-/Ausschalter
8. Batteriefach
9. Frontlader heben/senken
Batterien einlegen
Auf Polarität achten.
GB - Functions
1. Start button
2. Horn & Sound
3. Forward/backward
4. Left/right
5. Demo-function
6 . Power LED
8. Battery cover
9. Lift/Lower shovel
10. Function keys for accessories (not included)
Fitting the batteries
FR - Fonctions
3. Marche avant/arriére
4. Tourner à droite/gauche
6. Lumière LED
7. Interrupteurs
8. Batterie
9. Pelle en haut/bas
10. Touches de fonction pour accessoires (non incluses)
Mise en place des piles
Respectant la polarité.
IT - Funzioni
1. Accendi/Spegni - Avvio
2. Clacson e suono
3. Avanti/Indietro
4. Sinistra/Destra
5. Demo funzione
6. Power LED
7. Pulsante Accendi/Spegni
8. Vano batteria
9. Sollevare/Ribassare la pala
10. Tasti funzione per accessori (non incluso)
Montaggio delle pile
Rispettando la polarità.
ES - Funciónes
2. Claxon y Sonido
3. Avanti/Indietro
4. Sinistra/Destra
5. Función demo
6. Power LED
8. Vano batteria
9. Levantar/Rebajar la pala
10. Teclas de función para accesorios (no incluido)
Instalación de las pilas
Preste atención a la polaridad.
CZ-KomponentyVysílač
1.
4. doleva/doprava
9. Podnoszenie/opuszcza nie czerpaka
Vloženíbaterií:
PL - Funkcje
4. w lewo/w prawo
5. funkcja demo
6. dioda LED
8. komora na baterie
10. Klawisze funkcyjne akcesoriów (brak w zestawie)
Zakładaniebaterii
NL - Functies
1. Aan/uit knop
2. Geluidssignaal en geluid
3. Vooruit/achteruit
4. Links/rechts
5. Demo-functie
6. LED aanduiding van de voeding
7. Aanzetten/Uitzetten
8. Batterijcontainer
9. Lift/Lagere schop
10. Functie toetsen voor accessoires (niet meegeleverd)
Batterij zetten
SK - Funkcie
2. Horn a zvuk
3. Vpred / vzad
5. Demó funkció
6. Power svetlo emitujúca dióda (LED)
8. Priestor pre batérie
Vloženiebatérií
7
8
2x AA
1
10 10
3
5
9
4
2
6
12 3
4
SK
Pozor!
Pred prevádzkou:
Poukončení:
DE
Sollte das Modell nach rechts
bzw. links ziehen, können Sie
dies mit dem Regler
an der Unterseite des Modells
feinjustieren.
2. EIN/AUS Schalter
3. Batteriefach
(nicht enthalten)
GB
The directional guide on the
bottom of the
model can be used to adjust the
models straight-line-running
performance.
3. Battery cover
4. Socket for accessories
(not included)
FR
Si votre modéle devait tourner à
droite ou à gauche
compenser cela grâce au
bouton de réglage sous la
modéle.
3. Compartiment pour piles
4. Prise de raccordement pour
accessoires (non inclus)
IT
Se il modello con lo sterzo al
centro non va diritto potrete
egolare la sua traiettoria
con il regolatore ubicato sotto il
modello.
3. Compartimento batteria
4. Presa di collegamento per
accessori (non incluso)
ES
Si el modelo va en derecha o
izquierda, puedes ajustar el
modelo.
3. Compartimento de la batería
4. Enchufe del conector para
accesorios (no incluido)
CZ
modelu.
PL
3. komora na baterie
4. Gniazdo na akcesoria
(brak w zestawie)
NL
1. Hefboom voor het nivelere de
Als het model naar rechts of l
inks trekt, kan het gecorrigeerd
worden met behulp
van eennauwkeurige afstelling
met de regelaar onderaan.
2. Aan/ /uit
3. Batterijcontainer
4. Contactdoos voor accessoires
(niet meegel verd)
SK
3. Priestor pre batérie

4
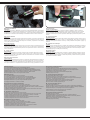
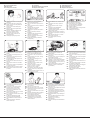
DE - Einlegen der Batterien
Batteriebox:
Lösen Sie die Schraube am Batteriefach und nehmen Sie den Batteriefachdeckel ab. Entnehmen
Sie die Batteriebox und legen Sie 4x AA Batterien (nicht enthalten) (je oben und unten 2 Stück) in
die Batteriebox ein, achten Sie auf die richtige Polung. Legen Sie anschließend die Batteriebox in
das Batteriefach. Schließen Sie die Abdeckung und schrauben Sie diese mit der Schraube fest.
GB - Fitting the Batteries
Batterybox:
Loosen the screw of the battery compartment and remove the battery cover. Remove the battery box
and insert 4x AA batteries (not included) (each two in the top and bottom of the battery box). Pay
attention to the correct polarity. Insert the battery box in the battery compartment. Put the battery
cover in place and secure it carefully.
FR - Insertion des piles
Compartiment des piles:
Dévissez les vis du compartiment à piles et retirez le couvercle. Retirez le compartiment à pile et
insérez 4x piles AA (non fournies) (2 pièces chacune en haut et en bas) dans le compartiment à
pile. Insérez ensuite le compartiment des piles dans son emplacement. Fermez le couvercle et le
serrer à l‘aide de la vis.
IT - Inserire le batterie
Scatola batteria:
Svitare la vita del vano batteria e rimuovere il coperchio del vano batteria. Rimuovere la scatola
batteria e inserire 4 batterie AA (non incluse) (2 pezzi ciascuna in alto e in basso) nel vano batte-
rie, facendo attenzione alla corretta polarità. Inserire la scatola batteria nel vano batterie. Chiudere
il coperchio e serrarlo con la vite.
ES-Colocacióndelasbaterías
Cajadelabatería:
-
tire la caja de la batería y inserte 4 pilas AA (no incluidas) (2 piezas cada una en la parte superior
y inferior) en la caja de la batería, prestando atención a la polaridad correcta. A continuación, inse-
rir la caja de la batería en el compartimento de la batería. Cierre la tapa y apriétela con el tornillo.
CZ-Vloženíbaterií
Prostorprovloženíbaterií:
PL - Umieszczanie baterii
Pojemnik na baterie:
starannie.
NL - Installatie van de batterijen
Accubak:
Draai de schroef in het batterijvak los en verwijder deze verwijder het batterijdeksel. Verwijder het
accubak en plaats 4 x AA-batterijen (inbegrepen niet) (elk twee bovenaan de accubak en onder).
Aandacht dat je de palen in de goede richting draait. Plaats de accubak in het batterijvak. Plaats
het batterijklepje terug en bevestig het het voorzichtig.
SK-Vkladaniebatérií
Nádobka na batérie:
-
ky na batérie a dotiahnite ho skrutkou.
DE - Batteriehinweis:
Die Anschlussklemmen dürfen nicht kurzgeschlossen werden!
GB - Battery warning:
Non-rechargeable batteries are not to be recharged!
Do not mix alkaline batteries, standard (carbon-zinc) or rechargeable batteries!
Rechargeable batteries are to be removed from the toy before being charged!
Rechargeable batteries are only to be charged under adult supervision!
The supply terminals are not to be short-circuited!
FR - Informations concernant l‘accumulateur:
Ne pas ouvrir! Ne pas jeter au feu! Ne pas utiliser des piles neuves et usées à la fois!
IT - Informazioni relative alle pile:
Le batterie non ricaricabili non devono essere caricate!
Non aprire! Non gettare nel fuoco! Non usare contemporaneamente pile nuove e pile usate!
Non usare contemporaneamente pile alcaline, standard (zinco-carbone) e ricaricabili!
Le batterie ricaricabili devono essere rimosse dal giocattolo!
Le batterie ricaricabili possono essere ricaricate solo sotto la supervisione di un adulto!
I morsetti di collegamento don devono essere cortocircuitati!
ES - Advertencia sobre las baterías:
Las baterías no recargables no se pueden cargar!
No abrir! No arrojar al fuego! No mezcle baterías nueva y viejas!
Las baterías recargables deben retirarse del juguete!
Las baterías recargables sólo pueden cargarse bajo la supervisión de un adulto!
Los conectores de conexión no deben estar en cortocircuito!
CZ - Informace ohledně akumulátoru:
PL - Informacja dotycząca akumulatora:
NL - Gegevens betreende de accu:
Laad geen wegwerpbatterij op!
Niet openen! Niet in het vuur werpen! Gebruik geen oude en nieuwe battijen tegelijkertijd
Gebruik geen alkaline batterijen, standaard (zinkkoolstof) of oplaadbare batterijen tegelijkertijd
Verwijder de batterijen uit het speelgoed voordat het wordt opgeladen!
Laad de batterijen op enkel onder toezicht van een volwassene!
Voorkom kortsluiting van de aansluitingsklemmen!
SK - Informácia ohľadom akumulátora:
Nenabíjajte jednorazové batérie!
Nezvierajte pripojovacie svorky!

1 1.2 1.3
ON
ON
OFF
OFF
DE - Achtung!
Sie es wieder in Betrieb nehmen. Beim Austausch der Batterien muss eine Ab-
kühlphase von mindestens 10 Minuten eingehalten werden bis das Modell wieder
betrieben wird. Bei Überhitzung kann Beschädigung der Elektronik oder Brandge-
fahr die Folge sein.
GB - Attention!
FR - Attention!
-
IT - Attenzione!
danneggiare l’elettronica o pericolo d’incendio possono esssere le conseguenze.
ES - ¡Atención!
ponerlo en funcionamiento. Al sustituir las baterías debe ser respetada un período de enfriamiento
de al menos 10 minutos hasta que se hace funcionar
de nuevo el modelo. El sobrecalentamiento puede dañar la electrónica o peligro de incendio puden
ser la consecuencia.
CZ -Upozornění!
-
PL-Uwaga!
-
NL - Attentie!
Laat het model na elk gebruik voldoende afkoelen voordat u het weer in gebruik neemt. Bij het vervan-
gen van batterijen moet er een afkoelfase van minstens 10 minuten zijn voordat het model opnieuw
kan worden gebruikt. Oververhitting kan de elektronica
beschadigen of brand veroorzaken.
SK - Upozornenie!
-
DE - Bedienung
GB - Operation
FR - Fonctionnement
IT - Funzionamento
ES - Funcionamiento
CZ - Obsluha
PL-Obsługa
NL-Bewerking
SK - Operácie
DE
1.ON/OFF
Schalten Sie erst das Modell und dann den Sender ein, ein kurzer Piep-Ton ertönt. Drücken Sie
den Startknopf und das Modell wird gestartet. Es ertönt ein realistisches Motorengeräusch.
Durch erneutes drücken des Startknopfs geht das Modell in den Standby-Modus.
Achtung:
WenndemModell länger als50Sek. keineBefehlegesendet werden,schaltetdas Modell
automatischinStandbyundmussdurcherneutesdrückendesStartknopfesneugestartet
werden.
GB
1.ON/OFF
the start button and the model is started. You will hear a realistic motor sound. By pressing the
start button again, the model goes into standby mode.
Warning!
Ifthemodeldoesnotgetanyinputwithin50sec.,themodelturnsautomaticallyinstandby
andmustberestartedwiththestartbutton.
FR
1.ON/OFF
bouton de démarrage et le modèle est en route. Vous entendrez un bruit de moteur réaliste. En
appuyant à nouveau sur le bouton de démarrage, le modèle se met en mode veille.
Attention!
Sivousn’envoyezplusd’ordrependantplusde50secondes,levéhiculeautomatiquement
en mode veille et il faudra le redémarrer.
IT
1.ON/OFF
Accendere prima il modello e poi il trasmettitore, si sente un breve segnale acustico. Premere il
pulsante di avvio e il modello viene messo in moto. Si sentirà un suono realistico del motore.
Premendo nuovamente il pulsante di avvio, il modello entra in modalità standby..
Attenzione!
Seilmotorenonricevecomandiperpiùdi50secondi,vaautomaticamenteinStandbye
deve essere riavviato.
ES
1.ON/OFF
Primero encender el modelo y luego la emisora, se oye un tono corto. Pulse el botón star y se
inicia el modelo. Suena un ruido de motor realista. Al pulsar el botón de inicio de nuevo, el modelo
entra en modo standby.
Atención!
Sinolevasadarmasde50segundosniguncomandos,elmodelovaautomáticamenteen
Standbyysedebereiniciarr.
CZ
1.ON/OFF
Upozornění:
Pokudběhem50sekundnedostanemodelžádnýpovelzdálkovéhoovládání,automaticky
sepřepnedopohotovostníhorežimu.Chcete-lijejopětzapnout,jenutnéstisknoutstartovací
tlačítko).
PL
1.ON/OFF
Ostrzeżenie:
Jeślipojazdnieorzymażadnegosygnałuwciągu50sekund,przełączysięautomatyczniew
funkcjęczuwaniaiabyponowniezacząłjeździćnależyuruchomićgoprzyciskiemstartowym.
NL
1.Aan/uit
Eerst het model aanzetten en vervolgens de zender, er volgt een kort geluidssignaal. Het
indrukken van start activeert het model. Er volgt een realistisch geluid van de motor. Door
nogmaals op de startknop te drukken gaat het model in stand-by modus.
WAARSCHUWING!
Alshet modelbinnen 50seconden geen invoer krijgt, wordt dezeautomatisch instand-by
gezetenmoethetopnieuwwordenopgestartmetdestartknop.
SK
1.ON/OFF
Upozornenie:
Akdlhšienež50sekúndmodelnedostanežiadenpokyn,potomautomatickyprejdedo
pohotovostnéhostavuamusísaznovuspustiťtlačidlom„Štart”.

6
DE
4. Schaufelheben/senken/
abkippen
Starten Sie den Traktor. Drücken
Sie an der Fernsteuerung die
linke Taste, hebt sich die
Schaufel. Drücken Sie die rechte
Taste, senkt sich die Schaufel.
GB
4. Raise/lower/tiltshovel
Start the tractor. Press the left
button to lift the shovel, press the
top right one to lower it.
FR
4. Lapelleélever/abaisser/
basculer
Mettez en marche le tracteur.
Quand vous appuyez sur la
touche gauche de la radio-
commande, la pelle s‘élève.
Si vous appuyez sur la touche
droite, la pelle s‘abaisse.
IT
4. Palasollevare/ribassare/
inclinare
Accendere il trattore. Premere il
tasto alla sinistra della radio, la
pala si solleva. Premere il tasto
destra, la pala si ribassa.
ES
4. Palalevantar/rebajar/inclinar
Encender el tractor. Pulse el
botón en la emisora en la
izquierda, la pala se levanta.
Pulse el botón a la derecha, la
pala se rebaja.
CZ
4. Zvednutí/sklopení/
nakloněnílžíce
PL
4. Podnoszenie/opuszczanie/
wychylanieczerpaka
lewy
przycisk na zdalnym sterowaniu
w celu ponoszenia czerpaka.
opuszczenia czerpaka.
NL
4. Bucketheen/dalen/optillen
Trekker activeren. Druk de linker
knop aan de afstandsbediening
in om de kiepbak te Druk
de rechter knop in om de
kiepbak te verlagen.
SK
4. Zdvíhanie/spúšťanie/
vyťahovanievedra
spustite vedro.
2
3
4
DE - Bedienung
GB - Operation
FR - Fonctionnement
IT - Funzionamento
ES - Funcionamiento
CZ - Obsluha
PL-Obsługa
NL-Bewerking
SK - Operácie
DE
2.Vorwärts/rückwärts
Drücken Sie den Gashebel nach
vorne oder zurück, wird das
Modell vorwärts bzw. rückwärts
fahren.
GB
2. Left or right turn
Push the throttle stick forward or
backward, the model will drive
forward or backward.
FR
2.Marcheavant/arriére
Poussez le levier du gaz vers
l‘avant ou vers l’arrière et le
modèle fera une marche
avant ou une marche arriére.
IT
2.Avanti/indietro
Spingere l‘acceleratore in avanti
o indietro e il modello andrà
avanti o indietro, mentre questo
manovra i fari sono accesi.
ES
2.Adelante/Atás
Primer la palanca de gas hacia
los faros brillan.
CZ
2.Vpřed/zpět
nebo dozadu, model se bude
PL
2.Doprzodu/dotyłu
NL
2.Vooruit/achteruit
naar achteren, het model zal
vooruit of achteruit rijden.
SK
2. Vpred/vzad
DE
3.Linksbzw.Rechtslenken
Drücken Sie den Richtungshebel
nach links oder rechts, lenkt das
Modell nach links oder rechts.
GB
3. Left or right turn
If you push the direction stick to
the left or right, the model will
drive to the left or right.
FR
3. Tourner à droite ou à gauche
Poussez le levier de direction
vers la droite ou vers la gauche.
Le véhicule va prendre la
direction commandée.
IT
3. Girare a sinistra o destra
Se si tiene premuto la leva di
direzione a sinistra o a destra, il
modello gira a destra o sinistra.
ES
3. Giro a la izquierda o derecha
Primer la palanca de dirección
hacia izquierda o derecha, el
modelo se gira hacia izquierda o
drecha.
CZ
3.Zatáčenídolevanebodoprava
-
doleva nebo doprava.
PL
3.Skrętwprawolubwlewo
zmiany kierunku w lewo lub w
-
wiednio w lewo lub w prawo.
NL
3. Links of rechts draaien
Als u de richtingsstick naar links
of rechts duwt, rijdt het voertuig
naar links of rechts.
SK
3. Riadenievľavoalebovpravo
alebo doprava sa model posunie

7
5 6
DE - Bedienung
GB - Operation
FR - Fonctionnement
IT - Funzionamento
ES - Funcionamiento
CZ - Obsluha
PL-Obsługa
NL-Bewerking
SK - Operácie
DE
5. Hupe/Soundabschalten
Durch drücken der Hupe ertönt ein Hup-
Ton. Durch längeres drücken der Hupe wird
der Ton abgeschaltet.
6. Demo-Taste
Die Demo-Taste lässt das Modell automa-
tisch Manöver durchfüren.
7. Motor aus
Wenn dem Modell länger als 50 Sek. keine
Befehle gesendet werden, schaltet sich das
Modell automatisch aus und muss neu
gestartet werden.
GB
5.Horn/Soundo
By holding down the horn-button the sound
a horn sound will be heard.
5. Demo button
The demo button allows the model to
automatically perform manoeuvres.
7.Engineo
If the model does not get any input within
and must be restarted.
FR
5.Klaxon/Éteindreleklaxon
Si vous appuyez longtemps sur le klaxon, le
son en est coupé. En appuyant sur le
klaxon, vous entendrez le son d’un klaxon.
6. Touche démo
Le bouton de démonstration permet au
automatiquement.
7. Moteur coupé
Si vous n’envoyez plus d’ordre pendant
plus de 50 secondes, le véhicule s’éteint
automatiquement et il faudra le redémarrer.
IT
5.Clacson/Spegnim.suono
Premendo per un tempo prolungato il
clacson si spegne il suono. Premendo il
clacson, si sente un suono di clacson.
6. Funzione Demo
Il pulsante demo permette al modello di
eseguire automaticamente delle manovre.
7. Spegnimento motore
50 secondi, si spegne automaticamente e
deve essere riavviato.
ES
5. Claxon/Apagarelsonido
el tono. Al pulsar el claxon suena un
sonido.
6. Botón-Demo
El botón permite que el modelo realliza
7. Motor apagado
Si no le vas a dar mas de 50 segundos
nigun comandos, el modelo se apaga en
CZ
5. Houkačka|Vypnutízvuku
zvuk vypne.
6. Demo-tlačítko
7.Vypnutímotoru
Pokud se modelu déle jak 50 sekund
automaticky vypne a musí se znovu
nastartovat.
PL
5.Klakson|Wyłączaniedźwięków
6.Przyciskfunkcjidemo
automatycznie wykona zapisany manewr.
7.Wyłączaniesilnika
uruchomiony ponownie.
NL
5.Geluidssignaal/geluiduitzetten
Door het indrukken van geluidssignaal
weerklinkt een realistisch geluid. Door op
het geluidssignaal lang te drukken, wordt
het geluid uitgeschakeld.
6. Demo-toets
Met de demo-knop voert hetmodel automa
tisch manoeuvres uit.
7. De motor uitzetten
Als het model opdrachten gedurende
50 sec. niet ontvangt, zal dan automatisch
uitgeschakeld worden en moet opnieuw
worden gestart.
SK
5.Vypínanieklaksónu/zvuku
6.Demotlačidlo
7.Vypnutiemotora
automaticky vypne a je teda nutné
DE - Fehlerbehebung
Das Fahrzeug fährt nicht
• Es wurden zu wenig Batterien eingelegt,
siehe Seite 3/4
• Die Batterien sind leer
Tauschen Sie die Batterien gegen volle
aus.
• Der Startknopf wurde nicht betätigt,
siehe Seite 5
• Das Fahrzeug ist im Standby modus,
siehe Seite 5
GB - Troubleshooting
The vehicle does not run
• Too few batteries have been inserted,
see page 3/4
• The batteries are empty
Replace the battery with full batteries
• The start button has not been pressed,
see page 5
• The vehicle is in standby mode,
see page 5
FR - Résolution des problèmes
La voiture n’avance pas
• Trop peu de piles ont été insérées,
voir page 3/4
• Les piles sont vides
Remplacez les piles par des piles
pleines.
• La touche de démarrage n‘ a pas été
actionnée, voir page 5
• Le véhicule est en mode veille,
voir page 5
IT - Risoluzione di problemi
Il veicolo non funziona
• Sono state inserite troppo poche
batterie, vedere pagina 3/4
• Le batterie sono scariche.
Sostituire le batterie con batterie
cariche.
• Il pulsante di avviamento non è stato
premuto, vedere pagina 5
• Il veicolo è in modalità standby,
vedere pagina 5
ES - Solución de problemas
El vehículo no funciona
• Se han introducido muy pocas baterías,
•
Reemplace las baterías por baterías
llenas.
• No se ha pulsado el botón de inicio,
•
CZ -Řešeníproblémů
Model vozidla nejede.
PL-Rozwiązywanieproblemów
•
Patrz str. 3/4
•
•
•
NL - Problemen oplossen
Het voertuig loopt niet
• Er zijn te weinig batterijen geplaatst
• De batterijen zijn leeg Vervang de
batterijen met nieuwe batterijen
•
pagina 5
• Het voertuig bevindt zich in de
SK -Odstránenieporúch
●

8
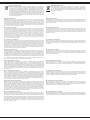
DE - Sicherheitsmaßnahmen
GB -SafetyNotes
FR - Consignes de sécurités
IT - Precauzioni
ES - Recomendaciones de seguridad
CZ -Bezpečnostníopatření
PL -Środkibezpieczeństwa
NL - Veiligheidsmiddelen
SK-Bezpečnostnéopatrenia
DE - Auf die Frequenzen in Ihrem Umfeld
achten!
GB - Pay attention to the frequencies in your
environment!
FR - Faites attention aux fréquences dans
votre environnement!
IT - Prestare attenzione alle frequenze nel
proprio ambiente!
ES - Preste atención a las frecuencias en su
entorno!
CZ -
okolí!
PL -
w waszym otoczeniu!
NL -
SK -
prostredí!
DE - Betreiben Sie das Modell nicht bei
Regen, Schnee, Nässe oder Sand.
GB - Do not drive in rain, snow, wetness or
sand.
FR - Ne pas conduire sous la pluie, la neige,
humidité ou sable.
IT - Non guidare sotto la pioggia, neve,
umidità o sabbia.
ES - No conduzca bajo la lluvia, la nieve,
humedad o arena.
CZ -
mokra nebo v písku.
PL -
powierzchni oraz na piasku.
NL - Het model mag niet worden gebruikt in
de regen, sneeuw en op natte grond of
zandgrond.
SK -
mokrom povrchu a piesku.
DE - Nicht auf befahrenen Straßen und
Plätzen fahren.
GB - Never drive on roads or areas used by
real vehicles.
FR - Ne roulez jamais sur la voie publique ou
des endroits fréquentés.
IT - Non giocare sulle strade comuni.
ES - No utilice en calles o plazas transitadas.
CZ -
PL -
ruchem drogowym).
NL - Niet op drukke straten en pleinen rijden
SK -
DE - Fahren Sie nie außerhalb der Reichweite
Ihrer Fernsteuerung
GB - Never run out of the reach of your remote
control.
FR - Laissez jamais celle-ci sortir de la portée
de votre émetteur.
IT - Non utilizzare il modello fuori la portata
della trasmittente.
ES -
emisora.
CZ -
PL -
pilota zdalnego sterowania
NL - Niet buiten het bereik van de
afstandsbediening rijden.
SK -
DE - Halten Sie Ihre Hände von beweglichen
Teilen fern.
GB - Keep hands away from moving parts.
FR - Garder vos mains hors de portées des
pièces mobiles.
IT - Tenere le mani lontane dalle parti in
movimento.
ES - Mantenga las manos alejadas de las
piezas móviles.
CZ
PL
NL - Houd uw handen uit de buurt van
bewegende delen.
SK
DE - Benutzung nur unter unmittelbarer
Aufsicht von Erwachsenen.
GB - Use only under direct supervision of an
adult!
FR - Utiliser uniquement sous la surveillance
d’un adulte!
IT - Utilizzare solo sotto la diretta
sorveglianza di un adulto!
ES - Usado bajo la supervisión directa de un
adulto!
CZ
PL
NL - Gebruiken enkel onder direct toezicht
van een volwassene.
SK
dospelej osoby.
DE - Sind die Batterien leer, wechseln Sie sie
aus.
GB - The batteries are nearly, replace the
batteries.
FR - Si ce les piles sont vides, changez
ceux-ci.
IT - Controllare il stato delle batterie,
potrebbero esserescariche.
ES -
pilas por otras nuevas.
CZ
PL
NL - Indien de batterijen leeg zijn, moeten
deze worden vervangen.
SK -
vymenené.
DE - Auf Polarität achten!
GB - Pay attention to the polarity!
FR -
IT - Prestare attenzione alla polarità!
ES - Preste atención a la polaridad!
CZ - Dbejte na polaritu!
PL -
NL
SK -
X
X X X X
DE - Nicht direkter Sonnenbestrahlung oder
Wärme aussetzen.
GB - Do not leave in very strong sunlight.
FR - N‘exposez jamais votre modèle
directement aux rayons du soleil.
IT - Non disporre il modello sotto il sole
oppure nel caldo.
ES - No exonga el modelo a los rayos solares
directos o fuentes de calor.
CZ -
tepla vystavit.
PL -
NL - Niet blootstellen aan direct zonlicht of
hitte.
SK
DE - Verschmutzungen mit einem feuchten
Tuch entfernen.
GB - Clean by using a damp cloth.
FR - Essuyez la boue avec un tissu humide.
IT - l‘inquinamento possono essere rimossi
con un panno umido.
ES - Polución se puede eliminar con un paño
húmedo.
CZ
PL
NL - Verontreinigingen moeten worden
verwijderd met een vochtige doek.
SK -
DE - Batterien/Akku niemals im Modell lagern.
GB - Store batteries/battery packs separately
when not in use.
FR -
dans la modèle.
IT - Conservare le batterie/accumulatore
separatamente quando non sono in uso.
ES - Sacar siempre las batería/acumulador y
CZ
modelu.
PL
akumulatorów w modelu.
NL - Batterijen/ accu`s niet in het
model bewaren.
SK
modeli.

9
DE-Entsorgungshinweise
Batterien und Akkumulatoren dürfen nicht im Hausmüll entsorgt werden sondern müs-
Entsorgung (getrennte Sammlung) zuzuführen. Nach Gebrauch können Sie Batterien
die reizend wirken, Allergien auslösen können oder hochreaktiv sind, ist die getrennte
Sammlung und ordnungsgemäße Verwertung wichtig für die Umwelt und Ihre Gesund-
heit. Sofern die Batterien unterhalb der durchgestrichenen Abfalltonne auf Rädern mit
diese mehr als 0,0005 % Quecksilber (Hg), mehr als 0,002 % Cadmium (Cd) oder mehr
als 0,004 % Blei (Pb) enthält.
GB - Disposal restrictions
Batteries and accumulators must not be disposed of in domestic waste. You are obliged to dispose
of batteries (seperate collection) appropriately. After use you can return batteries free of charge
to the retail store. As batteries contain substances that can be irritant, can cause allergy and are
highly reactive, separate collections and proper recycling is important to the environment and to your
health. If the batteries are marked with a chemical symbol Hg, Cd or Pb below the crossed-out waste
bin on wheels it refers to that more than 0.0005% of mercury (Hg), more than 0.002% of cadmium
(Cd) or more than 0.004% Lead (Pb) is included.
FR-Consignesderecyclage
-
tres communaux de collecte (collecte sélective). Après tout utilisation, vous avez la possibilité de
substances qui peuvent causés des irritations et pouvant provoquer des allergies, il est recom-
ces piles contiennent plus de 0,0005% de mercure (Hg), plus de plus de 0,002% de cadmium
(Cd),ou plus de 0,004% de plomb (Pb).
IT - Istruzioni per lo smaltimento
-
titi separatamente. Siete obbligati di eseguire lo smaltimento professionale delle batterie vecchie
-
merciali. Dato che le batterie contengono delle sostanze, che provocano irritazione, possono cau-
l’ambiente e la sua salute. Se le batterie, a disotto del “bidone a ruote cancellato” sono segnati con
di 0,002 % Cadmio (Cd) o piu di 0,004 % Piombo (Pb).
ES - Notas sobre el reciclado
Baterías y acumuladores no deben desecharse en la basura doméstica, pero se deben desechar
(recogida selectiva). Es posible devolver las baterías después de su uso de forma gratuita en las
actividades comerciales. Dado que las baterías contienen sustancias que causan irritación, pueden
causar alergias o son altamente reactivos, la recogida selectiva y el reciclaje son importantes para
CZ-Informacetýkajícíselikvidace
PL -Informacjedotycząceutylizacji
-
-
NL-Informatieoverdeafvalverwerking
Batterijen en accu`s mogen niet met het gewone huisvuil weggegooid worden, maar moeten apart
worden verwijderd. De eindgebruiker moet de gebruikte batterijen in overeenstemming met de pro-
cedures ontdoen (gescheiden inzameling van afval). Na gebruik kan de batterij kosteloos in de
veroorzaken en zijn zeer reactief, moeten om die reden afzonderlijk worden ingezameld en in
Wanneer de batterijen onder het symbool van de doorkruiste afvalbak met wielen, met chemisch
symbool Hg, Cd en Pb zijn gemarkeerd, geeft dat aan dat ze meer dan 0,0005% kwik (Hg), meer
dan 0,002% cadmium (Cd) of meer dan 0004 % lood bevatten.
SK-Informácietýkajúcesalikvidácie
alebo viac, ako 0,004 % olova.
DE-Entsorgungshinweise
Elektrogeräte dürfen nicht im Hausmüll entsorgt werden, sondern müssen getrennt
-
men und das Elektroaltgerät bei den kommunalen Sammelstellen abzugeben. Sollten
Ihnen selbst entfernt werden.
GB - Disposal restrictions
Electrical appliances must not be disposed of in domestic waste and must be disposed of separately.
You are obliged to take out the batteries, if possible, and to dispose of the electrical equipment at
the communal collection points. Should personal data be stored on the electrical appliance you must
remove them by yourself.
FR-Consignesderecyclage
appareils électriques dans les centres communaux de collectes. Si des informations personnelles
élimination du produit.
IT - Istruzioni per lo smaltimento
-
paratamente. Siete obbligati di rimuovere le batterie e portare l´apparecchi elettrici vecchi ai punti di
raccolta comunali. Qualora ci sono dati personali sul apparecchio elettrico, devono essere rimossi
da voi stessi.
ES - Notas sobre el reciclado
Aparatos eléctricos no pueden desecharse en la basura doméstica, pero se deben desechar de
los puntos de recogida comunales. En caso de que hay datos personales en el aparato eléctrico se
deben remover de usted mismo.
CZ-Informacetýkajícíselikvidace
PL-Informacjedotycząceutylizacji
-
NL-Informatieoverdeafvalverwerking
Elektrische apparatuur mag niet met het gewone huisvuil weggegooid worden, maar moet apart
worden verwijderd. De eindgebruiker is verplicht- indien mogelijk - om de accu te verwijderen en
elektrische apparatuur naar stedelijk afvalinzameling te leveren. Staan op het apparaat de persoon-
lijke gegevens dan moeten ze zelfstandig worden verwijderd.
SK-Informácietýkajúcesalikvidácie
-


Traktorenwerk
Lindner GmbH
Ing.-Hermann-Lindner-Straße 4
6250 Kundl
Tirol - AUSTRIA
www.lindner-traktoren.at
info@lindner-traktoren.at
Tel.: +43 (0) 5338 / 7420
Fax: +43 (0) 5338 / 7420 - 333
Hergestellt für:

Irrtum und technische Änderungen vorbehalten. Copyright JAMARA e.K. 2022
Kopie und Nachdruck, auch auszugsweise, nur mit Genehmigung von JAMARA e.K.
All rights reserved. Copyright JAMARA e.K. 2022
Copying or reproduction in whole or part, only with the expressed permission of JAMARA e.K.
JAMARA e.K.
Inh. Manuel Natterer
Am Lauerbühl 5 - DE-88317 Aichstetten
Tel.+49(0)7565/9412-0-Fax+49(0)7565/9412-23
[email protected] ●www.jamara.com
Service-Tel.+49(0)7565/9412-777
service@ jamara.com
Reitter Modellbau Versand
Patricia Reitter
Degerfeldstrasse 11
DE-72461 Albstadt
Tel +49 (0) 7432 9802700
Fax +49 (0) 7432 2009594
Mail [email protected]
Web www.modellbauversand.de
Modellbau Zentral
Peter Hofer
Bresteneggstrasse 2
CH-6460 Altdorf
Tel +41 79 429 62 25
Mobil +41 41 870 02 13
Mail [email protected]
Web www.modellbau-zentral.ch
PenTec s.r.o.
Distributor Jamara for Czech Republic and Slovakia
Tel +420 235 364 664
Mobil +420 739 075 380
Mail servis@topdrony.cz
Web www.topdrony.cz
Viva-net d.o.o.
Distributor Jamara for Croatia
Ante Topic - Mimare 8
Mail [email protected]
Web www.viva-net.hr
Nettrade Kft.
Distributor Jamara for Hungary
1033 Budapest, Hévízi út 3/b
Tel +36 30 664 3835
Mail [email protected]
Janus Trade D.O.O.
Distributor Jamara for Slovenia
SI-4000 Kranj
Mail [email protected]
Web www.janustrade.si
DE
SI
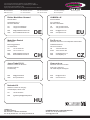
JAMARA e.K.
Manuel Natterer
Am Lauerbühl 5
DE-88317 Aichstetten
Tel +49 (0) 7565 9412-0
Fax +49 (0) 7565 9412-23
Mail [email protected]
Web www.jamara.com EU
CH CZ
HR
HU
DE - Servicehändler
GB - Service centre
FR - Revendeur de service
IT - Centro assistenza
ES - Servicio asistencia
CZ-Servisnícentrum
PL-Partnerserwisowy
NL - Servicepartner
SK-Servisnýpartner
-
 1
1
-
 2
2
-
 3
3
-
 4
4
-
 5
5
-
 6
6
-
 7
7
-
 8
8
-
 9
9
-
 10
10
-
 11
11
-
 12
12


Jamara 405050 Istruzioni per l'uso
- Categoria
- Giocattoli telecomandati
- Tipo
- Istruzioni per l'uso
in altre lingue
- français: Jamara 405050 Mode d'emploi
- español: Jamara 405050 Instrucciones de operación
- Deutsch: Jamara 405050 Bedienungsanleitung
- Nederlands: Jamara 405050 Handleiding
- slovenčina: Jamara 405050 Návod na používanie
- polski: Jamara 405050 Instrukcja obsługi
Documenti correlati
-
Jamara 405112 Istruzioni per l'uso
-
Jamara Audi RS Q e-tron E2 Manuale del proprietario
-
-
-
Jamara 404960 Istruzioni per l'uso
-
Jamara 412412 Istruzioni per l'uso
-
Jamara 406301 Istruzioni per l'uso