
A. Kühlraum
1. Innenbeleuchtung
2. Filter im Lüfter
2a. Lüftertaste
2b. Lüfterabdeckung
3. Ablagen / Ablagenbereich
4. Flaschenfach
5. Multi-flow-Kaltluftsystem
6. Kältefach (ideal für Fleisch und Fisch) oder "Null-Grad-Fach"
(für lange Haltbarkeit frischer Lebensmittel)
7. Typenschild mit Handelsnamen
8. Obst- und Gemüsefach
9. Trennelement für Obst- und Gemüsefach
10. Bausatz für Türanschlagwechsel
11. Trennelement
12. Innentürfächer
B. Gefrierfach
13. Schubfächer für tiefgefrorene Lebensmittel
14. Abstellflächen
15. Mittlerer Korb (Einfrierbereich)
16. Eiswürfelbehälter und/oder Kälteakku
17. Türdichtungen
C. Bedienfeld
Antibakterieller Schutz (modellabhängig):
- Antibakterieller Filter im Lüfter (2)
- Antibakterielle Zusätze im Obst- und Gemüsefach (8)
- Die Türdichtungen bestehen aus Material, das das Wachstum
von Bakterien hemmt (17).
Hinweise:
- Je nach Modell können die Zahl und die Art der Zubehörteile
unterschiedlich sein sein.
- Bei Stromausfall sorgt der Kälteakku dafür, dass die optimale
Lagertemperatur im Gefrierraum länger aufrecht erhalten
wird.
- Alle Ablagen und Türeinsätze lassen sich herausnehmen.
- Die Innentemperaturen des Gerätes hängen von der
Raumtemperatur, der Häufigkeit der Türöffnungen und dem
Gerätestandort ab. Bei der Temperatureinstellung müssen
diese Faktoren berücksichtigt werden.
- Das Gerätezubehör ist nicht zum Spülen im Geschirrspüler
geeignet.
- Vergewissern Sie sich nach dem Einlagern der Lebensmittel,
dass die Gefrierraumtür richtig geschlossen ist.
ERHÖHUNG DER LAGERKAPAZITÄT
Zur Erhöhung der Lagerkapazität und zur Aufnahme großer
Lebensmittel können die Körbe entfernt werden.
Sie können Sie Lebensmittel direkt auf die Ablagen legen.
HYDROSENSE-ABLAGEN (je nach Modell)
Die spezielle Form der HydroSense Ablagen verhindert, dass
Flüssigkeiten auf die unteren Ablagen tropfen können und
erleichtert die Reinigung.
INBETRIEBNAHME DES GERÄTES
Die Distanzstücke (falls mitgeliefert) an
der Hinterwand des Kondensators auf der
Geräterückseite anbringen.
Den Netzstecker in die Steckdose
stecken; das Gerät startet automatisch.
Warten Sie nach der Inbetriebnahme des Gerätes mindestens 4-
6 Stunden mit dem Einlegen von Lebensmitteln in das Gerät.
Nach dem Anschluss an das Stromnetz leuchtet das Display auf
und für einige Sekunden werden alle Symbole angezeigt. Die
werkseitigen Einstellwerte des Gefrier- und Kühlfachs werden
eingeblendet. In der Zwischenzeit funktioniert das Gerät, um die
werkseitig vorgegebene Temperatur zu erreichen, ein
akustisches Signal ertönt, das Alarmsymbol und die
Temperatur-LEDs des Gefrierfachs blinken. Damit wird
angezeigt, dass das Gerät den für die Aufbewahrung optimalen
Temperaturwert noch nicht erreicht hat. Drücken Sie Reset-
Taste, um das Warnsignal abzuschalten. Das Alarmsymbol
erlischt automatisch, sobald im Gefrierfach die Temperatur unter
-10 °C sinkt, die Temperatur - LEDs des Gefrierfachs nicht mehr
blinken und die gewählte Einstellung angezeigt wird.
LÜFTER MIT SCHALTER
Der Lüfter sorgt für eine gleichmäßige Temperaturverteilung im
Kühlraum und somit für optimale Konservierung des Kühlgutes.
Normalerweise ist der Lüfter in Betrieb. Für den korrekten
Betrieb der Funktion "6th Sense Fresh Control" / "Green
Intelligence ProFresh" sollte der Lüfter eingeschaltet sein,
ebenso wenn die Raumtemperatur 27 ÷ 28°C übersteigt oder
wenn auf den Glasablagen Wassertropfen zu sehen sind oder bei
hoher Luftfeuchtigkeit.
Hinweis
Den Luftansaugbereich nicht mit Lebensmitteln
verdecken.
Zur Optimierung des Energieverbrauchs und der
Geräteleistung bei niedriger Raumtemperatur (unter
18°C) sollte der Lüfter abgeschaltet werden.
Zum Abschalten des Lüfters die Taste (2a) drücken.
Wenn das Gerät mit einem Lüfter ausgestattet ist, kann es mit
einem antibakteriellen Filter ausgerüstet werden. Den Filter
aus der Schachtel im Gemüsefach (Teil 8) entnehmen und in das
Lüftungsgitter des Lüfters (Element 1b) einsetzen.
Die Einbauanleitungen liegen dem Filter bei.
PRODUKTANGABEN
D
ID PLFGB

BEDIENFELD
1. Temperaturwahl-LEDs Kühlfach
2. Symbol/Taste Ein/Standby
3. Symbol "6th Sense Fresh Control" / "Green Intelligence
ProFresh"
4. Symbol/Taste Öko Nachtbetrieb
5. Temperaturwahl-LEDs Gefrierfach
6. Kühlfachtemperatur- / Schnellkühltaste (3 Sekunden
drücken)
7. Alarmsymbol Stromausfall
8. Reset-Taste / Alarmsymbol
9. Tastensperre
10. Gefrierfachtemperatur- / Schnellgefriertaste (3 Sekunden
drücken)
“NULL GRAD”-FACH (modellabhängig)
Das "Null Grad"-Fach wurde speziell entwickelt, um eine
niedrige Temperatur- und die korrekte Feuchtigkeitsstufe
aufrecht zu erhalten, damit frische Lebensmittel (beispielsweise
Fleisch, Fisch) sich länger lagern lassen.
Ein- und Ausschalten des Fachs
Die Temperatur in dem Fach beträgt nach dem Einschalten der
Funktion ca. 0°.
Für eine korrekte Funktionsweise des "Null Grad"-Fachs müssen:
- Der Kühlraum eingeschaltet sein
- Die Temperatur im Kühlfach zwischen +2°C und +5°C liegen
- Das Fach eingeschoben sein, um die Funktion aktivieren zu
können
- Keine Sonderfunktionen angewählt sein (Standby, Kühlen-Aus,
Urlaub - soweit anwendbar).
Ist eine dieser Sonderfunktionen ausgewählt, müssen das "Null
Grad"-Fach manuell ausgeschaltet und die darin aufbewahrten
frischen Lebensmittel entfernt werden. Wird das Fach nicht
manuell ausgeschaltet, wird es nach 8 Stunden automatisch
deaktiviert.
Hinweis:
- Leuchtet das Symbol nach Aktivierung des Fachs nicht auf,
sich vergewissern, dass das Fach richtig eingeschoben ist;
sollte die Störung fortbestehen, wenden Sie sich an den
Kundendienst
- Ist das Fach aktiv und die Schublade herausgezogen, kann sich
das Symbol auf dem Bedienfeld automatisch abschalten. Das
Symbol leuchtet wieder auf, sobald das Fach eingeschoben
wird
- Unabhängig vom Status des Fachs kann ein leises Geräusch
hörbar sein: das ist normal.
- Ist das Fach ausgeschaltet, so hängt die Innentemperatur des
Fachs von der allgemeinen Kühlraumtemperatur ab. In diesem
Fall empfiehlt sich das Aufbewahren von nicht
kälteempfindlichem Obst und Gemüse (Waldfrüchte, Äpfel,
Aprikosen, Karotten, Spinat, Salat usw.).
Wichtiger Hinweis: Bei eingeschalteter Funktion kann die
Aufbewahrung von Speisen mit hohem Wassergehalt zur Bildung
von Kondenswasser auf den Ablagen führen. In diesem Fall die
Funktion vorübergehend ausschalten.
Entnahme des "Null Grad"-Fachs:
Um im Kühlschrank mehr Platz zu
schaffen, kann das "Null Grad"-Fach
entfernt werden. Hierzu
folgendermaßen vorgehen:
- Das Fach abschalten
- Das Gemüsefach und die weiße
Kunststoffablage unter dem Fach herausziehen.
Hinweis: Die obere Ablage und die seitlichen Ablagen lassen
sich nicht herausnehmen. Vergessen Sie beim Wiedereinsetzen
des "Null Grad"-Fachs nicht, die weiße Kunststoffablage unter
dem Fach anzubringen, bevor Sie das Schubfach wieder
einsetzen und die Funktion einschalten. Zur Optimierung des
Energieverbrauchs empfiehlt es sich, das "Null Grad"-Fach
abzuschalten und zu entfernen. Reinigen Sie das Fach und seine
Bestandteile regelmäßig mit einem Tuch und einer Lösung aus
lauwarmem Wasser und einem Neutralreiniger für die
Innenreinigung von Kühlschränken (tauchen Sie die weiße
Kunststoffablage unter dem Schubfach nicht ins Wasser).
Entnehmen Sie das Schubfach vor dem Reinigen (auch der
Außenseiten), um die Stromzufuhr des Fachs zu
unterbrechen.
Verwenden Sie keine Scheuermittel.
FUNKTIONEN
Ein / Standby
Mit dieser Funktion werden der Kühl- und der Gefrierraum
ein- oder auf Standby geschaltet. Um das Gerät auf Standby
zu schalten, die & Taste Ein/Standby für 3 Sekunden
drücken. Alle Symbole erlöschen mit Ausnahme des
Symbols Ein/Standby, das weiterhin anzeigt, dass sich das
Gerät in Standby befindet. Im Standby-Betrieb ist die
Innenbeleuchtung des Kühlfachs deaktiviert. Bitte beachten,
dass das Gerät im Standby-Betrieb weiterhin mit Strom
versorgt wird. Drücken Sie, um das Gerät wieder
einzuschalten, einfach die Taste Ein/Standby.
Kühlraumtemperatur
Zur Einstellung der Kühlraumtemperatur die Taste Fridge
°C drücken. Die Kühlraumtemperatur kann kann im Bereich
von +2°C bis + 8°C eingestellt werden (siehe
Temperaturwahl-LEDs des Kühlfachs).
Zum Ein- /Ausschalten des Fachs drücken
Sie die in der Abbildung dargestellte Taste.
Das Aufleuchten des Symbols zeigt
an, dass das Fach eingeschaltet ist.
ID PLFGB
PRODUKTANGABEN
D

Gefrierraumtemperatur
Zur Einstellung der Gefrierfachtemperatur die Taste
Freezer °C drücken. Die Gefrierfachtemperatur kann im
Bereich von -16°C und -24°C eingestellt werden (siehe
Temperaturwahl-LEDs des Gefrierfachs).
Schnellkühlen
Mit der Funktion Schnellkühlen kann die
Kühlleistung im Kühlfach erhöht werden.
Diese Funktion sollte beim Einlagern einer
größeren Lebensmittelmenge in den
Kühlraum verwendet werden. Drücken Sie &
für 3 Sekunden die Taste Fridge °C, um
diese Funktion ein-/auszuschalten.
Die Zuschaltung der Schnellkühlfunktion wird
durch die Temperatur-LEDs des Gefrierfachs
laut nebenstehender Abbildung angezeigt. Die
Funktion schaltet sich nach 6 Stunden automatisch ab, kann
aber auch durch Drücken der Taste Fridge °C
aufgehoben werden.
Schnellgefrieren
Diese Funktion sollte verwendet werden,
wenn eine größere Lebensmittelmenge zum
Einfrieren in den Gefrierraum eingelagert
wird. Drücken Sie 24 Stunden vor dem
Einfrieren frischer Lebensmittel & für 3
Sekunden die Taste Freezer, um die
Schnellgefrierfunktion einzuschalten. Die
Zuschaltung der Schnellgefrierfunktion wird
durch die Temperatur-LEDs des Gefrierfachs
laut nebenstehender Abbildung angezeigt.
Nach 24 Stunden können Sie das Gefriergut in den oberen
Korb des Gefrierraums einlagern. Die Funktion schaltet sich
nach 48 Stunden automatisch ab, kann aber auch durch
Drücken der Taste Freezer °C aufgehoben werden.
Öko Nachtbetrieb:
Die Nachttarif-Funktion erlaubt, den Energieverbrauch des
Gerätes auf die Zeit außerhalb der Spitzenbelastung (die
gewöhnlich der Nachtzeit entspricht) zu konzentrieren,
wenn Energie in großem Umfang und zu günstigeren Kosten
als zur Tageszeit zur Verfügung steht (nur in Ländern mit
nach Netzbelastung gestaffelten Tarifen - wenden Sie sich an
Ihr Elektrizitätswerk) Drücken Sie zum Einschalten der
Funktion die Taste Öko Nacht zum Beginn des
Normalbelastungstarifs (je nach Ihrem spezifischen
Tarifvertrag). Wenn der Tarif für Zeiten außerhalb der
Spitzenbelastung zum Beispiel um 20:00 beginnt, drücken
Sie die Taste zu diesem Zeitpunkt. Das Aufleuchten des
Symbols Öko Nacht zeigt an, dass die Funktion aktiv ist.
Nach Aktivierung der Funktion passt das Gerät den
Energieverbrauch der gewählten Zeit an und verbraucht am
Tag weniger Energie als während er Nacht.
WICHTIGE HINWEISE: Die Funktion muss tags und
nachts aktiv sein, um korrekt zu funktionieren.
Sie bleibt aktiv, bis sie deaktiviert wird (durch einen
Stromausfall oder durch Abschalten des Gerätes). Zum
Abschalten der Funktion drücken Sie erneut die Taste
Öko Nacht. Das Erlöschen des Symbols Öko Nacht
zeigt an, dass die Funktion abgeschaltet ist.
Hinweis: Der erklärte Energieverbrauch des Gerätes
wurde bei abgeschalteter Funktion Nachtbetrieb ermittelt.
/ "6th Sense Fresh Control" / "Green Intelligence
ProFresh"
Diese Funktion ermöglicht das rasche Erreichen der
optimalen Temperatur- und Feuchtigkeitsbedingungen Für
den korrekten Betrieb der Funktion muss das Gebläse
eingeschaltet sein. Die Funktion "6th Sense Fresh Control" /
"Green Intelligence ProFresh" ist standardmäßig in Betrieb.
Um Energie zu sparen, wird empfohlen, die Funktion "6th
Sense Fresh Control" / "Green Intelligence ProFresh" und
das Gebläse abzuschalten. Drücken Sie die Tasten
Freezer °C und Öko Nacht für 3 Sekunden, um die
Funktion manuell abzuschalten: ein doppelt langer Signalton
zeigt an, dass die Funktion deaktiviert ist. Die Funktion kann
auf dieselbe Weise wieder zugeschaltet werden: ein langer
Signalton zeigt an, dass die Funktion erneut aktiv ist
Ökomodus
Mit dieser optionalen Funktion können Sie Energie sparen.
Drücken Sie zum Einschalten des gleichzeitig die Tasten
Fridge °C und Freezer °C 3 Sekunden lang, bis der
Signalton ertönt. Fünf Sekunden nach dem Aktivieren des
Ökomodus schaltet sich das Display aus mit Ausnahme des
Symbols 6th Sense (und ggf. der Alarmanzeigen). Zum
Einstellen der Temperatur oder für andere Funktionen
müssen Sie das Display durch Drücken einer beliebigen
Taste wieder einschalten. Nach etwa 15 Sekunden ohne
Betätigung einer Taste, schaltet sich das Display wieder ab
und nur das Symbol 6th Sense ist sichtbar. Drücken Sie zum
Abschalten der Funktion gleichzeitig die Tasten Fridge °C
und Freezer °C 3 Sekunden lang, bis der Signalton ertönt.
Das Display kehrt zur Normalanzeige zurück. Der
Ökomodus wird nach einem Stromausfall oder bei
Störungsanzeigen automatisch deaktiviert. Das Gerät wird
bei dieser Funktion jedoch weiterhin normal mit Strom
versorgt.
Tastensperre
Diese Funktion verhindert das versehentliche Ändern der
Einstellungen und Abschalten des Gerätes. Drücken Sie zum
Sperren der Tasten die Reset -Taste für 3 Sekunden, bis
auf dem Display das Symbol eingeblendet wird: ein
Signalton bestätigt die Auswahl. Zum Deaktivieren der
Funktion den gleichen Vorgang wiederholen, bis das Symbol
Tastensperre erlischt.
ALARM "TÜR OFFEN"
Das Alarmsymbol blinkt und das Warnsignal ertönt.
Der Alarm ertönt, wenn die Kühlraumtür länger als 2 Minuten
geöffnet bleibt. Die Tür schließen, um den Alarm rückzusetzen,
oder einmal die Reset-Taste drücken, um den Signalton für 2
Minuten abzuschalten.
Wird die Tür nicht geschlossen, ertönt das Warnsignal nach zwei
Minuten erneut. Zum Rücksetzen des Türalarms die
Kühlraumtür schließen.
TEMPERATURALARM
Der akustische Alarm ertönt und alle 5 Temperatur - LEDs des
Gefrierfachs blinken.
Der Alarm wird in folgenden Fällen ausgelöst:
• Das Gerät wird zum ersten Mal oder nach längerer
Nichtbenutzung an die Stromversorgung angeschlossen
• Die Gefrierraumtemperatur ist zu hoch
PRODUKTANGABEN
D
ID PLFGB

BETRIEBSSTÖRUNGEN UND ALARMANZEIGEN
Durch Betriebsstörungen ausgelöste Alarme
Meldungen von Betriebsstörungen werden zusätzlich auch durch die Temperatur - LEDs angezeigt (z.B. Störung 1,
Störung 2 usw.). Benachrichtigen Sie den Kundendienst und geben Sie den jeweiligen Fehlercode an.
Das Warnsignal ertönt, das Alarmsymbol leuchtet auf und die 3 mittleren LEDs der Temperatur - LEDs blinken je
nach anstehender Störung, wie im Folgenden erläutert wird:
Legende LED AUS LED blinkt
Fehlercode Anzeige
Fehler 2
RC & FC Die Einstellungen blinken Ein/Aus mit 500 ms. Blinkt 2 Mal
und erlischt dann für 5 Sekunden. Der Ablauf wiederholt sich.
x2
Fehler 3
RC & FC Die Einstellungen blinken Ein/Aus mit 500 ms. Blinkt 3 Mal
und erlischt dann für 5 Sekunden. Der Ablauf wiederholt sich.
x3
Fehler 6
RC & FC Die Einstellungen blinken Ein/Aus mit 500 ms. Blinkt 6 Mal
und erlischt dann für 5 Sekunden. Der Ablauf wiederholt sich.
x6
• Die in den Gefrierraum eingelagerte Lebensmittelmenge
übertrifft die auf dem Typenschild angegebene
• Die Gefrierraumtür stand lange offen
Zum Abschalten des Summers einmal die Reset-Taste drücken.
Das Alarmsymbol erlischt automatisch, sobald im Gefrierfach
die Temperatur unter -10 °C sinkt, die Temperatur - LEDs des
Gefrierfachs nicht mehr blinken und die gewählte Einstellung
angezeigt wird.
ALARM STROMAUSFALL
Bei einem Stromausfall ist Ihr Gerät in der Lage, die Temperatur
im Gefrierraum automatisch zu überwachen, sobald die
Stromversorgung wieder hergestellt wird. Steigt die Temperatur
im Gefrierraum über den Gefrierpunkt an, leuchtet das Symbol
Stromausfall auf, blinkt & das Alarmsymbol und ertönt
das Warnsignal, wenn die Stromversorgung wieder einsetzt.
Zum Rücksetzen des Alarms einmal die Reset-Taste drücken.
Im Falle eines Stromausfalls sollten folgende Maßnahmen
getroffen werden:
• Angetaute, aber noch kalte Lebensmittel aus Gefrierraum in
den Kühlraum umlagern und innerhalb von 24 Stunden
verbrauchen.
• Falls die Lebensmittel im Gefrierraum gefroren sind, bedeutet
dies, dass sie angetaut waren und nach Wiederaufnahme der
Stromversorgung wieder gefroren sind. Dadurch werden
nicht nur Geschmack, Qualität und Nährwert der
Lebensmittel verändert, sondern sie sind auch potentiell
gefährlich. Sie sollten diese Lebensmittel nicht verzehren und
den gesamten Inhalt des Gefrierraums wegwerfen.
Der "Alarm Stromausfall" liefert Ihnen Hinweise zur Qualität der
im Gefrierraum eingelagerten Lebensmittel im Falle eines
Stromausfalls. Dieses System stellt keine Garantie für die
Qualität und Unbedenklichkeit der Lebensmittel dar, sondern
weist lediglich darauf hin, dass der einwandfreie Zustand der
Lebensmittel im Kühl- und Gefrierraum überprüft werden muss.
REINIGUNG
Reinigen Sie das Gerät regelmäßig mit einem Tuch und
lauwarmer Lauge mit neutralem Spezialreiniger für die
Innenreinigung des Kühlraums.
Verwenden Sie weder Scheuermittel noch harte Gegenstände
für die Reinigung.
Für einen kontinuierlichen und korrekten Tauwasserablauf die
Abflussöffnung an der Kühlraumrückwand in der Nähe des Obst-
und Gemüsefachs mit dem mitgelieferten Werkzeug regelmäßig
reinigen.
Vor Reinigungs- und Wartungsarbeiten den Netzstecker des
Geräts ziehen oder die Stromversorgung unterbrechen.
KÜHLRAUM ABTAUEN
Das Abtauen des Kühlraums erfolgt vollautomatisch.
Die von Zeit zu Zeit an der Innenrückwand des Kühlraums
auftretenden Wassertropfen zeigen die automatische Abtauphase
an. Das Tauwasser wird automatisch in eine Abflussöffnung
geleitet und anschließend in einem Behälter gesammelt, in dem
es verdunstet.
GEFRIERRAUM ABTAUEN
Der Gefrierraum No Frost gewährleistet ein inneres
Umluftsystem das Eisbildungen vermeidet. Demzufolge muss der
Gefrierraum nicht abgetaut werden. Die Tiefkühlware bleibt
nicht an den Wänden haften, die Etiketten sind immer leserlich
und der Lagerungsraum bleibt sauber und übersichtlich.
LED-INNENBELEUCHTUNG
Wenn die LED-Innenbeleuchtung nicht
funktioniert, muss sie vom Kundendienst
ausgetauscht werden:
Wichtig:
Beim Öffnen der Tür schaltet sich die
Innenbeleuchtung ein. Bleibt die Tür länger
als 10 Minuten offen, schaltet sich die
Beleuchtung ab.
5019 637 01111 Printed in Poland 11/11
PRODUKTANGABEN
D
ID PLFGB

A. Refrigerator Compartment
1. Lighting
2. Filter in the fan
2a. button of fan
2b. cover of fan
3. Shelves / Shelf area
4. Bottle rack
5. Multi-flow cold air system
6. Cooler compartment (best for meat and fish) or
"Zero Degrees" box (to keep foods fresher for longer)
7. Rating plate with commercial name
8. Fruits and vegetables crisper
9. Crisper divider
10. Reversibility kit
11. Separator
12. Door trays
B. Freezer Compartment
13. Storage baskets for frozen food items
14. Shelve
15. Middle basket (freezing zone)
16. Ice tray and/or cold accumulator
17. Door seals
C. Control panel
Anti-bacterial protection (depending on the model):
- Antibacterial filter in the fan (2)
- Antibacterial additives in the Crisper (8)
- Door seals are made of material able to inhibit bacterial
growth (17)
Notes:
- Depending on the model the number and type of
accessories may vary.
- In case of power failure the cold accumulator helps to
keep optimal storage temperature longer.
- All shelves and door trays are removable.
- The internal temperatures of the appliance depend on
the ambient temperature, frequency of opening the
doors, as well as location of the appliance. Temperature
setting must consider these factors.
- The appliance accessories are not suitable for washing
dishwasher.
- After inserting food, ensure that the freezer
compartment door closes properly.
TO INCREASE STORAGE
The freezer compartment can be used without the
baskets to increase storage and for large products.
You can place the food products directly on the racks.
HYDROSENSE SHELVES
(depending on the model)
The special contour of the HydroSense shelves creates a
barrier that contain spills and simplifies cleanup,
preventing liquids from leaking onto shelves below.
HOW TO START THE APPLIANCE
Fit the spacers (if supplied) on the
upper part of the condenser at the
rear of the appliance. After plugging
the appliance to the mains, it starts
the operation automatically. After
starting the appliance, wait at least 4-6 hours before
placing food into the appliance. When the appliance is
connected to the power supply, the display lights up and
all the icons appear on the display for few seconds. The
default (factory) values of the freezer compartment and
refrigerator compartment settings light-up. In the
meanwhile the appliance is working to reach the factory-
set temperature, an acoustic alarm sounds, the Alarm
Icon and Freezer Temperature LEDs blink. This indicates
that the appliance has not yet reached the optimal
temperature for storage of foodstuffs. Press the Reset
button to silence the acoustic alarm. The Alarm Icon is
automatically turned-off as soon as the freezer
compartment reaches a temperature below
-10°C and the Freezer Temperature LEDs stop blinking
and shows the chosen setting.
FAN WITH A BUTTON
The fan improves temperature distribution inside the
refrigerator compartment, allowing better preservation of
stored food. By default, the fan is ACTIVE.
It is advisable to keep the fan active, so that the "6th
Sense Fresh Control" / "Green Intelligence ProFresh"
function can work and also when the ambient air
temperature is above 27 ÷ 28°C or if you perceive drops
of water on the glass shelves or in the severe humidity
conditions.
Note
Do not obstruct the air intake area with food items.
To optimize energy consumption and to guarantee
the right performance at lower ambient temperature
(colder than 18°C) please turn off the fan.
To turn off the fan press the button (2a).
If the appliance has the fan it can be equipped with the
antibacterial filter.
Remove it from the box (found in the crisper drawer
PRODUCT SHEET
GB
ID PLFGB

(item 8) and insert into the cover of fan (item 2b).
The replacement procedure is attached with the filter.
CONTROL PANEL
1. Fridge temperature LEDs
2. On/Stand-by icon/button
3. "6th Sense Fresh Control" / "Green Intelligence
ProFresh" icon
4. Eco Night icon/button
5. Freezer temperature LEDs
6. Fridge temperature / Fast Cool (press 3 sec.) button
7. Black Out icon
8. Reset button / Alarm icon
9. Key Lock button
10.Freezer temperature / Fast Freeze (press 3 sec.)
button
“ZERO DEGREES” BOX (depending on the model)
The "Zero Degrees" box is specifically designed to maintain a
low temperature and a suitable humidity level, in order to keep
foods fresher for longer (e.g. meat, fish).
Activating and deactivating the box
The temperature inside the box, when active, is approximately 0°.
The following factors are vital for the "Zero Degrees" box to
work properly:
- the refrigerator compartment must be switched on
- the temperature of the refrigerator compartment must be
between +2°C and +5°C
- the box must be inserted to enable activation
- no special functions must have been selected (Standby,
Cooling-Off, Vacation – where applicable).
If one of these special functions has been selected, the "Zero
Degrees" box must be deactivated manually, and any fresh food
inside it removed. If manual deactivation does not take place, the
box will be deactivated automatically after 8 hours.
Note:
- if the symbol does not light up when the box is activated,
check that the box is properly inserted; if the problem
persists, contact your nearest authorized After-sales Service
- if the box is active and the drawer open, the symbol on the
control panel may be deactivated automatically. If the drawer
is inserted, the symbol will become active again
- irrespective of the state of the box, a slight noise may be
heard: this is normal and is not a cause for concern.
- when the box is not active, the temperature inside it depends
on the general temperature inside the refrigerator
compartment. In this case, we recommend it is used to store
fruit and vegetables which are not sensitive to cold
temperatures (fruits of the forest, apples, apricots, carrots,
spinach, lettuce, etc.).
Important: when the function is activated and there are
foodstuffs with a high water content, condensation may form on
shelves. In this case, disable the function temporarily.
Removing the "Zero Degrees" box:
The "Zero Degrees" box can be
removed to create more space
inside the refrigerator. In this case
proceed as follows:
- switch off the box
- pull out the drawer and the white
plastic shelf underneath the box.
Note: the upper shelf and the side supports cannot be removed.
To restore "Zero Degrees" box operation, make sure you
replace the white plastic shelf underneath the box before
inserting the drawer and reactivating the function. To optimise
energy consumption, we recommend you deactivate the "Zero
Degrees" box and remove it.
Clean the box and all its parts regularly, using a cloth and a
solution of warm water and neutral detergent specifically
formulated for refrigerator interiors (take care not to immerse
the white plastic shelf underneath the box in water).
Before cleaning the box (including the outside), remove
the drawer so as to disconnect the box from the
electricity supply.
Never use abrasive detergents.
FUNCTIONS
On/Stand-by
This function turns On/Stand-by both the refrigerator
and freezer compartments. To put the product in
Stand-by, press & hold the On/Stand-by button for
3 seconds. All the icons turn off except On/Stand-
by icon back light to indicate that the appliance is in
Stand-by. When the appliance is in Stand-by, the light
inside the refrigerator compartment does not work.
Remember that this operation does not disconnect
the appliance from the power supply. To switch the
appliance on again, simply press the On/Stand-By
button.
Fridge Temperature
To adjust the Fridge Temperature, press the Fridge
°C button. The Fridge Temperature can be adjusted
between +2°C and + 8°C, as shown by the Fridge
Temperature LEDs.
PRODUCT SHEET
GB
To activate/deactivate the box, press
the button as illustrated in the figure.
When the box has been
activated, the symbol lights up.
PLIFGBD

Freezer Temperature
To adjust the Freezer Temperature inside, press the
Freezer °C button. The Freezer Temperature can be
adjusted between -16°C and -24°C, as shown by the
Freezer Temperature LEDs.
Fast Cool
Using Fast Cool function it is possible to
increase the cooling in the refrigerator
compartment. The use of this function is
recommended when placing a very high
quantity of food in the refrigerator
compartment. Press & hold for 3 sec.
the Fridge °C button to
activate/deactivate Fast Cool function.
When activated, the Fast Cool indication
will be displayed by the Fridge
Temperature LEDs as shown in the beside sequence.
The function is automatically disabled after 6 hours, or
can be manually disabled by pressing Fridge °C
button.
Fast Freeze
The use of this function is recommended
when placing a very high quantity of food
to be frozen in the freezer compartment.
24 hours before freezing fresh food,
press & hold for 3 sec. the Freezer
button to activate the Fast Freeze
function. When activated, the Fast
Freeze indication will be displayed by the
Freezer Temperature LEDs as shown in
the beside sequence. After 24 hours
place the food to be frozen in the upper basket of
freezer compartment. The function is automatically
disabled after 48 hours, or can be manually disabled
by pressing Freezer °C button.
Eco Night:
Eco Night function allows to concentrate the energy
consumption of the product during off-peak time
(usually coinciding with night time), when energy is
available in large quantity and it costs less than during
the day (only in specific countries using multiple-rate
system based on off-peak times - check your rate plan
with your utility company). To activate the function,
press the Eco Night button at the starting
moment of the off-peak rate (depending on your
specific rate plan). For example, if the off-peak rate
starts at 20:00, you have to press the button at that
time. When the Eco Night icon is ON, the
function is active. After you activate the function, the
product automatically starts to adapt the energy
consumption to the time, i.e. consuming less energy
during the day then during the night.
IMPORTANT: In order to work in a correct way, the
function must be active both during the night and the
day.
The feature remains active until you deactivate it (or if
a blackout occurs, or if the product is switched off).
To deactivate the function, press the Eco Night
button. When the Eco Night icon is OFF the
function is not active.
Note: appliance energy consumption is declared with
Eco Night function disabled.
/ "6th Sense Fresh Control" / "Green
Intelligence ProFresh"
This function allows optimum storage conditions
(regarding temperature and humidity) to be quickly
reached inside the appliance. The fan must also be
switched on for it to work properly. The "6th Sense
Fresh Control" / "Green Intelligence ProFresh" s
activated by default. To minimize the Energy
consumption is suggested to disable the "6th Sense
Fresh Control" / "Green Intelligence ProFresh"
function and fan. To manually deactivate the function,
press the Freezer °C and Eco Night buttons for
3 sec.: you will hear double long acoustical signals as
confirmation that the feature has been deactivated.
The function can be reactivated by repeating the same
procedure: you will hear a long acoustical signal as
confirmation that the feature has been activated.
Eco Mode
This optional function can be used to save energy. To
activate the Eco Mode, press Fridge °C and
Freezer °C buttons at the same time for 3 seconds
until the acoustic signal sounds. Two seconds after the
Eco Mode activation, the display goes off, except the
6th Sense icon (and the alarms, if any). To adjust
temperature or use other functions, it is necessary to
activate the display by pressing any button. After
about 15 seconds without any action, the display will
go off again, with the 6th Sense icon remaining visible.
To deactivate the function, press Fridge °C and
Freezer °C buttons at the same time for 3 seconds
until the acoustic signal sounds. The display will come
back to the normal visualization. Eco Mode function is
automatically disabled after Black-out or any Failure
alarm appearance. It is important to remember that
this function does not disconnect the appliance from
the power supply.
Key Lock
This function prevents anyone from inadvertently
changing settings or switching off the appliance. To
lock the keys, press Reset button for 3 seconds
until the display shows the Key Lock icon: an
acoustic signal confirms the function has been
selected. To unlock the keys, follow the same
procedure until the Key Lock icon switches off.
DOOR OPEN ALARM
The Alarm icon lights up blinking and the acoustic
alarm sounds. The alarm is activated when the
refrigerator's door is left open for more than 2 minutes.
Close the door to disengage the alarm, or press once
Reset button to mute the acoustic alarm for 2 minutes.
If the door is not closed, the acoustic alarm will sound
again after two minutes. To disengage the door alarms
close the door.
OVER TEMPERATURE ALARM
The acoustic alarm sounds and all the 5 Freezer
Temperature LEDs blinks.
PRODUCT SHEET
GB
PLIFGBD

PRODUCT SHEET
GB
PLIFGBD
MALFUNCTION AND ALARM INDICATIONS:
Operation Alarms
In the event of operation alarms, they will also be displayed in the Fridge Temperature LEDs, (e.g. Failure1, Failure 2,
etc...) call After-sales Service and specify the alarm code. The acoustic alarm sounds, the Alarm icon lights up and
the 3 central LEDs in the Fridge Temperature LEDs blinks according to failure code described below:
Legend: Led off Led flashing
Failure code Visualization
Error 2
RC & FC Set points blink on/off at 500msec. Blinks ON
2 times then remain off for 5 seconds. Pattern repeats.
x2
Error 3
RC & FC Set points blink on/off at 500msec. Blinks ON
3 times then remain off for 5 seconds. Pattern repeats.
x3
Error 6
RC & FC Set points blink on/off at 500msec. Blinks ON
6 times then remain off for 5 seconds. Pattern repeats.
x6
The alarm is activated when:
• The appliance is connected to the power supply for the
first time or after prolonged disuse
• The freezer compartment temperature is too high
• The quantity of foods loaded into the freezer exceeds
that indicated on the data plate
• The freezer door has been left open for a long time
To mute the alarm buzzer press Reset button just once.
The Alarm Icon is automatically turned-off as soon as
the freezer compartment reaches a temperature below
-10°C and the Freezer Temperature LEDs stop blinking
and shows the chosen setting.
BLACK OUT ALARM
In the event of an interruption in electricity, your product
is designed to automatically monitor the temperature in
the freezer when electricity is resupplied. If the
temperature in the freezer rises above freezing level, the
Black Out icon lit, & the Alarm Icon blinks and the
acoustical alarm sounds when electricity is re-supplied. To
reset the alarm press the Reset button just once.
In case of Black Out Alarm, the following actions are
recommended:
• If the food in the freezer is unfrozen but still cold, all
the food in the freezer should be moved to the fridge
compartment and eaten within the next 24 hours.
• If the food in the freezer is frozen, this indicates the
food was thawed and then refrozen when electricity
was re-supplied which degrades taste, quality and
nutritional value and also could be unsafe. It is
recommended to not consume the food but to dispose
of the entire content of the freezer.
The Black Out Alarm is designed to provide guidance on
food quality in the freezer in the event of electricity black
out. This system does not guarantee food quality or safety
and consumers are advised to use their own judgment in
evaluating food quality in freezer and refrigerator
compartments.
CLEANING
Regularly clean the appliance using a cloth and a solution
of warm water, with some soft detergent suitable for
cleaning the inside of the refrigerator compartment.
Do not use abrasive detergents or tools.
To ensure continuous and correct flow of defrost water,
regularly clean the inside of the draining hole on the back
of the refrigerator near the fruit and vegetable drawer,
using the tool provided.
Before carrying out any cleaning or maintenance
operation, unplug the appliance or disconnect it from the
power supply.
DEFROSTING THE REFRIGERATOR
COMPARTMENT
Refrigerator compartment defrosting is completely
automatic.
Droplets of water on the rear wall inside the refrigerator
compartment indicate that the automatic defrost phase is
in progress. The defrost water is automatically run into a
drain hole and collected in a container, where it
evaporates.
DEFROSTING THE FREEZER
COMPARTMENT
No Frost freezers provide chilled air circulation around
the storage areas and prevent the formation of ice,
thereby completely eliminating the need for defrosting.
Frozen items don't stick to the walls, labeling stays legible
and storage space remains neat and clear.
LED's LIGHTING
If the inside LED light is not
working, it must be replace by
service.
Important:
The refrigerator compartment light
switches on when the refrigerator
door is opened. After 10 minutes of
door opening the light switches off.
5019 637 01111 Printed in Poland 11/11

A. Compartiment Réfrigérateur
1. Éclairage
2. Filtre de ventilateur
2a. Touche du ventilateur
2b. Couvercle du ventilateur
3. Clayettes / Zone réservée aux clayettes
4. Galerie porte-bouteilles
5. Système d'air froid Multi-flow
6. Compartiment fraîcheur (idéal pour la viande et le poisson) ou
bac "Zéro degré" (pour maintenir les aliments frais plus
longtemps)
7. Plaque signalétique avec nom commercial
8. Bac à fruits et légumes
9. Séparateur bac à fruits et légumes
10. Kit de réversibilité
11. Séparateur
12. Balconnets
B. Compartiment congélateur
13. Tiroir pour la conservation des aliments congelés
14. Clayettes
15. Bac central (zone de congélation)
16. Bac à glaçons et/ou accumulateur de froid
17. Joints de porte
C. Bandeau de commande
Protection antibactérienne (selon modèle) :
- Filtre antibactérien dans le ventilateur (2)
- Additifs antibactériens dans le bac à fruits et légumes (8)
- Les joints de porte sont fabriqués dans un matériau qui prévient la
prolifération des bactéries (17).
Remarques :
- Le nombre et le type des accessoires peuvent varier en fonction
du modèle.
- En cas de panne de courant, l'accumulateur de froid permet de
maintenir plus longtemps la température de stockage idéale.
- Les clayettes et les balconnets de porte sont amovibles.
- La température intérieure de l'appareil dépend de la température
ambiante, de la fréquence d'ouverture des portes et de l'endroit
où est installé l'appareil. Le thermostat doit être réglé en fonction
de ces facteurs.
- Les accessoires ne peuvent en aucun cas être lavés en machine.
- Après avoir introduit les aliments, vérifiez que la porte du
compartiment congélateur ferme correctement.
POUR AUGMENTER L'ESPACE DE RANGEMENT
Il est possible de retirer les bacs présents à l'intérieur du
congélateur, afin d'augmenter l'espace de stockage et de permettre
le rangement d'aliments volumineux.
Placez les aliments directement sur les grilles.
CLAYETTES HYDROSENSE (selon modèle)
Le contour spécial des clayettes HydroSense crée une barrière qui
retient les renversements et simplifie le nettoyage en évitant
l'écoulement des liquides sur les clayettes inférieures.
MISE EN MARCHE DE L'APPAREIL
Installez les entretoises (le cas échéant) sur
la partie supérieure du condenseur, à
l'arrière de l'appareil. L'appareil se met
automatiquement en marche une fois
branché. Une fois l'appareil en marche, attendez au moins 4 à 6
heures avant d'y introduire des aliments. Lorsque l'appareil est
branché au réseau, l'écran s'allume et toutes les icônes s'affichent
pendant quelques secondes. La valeur par défaut (réglée en usine)
des paramétrages des compartiments congélateur et réfrigérateur
s'allument. Pendant que l'appareil travaille en vue d'atteindre la
température réglée en usine, une alarme sonore retentit, l'icône
d'Alarme et les Leds de température du congélateur clignotent.
Cela indique que l'appareil n'a pas encore atteint la température
optimale pour une bonne conservation des aliments. Appuyez sur la
touche Réinitialisation pour désactiver l'alarme sonore. L'icône
d'Alarme est automatiquement désactivée dès que le
compartiment congélateur atteint une température inférieure à -10
°C, que les Leds de température du congélateur cessent de clignoter
et que le réglage sélectionné s'affiche.
VENTILATEUR À TOUCHE
Le ventilateur assure une répartition homogène de la température à
l'intérieur du réfrigérateur, garantissant une meilleure conservation
des aliments. Le ventilateur est activé par défaut. Il est recommandé
de maintenir le ventilateur en fonctionnement pour que la fonction
"6th Sense Fresh Control" / "Green Intelligence ProFresh"
puisse fonctionner également lorsque la température ambiante est
supérieure à 27 ÷ 28 °C, si des gouttes d'eau sont présentes sur les
clayettes en verre ou si le taux d'humidité est particulièrement élevé.
Remarque
Évitez d'obstruer les zones d'admission d'air avec des
aliments.
Afin d'optimiser la consommation énergétique et garantir de
bonnes performances de l'appareil, lorsque la température
ambiante est inférieure à 18° C, veillez à désactiver le
ventilateur.
Pour ce faire, appuyez sur la touche (2a). Si votre appareil est équipé
d'un ventilateur, celui-ci peut être doté d'un filtre antibactérien.
Sortez le filtre de la boîte située dans le bac à fruits et légumes
(élément 8) et introduisez-le dans le couvercle du ventilateur
(élément 2b). La procédure de remplacement du filtre est fournie
avec le filtre.
FICHE PRODUIT
F
ID PLFGB

BANDEAU DE COMMANDE
1. Voyants de température du réfrigérateur
2. Icône/touche On (Marche)/Stand-by (Veille)
3. Icône "6th Sense Fresh Control" / "Green Intelligence
ProFresh"
4. Icône/touche Eco Night (Tarif Nuit)
5. Voyants de température du congélateur
6. Touche Température congélateur / Fast Cool (Refroidissement
rapide - appuyer pendant 3 secondes)
7. Icône Black Out (Coupure de courant)
8. Touche Reset (Réinitialisation) / Icône d'Alarme
9. Touche Key Lock (Blocage touches)
10. Touche Température congélateur / Fast Freeze (Congélation
rapide - appuyer pendant 3 secondes)
COMPARTIMENT “ZÉRO DEGRÉ” (selon le modèle)
Le compartiment "Zéro degré" est spécialement conçu pour
maintenir une température basse et un niveau d'humidité adéquat,
afin de conserver plus longtemps les aliments frais (par exemple :
viande, poisson).
Activer et désactiver le compartiment
Lorsque le compartiment est activé, la température à l'intérieur de
celui-ci est d'environ 0° C.
Pour que le compartiment "Zéro degré" fonctionne correctement, il
faut que :
- le compartiment réfrigérateur soit activé
- la température du compartiment réfrigérateur doit être comprise
entre +2 °C et +5 °C
- le compartiment doit être installé pour permettre l'activation
- aucune fonction spéciale ne doit être activée (Standby (Veille),
Cooling-Off (Arrêt refroidissement), Vacation (Absence de longue
durée) – le cas échéant).
Si l'une de ces fonctions spéciales est activée, il est nécessaire de
désactiver le compartiment "Zéro degré" manuellement, en veillant à
retirer les aliments frais qui y sont stockés. Si vous omettez de
désactiver le compartiment manuellement, la désactivation s'opérera
automatiquement au bout de 8 heures.
Remarque :
- si le symbole ne s'allume pas lorsque vous activez le
compartiment, vérifiez si le compartiment est inséré
correctement. Si le problème persiste, contactez le Service
Après-vente
- si le compartiment est activé et que le bac est ouvert, il se peut
que le symbole du bandeau de commande se désactive
automatiquement. Lorsque vous inséré le bac, le symbole s'affiche
à nouveau
- Indépendamment de l'état du compartiment, il se peut que vous
entendiez un léger bruit, ce qui est tout à fait normal.
- Lorsque le compartiment n'est pas en service, la température du
compartiment dépend de la température générale du
compartiment réfrigérateur. Dans ce cas, il est conseillé d'y
conserver des fruits et des légumes non sensibles au froid (fruits
des bois, pommes, abricots, carottes, épinards, laitues, etc.).
Remarque importante : si la fonction est activée et que des
aliments à haute teneur en eau sont présents, de la condensation
pourrait se former sur les clayettes. Dans ce cas, désactivez
momentanément cette fonction.
Retrait du compartiment "Zéro degré" :
Pour avoir plus de volume disponible
dans le réfrigérateur, il est possible
d'enlever le compartiment "Zéro
degré". Pour ce faire, procédez de la
façon suivante :
- désactivez le compartiment
- extrayez le bac et la tablette en
plastique blanche située sous le compartiment.
Remarque : la tablette supérieure et les supports latéraux ne sont
pas amovibles. Pour réutiliser le compartiment "Zéro degré", veillez
à remettre la tablette blanche en plastique sous le compartiment
avant d'introduire le bac et d'activer de nouveau cette fonction. Afin
d'optimiser la consommation énergétique, il est conseillé de
désactiver le compartiment "Zéro degré" et de retirer le
compartiment. Nettoyez périodiquement le compartiment et ses
éléments à l'aide d'un chiffon imbibé d'une solution d'eau tiède (en
veillant à ne pas plonger la tablette blanche en plastique située sous
le bac) et d'un peu de détergent neutre spécial pour réfrigérateur.
Avant de procéder au nettoyage du compartiment
(également à l'extérieur), il est nécessaire de dégager le bac,
de façon à le déconnecter de l'alimentation électrique du
compartiment.
N'utilisez jamais de détergents abrasifs.
FONCTIONS
On (Marche)/Stand-by (Veille)
Cette fonction sert à activer/mettre en veille les compartiments
réfrigérateur et congélateur. Pour mettre l'appareil en mode
Veille, appuyez sur la touche On/Stand-by pendant 3
secondes. Toutes les icônes s'éteignent sauf le rétro-éclairage
de l'icône On/Stand-by , indiquant que l'appareil est en
mode Veille. Lorsque l'appareil est en stand-by (veille),
l'éclairage interne du compartiment réfrigérateur ne fonctionne
pas. Il est bon de rappeler que cette opération ne coupe pas
l'alimentation électrique au niveau de l'appareil.
Pour rallumer l'appareil, il suffit d'appuyer à nouveau sur la
touche On/Stand-by .
Pour activer/désactiver le compartiment,
appuyez sur la touche indiquée dans la figure.
Lorsque le symbole est allumé, cela signifie
que le compartiment est en service.
ID PLFGB
FICHE PRODUIT
F

Température du réfrigérateur
Pour régler la température du réfrigérateur, appuyez sur la
touche °C du réfrigérateur. La température du réfrigérateur
peut être réglée entre +2 °C et + 8 °C, comme illustré par les
voyants de température du réfrigérateur.
Température du congélateur
Pour régler la température du congélateur, appuyez sur la
touche de température du congélateur . La température du
congélateur peut être réglée entre -16 °C et -24 °C, comme
illustré par les voyants de température du congélateur.
Refroidissement rapide (Fast Cool)
Activez la fonction Refroidissement rapide pour
accélérer le refroidissement du compartiment
réfrigérateur. Il est recommandé d'activer cette
fonction si vous rangez une très grande quantité
d'aliments dans le compartiment réfrigérateur.
Appuyez pendant 3 secondes sur la touche de
température du réfrigérateur pour
activer/désactiver la fonction "Fast Cool".
Dès que la fonction est activée, l'indication "Fast
Cool" s'affiche au niveau des voyants de
température du réfrigérateur, comme illustré dans la séquence
ci-contre. La fonction se désactive automatiquement au bout de
6 heures. Il est possible de la désactiver manuellement en
appuyant sur la touche de température du réfrigérateur .
Congélation rapide (Fast Freeze)
Il est recommandé d'activer cette fonction
lorsque vous introduisez une grande quantité
d'aliments à congeler dans le compartiment
congélateur. 24 heures avant de congeler des
aliments frais, appuyez pendant 3 secondes sur la
touche Congélateur pour activer la fonction
"Fast Freeze". Dès que la fonction est activée,
l'indication "Fast Freeze" s'affiche au niveau des
voyants de température du congélateur, comme
illustré dans la séquence ci-contre. Au bout de 24
heures, placez les aliments à congeler dans le bac supérieur du
congélateur. La fonction se désactive automatiquement au bout
de 48 heures. Il est possible de la désactiver manuellement en
appuyant sur la touche de température du congélateur .
Tarif Nuit (Eco Night) :
La fonction Tarif nuit permet de concentrer la consommation
d'énergie de l'appareil pendant les heures creuses (qui
coïncident généralement avec les heures de la nuit), au moment
où la disponibilité d'énergie est plus importante et les coûts
inférieurs (uniquement dans les pays appliquant un système à
taux multiples, basé sur les heures creuses - vérifiez votre plan
tarifaire avec votre société de distribution d'énergie). Pour
activer cette fonction, appuyez sur la touche Eco Night au
moment où démarre le tarif Heures creuses (en fonction de
votre plan tarifaire spécifique). Par exemple, si le taux Heures
creuses est applicable dès 20:00, il faut que vous appuyiez sur
cette touche à cette heure-là. La fonction est activée dès que
l'icône Tarif nuit est allumée. Dès que vous avez activé la
fonction, l'appareil adapte automatiquement la consommation
énergétique à la période, c'est à dire qu'il consomme moins
d'énergie pendant la journée que pendant la nuit.
REMARQUE IMPORTANTE : Afin que l'appareil fonctionne
de manière correcte, il est nécessaire que la fonction soit
activée tant la nuit que le jour. La fonction reste activée jusqu'à
ce que vous la désactiviez (ou en cas de coupure de courant, ou
si vous éteignez l'appareil). Pour désactiver la fonction, appuyez
sur la touche "Eco Night" . La fonction est désactivée dès
que l'icône "Eco Night est éteinte.
Remarque : la consommation énergétique de l'appareil est
déclarée avec la fonction Tarif nuit désactivée.
/ "6th Sense Fresh Control" / "Green Intelligence
ProFresh"
Cette fonction permet d'atteindre rapidement des conditions
de conservation optimales (en termes de température et
d'humidité) à l'intérieur de l'appareil. Pour que cette fonction
soit pleinement efficace, il est nécessaire d'activer également le
ventilateur. La fonction "6th Sense Fresh Control" / "Green
Intelligence ProFresh" est activée par défaut. Pour réduire la
consommation énergétique, il est conseillé de désactiver la
fonction "6th Sense Fresh Control" / "Green Intelligence
ProFresh" et le ventilateur. Pour désactiver la fonction
manuellement, appuyez sur les touches Température du
congélateur et Tarif nuit pendant 3 secondes : un long
signal sonore double retentira, indiquant que la fonction a été
désactivée. Pour réactiver la fonction, il vous suffit de répéter la
même procédure: un long signal sonore retentira, indiquant que
la fonction a été activée.
Mode Éco
Cette fonction optionnelle peut être utilisée pour réaliser des
économies d'énergie. Pour activer le mode Eco, appuyez
simultanément sur els touches Température du réfrigérateur
et Température du congélateur pendant 3 secondes, jusqu'à
ce qu'un signal sonore retentisse. Deux secondes après
l'activation du mode Eco, l'affichage s'éteint, à l'exception de
l'icône "6th Sense" (et des alarmes, le cas échéant). Pour régler
la température ou utiliser d'autres fonctions, il est nécessaire
d'activer l'affichage en appuyant sur une touche quelconque. Si
aucune action n'a été effectuée dans les 15 secondes qui
suivent, l'affichage s'éteint à nouveau et seule l'icône "6th Sense"
reste activée. Pour désactiver la fonction, appuyez
simultanément sur les touches Température du réfrigérateur
et Température du congélateur pendant 3 secondes, jusqu'à
ce qu'un signal sonore retentisse. La visualisation normale de
l'affichage est restaurée. La fonction Mode Éco est
automatiquement désactivée après l'activation d'une alarme de
coupure de courant ou autre erreur. Il est important de
rappeler que cette fonction ne déconnecte pas l'appareil de
l'alimentation électrique.
Blocage des touches (Key Lock)
L'activation de cette fonction empêche toute modification
inopinée des valeurs programmées ou toute extinction
accidentelle de l'appareil. Pour bloquer les touches, appuyez sur
la touche Reset pendant 3 secondes, jusqu'à ce que
l'affichage visualise l'icône Blocage touches : un signal sonore
confirme l'activation de la fonction. Pour débloquer les touches,
suivez la même procédure, jusqu'à ce que l'icône Blocage
touches soit éteinte.
ALARME PORTE OUVERTE
L'icône d'Alarme commence à clignoter et le signal sonore
retentit. L'alarme se déclenche si la porte du réfrigérateur reste
ouverte pendant plus de 2 minutes. Fermez la porte pour acquitter
l'alarme, ou appuyez une fois sur la touche Reset pour
FICHE PRODUIT
F
ID PLFGB

ANOMALIES DE FONCTIONNEMENT ET INDICATIONS D'ALARME :
Alarme de fonctionnement
Si une alarme de fonctionnement se déclenche, celle-ci sera également visualisée au niveau des voyants de température
du réfrigérateur (par ex. Erreur 1, Erreur 2, etc.). Appelez le Service Après-vente et spécifiez le code d'alarme.
Le signal sonore retentit, l'icône d'Alarme s'allume et les 3 voyants au centre de l'affichage de température du
réfrigérateur clignotent en fonction du code d'erreur décrit ci-après :
Légende Voyant éteint Voyant clignotant
Code d'anomalie Visualisation
Erreur 2
Les points de consigne des compartiments Réfrigérateur et Congélateur clignotent à une fréquence de
500 msec. S'allume (ON) 2 fois, puis s'éteint (OFF) pendant 5 secondes. La séquence se répète.
x2
Erreur 3
Les points de consigne des compartiments Réfrigérateur et Congélateur clignotent à une fréquence de
500 msec. S'allume (ON) 3 fois, puis s'éteint (OFF) pendant 5 secondes. La séquence se répète.
x3
Erreur 6
Les points de consigne des compartiments Réfrigérateur et Congélateur clignotent à une fréquence de
500 msec. S'allume (ON) 6 fois, puis s'éteint (OFF) pendant 5 secondes. La séquence se répète.
x6
désactiver l'alarme sonore pendant 2 minutes. Si la porte n'est pas
refermée, l'alarme se déclenche de nouveau après deux minutes.
Pour désactiver les alarmes, fermez la porte.
ALARME DE DÉPASSEMENT DE TEMPÉRATURE
L'alarme sonore retentit et les 5 voyants de température du
congélateur clignotent.
L'alarme se déclenche quand :
• L'appareil est branché pour la première fois ou après une longue
période d'inutilisation.
• La température du compartiment congélateur est trop élevée.
• La quantité d'aliments stockée dans le congélateur est supérieure
à celle qui est spécifiée sur la plaque signalétique.
• La porte du compartiment congélateur est restée ouverte trop
longtemps.
Pour désactiver l'alarme, appuyez une seule fois sur la touche Reset
. L'icône d'Alarme s'éteint automatiquement dès que le
compartiment congélateur atteint une température inférieure à -10
°C, que les voyants de température du congélateur cessent de
clignoter et que le réglage sélectionné s'affiche.
ALARME COUPURE DE COURANT (BLACK OUT)
En cas de coupure de courant, votre appareil est conçu pour
contrôler automatiquement la température dans le congélateur
lorsque le courant est rétabli. Si la température du congélateur
dépasse la température de congélation, l'icône "Black Out"
s'allume, l'icône d'Alarme clignote et un signal sonore retentit
dès que la courant est rétabli. Pour réinitialiser l'alarme, appuyez une
seule fois sur la touche Reset . Si l'alarme "Black Out" se
déclenche, il est recommandé de procéder comme suit :
• Si les aliments dans le congélateur ne sont pas congelés mais
encore froids, mettez-les dans le compartiment réfrigérateur et
consommez-les dans les 24 heures.
• Si les aliments dans le congélateur sont congelés, ceci indique que
les aliments se sont décongelés, puis recongelés au rétablissement
de l'alimentation électrique, ce qui nuit à leur saveur, à leur
qualité et à leur valeur nutritive, et peut même être nocif. Il est
conseillé d'éliminer le contenu du congélateur.
En cas de coupure d'électricité, l' alarme "Black Out" fournit des
indications sur la qualité des aliments contenus dans le congélateur.
Ce système ne garantit pas la qualité des aliments ni la sécurité et les
consommateurs sont invités à juger d'eux mêmes de la qualité des
denrées dans les compartiments réfrigérateur et congélateur.
NETTOYAGE
Nettoyez régulièrement l'intérieur du compartiment réfrigérateur à
l'aide d'un chiffon imbibé d'une solution d'eau tiède et de détergent
neutre. N'utilisez ni produits abrasifs ni outils. Pour assurer une
évacuation constante et correcte de l'eau de dégivrage, nettoyez
régulièrement l'intérieur de l'orifice d'évacuation situé sur la paroi
arrière du compartiment réfrigérateur, à proximité du bac à fruits et
légumes, à l'aide de l'outil fourni avec l'appareil.
Avant d'effectuer les opérations d'entretien ou de nettoyage,
débranchez la fiche d'alimentation électrique de la prise de courant
ou coupez l'alimentation électrique.
DÉGIVRAGE DU COMPARTIMENT RÉFRIGÉRATEUR
Le dégivrage du compartiment réfrigérateur est entièrement
automatique.
Des gouttelettes d'eau sur la paroi arrière à l'intérieur du
compartiment réfrigérateur indiquant que la phase de dégivrage
automatique est en cours. L'eau de dégivrage est automatiquement
conduite dans un trou de vidange et récoltée par un récipient dans
lequel elle s'évapore.
DÉGIVRAGE DU COMPARTIMENT CONGÉLATEUR
Les congélateurs No Frost fournissent la circulation de l'air froid
autour des zones de stockage pour éviter la formation de givre afin
d'éliminer totalement la nécessité de dégivrer l'appareil. Les aliments
gelés ne collent pas aux parois, les étiquettes restent lisibles et
l'espace de stockage reste ordonné et clair.
ÉCLAIRAGE à LED
Si l'éclairage LED intérieur ne fonctionne
pas, faites-le réparer par le Service Après-
vente.
Remarque importante :
L'éclairage intérieur du compartiment
réfrigérateur s'allume à l'ouverture de la porte. Après 10 minutes
d'ouverture de la porte, l'éclairage s'éteint.
5019 637 01111 Printed in Poland 11/11
FICHE PRODUIT
F
ID PLFGB

A. Comparto frigorifero
1. Illuminazione
2. Ventola con filtro
2a. pulsante ventola
2b. coperchio ventola
3. Ripiani/Zona ripiani
4. Mensola bottiglie
5. Sistema ad aria fredda Multi-flow
6. Comparto refrigerante (ideale per carne e pesce) o cassetto
"Zero gradi" (per mantenere freschi gli alimenti più a lungo)
7. Targhetta dati con il nome commerciale
8. Cassetto crisper per frutta e verdura
9. Divisore crisper
10. Kit reversibilità
11. Separatore
12. Balconcini
B. Comparto congelatore
13. Cestelli per la conservazione di alimenti congelati
14. Ripiani
15. Cassetto centrale (zona di congelamento)
16. Vaschetta ghiaccio e/o accumulatore freddo
17. Guarnizioni
C. Pannello comandi
Protezione antibatterica (a seconda del modello):
- Filtro antibatterico nella ventola (2)
- Additivi antibatterici nel cassetto crisper (8)
- Guarnizioni porte in materiale che impedisce la proliferazione
batterica (17).
Note:
- Il numero e il tipo di accessori possono variare in base al
modello.
-
In caso di mancanza di elettricità l'accumulatore di freddo aiuta a
mantenere più a lungo la temperatura di conservazione ottimale.
- Tutti i ripiani e i balconcini sono estraibili.
- Le temperature interne dell'apparecchio dipendono dalla
temperatura ambiente, dalla frequenza di apertura delle porte e
dal punto in cui viene collocato l'apparecchio. L'impostazione
della temperatura deve tenere conto di questi fattori.
- Gli accessori dell'apparecchio non sono lavabili in lavastoviglie.
- Dopo aver introdotto gli alimenti, assicurarsi che la porta del
comparto congelatore si chiuda bene.
AUMENTO DELLO DELLO SPAZIO DI
CONSERVAZIONE
È possibile utilizzare il comparto congelatore senza cassetti per
aumentare lo spazio disponibile e per la conservazione di alimenti
voluminosi.
È possibile collocare gli alimenti direttamente sulle griglie.
RIPIANI HYDROSENSE (a seconda del modello)
Il contorno speciale dei ripiani HydroSense crea una barriera
contro il gocciolamento e semplifica la pulizia, evitando che i
liquidi si riversino sui ripiani sottostanti.
AVVIAMENTO DELL'APPARECCHIO
Montare i distanziali (se in dotazione) sulla
parte superiore del condensatore posto
sulla parte posteriore dell'apparecchio. Il
funzionamento si avvia in modo
automatico, una volta collegato
l'apparecchio alla rete di alimentazione. Dopo aver avviato
l'apparecchio, attendere almeno 4-6 ore prima di introdurre
alimenti all'interno dello stesso. Quando l'apparecchio viene
collegato all'alimentazione elettrica, il display si illumina e tutte le
icone appaiono sul display per alcuni secondi. I valori predefiniti
impostati in fabbrica sia per il comparto congelatore che per il
comparto frigorifero si illuminano. Nel frattempo l'apparecchio
lavora per portarsi alla temperatura impostata in fabbrica, si attiva
un allarme acustico, l'icona Allarme e i LED della temperatura
del comparto congelatore lampeggiano. Questo significa che il
prodotto non ha ancora raggiunto la temperatura ottimale per la
conservazione dei cibi. Premere il pulsante Reset per
silenziare l'allarme acustico. L'icona Allarme scompare
automaticamente non appena il comparto congelatore raggiunge
una temperatura inferiore a -10°C; i LED della temperatura del
comparto congelatore smettono di lampeggiare e mostrano
l'impostazione selezionata.
VENTOLA DOTATA DI PULSANTE
La ventola migliora la distribuzione della temperatura all'interno
del comparto frigorifero, migliorando di conseguenza la
conservazione degli alimenti. La ventola è preimpostata come
ATTIVA. Si consiglia di mantenere la ventola attiva, cosicché la
funzione "6° Senso Fresh Control" / "Green Intelligence
ProFresh" possa funzionare e anche quando la temperatura
dell'aria dell'ambiente supera i 27÷28°C o se sui ripiani di vetro
sono presenti gocce d'acqua oppure in condizioni di forte umidità.
Nota
Non ostruire l'ingresso dell'aria con alimenti.
Per ottimizzare i consumi energetici e garantire il buon
funzionamento dell'apparecchio a temperature ambiente
basse (meno di 18°C) spegnere la ventola.
Per disattivare la ventola premere il pulsante (2a). Se presente
nell'apparecchio, la ventola può essere dotata di filtro
antibatterico. Rimuoverlo dalla scatola (che si trova nel cassetto
crisper - elemento 8) e inserirlo nel coperchio della ventola
(elemento 2b). La procedura di sostituzione è allegata al filtro.
SCHEDA PRODOTTO
I
ID PLFGB

PANNELLO COMANDI
1. LED temperatura frigorifero
2. Icona/pulsante On/Stand-by
3. Icona "6° Senso Fresh Control" / "Green Intelligence
ProFresh"
4. Icona/pulsante Eco notte
5. LED temperatura congelatore
6. Temperatura frigorifero / Pulsante Raffreddamento rapido
(tenere premuto per 3 sec.)
7. Icona Black out
8. Pulsante di Reset / Icona Allarme
9. Pulsante di Blocco tasti
10. Temperatura congelatore / Pulsante Congelamento rapido
(tenere premuto per 3 sec.)
COMPARTO “ZERO GRADI” (a seconda del
modello)
Il Comparto "Zero Gradi" è appositamente studiato per
mantenere una bassa temperatura e una giusta umidità, al fine di
mantenere freschi più a lungo gli alimenti.
Attivare e disattivare il comparto
La temperatura all'interno del comparto è di circa di 0° quando il
comparto è attivo.
Per un corretto funzionamento del comparto "Zero Gradi", è
necessario che:
- il comparto frigorifero sia attivo
- la temperatura del comparto frigorifero sia compresa tra +2°C
e +5°C
- il cassetto deve essere inserito per consentire l'attivazione
- non siano state selezionate funzioni speciali (Stand-by, Cooling-
Off, Vacation - se presenti).
Nel caso in cui sia stata selezionata una di queste funzioni speciali,
il comparto "Zero Gradi" deve essere disattivato manualmente
avendo cura di rimuovere gli alimenti freschi in esso contenuti. In
caso di mancata disattivazione manuale, il comparto verrà
automaticamente disattivato dopo circa 8 ore.
Nota:
- se il simbolo non si illumina all'attivazione del comparto,
verificare che il cassetto sia correttamente inserito; se il
problema persiste, contattare il più vicino Servizio Assistenza
Tecnica autorizzato
- se il comparto è attivo e il cassetto è aperto, il simbolo sul
pannello di controllo potrebbe disattivarsi automaticamente.
Inserendo il cassetto il simbolo sarà nuovamente attivo
- indipendentemente dallo stato del comparto, è possibile udire
un leggero rumore che è da considerarsi normale.
- quando il comparto non è in funzione, la temperatura al suo
interno dipende da quella generale del comparto frigorifero. Si
consiglia in questo caso la conservazione di frutta e verdura non
sensibile al freddo (frutti di bosco, mele, albicocche, carote,
spinaci, lattuga, etc.).
Importante: in caso di funzione attivata e presenza di cibi con
elevato contenuto d'acqua, potrebbe formarsi della condensa sui
ripiani. In tal caso disattivare temporaneamente la funzione.
Rimozione del comparto "Zero Gradi":
Per avere a disposizione un maggior
volume del frigorifero, è possibile
rimuovere il comparto "Zero Gradi".
In tal caso procedere come segue:
- spegnere il comparto
- estrarre il cassetto e il ripiano
bianco in plastica sotto al
comparto.
Nota: non è possibile rimuovere il ripiano superiore e i supporti
laterali. Per ripristinare il comparto "Zero Gradi", avere cura di
riposizionare il ripiano bianco in plastica sotto al comparto, prima
di inserire il cassetto stesso e riattivare la funzione. Per
ottimizzare i consumi energetici, si consiglia di disattivare il
comparto "Zero Gradi" e di rimuovere il comparto. Pulire
periodicamente il comparto e i suoi componenti utilizzando un
panno ed una soluzione di acqua tiepida (avendo cura di non
immergere in acqua il ripiano bianco in plastica sotto al cassetto) e
detergenti neutri specifici per la pulizia interna del frigorifero.
Prima di pulire il comparto (anche esternamente) è
necessario rimuovere il cassetto in modo da scollegare
l'alimentazione elettrica del comparto.
Non usare mai detergenti abrasivi.
FUNZIONI
On/Stand-By
Questa funzione serve ad attivare/mettere in stand-by
entrambi i comparti frigorifero e congelatore. Per mettere
l'apparecchio in stand-by premere il pulsante On/Stand-by
e tenerlo premuto per 3 secondi. Tutte le icone si spengono,
tranne la retroilluminazione dell'icona On/Stand-by a
significare che l'apparecchio è in stand-by. Quando
l'apparecchio è in stand-by la luce posta all'interno del
comparto frigorifero non funziona.
E' importante tener presente che questa operazione non
scollega l'apparecchio dall'alimentazione elettrica.
Per riaccendere l'apparecchio è sufficiente premere il
pulsante On/Stand-by.
Temperatura comparto frigorifero
TPer regolare la temperatura del comparto frigorifero
premere il pulsante Fridge °C.
La temperatura del comparto frigorifero può essere regolata
Per attivare/disattivare il comparto
premere il pulsante indicato in figura.
Il simbolo illuminato indica
che il comparto è in funzione.
SCHEDA PRODOTTO
I
ID PLFGB

tra +2°C e +8°C, come mostrato dai LED della temperatura
comparto frigorifero.
Temperatura del congelatore
Per regolare la temperatura interna del comparto congelatore
premere il pulsante Freezer °C.
La temperatura del comparto congelatore può essere
regolata tra -16°C e -24°C, come mostrato dai LED della
temperatura del comparto congelatore.
Raffreddamento Rapido
La funzione Raffreddamento rapido consente di
aumentare la velocità di raffreddamento
all'interno del comparto frigorifero. L'utilizzo di
questa funzione è raccomandato qualora si
collochi all'interno del comparto frigorifero una
quantità elevata di alimenti. Per
attivare/disattivare la funzione di
Raffreddamento rapido premere il pulsante
Fridge °C e tenerlo premuto per 3 sec.
L'attivazione di questa funzione è segnalata dai
LED della temperatura del comparto
frigorifero, come si vede nella sequenza qui a lato. La
funzione si disattiva automaticamente dopo 6 ore, oppure
manualmente premendo il pulsante Fridge °C button.
Congelamento Rapido
L'utilizzo di questa funzione è raccomandato
qualora si collochi all'interno del comparto
congelatore una quantità elevata di alimenti da
congelare. 24 ore prima di congelare degli
alimenti freschi premere il pulsante
Congelatore e tenerlo premuto per 3 sec. per
attivare la funzione di Congelamento rapido.
L'attivazione di questa funzione è segnalata dai
LED della temperatura del comparto
congelatore, come si vede nella sequenza qui a
lato. Dopo 24 ore, riporre gli alimenti da
congelare nel cestello inferiore o nel comparto congelatore.
La funzione si disattiva automaticamente dopo 48 ore,
oppure manualmente premendo il pulsante Freezer °C.
Eco Notte:
La funzione Eco Notte consente di concentrare il consumo
energetico dell'apparecchio negli orari a tariffa ridotta
(solitamente coincidenti con le ore notturne), quando
l'energia è disponibile in grande quantità e costa meno
rispetto alle ore diurne (solo nei paesi che utilizzano un
sistema a tariffa multipla basata sull'orario - verificare il
proprio piano tariffario presso il locale fornitore dell'energia
elettrica). Per attivare questa funzione, premere il pulsante
Eco Notte nel momento in cui entra in vigore la tariffa
ridotta (in base al proprio piano tariffario specifico). Per
esempio, se la tariffazione ridotta si applica a partire dalle ore
20:00, premere il pulsante a quell'ora. Quando l'icona Eco
Notte è accesa (ON), la funzione è attiva. Una volta attivata
la funzione, l'apparecchio inizia automaticamente ad adattare
il consumo energetico in base all'orario selezionato, cioè
consumando meno energia durante il giorno rispetto alla
notte.
IMPORTANTE: Per operare in maniera corretta, la funzione
deve essere attiva sia durante la notte sia durante il giorno.
La funzione rimane attiva finché viene disattivata (oppure si
disattiva in caso di blackout o spegnimento dell'apparecchio).
Per disattivare la funzione, premere il pulsante Eco
Notte. Quando l'icona Eco Notte è spenta (OFF), la
funzione non è attiva.
Nota: il consumo di energia dell'apparecchio è dichiarato con
la funzione Eco Notte disattivata.
/ "6° Senso Fresh Control" / "Green Intelligence
ProFresh"
Questa funzione consente di raggiungere rapidamente,
all'interno dell'apparecchio, le condizioni di conservazione
ottimali (quanto a temperatura e umidità). Perché funzioni
correttamente, é necessario che anche il ventilatore sia
attivo. La funzione "6° Senso Fresh Control" / "Green
Intelligence ProFresh" è preimpostata come attiva. Per
ridurre al minimo il consumo di energia si suggerisce di
disattivare sia la funzione "6° Senso Fresh Control" / "Green
Intelligence ProFresh" che la ventola. Per disattivare
manualmente la funzione, premere i pulsanti Freezer °C e
Eco Notte e tenerli premuti per 3 sec.: si sentirà un
doppio segnale acustico lungo a conferma dell'avvenuta
disattivazione. La funzione può essere riattivata ripetendo la
medesima procedura: un segnale acustico lungo confermerà
l'avvenuta attivazione.
Modalità ECO
Questa funzione opzionale può essere usata per risparmiare
energia. Per attivare la modalità Eco, premere
contemporaneamente i pulsanti Fridge °C e Freezer °C
per 3 secondi finché non viene emesso il segnale acustico.
Due secondi dopo l'attivazione della modalità Eco, il display si
spegne, tranne l'icona 6° Senso (e viene disattivato il segnale
acustico, se emesso). Per regolare la temperatura o usare
altre funzioni, è necessario attivare il display premendo un
tasto qualsiasi. Dopo circa 15 secondi senza avere compiuto
alcuna azione, il display si spegne nuovamente e rimane
visibile soltanto l'icona 6° Senso. Per disattivare questa
funzione, premere contemporaneamente i pulsanti Fridge
°C e Freezer °C per 3 secondi finché non viene emesso il
segnale acustico. Il display torna alla normale visualizzazione.
La modalità Eco viene disabilitata automaticamente dopo un
black-out o un allarme di guasto. È importante tener presente
che questa funzione non scollega l'apparecchio
dall'alimentazione elettrica.
Blocco Tasti
Questa funzione impedisce la modifica delle impostazioni o lo
spegnimento dell'apparecchio accidentali. Per bloccare i tasti
premere il pulsante Reset per 3 secondi finché sul display
non compare l'icona Blocco tasti; un segnale acustico
conferma la selezione della funzione. Per sbloccare i tasti
eseguire la stessa procedura fino allo spegnimento del
dell'icona Blocco tasti.
ALLARME PORTA APERTA
L'icona Allarme si illumina lampeggiando e si attiva un allarme
acustico. L'allarme s'inserisce quando la porta del frigorifero
rimane aperta per oltre 2 minuti. Chiudere la porta per disattivare
l'allarme, oppure premere una volta il pulsante Reset per
tacitare l'allarme acustico per 2 minuti. Se la porta non viene
chiusa, l'allarme acustico si attiva nuovamente dopo due minuti.
Per disattivare gli allarmi porta chiudere la porta.
SCHEDA PRODOTTO
I
ID PLFGB

SPIE DI ALLARME E MALFUNZIONAMENTO:
Allarmi funzionamento
Qualora dovessero attivarsi, gli allarmi di funzionamento verranno visualizzati anche dai LED della temperatura del comparto frigorifero (p.es.
Guasto1, Guasto2, ecc.) chiamare l’assistenza e comunicare loro il codice indicato. Si attiva l'allarme acustico, l'icona Allarme si illumina e i
3 LED centrali tra quelli della temperatura del comparto frigorifero lampeggiano, a seconda del codice di avaria, come segue:
Legenda Led spento Led lampeggiante
Codice guasto: Visualizzazione
Errore 2
I valori impostati per il comparto frigorifero e il comparto congelatore lampeggiano accendendosi e spegnendosi
ogni 500 msec. ON lampeggia 2 volte, poi rimane spento per 5 secondi. La sequenza si ripete.
x2
Errore 3
I valori impostati per il comparto frigorifero e il comparto congelatore lampeggiano accendendosi e spegnendosi
ogni 500 msec. ON lampeggia 3 volte, poi rimane spento per 5 secondi. La sequenza si ripete.
x3
Errore 6
I valori impostati per il comparto frigorifero e il comparto congelatore lampeggiano accendendosi e spegnendosi
ogni 500 msec. ON lampeggia 6 volte, poi rimane spento per 5 secondi. La sequenza si ripete.
x6
ALLARME TEMPERATURA TROPPO ALTA
Si attiva l'allarme acustico e tutti e 5 i LED della temperatura del
comparto congelatore lampeggiano.
L'allarme si attiva quando:
• l'apparecchio viene collegato all'alimentazione elettrica per la
prima volta oppure dopo un periodo di inattività prolungato
• la temperatura del comparto congelatore è troppo alta
• la quantità di alimenti posta nel congelatore supera quella
indicata sulla targhetta
• la porta del congelatore è stata lasciata aperta per un lasso di
tempo prolungato
Per disattivare il segnale acustico premere il pulsante Rese solo
una volta.
L'icona Allarme scompare automaticamente non appena il
comparto congelatore raggiunge una temperatura inferiore a -
10°C; i LED della temperatura del comparto congelatore
smettono di lampeggiare e mostrano l'impostazione selezionata.
ALLARME DI BLACK OUT
In caso di interruzione nell'erogazione di energia elettrica,
l'apparecchio è progettato per monitorare in modo automatico la
temperatura nel congelatore, una volta ripristinata l'erogazione di
energia. Se nel congelatore la temperatura supera il livello di
congelamento, al ripristino dell'erogazione della corrente l'icona
Black Out si illumina, l'icona Allarme lampeggia e si attiva
l'allarme acustico. Per resettare l'allarme premere il pulsante
Rese solo una volta.
Nel caso si attivi l'allarme di black out, si consiglia di:
• Se il cibo nel congelatore non è congelato ma è ancora freddo,
trasferirlo nel comparto frigorifero e consumarlo entro 24 ore.
• Se il cibo nel congelatore è congelato, significa che si è
ricongelato dopo lo scongelamento causato dall'interruzione
dell'alimentazione elettrica, il che potrebbe aver interferito su
sapore, qualità e valore nutrizionale del cibo stesso, fino a
renderlo pericoloso. Si consiglia di non consumare gli alimenti e
di eliminare l'intero contenuto del congelatore.
Lo scopo dell'allarme di black out è quello di fornire indicazioni in
merito alla qualità degli alimenti presenti nel congelatore in caso di
black out elettrico. Questo sistema non garantisce la qualità o la
sicurezza degli alimenti e i consumatori sono invitati ad utilizzare il
proprio giudizio per valutare la qualità degli alimenti nei comparti
congelatore e frigorifero.
PULIZIA
Pulire regolarmente l'apparecchio utilizzando un panno ed una
soluzione di acqua calda e detergente neutro specifico per la pulizia
interna del comparto frigorifero. Non usare detergenti abrasivi o
utensili. Per garantire il deflusso costante e corretto dell'acqua di
sbrinamento, pulire regolarmente l'interno del foro di scarico situato
sulla parete posteriore del comparto frigorifero in prossimità del
cassetto frutta e verdura, usando l'utensile in dotazione.
Prima di qualsiasi operazione di manutenzione o pulizia, disinserire
la spina dalla presa di corrente o scollegare l'alimentazione.
SCONGELAMENTO DEL COMPARTO FRIGORIFERO
Lo scongelamento del comparto frigorifero avviene in
maniera completamente automatica.
Eventuali goccioline di acqua sulla parete posteriore all'interno del
comparto frigorifero indicano che la fase di scongelamento
automatico è stata avviata. L'acqua di scongelamento viene
direttamente condotta in un foro di scarico e raccolta in un
apposito contenitore, da dove evapora.
SBRINAMENTO DEL COMPARTO CONGELATORE
I congelatori No Frost assicurano la circolazione di aria molto
fredda attorno alle aree di conservazione alimentare, evitando così
la formazione di ghiaccio ed eliminando completamente la
necessità di sbrinamento. I prodotti congelati non si incollano alle
pareti, le etichette risultano ben leggibili, lo spazio di
conservazione rimane ordinato e pulito.
ILLUMINAZIONE LED
Qualora la luce LED interna non
funzioni è necessaria la sostituzione da
parte del servizio assistenza.
Attenzione:
La luce all'interno del comparto frigorifero si
accende quando si apre la porta del
frigorifero. La luce si spegne dopo che la porta rimane aperta per
10 minuti.
5019 637 01111 Printed in Poland 11/11
SCHEDA PRODOTTO
I
ID PLFGB

A. Komora chłodziarki
1. Oświetlenie
2. Filtr wentylatora
2a. przycisk wentylatora
2b. pokrywa wentylatora
3. Półki /Obszar półek
4. Półka na butelki
5. System zimnego powietrza Multi-flow
6. Komora chłodziarki (najlepsza na mięso i ryby) lub komora
„Zero stopni" (zapewniająca dłuższą świeżość produktów
spożywczych)
7. Tabliczka znamionowa z nazwą handlową
8. Pojemnik na owoce i warzywa
9. Przegroda pojemnika na owoce i warzywa
10. Zestaw do zmiany kierunku otwierania drzwi
11. Przegroda
12. Półki drzwiowe
B. Komora zamrażarki
13. Szuflady do przechowywania mrożonych produktów
spożywczych
14. Półki
15. Kosz środkowy (strefa zamrażania)
16. Pojemnik na lód i/lub akumulator zimna
17. Uszczelki drzwi
C. Panel sterowania
Ochrona przed bakteriami (w zależności od modelu):
- Filtr antybakteryjny w wentylatorze (2)
- Dodatki antybakteryjne w pojemniku na owoce i warzywa (8)
- Uszczelki drzwiowe są wykonane z materiałów
ograniczających rozwój bakterii (17)
Uwagi:
- Liczba oraz rodzaj akcesoriów zależą od modelu.
- W razie przerwy w dostawie prądu akumulator zimna będzie
pomagać w dłuższym utrzymaniu optymalnej temperatury
przechowywania.
- Wszystkie półki, w tym półki drzwiowe, można wyjmować.
- Temperatura wewnątrz urządzenia zależy od temperatury
otaczającego powietrza, częstotliwości otwierania drzwi oraz
od miejsca, w którym stoi urządzenie. Podczas ustawiania
temperatury należy uwzględnić te czynniki.
- Akcesoria urządzenia nie nadają się do mycia w zmywarce.
- Po włożeniu produktów sprawdzić, czy drzwi komory
zamrażarki zamykają się prawidłowo.
W CELU ZWIĘKSZENIA POWIERZCHNI
PRZECHOWYWANIA
Z komory zamrażarki można korzystać bez koszy, dzięki czemu
powiększa się przestrzeń do przechowywania dużych artykułów.
Produkty spożywcze można umieścić bezpośrednio na półkach.
PÓŁKI HYDROSENSE (w zależności od modelu)
Specjalne profilowanie półek HydroSense stwarza barierę, która
ogranicza rozlewanie się cieczy, a zapobiegając ich kapaniu na
inne półki, ułatwia czyszczenie.
URUCHOMIENIE URZĄDZENIA
Zamontować rozpórki (jeśli dostarczono w
komplecie) na górnej części skraplacza
znajdującego się z tyłu urządzenia. Po
podłączeniu urządzenia do zasilania
zaczyna ono działać automatycznie. Po
uruchomieniu urządzenia należy odczekać co najmniej 4-6
godzin przed włożeniem żywności do środka. Po podłączeniu
urządzenia do sieci wyświetlacz zostaje podświetlony i na kilka
sekund ukazują się wszystkie ikony. Podświetlone zostają
również fabryczne (domyślne) ustawienia komory zamrażarki
oraz komory chłodziarki. W międzyczasie urządzenie pracuje,
aby osiągnąć fabrycznie ustawioną temperaturę, rozlega się
alarm dźwiękowy oraz migają ikona alarmu i kontrolki
temperatury zamrażarki. Oznacza to, że urządzenie nie
osiągnęło jeszcze optymalnej temperatury do przechowywania
żywności. Nacisnąć przycisk resetowania , aby wyłączyć
alarm dźwiękowy. Ikona alarmu wyłącza się automatycznie
po osiągnięciu przez komorę zamrażarki temperatury poniżej -
10°C. Kontrolki temperatury zamrażarki przestają migać i
pokazują wybrane ustawienie.
WENTYLATOR Z PRZYCISKIEM
Wentylator zapewnia korzystniejszy rozkład temperatur w
komorze chłodziarki, a w konsekwencji lepsze przechowywanie
artykułów spożywczych. Wentylator jest domyślnie WŁĄCZONY.
Zaleca się, aby wentylator był włączony, aby funkcja „6th Sense
Fresh Control” / „Green IntelligenceProFresh” mogła działać,
a także wtedy, gdy temperatura otoczenia przekroczy 27 ÷ 28°C,
w przypadku zauważenia kropel wody na szklanych półkach lub
w przypadku dużej wilgotności powietrza.
Uwaga
Nie zasłaniać strefy wlotu powietrza produktami
spożywczymi.
Aby zoptymalizować zużycie energii oraz zagwarantować
prawidłowe parametry pracy w niskiej temperaturze
otoczenia (poniżej 18°C), zaleca się wyłączenie wentylatora.
Aby włączyć wentylator, nacisnąć przycisk (2a).
Jeśli w urządzeniu jest wentylator, można go wyposażyć w filtr
antybakteryjny.
Wyjąć go z pudełka znajdującego się w szufladzie na owoce i
warzywa (poz. 8) i włożyć w osłonę wentylatora (poz. 2b).
Sposób wymiany opisano w instrukcji dołączonej do filtra.
KARTA URZĄDZENIA
PL
ID PLFGB

PANEL STEROWANIA
1. Kontrolki temperatury chłodziarki
2. Ikona / przycisk Wł. / Tryb czuwania
3. Ikona „6th Sense Fresh Control” / „Green Intelligence
ProFresh”
4. Ikona / przycisk Eco Night
5. Kontrolki temperatury zamrażarki
6. Przycisk temperatury chłodziarki / Szybkie chłodzenie
(przytrzymać przez 3 s.)
7. Ikona przerwy w zasilaniu
8. Przycisk resetowania / Ikona alarmu
9. Przycisk blokady przycisków
10. Przycisk temperatury zamrażarki / Szybkie zamrażanie
(przytrzymać przez 3 s.)
KOMORA „ZERO STOPNI” (w zależności od modelu)
Komora „Zero stopni” została opracowana specjalnie pod kątem
utrzymywania niskiej temperatury i odpowiedniej wilgotności w
celu zapewnienia dłuższego przechowywania świeżych
produktów spożywczych (np. mięsa, ryb).
Włączenie i wyłączenie komory
Gdy komora jest włączona, temperatura w jej wnętrzu wynosi
około 0°.
W celu zapewnienia prawidłowego działania komory „Zero
stopni”:
- komora chłodziarki musi być włączona
- temperatura w komorze chłodziarki musi mieścić się w
zakresie od +2°C do +5°C
- komora musi być włożona, aby możliwe było jej włączenie
- żadne funkcje specjalne nie mogą być włączone (tryb
czuwania, Chłodzenie, Wakacje – w zależności od modelu).
W przypadku wybrania jednej z tych funkcji specjalnych należy
ręcznie wyłączyć komorę „Zero stopni”, pamiętając o wyjęciu
wszystkich znajdujących się w niej świeżych produktów
spożywczych. W przypadku niewyłączenia ręcznego komora
wyłączy się automatycznie po upływie około 8 godzin.
Uwaga:
- Jeśli ten symbol nie zapala się po włączeniu komory,
sprawdzić, czy komora jest prawidłowo włożona; jeśli problem
nadaj występuje, skontaktować się z najbliższym
autoryzowanym serwisem
- jeśli komora jest włączona, a szuflada otwarta, symbol na
panelu sterowania może się automatycznie wyłączyć. Jeśli
szuflada zostanie włożona, symbol ponownie się włączy
- Niezależnie od stanu komory można będzie usłyszeć ciche
odgłosy, co jest zjawiskiem normalnym.
- Gdy komora nie działa, temperatura w jej wnętrzu
uzależniona jest od temperatury ogólnej panującej w
chłodziarce. W takim przypadku zaleca się przechowywanie
owoców i warzyw niewrażliwych na zimno (takich jak owoce
leśne, jabłka, morele, marchew, szpinak, sałata itp.).
Ważne: W przypadku włączenia funkcji i przechowywania w
komorze produktów o dużej zawartości wody na półkach mogą
się gromadzić skropliny. W takim wypadku należy czasowo
wyłączyć funkcję.
Wyjmowanie komory „Zero stopni”:
Aby zwiększyć pojemność
chłodziarki, można z niej wyjąć
komorę „Zero stopni”. W takim
przypadku należy postępować w
następujący sposób:
- wyłączyć komorę
- wyjąć szufladę i białą plastikową
półkę znajdującą się pod komorą.
Uwaga: Nie można wyjmować półki górnej i wsporników
bocznych.
Aby przywrócić działanie komory „Zero stopni”, przed włożeniem
samej szuflady i ponownym włączeniem funkcji należy ostrożnie
włożyć pod komorę białą plastikową półkę. W celu optymalizacji
poboru energii zaleca się wyłączenie komory „Zero stopni” i
wyjęcie komory.
Wnętrze komory chłodziarki oraz zamrażarki należy okresowo
czyścić szmatką zwilżoną ciepłą wodą z dodatkiem neutralnych
detergentów, stosownych do mycia wnętrza chłodziarek. Należy
przy tym uważać, aby nie zanurzać w wodzi białej plastikowej
półki znajdującej się pod szufladą.
Przed przystąpieniem do czyszczenia komory (oraz
obudowy) należy wyjąć szufladę, aby odłączyć komorę od
zasilania elektrycznego.
Nie stosować ściernych detergentów.
FUNKCJE
Przycisk Wł. / Tryb czuwania
Ta funkcja pozwala wyłączyć komorę chłodziarki i
zamrażarki lub włączyć je w trybie czuwania. Aby włączyć
urządzenie w trybie czuwania, należy nacisnąć i
przytrzymać przez 3 sekundy przycisk Wł. / Tryb czuwania
.& Zgasną wszystkie ikony za wyjątkiem podświetlenia
przycisku Wł. / Tryb czuwania . Oznacza to, że
urządzenie jest w trybie czuwania. Gdy urządzenie pracuje
w trybie czuwania, oświetlenie wewnątrz komory chłodziarki
nie działa. Należy pamiętać, że ta czynność nie powoduje
odłączenia urządzenia od zasilania elektrycznego.
Aby ponownie włączyć urządzenie, należy nacisnąć
przycisk Wł. / Tryb czuwania .
Temperatura chłodziarki
Aby ustawić temperaturę chłodziarki, nacisnąć przycisk
Chłodziarka °C .
Temperaturę chłodziarki można regulować z zakresie od
+2°C do + 8°C. O ustawieniu informują kontrolki
temperatury chłodziarki.
W celu włączenia/wyłączenia komory należy
nacisnąć przycisk pokazany na ilustracji.
Podświetlony symbol
wskazuje, że komora działa.
KARTA URZĄDZENIA
PL
ID PLFGB

Temperatura zamrażarki
Aby ustawić temperaturę wewnątrz zamrażarki, nacisnąć
przycisk Zamrażarka °C . Temperaturę zamrażarki można
regulować w zakresie od -16°C do -24°C. O ustawieniu
informują kontrolki temperatury zamrażarki.
Fast Cool (Szybkie chłodzenie)
Włączenie funkcji „Szybkie chłodzenie”
pozwala na przyspieszenie chłodzenia w
komorze chłodziarki. Zaleca się korzystać z
tej funkcji w momencie wkładania dużych
ilości żywności do komory chłodziarki.
Wcisnąć i przytrzymać przez 3 s. przycisk
Chłodziarka °C , aby włączyć lub wyłączyć
funkcję Szybkie chłodzenie.&
Po włączeniu funkcji „Szybkie chłodzenie”
informacja o tym zostanie wyświetlona przez
kontrolki temperatury chłodziarki w postaci
poniższej sekwencji.
Funkcja wyłącza się automatycznie po upływie 6 godzin lub
można ją wyłączyć ręcznie poprzez ponowne naciśnięcie
przycisku Chłodziarka °C .
Fast Freeze (Szybkie zamrażanie)
Zaleca się korzystanie z tej funkcji w
przypadku wkładania dużych ilości żywności
do komory zamrażarki. Na 24 godziny przez
włożeniem świeżej żywności do zamrożenia
nacisnąć i przytrzymać przez 3 s. przycisk
Zamrażarka , aby włączyć funkcję „Szybkie
zamrażanie”.& Po włączeniu funkcji „Szybkie
zamrażanie” informacja o tym zostanie
wyświetlona przez kontrolki temperatury
zamrażarki w postaci poniższej sekwencji.
Po 24 godzinach umieścić żywność
przeznaczoną do zamrożenia w górnym koszu komory
zamrażarki.
Funkcja wyłącza się automatycznie po upływie 48 godzin
lub można ją wyłączyć ręcznie poprzez ponowne
naciśnięcie przycisku Zamrażarka °C .
Eco Night:
Funkcja Eco Night pozwala na skoncentrowanie zużycia
energii urządzenia w godzinach poza szczytem (zwykle
oznacza to godziny nocne), kiedy energia dostępna jest w
dużej ilości i kosztuje mniej niż w trakcie dnia (jedynie w
konkretnych krajach, które różnicują taryfy w oparciu o
dzienny rozkład zapotrzebowania na energię - należy
sprawdzić plan taryfowy w lokalnym zakładzie
energetycznym). Aby włączyć tę funkcję, nacisnąć przycisk
Eco Night w momencie rozpoczęcia obowiązywania
stawki poza szczytem (w zależności od konkretnego planu
taryfowego). Np. jeśli czas poza szczytem rozpoczyna się o
godz. 20.00, przycisk należy nacisnąć o tej godzinie.
Kiedy świeci się ikona Eco Night , funkcja jest włączona.
Po włączeniu tej funkcji urządzenie automatycznie
rozpoczyna dostosowywanie poboru energii do czasu, tj. za
dnia pobiera mniej energii niż w nocy.
WAŻNE: Aby funkcja działała prawidłowo, musi być
włączona zarówno w nocy jak i w dzień.
Funkcja pozostaje włączona do momentu jej wyłączenia (lub
do przerwy w zasilaniu bądź wyłączenia urządzenia). Aby
wyłączyć funkcję, nacisnąć przycisk Eco Night . Kiedy
ikona Eco Night jest wyłączona, funkcja jest wyłączona.
Uwaga: Pobór energii przez urządzenie jest zadeklarowany
przy wyłączonej funkcji Eco Night.
/ „6th Sense Fresh Control” / „Green Intelligence
ProFresh”
Funkcja ta umożliwia szybkie uzyskanie wewnątrz
urządzenia optymalnych warunków (temperatury i
wilgotności) przechowywania żywności. Aby funkcja działała
prawidłowo, wentylator musi być włączony. Funkcja „6th
Sense Fresh Control” / „Green Intelligence ProFresh” jest
domyślnie włączona. Aby zminimalizować pobór energii,
zaleca się wyłączanie funkcji „6th Sense Fresh Control” /
„Green Intelligence ProFresh” oraz wentylatora. Aby ręcznie
wyłączyć funkcję, nacisnąć przycisk Zamrażarka °C oraz
Eco Night i przytrzymać przez 3 sekundy: rozlegnie się
podwójny, długi sygnał dźwiękowy, będący potwierdzeniem
wyłączenia. Funkcję można ponownie włączyć, wykonując
te same czynności: rozlegnie się długi sygnał dźwiękowy,
będący potwierdzeniem włączenia.
Tryb Eko
Z tej opcjonalnej funkcji można korzystać, aby oszczędzać
energię. Aby włączyć Tryb Eko, jednocześnie nacisnąć
przyciski Chłodziarka °C oraz Zamrażarka °C i
przytrzymać je przez minimum 3 sekundy do chwili, kiedy
rozlegnie się sygnał dźwiękowy. Dwie sekundy po włączeniu
Trybu Eko wyłącza się wyświetlacz, za wyjątkiem ikony
Szósty Zmysł (oraz ewentualnych alarmów). Aby dokonać
regulacji temperatury lub skorzystać z innych funkcji, należy
włączyć wyświetlacz. W tym celu nacisnąć dowolny
przycisk. Po ok. 15 sekundach bezczynności, wyświetlacz
ponownie zgaśnie i tylko ikona Szósty Zmysł pozostanie
włączona. Aby wyłączyć tę funkcję, jednocześnie nacisnąć
przyciski Chłodziarka °C oraz Zamrażarka °C i
przytrzymać je przez minimum 3 sekundy do chwili, kiedy
rozlegnie się sygnał dźwiękowy. Wyświetlacz powróci do
normalnej pracy. Funkcja Tryb Eko wyłącza się
automatycznie po przerwie w zasilaniu oraz w razie
pojawienia się jakiegokolwiek alarmu o błędzie. Należy
pamiętać, że funkcja ta nie powoduje odłączenia urządzenia
od zasilania elektrycznego.
Blokada uruchomienia
Funkcja ta pozwala zapobiec przypadkowej zmianie
ustawień lub wyłączeniu urządzenia. Aby zablokować
przyciski, nacisnąć przycisk resetowania i przytrzymać
przez 3 sekundy, do momentu pojawienia się na
wyświetlaczu ikony blokady przycisków : sygnał
dźwiękowy potwierdzi włączenie funkcji. Aby odblokować
przyciski, należy wykonać te same czynności, dopóki nie
zgaśnie ikona blokady przycisków .
ALARM „OTWARTE DRZWI”
Miga ikona alarmu i emitowany jest sygnał dźwiękowy.
Alarm uruchamia się, gdy drzwi chłodziarki pozostają otwarte
przez ponad 2 minuty. Zamknąć drzwi, aby wyłączyć alarm lub
jeden raz nacisnąć przycisk resetowania , aby wyłączyć
sygnał dźwiękowy alarmu na 2 minuty.
Alarm włączy się ponownie po 2 minutach, jeśli drzwi pozostaną
otwarte. Aby wyłączyć alarm, zamknąć drzwi.
ALARM NADMIERNEJ TEMPERATURY
Emitowany jest alarm dźwiękowy oraz miga wszystkie 5
kontrolek temperatury zamrażarki.
Alarm włącza się, gdy:
• Urządzenie jest podłączane do zasilania po raz pierwszy lub
po dłuższej przerwie w eksploatacji
• Temperatura w komorze zamrażarki jest zbyt wysoka
• Ilość artykułów spożywczych włożona do zamrażarki
przekracza ilość wskazaną na tabliczce znamionowej
KARTA URZĄDZENIA
PL
ID PLFGB

WSKAZANIA AWARII I NIEPRAWIDŁOWEGO DZIAŁANIA
Alarmy nieprawidłowego działania urządzenia
W przypadku wystąpienia alarmu nieprawidłowego działania urządzenia informacja o nim będzie również wyświetlana przy
pomocy kontrolek temperatury chłodziarki (np. Awaria 1, Awaria 2 itp.). W takim wypadku należy skontaktować się z
autoryzowanym serwisem i podać kod alarmu. Rozlega się sygnał dźwiękowy, włącza się ikona alarmu , a 3 środkowe
kontrolki spośród wszystkich kontrolek temperatury chłodziarki migają zgodnie z następującym kodem:
Legenda Dioda wyłączona Dioda miga
Kod awarii Wizualizacja
Błąd 2
Ustawienie komory chłodziarki i zamrażarki miga co 500 ms.& Miga 2 razy, a
następnie pozostaje wyłączona przez 5 s. Opisany tryb powtarza się.
x2
Błąd 3
Ustawienie komory chłodziarki i zamrażarki miga co 500 ms.& Miga 3 razy, a
następnie pozostaje wyłączona przez 5 s. Opisany tryb powtarza się.
x3
Błąd 6
Ustawienie komory chłodziarki i zamrażarki miga co 500 ms.& Miga 6 razy, a
następnie pozostaje wyłączona przez 5 s. Opisany tryb powtarza się.
x6
• Drzwi zamrażarki są otwarte od dłuższego czasu
Aby wyłączyć alarm dźwiękowy, jeden raz nacisnąć przycisk
resetowania . Ikona alarmu wyłącza się automatycznie po
osiągnięciu przez komorę zamrażarki temperatury poniżej -10°C.
Kontrolki temperatury zamrażarki przestają migać i pokazują
wybrane ustawienie.
ALARM PRZERWY W ZASILANIU
W przypadku przerwy w dopływie prądu urządzenie będzie
automatycznie monitorowało temperaturę w komorze zamrażarki
po przywróceniu zasilania. Jeżeli temperatura w zamrażarce
wzrośnie powyżej zera, po przywróceniu zasilania włączy się
ikona przerwy w zasilaniu , miga ikona alarmu oraz
rozlegnie się sygnał alarmu dźwiękowego.& Aby wyłączyć alarm,
jeden raz nacisnąć przycisk resetowania .
W razie alarmu przerwy w zasilaniu zaleca się podjęcie
następujących działań:
• Jeśli produkty spożywcze w zamrażarce zostały rozmrożone,
ale wciąż są zimne, należy przenieść je do komory chłodziarki
i spożyć w ciągu 24 godzin.
• Jeśli produkty spożywcze w zamrażarce są nadal zamrożone,
oznacza to, że uległy one ponownemu zamrożeniu po
uprzednim rozmrożeniu w okresie przerwy w dopływie prądu,
co prowadzi do pogorszenia smaku, jakości i wartości
odżywczych żywności i może spowodować, że jej spożycie
może być niebezpieczne dla zdrowia. Zaleca się nie
spożywać tej żywności i wyrzucić całą zawartość zamrażarki.
Alarm przerwy w zasilaniu ma dostarczyć wskazówki na temat
jakości żywności w zamrażarce w przypadku przerwy w
dostawie elektryczności Nie gwarantuje on jednak jakości
żywności ani bezpieczeństwa w razie jej spożycia. Zaleca się,
aby konsumenci we własnym zakresie ocenili jakość produktów
spożywczych w komorze zamrażarki i chłodziarki.
CZYSZCZENIE
Należy regularnie czyścić urządzenie szmatką zwilżoną
roztworem ciepłej wody i neutralnego detergentu
przeznaczonego do mycia wnętrza chłodziarki.
Nigdy nie stosować ściernych detergentów ani narzędzi.
Aby zapewnić stałe i prawidłowe odprowadzanie skroplin, należy
regularnie czyścić otwór odpływowy znajdujący się na ściance
tylnej komory chłodziarki, w pobliżu szuflady na owoce i
warzywa, używając w tym celu dostarczonego narzędzia.
Przed przystąpieniem do czyszczenia lub dowolnych czynności
konserwacyjnych należy wyjąć wtyczkę przewodu zasilającego
urządzenia z gniazdka sieciowego lub odłączyć je od zasilania.
ROZMRAŻANIE PRZEDZIAŁU CHŁODZIARKI
Rozmrażanie przedziału chłodziarki odbywa się w sposób
całkowicie automatyczny.
Widniejące na tylnej ściance urządzenia kropelki wody wskazują,
że jest w toku automatyczne rozmrażanie. Woda topnienia
automatycznie kieruje się do otworów spustu i jest gromadzona
w zbiorniku, z którego sama wyparowuje.
ROZMRAŻANIE PRZEDZIAŁU ZAMRAŻARKI
Zamrażarki bezszronowe No Frost zapewniają krążenie
chłodzonego powietrza wokół stref przechowywania żywności
zapobiegając powstawaniu lodu, i tym samym eliminują
całkowicie konieczność rozmrażania. Zamrożone produkty nie
przylepiają się do ścianek, etykietki pozostają nadal czytelne i
cała przestrzeń przeznaczona na przechowywanie jest zawsze
porządna i czysta.
OŚWIETLENIE DIODOWE
Jeżeli wewnętrzne oświetlenie LED nie
działa, należy zlecić jego wymianę
serwisantowi.
Ważne:
Gdy drzwi są otwarte, zapala się lampka
wewnętrzna komory chłodziarki. Po 10
minutach od otworzenia drzwi światło
wyłączy się.
5019 637 01111 Printed in Poland 11/11
KARTA URZĄDZENIA
PL
ID PLFGB
-
 1
1
-
 2
2
-
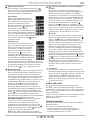 3
3
-
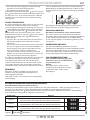 4
4
-
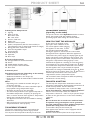 5
5
-
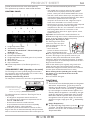 6
6
-
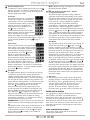 7
7
-
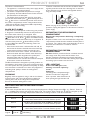 8
8
-
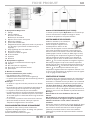 9
9
-
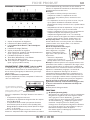 10
10
-
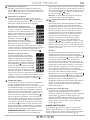 11
11
-
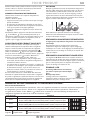 12
12
-
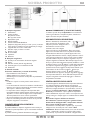 13
13
-
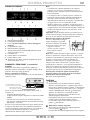 14
14
-
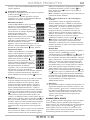 15
15
-
 16
16
-
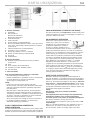 17
17
-
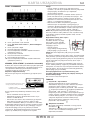 18
18
-
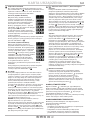 19
19
-
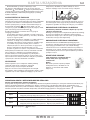 20
20


Whirlpool Demo WBV33992 IX Program Chart
- Tipo
- Program Chart
- Questo manuale è adatto anche per
in altre lingue
- English: Whirlpool Demo WBV33992 IX
- français: Whirlpool Demo WBV33992 IX
- Deutsch: Whirlpool Demo WBV33992 IX
- polski: Whirlpool Demo WBV33992 IX
Documenti correlati
-
Whirlpool WTV45972 NFC IX Program Chart
-
Whirlpool WBC3545 A++NFX Program Chart
-
Whirlpool Demo WBV33992 IX Program Chart
-
-
Whirlpool Demo WBV33992 IX Guida utente
-
Whirlpool WBA34983 DFC IX Program Chart
-
Whirlpool WBV34973 DFC W Program Chart
-
Whirlpool Demo WBV33992 IX Program Chart
-
-
Altri documenti
-
HOTPOINT/ARISTON HA70BE 72 X Daily Reference Guide
-
KitchenAid KCBPF 18120 2 Guida utente
-
HOTPOINT/ARISTON SH8 2D XROFD 2 Guida utente
-
Bauknecht KVIC 2870 A++ LH Program Chart
-
Bauknecht KGIN 3300/A Program Chart
-
Bauknecht KVIE 4184 A+++ Program Chart
-
Bauknecht KVIF 3183 FRESHA++ Program Chart
-
Bauknecht KRIE 3181/A+ Program Chart
-
Bauknecht KVIE 2210/A+ Guida utente
-
KitchenAid KCBPZ 18120 2 Daily Reference Guide