KitchenAid KCBPZ 18120 2 Daily Reference Guide
- Tipo
- Daily Reference Guide

Product sheet


Quick Guide
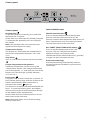
10
9
1
6
4
2
3
5
7
8
11
Carefully read the user handbook provided before using the appliance.
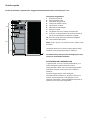
Freezer Compartment
I. Control panel
2. LED’s lighting
3. Ice tray
4. Shock Freeze compartment
5. Drawer divider
6. Bottle rack
7. Glass shelves
8. Rating plate with commercial name
9. Area for freezing fresh food or to store
frozen food
10. Area for storing frozen foods
11. Door seal
Note: All shelves, drawers and aps are removable.
The ideal food storage temperatures are already
factory-set.
The characteristics, technical data and images
may vary according to the model.
HOW TO START THE APPLIANCE
After plugging the appliance to the mains, it starts
the operation automatically. After starting the
appliance, wait at least 4-6 hours before placing
food into the appliance.
When the appliance is connected to the power
supply, the display lights up and all the icons appear
on the display for approximately 1 second. The
default (factory) values of the fridge compartment
settings light-up.
3

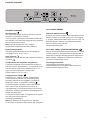
Control panel
On/Stand-by
To put the product in Stand-by, press and hold
the button for 3 seconds.
All the icons turn off except On/Standby indicator.
To reactivate the appliance press once (briey)
this button.
Note: this operation does not disconnect the
appliance from the power supply.
Temperature display
The display can show either the temperature in
the freezer compartment (between -16°C and -
24°C).
Stop Alarm
Press in case of alarm to mute the acoustic alarm
.
Freezer compartment temperature
A different temperature can be set using the
“Temperature” button. The storage temperature
can be changed by -1°C with each pressure of the
button: the value changes cyclically between -
16°C and -24°C.
Fast Freeze
Long-press the “Freezer” button for 3 seconds 24
hours before placing large amounts of food in the
freezer compartment. When the function is
activated, the symbol lights up.
This function is automatically deactivated after 50
hours. To speed up freezing times, the bottom
drawer can be removed and food placed directly
on the bottom of the compartment.
Shock Freeze and Fast Freeze functions can’t be
both active at the same time.
Note: food to be frozen must not be touching
already frozen food.
SHOCK FREEZE button
Shock Freeze function
Press to activate/deactivate the Shock Freeze
function (see the Instructions for Use). The
function switches off automatically after about 4-5
hours. Shock Freeze and Fast Freezing functions
can’t be both active at the same time.
OPT TARIFF (NIGHT TIME RATE) button
Press to activate/deactivate the Opt Tariff
function. The Opt Tariff function enables
appliance energy consumption to be
concentrated in the reduced rate hours, generally
at night (see the Instructions for Use).
ProFreeze technology
ProFreeze technology automatically works to
ensure the optimal conditions to preserve the
stored food.
4
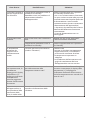
Control panel

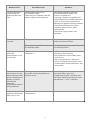
What to do if… Possible causes Solutions
The control panel is
switched off, the
appliance does not
work.
The appliance could be in
On/Standby mode.
There may be a problem with the
power supply to the appliance.
Activate the appliance with the
On/Standby button. Make sure:
- there is no power cut
- the plug is properly inserted in the
socket and that any double-pole mains
switch is in the correct position (i.e.
allowing the appliance to be powered)
- the household electrical system
protection devices are in good
working order
- the power supply cable is not
damaged.
The inside light does
not work.
The light may need replacing. Models with LED lights: contact the
authorised Service Centre.
The appliance could be in
On/Standby mode.
Activate the appliance with the
On/Standby button.
The temperature
inside the
compartments is not
low enough.
There could be various causes (see
“Solutions”).
Make sure:
- the doors close properly
- the appliance is not installed near a
heat source
- the set temperature is adequate
- the air circulation through the vents
at the bottom of the appliance is not
obstructed.
The Black Out Alarm
icon remains on, the
Alarm indicator blinks
and the Temperature
display (°C) blinks,
showing the
maximum
temperature reached
during blackout.
Prolonged power failure, able to
cause the inside temperature to
increase to 0°C.
Press the Stop Alarm button the
acoustical alarm stops, the
Temperature Display (°C) blinks and
the Alarm Indicator remains on until a
temperature < -10°C is reached.
The front edge of the
appliance, at the door
striker seal, is hot.
This is not a defect. It prevents
condensation.
No solution is necessary.
5

What to do if… Possible causes Solutions
The red led ashes
and an acoustic signal
sounds.
Door open alarm
Activates when the freezer
compartment door has remained
open for more than 2 minutes.
Close the door or press the Stop Alarm
to mute the acoustical alarm.
The red led ashes,
an acoustic signal
sounds and the
symbol is
displayed.
Blackout alarm
Activates when a prolonged power
cut causes the freezer
compartment temperature to rise.
Note: a different product
temperature cannot be set until
the blackout alarm is deactivated.
Before deactivating the acoustic signal,
it is advisable to pay attention to the
temperature shown on the
temperature display, corresponding to
the highest temperature reached in
the freezer compartment during the
power failure. Press the “Stop Alarm”
button briey to deactivate the
acoustic signal. After pressing the
button, the temperature display shows
the set temperatures again. If the
freezer compartment has not yet
reached the optimum food storage
temperature, the freezer compartment
temperature alarm could be activated
(see freezer compartment temperature
alarm). Check the food before
consuming it.
The red led lights
up (without ashing),
an acoustic signal
sounds and the
freezer compartment
temperature display
ashes.
Freezer compartment
temperature alarm
The freezer compartment
temperature alarm indicates that
the temperature is not at the
optimum level. This may happen:
with rst use, after defrosting
and/or cleaning, if large amounts
of food are placed inside the
freezer or when the freezer door
has not been closed properly.
To deactivate the acoustic signal, press
the Stop Alarm button ; the acoustical
alarm stops, the Temperature Display
(°C) blinks and the Alarm Indicator
remains on until a temperature < -10°C
is reached.
The red led lights
up, an acoustic signal
sounds and the letter
“F” ashes on the
display.
Malfunction Alarm
The alarm indicates a fault in a
technical component.
Call the authorised Service Centre.
Press the “Stop Alarm” button briey
to deactivate the acoustic signal.
Note: it is normal for the refrigeration system to produce some noises, such as gurgling and hissing.
6


19514595401
Printed in Italy
n
05/16
GB

Fiche produit


Guide rapide
1
0
9
1
6
4
2
3
5
7
8
11
Avant d'utiliser l’appareil, lisez attentivement les instructions fournies.
Compartiment congélateur
I. Panneau de commande
2. Éclairage LED
3. Bac à glaçons
4. Compartiment Congélation choc
5. Séparateur de tiroir
6. Porte-bouteilles
7. Clayettes en verre
8. Étiquette signalétique avec nom commercial
9. Zone pour la congélation d'aliments frais ou
pour conserver surgelés
10. Zone de stockage de produits surgelés
11. Joint du hublot
Remarque: Toutes les tablettes, les bacs, et les
volets peuvent être enlevés.
La température idéale de stockage des aliments est
préréglée en usine.
Les caractéristiques, les données techniques, et
les images peuvent varier selon le modèle.
MISE EN MARCHE DE L'APPAREIL
L'appareil se met automatiquement en marche une
fois branché. Une fois l'appareil en marche, attendez
au moins 4 à 6 heures avant d'y placer des aliments.
Lorsque l'appareil est branché à l'alimentation
électrique, l'afficheur s'illumine et toutes les icônes
s'illuminent pendant environ 1 seconde. Les valeurs
par défaut (réglées en usine) du compartiment
réfrigérateur s'illuminent.
3

Panneau de commande
Marche/Veille
Pour mettre le produit en veille, appuyez sur la
touche et maintenez-la enfoncée pendant
3 secondes.
Toutes les icônes s'éteignent sauf le voyant
Marche/Veille. Pour réactiver l'appareil, appuyez
une fois (brièvement) sur cette touche.
Remarque : Cette opération ne débranche pas
l'appareil de l'alimentation électrique.
Affichage de la température
L'écran peut afficher la température dans le
compartiment congélateur (entre -16°C et -24°C).
Arrêt d'alarme
Si l'alarme se déclenche, appuyez désactiver
l'alarme sonore .
Température du compartiment congélateur
Vous pouvez changer la température en utilisant
la touche « Température ». Chaque pression
permet de modier la température de stockage
de -1°C: la valeur change de manière cyclique
entre -16°C et -24°C.
Congélation rapide
Appuyez sur la touche « Congélateur » pendant
3 secondes, 24 heures avant d'introduire une
grande quantité d'aliments dans le compartiment
congélateur. Lorsque la fonction est activée,
l'icône s'illumine.
La fonction est automatiquement désactivée
après 50 heures. Pour optimiser la vitesse de
congélation, le tiroir inférieur peut être retiré et
les aliments peuvent être placés directement au
fond du compartiment.
Les fonctions Congélation choc et Congélation
rapide peuvent être activées en même temps.
Remarque: les aliments qui doivent être
congelés ne doivent pas être en contact avec des
aliments déjà congelés.
Touche CONGÉLATION CHOC
Fonction Congélation choc
Appuyez sur cette touche pour activer/désactiver
la fonction Congélation choc (voir les consignes
d'utilisation). La fonction se désactive
automatiquement au bout de 4 à 5heures. Les
fonctions Congélation choc et Congélation rapide
ne peuvent pas être activées en même temps.
Touche OPT TARIF (TAUX DE NUIT)
Appuyez pour activer/désactiver la fonction Opt
tarif. La fonction Opt tarif permet de reporter la
consommation d'énergie de l'appareil aux heures
où le tarif est moins élevé, généralement la nuit
(voir les consignes d'utilisation).
Technologie ProFreeze
La technologie ProFreeze se met
automatiquement en marche pour garantir des
conditions optimales pour la conservation des
aliments.
4
Panneau de commande

Que faire si... Causes possibles Solutions
Le panneau de
commandes est
éteint, l'appareil ne
fonctionne pas.
L'appareil peut être en mode
Marche/Veille.
Il se peut que l'alimentation
électrique de l'appareil présente
une anomalie.
Activez l'appareil en appuyant sur la
touche Marche/Veille. Vériez les
points suivants:
- il n'y a pas de coupure de courant
- la che est correctement insérée dans
la prise de courant et l'interrupteur
bipolaire principal se trouve dans la
bonne position (c.-à-d. qu'il permet à
l'appareil d'être alimenté)
- les dispositifs de protection de
l'installation électrique de la résidence
fonctionnent correctement
- le câble d'alimentation n'est pas
endommagé.
L'éclairage intérieur
ne fonctionne pas.
Il se peut que l'ampoule ait besoin
d'être remplacée.
Modèles avec voyants à LED: adressez-
vous à un Service Après-vente agréé.
L'appareil peut être en mode
Marche/Veille.
Activez l'appareil en appuyant sur la
touche Marche/Veille.
La température à
l'intérieur des
compartiments n'est
pas assez basse.
Plusieurs causes sont possibles
(voir Solutions »).
Vériez les points suivants:
- les portes ferment correctement
- l'appareil n'est pas situé près d'une
source de chaleur
- la température programmée est
adéquate
- la circulation d'air par les bouches,
situées au bas de l'appareil, n'est pas
obstrué.
L'icône de l'alarme de
coupure de courant
reste allumée, le
voyant de l'alarme
ainsi que l'affichage
de la température (°C)
clignotent, indiquant
la température
maximale atteinte au
cours de la coupure
de courant.
Panne de courant prolongée,
pouvant faire monter la
température à l'intérieur à 0°C.
Appuyez sur la touche Arrêt d'alarme,
l'alarme sonore s'arrête, l'affichage de
la température (°C) clignote, et le
voyant Arrêt d'alarme reste illuminé
jusqu'à ce qu'une température de
< -10°C est atteinte.
Le pourtour frontal de
l'appareil, au niveau
du joint de porte, est
chaud.
Ceci est tout à fait normal. Il
prévient la condensation.
Aucune solution n'est requise.
5

Que faire si... Causes possibles Solutions
Le voyant rouge
clignote et un signal
sonore retentit.
Alarme porte ouverte
S'active lorsque la porte du
compartiment réfrigérateur reste
ouverte plus de 2 minutes.
Fermez la porte ou appuyez sur Arrêt
Alarme pour arrêter le signal sonore.
Le voyant rouge
clignote, un signal
sonore se fait
entendre et le
symbole s'affiche à
l'écran.
Alarme d'interruption
S'active lorsque la température du
compartiment congélateur
augmente à cause d'une coupure
de courant prolongée.
Remarque: l'alarme de coupure de
courant doit être désactivée avant
de pouvoir régler une autre
température.
Avant de désactiver le signal sonore,
nous vous conseillons de prêter
attention à la température affichée sur
l'écran, qui correspond à la
température maximale atteinte dans le
compartiment congélateur pendant la
coupure de courant. Appuyez sur la
touche « Arrêter alarme » pour
désactiver le signal sonore. Après avoir
appuyé sur la touche, l'affichage de
température indique une nouvelle fois
la température réglée. Si le
compartiment congélateur n'a pas
encore atteint sa température de
conservation optimale, l'alarme de
température peut être activée (voir
Alarme de température du
compartiment congélateur). Vériez
les aliments avant de les consommer.
Le voyant rouge
s'allume (sans
clignoter), un signal
sonore retentit, et le
voyant de
température du
compartiment
congélateur clignote.
Alarme de température du
compartiment congélateur
L'alarme de température du
compartiment congélateur indique
que la température dans le
compartiment n'est pas optimale.
Cela peut se produire: lors de la
première utilisation, après le
dégivrage et/ou le nettoyage, si
une grande quantité d'aliments est
placée dans le congélateur, ou si la
porte du congélateur n'a pas été
fermée correctement.
Appuyez sur la touche « Arrêt
d'alarme » pour désactiver le signal
sonore; l'alarme sonore s'arrête,
l'affichage de la température (°C)
clignote et l'Indicateur d'alarme reste
allumé jusqu'à ce qu'une température
de < -10°C soit atteinte.
Le voyant rouge
s'illumine, un signal
sonore se fait
entendre, et la lettre
« F » clignote à
l'écran.
Défaillance de l'alarme
L'alarme indique le
dysfonctionnement d'une
composante électrique.
Adressez-vous à un Service Après-
Vente agréé. Appuyez sur la touche
« Arrêter alarme » pour désactiver le
signal sonore.
Remarque: il est normal pour le système de réfrigération de produire certains bruits, comme des
gargouillements et des sifflements.
6


19514595401
Imprimé en Italie
n
05/16
FR

Scheda tecnica


Guida rapida
1
0
9
1
6
4
2
3
5
7
8
11
Prima di utilizzare l’apparecchio, leggere attentamente anche le istruzioni per l’uso.
Comparto congelatore
I. Pannello comandi
2. Illuminazione a LED
3. Vaschetta del ghiaccio
4. Comparto Shock Freeze
5. Separatore cassetto
6. Mensola portabottiglie
7. Ripiani in vetro
8. Targhetta dati con il nome commerciale
9. Area per il congelamento di alimenti freschi o
per la conservazione di alimenti surgelati
10. Area di conservazione di alimenti congelati
11. Guarnizione della porta
Nota: Tutti i ripiani, i cassetti e le ante a ribalta sono
estraibili.
Le temperature per la conservazione ideale degli
alimenti sono già preimpostate in fabbrica.
Caratteristiche, dati tecnici e immagini possono
variare a seconda del modello.
ACCENSIONE DELL'APPARECCHIO
L'apparecchio si avvia in modo automatico, una
volta collegato l'apparecchio alla rete di
alimentazione. Dopo avere avviato l'apparecchio,
attendere almeno 4-6 ore prima di introdurre
alimenti.
Quando l'apparecchio viene collegato
all'alimentazione elettrica, il display si illumina e
tutte le icone appaiono sul display per circa 1
secondo. Appaiono i valori predeniti impostati in
fabbrica per il comparto frigorifero.
3

Pannello comandi
On/Stand-by
Per impostare l'apparecchio in stand-by, tenere
premuto il tasto per 3 secondi.
Tutte le icone si spengono a eccezione della spia
On/Standby. Per riattivare l'apparecchio, premere
brevemente questo tasto.
Nota: questa operazione non scollega
l’apparecchio dall’alimentazione elettrica.
Display temperatura
Il display indica la temperatura del comparto
congelatore (tra -16°C e -24°C).
Stop allarme
Premere in caso di allarme per silenziare l'allarme
acustico .
Temperatura del comparto congelatore
È possibile impostare una temperatura diversa
usando il tasto “Temperatura”. La temperatura di
conservazione può essere modicata di -1°C a
ogni pressione del tasto: il valore varia
ciclicamente tra -16°C e -24°C.
Congelamento rapido
Premere per 3 secondi il tasto “Congelatore”
24 ore prima di inserire nel comparto grandi
quantità di alimenti da congelare. Quando la
funzione è attiva, si accende il simbolo .
Questa funzione si disattiva automaticamente
dopo 50 ore. Per velocizzare il processo di
congelamento, è possibile rimuovere il cassetto
inferiore e collocare gli alimenti direttamente sul
fondo del comparto.
Le funzioni Shock Freeze e Congelamento rapido
non possono essere attivate
contemporaneamente.
Nota: gli alimenti da congelare non devono
essere posti a contatto con alimenti già congelati.
Tasto SHOCK FREEZE
Funzione Shock Freeze
Premere per attivare/disattivare la funzione Shock
Freeze (vedere le Istruzioni per l'uso). La funzione
si spegne automaticamente dopo circa 4-5 ore. Le
funzioni Shock Freeze e Congelamento rapido
non possono essere attivate
contemporaneamente.
Tasto OPT TARIFF (TARIFFA NOTTURNA)
Questo tasto attiva/disattiva la funzione Opt Tariff
(Tariffa notturna), che permette di concentrare il
consumo di energia dell'apparecchio negli orari a
tariffa ridotta, solitamente nella fascia notturna
(vedere le Istruzioni per l'uso).
Tecnologia ProFreeze
La tecnologia ProFreeze imposta
automaticamente le condizioni ottimali per la
conservazione degli alimenti.
4
Pannello comandi
La pagina si sta caricando...
La pagina si sta caricando...
La pagina si sta caricando...
La pagina si sta caricando...
-
 1
1
-
 2
2
-
 3
3
-
 4
4
-
 5
5
-
 6
6
-
 7
7
-
 8
8
-
 9
9
-
 10
10
-
 11
11
-
 12
12
-
 13
13
-
 14
14
-
 15
15
-
 16
16
-
 17
17
-
 18
18
-
 19
19
-
 20
20
-
 21
21
-
 22
22
-
 23
23
-
 24
24


KitchenAid KCBPZ 18120 2 Daily Reference Guide
- Tipo
- Daily Reference Guide
in altre lingue
- English: KitchenAid KCBPZ 18120 2
- français: KitchenAid KCBPZ 18120 2
Documenti correlati
Altri documenti
-
Bauknecht GKN 14G3 WS 2 Guida utente
-
-
Whirlpool GKN 1958 A++ Guida utente
-
Bauknecht GKN 17G4 A2+ WS Manuale del proprietario
-
-
Whirlpool WTV45972 NFC IX Program Chart
-
Whirlpool Demo WBV33992 IX Program Chart
-
Whirlpool UW8 F2C XBI N Manuale del proprietario