Princess 01.183022.01.001 Manuale utente
- Categoria
- Friggitrici
- Tipo
- Manuale utente

!"#$%&'
!" ()!)*!+
# ,!)!'!'
$ ()!
%& ()!&)
'& (!!!
$( ,#-'
)$ ./-)+01
% #%"2'
$* ./-) +0!
3454673885345334
+,&-

19
15
18
16
17
13
14
3
2
4
5 6 7 8 9 10 11 12
ĘŚČ !
"Č!
1

Instruction manual
3
SAFETY
• By ignoring the safety instructions the
manufacturer cannot be held responsible for
the damage.
• If the supply cord is damaged, it must be
replaced by the manufacturer, its service
agent or similarly qualified persons in order
to avoid a hazard.
• Never move the appliance by pulling the
cord and make sure the cord cannot
become entangled.
• The appliance must be placed on a stable,
level surface.
• This appliance is only to be used for
household purposes and only for the
purpose it is made for. In worst case the
food can catch fire. (i.e. do not use more
than one tea spoon of oil, no meat that will
release to much grease or water intended
for boiling foods.
• This appliance shall not be used by children
aged less than 8 years. This appliance can
be used by children aged from 8 years and
above and persons with reduced physical,
sensory or mental capabilities or lack of
experience and knowledge if they have been
given supervision or instruction concerning
use of the appliance in a safe way and
understand the hazards involved. Children
shall not play with the appliance. Keep the
appliance and its cord out of reach of
children aged less than 8 years. Cleaning
and user maintenance shall not be made by
children unless older than 8 and supervised.
• To protect yourself against an electric shock,
do not immerse the cord, plug or appliance
in the water or any other liquid.
• The appliance is to be connected to a
socket-outlet having an earthed contact (for
class I appliances).
• WARNING: If the surface is cracked, switch
off the appliance to avoid the possibility of
an electric shock.
• Keep the appliance and its cord out of reach
of children less than 8 years.
• The temperature of accessible surfaces may
be high when the appliance is operating.
• The appliance is not intended to be operated
by means of an external timer or a separate
remote-control system.
EN

Instruction manual
4
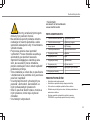
• Surfaces indicated with this logo are
liable to get hot during use.
• In order to prevent disruptions of the airflow do
not put anything on top of the appliance and
make sure there is always 10 centimeter of free
space around the appliance.
• After the baking process the appliance needs to
cooldown, this cooling process will activate
automatically when the timer is done. Avoid to
unplug the appliance from the net socket before
the cooling process is finished because the
remaining hot air can damage the appliance.
• This appliance is intended to be used in
household and similar applications such as:
• Staff kitchen areas in shops, offices and other
working environments.
• By clients in hotels, motels and other residential
type environments.
• Bed and breakfast type environments.
• Farm houses.
SAVE THESE INSTRUCTIONS
HOUSEHOLD USE ONLY
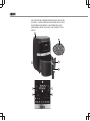
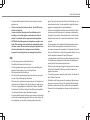
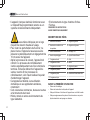
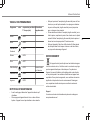
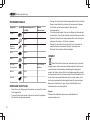
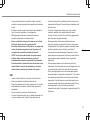
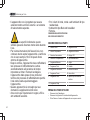
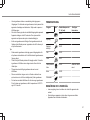
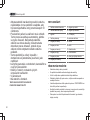
PARTS DESCRIPTION
1 Timer control buttons 11 Bake program
2 Temperature control buttons 12 Vegetable program
3 Power button 13 LCD display
4 Preset button 14 Heating-up light
5 Meat program 15 Grid
6 Chicken program 16 Basket
7 Shellfish/Crustaceans program 17 Basket handle
8 Fish program 18 Air inlet
9 Pizza program 19 Air outlet openings
10 Aerofryer Fries program
BEFORE THE FIRST USE
• Remove all packaging material.
• Remove any stickers or labels from the appliance.
• Wipe the inside and outside of the appliance with a moist cloth.
• Thoroughly clean the parts with hot water, some washing-up liquid and
a non-abrasive sponge.
• Place the removable grid in the pan properly. NOTE: do not use the
appliance without this grid.
• Place the appliance on a stable, horizontal and level surface, do not
place the appliance on non-heat-resistant surfaces.
• Baking times may vary based on amount of fries, type of fries,
temperature and brand.

Instruction manual
5
• Press and hold the power button for some seconds to turn the
appliance on.
•This is an air fryer that works on hot air. Do not fill the pan
with oil or frying fat.
•In order to prevent disruptions of the airflow do not put
anything on top of the appliance and make sure there is
always 10 centimeter of free space around the appliance.
•NOTE: After the baking process the appliance needs to cool
down, this cooling process will activate automatically when
the timer is done. Please avoid to unplug the appliance from
the net-socket before the cooling process is finished
because the remaining hot air can damage the appliance.
USE
• Put the mains plug in an earthed wall socket.
• Carefully pull the pan out of the air fryer.
• Put the ingredients in the pan, make sure the removable grid is
placed in the pan before you put in the ingredients.
• Slide the pan back into the air fryer.
• Do not touch the pan during and some time after use, as it gets
very hot. Only hold the pan by the handle.
• When the pan is cold, please warm up the pan for 5 minutes on a
temperature of 80 degrees. After this, the device is ready for use.
• There are 8 frying programs included: Meat, Chicken, Shellfish/
Crustaceans, Fish, Pizza, Aerofryer Fries, Bake and Vegetables.
Use the preset button to select the desired program.
• Press and hold the power button for some seconds, the Aerofryer
will start the corresponding program. When you have chosen the
wrong program, you can abort by pressing the power button
again. The device will stop after 20 seconds. After this you can
select another function. It is also possible to adjust the chosen
program by changing the time and temperature.
• The time can be adjusted with the timer control buttons. Press
the timer control buttons one time to increase or decrease the
frying time by one minute. Press and hold one of the buttons to
adjust the time faster. You can set the timer between 1 and 60
minutes.
• The temperature can be adjusted with the temperature control
buttons. Press the temperature control buttons one time to
increase or decrease the temperature by 5 degrees. Press and
hold one of the buttons to adjust the temperature faster. You can
set the temperature between 80 and 200 degrees.
• It is also possible to start the device without selecting a function.
Set the time and temperature with the timer and temperature
control buttons, then press the power button.
• When you pull out the pan during the frying process, the device
will shut off automatically. When you reinsert the device, the
program will resume.
• To cancel any program, press the power button. The device will
shut off after 20 seconds.
• During the hot air frying process, the heating-up light comes on
and goes out from time to time. This indicates that the heating
element is switched on and off to maintain the set temperature.
• Excess oil from the ingredients is collected on the bottom of the
pan.
EN

Instruction manual
6
• Some ingredients require shaking halfway through the preparation
time. To shake the ingredients, pull the pan out of the appliance by the
handle and shake it. Then slide the pan back into the air fryer.
• When you hear the timer beep, the set preparation time has elapsed.
The device will shut off after 20 seconds. Pull the pan out of the
appliance and place it on a heatresistant surface.
• Check if the ingredients are ready. If the ingredients are not ready yet,
simply slide the pan back into the appliance and set the timer to a few
extra minutes.
Tips
• Shaking smaller ingredients halfway during the preparation time
optimizes the end result and can help prevent unevenly fried
ingredients.
• Add some oil to fresh potatoes for a crispy result. Fry your ingredients
in the air fryer within a few minutes after you've added the oil.
• Do not prepare extremely greasy ingredients such as sausages in the
air fryer.
• Place a baking tin in the pan if you want to bake a cake or quiche or if
you want to fry fragile ingredients or filled ingredients.
• You can also use the air fryer to reheat ingredients. To reheat
ingredients, set the temperature to 150°C for up to 10 minutes.
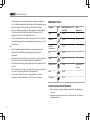
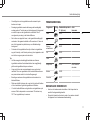
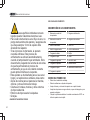
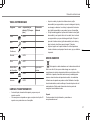
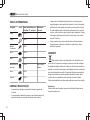
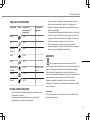
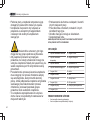
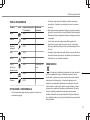
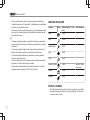
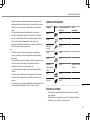
PROGRAM TABLE
Program Icon Default temperature ⁰C /
time (Min)
Extra
information
Meat 180/12
Chicken 180/25
Shellfish/
Crustaceans
180/12
Fish 180/18
Pizza 160/17
Aerofryer Fries 200/18 Shake every 5
minutes
Bake 160/25
Vegetables 180/12
CLEANING AND MAINTENANCE
• Before cleaning, unplug the appliance and wait for the appliance to
cool down.
• Never immerse the device in water or any other liquid. The device is
not dishwasher proof.

Instruction manual
7
• Clean the pan and aeroplate (removable grid) with hot water,
some washing-up liquid and a non-abrasive sponge. The pan and
aeroplate (removable grid) are not dishwasher-proof.
• If dirt is stuck to the aeroplate (removable grid) or the bottom of
the pan, fill the pan with hot water with some washing-up liquid.
Put the aeroplate (removable grid) in the pan and let the pan and
the grid soak for about 10 minutes.
• Clean the appliance with a damp cloth. Never use harsh and
abrasive cleaners, scouring pad or steel wool, which damages
the appliance.
ENVIRONMENT
This appliance should not be put into the domestic garbage at
the end of its durability, but must be offered at a central point for the
recycling of electric and electronic domestic appliances. This symbol
on the appliance, instruction manual and packaging puts your
attention to this important issue. The materials used in this appliance
can be recycled. By recycling of used domestic appliances you
contribute an important push to the protection of our environment.
Ask your local authorities for information regarding the point of
recollection.
Support
You can find all available information and spare parts at
www.princesshome.eu!
EN

Gebruiksaanwijzing
8
VEILIGHEID
• Als u de veiligheidsinstructies negeert, kan de
fabrikant niet verantwoordelijk worden
gehouden voor de mogelijke schade.
• Als het netsnoer beschadigd is, moet het
worden vervangen door de fabrikant, de
onderhoudsmonteur van de fabrikant of door
personen met een soortgelijke kwalificatie om
gevaar te voorkomen.
• Verplaats het apparaat nooit door aan het snoer
te trekken en zorg dat het snoer niet in de war
kan raken.
• Het apparaat moet op een stabiele, vlakke
ondergrond worden geplaatst.
• Dit apparaat is uitsluitend voor huishoudelijk
gebruik en voor het doel waar het voor bestemd
is. In het ergste geval kan het voedsel vlam
vatten. (Gebruik niet meer dan één theelepel
olie, geen vlees dat te veel vet vrijgeeft of water
dat bedoeld is om voedsel te koken.)
• Dit apparaat mag niet worden gebruikt door
kinderen jonger dan 8 jaar. Dit apparaat kan
worden gebruikt door kinderen vanaf 8 jaar en
door personen met verminderde lichamelijke,
zintuiglijke of geestelijke vermogens of gebrek
aan de benodigde ervaring en kennis indien ze
onder toezicht staan of instructies krijgen over
hoe het apparaat op een veilige manier kan
worden gebruikt alsook de gevaren begrijpen
die met het gebruik samenhangen. Kinderen
mogen niet met het apparaat spelen. Houd het
apparaat en het netsnoer buiten bereik van
kinderen jonger dan 8 jaar. Laat reiniging en
onderhoud niet door kinderen uitvoeren, tenzij
ze ouder zijn dan 8 jaar en onder toezicht staan.
• Dompel het snoer, de stekker of het apparaat
niet onder in water of andere vloeistoffen om
elektrische schokken te voorkomen.
• Het apparaat moet worden aangesloten op een
geaard stopcontact (voor klasse I-apparaten).
• WAARSCHUWING: Indien het oppervlak is
gebarsten, schakel dan het apparaat uit om
elektrische schokken te voorkomen.
• Houd het apparaat en het netsnoer buiten
bereik van kinderen jonger dan 8 jaar.
• De temperatuur van de toegankelijke
oppervlakken kan hoog zijn wanneer het
apparaat in gebruik is.
• Het apparaat is niet bedoeld om bediend te
worden met behulp van een externe timer of
een afzonderlijk afstandbedieningssysteem.

Gebruiksaanwijzing
9
• Oppervlakken gemarkeerd met dit
logo kunnen heet worden tijdens gebruik.
• Plaats niets boven op het apparaat en zorg
ervoor dat er altijd 10cm vrije ruimte rondom
het apparaat is om verstoring van de
luchtstroom te voorkomen.
• Na het bakken moet het apparaat afkoelen.
Dit koelproces wordt automatisch
geactiveerd na afloop van de timer.
Verwijder de stekker pas na voltooiing van
het koelproces uit het stopcontact, omdat de
resterende hete lucht het apparaat kan
beschadigen.
• Dit apparaat is bedoeld voor huishoudelijk
en soortgelijk gebruik, zoals:
• Personeelskeukens in winkels, kantoren en
andere werkomgevingen.
• Door gasten in hotels, motels en andere
residentiële omgevingen.
• Bed&Breakfast-type omgevingen.
• Boerderijen.
BEWAAR DEZE INSTRUCTIES
ALLEEN VOOR HUISHOUDELIJK GEBRUIK
ONDERDELENBESCHRIJVING
1 Toetsen voor timerregeling 11 Programma voor gebak
2 Temperatuurtoetsen 12 Programma voor groenten
3 Aan/uit-toets 13 Lcd-display
4 Snelkeuzetoets 14 Opwarmlampje
5 Programma voor biefstuk 15 Rooster
6 Programma voor kip 16 Mandje
7 Programma voor garnalen 17 Handgreep van mandje
8 Programma voor vis 18 Luchtinlaat
9 Programma voor pizza 19 Openingen voor afvoer van
hete lucht
10 Programma voor friet
VOOR HET EERSTE GEBRUIK
• Verwijder alle verpakkingsmateriaal.
• Verwijder eventuele stickers of etiketten van het apparaat.
• Reinig de binnenkant en de buitenkant van het apparaat met een
vochtige doek.
• Reinig de onderdelen grondig met heet water, een beetje
afwasmiddel en een niet-schurende spons.
• Plaats het uitneembare rooster op de juiste wijze in de pan. LET
OP: Gebruik het apparaat niet zonder dit rooster.
• Plaats het apparaat op een stabiele, horizontale en vlakke
ondergrond. Plaats het apparaat niet op een niet-hittebestendige
ondergrond.
NL

Gebruiksaanwijzing
10
• Baktijden kunnen variëren, afhankelijk van de hoeveelheid friet, het
type friet, de temperatuur en het merk.
• Houd de aan/uit-knop een paar seconden ingedrukt om het apparaat
aan te zetten.
•Dit is een heteluchtfriteuse die werkt op hete lucht. Vul de pan
niet met olie of frituurvet.
•Plaats niets boven op het apparaat en zorg ervoor dat er altijd 10
centimeter vrije ruimte rondom het apparaat is om verstoring van
de luchtstroom te voorkomen.
•LET OP: Na het bakken moet het apparaat afkoelen. Dit
koelproces wordt automatisch na afloop van de timer
ingeschakeld. Trek de stekker van het apparaat pas na voltooiing
van het koelproces uit het stopcontact. Dit omdat de resterende
hete lucht het apparaat kan beschadigen.
GEBRUIK
• Plaats de netstekker in een geaard stopcontact.
• Trek de pan voorzichtig uit de heteluchtfriteuse.
• Plaats de ingrediënten in de pan. Controleer voordat u de ingrediënten
in de pan doet of het uitneembare rooster is geplaatst.
• Schuif de pan terug in de heteluchtfriteuse.
• Raak de pan tijdens en enige tijd na gebruik niet aan. De pan wordt
zeer heet. Houd de pan uitsluitend bij de handgreep vast.
• Warm een koude pan 5minuten op tot een temperatuur van
80graden. Hierna is het apparaat gereed voor gebruik.
• Er zijn 8 bakprogramma's beschikbaar: Vlees, Kip, Schelp- en
schaaldieren, Vis, Pizza, Aerofryer-friet, Gebak en Groenten. Gebruik
de snelkeuzetoets om het gewenste programma te selecteren.
• Houd de aan/uit-knop een paar seconden ingedrukt om de Aerofryer
met het desbetreffende programma te laten beginnen. Wanneer je
hebt verkeerde programma hebt gekozen, kun je het afbreken door de
knop opnieuw in te drukken. Na 20 seconden stopt het apparaat.
Hierna kun je een andere functie selecteren. Het is ook mogelijk het
gekozen programma aan te passen door de tijd en temperatuur te
veranderen.
• De tijd kan worden gewijzigd met de timerregelknoppen. Druk
eenmaal op de timerregelknoppen om de frituurtijd met één minuut te
verlengen of te verkorten. Houd een van de knoppen ingedrukt om de
tijd sneller te wijzigen. U kunt de timer tussen 1 en 60 minuten
instellen.
• De temperatuur kan worden gewijzigd met de
temperatuurregelknoppen. Druk eenmaal op de
temperatuurregelknoppen om de temperatuur met 5 graden te
verhogen of te verlagen. Houd een van de knoppen ingedrukt om de
temperatuur sneller te wijzigen. U kunt de temperatuur instellen tussen
80 en 200 graden.
• Het is ook mogelijk het apparaat te starten zonder een functie te
selecteren. Stel de tijd en de temperatuur in met de timer- en
temperatuurregelknoppen. Druk vervolgens op de aan/uitknop.
• Als u de pan tijdens het frituren verwijdert, schakelt het apparaat
automatisch uit. Als u het apparaat terugplaatst, zal het programma
hervatten.
• Druk om een programma te annuleren op de aan/uitknop. Het
apparaat schakelt na 20 seconden uit.
• Tijdens het heteluchtfrituren gaat de opwarmindicator van tijd tot tijd
aan en uit. Dit geeft aan dat het verwarmingselement wordt in- en
uitgeschakeld om de ingestelde temperatuur te handhaven.

Gebruiksaanwijzing
11
• Overtollige olie van de ingrediënten wordt verzameld op de
bodem van de pan.
• Sommige ingrediënten moeten halverwege de bereidingstijd
worden geschud. Trek de pan met de handgreep uit het apparaat
en schud de pan om de ingrediënten te schudden. Schuif
vervolgens de pan terug in de heteluchtfriteuse.
• Als de timer een piep laat horen, is de ingestelde bereidingstijd
verstreken. Het apparaat schakelt na 20 seconden uit. Neem de
pan uit het apparaat en plaats deze op een hittebestendige
ondergrond.
• Controleer of de ingrediënten klaar zijn. Indien de ingrediënten
nog niet klaar zijn, schuif dan de pan terug in het apparaat en stel
met de timer nog een paar extra minuten in.
Tips
• Het halverwege de bereidingstijd schudden van kleinere
ingrediënten verbetert het eindresultaat en kan ongelijkmatig
gefrituurde ingrediënten helpen voorkomen.
• Voeg wat olie toe aan verse aardappelen voor een krokant
resultaat. Frituur uw ingrediënten in de heteluchtfriteuse binnen
een paar minuten nadat u de olie heeft toegevoegd.
• Bereid geen extreem vette ingrediënten zoals worsten in de
heteluchtfriteuse.
• Plaats een bakblik in de pan als u een taart of quiche wilt bakken
of als u kwetsbare of gevulde ingrediënten wilt bakken.
• U kunt de heteluchtfriteuse ook gebruiken om ingrediënten op te
warmen. Stel de temperatuur voor maximaal 10 minuten in op
150°C om ingrediënten op te warmen.
PROGRAMMATABEL
Programma Pictog
ram
Standaardtemperatuur
⁰C / tijd (min.)
Extra
informatie
Vlees 180/12
Kip 180/25
Schelp-/
schaaldieren
180/12
Vis 180/18
Pizza 160/17
Airfryer friet 200/18 Elke 5 minuten
schudden
Bakken 160/25
Groenten 180/12
REINIGING EN ONDERHOUD
• Haal voor het schoonmaken de stekker uit het stopcontact en
wacht tot het apparaat afgekoeld is.
• Dompel het toestel nooit onder in water of een andere vloeistof.
Het apparaat is niet vaatwasmachinebestendig.
NL

Gebruiksaanwijzing
12
• Reinig de pan en aero-plaat (het verwijderbare rooster) met heet
water, wat afwasmiddel en een niet-schurende spons. De pan en
aero-plaat (het verwijderbare rooster) zijn niet vaatwasserbestendig.
• Als er resten vastzitten op de aero-plaat (het verwijderbare rooster) of
de onderkant van de pan, vult u de pan met heet water en wat
afwasmiddel. Plaats de aero-plaat (het verwijderbare rooster) in de
pan en laat de pan en het rooster ongeveer 10minuten weken.
• Reinig het apparaat met een vochtige doek. Gebruik nooit agressieve
en schurende schoonmaakmiddelen, schuursponsjes of staalwol, die
het apparaat beschadigen.
MILIEU
Dit apparaat mag aan het einde van de levensduur niet bij het
normale huisafval worden gedeponeerd, maar moet bij een speciaal
inzamelpunt voor hergebruik van elektrische en elektronische apparaten
worden aangeboden. Het symbool op het apparaat, in de
gebruiksaanwijzing en op de verpakking attendeert u hierop. De in het
apparaat gebruikte materialen kunnen worden gerecycled. Met het
recyclen van gebruikte huishoudelijke apparaten levert u een belangrijke
bijdrage aan de bescherming van ons milieu. Informeer bij uw lokale
overheid naar het inzamelpunt.
Support
U kunt alle beschikbare informatie en reserveonderdelen vinden op
www.princesshome.eu!

Manuel d'instructions
13
SÉCURITÉ
• Si vous ignorez les consignes de sécurité, le
fabricant ne peut être tenu pour responsable
des dommages.
• Si le cordon d'alimentation est endommagé,
il doit être remplacé par le fabricant, son
réparateur ou des personnes qualifiées afin
d'éviter tout risque.
• Ne déplacez jamais l'appareil en tirant sur le
cordon et veillez à ce que celui-ci ne
s'enroule pas.
• L'appareil doit être posé sur une surface
stable et nivelée.
• Cet appareil est uniquement destiné à des
utilisations domestiques et seulement dans
le but pour lequel il est fabriqué. Dans le pire
des cas, les aliments peuvent prendre feu.
(N'utilisez pas plus d'une cuillère à café
d'huile, aucune viande pouvant diffuser trop
de graisse ou d'eau pour l'ébullition des
aliments.)
• Cet appareil ne doit pas être utilisé par des
enfants de moins de 8 ans. Cet appareil
peut être utilisé par des enfants de 8 ans ou
plus et des personnes présentant un
handicap physique, sensoriel ou mental
voire ne disposant pas des connaissances
et de l'expérience nécessaires en cas de
surveillance ou d'instructions sur l'usage de
cet appareil en toute sécurité et de
compréhension des risques impliqués. Les
enfants ne doivent pas jouer avec l'appareil.
Maintenez l'appareil et son cordon
d'alimentation hors de portée des enfants de
moins de 8 ans. Le nettoyage et la
maintenance utilisateur ne doivent pas être
confiés à des enfants sauf s'ils ont 8 ans ou
plus et sont sous surveillance.
• Afin de vous éviter un choc électrique,
n'immergez pas le cordon, la prise ou
l'appareil dans de l'eau ou autre liquide.
• Branchez l'appareil sur une prise électrique
munie d'une connexion à la terre (pour les
appareils de catégorie I).
• AVERTISSEMENT: Si la surface est
fissurée, arrêtez l'appareil pour éviter tout
risque de choc électrique.
• Maintenez l'appareil et son cordon
d'alimentation hors de portée des enfants de
moins de 8 ans.
• La température des surfaces accessibles
peut devenir élevée quand l'appareil est en
fonction.
FR

Manuel d'instructions
14
• L'appareil n'est pas destiné à fonctionner avec
un dispositif de programmation externe ou un
système de télécommande indépendant.
• Les surfaces indiquées par ce logo
risquent de devenir chaudes à l'usage.
• Pour éviter les perturbations du flux d'air, ne
placez rien sur l'appareil et assurez-vous de
préserver systématiquement un dégagement de
10 cm autour de l'appareil.
• Après le processus de cuisson, l'appareil doit
refroidir. Ce processus de refroidissement
s'active automatiquement une fois la minuterie
terminée. Évitez de débrancher l'appareil du
secteur avant la fin du processus de
refroidissement. L'air chaud résiduel risquerait
d'endommager l'appareil.
• Cet appareil est destiné à une utilisation
domestique et aux applications similaires,
notamment:
• Coin cuisine des commerces, bureaux et autres
environnements de travail.
• Hôtels, motels et autres environnements de
type résidentiel.
• Environnements de type chambre d’hôtes.
• Fermes.
CONSERVEZ CES INSTRUCTIONS
USAGE DOMESTIQUE UNIQUEMENT
DESCRIPTION DES PIÈCES
1 Boutons de minuterie 11 Programme gâteau
2 Boutons de contrôle de la
température
12 Programme légumes
3 Bouton marche/arrêt 13 Affichage LCD
4 Bouton de préréglage 14 Voyant d'échauffement
5 Programme steak 15 Grille
6 Programme volaille 16 Panier
7 Programme crevettes 17 Poignée du panier
8 Programme poisson 18 Entrée d'air
9 Programme pizza 19 Ouvertures d'évacuation d'air
10 Programme chips
AVANT LA PREMIÈRE UTILISATION
• Retirez tout l'emballage.
• Retirez tout autocollant ou étiquette de l'appareil.
• Nettoyez l'intérieur et l'extérieur de l'appareil avec un chiffon humide.
• Nettoyez soigneusement les pièces à l'eau chaude avec un peu de
liquide vaisselle et une éponge non abrasive.

Manuel d'instructions
15
• Placez la grille amovible correctement dans la cuve. NOTE :
n’utilisez pas l’appareil sans cette grille.
• Placez l'appareil sur une surface stable, horizontale et de niveau
et évitez les surfaces non thermorésistantes.
• Les durées de cuisson indiquées peuvent varier selon la quantité
de frites, le type de frites, la température et la marque.
• Appuyez sur le bouton d'alimentation et maintenez-le enfoncé
pendant quelques secondes pour allumer l'appareil.
•Cette friteuse à air chaud fonctionne à l'air chaud. Ne
remplissez pas la cuve avec de l'huile ou de la graisse de
friture.
•Pour éviter les perturbations du flux d'air, ne placez rien sur
l'appareil et assurez-vous de préserver systématiquement un
dégagement de 10 cm autour de l'appareil.
•NOTE: Après le processus de cuisson, l'appareil doit
refroidir. Ce processus de refroidissement s'active
automatiquement une fois la minuterie terminée. Évitez de
débrancher l'appareil du secteur avant la fin du processus
de refroidissement. L'air chaud résiduel risquerait
d'endommager l'appareil.
UTILISATION
• Branchez la fiche secteur dans une prise murale mise à la terre.
• Retirez prudemment la cuve de la friteuse à air chaud.
• Placez les ingrédients dans la cuve en vous assurant que la grille
amovible est en place avant de le faire.
• Glissez à nouveau la cuve dans la friteuse à air chaud.
• Ne touchez pas la cuve durant l'usage et ensuite pendant un
certain temps. Elle devient très chaude. Tenez la cuve
uniquement par la poignée.
• Lorsque la cuve est froide, laissez-la chauffer pendant 5 minutes
à une température de 80 degrés. Ensuite, l'appareil est prêt à
être utilisé.
• Il y a 8 programmes de cuisson inclus: Viande, Volaille,
Coquillages et crustacés, Poisson, Pizza, Frites Aerofryer,
Cuisson et Légumes. Utilisez le bouton de préréglage pour
choisir le programme souhaité.
• Appuyez sur le bouton d'alimentation et maintenez-le enfoncé
pendant quelques secondes, l'Aerofryer lancera le programme
correspondant. Si vous avez choisi le mauvais programme, vous
pouvez l'interrompre en appuyant à nouveau sur le bouton
d'alimentation. L'appareil s'arrêtera après 20 secondes. Après
cela, vous pouvez sélectionner une autre fonction. Il est
également possible d'ajuster le programme choisi en modifiant le
temps et la température.
• La durée est réglable avec les boutons de minuterie. Appuyez
sur les boutons de minuterie une fois pour augmenter /réduire le
temps de friture d'une minute. Appuyez sur l'un des boutons sans
le relâcher pour accélérer le réglage de la durée. La minuterie est
réglable entre 1 et 60 minutes.
• La température est réglable avec les boutons de thermostat.
Appuyez sur les boutons de température une fois pour
augmenter /réduire la température de 5 degrés. Appuyez sur l'un
des boutons sans le relâcher pour accélérer le réglage de
température. La température est réglable entre 80 et 200 degrés.
FR

Manuel d'instructions
16
• Vous pouvez aussi démarrer l'appareil sans sélectionner une fonction.
Réglez la durée et la température avec les boutons de minuterie et de
thermostat puis appuyez sur le bouton d'alimentation.
• Si vous retirez la cuve durant le processus de friture, l'appareil s'éteint
automatiquement. Lorsque vous remettez l'appareil, le programme
reprend.
• Pour annuler un programme, appuyez sur le bouton d'alimentation.
L'appareil s'éteint après 20 secondes.
• Durant le processus de friture à l'air chaud, le témoin de chauffage
s'allume et s'éteint de temps à autre. C'est l'indication que l'élément
chauffant s'allume et s'éteint pour entretenir la température.
• L'excès d'huile des ingrédients est recueilli au fond de la cuve.
• Certains ingrédients ont besoin d'être secoués à mi-temps de la
préparation. Pour secouer les ingrédients, sortez la cuve de l'appareil
par la poignée et secouez-la. Puis glissez à nouveau la cuve dans la
friteuse à air chaud.
• Dès que le minuteur sonne, le temps de préparation réglé s'est
écoulé. L'appareil s'éteint après 20 secondes. Sortez la cuve de
l'appareil et placez-la sur une surface thermorésistante.
• Vérifiez si les ingrédients sont prêts. Si les ingrédients ne sont pas
encore prêts, glissez simplement à nouveau la cuve dans l'appareil et
ajoutez quelques minutes au minuteur.
Conseils
• Secouer les petits ingrédients à mi-temps durant la préparation
optimise le résultat final et contribue à éviter la friture irrégulière des
ingrédients.
• Ajoutez de l'huile aux pommes de terre fraîches pour un résultat
croustillant. Faites frire vos ingrédients dans la friteuse à air chaud en
quelques minutes après avoir ajouté de l'huile.
• Évitez de préparer des ingrédients très graisseux comme les
saucisses dans la friteuse à air chaud.
• Placez un moule à pâtisserie dans la friteuse si vous souhaitez
préparer un gâteau ou une quiche, ou si vous voulez faire frire des
ingrédients fragiles ou farcis.
• Vous pouvez aussi utiliser la friteuse à air chaud pour réchauffer des
ingrédients. Pour réchauffer les ingrédients, réglez la température sur
150°C pendant un maximum de 10 minutes.

Manuel d'instructions
17
TABLEAU DES PROGRAMMES
Programme Icône Température par défaut
⁰C / temps (min)
Informations
supplémentaire
s
Viande 180/12
Poulet 180/25
Fruits de mer/
Crustacés
180/12
Poisson 180/18
Pizza 160/17
Frites Aerofryer 200/18 Secouer toutes
les 5 minutes
Cuisson au four 160/25
Légumes 180/12
NETTOYAGE ET MAINTENANCE
• Avant le nettoyage, débranchez l'appareil et attendez qu'il
refroidisse.
• N'immergez pas l'appareil dans de l'eau ou dans d'autres
liquides. L'appareil ne sont pas lavables au lave-vaisselle.
• Nettoyez le panier et l'aeroplate (la grille amovible) avec de l'eau
chaude, un peu de liquide vaisselle et une éponge non abrasive.
Le panier et l'aeroplate (la grille amovible) ne sont pas prévus
pour un lavage au lave-vaisselle.
• Si des saletés sont collées à l'aeroplate (la grille amovible) ou au
fond du panier, remplissez le panier d'eau chaude avec du liquide
vaisselle. Mettez l'aeroplate (la grille amovible) dans le panier et
laissez les deux tremper pendant 10minutes environ.
• Nettoyez l'appareil à l'aide d'un chiffon humide. N'utilisez jamais
de nettoyant abrasif ni de tampon à récurer ou de laine d'acier,
ce qui pourrait endommager l'appareil.
ENVIRONNEMENT
Cet appareil ne doit pas être jeté avec les déchets ménagers
à la fin de sa durée de vie, il doit être remis à un centre de recyclage
pour les appareils électriques et électroniques. Ce symbole sur
l'appareil, le manuel d'utilisation et l'emballage attire votre attention
sur un point important. Les matériaux utilisés dans cet appareil sont
recyclables. En recyclant vos appareils, vous contribuez de manière
significative à la protection de notre environnement. Renseignez-
vous auprès des autorités locales pour connaître les centres de
collecte des déchets.
Support
Vous retrouvez toutes les informations et pièces de rechange sur
www.princesshome.eu!
FR

Bedienungsanleitung
18
SICHERHEIT
• Beim Ignorieren der Sicherheitshinweise kann
der Hersteller nicht für Schäden haftbar
gemacht werden.
• Ist das Netzkabel beschädigt, muss es vom
Hersteller, dem Kundendienst oder ähnlich
qualifizierten Personen ersetzt werden, um
Gefahren zu vermeiden.
• Bewegen Sie das Gerät niemals durch Ziehen
am Kabel, und stellen Sie sicher, dass sich das
Kabel nicht verwickeln kann.
• Das Gerät muss auf einer ebenen, stabilen
Fläche platziert werden.
• Dieses Gerät darf nur für den
Haushaltsgebrauch und nur für den Zweck
benutzt werden, für den es hergestellt wurde.
Im schlimmsten Fall kann sich das Essen
entzünden. (Verwenden Sie nicht mehr als
einen Teelöffel Öl, verwenden Sie kein Fleisch,
das zu viel Fett auslässt oder Wasser, das zum
Kochen von Speisen vorgesehen ist.)
• Dieses Gerät darf nicht von Kindern unter 8
Jahren verwendet werden. Dieses Gerät darf
von Kindern ab 8 Jahren und von Personen mit
eingeschränkten körperlichen, sensorischen
oder geistigen Fähigkeiten oder einem Mangel
an Erfahrung und Kenntnissen verwendet
werden, sofern diese Personen beaufsichtigt
oder über den sicheren Gebrauch des Geräts
unterrichtet wurden und die damit verbundenen
Gefahren verstanden haben. Kinder dürfen mit
dem Gerät nicht spielen. Halten Sie das Gerät
und sein Anschlusskabel außerhalb der
Reichweite von Kindern unter 8 Jahren.
Reinigungs- und Wartungsarbeiten dürfen nicht
von Kindern vorgenommen werden, es sei
denn, sie sind älter als 8 und werden
beaufsichtigt.
• Tauchen Sie das Kabel, den Stecker oder das
Gerät nicht in Wasser oder andere
Flüssigkeiten, um einen elektrischen Schlag zu
vermeiden.
• Dieses Gerät darf nur mit einer geerdeten
Steckdose (für Klasse I Geräte) verbunden
werden.
• ACHTUNG: Hat die Oberfläche einen Riss,
schalten Sie das Gerät aus, um die Gefahr
eines Stromschlags zu vermeiden.
• Halten Sie das Gerät und sein Anschlusskabel
außerhalb der Reichweite von Kindern unter 8
Jahren.
• Die Temperatur der zugänglichen Oberflächen
kann hoch sein, wenn das Gerät in Betrieb ist.

Bedienungsanleitung
19
• Das Gerät darf nicht mit einem externen
Timer oder einem separaten
Fernbedienungssystem betrieben werden.
• Oberflächen, die mit diesem Logo
gekennzeichnet sind, können beim
Gebrauch heiß werden.
• Legen Sie keine Gegenstände auf das Gerät
und stellen Sie sicher, dass immer 10
Zentimeter Freiraum um das Gerät herum
sind, damit die Luft ungehindert zirkulieren
kann.
• Nach dem Backvorgang muss das Gerät
abkühlen; dieser Abkühlvorgang wird
automatisch aktiviert, wenn der Timer
abgelaufen ist. Ziehen Sie nicht den
Netzstecker aus der Netzsteckdose, bevor
der Abkühlvorgang beendet ist, weil die
sonst verbleibende heiße Luft das Gerät
beschädigen kann.
• Dieses Gerät ist dazu bestimmt, im Haushalt
und ähnlichen Anwendungen verwendet zu
werden, wie beispielsweise:
• In Küchen für Mitarbeiter in Läden, Büros
und anderen gewerblichen Bereichen.
• Von Kunden in Hotels, Motels und anderen
Wohneinrichtungen.
• In Frühstückspensionen.
• In Gutshäusern.
BEWAHREN SIE DIESE ANLEITUNG AUF
NUR FÜR DEN HAUSGEBRAUCH
TEILEBESCHREIBUNG
1 Zeiteinstelltasten 11 Gebäckprogramm
2 Temperatur-Einstelltasten 12 Gemüseprogramm
3 Ein/Aus-Taste 13 LCD-Display
4 Preset-Taste 14 Aufheizlampe
5 Steak-Programm 15 Rost
6 Geflügelprogramm 16 Garkorb
7 Shrimps-Programm 17 Korbgriff
8 Fischprogramm 18 Lufteinlass
9 Pizza-Programm 19 Luftauslassöffnungen
10 Pommes-Frites-Programm
VOR DER ERSTEN INBETRIEBNAHME
• Entfernen Sie das gesamte Verpackungsmaterial.
• Entfernen Sie die Aufkleber oder Schilder vom Gerät.
DE

Bedienungsanleitung
20
• Wischen Sie das Innere und das Äußere des Geräts mit einem
feuchten Lappen.
• Reinigen Sie die Teile gründlich mit heißem Wasser, etwas Spülmittel
und einem nicht scheuernden Schwamm.
• Setzen Sie den herausnehmbaren Korb richtig in die Wanne ein.
HINWEIS: Verwenden Sie das Gerät nicht ohne diesen Korb.
• Stellen Sie das Gerät auf einer stabilen, waagerechten und ebenen
Fläche auf. Stellen Sie das Gerät nicht auf Oberflächen auf, die nicht
hitzebeständig sind.
• Die Garzeiten können je nach Menge und Art der Pommes-Frites
sowie Temperatur und Marke variieren.
• Halten Sie die Einschalttaste einige Sekunden lang gedrückt, um das
Gerät einzuschalten.
•Diese Friteuse arbeitet mit Heißluft. Füllen Sie die Wanne nicht
mit Öl oder Frittierfett.
•Legen Sie keine Gegenstände auf das Gerät und stellen Sie
sicher, dass immer 10 Zentimeter Freiraum um das Gerät herum
sind, damit die Luft ungehindert zirkulieren kann.
•HINWEIS: Nach dem Backvorgang muss das Gerät abkühlen;
dieser Abkühlvorgang wird automatisch aktiviert, wenn der Timer
abgelaufen ist. Bitte ziehen Sie nicht den Netzstecker aus der
Netzsteckdose, bevor der Abkühlvorgang beendet ist, weil die
sonst verbleibende heiße Luft das Gerät beschädigen kann.
GEBRAUCH
• Stecken Sie den Netzstecker in eine geerdete Wandsteckdose.
• Ziehen Sie die Wanne vorsichtig aus der Heißluftfriteuse heraus.
• Geben Sie die Zutaten in die Wanne und achten Sie darauf, dass der
herausnehmbare Korb in die Wanne eingesetzt ist, bevor Sie die
Zutaten in die Wanne geben.
• Schieben Sie die Wanne wieder in die Heißluftfriteuse.
• Berühren Sie die Wanne beim und kurze Zeit nach dem Gebrauch
nicht, da sie sehr heiß wird. Halten Sie die Wanne nur am Handgriff
fest.
• Wenn die Pfanne kalt ist, wärmen Sie die Pfanne bitte 5 Minuten lang
auf eine Temperatur von 80 Grad auf. Danach ist das Gerät
gebrauchsbereit.
• Folgende 8 Frittierprogramme sind verfügbar: Fleisch, Geflügel,
Meeresfrüchte/Krustentiere, Fisch, Pizza, Pommes-Frites, Backen und
Gemüse. Verwenden Sie die Preset-Taste, um das gewünschte
Programm zu wählen.
• Halten Sie die Einschalttaste einige Sekunden lang gedrückt, die
Heißluftfritteuse startet das entsprechende Programm. Wenn Sie das
falsche Programm ausgewählt haben, können Sie es abbrechen,
indem Sie erneut die Einschalttaste drücken. Das Gerät stoppt nach
20 Sekunden. Danach können Sie eine andere Funktion auswählen.
Es ist auch möglich, das gewählte Programm durch Ändern von Zeit
und Temperatur anzupassen.
• Die Zeit kann mit den Timer-Steuertasten eingestellt werden. Drücken
Sie ein Mal auf die Timer-Steuertasten, um die Frittierzeit um eine
Minute zu erhöhen oder zu verringern. Drücken und halten Sie eine
der Tasten, um die Zeit schneller einzustellen. Sie können den Timer
zwischen 1 und 60 Minuten einstellen.
La pagina si sta caricando...
La pagina si sta caricando...
La pagina si sta caricando...
La pagina si sta caricando...
La pagina si sta caricando...
La pagina si sta caricando...
La pagina si sta caricando...
La pagina si sta caricando...
La pagina si sta caricando...
La pagina si sta caricando...
La pagina si sta caricando...
La pagina si sta caricando...
La pagina si sta caricando...
La pagina si sta caricando...
La pagina si sta caricando...
La pagina si sta caricando...
La pagina si sta caricando...
La pagina si sta caricando...
La pagina si sta caricando...
La pagina si sta caricando...
La pagina si sta caricando...
La pagina si sta caricando...
La pagina si sta caricando...
La pagina si sta caricando...
La pagina si sta caricando...
La pagina si sta caricando...
La pagina si sta caricando...
La pagina si sta caricando...
La pagina si sta caricando...
La pagina si sta caricando...
La pagina si sta caricando...
La pagina si sta caricando...
La pagina si sta caricando...
La pagina si sta caricando...
La pagina si sta caricando...
La pagina si sta caricando...
La pagina si sta caricando...
La pagina si sta caricando...
La pagina si sta caricando...
La pagina si sta caricando...
-
 1
1
-
 2
2
-
 3
3
-
 4
4
-
 5
5
-
 6
6
-
 7
7
-
 8
8
-
 9
9
-
 10
10
-
 11
11
-
 12
12
-
 13
13
-
 14
14
-
 15
15
-
 16
16
-
 17
17
-
 18
18
-
 19
19
-
 20
20
-
 21
21
-
 22
22
-
 23
23
-
 24
24
-
 25
25
-
 26
26
-
 27
27
-
 28
28
-
 29
29
-
 30
30
-
 31
31
-
 32
32
-
 33
33
-
 34
34
-
 35
35
-
 36
36
-
 37
37
-
 38
38
-
 39
39
-
 40
40
-
 41
41
-
 42
42
-
 43
43
-
 44
44
-
 45
45
-
 46
46
-
 47
47
-
 48
48
-
 49
49
-
 50
50
-
 51
51
-
 52
52
-
 53
53
-
 54
54
-
 55
55
-
 56
56
-
 57
57
-
 58
58
-
 59
59
-
 60
60


Princess 01.183022.01.001 Manuale utente
- Categoria
- Friggitrici
- Tipo
- Manuale utente
in altre lingue
- français: Princess 01.183022.01.001 Manuel utilisateur
- español: Princess 01.183022.01.001 Manual de usuario
- Deutsch: Princess 01.183022.01.001 Benutzerhandbuch
- Nederlands: Princess 01.183022.01.001 Handleiding
- português: Princess 01.183022.01.001 Manual do usuário
- slovenčina: Princess 01.183022.01.001 Používateľská príručka
- polski: Princess 01.183022.01.001 Instrukcja obsługi
Documenti correlati
-
Princess 01.183312.01.750 Manuale utente
-
Princess 01.182060.01.001 Manuale utente
-
-
-
-
-
-
-
Princess 182020 Manuale utente
-
Altri documenti
-
Eden ED-7012 Manuale utente
-
Tristar FR-9006PR AIRFRYER Manuale utente
-
Tristar FR-6974 Manuale utente
-
-
Nova 02.180138.01.001 Manuale utente
-
-
Tristar FR-9037 Manuale utente
-
Eden ED-7005 Manuale utente
-
Tristar FR-6997 Manuale utente