Brother Innov-is XJ1 Guida d'installazione
- Categoria
- Giocattoli
- Tipo
- Guida d'installazione
Questo manuale è adatto anche per

English
German
French
Dutch
Italian
Spanish
Portuguese
Russian
• Read this guide before installing.
• Lesen Sie diese Anleitung vor der Installation durch.
• Lisez ce guide avant de procéder à l'installation.
• Lees deze handleiding voordat u begint met installeren.
• Leggere la presente guida prima dell'installazione.
• Antes de instalar, lea este guía.
• Leia este guia antes da instalação.
• Перед началом установки прочитайте данное руководство.
Premium Pack I
Installation Guide
Pacchetto Premium I
Guida all’installazione
Premium Pack I
Guía de instalación
Pacote Premium I
Guia de Instalação
Премиум пакет I
Руководство по установке
Premium-pakket I
Installatie handleiding
Pack Premium I
Guide d’installation
Premium-Paket I
Installationsanleitung

1
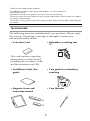
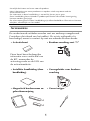
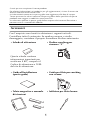
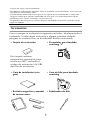
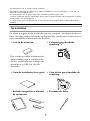
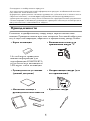
Accessories
The following items are included with your purchase. Please verify
all contents. If anything is missing or damaged, contact your
authorized Brother dealer.
Thank you for choosing our product.
For additional product information and updates, visit our website at
www.brother.com.
Information found in this guide is current at the time of printing.
Please be aware that some contents of this guide and product specifications are subject
to change without notice.
The screens in this guide are for illustration purposes only and may differ depending on
the model.
• Activation Card • Embroidery couching foot
"Y"
This card contains important
information to certify the KIT,
including the Activation Code
and the activation site URL.
• Installation Guide (this
guide)
• Yarn guide for embroidery
couching
• Magnetic frame and
instruction manual
• Yarn threader
Y
×4
×4

2
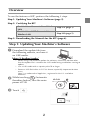
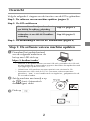
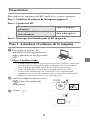
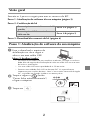
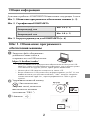
Overview
To use the features of KIT, perform the following 3 steps.
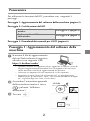
Step 1: Updating Your Machine's Software
aDownload the update file from
the following website, and save it
on USB media.
https://s.brother/cueka/
* When using USB media to update the software, check that no data other
than the update file is saved on the USB media being used before starting to
update.
* Use a USB media with a capacity of 4GB or larger.
* Format a USB flash drive in FAT 32 format (especially important for Mac
users.)
"Mac" is a trademark of Apple Inc., registered in the U.S. and other
countries.
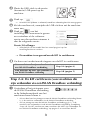
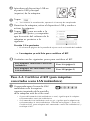
bWhile touching (Automatic
threading button), turn the main
power to ON.
cTouch .
Step 1: Updating Your Machine's Software (page 2)
Step 2: Certifying the KIT
For Machines Connected to a Wireless
LAN Step 2-A (page 3)
For Machines NOT Connected to a
Wireless LAN Step 2-B (page 5)
Step 3: Downloading the Manuals for the KIT (page 6)

3
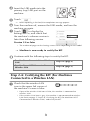
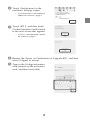
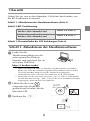
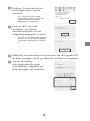
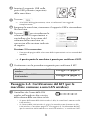
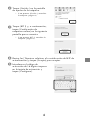
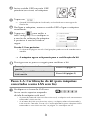
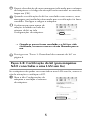
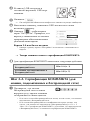
dInsert the USB media into the
primary (top) USB port on the
machine.
eTouch .
When updating is finished, the completion message appears.
fTurn the machine off, remove the USB media, and turn the
machine on again.
gTouch to display the
Settings screen, and check that
the machine’s software version is
later than following version.
Version 2.0 or later
* The number of pages on the Settings screen varies depending on the model.
Machine is now ready to certify the KIT.
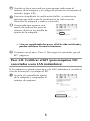
hContinue with the following steps to certify the KIT.
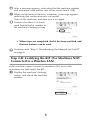
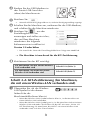
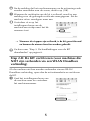
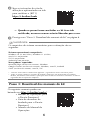
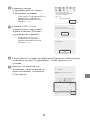
Step 2-A: Certifying the KIT (For Machines
Connected to a Wireless LAN)
aCheck that the wireless LAN
icon in the upper left corner of
the machine's screen is blue.
* If part of the wireless LAN icon is blue, the machine is connected to
wireless LAN.
* If the wireless LAN icon is gray, the machine is not connected to wireless
LAN. Refer to page 5 “Step 2-B: Certifying the KIT (For Machines NOT
Connected to a Wireless LAN)” and certify the KIT.
For Machines Connected to a Wireless
LAN Step 2-A (page 3)
For Machines NOT Connected to a
Wireless LAN Step 2-B (page 5)

4
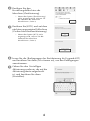
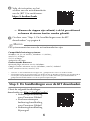
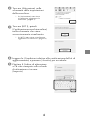
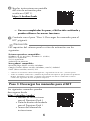
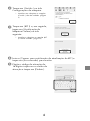
bTouch [Certification] in the
machine's Settings screen.
* If [Certification] is not displayed,
update the machine. (page 2)
cTouch [KIT I], and then touch
[Online Machine Certification]
in the next screen that appears.
* If [KIT I] is not displayed, update
the machine. (page 2)
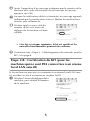
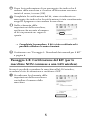
dReview the [Terms on Certification of Upgrade KIT], and then
touch [I Agree] to accept.
eType in the 16-digit activation
code printed on the activation
card, and then touch [Set].

5
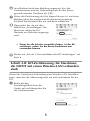
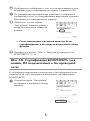
fAfter a message appears, indicating that the machine number
and activation code will be sent to the server, touch [OK].
gWhen certification of the kit is complete, a message appears,
indicating that certification was successful.
Turn off the machine, and then turn it on again.
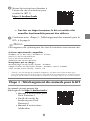
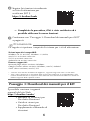
hConfirm that there is a check
mark beside the kit number in
the machine’s Settings screen.
When steps are completed, the kit has been certified, and
the new features can be used.
iContinue with “Step 3: Downloading the Manuals for the KIT”
on page 6.
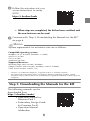
Step 2-B: Certifying the KIT (For Machines NOT
Connected to a Wireless LAN)
If the machine cannot connect to wireless LAN, access the
activation site and certify the KIT.
aDisplay the machine’s Settings
screen, and check the machine
number.

6
bFollow the activation site’s on-
screen instructions to certify
[KIT I].
https://s.brother/kawb
When steps are completed, the kit has been certified, and
the new features can be used.
cContinue with “Step 3: Downloading the Manuals for the KIT”
on page 6.
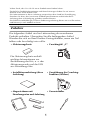
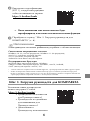
Step 3: Downloading the Manuals for the KIT
The following manuals can be
downloaded from
https://s.brother/cmeka/
• Operation Manual for
Premium Pack I
• Embroidery Design Guide
for Premium Pack I
• Operation Manual
Addendum
Memo
System requirements for activation sites are as follows.
Compatible operating systems:
Windows 10 (32 or 64bit), Windows 11 (64bit)
macOS 11 or later
iOS 13 or later
Android 8.0 or later
Supported browsers:
Microsoft Edge (Latest version): Windows
Google Chrome (Latest version): Windows, macOS, Android
Safari (Latest version): macOS, iOS
* "macOS" is a trademark of Apple Inc., registered in the U.S. and other countries.
* Any trade names and product names of companies appearing on Brother products, related
documents and any other materials are all trademarks or registered trademarks of those respective
companies.

1
Zubehör
Die folgenden Artikel sind im Lieferumfang des erworbenen
Produkts enthalten. Überprüfen Sie alle beiliegenden Artikel.
Wenden Sie sich an Ihren Brother-Vertragshändler, wenn ein Teil
fehlen oder beschädigt sein sollte.
Vielen Dank, dass Sie sich für unser Produkt entschieden haben.
Zusätzliche Produktinformationen und Aktualisierungen finden Sie auf unserer
Website unter www.brother.com.
Die Informationen in dieser Anleitung entsprechen dem Stand bei Drucklegung.
Beachten Sie bitte, dass bestimmte Produktspezifikationen und Inhalte dieser
Anleitung ohne Ankündigung geändert werden können.
Die Bildschirmabbildungen in dieser Bedienungsanleitung dienen nur zur Illustration
und können je nach Modell variieren.
• Aktivierungskarte • Couchingfuß „Y“
Die Aktivierungskarte enthält
wichtige Informationen zur
Zertifizierung des Kits, u. a. den
Aktivierungscode und die URL
zur Aktivierungs-Site.
• Installationsanleitung (diese
Anleitung)
• Garnführung für Couching-
Funktion (Sticken)
• Magnetrahmen mit
Einzelmagneten und Anleitung
•Garneinfädler
Y
×4
×4

2
Übersicht
Gehen Sie vor, wie in den folgenden 3 Schritten beschrieben, um
die KIT-Funktionen zu nutzen:
Schritt 1: Aktualisieren der Maschinensoftware
aLaden Sie die
Aktualisierungsdatei von der
unten genannten Website
herunter und speichern Sie sie
auf einem USB-Stick.
https://s.brother/cueka/
* Wenn Sie einen USB-Stick zur Aktualisierung der Software verwenden,
dürfen sich außer der Aktualisierungsdatei keine anderen Daten auf dem
USB-Stick befinden, bevor Sie mit der Aktualisierung beginnen.
* Verwenden Sie einen USB-Stick mit mindestens 4 GB Speicherplatz.
* Formatieren Sie den USB-Stick im Format „FAT 32“ (dies ist insbesondere
für Mac-Benutzer wichtig.). „Mac“ ist ein in den USA und anderen Ländern
eingetragenes Warenzeichen von Apple Inc.
bHalten Sie die Taste
(Automatisches Einfädeln)
gedrückt und schalten Sie die
Maschine EIN.
cBerühren Sie .
Schritt 1: Aktualisieren der Maschinensoftware (Seite 2)
Schritt 2:KIT-Zertifizierung
Für Maschinen, die mit einem
Wireless-LAN verbunden sind Schritt 2-A (Seite 3)
Für Maschinen, die nicht mit einem
Wireless-LAN verbunden sind Schritt 2-B (Seite 5)
Schritt 3: Herunterladen der KIT-Anleitungen (Seite 6)

3
dStecken Sie das USB-Medium in
den Primär-USB-Anschluss
(oben) der Maschine ein.
eBerühren Sie .
Wenn die Aktualisierung abgeschlossen ist, wird eine Bestätigungsmeldung angezeigt.
fSchalten Sie die Maschine aus, entfernen Sie das USB-Medium,
und schalten Sie die Maschine wieder ein.
gBerühren Sie , um den
Einstellungsbildschirm
anzuzeigen und stellen sie sicher,
dass auf Ihrer Maschine
mindestens die folgende
Softwareversion installiert ist.
Version 2.0 oder höher
* Die Anzahl der Seiten des Einstellungsbildschirms hängt vom Modell ab.
Die Maschine ist nun bereit für die KIT-Zertifizierung.
hZertifizieren Sie das KIT wie folgt.
Schritt 2-A: KIT-Zertifizierung (für Maschinen,
die mit einem Wireless-LAN verbunden sind)
aÜberprüfen Sie, ob das Wireless-
LAN-Symbol in der oberen
linken Ecke des
Maschinenbildschirms blau ist.
* Wenn das Wireless-LAN-Symbol teilweise blau ist, ist die Maschine mit
einem Wireless-LAN verbunden.
* Wenn das Wireless-LAN-Symbol grau ist, ist die Maschine nicht mit einem
Wireless-LAN verbunden. Zertifizieren Sie das KIT wie unter „Schritt 2-B:
KIT-Zertifizierung (für Maschinen, die NICHT mit einem Wireless-LAN
verbunden sind)” auf Seite 5 beschrieben.
Für Maschinen, die mit einem Wireless-
LAN verbunden sind Schritt 2-A (Seite 3)
Für Maschinen, die nicht mit einem
Wireless-LAN verbunden sind Schritt 2-B (Seite 5)

4
bBerühren Sie den
Einstellungsbildschirm der
Maschine [Zertifizierung].
* Wenn die Option [Zertifizierung]
nicht angezeigt wird, müssen Sie
die Software der Maschine
aktualisieren. (Seite 2)
cBerühren Sie [KIT I] und auf dem
nächsten angezeigten Bildschirm
[Online Maschinezertifizierung].
* Wenn die Option [KIT I] nicht
angezeigt wird, müssen Sie die
Software der Maschine
aktualisieren. (Seite 2)
dLesen Sie die [Bedingungen der Zertifizierung für Upgrade KIT]
und berühren Sie dann [Ich stimme zu], um den Bedingungen
zuzustimmen.
eGeben Sie den 16-stelligen
Aktivierungscode ein, der auf die
Aktivierungskarte aufgedruckt
ist, und berühren Sie dann
[Einstellen].

5
fAnschließend wird eine Meldung angezeigt, dass die
Gerätenummer und der Aktivierungscode an den Server
gesendet werden. Berühren Sie [OK].
gWenn die Zertifizierung des Kits abgeschlossen ist, wird eine
Meldung über die erfolgreiche Zertifizierung angezeigt.
Schalten Sie die Maschine aus und dann wieder ein.
hÜberprüfen Sie, ob auf dem
Bildschirm „Einstellungen“ der
Maschine neben der Kit-
Nummer ein Häkchen angezeigt
wird.
Wenn Sie alle Schritte ausgeführt haben, ist das Kit
zertifiziert, sodass Sie die neuen Funktionen nun
verwenden können.
iWeiter mit „Schritt 3: Herunterladen der KIT-Anleitungen” auf
Seite 6.
Schritt 2-B: KIT-Zertifizierung (für Maschinen,
die NICHT mit einem Wireless-LAN verbunden
sind)
Wenn das Gerät keine Verbindung zum Wireless-LAN herstellen
kann, rufen Sie die Aktivierungsseite auf und zertifizieren Sie das
KIT.
aRufen Sie den
Einstellungsbildschirm des
Geräts auf und überprüfen Sie
die Gerätenummer.

6
bFolgen Sie den Anweisungen auf
dem Bildschirm der
Aktivierungsseite, um [KIT I] zu
zertifizieren.
https://s.brother/kawb
Wenn Sie alle Schritte ausgeführt haben, ist das Kit zertifiziert,
sodass Sie die neuen Funktionen nun verwenden können.
c
Weiter mit „Schritt 3: Herunterladen der KIT-Anleitungen” auf Seite 6.
Schritt 3: Herunterladen der KIT-Anleitungen
Sie können die nachstehenden
Anleitungen auf der folgenden Seite
herunterladen:
https://s.brother/cmeka/
• Bedienungsanleitung für
Premium-Paket I
• Stickmuster-Katalog für
Premium-Paket I
• Ergänzung zur
Bedienungsanleitung
Anmerkung
Für die Aktivierungsseiten müssen die folgenden
Systemvoraussetzungen erfüllt sein.
Kompatible Betriebssysteme:
Windows 10 (32 oder 64bit), Windows 11 (64bit)
macOS 11 oder höher
iOS 13 oder höher
Android 8.0 oder höher
Unterstützte Browser:
Microsoft Edge (neueste Version): Windows
Google Chrome (neueste Version): Windows, macOS, Android
Safari (neueste Version): macOS, iOS
* „macOS“ ist ein in den USA und anderen Ländern eingetragenes Warenzeichen von Apple Inc.
* Alle Warenzeichen und Produktnamen von Unternehmen, die bei Brother-Produkten, in den
zugehörigen Dokumenten und anderen Unterlagen vorkommen, sind Warenzeichen oder
eingetragene Warenzeichen der jeweiligen Unternehmen.

1
Accessoires
Les éléments suivants sont inclus dans votre achat. Veuillez vérifier
l'ensemble du contenu. Si l'un des éléments est manquant ou
endommagé, contactez votre revendeur Brother agréé.
Merci d'avoir choisi notre produit.
Pour de plus amples informations sur le produit et les mises à jour, consultez notre site
Web www.brother.com.
Les informations présentées sont à jour à la date d'impression de ce guide.
Sachez néanmoins que certaines informations de ce guide et certaines spécifications
de produits sont sujettes à modification sans avis préalable.
Les écrans de ce guide sont fournis à titre d'information uniquement et peuvent varier
en fonction du modèle.
• Carte d'activation • Pied de broderie pour fil
couché « Y »
Cette carte contient des
informations importantes pour
certifier le KIT, notamment le
code d'activation et l'URL
d'activation.
• Guide d'installation (le
présent guide)
• Guide-fil pour broderie en fil
couché
• Cadre à broder magnétique
et manuel d'utilisation
• Enfileur pour fil couché
Y
×4
×4

2
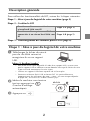
Description générale
Pour utiliser les fonctionnalités du KIT, suivez les 3 étapes suivantes.
Étape 1 : Mise à jour du logiciel de votre machine
aTéléchargez le fichier de mise à
jour du site Web suivant et
enregistrez-le sur un support
USB.
https://s.brother/cueka/
* Lors d'une mise à jour logicielle à l'aide d'un support USB, assurez-vous
que le support USB ne contient aucune donnée autre que le fichier de mise
à jour avant de commencer la mise à jour.
* Utilisez un support USB d'une capacité de 4 Go ou plus.
* Formatez un lecteur flash USB au format FAT 32 (particulièrement
important pour les utilisateurs de Mac.) « Mac » est une marque déposée
d'Apple Inc. aux États-Unis et dans d'autres pays.
bMettez la machine sous tension
tout en appuyant sur
(Touche d'enfilage
automatique).
cAppuyez sur .
Étape 1 : Mise à jour du logiciel de votre machine (page 2)
Étape 2 : Certifier le KIT
Pour les machines connectées à un
réseau local LAN sans fil Étape 2-A (page 3)
Pour les machines qui ne sont PAS
connectées à un réseau local LAN sans
fil
Étape 2-B (page 5)
Étape 3 : Téléchargement des manuels pour le KIT (page 6)

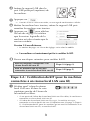
3
dInsérez le support USB dans le
port USB principal (supérieur) de
la machine.
eAppuyez sur .
Une fois la mise à niveau terminée, un message de confirmation s'affiche.
fMettez la machine hors tension, retirez le support USB puis
remettez la machine sous tension.
gAppuyez sur pour afficher
l'écran des réglages et vérifiez
que la version logicielle de la
machine est plus récente que la
version suivante.
Version 2.0 ou ultérieure
* Le nombre de pages sur l'écran de réglages varie selon le modèle.
La machine est maintenant prête à certifier le KIT.
hPassez aux étapes suivantes pour certifier le KIT.
Étape 2-A : Certification du KIT (pour les machines
connectées à un réseau local LAN sans fil)
aVérifiez que l'icône du réseau
local LAN sans fil dans le coin
supérieur gauche de l'écran de
la machine est bleu.
* Si une partie de l'icône du réseau local LAN sans fil est bleu, la machine est
connectée au réseau local LAN sans fil.
* Si l'icône du réseau local LAN sans fil est gris, la machine n'est pas
connectée au réseau local LAN sans fil. Reportez-vous à la page 5 «Étape 2-
B : Certification du KIT (pour les machines qui ne sont PAS connectées à un
réseau local LAN sans fil)» et certifiez le KIT.
Pour les machines connectées à un
réseau local LAN sans fil Étape 2-A (page 3)
Pour les machines qui ne sont PAS
connectées à un réseau local LAN sans fil
Étape 2-B (page 5)

4
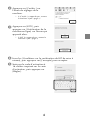
bAppuyez sur [Certific.] sur
l'écran de réglages de la
machine.
* Si [Certific.] n'apparaît pas, mettez
la machine à jour. (page 2)
cAppuyez sur [KIT I], puis
appuyez sur [Certification de la
machine en ligne] sur l'écran qui
apparaît alors.
* Si [KIT I] n'apparaît pas, mettez la
machine à jour. (page 2)
dLisez les [Conditions sur la certification du KIT de mise à
niveau], puis appuyez sur [J'accepte] pour accepter.
eSaisissez le code d'activation à
16 chiffres imprimé sur la carte
d'activation, puis appuyez sur
[Régler].

5
fAprès l'apparition d'un message indiquant que le numéro de la
machine et le code d'activation seront envoyés au serveur,
appuyez sur [OK].
gLorsque la certification du kit est terminée, un message apparaît
indiquant que la certification a réussi. Mettez la machine hors
tension, puis rallumez-la.
hVérifiez que la case à côté du
numéro de kit sur l'écran de
réglages de la machine est bien
cochée.
Une fois ces étapes terminées, le kit est certifié et les
nouvelles fonctionnalités peuvent être utilisées.
iContinuez avec «Étape 3 : Téléchargement des manuels pour le
KIT» à la page 6.
Étape 2-B : Certification du KIT (pour les
machines qui ne sont PAS connectées à un réseau
local LAN sans fil)
Si la machine ne peut pas se connecter à un réseau local LAN sans
fil, accédez au site d'activation et certifiez le KIT.
aAffichez l'écran de réglages de la
machine, puis vérifiez le numéro
de la machine.

6
bSuivez les instructions données à
l'écran du site d'activation pour
certifier le [KIT I].
https://s.brother/kawb
Une fois ces étapes terminées, le kit est certifié et les
nouvelles fonctionnalités peuvent être utilisées.
cContinuez avec «Étape 3 : Téléchargement des manuels pour le
KIT» à la page 6.
Étape 3 : Téléchargement des manuels pour le KIT
Les manuels suivants peuvent être
téléchargés du site
https://s.brother/cmeka/
• Manuel d'instructions pour
Pack Premium I
• Guide de motifs de
broderie pour Pack
Premium I
• Manuel d'instructions -
Addendum
Mémo
Les exigences du système pour les sites d'activation sont comme suit.
Systèmes opérationnels compatibles :
Windows 10 (32 ou 64 bits), Windows 11 (64 bits)
macOS 11 ou version ultérieure
iOS 13 ou version ultérieure
Android 8.0 ou version ultérieure
Navigateurs pris en charge :
Microsoft Edge (version la plus récente) : Windows
Google Chrome (version la plus récente) : Windows, macOS, Android
Safari (version la plus récente) : macOS, iOS
* « macOS » est une marque de commerce d'Apple Inc. aux États-Unis et dans d'autres pays.
* Tous les noms commerciaux et noms de produits de sociétés figurant sur les produits Brother, les documents connexes
et n'importe quel autre matériel sont des marques de commerce ou des marques déposées de ces sociétés respectives.

1
Accessoires
De onderstaande artikelen worden met uw aankoop meegeleverd.
Controleer de inhoud van het pakket. Als er iets ontbreekt of is
beschadigd, neemt u contact op met uw erkende Brother-dealer.
Hartelijk dank voor uw keuze voor dit product.
Meer informatie over onze producten en updates vindt u op onze website
www.brother.com.
De informatie in deze handleiding is actueel bij het ter perse gaan.
Deze handleiding bevat inhoud en productspecificaties die zonder kennisgeving
kunnen worden gewijzigd.
De schermweergaven in deze handleiding zijn alleen bedoeld ter illustratie en kunnen
afwijken, afhankelijk van het model.
• Activatiekaart • Borduur-couching-voet “Y”
Deze kaart bevat belangrijke
informatie voor certificatie van
de KIT, waaronder de
activeringscode en de URL van
de activatiewebsite.
• Installatie handleiding (deze
handleiding)
• Garengeleider voor borduur-
couching
• Magnetisch borduurraam en
gebruiksaanwijzing
• Garen inrijger
Y
×4
×4
La pagina si sta caricando...
La pagina si sta caricando...
La pagina si sta caricando...
La pagina si sta caricando...
La pagina si sta caricando...
La pagina si sta caricando...
La pagina si sta caricando...
La pagina si sta caricando...
La pagina si sta caricando...
La pagina si sta caricando...
La pagina si sta caricando...
La pagina si sta caricando...
La pagina si sta caricando...
La pagina si sta caricando...
La pagina si sta caricando...
La pagina si sta caricando...
La pagina si sta caricando...
La pagina si sta caricando...
La pagina si sta caricando...
La pagina si sta caricando...
La pagina si sta caricando...
La pagina si sta caricando...
La pagina si sta caricando...
La pagina si sta caricando...
La pagina si sta caricando...
La pagina si sta caricando...
La pagina si sta caricando...
La pagina si sta caricando...
La pagina si sta caricando...
La pagina si sta caricando...
La pagina si sta caricando...
La pagina si sta caricando...
-
 1
1
-
 2
2
-
 3
3
-
 4
4
-
 5
5
-
 6
6
-
 7
7
-
 8
8
-
 9
9
-
 10
10
-
 11
11
-
 12
12
-
 13
13
-
 14
14
-
 15
15
-
 16
16
-
 17
17
-
 18
18
-
 19
19
-
 20
20
-
 21
21
-
 22
22
-
 23
23
-
 24
24
-
 25
25
-
 26
26
-
 27
27
-
 28
28
-
 29
29
-
 30
30
-
 31
31
-
 32
32
-
 33
33
-
 34
34
-
 35
35
-
 36
36
-
 37
37
-
 38
38
-
 39
39
-
 40
40
-
 41
41
-
 42
42
-
 43
43
-
 44
44
-
 45
45
-
 46
46
-
 47
47
-
 48
48
-
 49
49
-
 50
50
-
 51
51
-
 52
52


Brother Innov-is XJ1 Guida d'installazione
- Categoria
- Giocattoli
- Tipo
- Guida d'installazione
- Questo manuale è adatto anche per
in altre lingue
- français: Brother Innov-is XJ1 Guide d'installation
- español: Brother Innov-is XJ1 Guía de instalación
- Deutsch: Brother Innov-is XJ1 Installationsanleitung
- Nederlands: Brother Innov-is XJ1 Installatie gids
- português: Brother Innov-is XJ1 Guia de instalação
Documenti correlati
-
Brother Innov-is XP1 Guida d'installazione
-
-
Brother Innov-is XV8500D Guida d'installazione
-
Brother PR-650/650C Guida d'installazione
-
-
Brother SDX125TS Guida utente
-
Brother Innov-is 4750D Guida d'installazione
-
Brother SDX125 Guida utente
-
-
Brother INNOV-IS 4000 Guida d'installazione